Popular Articles

Sorry! nothing found for

How can I check the status of my submitted paper?
Modified on Fri, 27 Oct 2023 at 04:59 PM
To check the status of your submission in our system, log into your ScholarOne Manuscripts account, and click on “Author.” Under the Author Dashboard Section, click on “Submitted Manuscripts.”

Please note that the following definitions generally apply to most journals. Each journal follows its own workflow, so some terms may not apply. Please contact the journal's editorial office for clarification.
| | |
| | This means the author has successfully submitted and approved the manuscript. After this, the manuscript usually goes through a formatting check by the journal staff before it is assigned to an editor. |
| | Your submission is waiting for initial review by the editorial office. This may involve checking that the submission is within the journal's scope and adheres to submission guidelines. |
| Multiple editors may be assigned to your submission, depending on the journal's workflow. This status typically means your manuscript is awaiting assignment to an editor after the initial review of the submission. Depending on the journal's workflow, this status could also indicate when the editorial office determines if your submission is eligible for peer review. This may not apply. | |
| | It means the manuscript has been assigned to an editor and is waiting for the editor to agree to evaluate the manuscript. This may not apply. |
| This indicates that an editor has agreed to evaluate the manuscript, and the assignment is in their editorial queue. At this stage, the editor may complete their own manuscript screening and determine if it is suitable for peer review. If the manuscript does not match the journal's scope or does not meet the journal's standards, it may be returned without review or be desk rejected. | |
| If the manuscript is suitable for peer review, this step indicates that the editor is searching for viable peer reviewers. When the system shows the status “Reviewer invited,” it means that invitations have been sent out to reviewers, but they have not yet accepted the invitation. Sometimes, the tracking system may show the “Reviewer Invited” status for some time and then move back to “With Editor.” This probably means that the peer reviewers have declined the invitations, and the editor will now have to look for other reviewers. Sage Journals usually have a required minimum of two external reviews. | |
| This status means that the manuscript is under peer review. Peer review is an honorary service that requires detailed scrutiny and evaluation of the manuscript and therefore takes time. The amount of time a manuscript is in review depends on reviewer availability. | |
| This status indicates that all peer reviews are completed and have been received by the editorial office. Sometimes, the editor, after going through the reviews, might feel that an additional review is required. In such cases, the status might return to “Under Review.” Once the additional review is completed, the status will return to “Required Reviews Complete.” | |
| This means that the editor is now determining a decision based on the peer reviewer's comments and their own assessment. The editor may consult the editorial board or other editorial office members if required. Once this status shows up, the author is generally informed of the editorial decision shortly afterward. |
| This indicates that a decision was made and a revision has been requested. The submission is now with the author. The author is usually given a deadline of a few weeks to a few months; this may be extended upon request. Additionally, some journals ask the author to submit a point-by-point response to the reviewer's comments with their revised manuscript. | |
| This indicates that the author has submitted the revised document (and a point-by-point response to the reviewer's comments, if required). The document is now awaiting a check by the journal's editorial office. | |
| It shows that the author has clicked on an action link indicating that they do not wish to submit a revised version of the manuscript. In other words, the author is not ready to make the revisions suggested and would like to withdraw their paper. This may not apply. | |
| | If submitted to a subscription journal, a completed contributor form is required after the manuscript has been accepted. Locate the manuscript and complete the form. If you have any questions, contact the editorial office. |
Please see our resources on the peer review process and tips on How to Get Published .
Was this article helpful?
That’s Great!
Thank you for your feedback
Sorry! We couldn't be helpful
Let us know how can we improve this article! *
Feedback sent
We appreciate your effort and will try to fix the article
- Technical Support
- Find My Rep
You are here
Submission management in sage track, manuscript information overview, audit trail overview, unsubmitting a manuscript, editing manuscript files.
- Adding Manuscript Flags and Notes
Withdrawing a Manuscript
Extending manuscript due dates, using the companion papers tool, rescinding a decision, email templates, turning off reminder emails.
Manuscript Information contains a record of tasks that have been completed by authors, reviewers, and admins/editors. Each manuscript, including revisions, will have its own record. The page will expand as more tasks are competed.

Default Categories
The following categories appear on all manuscripts. Please note that the latter three (Assign to Issue, Companion Papers, Flag This Manuscript) will move to the bottom of the page as more categories become available, while all others remain at the
Peer Review Milestones
Peer Review Milestones provides a timeline detailing when each user was assigned in a certain administrative or editorial role. If a manuscript is awaiting revision, you will be able to extend the due date using the “Due on:” box and clicking “Save.”
Version History
This section stores the at-a-glance details of all revisions a manuscript has received. The purple “you are viewing” icon indicates the version of the manuscript you are located in. You may toggle to another version by clicking “Switch Details.” This will take you to the selected version’s Manuscript Details page, though you could also toggle to the Audit Trail and Manuscript Files tabs as needed.
Author-Supplied Data
Author-Supplied Data allows you to view and modify information provided by the author during the submission process.
Assign to Issue
Blank by default, the Assign to Issue populates based on information entered in the Production Center Issue tool (optional). This information does not export to production, so it is only used for internal editorial tracking.
Companion Papers
The Companion Papers tool allows editors and admins to link manuscripts together. It is typically used to track duplicate submissions, revisions that have been submitted as a new manuscript rather than a revision, or resubmissions. Clicking “Search for a Companion Paper” will generate a screen where the manuscript in question can be selected. Once a manuscript has been added as a Companion Paper, this category functions similarly to Version History.

Flag this Manuscript
Once a manuscript has been flagged, the selected icon appears in front of the ID across Sage Track. Flags can be labelled by a member of the Sage Track team to indicate their individual purposes. The purpose of each flag is determined by the Journal’s editorial team.
Status Specific Categories
Immediate decision.

An Immediate Decision box may appear on in-process manuscripts depending on the site’s workflow. This allows the editor/admin to make a decision without sending the manuscript to review. If a manuscript has received reviews, please use the standard “Make Decision” task to make a decision.
Admin Checklist

A copy of the Admin Checklist will be visible, and editable, once complete.
Forward to Admin/Editor and Admin/Editor List

These sections will appear depending on the site’s configuration settings. If present, you will be able to view or reassign the Admin or Editor assigned to the manuscript. Please note that this is only available for in-process manuscripts; manuscripts with decisions cannot be reassigned to another user for historical purposes.
Make Decision
A copy of the decision task will be available once completed. If necessary, the decision can be rescinded here as well.
Please note that other decision tasks such as Make Recommendation and Admin Approve Decision will also be available if present in the site workflow.
Production Checklist
A copy of the Production Checklist will be available, and editable, once completed.
Reviewer List
A copy of the reviewer list will be available. This will include reviewers who were selected, invited, assigned, invitation response records, and copies of the reviewer score sheets received.
Forms Tracking
The contributor form will be visible. The form can also be rescinded if needed. Please note that the form must be submitted when exporting a manuscript to production. This section can also be used to officially check in the contributor form after the “skip for now” button has been used during Forms Tracking.
Assign to Batch
A copy of the manuscript’s export history will be available. The manuscript can also be re-exported if needed.
The Audit Trail provides an in-depth look at individual tasks that have been performed on a manuscript, including emails that have sent out through Sage Track.
The Audit Trail contains three main columns:
- “Date/Time” indicates when an action took place.
- “Event” displays the action and action performer.
- “Manuscript Status” will show the users who were assigned to the manuscript, decision (if applicable) and the task the manuscript was in when the action was performed.

Events Dropdown
The drop down box or arrows next to “Events:” can be used to move to a different page. The Audit Trail will display the most recently completed tasks first.

View Correspondance History Only
To view all emails that have sent, click “letters only.” This will remove all other tasks and show emails exclusively. Clicking “all” will restore the full view.
When viewing emails, the Event column will display the recipient and sender information, along with the subject and status (ie: “Successfully sent”.)

Clicking the envelope icon will generate a pop up window where you can see the body of the email.

Resending/Forwarding Correspondance
If an email needs to be resent, clicking “forward” will open an editable version that can be modified or resent as-is by clicking “Save and Send.”

Enter Correspondance
Toward the bottom of the page, there is a heading labelled “Enter correspondence sent/received from outside of ScholarOne Manuscripts.” In the corresponding box, you have the option of inserting an email that was not sent via Sage Track into the audit trail by filling out the fields provided. Clicking “Save” will enter the correspondence into the Audit Trail in the location that matches the specified date and time.

If you’d prefer that the author make the changes to the manuscript, you can unsubmit the manuscript using one of two methods:
1.Use the “Unsubmit” button in the Admin Checklist.

2. Use the “Click here to unsubmit the manuscript” link available in the Manuscript Files tab, available on the left side of the submission entry. This option remains open after the Admin Checklis task is completed.

Both unsubmit options provide an editable email for the purpose of informing the author why their manuscript has been unsubmitted. Unsubmission sends the manuscript back to the Author Center so the author can make the requested changes and resubmit the manuscript. The manuscript will retain the originally assigned ID.
Please note that manuscripts should not be unsubmitted after reviewers have been invited. This will cause any reviewer data, including completed score sheets, to be lost.
If you’d prefer to make the changes yourself, you can do so through the Manuscript Files tab.
To edit an existing file:
1. Enter Manuscript Files.
2. Click the file name of the document that requires editing. This will download the file to your computer, where it can be modified and saved using a word processing program.
3. Click the “Edit Details” icon corresponding with the edited document.

4. In the File Details window, upload the file using the “Upload later version of file” section. You may optionally leave comments or denote the new upload as a Minor Version or Major Version. Click “Save” once complete.
5. The new file will be added to the Version History. While the previous file will be retained for historical purposes, only the newest uploaded version will be viewable to reviewers.
a. If the previous version still appears when viewing the manuscript PDF proof, please clear your browser cache or log out of Sage Track and log back in.
To upload a new file:
1. Use the Upload File(s) button to select a new file
2. Select the appropriate File Designation from the dropdown list.
a. Please note that the Review File, Recommendation File, and Decision File designations are not intended for manuscript files. Instead, please use Title Page, Main Document, Figure, and so on.
3. Click “Upload” and “Save.”

4. The new file will appear in the file list and pull into the PDF proof if applicable. If the file does not appear, please ensure that the “HTML/PDF Proof” box is checked, then clear your browser cache or log out and back in. The Order dropdown can be used to determine where the new file should appear in the proof if needed.

Please note that files should not be modified by uploading the updated document and deleting the previous version. When modifying an existing document, please use the instructions listed in “To edit an existing file.” The new file upload tool should only be used to add files that had not been previously uploaded by the author.
Adding Manuscript Flags & Notes
Manuscript flags.
Sage Track Clarivate (STC) provides 10 color flags that can be used to flag manuscripts for easy identification “at-a-glance.”
Manuscript flags are available on a submission’s Manuscript Information tab by scrolling to “Flag This Manuscript.”

For example, the journal below includes labels for “Special Collection Paper,” “Editor Waiver Applies,” “See notes for discount instructions,” and “Requires re-review/additional review.”
However, these flags will remain unlabeled unless otherwise specified. To update flag labels, please reach out to [email protected] .
You can use multiple flags by selecting more than one from the checklist.
Once flagged, the colored flags will appear after the Manuscript ID in the manuscript header and be used to create custom reports.

NOTE: Flags can be configured to have the ability to carry over to revisions and to attach files. Please reach out to [email protected] for more information.
Adding & Viewing Notes
Notes are only viewable to the Admin and Editor roles. Authors and Reviewers will not see the notes section.
Notes appear at the bottom of each tab within a submission’s Manuscript Details. See the image below (pulled from the ScholarOne guide ) for more information.

Adding a Note

Enter your preferred Title and Note text. Save.
Accessing & Editing Existing Notes
Notes appear at the bottom of the Manuscript Details page on all tabs.

NOTE: Notes can be configured to have the ability to carry over to revisions and to attach files. Please reach out to [email protected] for more information.
Occasionally, authors may request to remove their manuscript from review. Because authors are unable to withdraw their own manuscripts, this must be done by a site admin. If you do not have Admin access or access to the “Manuscript Files” tab, please reach out to Sage
To withdraw a manuscript from Sage Track, please follow the steps below.
1. Locate the Manuscript via Quick Search
In the Admin Center, the quickest way to locate the manuscript is to perform a search in the Quick Search available on the right side of the page.

Please note that the manuscript can also be located in the Admin Lists, to the left.
2. Enter the Manuscript Files page
When the search results appear, select “View Manuscript Files” from the Take Action drop down bar.

You will be taken to the Manuscript Files page. Please note that this page may also be reached using the Manuscript Files tab on the left side of the manuscript entry.

3. Locate "Change Manuscript Status"
Once in the manuscript’s Manuscript Files page, scroll to the Change Manuscript Status box. “Click here to withdraw the manuscript” is the second link.

4. Additional Notes
- There is currently no way to rescind a withdrawal; if a manuscript is mistakenly withdrawn, please contact a member of the Sage Publications peer review team for assistance.
- Manuscript withdrawals do not impact the journal decision ratio, although the time to review (if reviews have been received) and time to decision (if a decision has been made) will be counted in the site’s turnaround time statistics.
- Once a manuscript is withdrawn, it can no longer be found in the Admin or Editor Lists. However, it can still be viewed by performing a manuscript search.
If an author requires additional time to submit a revised manuscript, their due date can be extended. This will allow the author to follow the standard revision process, rather than submitting their revised manuscript as a new submission with a new ID.
Manuscript due dates can be found in the “Peer Review Details” box of the “Manuscript Information” tab. To find these, follow the instructions below.
1. Enter the Admin Center

2. Locate the manuscript using the Quick Search or “Manuscripts Awaiting Revision” queue.
Please note that manuscripts are removed from Manuscripts Awaiting Revision once the revision due date has passed. These submissions can still be located via search.

3. Once you have located the manuscript, click the dropdown under “Take Action” and select “View Details.”

4. The due date can be found in “Peer Review Milestones.” This date can be altered by typing directly into the white box or using the calendar applet on the right to select a new date.

- The editable due date box only appears on the most recent version of the manuscript. If the option to change the due date is not available, scroll to “Version History.” Use the “Switch Details” button to toggle to the newest version. The newest version will be located first on the list.

- Due dates can only be extended in journals that utilize revision due dates. If this box is unavailable in the newest version of the manuscript and the revision has not been submitted, it is possible your journal is not utilizing due dates. In this case, please contact your Sage Track Support representative for further information.
Occasionally, an author will submit a revised manuscript as a new document and this document will be inadvertently processed. Other times, an author will re-submit a manuscript that had previously been rejected. In these situations, the Companion Papers tool can be used to link the two manuscripts together for easy reference.
1. Locate one of the manuscripts you would like to link and click “View Details” under the Take Action selection drop down.

2. Scroll to Companion Papers and click “Search for a Companion Paper.”

3. In the new window, locate the manuscript that should be linked by performing an advanced search, then click the “Search” button at the bottom of the page.

4. When the results appear, click the blue icon under “Use this Paper” to link the manuscript.

6. In “Companion Papers”, you will see the details of the manuscript this submission is linked to. You can also view the manuscript proof (“View Submission”), toggle to the Manuscript Information page of the companion paper (“View Details”), delete the listing, or search for a new companion paper.

If a decision has been made in error or an author has appealed the original decision made on their manuscript, you may undo the previous decision and select a new one in its place. You may send the manuscript back to reviewers if desired.
The “Contents” below contain an outline of the process; further information can be found beneath each heading, starting on page 2.
Please note that this tool is not intended to replace the revision workflow. If a manuscript requires a new decision after content changes have been made by the author, this new version should be submitted as a revision and a new decision rendered.
Enter the submission's Manuscript Information page
1. Search for the manuscript by ID, title, or author name using the Quick Search feature.

2. When the search results appear, select “View Details” in the “Take Action” drop down menu.

3. This page is also available within the submission by clicking the “Manuscript Information” tab.

In the "Make Decision" box, use the button labelled "Rescind."
4. The Make Decision box can be found toward the middle or end of the page. The “Scroll To…” dropdown box at the top of the page can be used to locate this box without scrolling.

5. Click the “Rescind” button, located on the top right side of the Make Decision box.

6. A pop-up window will appear. Click “OK.”

7. An email template will appear alerting the author that the decision has been rescinded. Make edits to the text if desired, then click “Save and Send.”

Commit a new decision using the "Make Decision" task.
8. After sending the “Decision Rescinded” notification, the page will refresh and return to the “Make Decision” task.
9. Click the radio button that corresponds with the new decision.

10. A confirmation pop-up will appear indicating that a new decision letter must be drafted. Click “OK.”

11. Click “Commit Decision.”

12. Make edits to the decision letter text if desired, then click “Send and Commit Decision.”

Additional Options
- If additional reviews are necessary before making a new decision, you may increase the number listed in “# reviews required to make decision” and click “Save” to return to the Select Reviewers step.

Finding and Navigating E-mail Templates
Where to find.
The E-Mail Templates can be found in your Admin Dashboard, under ‘Admin Tools’. After clicking ‘Email Templates’ you will be taken to the templates, where you can select the area.

Select Area
The templates are separated in to categories, and you can navigate these using the ‘Select area’ drop-down list.

- Hyperlink E-Mail: the templates used when a user name is clicked on. These should usually be blank.
- System E-Mails: contains automatic e-mails sent at various stages in the process, from ‘Account Created’ to ‘Manuscript Exported’.
- Decision Letters: all decision letters sent to authors and/or reviewers.
- Invitation E-Mails: letters sent to reviewers to invite them to review a manuscript.
- Invitation Response E-Mails: the automatic response e-mails following a reviewers invitation response.
- E-Mail Notifications and Reminders: contains all the reminders sent to editors and reviewers for tasks assigned to them.
- Author Reminders: contains reminders sent to author for resubmissions.
- Printable E-Mail Letterhead: not in use.
Commonly Edited Templates
The template areas most often used are:
- Decision Letters
- Invitation & Invitation Response E-Mails
- E-Mail Notification and Reminders
View and Modify Templates
Edit templates.
To view and modify an e-mail template, use the ‘Modify’ button as shown below. This will open a new window (pop-ups will need to be allowed in your browser). The e-mail will need to be edited in both the Submitted Workflow (new manuscripts) and Revised Workflow (manuscripts that were sent back to authors for revision and have since been resubmitted).
For example, to change the Accept Decision letter you would need to modify the SW (submitted workflow) template and then the RW (revised workflow) template.

Using the ‘Modify’ button will open a new e-mail window, where you can view and edit the e-mail. The top half of the window will show a preview of the current e-mail, and the bottom half includes the editable e-mail template. Here, you can change the wording or add/remove e-mail tags as needed. To view all the e-mail tags, click ‘View E-Mail Tags’.
Once you are finished with editing, click ‘Save and Preview’ to check your changes.

Create New Template or Add Task Related E-Mail
To create a new template, go to the area and task you’d like to add to and click ‘add template’. For example, to add a new Invitation E-Mail, go to ‘Invitation E-Mails’ and click ‘add template’ next to the related task.

This will open a blank e-mail window where you will need to add the e-mail body, To and From fields and the Subject. You will also need to name the template, following the other title formats of ‘SW -…’ or ‘RW -…’.

The ‘From’ and ‘To’ fields will need to use the corresponding tags, and the ‘Subject’ and ‘Body’ can use text with tags. To find the corresponding tags, use the ‘View E-Mail Tags’ button or reference related e-mail templates.

Once the new template has been saved, it will appear under the task. To make the template available, tick ‘Active’.

For task related e-mails, tick ‘Edit Before Sending’ and ‘Required for Event’. This will allow the editor to select which template they want to use when it generates. Add the template to the Revised Workflow as needed.
Using E-mail Tags
The e-mail tags are used in the templates to generate the relevant information for each manuscript, and using them also ensures that the correct Admin and EIC contacts will be used following editorial transitions.
E-mail Tags can be found by opening any e-mail template and clicking ‘View E-Mail Tags’. This will open a new window that lists all the tags available on the site.
Each tag also has a brief description of the information it will generate, so when looking for a specific tag use Ctrl+F to find a match.
Admin & EIC Contact Tag
The Admin and EIC contact tags will pull the name and e-mail address of the users listed in the Admin Configuration settings.

The Admin contact tags:
- ##EMAIL_CONTACT_ADMIN_CENTER_EMAIL##
- ##EMAIL_CONTACT_ADMIN_CENTER_NAME##
The EIC contact tags:
- ##EMAIL_CONTACT_EIC_CENTER_EMAIL##
- ##EMAIL_CONTACT_EIC_CENTER_NAME##
Changing Admin or EIC Contact
The Admin and EIC contact should be changed during editorial transitions, or when a new Admin or EIC takes over the role.
To change the contact, go to the Admin Configuration Settings and scroll down to Set E-Mail Contacts. Update the name and e-mail address of the corresponding user and click Save.

Reminder Timescales
The site will send out reminder emails for certain tasks, and most of these timeframes can be edited from within the e-mail templates.
Reviewers will receive invitation response reminders following the initial invitation to review. These are usually 3 and 5 days following, but these timescales can be edited in ‘Admin Configuration’.
Reviewers and Editors will also receive task related reminders, which can be found in ‘E-Mail Notifications and Reminders’.
The reminders are triggered by one of two fields, When Task Enters or Reminder Days.

When Task Enters will trigger the e-mail to send when one of the following is selected:
- Pending (task has started)
- Processing (task in process but not complete)
- Overdue (task has reached due date)
- Completed (task completed)
- Abandoned (action no longer needed, but task still open)
- Rescinded (manuscript moved back from step)
Or, a specific timeframe can be selected by entering the number of days before or after the task begins to send the reminder.
An example of these triggers is in the Reviewers Score task, as shown below. The ‘-7’ indicated that the ‘Reviewer Score due in 1 week’ e-mail should send 7 days before the task is due. The ‘7’ indicates that the ‘Reviewer Scores are 1 week late’ e-mail should send when the due date is 7 days passed but the task has not been completed.

The ‘Overdue’ field will trigger the ‘Reviewer Scores now due’ e-mail to send on the day the review is due. The ‘Completed’ field indicates that the ‘Thank you for submitting your review’ e-mail should send when the reviewer has returned their review, therefore completed the Reviewer Score task.
Download .xml Templates
It’s recommended that e-mail tags are used to populate names and e-mails, rather than typing them directly in to the templates.
This means that when a user role is updated, the e-mail templates will automatically be updated. If there is an instance where a name or e-mail address has been hardcoded in to the templates, you can find the templates to edit by downloading an .xml of all the templates. This option is at the bottom of the E-Mail Templates, in ‘E-Mail Tools’.

Once this file has been opened, you can use Ctrl+F to search for specific names, e-mail addresses or phrases and make a note of the templates they appear in to then edit on the site.
Note: please do not edit within the .xml and re-upload as this can cause duplications and errors. Only edit within the Modify Template window.
If your journal Editorial team regularly check queues and therefore do not require the system generated prompts and reminders, follow the below guidance to de-activate them.
To turn off reminder emails, go into the ‘Admin Centre’ dashboard and scroll down to the ‘Admin Tools’ section and select ‘Email Templates’.

You will be directed to a new page where you will need to select the ‘Email Notifications and Reminders’ tab from the ‘select area’ drop-down menu.

Starting with the ‘Submitted Workflow Tasks’, search for email reminders that are currently set up to go out to the Admin role and uncheck the ‘active’ box.

Once inactivated, scroll to the bottom of the ‘Submitted workflow Tasks’ section and click ‘Save’.

Please note: reminders to EIC/ AE/ Editor roles and reviewers should not be made inactive unless previously discussed with your Publishing Editor.
You will then need to repeat the same process for the ‘Re-submitted Workflow Tasks’ (if applicable), ‘Revised Workflow Tasks’, and the ‘Accept Workflow Tasks’, remembering to click ‘Save’ after you have inactivated any templates.

Email reminders you may want to consider inactivating:
Submitted, Resubmitted and Revised Workflow templates:
-Awaiting Checklist Completion
-Awaiting EiC assignment
-Awaiting AE Assignment
Accepted Workflow templates:
-Awaiting Production Checklist
-Awaiting Assignment to Batch
-Notice to Admin: Form is now due
- Journal Author Gateway
- Increasing Citations and Improving Your Impact Factor
- Editor Guide to SAGE Editorial and Publishing Policies
- Editor Guide to Peer Review Best Practice
- Open Access
- Working with Your Team
- Taking Action on Diversity
- Promote Your Journal
- Publishing Quality Content
- Publishing Special Issues
- Impact Factor & Ranking Results
- Editor Resources
- ScholarOne User Guides
- Submission Management in SAGE Track
- Selecting and Inviting Reviewers
- Making Decisions
- Production Management in Sage Track
- Account Management in Sage Track
- How-To Videos
- Journals Production
- New Journal Proposals
- Open Editor Positions
- Journal Editorial Board Members
- Journal Reviewer Gateway
- Ethics & Responsibility
- Sage editorial policies
- Publication Ethics Policies
- Sage Chinese Author Gateway 中国作者资源
After submitting
In this section:
- NEW! Featured Author Support
- Tracking your submission
- My paper has been accepted – what next?
- Appeals and rebuttals
- BMJ Article Transfer Service
- Abstracting and indexing
- Archiving, permissions and copyright
- Article metrics and alerts
- Correction and retraction policies
- Publication embargo
- Rapid responses
The review process
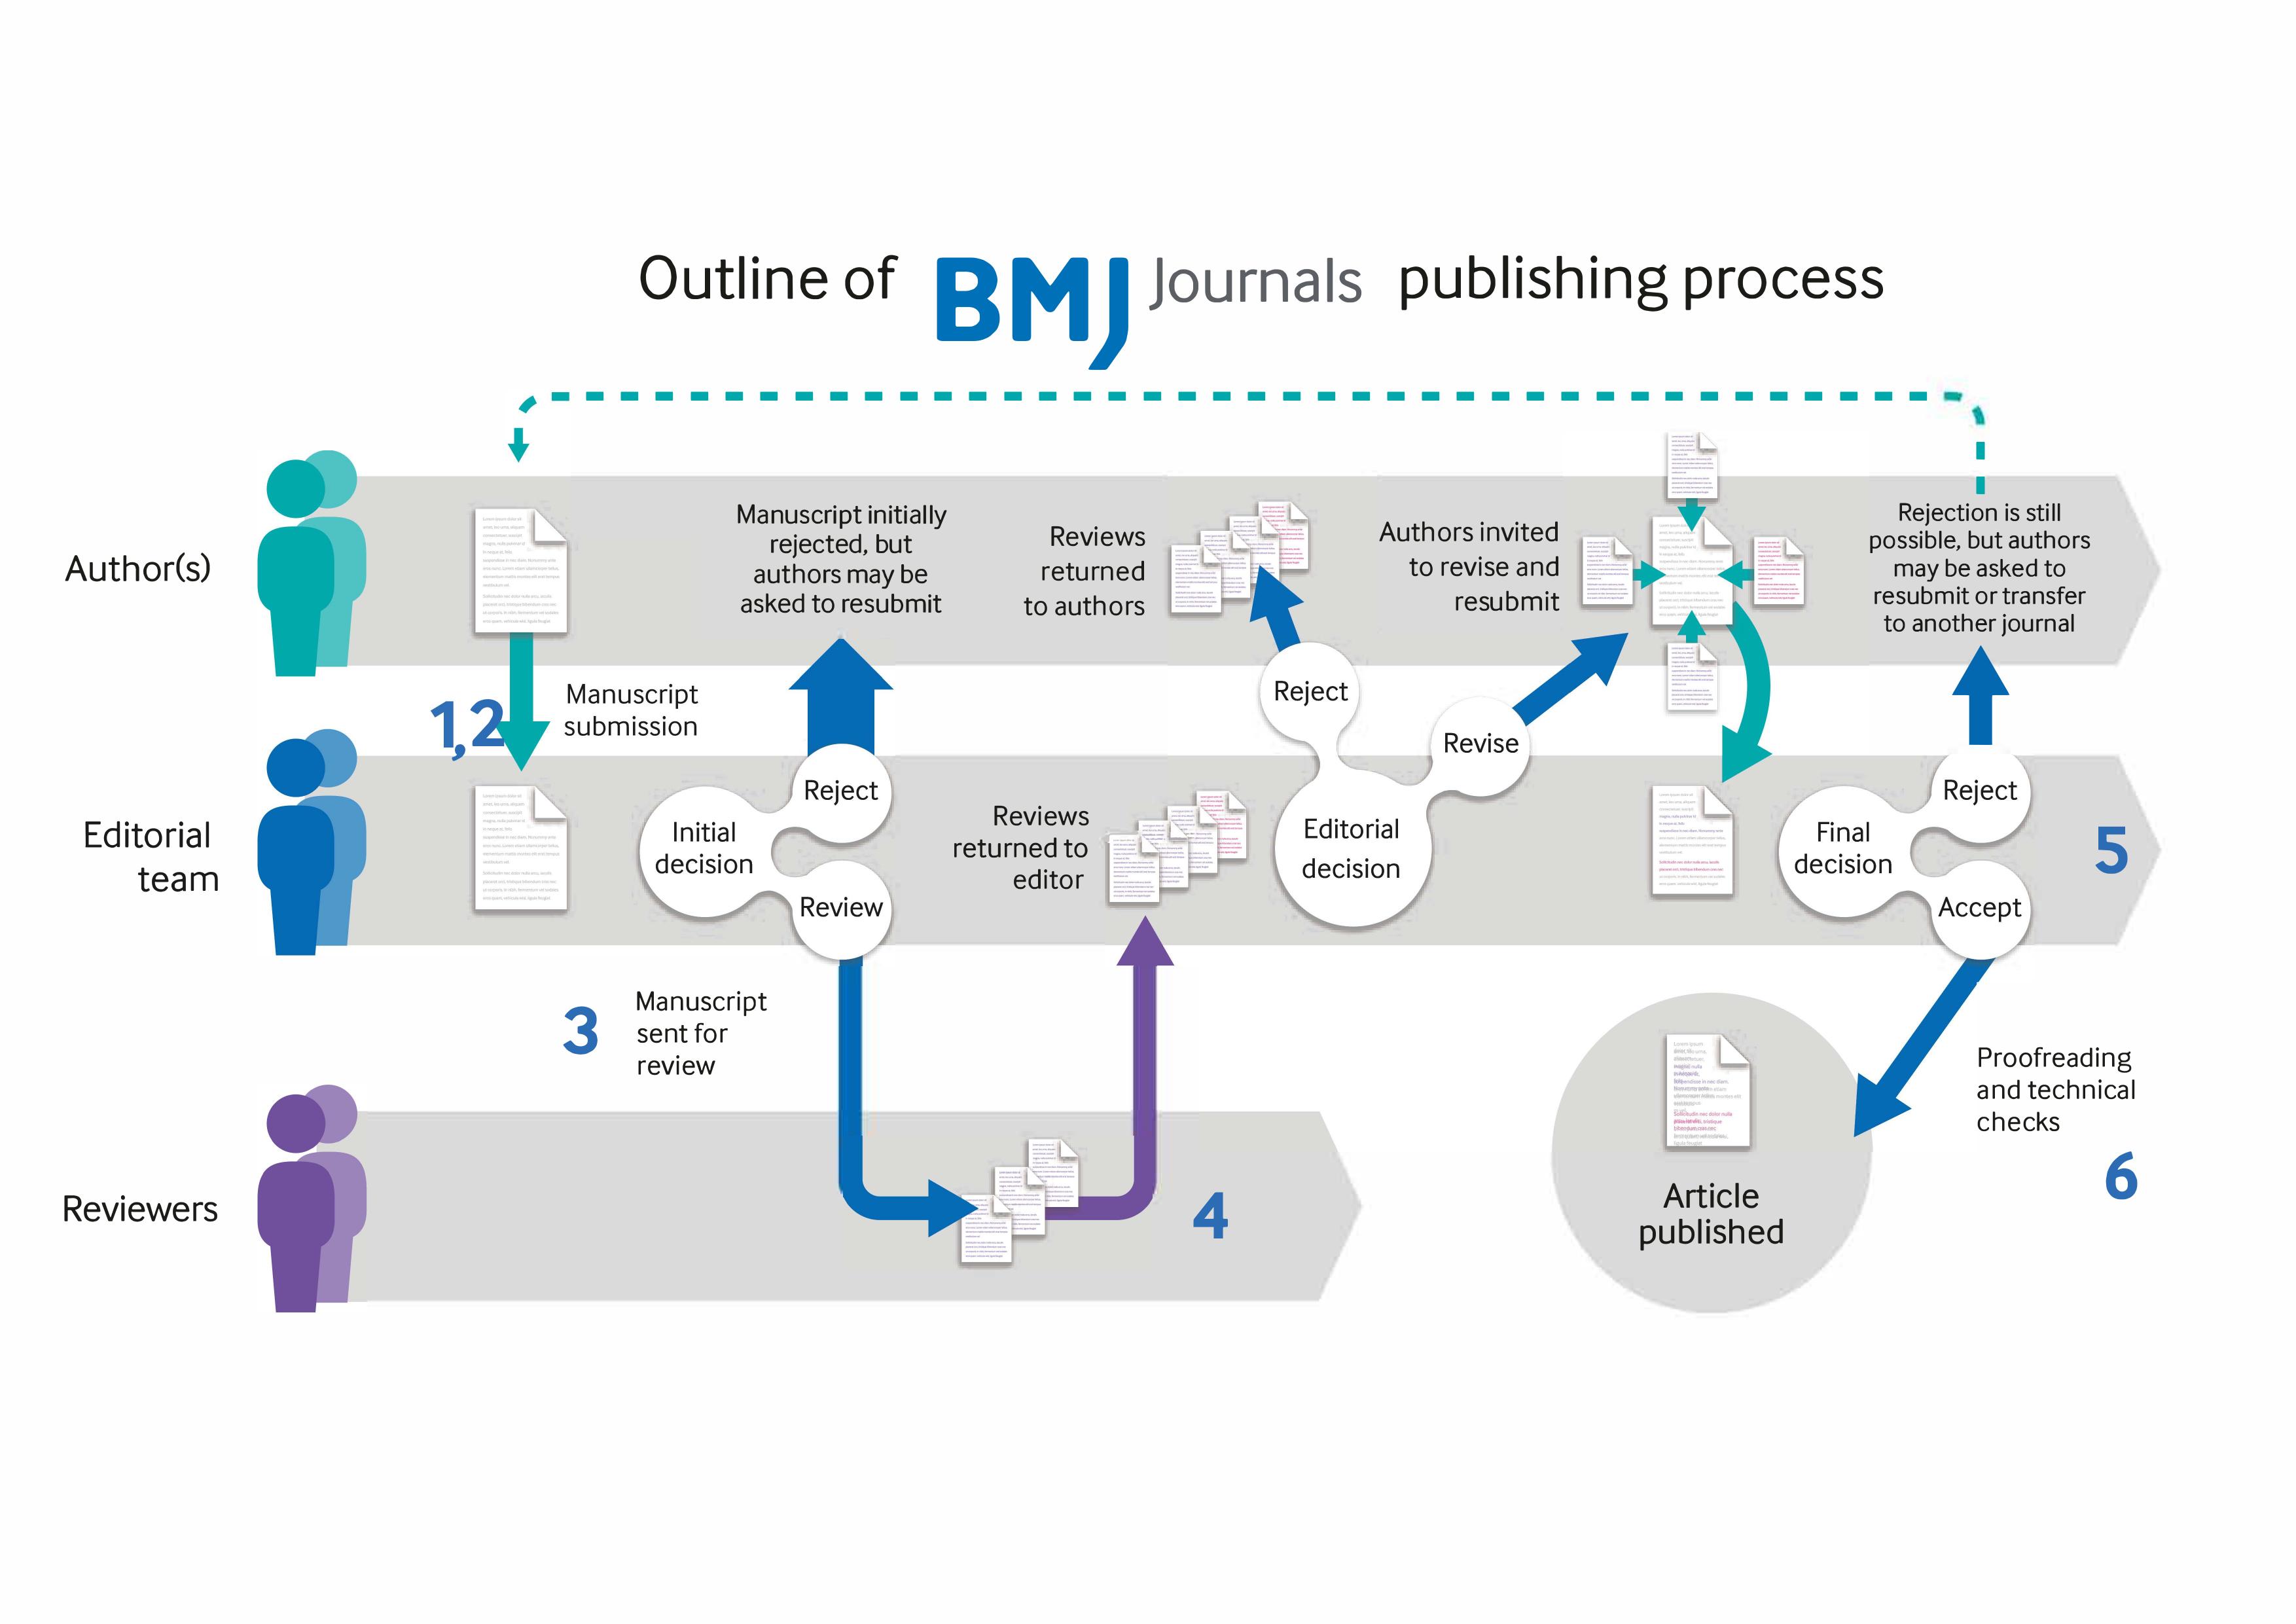
1. Awaiting Editorial Production Assistant Processing
The Editorial Production Assistant will carry out quality checks on your article at which point you may need to provide further information before your article is sent for Peer Review.
2. Awaiting Editor Assignment:
Your article has passed initial quality checks by the Editorial Production Assistant and is in the process of being assigned to an appropriate Editor who will evaluate your article for scope, quality, and fit for the journal. Papers that do not meet these criteria will be rejected.
3. Awaiting Reviewer Selection
Your article meets the Journal’s scope and has been approved for peer review. The Editorial Team are in the process of finding suitable external expert reviewers that are available to review your article. Your article may also be sent to relevant Associate Editor’s for internal review. For most articles, a minimum of two reviews are required. Articles can be sent to multiple prospective reviewers before the required number are secured.
4. Peer Review in Progress
Your article has secured the minimum number of required reviewers. Peer reviewers are given 2 weeks to submit their review of your article. On the occasion that a reviewer withdraws from the process, the Editorial Team will begin the reviewer selection process again.
5. Awaiting Editor Decision
Your article has now received the minimum number of reviews required to make a decision. The Editor will take into account the expert reviewers’ opinions to make an informed decision of accept, reject or revise.
6. In Production
Your article has been accepted and you will receive an email to confirm. Your article will move through the final quality checks and in to Production where it will be processed for publication. You will be emailed by the Production Editor with a timeline and be provided with a link to a platform called Publishing at Work where you can continue to track your article’s progress. More information about the Production process can be found here .
24小时热门版块排行榜
- > 论坛更新日志 (2343)
- > 考博 (82)
- > 虫友互识 (61)
- > 休闲灌水 (39)
- > 基金申请 (36)
- > 论文道贺祈福 (33)
- > 公派出国 (24)
- > 导师招生 (17)
- > 博后之家 (17)
- > 找工作 (15)
- > 文献求助 (13)
- > 硕博家园 (12)
- > 教师之家 (10)
- > 论文投稿 (8)
- > 招聘信息布告栏 (6)
- > 材料综合 (3)
| 8 | 1/1 |
| 查看: 2594 | 回复: 7 | --> |
| (小有名气)
| ] 请问大家IEEE Trans 提交final files 之后一般要多久才会交版面封及proof啊已有1人参与 |
| --> |
» 猜你喜欢
哈哈\\\'sci.
- 应助: 2 (幼儿园)
- 在线: 151.6小时
- 虫号: 8125646
- 注册: 2018-03-01
- 专业: 控制理论与方法
| 你这个还没送去出版呢,不着急,送去出版会有邮件通知你,这样在你的 IEEE Author Gatway 账号了里就能看到论文进程了 |
| 一下(1人) |
- 应助: 1 (幼儿园)
- 在线: 100.9小时
- 虫号: 2673643
- 注册: 2013-09-23
| 都中了 你急个球 上次中了一个TIP |
- 应助: 0 (幼儿园)
- 虫号: 3668049
- 注册: 2015-01-28
| : Originally posted by at 2019-07-21 21:45:14 你这个还没送去出版呢,不着急,送去出版会有邮件通知你,这样在你的 IEEE Author Gatway 账号了里就能看到论文进程了 你好,请问在提交 final files 的时候发现有几个图片引用标号错误,顺手就给改过来了,并在MOD文件里进行了说明,这样会不会对出版进程造成影响? |
| 一下 |
| : Originally posted by at 2019-07-22 10:56:15 你好,请问在提交 final files 的时候发现有几个图片引用标号错误,顺手就给改过来了,并在MOD文件里进行了说明,这样会不会对出版进程造成影响?... 我觉得影响应该不大,下次可以放到Proof里再改! |
| : Originally posted by at 2019-07-22 12:00:42 我觉得影响应该不大,下次可以放到Proof里再改! ... 好的,谢谢你了 |
| |
- 虫号: 4018202
- 注册: 2015-08-12
| 估计楼主问题已经解决。 我有类似经历,某次中某trans后在batch状态下停留了两周多接近三周(跟PE不到一周比,慢多了),给编辑部发邮件询问awaiting assignment to batch时长,回复是:该状态表明EIC正在核对终审稿与提交的最终文件。 对终审稿与最终文件进行对比并把关,不允许后者相对前者有较大改动是EIC的职责。考虑到EIC的兼职性质与EIC同时要负责稿件数量,文章在这个阶段耗时两三周是很正常的。 |
| | | | 在新窗口页面中打开自己喜欢的网盘网站,将文件上传后,然后将下载链接复制到帖子内容中就可以了。 |
| 最具人气热帖推荐 | 作者 | 回/看 | 最后发表 | |
|---|---|---|---|---|
| [ ] +7 | 2024-06-04 | 10/500 | by | |
|---|---|---|---|---|
| [ ] +16 | 2024-06-04 | 23/1150 | by | |
| [ ] +6 | 2024-06-05 | 7/350 | by | |
| [ ] +17 | 2024-06-06 | 32/1600 | by | |
| [ ] +9 | 2024-06-08 | 11/550 | by | |
| [ ] +8 | 2024-06-04 | 8/400 | by | |
| [ ] +23 | 2024-06-07 | 23/1150 | by | |
| [ ] +4 | 2024-06-06 | 5/250 | by | |
| [ ] +3 | 2024-06-05 | 5/250 | by | |
| [ ] +7 | 2024-06-04 | 7/350 | by | |
| [ ] +5 | 2024-06-06 | 5/250 | by | |
| [ ] +12 | 2024-06-05 | 14/700 | by | |
| [ ] +6 | 2024-06-05 | 7/350 | by | |
| [ ] +3 | 2024-06-06 | 3/150 | by | |
| [ ] +3 | 2024-06-05 | 5/250 | by | |
| [ ] +6 | 2024-06-04 | 8/400 | by | |
| [ ] +3 | 2024-06-05 | 3/150 | by | |
| [ ] +3 | 2024-06-05 | 5/250 | by | |
| [ ] +3 | 2024-06-04 | 3/150 | by | |
| [ ] +4 | 2024-06-04 | 12/600 | by |
Moving through production
Once your article has been accepted for publication, the next step is production. Copy editing begins, and your proofs are created.
You’ll sign a publishing agreement, and if you submitted to an Open Select journal , you’ll now choose whether to publish your article open access .
Jump to section
Checking your proofs.
Once your article has been accepted and sent to our production department, it is entered into our Central Article Tracking System (CATS). You’ll receive an email notification when your proof is ready for review.
When you receive your email notification, please read the instructions carefully as some journals use CATS for proofing and others use an online correction tool (OCT).
Read through what to look for when you’re checking your proofs and watch our helpful video below talking you through what to expect during the production process. Use our guide if you’re correcting your proofs using Adobe .
Avoid delays and problems in production with our guide to writing your paper .
Read the video transcript .
Publishing rights
To publish an article and make it available, we need publishing rights from you for that work. It is important to make sure that you fully understand your copyright options .
Subscription articles
There are two main options for authors publishing a (non open access) article in a subscription journal:
Copyright assignment: You transfer or “assign” copyright to us as the owner and publisher of the journal (or, in the case of a society-owned journal, to that learned society).
Exclusive license to publish: You grant us (or the learned society) an exclusive license to publish your paper rather than assigning copyright. In this arrangement, you as the author retain copyright in your work, but grant us exclusive rights to publish and disseminate it.

Open access articles
When you publish an open access article , you retain the copyright in your work. You’ll sign an author contract which gives us the non-exclusive right to publish the Version of Record of your article. This author contract incorporates the Creative Commons license of your choice, which dictates what others can do with your article once it has been published.
Please thoroughly read through our guidance on copyright to make sure you fully understand your options and their potential implications.
Your article is published
Video abstracts are a great way to introduce your article and are easy to share via social media, include in an email, or link to from a web page. A quick and easy way to tell others your research story, you can send us yours as soon as your paper has been accepted for publication.
All authors can purchase article reprints once it reaches production. Find out how to order print copies of your article .

Now that your article is live online, there are many things that you can do to promote it, read our advice on promoting your research article to help increase your impact as a researcher , such as using social media, writing blog posts, using your institution network, and read tips on presenting your findings at academic conferences.
Making changes to published articles
Sometimes after an article has been published it may be necessary to make changes.
If you believe a correction or retraction is necessary for your article, you’ll need to contact us as soon as possible. Read more about what to do if any corrections to published articles are needed.
If you’d like to translate a published article into another language read our guidance on translating an article

Production at F1000Research
If you have submitted your article to F1000Research, the production process looks a little bit different. Here’s a quick run-down of what to expect after submission:
Immediately after submission, your manuscript will undergo a series of comprehensive checks, all undertaken by our in-house editorial team; this is to ensure that your article complies with our guidelines and policies .
At this stage, you need to start thinking about who could review your manuscript – authors need to suggest at least five reviewers in line with our invited, open peer review criteria. Read our tips on finding peer reviewers here.
Once your article has passed the initial checks, one of our internal editors will accept the manuscript and you’ll receive an acceptance email.
You will receive another email when your typeset article is ready for review: at this stage, it’s important to proofread your article carefully and identify any corrections which are needed.
Once these corrections have been made, your article is nearly ready to publish – as long as our peer review team have approved your five suggested reviewers.
Your article is published, and the post-publication peer review process can begin! Keep track of your published articles and their peer review status (plus details of any draft submissions) in the My Research tab on f1000research.com.
Fun fact: the article ID for your submission to F1000Research forms the basis of your published article’s DOI! Your final DOI will also include the standard identifier code for F1000Research, and a number for the article version.
Publishing tips, direct to your inbox
Expert tips and guidance on getting published and maximizing the impact of your research. Register now for weekly insights direct to your inbox.
Explore related posts
Insights topic: Get published

5 practical tips for writing an academic article

5 ways to avoid the wrong journal and find the right one

5 key benefits of using an academic editing service
- Find My Rep
You are here
Submission management in sage track, manuscript information overview, audit trail overview, unsubmitting a manuscript, editing manuscript files.
- Adding Manuscript Flags and Notes
Withdrawing a Manuscript
Extending manuscript due dates, using the companion papers tool, rescinding a decision, email templates, turning off reminder emails.
Manuscript Information contains a record of tasks that have been completed by authors, reviewers, and admins/editors. Each manuscript, including revisions, will have its own record. The page will expand as more tasks are competed.

Default Categories
The following categories appear on all manuscripts. Please note that the latter three (Assign to Issue, Companion Papers, Flag This Manuscript) will move to the bottom of the page as more categories become available, while all others remain at the
Peer Review Milestones
Peer Review Milestones provides a timeline detailing when each user was assigned in a certain administrative or editorial role. If a manuscript is awaiting revision, you will be able to extend the due date using the “Due on:” box and clicking “Save.”
Version History
This section stores the at-a-glance details of all revisions a manuscript has received. The purple “you are viewing” icon indicates the version of the manuscript you are located in. You may toggle to another version by clicking “Switch Details.” This will take you to the selected version’s Manuscript Details page, though you could also toggle to the Audit Trail and Manuscript Files tabs as needed.
Author-Supplied Data
Author-Supplied Data allows you to view and modify information provided by the author during the submission process.
Assign to Issue
Blank by default, the Assign to Issue populates based on information entered in the Production Center Issue tool (optional). This information does not export to production, so it is only used for internal editorial tracking.
Companion Papers
The Companion Papers tool allows editors and admins to link manuscripts together. It is typically used to track duplicate submissions, revisions that have been submitted as a new manuscript rather than a revision, or resubmissions. Clicking “Search for a Companion Paper” will generate a screen where the manuscript in question can be selected. Once a manuscript has been added as a Companion Paper, this category functions similarly to Version History.

Flag this Manuscript
Once a manuscript has been flagged, the selected icon appears in front of the ID across Sage Track. Flags can be labelled by a member of the Sage Track team to indicate their individual purposes. The purpose of each flag is determined by the Journal’s editorial team.
Status Specific Categories
Immediate decision.

An Immediate Decision box may appear on in-process manuscripts depending on the site’s workflow. This allows the editor/admin to make a decision without sending the manuscript to review. If a manuscript has received reviews, please use the standard “Make Decision” task to make a decision.
Admin Checklist

A copy of the Admin Checklist will be visible, and editable, once complete.
Forward to Admin/Editor and Admin/Editor List

These sections will appear depending on the site’s configuration settings. If present, you will be able to view or reassign the Admin or Editor assigned to the manuscript. Please note that this is only available for in-process manuscripts; manuscripts with decisions cannot be reassigned to another user for historical purposes.
Make Decision
A copy of the decision task will be available once completed. If necessary, the decision can be rescinded here as well.
Please note that other decision tasks such as Make Recommendation and Admin Approve Decision will also be available if present in the site workflow.
Production Checklist
A copy of the Production Checklist will be available, and editable, once completed.
Reviewer List
A copy of the reviewer list will be available. This will include reviewers who were selected, invited, assigned, invitation response records, and copies of the reviewer score sheets received.
Forms Tracking
The contributor form will be visible. The form can also be rescinded if needed. Please note that the form must be submitted when exporting a manuscript to production. This section can also be used to officially check in the contributor form after the “skip for now” button has been used during Forms Tracking.
Assign to Batch
A copy of the manuscript’s export history will be available. The manuscript can also be re-exported if needed.
The Audit Trail provides an in-depth look at individual tasks that have been performed on a manuscript, including emails that have sent out through Sage Track.
The Audit Trail contains three main columns:
- “Date/Time” indicates when an action took place.
- “Event” displays the action and action performer.
- “Manuscript Status” will show the users who were assigned to the manuscript, decision (if applicable) and the task the manuscript was in when the action was performed.

Events Dropdown
The drop down box or arrows next to “Events:” can be used to move to a different page. The Audit Trail will display the most recently completed tasks first.

View Correspondance History Only
To view all emails that have sent, click “letters only.” This will remove all other tasks and show emails exclusively. Clicking “all” will restore the full view.
When viewing emails, the Event column will display the recipient and sender information, along with the subject and status (ie: “Successfully sent”.)

Clicking the envelope icon will generate a pop up window where you can see the body of the email.

Resending/Forwarding Correspondance
If an email needs to be resent, clicking “forward” will open an editable version that can be modified or resent as-is by clicking “Save and Send.”

Enter Correspondance
Toward the bottom of the page, there is a heading labelled “Enter correspondence sent/received from outside of ScholarOne Manuscripts.” In the corresponding box, you have the option of inserting an email that was not sent via Sage Track into the audit trail by filling out the fields provided. Clicking “Save” will enter the correspondence into the Audit Trail in the location that matches the specified date and time.

If you’d prefer that the author make the changes to the manuscript, you can unsubmit the manuscript using one of two methods:
1.Use the “Unsubmit” button in the Admin Checklist.

2. Use the “Click here to unsubmit the manuscript” link available in the Manuscript Files tab, available on the left side of the submission entry. This option remains open after the Admin Checklis task is completed.

Both unsubmit options provide an editable email for the purpose of informing the author why their manuscript has been unsubmitted. Unsubmission sends the manuscript back to the Author Center so the author can make the requested changes and resubmit the manuscript. The manuscript will retain the originally assigned ID.
Please note that manuscripts should not be unsubmitted after reviewers have been invited. This will cause any reviewer data, including completed score sheets, to be lost.
If you’d prefer to make the changes yourself, you can do so through the Manuscript Files tab.
To edit an existing file:
1. Enter Manuscript Files.
2. Click the file name of the document that requires editing. This will download the file to your computer, where it can be modified and saved using a word processing program.
3. Click the “Edit Details” icon corresponding with the edited document.

4. In the File Details window, upload the file using the “Upload later version of file” section. You may optionally leave comments or denote the new upload as a Minor Version or Major Version. Click “Save” once complete.
5. The new file will be added to the Version History. While the previous file will be retained for historical purposes, only the newest uploaded version will be viewable to reviewers.
a. If the previous version still appears when viewing the manuscript PDF proof, please clear your browser cache or log out of Sage Track and log back in.
To upload a new file:
1. Use the Upload File(s) button to select a new file
2. Select the appropriate File Designation from the dropdown list.
a. Please note that the Review File, Recommendation File, and Decision File designations are not intended for manuscript files. Instead, please use Title Page, Main Document, Figure, and so on.
3. Click “Upload” and “Save.”

4. The new file will appear in the file list and pull into the PDF proof if applicable. If the file does not appear, please ensure that the “HTML/PDF Proof” box is checked, then clear your browser cache or log out and back in. The Order dropdown can be used to determine where the new file should appear in the proof if needed.

Please note that files should not be modified by uploading the updated document and deleting the previous version. When modifying an existing document, please use the instructions listed in “To edit an existing file.” The new file upload tool should only be used to add files that had not been previously uploaded by the author.
Adding Manuscript Flags & Notes
Manuscript flags.
Sage Track Clarivate (STC) provides 10 color flags that can be used to flag manuscripts for easy identification “at-a-glance.”
Manuscript flags are available on a submission’s Manuscript Information tab by scrolling to “Flag This Manuscript.”

For example, the journal below includes labels for “Special Collection Paper,” “Editor Waiver Applies,” “See notes for discount instructions,” and “Requires re-review/additional review.”
However, these flags will remain unlabeled unless otherwise specified. To update flag labels, please reach out to [email protected] .
You can use multiple flags by selecting more than one from the checklist.
Once flagged, the colored flags will appear after the Manuscript ID in the manuscript header and be used to create custom reports.

NOTE: Flags can be configured to have the ability to carry over to revisions and to attach files. Please reach out to [email protected] for more information.
Adding & Viewing Notes
Notes are only viewable to the Admin and Editor roles. Authors and Reviewers will not see the notes section.
Notes appear at the bottom of each tab within a submission’s Manuscript Details. See the image below (pulled from the ScholarOne guide ) for more information.

Adding a Note

Enter your preferred Title and Note text. Save.
Accessing & Editing Existing Notes
Notes appear at the bottom of the Manuscript Details page on all tabs.

NOTE: Notes can be configured to have the ability to carry over to revisions and to attach files. Please reach out to [email protected] for more information.
Occasionally, authors may request to remove their manuscript from review. Because authors are unable to withdraw their own manuscripts, this must be done by a site admin. If you do not have Admin access or access to the “Manuscript Files” tab, please reach out to Sage
To withdraw a manuscript from Sage Track, please follow the steps below.
1. Locate the Manuscript via Quick Search
In the Admin Center, the quickest way to locate the manuscript is to perform a search in the Quick Search available on the right side of the page.

Please note that the manuscript can also be located in the Admin Lists, to the left.
2. Enter the Manuscript Files page
When the search results appear, select “View Manuscript Files” from the Take Action drop down bar.

You will be taken to the Manuscript Files page. Please note that this page may also be reached using the Manuscript Files tab on the left side of the manuscript entry.

3. Locate "Change Manuscript Status"
Once in the manuscript’s Manuscript Files page, scroll to the Change Manuscript Status box. “Click here to withdraw the manuscript” is the second link.

4. Additional Notes
- There is currently no way to rescind a withdrawal; if a manuscript is mistakenly withdrawn, please contact a member of the Sage Publications peer review team for assistance.
- Manuscript withdrawals do not impact the journal decision ratio, although the time to review (if reviews have been received) and time to decision (if a decision has been made) will be counted in the site’s turnaround time statistics.
- Once a manuscript is withdrawn, it can no longer be found in the Admin or Editor Lists. However, it can still be viewed by performing a manuscript search.
If an author requires additional time to submit a revised manuscript, their due date can be extended. This will allow the author to follow the standard revision process, rather than submitting their revised manuscript as a new submission with a new ID.
Manuscript due dates can be found in the “Peer Review Details” box of the “Manuscript Information” tab. To find these, follow the instructions below.
1. Enter the Admin Center

2. Locate the manuscript using the Quick Search or “Manuscripts Awaiting Revision” queue.
Please note that manuscripts are removed from Manuscripts Awaiting Revision once the revision due date has passed. These submissions can still be located via search.

3. Once you have located the manuscript, click the dropdown under “Take Action” and select “View Details.”

4. The due date can be found in “Peer Review Milestones.” This date can be altered by typing directly into the white box or using the calendar applet on the right to select a new date.

- The editable due date box only appears on the most recent version of the manuscript. If the option to change the due date is not available, scroll to “Version History.” Use the “Switch Details” button to toggle to the newest version. The newest version will be located first on the list.

- Due dates can only be extended in journals that utilize revision due dates. If this box is unavailable in the newest version of the manuscript and the revision has not been submitted, it is possible your journal is not utilizing due dates. In this case, please contact your Sage Track Support representative for further information.
Occasionally, an author will submit a revised manuscript as a new document and this document will be inadvertently processed. Other times, an author will re-submit a manuscript that had previously been rejected. In these situations, the Companion Papers tool can be used to link the two manuscripts together for easy reference.
1. Locate one of the manuscripts you would like to link and click “View Details” under the Take Action selection drop down.

2. Scroll to Companion Papers and click “Search for a Companion Paper.”

3. In the new window, locate the manuscript that should be linked by performing an advanced search, then click the “Search” button at the bottom of the page.

4. When the results appear, click the blue icon under “Use this Paper” to link the manuscript.

6. In “Companion Papers”, you will see the details of the manuscript this submission is linked to. You can also view the manuscript proof (“View Submission”), toggle to the Manuscript Information page of the companion paper (“View Details”), delete the listing, or search for a new companion paper.

If a decision has been made in error or an author has appealed the original decision made on their manuscript, you may undo the previous decision and select a new one in its place. You may send the manuscript back to reviewers if desired.
The “Contents” below contain an outline of the process; further information can be found beneath each heading, starting on page 2.
Please note that this tool is not intended to replace the revision workflow. If a manuscript requires a new decision after content changes have been made by the author, this new version should be submitted as a revision and a new decision rendered.
Enter the submission's Manuscript Information page
1. Search for the manuscript by ID, title, or author name using the Quick Search feature.

2. When the search results appear, select “View Details” in the “Take Action” drop down menu.

3. This page is also available within the submission by clicking the “Manuscript Information” tab.

In the "Make Decision" box, use the button labelled "Rescind."
4. The Make Decision box can be found toward the middle or end of the page. The “Scroll To…” dropdown box at the top of the page can be used to locate this box without scrolling.

5. Click the “Rescind” button, located on the top right side of the Make Decision box.

6. A pop-up window will appear. Click “OK.”

7. An email template will appear alerting the author that the decision has been rescinded. Make edits to the text if desired, then click “Save and Send.”

Commit a new decision using the "Make Decision" task.
8. After sending the “Decision Rescinded” notification, the page will refresh and return to the “Make Decision” task.
9. Click the radio button that corresponds with the new decision.

10. A confirmation pop-up will appear indicating that a new decision letter must be drafted. Click “OK.”

11. Click “Commit Decision.”

12. Make edits to the decision letter text if desired, then click “Send and Commit Decision.”

Additional Options
- If additional reviews are necessary before making a new decision, you may increase the number listed in “# reviews required to make decision” and click “Save” to return to the Select Reviewers step.

Finding and Navigating E-mail Templates
Where to find.
The E-Mail Templates can be found in your Admin Dashboard, under ‘Admin Tools’. After clicking ‘Email Templates’ you will be taken to the templates, where you can select the area.

Select Area
The templates are separated in to categories, and you can navigate these using the ‘Select area’ drop-down list.

- Hyperlink E-Mail: the templates used when a user name is clicked on. These should usually be blank.
- System E-Mails: contains automatic e-mails sent at various stages in the process, from ‘Account Created’ to ‘Manuscript Exported’.
- Decision Letters: all decision letters sent to authors and/or reviewers.
- Invitation E-Mails: letters sent to reviewers to invite them to review a manuscript.
- Invitation Response E-Mails: the automatic response e-mails following a reviewers invitation response.
- E-Mail Notifications and Reminders: contains all the reminders sent to editors and reviewers for tasks assigned to them.
- Author Reminders: contains reminders sent to author for resubmissions.
- Printable E-Mail Letterhead: not in use.
Commonly Edited Templates
The template areas most often used are:
- Decision Letters
- Invitation & Invitation Response E-Mails
- E-Mail Notification and Reminders
View and Modify Templates
Edit templates.
To view and modify an e-mail template, use the ‘Modify’ button as shown below. This will open a new window (pop-ups will need to be allowed in your browser). The e-mail will need to be edited in both the Submitted Workflow (new manuscripts) and Revised Workflow (manuscripts that were sent back to authors for revision and have since been resubmitted).
For example, to change the Accept Decision letter you would need to modify the SW (submitted workflow) template and then the RW (revised workflow) template.

Using the ‘Modify’ button will open a new e-mail window, where you can view and edit the e-mail. The top half of the window will show a preview of the current e-mail, and the bottom half includes the editable e-mail template. Here, you can change the wording or add/remove e-mail tags as needed. To view all the e-mail tags, click ‘View E-Mail Tags’.
Once you are finished with editing, click ‘Save and Preview’ to check your changes.

Create New Template or Add Task Related E-Mail
To create a new template, go to the area and task you’d like to add to and click ‘add template’. For example, to add a new Invitation E-Mail, go to ‘Invitation E-Mails’ and click ‘add template’ next to the related task.

This will open a blank e-mail window where you will need to add the e-mail body, To and From fields and the Subject. You will also need to name the template, following the other title formats of ‘SW -…’ or ‘RW -…’.

The ‘From’ and ‘To’ fields will need to use the corresponding tags, and the ‘Subject’ and ‘Body’ can use text with tags. To find the corresponding tags, use the ‘View E-Mail Tags’ button or reference related e-mail templates.

Once the new template has been saved, it will appear under the task. To make the template available, tick ‘Active’.

For task related e-mails, tick ‘Edit Before Sending’ and ‘Required for Event’. This will allow the editor to select which template they want to use when it generates. Add the template to the Revised Workflow as needed.
Using E-mail Tags
The e-mail tags are used in the templates to generate the relevant information for each manuscript, and using them also ensures that the correct Admin and EIC contacts will be used following editorial transitions.
E-mail Tags can be found by opening any e-mail template and clicking ‘View E-Mail Tags’. This will open a new window that lists all the tags available on the site.
Each tag also has a brief description of the information it will generate, so when looking for a specific tag use Ctrl+F to find a match.
Admin & EIC Contact Tag
The Admin and EIC contact tags will pull the name and e-mail address of the users listed in the Admin Configuration settings.

The Admin contact tags:
- ##EMAIL_CONTACT_ADMIN_CENTER_EMAIL##
- ##EMAIL_CONTACT_ADMIN_CENTER_NAME##
The EIC contact tags:
- ##EMAIL_CONTACT_EIC_CENTER_EMAIL##
- ##EMAIL_CONTACT_EIC_CENTER_NAME##
Changing Admin or EIC Contact
The Admin and EIC contact should be changed during editorial transitions, or when a new Admin or EIC takes over the role.
To change the contact, go to the Admin Configuration Settings and scroll down to Set E-Mail Contacts. Update the name and e-mail address of the corresponding user and click Save.

Reminder Timescales
The site will send out reminder emails for certain tasks, and most of these timeframes can be edited from within the e-mail templates.
Reviewers will receive invitation response reminders following the initial invitation to review. These are usually 3 and 5 days following, but these timescales can be edited in ‘Admin Configuration’.
Reviewers and Editors will also receive task related reminders, which can be found in ‘E-Mail Notifications and Reminders’.
The reminders are triggered by one of two fields, When Task Enters or Reminder Days.

When Task Enters will trigger the e-mail to send when one of the following is selected:
- Pending (task has started)
- Processing (task in process but not complete)
- Overdue (task has reached due date)
- Completed (task completed)
- Abandoned (action no longer needed, but task still open)
- Rescinded (manuscript moved back from step)
Or, a specific timeframe can be selected by entering the number of days before or after the task begins to send the reminder.
An example of these triggers is in the Reviewers Score task, as shown below. The ‘-7’ indicated that the ‘Reviewer Score due in 1 week’ e-mail should send 7 days before the task is due. The ‘7’ indicates that the ‘Reviewer Scores are 1 week late’ e-mail should send when the due date is 7 days passed but the task has not been completed.

The ‘Overdue’ field will trigger the ‘Reviewer Scores now due’ e-mail to send on the day the review is due. The ‘Completed’ field indicates that the ‘Thank you for submitting your review’ e-mail should send when the reviewer has returned their review, therefore completed the Reviewer Score task.
Download .xml Templates
It’s recommended that e-mail tags are used to populate names and e-mails, rather than typing them directly in to the templates.
This means that when a user role is updated, the e-mail templates will automatically be updated. If there is an instance where a name or e-mail address has been hardcoded in to the templates, you can find the templates to edit by downloading an .xml of all the templates. This option is at the bottom of the E-Mail Templates, in ‘E-Mail Tools’.

Once this file has been opened, you can use Ctrl+F to search for specific names, e-mail addresses or phrases and make a note of the templates they appear in to then edit on the site.
Note: please do not edit within the .xml and re-upload as this can cause duplications and errors. Only edit within the Modify Template window.
If your journal Editorial team regularly check queues and therefore do not require the system generated prompts and reminders, follow the below guidance to de-activate them.
To turn off reminder emails, go into the ‘Admin Centre’ dashboard and scroll down to the ‘Admin Tools’ section and select ‘Email Templates’.

You will be directed to a new page where you will need to select the ‘Email Notifications and Reminders’ tab from the ‘select area’ drop-down menu.

Starting with the ‘Submitted Workflow Tasks’, search for email reminders that are currently set up to go out to the Admin role and uncheck the ‘active’ box.

Once inactivated, scroll to the bottom of the ‘Submitted workflow Tasks’ section and click ‘Save’.

Please note: reminders to EIC/ AE/ Editor roles and reviewers should not be made inactive unless previously discussed with your Publishing Editor.
You will then need to repeat the same process for the ‘Re-submitted Workflow Tasks’ (if applicable), ‘Revised Workflow Tasks’, and the ‘Accept Workflow Tasks’, remembering to click ‘Save’ after you have inactivated any templates.

Email reminders you may want to consider inactivating:
Submitted, Resubmitted and Revised Workflow templates:
-Awaiting Checklist Completion
-Awaiting EiC assignment
-Awaiting AE Assignment
Accepted Workflow templates:
-Awaiting Production Checklist
-Awaiting Assignment to Batch
-Notice to Admin: Form is now due
Stack Exchange Network
Stack Exchange network consists of 183 Q&A communities including Stack Overflow , the largest, most trusted online community for developers to learn, share their knowledge, and build their careers.
Q&A for work
Connect and share knowledge within a single location that is structured and easy to search.
Question on "Awaiting Production Checklist" Status for Manuscript
After my paper was accepted, the status in the ScholarOne manuscript center changed from accepted to "accept" with the additional "awaiting production checklist".
Now it has been about 3-4 weeks with this status after the acceptance. I would like to ask from you: does this status sounds like a normal status after acceptance? Personally, I would think and expect the status now be, for example, "checklist complete"? I have received so far only the official acceptance mail. I also would like to know how long the delay may be after acceptance to the first on-line view (the journal does not indicate the different dates of acceptance, on-line etc.)?
- peer-review
- publications
- journal-workflow
You need to find out the journal's policies on "Online First" vs. paper issue publication. The reason is because the date that a paper is accepted may be very different than the date when it is formally published, if the journal is still tightly tied to paper issues and has a long publication queue.
If the journal does online publication in advance of its paper issues, then you should be expecting production to begin shortly and a citable preprint of your paper to become available very quickly (though the final official publication date might be many months in the future).
If, on the other hand, the journal schedules its publication based on print only, and does not publish early online, then it might stay in this status for a long time, as the publication staff may not have any reason to work on the article until it is approaching the final publication date.
- Yes, the paper has early online publication in advance of paper issues. So, the paper should be in the queu for publication. I was afraid of the status that gives an impression that it is "awaiting" something. If it is not moving in a few weeks, I will ask from the assistant. Thank you very much jakebeal. – Anna May 16, 2015 at 6:32
You must log in to answer this question.
Not the answer you're looking for browse other questions tagged journals peer-review publications journal-workflow ., hot network questions.
- Is it rational for heterosexuals to be proud that they were born heterosexual?
- Should I ask for authorship or ignore?
- Customary learning areas for Shavuos?
- Help me SMD diode identifying
- In beamer, can I have a caption only in article mode, but some of its content in all modes?
- Have I ruined my AC by running it with the outside cover on?
- What happens when you target a dead creature with Scrying?
- Who would I call to inspect the integrity of a truss after an electrician cut into it?
- Preventing Javascript in a browser from connecting to servers
- An application of the (100/e)% rule applied to postdocs: moving on from an academic career, perhaps
- Reaction of RuCl3 and alkaline solution
- Movie I saw in the 80s where a substance oozed off of movie stairs leaving a wet cat behind
- Group with a translation invariant ultrafilter
- How can I use a transistor to control the segments on this 7-segment display?
- Am I seeing double? What kind of helicopter is this, and how many blades does it actually have?
- Is it allowed to use patents for new inventions?
- Windows Server 2022 Support for Intel X520-DA2
- Format of generated .HSX file?
- It suggests vs It would suggest
- Starlink Satellite Orbits
- A trigonometric equation: how hard could it be?
- Is it theoretically possible for the sun to go dark?
- How do Authenticators work?
- Can someone explain the damage distrubution on this aircraft that flew through a hailstorm?
COMMENTS
A user asks what "Awaiting Assignment to Batch" means after their paper was accepted by a journal. An employee of ScholarOne answers that it is part of the accepted workflow and explains the batching process.
Learn how to prepare a manuscript for publication after acceptance in Sage Track, a peer review and submission system. Find out the steps, tasks and options for assigning a manuscript to batch and exporting it to production.
Learn how to log in to your author dashboard and see the meaning of different manuscript statuses, such as awaiting editor assignment. Find out what to do if your submission is returned, rejected, or revised by the journal.
Learn how to manage manuscripts in Sage Track, a peer review and submission system for journals. Find out how to assign a manuscript to a batch, view the audit trail, and unsubmit a manuscript.
2. Awaiting Editor Assignment: Your article has passed initial quality checks by the Editorial Production Assistant and is in the process of being assigned to an appropriate Editor who will evaluate your article for scope, quality, and fit for the journal. Papers that do not meet these criteria will be rejected. 3. Awaiting Reviewer Selection
一个用户询问了IEEE Trans提交final files后一般要多久才会交版面封及proof的问题,得到了其他用户的回复和建议。有人说要等待出版通知,有人说要在IEEE Author Gateway账号里查看论文进程,有人说要不着急,有人说要着急。
Automatic Batch Assignment Sites have the option to have manuscripts assigned to a batch or batches automatically upon completion of the production checklist task. Once this has occurred, the manuscript will be placed directly in the Awaiting Export queue. If you would like this option activated, created a
This is the stage where the manuscript is queued for printing/online publication. In some cases, the "awaiting production checklist" status is a clickable link or requires a checklist to be completed. I recommend that you check whether there is a link provided with the status you see. If so, please click on it and follow subsequent steps.
Learn what it means when your manuscript is in the Awaiting Editor Assignment status and how long it may take for the next update. Find out the possible outcomes and tips for communicating with the journal editor.
Read through what to look for when you're checking your proofs and watch our helpful video below talking you through what to expect during the production process. Use our guide if you're correcting your proofs using Adobe. Avoid delays and problems in production with our guide to writing your paper. Read the video transcript.
Assign to Batch. A copy of the manuscript's export history will be available. The manuscript can also be re-exported if needed. Audit Trail Overview. The Audit Trail provides an in-depth look at individual tasks that have been performed on a manuscript, including emails that have sent out through Sage Track. ... -Awaiting EiC assignment
The manuscript awaiting the assignment of an editor for more than two-and-half months is both a bit long and unusual. It's more common to have a challenge finding peer reviewers, unless with this journal or for this paper, the review is to be done internally. If that's not the case, the journal is having a challenge assigning an editor to ...
placed directly in the Awaiting Export queue. If you would like this option activated, created a case Customer Support for the Client Solutions team, with the batch or batches you would like ... would like to close out the batch assignment, you can do a bypass batch export. Please note that this option is configurable and may need to be set up ...
本文记录了作者在IEEE Transactions on Intelligent Transportation Systems期刊投稿的过程,包括投稿流程、审稿意见、修改建议等。最终在2022年4月获得accept状态,并在2022年5月出版论文,期间经历了一年的时间和三次修回。
We would like to show you a description here but the site won't allow us.
The editorial hierarchy varies from journal to journal. Eic usually signifies the Editor in chief. Once initial check up is done on your manuscript, the EIC will screen your manuscript to check if it fits the scope of the journal and if it is of sufficient interest to the journal's readership. He will then assign a AE or an academic editor who ...
Yes, the paper has early online publication in advance of paper issues. So, the paper should be in the queu for publication. I was afraid of the status that gives an impression that it is "awaiting" something. If it is not moving in a few weeks, I will ask from the assistant. Thank you very much jakebeal. -
Awaiting the AI iPhone Apple has for years included AI in its products in small, often invisible ways that nonetheless make life easier for its fans. But now, Apple is set to introduce its most ...