How-To Geek
How to make a microsoft powerpoint presentation read-only.
You can set your PowerPoint presentation to "read-only" to discourage others from making edits to your content. Here's how.
If you want to discourage others from making edits to your Microsoft PowerPoint presentation or let them know the file you sent is the final version, you can do so by making it read-only. Here's how it's done.
While making your PowerPoint presentation read-only is a good deterrent from having others edit your content, it's easy to unlock a read-only presentation . It's by no means un-editable.
Open the presentation that you want to make read-only, then click the "File" tab.
Next, in the left-hand pane, select "Info."
You'll now see a "Protect Presentation" section, which lets you (to an extent) protect against any editing of your presentation. Click "Protect Presentation."
Once selected, a drop-down menu will appear with these four options:
- Always Open Read-Only: This asks the reader to opt-in to edit the presentation. This prevents accidental edits.
- Encrypt with Password: This password protects your presentation.
- Add a Digital Signature: This adds an invisible digital signature to your presentation.
- Mark as Final: This lets the reader know that this is the final version of the presentation.
All of these options are good for protecting the integrity of your Microsoft PowerPoint, but the two we'll need here to make the presentation read-only are (1) Always Open Read-Only and (2) Mark as Final.
Selecting either option will prevent the reader from editing the presentation--unless they opt-in to do so.
If you chose the Always Open Read-Only option, the reader will see this message when opening the presentation:
"To prevent accidental changes, the author has set this file to open as read-only."
If you chose the Mark as Final option, the reader will see this message:
"An author has marked this presentation as final to discourage editing."
In either case, your Microsoft PowerPoint presentation is now set to read-only. However, in both cases, all the reader has to do to edit the presentation is click the "Edit Anyway" button.

PowerPoint: How to Launch a Presentation Automatically as a Slide Show

What is a PowerPoint Show?
By default, PowerPoint saves your slide presentation as a PowerPoint presentation file with the .pptx file extension which, when double-clicked, launches PowerPoint. The presentation opens in whatever view was open when you saved it, such as the Normal view or Slide Sorter view. If you want your slide show to immediately launch in the Slide Show view, however, you need to save your file as a PowerPoint Show. In this article, find out how to create a PowerPoint slide show file and learn 2 bonus tips .
To Save a PowerPoint Presentation as a PowerPoint Show:
- Choose the File tab.
- Select Save As .
- Pick the Save as type as PowerPoint Show .
- Type a name for your slide show in the File name text box (you can use the same name and location as your .pptx/presentation file) and click Save . Your PowerPoint slide show file is saved with a .ppsx extension.
Now, the next time you or anyone else opens your presentation from outside of PowerPoint, your slide show immediately launches in Slide Show view. When you navigate past the last slide, the file automatically closes. To open the file for editing, launch PowerPoint first and open it as you would a standard presentation. If you have access to the original presentation, you may prefer to open the .pptx file to edit and save it again as a slide show file. Most importantly, make sure to manage your files, so you are working with the most current version.
PowerPoint Presentation Tips
BONUS TIP: When I save my presentations as a PowerPoint Show, I save the file to my desktop for easy access during speaking and training engagements. If needed, I can also quickly close and re-open the file without launching PowerPoint and without showing everyone all of my slides. Working with a PowerPoint Show also saves a number of steps because it automatically launches with a simple double-click of the mouse.
To move to a specific slide in a presentation while in the slide show view (as either a presentation or show format), just type the slide number and press [Enter] . To make these moves easier, print out a handout of your presentation, which includes slide numbers of each slide for quick navigation. Or, create a simple manual cheat sheet to reference when you want to jump to different slides.
BONUS TIP #2: In addition to saving PowerPoint shows to my desktop, I also add a generic slide to the beginning. For instance, a slide with your organization logo or simply a black slide. Although this may not apply to your presentations, I often navigate in and out of my slide show as I am also demonstrating software features and facilitating discussions within my training classes and conference sessions. With a generic or simple slide at the start, I can launch the slide show with a neutral, blank slide and then use the keyboard shortcut to type the slide number and press [Enter] to move to a specific slide within the presentation.
Were these PowerPoint tips helpful? Grab your handout of other quick and easy PowerPoint shortcuts and discover more PowerPoint techniques here .
© Dawn Bjork, MCT, MOSM, CSP®, The Software Pro® Microsoft Certified Trainer, Productivity Speaker, Certified Speaking Professional

Related Posts
Improve Your Presentations: Sites for Paid & Free Images May 21, 2022
Top 6 Reasons Why You Need a Presentation Remote for PowerPoint April 20, 2022
PowerPoint Presentations: Engage Your Audience with the PEER Method June 20, 2022
Join Our Tips Newsletter
Receive 477+ shortcuts & more!
- Irresistible Tech Gifts for That Special Dad
- Killer Smartphone Deals We Love
Change a PowerPoint Show File to a Work File
- Brock University
When you receive a PowerPoint file, whether over a company network or as an email attachment, the file extension indicates whether it's a show file (meant for viewing only) or a working presentation file. The show file has the file extension .ppsx, while the presentation working file uses the file extension of .pptx on the end of the file name. Changing this extension changes the file type.
Instructions in this article apply to PowerPoint 2019, 2016, 2010; PowerPoint for Microsoft 365, and PowerPoint for Mac.
PPTX vs. PPSX
A PowerPoint show is the actual presentation that you view when you are a member of the audience. A PowerPoint presentation file is a working file in the creation stage. They differ only in their extension and the PowerPoint format they in which they open.
PPTX is the extension for a PowerPoint presentation.
PPSX is the extension for a PowerPoint show. This format saves presentations as a slideshow. It is the same as the PPTX file but when you double-click it, it opens in Slide Show view rather than Normal view.
Editing a PowerPoint Show File
Sometimes, you want to make a few changes to the finished product, but all you received from your colleague is the show file with the .ppsx extension. There are a couple of ways to make edits to a .ppsx file.
Open the File in PowerPoint
Open PowerPoint.
Select File > Open and locate the show file with the .ppsx extension on your computer.
Edit the presentation as usual in PowerPoint.
Go to File .
Select Save As .
In the Save As Type box, choose PowerPoint Presentation (.*pptx) to save the file as a regular working presentation file.
Change the File Extension
In some cases, you can just change the extension before opening the file in PowerPoint.
Right-click the show file with the .ppsx extension and choose Open file location .
Right-click on the file name and choose Rename .
Change the file extension from .ppsx to .pptx .
Double-click on the newly named file to open it in PowerPoint as a working presentation file.
Get the Latest Tech News Delivered Every Day
- Print Slides From a PowerPoint Show File for PC
- How to Use Copilot in Powerpoint
- How to Save Sounds From PowerPoint Slideshows
- What Is a PPSM File?
- What Is a PPTX File?
- What Is a PPTM File?
- What Is a PPSX File?
- Create Pictures From PowerPoint Slides
- What Is a PPT File?
- Create a Default Presentation Template in PowerPoint
- How to Insert PDF Files Into PowerPoint Presentations
- How to Use Microsoft's Free PowerPoint Viewers
- How to Convert PowerPoint to Video
- How to Save PowerPoint Presentations as PDF Files
- What Is a PPS File?
- What Is a POTX File?

- Get started with computers
- Learn Microsoft Office
- Apply for a job
- Improve my work skills
- Design nice-looking docs
- Getting Started
- Smartphones & Tablets
- Typing Tutorial
- Online Learning
- Basic Internet Skills
- Online Safety
- Social Media
- Zoom Basics
- Google Docs
- Google Sheets
- Career Planning
- Resume Writing
- Cover Letters
- Job Search and Networking
- Business Communication
- Entrepreneurship 101
- Careers without College
- Job Hunt for Today
- 3D Printing
- Freelancing 101
- Personal Finance
- Sharing Economy
- Decision-Making
- Graphic Design
- Photography
- Image Editing
- Learning WordPress
- Language Learning
- Critical Thinking
- For Educators
- Translations
- Staff Picks
- English expand_more expand_less
PowerPoint - Saving Presentations
Powerpoint -, saving presentations, powerpoint saving presentations.

PowerPoint: Saving Presentations
Lesson 4: saving presentations.
/en/powerpoint/creating-and-opening-presentations/content/
Introduction
Whenever you create a new presentation in PowerPoint, you'll need to know how to save in order to access and edit it later. As with previous versions of PowerPoint, you can save files to your computer . If you prefer, you can also save files to the cloud using OneDrive . You can even export and share presentations directly from PowerPoint.
Watch the video below to learn more about saving and sharing PowerPoint presentations.
Save and Save As
PowerPoint offers two ways to save a file: Save and Save As . These options work in similar ways, with a few important differences.
- Save : When you create or edit a presentation, you'll use the Save command to save your changes. You'll use this command most of the time. When you save a file, you'll only need to choose a file name and location the first time. After that, you can just click the Save command to save it with the same name and location.
- Save As : You'll use this command to create a copy of a presentation while keeping the original. When you use Save As, you'll need to choose a different name and/or location for the copied version.
About OneDrive
Most features in Microsoft Office, including PowerPoint, are geared toward saving and sharing documents online . This is done with OneDrive , which is an online storage space for your documents and files. If you want to use OneDrive, make sure you’re signed in to PowerPoint with your Microsoft account. Review our lesson on Understanding OneDrive to learn more.
To save a presentation:
It's important to save your presentation whenever you start a new project or make changes to an existing one. Saving early and often can prevent your work from being lost. You'll also need to pay close attention to where you save the presentation so it will be easy to find later.

- If you're saving the file for the first time, the Save As pane will appear in Backstage view .

- The Save As dialog box will appear. Select the location where you want to save the presentation.

- The presentation will be saved . You can click the Save command again to save your changes as you modify the presentation.
You can also access the Save command by pressing Ctrl+S on your keyboard.
Using Save As to make a copy
If you want to save a different version of a presentation while keeping the original, you can create a copy . For example, if you have a file named Client Presentation you could save it as Client Presentation 2 so you'll be able to edit the new file and still refer back to the original version.
To do this, you'll click the Save As command in Backstage view. Just like when saving a file for the first time, you'll need to choose where to save the file and give it a new file name .

To change the default save location:
If you don't want to use OneDrive , you may be frustrated that OneDrive is selected as the default location when saving. If you find this inconvenient, you can change the default save location so This PC is selected by default.

Using AutoRecover
PowerPoint automatically saves your presentations to a temporary folder while you are working on them. If you forget to save your changes or if PowerPoint crashes, you can restore the file using AutoRecover .
To use AutoRecover:
- Open PowerPoint. If autosaved versions of a file are found, the Document Recovery pane will appear.

By default, PowerPoint autosaves every 10 minutes. If you are editing a presentation for less than 10 minutes, PowerPoint may not create an autosaved version.
If you don't see the file you need, you can browse all autosaved files from Backstage view . Just select the File tab, click Manage Presentation , then choose Recover Unsaved Presentations .

Exporting presentations
By default, PowerPoint presentations are saved in the .pptx file type. However, there may be times when you need to use another file type , such as a PDF or PowerPoint 97-2003 presentation . It's easy to export your presentation from PowerPoint to a variety of file types.
- PDF : This saves the presentation as a PDF document instead of a PowerPoint file.
- Video : This saves the presentation as a video.
- Package for CD : This saves the presentation in a folder along with the Microsoft PowerPoint Viewer, a special slide show player anyone can download.
- Handouts : This prints a handout version of your slides.
- Other file type : This saves in other file types, including PNG and PowerPoint 97-2003 .
To export a presentation:
In our example, we'll save the presentation as a PowerPoint 97-2003 file.
- Click the File tab to access Backstage view .

You can also use the Save as type drop-down menu in the Save As dialog box to save presentations in a variety of file types. Be careful to choose a file type others will be able to open.

Sharing presentations
PowerPoint makes it easy to share and collaborate on presentations using OneDrive . In the past, if you wanted to share a file with someone you could send it as an email attachment. While convenient, this system also creates multiple versions of the same file, which can be difficult to organize.
When you share a presentation from PowerPoint, you're actually giving others access to the exact same file . This lets you and the people you share with edit the same presentation without having to keep track of multiple versions.
In order to share a presentation, it must first be saved to your OneDrive .
To share a presentation:

- Open our practice presentation .
- Use Save As to create a copy of the presentation. Name the new copy Saving Challenge Practice . You can save it to a folder on your computer or to your OneDrive .
- Export the presentation as a PDF file.
/en/powerpoint/slide-basics/content/
How to Save a Copy of a PowerPoint? [Step-by-Step Guide!]
By: Author Shrot Katewa
![How to Save a Copy of a PowerPoint? [Step-by-Step Guide!]](https://artofpresentations.com/wp-content/uploads/2022/03/Featured-Image-How-to-Save-a-Copy-of-PowerPoint-Presentation.webp "save powerpoint as presentation only")
When creating a presentation using PowerPoint, you may be used to saving the presentation from time to time in order to prevent any data loss. But, what if you want to create another copy of your presentation? How do you save a copy of your PowerPoint presentation?
In this article, we shall understand the process of saving a copy of any PowerPoint presentation in a step-by-step manner. Plus, we shall also take a look at how to save a presentation as a read-only file! That, and much more!
So, let’s get started!
1. How to Save a Copy of a PowerPoint Presentation?
Let’s address the elephant in the room straight away! How do you create a copy of a PowerPoint presentation?
Microsoft PowerPoint offers a “Save A Copy” feature which allows you to save the changes in your PowerPoint presentation in a separate copied file rather than the original file.
In some versions of Microsoft PowerPoint, the “Save A Copy” option is replaced by the “Save As” option. However, the features available through both options are fully identical.
Let’s understand the process of saving a copy of a PowerPoint presentation in further detail –
1a. How to Save a Copy of PowerPoint to Desktop?
To save a copy of a PowerPoint presentation on your desktop, follow the 3 simple steps.
Step-1: Click on the “File” tab
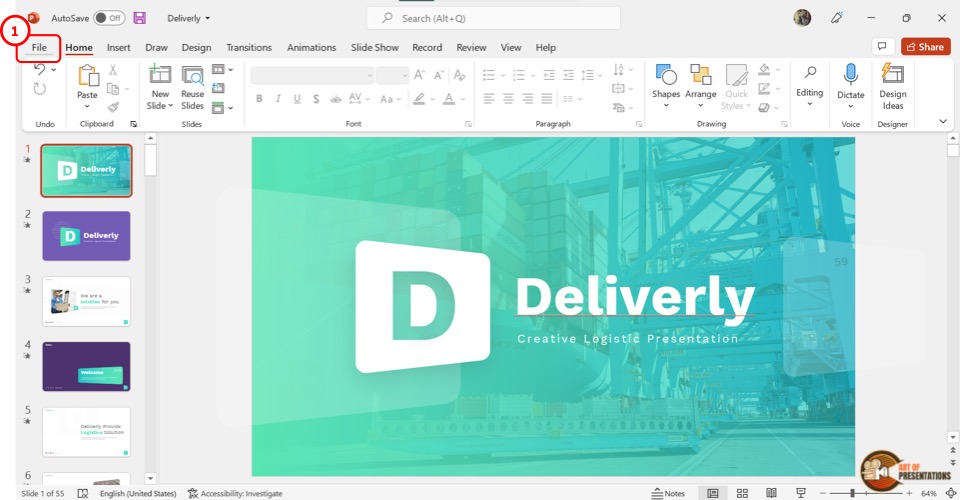
The first step is to click on the “File” tab. It is located on the left corner of the menu ribbon at the top of the screen. This will open the “File” menu.
Step-2: Click on the “Save A Copy” option

Depending on the version of your Microsoft PowerPoint, you have to click on the “Save A Copy” or the “Save As” option from the sidebar located on the left side in the “File” menu.
Step-3: Click on the “Save” button
In the “Save A Copy” screen, you can click on the “Save As Options” box and save a copy of your presentation in several different formats. Then all you have to do is click on the “Save” button beside the “Save As Options” box to save a copy of your presentation.
1b. Shortcut to Save a Copy of a PowerPoint Presentation
In Microsoft PowerPoint, you can also save a copy of your presentation using the keyboard shortcuts. All you have to do is press the “Alt+F2” keys (Cmd+Shift+S on Mac) on your keyboard.
This will directly open the “Save As” dialog box where you can click on the “Save as type” box to change the file format.
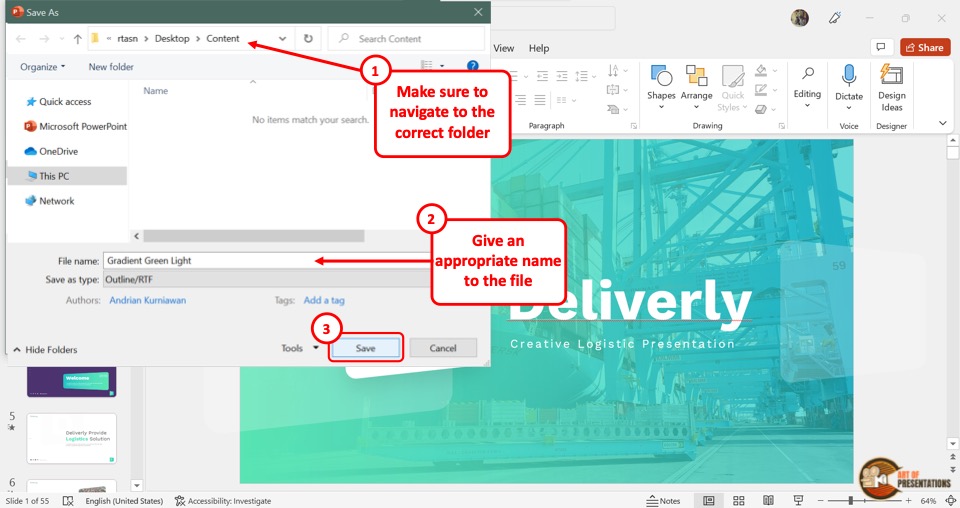
Make sure that you choose the correct location for saving the file from the navigation pane. Give an appropriate name to the file. Finally, click on the “Save” button.
2. How to Save a Copy of a Read-Only PowerPoint Presentation?
By saving the “Read-Only” version of a PowerPoint presentation , you can avoid any accidental edits in the original presentation file. A “Read-Only” PowerPoint file will force the user to create a copy of the presentation if any changes are made.
Thus, the original file is maintained as-in. To save a PowerPoint presentation as a read-only copy, follow the easy steps mentioned below –
Step-1: Click on the “File” Tab
In the menu ribbon located at the top of the screen, click on the “File” tab. In the sidebar located on the left side of the “File” menu, click on the “Info” option.
Step-2: Click on the “Alway Open Read-Only” option
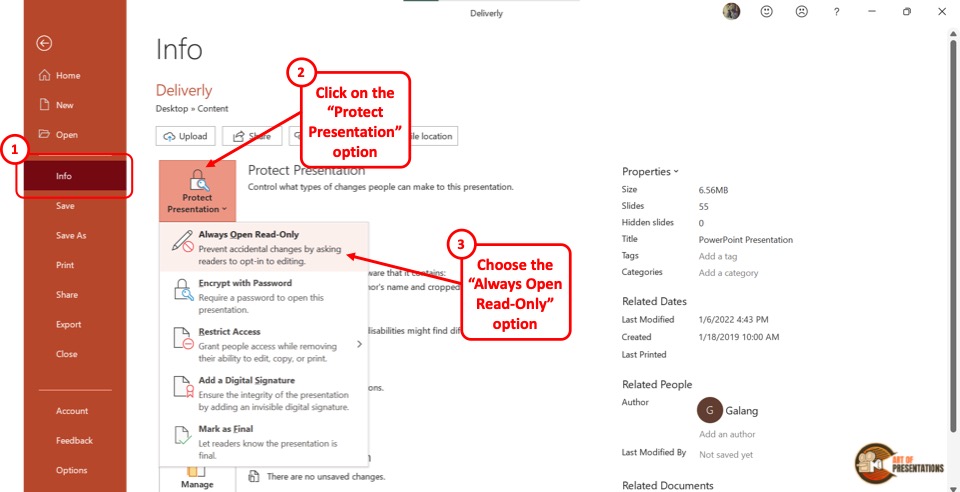
In the “Info” screen, click on the “Protect Presentation” button which is the first button in the left column. In the dropdown menu under “Protect Presentation” , click on the “Always Open Read-Only” option.
Also Read – 7 Ways to Protect Your PowerPoint Presentation from Editing!
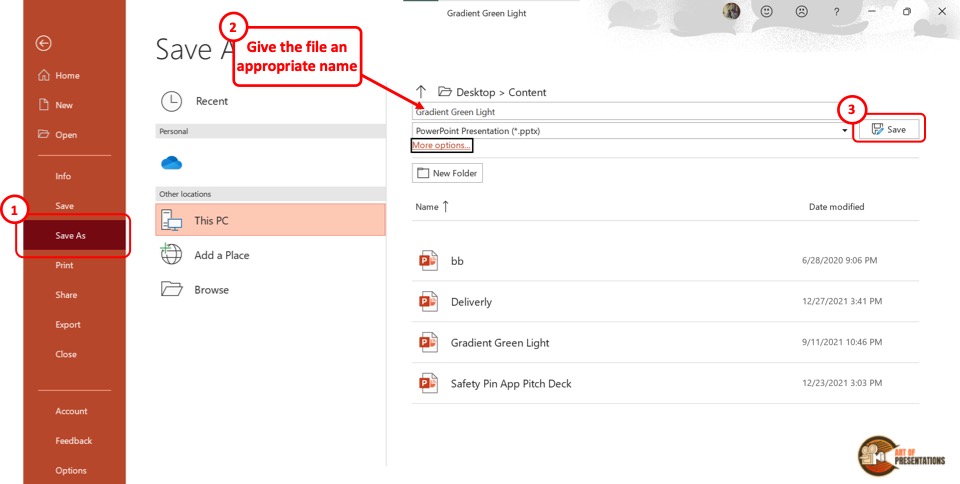
Finally, you have to click on the “Save A Copy” option in the sidebar on the left side of the “File” screen. Then click on the “Save” button to save a read-only copy of the PowerPoint presentation.
3. How to Save a Copy of a Shared PowerPoint Presentation?
If your colleague or client has shared a copy of a PowerPoint presentation using PowerPoint for the web or Shared Drive, you can easily download and save a copy of the shared presentation to your device.
Here’s what you need to do –
Step-1: Click on the “Save as” option
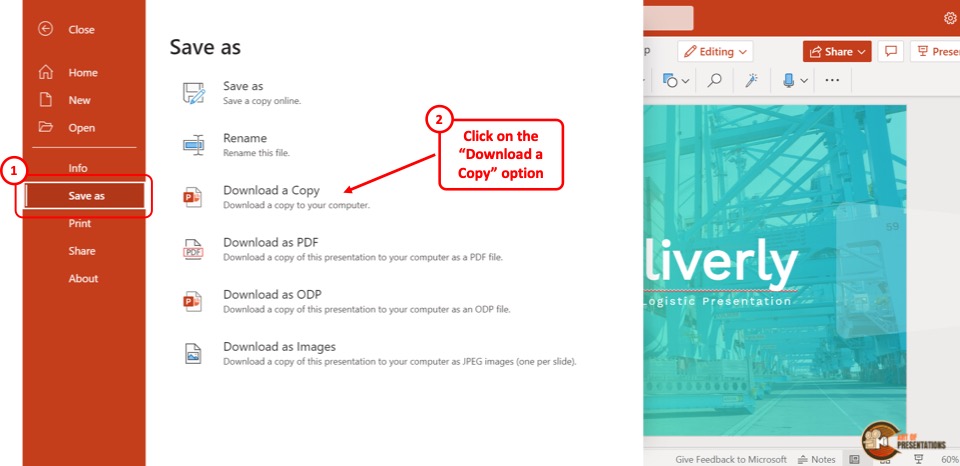
In the menu ribbon located at the top of the screen, click on the “File” tab. Then click on the “Save as” option from the “File” menu. Under the “Save As” option, click on the “Download a Copy” option.
Step-2: Click on “Download”
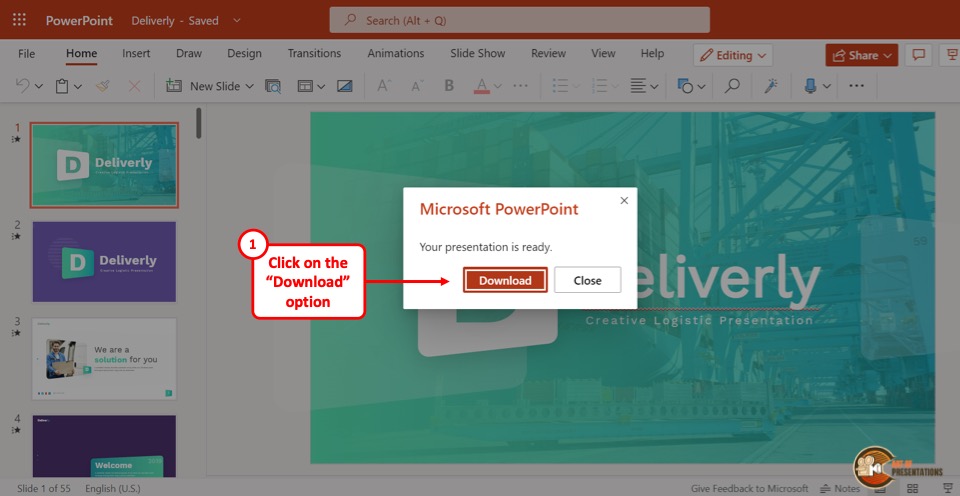
Now all you have to do is click on the “Download” button in the dialog box prompted by Microsoft PowerPoint.
4. How to Save a Copy of PowerPoint Without Notes?
In Microsoft PowerPoint, you can save a copy of the file without the notes.
To do so, you have to first remove the speaker notes, and then use the “Save A Copy” option. Here are 5 quick and easy steps that you can follow in order to save a copy of your PowerPoint file without notes –
In the menu ribbon, click on the “File” tab. Then click on the “Info” option from the “File” menu.
Step-2: Click on “Check for Issues”
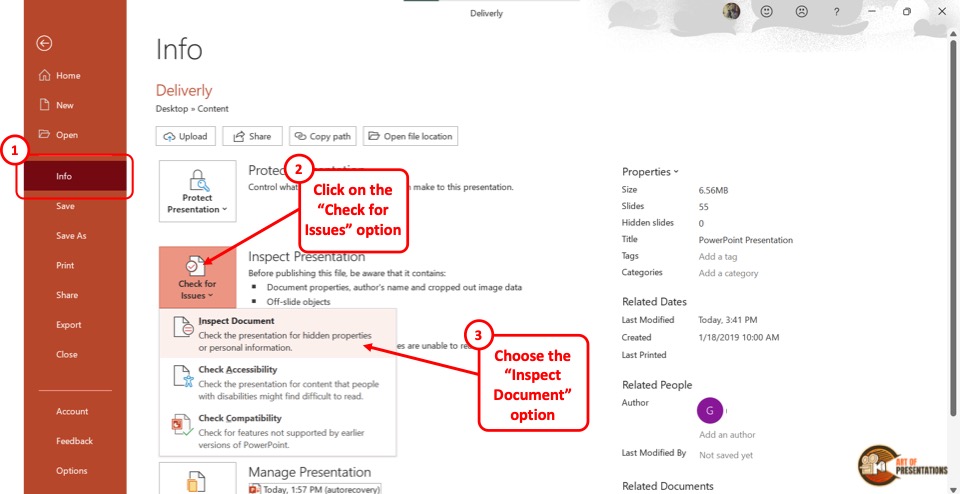
In the “Info” screen, click on the “Check for Issues” button. Then click on the “Inspect Document” option from the dropdown menu. This will prompt a dialog box.
Step-3: Click on the “Inspect” option
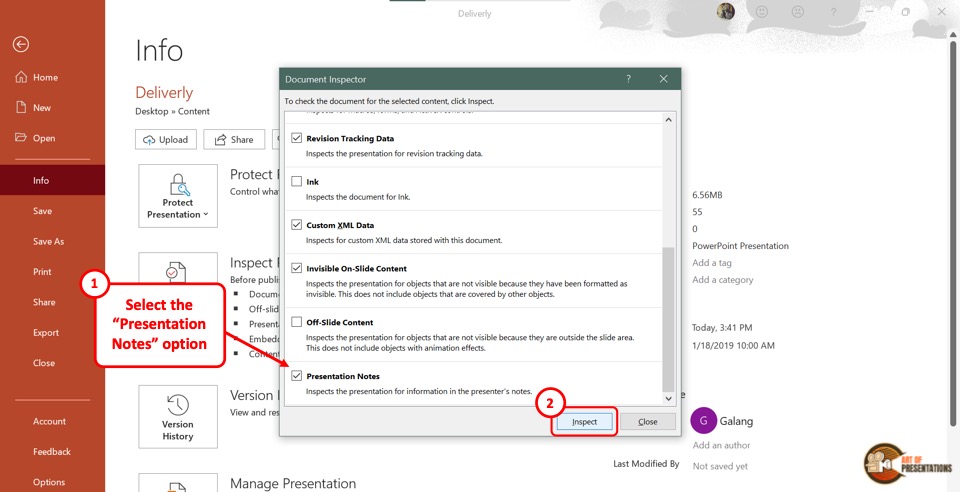
In the “Document Inspector” dialog box, scroll all the way to the bottom and make sure the “Presentation Notes” option is selected. Then click on the “Inspect” button at the bottom of the dialog box.
Step-4: Click on the “Remove All” option
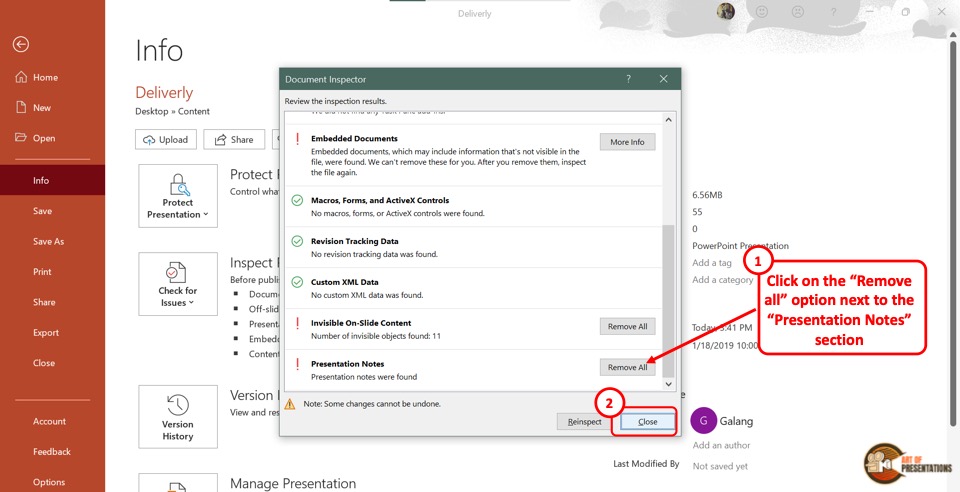
Once the inspection results are shown in the “Document Inspector” dialog, scroll to the bottom again to find the “Presentation Notes” option.
Then click on the “Remove All” button at the right side of the “Presentation Notes” option. Now all you have to do is click on the “Close” button at the bottom of the dialog box to finish the process.
Step-5: Click on the “Save” option
The final step is to click on the “Save A Copy” option in the sidebar of the “File” menu. In the “Save A Copy” screen, click on the “Save” button to save the presentation without notes.
5. How to Create a Copy of an Existing Presentation in a New PowerPoint File?
To create a copy of an existing presentation, you have to first open a new Microsoft PowerPoint file.
Then you can use the “Reuse Slides” feature to copy the existing presentation. The detailed process is explained in the following steps –
Step-1: Click on the “Reuse Slides” button
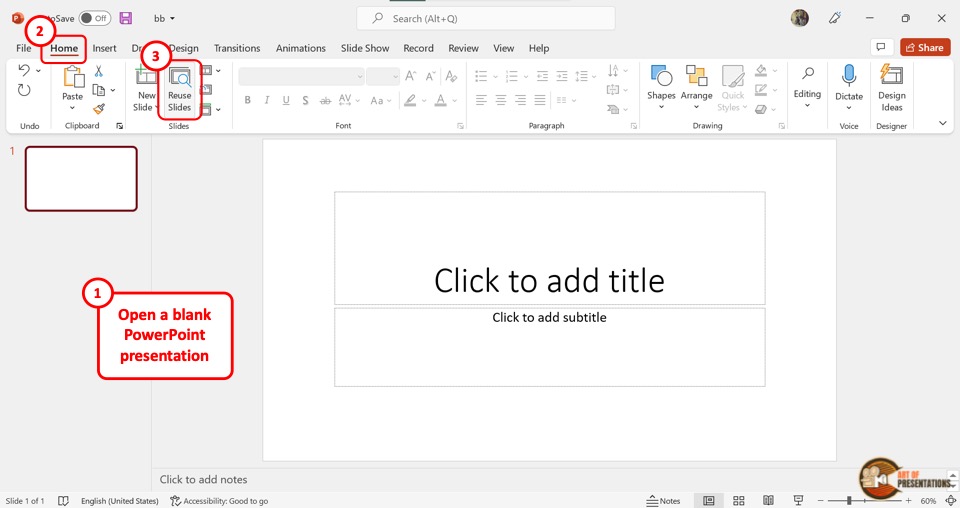
In the new PowerPoint presentation, click on the “Reuse Slides” button. It is located in the “Slides” group of the “Home” menu. This will open a sidebar on the right side of the screen.
Step-2: Click on “Choose Content”
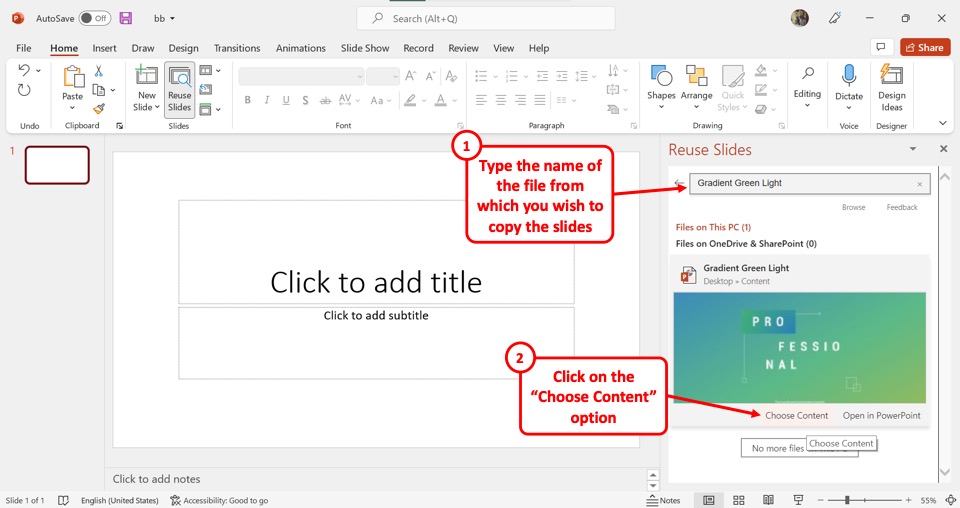
In the “Reuse Slides” sidebar, click on the “Search” box.
Then type in the file name of the presentation which you want to copy. Under the thumbnail of the PowerPoint presentation, click on the “Choose Content” option.
Step-3: Click on the “Insert All” option
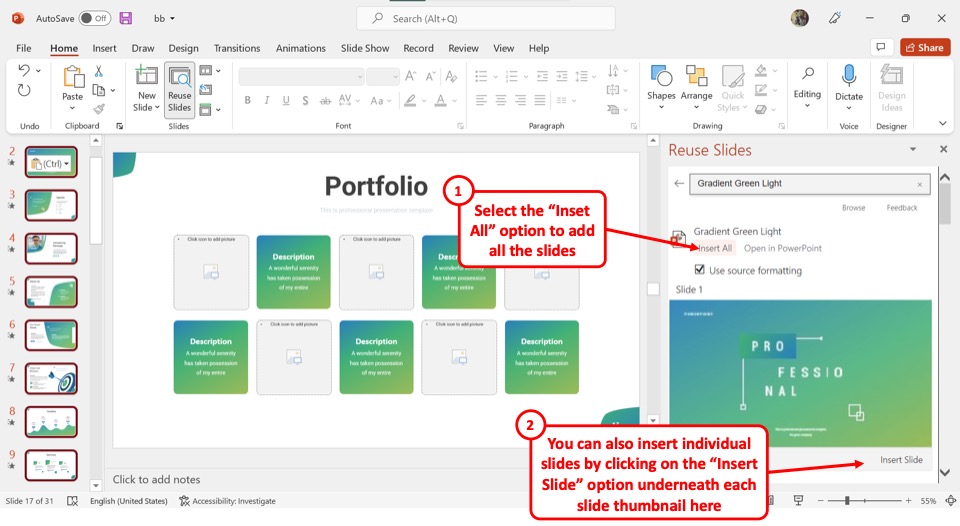
Now all you have to do is click on the “Insert All” option to copy the entire PowerPoint presentation into the new file.
You can also click on the “Insert Slide” option under each slide thumbnail to copy a few selected slides.
6. How to Save a Copy of PowerPoint Presentation in Other Formats?
Microsoft PowerPoint allows you to save a copy of your presentation in multiple file formats. I’ve written an entire article detailing the various formats in which you can save a PowerPoint presentation.
Make sure you check out the other article on “How to Save a PowerPoint Presentation in Multiple Formats” for all the details!
However, in a nutshell, to save a copy of your presentation in other formats, click on the “Save A Copy” option in the “File” menu. In the “Save A Copy” screen, click on the “Save As Type” box which is the second box in the right column.
Now all you have to do is click on your preferred file format from the dropdown menu. For complete details, make sure you check out the article.
Credit to drobotdean (on Freepik) for the featured image of this article (further edited)

Contribute to the Microsoft 365 and Office forum! Click here to learn more 💡
April 9, 2024
Contribute to the Microsoft 365 and Office forum!
Click here to learn more 💡
PowerPoint Forum Top Contributors: Steve Rindsberg - John Korchok - Bob Jones AKA: CyberTaz ✅
May 10, 2024
PowerPoint Forum Top Contributors:
Steve Rindsberg - John Korchok - Bob Jones AKA: CyberTaz ✅
- Search the community and support articles
- Microsoft 365 and Office
- Search Community member
Ask a new question
Pptx: Suddenly the file is Read-Only and Save As doesn't work
I'll be working on a file in PowerPoint 2016, saving frequently until suddenly the file claims it can't be saved because it is read only. Dialogue box gives option to keep changes via Save As.
Save As, however, doesn't work:
I will go through the steps, enter a new file name, a new file location, anything I can think of including saving to a flash drive, but without results. The worst part is, I don't receive an error message after attempting to save the file in a new location with a new name, the dialogue simply closes as if it completed: there is no new file created. The file name in PowerPoint doesn't change, navigating to the save location via windows explorer shows that the new file is not present.
So far, the only way to save my work is to open a new presentation, copy all the slides over and save that file. This wouldn't be such a pain if I could copy the outline along with the slides.
I have tried repairing office install but the issue persists.
Report abuse
Reported content has been submitted
Replies (151)
* Please try a lower page number.
* Please enter only numbers.
I would like to know the file size of the problem file.
Was there any updates installed.
Is the computer connected to a domain network?
Let us open a new PowerPoint document, click on file----open -----browse to the location where the problem document is located and open and check.
Let us also check if the document is marked as final. If yes then unlock a document that’s marked as final to make it writable again.
To do that open the problem document, click on file---info---protect presentation---mark as final.
Hope this information helps you. Please let us know if you need additional information.
13 people found this reply helpful
Was this reply helpful? Yes No
Sorry this didn't help.
Great! Thanks for your feedback.
How satisfied are you with this reply?
Thanks for your feedback, it helps us improve the site.
Thanks for your feedback.
No updates installed during editing: Computer was reformatted and brought fully up to date last month, no updates since.
Computer is sometimes connected to a domain network: this problem happens when online and offline. File is not shared and is stored locally.
File will open with as read only from new window.
Document is not marked as final. Not sure how it would suddenly become marked as final while I'm working on it but I double checked.
1 person found this reply helpful
- Microsoft Agent |
Thanks for posting about this issue. We are aware of it and plan to fix it in a future release. When we do, we'll update this thread with information about how to obtain the fix.
In the meantime, you can work around this issue by checking the file out of SharePoint before trying to open it in PowerPoint.
-Erik, Office Newsroom
2 people found this reply helpful
This issue is now fixed in build 16.0.6965.2082 and later. To get the latest updates, click File > Account > Update Options > Update Now .
7 people found this reply helpful
Hi Erik and others from MS team,
I started facing the exact same issue - that Powerpoint reports .PPTX file is read only and doesn't even allow to save with a new name - since 13th April, 2017 and a prior day before, everything was working fine.
I am on version 16.0.6965.2105 (which Powerpoint reports is the latest version), and have tried repairing (both quick and detailed one), re-installing Office 3565 ProPlus, restarting Windows, using Attrib command to change the attributes of files and folders, but nothing has helped so far. I have lost close to 12-15 hours in trying to resolve the issue!
I am able to create a new file, especially .PPT, but cannot edit my existing files (.PPTX). Copying a .PPTX file in Explorer and using the new file too doesn't help either. The only work around have found is that I create a blank presentation, delete the default slide, and copy over all the slides from existing PPTX, paste it in the blank presentation and save it, which is too archaic!
Can someone point a permanent solution/fix to it?
Hi all, This issue is now fixed in build 16.0.6965.2082 and later. To get the latest updates, click File > Account > Update Options > Update Now . Best, -Erik, Office Newsroom
5 people found this reply helpful
same problem here (Powerpoint2016 up to date in new installation)
somebody have find the solution ?
same issue, cannot solve it even with the update.
anyone with knowledge on how to solve it ?
4 people found this reply helpful
it's January 2018, with frequent update on Mircrosoft and the problem is still not fixed!!!
The same read-only box appears. I have to save as in order to save the work. Yet, when I open the new file that I have just saved as, all the pictures/photos cannot be seen. Where the photos are supposed to appear, there are error boxes.
This is really really annoying and time-consuming. Mircrosoft PLEASE HELP!
17 people found this reply helpful
47 people found this reply helpful
11 people found this reply helpful
Question Info
- Windows other
- Office 2016
- Norsk Bokmål
- Ελληνικά
- Русский
- עברית
- العربية
- ไทย
- 한국어
- 中文(简体)
- 中文(繁體)
- 日本語
- PRO Courses Guides New Tech Help Pro Expert Videos About wikiHow Pro Upgrade Sign In
- EXPLORE Tech Help Pro About Us Random Article Quizzes Request a New Article Community Dashboard This Or That Game Popular Categories Arts and Entertainment Artwork Books Movies Computers and Electronics Computers Phone Skills Technology Hacks Health Men's Health Mental Health Women's Health Relationships Dating Love Relationship Issues Hobbies and Crafts Crafts Drawing Games Education & Communication Communication Skills Personal Development Studying Personal Care and Style Fashion Hair Care Personal Hygiene Youth Personal Care School Stuff Dating All Categories Arts and Entertainment Finance and Business Home and Garden Relationship Quizzes Cars & Other Vehicles Food and Entertaining Personal Care and Style Sports and Fitness Computers and Electronics Health Pets and Animals Travel Education & Communication Hobbies and Crafts Philosophy and Religion Work World Family Life Holidays and Traditions Relationships Youth
- Browse Articles
- Learn Something New
- Quizzes Hot
- This Or That Game
- Train Your Brain
- Explore More
- Support wikiHow
- About wikiHow
- Log in / Sign up
- Computers and Electronics
- Presentation Software
- PowerPoint Presentations
How to Save a PowerPoint Presentation
Last Updated: May 26, 2022
wikiHow is a “wiki,” similar to Wikipedia, which means that many of our articles are co-written by multiple authors. To create this article, volunteer authors worked to edit and improve it over time. This article has been viewed 51,601 times. Learn more...
A PowerPoint presentation is an excellent way of presenting information or ideas to an audience. The software is easy to use and offers a lot of cool effects for your slideshows, too. But, what's all the use of this if you don't even know how to save your finished PowerPoint? This wikiHow will teach you how to save your file.
Design your PowerPoint presentation.

- You don't have to wait until you're totally finished to save your work. It can help to save along the way, too, to ensure you don't lose any progress.
Open the File menu when you're ready to save.

Choose the Save or Save As option.

Decide where to save the presentation.

Name and save your presentation.

Expert Q&A
You might also like.

About This Article
- Send fan mail to authors
Is this article up to date?

Featured Articles

Trending Articles

Watch Articles

- Terms of Use
- Privacy Policy
- Do Not Sell or Share My Info
- Not Selling Info
wikiHow Tech Help:
Tech troubles got you down? We've got the tips you need
IMAGES
VIDEO
COMMENTS
Make a slide show that starts automatically when opened. Select File > Save as (or Save a Copy ). Click More options. Browse to the folder where you want to save your presentation. In the File name box, type a name for your presentation. Under Save as type, select PowerPoint Show. The file is saved as a .ppsx file.
It's by no means un-editable. Open the presentation that you want to make read-only, then click the "File" tab. Next, in the left-hand pane, select "Info." You'll now see a "Protect Presentation" section, which lets you (to an extent) protect against any editing of your presentation. Click "Protect Presentation."
If so, we'd suggest you save presentation file as .ppsx type file, if you are using PowerPoint in Windows, we'd suggest you go to PowerPoint File > Save as > Click More Options > select PowerPoint Show under Save as type, the file is saved as a .ppsx file. When the file is double-clicked, it opens as a slide show.
4] Select Always Open Read-Only. In order to set your presentation to Read-Only, you must click on Always Open Read-Only from the dropdown menu, and right away, the changes will take effect. Now ...
To Save a PowerPoint Presentation as a PowerPoint Show: Choose the File tab. Select Save As. Pick the Save as type as PowerPoint Show. Type a name for your slide show in the File name text box (you can use the same name and location as your .pptx/presentation file) and click Save. Your PowerPoint slide show file is saved with a .ppsx extension.
This http://OneMinuteGeek.com video tutorial shows you how to save your PowerPoint presentations as an automatic slideshow when you open the file. Visit http...
Open the desired PowerPoint presentation, and click on the " File " tab. Next, click on the " Info " tab from the options presented on the left part of the screen. Select the " Protect Presentation " option. From the dropdown, select " Always Open Read-Only ". Finally, save the file by pressing Ctrl+S.
To save the PowerPoint presentation as a PDF file, follow the 4 easy steps. Step-1: Click on the "File" Tab. First, click on the " File " tab in PowerPoint to open the back stage view of PowerPoint. Step 2 - Click on the "Save As" option. In the menu ribbon located at the top of the screen, click on the "File" tab.
-In today's tutorial, we will teach you how to save PowerPoint as read only.Open PowerPoint presentation you need. Click on ´File´ at the top left corner of ...
Open the File in PowerPoint. Open PowerPoint. Select File > Open and locate the show file with the .ppsx extension on your computer. Edit the presentation as usual in PowerPoint. Go to File . Select Save As . In the Save As Type box, choose PowerPoint Presentation (.*pptx) to save the file as a regular working presentation file.
A PPT shows the slides and the work that can be done on the presentation. By saving as a PPS (PowerPoint Show), when you double-click it, it will auto launch into the show mode. It makes it look ...
Save your presentation in an earlier version of PowerPoint. In newer versions, you can save files to an earlier version of PowerPoint by selecting the version from the Save as type list in the Save As box. For example, you can save your PowerPoint presentation in the newest PowerPoint Presentation format (.pptx), or as a PowerPoint 97-2003 Presentation (.ppt).
To make a PowerPoint Presentation read-only: Open your Powerpoint presentation. Choose File at the top left. Select Info on the bar on the left. Click Protect Presentation. In the pull-down menu ...
In PowerPoint for the web, click the Share tab. Under Share, click Get a link. Under View only, click Create. Tip: Click Shorten to decrease the length of the URL that you share with others. Right-click the URL and click Copy. Under Share, click Send email. Enter the email address in the To box. Paste the URL in the message box, and click Share.
Learn how to send Microsoft PowerPoint in Presentation ModeFollow our presenters/host on Twitter: https://twitter.com/educatoralexHIT THE RED SUBSCRIBE BUTTO...
Click the File tab to access Backstage view. Click Export, then choose the desired option. In our example, we'll select Change File Type. Select a file type, then click Save As. The Save As dialog box will appear. Select the location where you want to export the presentation, type a file name, then click Save.
In the Seconds spent on each slide box, select the default time you want to spend on each slide. Select Create Video. Enter a file name and then browse to the location you want to save your video. In the Save As type box, select if you want to save the video as a MPEG-4 Video or Windows Media Video. Tip: The MPEG-4 Video format is recommended ...
To save a copy of a PowerPoint presentation on your desktop, follow the 3 simple steps. Step-1: Click on the "File" tab. The first step is to click on the "File" tab. It is located on the left corner of the menu ribbon at the top of the screen. This will open the "File" menu. Step-2: Click on the "Save A Copy" option.
In this Microsoft PowerPoint 2019 tutorial you are going to learn how to export and save a specific single Slide of your presentation in a file, so your sele...
The file name in PowerPoint doesn't change, navigating to the save location via windows explorer shows that the new file is not present. So far, the only way to save my work is to open a new presentation, copy all the slides over and save that file. This wouldn't be such a pain if I could copy the outline along with the slides.
Choose the Save or Save As option. Download Article. Click Save to save to the current file, or Save as to create a new file. If you've already saved the file at some point, you'll have the option to click Save, which simply saves your changes to that file. Otherwise, choose Save as to create a brand new file. 4.