April 12, 2024

How to play PowerPoint slides automatically without clicking
Wondering how to make PowerPoint play automatically? We’ll guide you through the process and also show you how Plus AI can help you create the content for your slideshow

Are you setting up a slideshow at a convention or trade show, or maybe in a conference room or waiting area? You can easily set up a Microsoft PowerPoint slideshow to run automatically without a speaker at all. This lets you present your product, service, or company mission to a broad audience without manual intervention.
Here’s how to play PowerPoint slides automatically without clicking to advance through the show as well as how Plus AI can save you time on editing or creating the content.
Set up the slide timings or transitions
Before you set your presentation to play on its own, you’ll want to decide on the timings for your slides.
This allows you to display each slide for a specific amount of time before advancing to the next and is especially important if you use effects for your slides.
For both of the settings below, go to the Slide Show tab and check the box for Use Timings in the Set Up section.

Slide timings
With slide timings, you rehearse and record the timings for all slides. Simply move through the slideshow at a normal pace, use the control to advance to each effect and slide, and save the recorded timings when you finish.
- Go to the Slide Show tab and select Rehearse Timings .

- When the slideshow show begins, stay on the first slide for the amount of time you want and click the Next arrow in the Rehearsal toolbar to advance.

- If necessary, you can use the Rehearsal toolbar to Pause , Play , or Repeat the recording as it progresses.

- At the end of the presentation, press Esc (Escape key) and you’ll see a message letting you know the total duration of the slideshow. To save the recorded timings, click Yes .

You can review the timing for each slide by going to the View tab and choosing Slide Sorter .

When you set up your presentation to play automatically as described below, your slides advance per the timings you recorded.
Slide transitions
Another way to automatically choose the slide advance timings is using the Transitions tab. If you apply slide transitions to enhance the appearance of your presentation , this is a good option. However, you can choose None if you want to advance the slides without an effect between them.
- Select your first slide and go to the Transitions tab.
- Optionally choose an effect in the Transition to This Slide box and set the Duration for the transition to the right. You can enter a number in seconds or use the arrows to move up or down in small increments.

- In the Advance Slide group, uncheck the box for On Mouse Click and check the box for After . Then, enter the seconds for advancing to the next slide to the right.

- Repeat these steps for each slide in the presentation or choose Apply to All .
When you set up your presentation to play automatically as described next, you’ll see your slides advance for the “After” time you entered.
Note : Recording the Slide Timings overrides the Slide Transition “After” settings. If you want to use both, record the timings first and then change the “After” timing for the selected slides.
Make PowerPoint play automatically
Once your slide timings are in place, you can easily set up your PowerPoint presentation to run automatically. Whether you’re revealing a new product or providing an instructional slideshow, you can benefit from this PowerPoint feature.
Tip : New product, new company? Look at these helpful productivity apps for startups .
Open your slideshow in PowerPoint on Windows or Mac and follow these steps to set up automatic play.
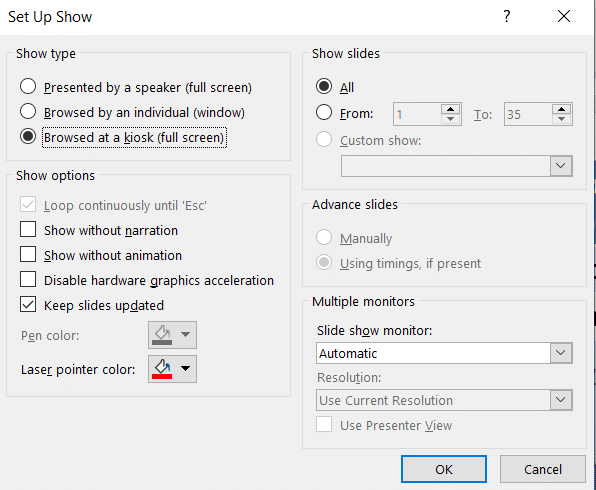
- Go to the Slide Show tab and select Set Up Slide Show .

- In the pop-up window, mark Browsed at a kiosk in the Show type section. This automatically loops the slideshow for continuous play and only stops when you press Esc .

- Show options : Check the boxes for those settings you want to use. Note that the Loop setting is marked by default for this Show Type.
- Show slides : Choose all slides, specific slides, or a custom slide show.
- Advance slides : Using Timings is selected by default when you check the box described earlier and works with those timings you set.
- Multiple monitors : Choose the Slide Show Monitor and Resolution (Windows).
- Click OK when you finish.

Edit slides with ease using Plus AI
When you create a self-running presentation, you have to be sure that your slides can speak for themselves. This might require you to adjust the text for clarity or shorten lengthy paragraphs or sentences. Luckily, Plus AI can help you make these types of changes almost effortlessly.
If you are looking at AI presentation makers to speed up your presentation workflow, check out Plus AI. Plus is an add-on that intelligently composes content, arranges slide elements, and more. Once you create or edit a presentation with Plus AI, you can download it as a PowerPoint slideshow and set up autoplay as described above.
Along with rewriting slide content, you can use Plus AI to remix slides for different layouts and create custom designs that you can reuse for future presentations. If you need help from the get-go, you can create slideshows from scratch with attractive templates, custom instructions, and even PDF uploads .
When you can’t be there to walk your audience through the show, you don’t have to postpone or reschedule it; just set it up to play automatically. If that’s not what you need, you can also create informative or entertaining PowerPoint slideshows for patients in a waiting room or meeting attendees who arrive early.
Now that you know how to play a slideshow in PowerPoint automatically, look at how to convert PowerPoint to Google Slides and take advantage of Plus AI.

Latest posts
Latest post.

Why Chatbots Aren’t Working
Four reasons chatbots are not the right interface for AI
20 Best Pitch Deck Examples for Startups (And Why They Work)
If the thought of creating a pitch deck makes you nervous, you’re not alone. In this article, I’ll share 20 examples of early pitch decks from successful startups that have raised billions of dollars.

How to use ChatGPT to create PowerPoint presentations
Step-by-step guide to using AI tools to create presentations. Looking for ChatGPT for PowerPoint? Here's a guide to using AI in PowerPoint and Google Slides
More resources

How to end a presentation
Not quite sure how to wrap up your slideshow? We’ll explain what you need to successfully end your presentation along with a tool for creating the slides.

How to start a presentation
Looking for a good way to start a presentation? We’ll walk you through several types of example openings you can use to get your audience’s attention.

How to convert YouTube to PowerPoint
Have a video that would make the perfect presentation? We’ll show you how to convert YouTube video content to PowerPoint a couple different ways using Plus AI.

Start a presentation automatically with a PowerPoint Show
If you’re sending your PowerPoint presentation to colleagues or friends, or if you're running it in a booth or kiosk, you might want people to immediately watch your presentation as a slide show instead of seeing the slides in edit mode. Save your PowerPoint presentation as a PowerPoint Show (a .ppsx file) so it automatically starts the slide show when the file is opened.
Make a slide show that starts automatically when opened
Select File > Save as (or Save a Copy ).
Click More options .
Browse to the folder where you want to save your presentation.
In the File name box, type a name for your presentation.
Under Save as type , select PowerPoint Show .

The file is saved as a .ppsx file. When the file is double-clicked, it opens as a slide show.
Edit a .ppsx file
In PowerPoint, click File > Open .
Browse to the .ppsx file, and open it.
Saving a presentation as a PowerPoint Show (.ppsx file) isn't available in PowerPoint for the web.
To start a slide show in PowerPoint for the web , open the file, and on the Slide Show tab of the ribbon, select Play from Beginning .

(If you've turned off the Simplified Ribbon, you don't have a Slide Show tab; instead use the View tab to start Presenter Coach.)
For more details on running a slide show, see Present your slide show in PowerPoint for the web .
Set the speed and timing of transitions
Create a self-running presentation
Record a slide show with narration and slide timings
Turn your presentation into a video

Need more help?
Want more options.
Explore subscription benefits, browse training courses, learn how to secure your device, and more.

Microsoft 365 subscription benefits

Microsoft 365 training

Microsoft security

Accessibility center
Communities help you ask and answer questions, give feedback, and hear from experts with rich knowledge.

Ask the Microsoft Community

Microsoft Tech Community

Windows Insiders
Microsoft 365 Insiders
Was this information helpful?
Thank you for your feedback.
How to Use Autoplay in a PowerPoint Presentation
So you can snooze off more easier
When you must give a presentation at work, Microsoft PowerPoint is the standard tool most people use. However, without some creativity, PowerPoint presentations can end up dull. Learning how to autoplay PowerPoint slides can add some spice to your presentations.
In this article, you’ll learn how to autoplay content in PowerPoint slides. You can automatically play an embedded video when a slide appears or autoplay animations. Finally, you can create a self-running presentation that moves through the next slide using specific timing that you’ve set up and even loop the presentation for continuous play.
Note : The following tips will work on PowerPoint, whether running on a Windows or a Mac computer.

How to Create a Self-Running PowerPoint Presentation
Why create a self-running PowerPoint presentation? You may not want to get distracted by clicking to move your presentation to the next slide. Or you’d like to set up your presentation on a kiosk at a convention. Some presentations that can run themselves may not even need a speaker.
Set Up the Slide Show
By default, PowerPoint presentations are configured to run as “Presented by a speaker”, where you have to click through each slide to trigger transitions throughout the presentation.
To set up Autoplay, first configure the presentation to autoplay how you would like.
- Select Slide Show tab from the menu, then select Set Up Slide Show from the ribbon.

- Use the options on the pop-up window to configure how your presentation will behave during autoplay.

Here’s how each option works:
- Presented by a speaker : The speaker must click through each slide using the mouse click. However, automatic slide timing is still an option if you select it on the right.
- Browsed by an individual : The viewer will need to press Play to start the presentation, but after that, it’ll play on its own.
- Browsed at a kiosk : This option will continue to loop through the presentation until you press the Esc key on the keyboard. This will automatically enable the Loop Continuously option at the bottom of the window.
Rehearse and Set Slide Times
The next step is to set up the slide timing and rehearse your presentation to ensure the time spent automatically on each slide is appropriate.
Using this rehearsal option is also a great way to practice your presentation and ensure that the overall runtime is within your limitations.
To do this:
- Select Slide Show from the menu and choose Rehearse Timings from the ribbon.

- This will start the “Recording” session. In this mode, you’ll need to speak normally using the script you will use during your presentation. When done speaking on a specific slide, select the “Next” arrow to continue to the next slide.
Note : Use the “Pause” button to pause the time for the current slide if you need to collect your thoughts or take a break for any reason. This small window will also show you the overall time for your entire presentation.

- Continue to do this through all of the slides. Finally, press the “x” at the upper right corner to finish recording on the last slide. You’ll see a pop-up message asking if you’d like to save your new slide timings.

Once you’ve saved these changes, your PowerPoint presentation is ready to use. If you’ve kept the default Presented by a speaker setting and enabled the Using timings, if present select under “Advance Slides,” you can start your presentation manually and then let slides advance automatically as you speak.
Record Slide Show (Fully Automated)
If you want to create a fully self-running presentation for a kiosk or send people to run themselves, select the correct option in the “Set Up Show” window described above.
Then, record your presentation by selecting Slide Show from the menu and selecting Record in the ribbon. Next, select From Beginning in the drop-down menu to start recording your presentation in full screen from the first slide.

You can skip this step if you don’t want to record your voice narrating the slideshow. Just make sure you’ve enabled the Show without narration check box in the Set Up Show window.
How to Embed and Autoplay a Video
Another thing you can automate in your PowerPoint presentations is triggering an embedded video file when you click on the slide where you’ve placed it.
In the editing view, right click the video you want to automate and select the down arrow to the right of the Start button.

Select Automatically from the dropdown menu.

Save the PowerPoint presentation. Now, it’ll start playing automatically when you advance to the slide with your embedded video while in presenter view.
Should You Use a Self-Running PowerPoint Presentation?
The option to have your PowerPoint slide show advance automatically can be handy. However, it isn’t always the right approach. For example, a complete, recorded presentation is great if you’re emailing your presentation or offering a download. But a self-running presentation could backfire if you’re drawn into a side conversation or have other things you want to say on the fly. As a result, you may find yourself fumbling to pause your presentation.
If you want more control over your presentation flow, sticking with a manually run presentation might be best for your situation.

Ryan has been writing how-to and other technology-based articles online since 2007. He has a BSc degree in Electrical Engineering and he's worked 13 years in automation engineering, 5 years in IT, and now is an Apps Engineer. Read Ryan's Full Bio
Read More Posts:

Our Recommendations
- Best Small Business Loans for 2024
- Businessloans.com Review
- Biz2Credit Review
- SBG Funding Review
- Rapid Finance Review
- 26 Great Business Ideas for Entrepreneurs
- Startup Costs: How Much Cash Will You Need?
- How to Get a Bank Loan for Your Small Business
- Articles of Incorporation: What New Business Owners Should Know
- How to Choose the Best Legal Structure for Your Business
Small Business Resources
- Business Ideas
- Business Plans
- Startup Basics
- Startup Funding
- Franchising
- Success Stories
- Entrepreneurs
- The Best Credit Card Processors of 2024
- Clover Credit Card Processing Review
- Merchant One Review
- Stax Review
- How to Conduct a Market Analysis for Your Business
- Local Marketing Strategies for Success
- Tips for Hiring a Marketing Company
- Benefits of CRM Systems
- 10 Employee Recruitment Strategies for Success
- Sales & Marketing
- Social Media
- Best Business Phone Systems of 2024
- The Best PEOs of 2024
- RingCentral Review
- Nextiva Review
- Ooma Review
- Guide to Developing a Training Program for New Employees
- How Does 401(k) Matching Work for Employers?
- Why You Need to Create a Fantastic Workplace Culture
- 16 Cool Job Perks That Keep Employees Happy
- 7 Project Management Styles
- Women in Business
- Personal Growth
- Best Accounting Software and Invoice Generators of 2024
- Best Payroll Services for 2024
- Best POS Systems for 2024
- Best CRM Software of 2024
- Best Call Centers and Answering Services for Busineses for 2024
- Salesforce vs. HubSpot: Which CRM Is Right for Your Business?
- Rippling vs Gusto: An In-Depth Comparison
- RingCentral vs. Ooma Comparison
- Choosing a Business Phone System: A Buyer’s Guide
- Equipment Leasing: A Guide for Business Owners
- HR Solutions
- Financial Solutions
- Marketing Solutions
- Security Solutions
- Retail Solutions
- SMB Solutions
How to Create an Auto-Playing PowerPoint Presentation
Self-running presentations work great at conferences and conventions. Here's how to set one up.

Table of Contents
Creating a self-running PowerPoint, as Microsoft calls it, can be a great addition to your company’s booth at conventions or industry-wide conferences. By featuring photos, infographics and key points in a continuous loop, PowerPoint becomes an effective communication tool to inform others about your company, its goals, and your products or services.
Auto-playing presentations are also great for employee training, meetings where the speaker is absent, and reaching remote clients or customers. Microsoft provides easy steps to turn your PowerPoint into an autoplay presentation.
Setting up the presentation
There are several options for creating a PowerPoint presentation automatically. All of these can be accessed under the Slide Show tab.
Slide Show > Set Up Slide Show
There are three options under this menu:
- Presented by a speaker : This first option requires the viewer to click through each slide. This is the default setting that most PowerPoint presentations are already in and is the mode with which you’re likely most familiar.
- Browsed by an individual : This option will create a slideshow where the viewer cannot control when slides advance. This is an autoplay feature, but the viewer will still have to hit Play to get it started.
- Browsed at a kiosk . Once selected, this option will loop the slide show until a viewer presses the escape button.
If you don’t want your viewers to have access to when the slideshow starts and stops, select the third option. The Loop Continuously option underneath will be automatically selected.
Recording slide timing
Before you begin recording your presentation, it’s important to set the slide time using the rehearsal toolbar. This will give you an idea of how long each slide will run before advancing to the next one. It will also allow you to practice your presentation and understand how long the runtime will be. Like setting up the slide show, this window can be accessed via the Slide Show tab.
Slide Show > Rehearse Timings
The recording window allows users to advance to the next slide, pause the presentation, view the current slide’s time, restart the recording for a slide and view the total runtime of the presentation.
After recording the last slide, PowerPoint will ask whether you want to keep the slide timings or not.
Recording your presentation
Once your slide timings are set, you can record your slide show.
Navigate to Slide Show > Record Slide Show to begin your recording. Click End Show and save your file once you are done recording. After saving, your presentation is ready to be sent to clients, customers or played at your convention or conference booth.
Here are some quick tips to check for before recording your presentation:
- Before beginning your recording, make sure you adjust the Play Narrations and the Use Timings checkboxes.
- If you want all narration and slide transitions included, both boxes should be checked.
- To create a silent sequence of slides, make sure the Play Narrations button is deselected.
What is PowerPoint autoplay?
Autoplay allows you to keep a PowerPoint presentation running. In typical PowerPoint presentations, presenters click from slide to slide manually using a clicker or spacebar on a keyboard.
Luckily, PowerPoint autoplay allows users to set up their slides, so they automatically change. That way, they can focus on their presentation without interruptions. There are options to have slides timed to music or voiceovers and make each slide the same length.
Why is PowerPoint autoplay beneficial?
Autoplay is great for several uses, from delivering announcements throughout a company’s office or a school, to giving speeches and presentations at conventions or work. Presenters can rehearse the timings of the slides and then present without worry. Here are some of the reasons why someone may use PowerPoint’s autoplay features:
- Rehearsal . Practicing your presentation involves timing, and autoplay can be a great tool for learning how to fill time or keeping it short. For example, many teachers and professors require presentations to fill a certain amount of time for class projects. While rehearsing timings, users can determine how much time to spend on each slide. This keeps presenters on track during their presentations, even when they want to speed up due to nerves or pressure.
- Convention booths and exhibits. Trade shows , conventions and networking events are great for companies and salespeople who want to showcase a variety of products and services. People who walk by can look at the presentation and not have to ask employees for information. In addition, a good PowerPoint presentation with eye-catching visuals and information can attract potential customers and clients, which could turn into sales.
- Music videos and tribute presentations. Whether it is a presentation of family vacation photos to the soundtrack of the summer or a lyric video to your favorite song, autoplay allows users to create appealing presentations and videos. These could even be downloaded into MP4 files to share with family and friends.
- Replay and loop at events or other occasions. This is great for offices that have a slideshow of information for their clients or patients. They can show a variety of pictures, information about services, and even the company’s latest news and contact information. Because of this, employees can set up the presentation, walk away and know that their announcements are being made public without even saying a word.

Building Better Businesses
Insights on business strategy and culture, right to your inbox. Part of the business.com network.
Search for: Search Button
Make a self-running or kiosk display in PowerPoint
PowerPoint can show slides on a screen as a high-tech signboard, using a self-running presentation known as Kiosk display. Here’s how to do it plus all the settings and tricks available.
We’ve all seen screens displaying information on a series of slides – maybe in a shop or conference. Maybe as a prelude or postscript to a presentation. These days it’s easy to setup a laptop with an external screen almost anywhere to make a high-tech signboard.
At a party or celebration you can use Powerpoint to display photos (with or without captions) of the guest of honor.
There’s various ways to do it but the main one is PowerPoint. Many of us have PowerPoint but never use it because we think of it as being for speeches. In fact there’s plenty of other uses.
PowerPoint Kiosk mode
At its basic level, PowerPoint’s Kiosk mode is merely a different way to display a presentation. Instead of clicking to move between slides, PowerPoint will automatically display the slides going in an infinite loop … until someone presses Escape.
Go to the Slide Show tab, Set up Slide Show … it’s a PowerPoint dialog that hasn’t changed for many years/versions.
Choose ‘ Browsed at a kiosk (full screen) ‘ and click OK.
That’s as far as most people go in explaining Kiosk mode but, as usual with Office, there’s a lot more going on and Office-Watch.com is here to help.
Browsed by Individual
The Browsed by individual (window) option lets someone use a mouse or keyboard to move through the slides at their own pace. In this case the slides can change automatically (if no human intervention) or only when asked – see the Advance slide options on the Set Up Show dialog.
To make the self-guided presentation more accessible, you should add action buttons (forward / back etc) to the slide master so the buttons appear on all slides. Make the mouse available to users and they can click to their heart’s content.
Show without narration
PowerPoint presentations can have an audio track or narration included. This option lets you let that audio be heard as the slides progress or not. The default is for the narration to be heard (i.e selection unchecked).
Show without animation
Slides can have animations or motions on them – for example bullet points appearing one by one. Check this box if you don’t want the animations – in other words, the slide appears all at once.
Disable hardware graphics acceleration
Usually you’d leave this off, but if there are problems with the display this might help.
Show slides
Show all the slides or just a range from a larger presentation.
Advance slides
In kiosk mode, PowerPoint lets each slide appear for a few seconds unless there’s a slide timing set (at Transitions | Timing | Advance slide | After:
Multiple Monitors
Very useful if you have a second monitor. Use the pull down list to select the screen to display the presentation.
Why won’t the slide/s move?
If your kiosk presentation is stuck on a slide, or the first slide, make sure the Advance Slide timing is set higher than zero at Transitions | Timing | Advance slide | After:
After setting a value (in seconds) click Apply to All to set that as the default display time for all slides.
Sometimes the Advance Slide After: value is set to zero. If that happens PowerPoint will obey the zero timing set and never move past that slide, even though it makes no sense in Kiosk mode.
How to wait longer or shorter on one slide
Some slides deserve more time to read while others you might want to whizz by. After setting the default timing (see ‘Why won’t the slides move?’) go to individual slides and change the Transitions | Timing | Advance slide | After: for that slide only.
You can also select multiple slides from the slide sorter and apply a timing to all the selected slides in one go.
Starting Kiosk Mode
To start a kiosk presentation, just click the Slide Show | From Beginning or From Current Slide buttons.
Stopping Kiosk Mode
Stopping the presentation by just pressing the Escape button. If you don’t want people to do that, hide the keyboard out of sight.
Blocking the ESCape route
There’s always some smartie who will try to bypass the automatic presentation and get access to an unattended computer. To make things more difficult for them, use the No ESCape add-in for PowerPoint 2000-2007. This will disable the Escape key option in Powerpoint. We’ve not found an equivalent for PowerPoint 2010 and beyond.
If you use this add-in make sure you add your own escape route. Add an invisible shape to a slide (probably the last) with the on click action set to End show.
Self running presentation packages
Another option is to create a self-contained PowerPoint Show (.ppsx) that can be run on another computer without additional software.
Simple Self-running Presentations
The simplest self-running presentations are just a collection of photos . You can add captions or headings if you like or just put each photo, full size, on a slide.
A new Kiosk presentation
Aside from the setup mentioned above, there’s nothing special about presentation used in kiosk mode.
You can make a presentation that has just photos – a traditional photo album on the screen. It can be a point of discussion or derision at a party or meeting.
Below is the step-by-step to make a presentation with photos, or … you can use the easy way … PowerPoint Photo Album .
Choose a background color (probably black or white) at Design | Customize | Format Backround. The background is necessary because some images won’t be the same proportions as the screen, leaving edges where the background will appear.
Change the slide layout to one that suit you. For full screen photos, choose ‘Blank’ layout.
Then add your photos. On each new slide click Insert | Picture then adjust the image to fit the slide.
There are ‘photo only’ presentation software programs out there, just search for then. Some have the advantage of working with all the photos in a nominated folder. It’s easy to change the presentation by simply changing the images in that folder. At a pinch, a photo screen saver can be used.
Videos in PowerPoint Kiosk mode
PowerPoint Photo Album
About this author

Office-Watch.com
Office 2021 - all you need to know . Facts & prices for the new Microsoft Office. Do you need it? Office LTSC is the enterprise licence version of Office 2021.
Office 2024 what's known so far plus educated guesses. Microsoft Office upcoming support end date checklist.
Latest from Office Watch
- HUGE news - Excel gets Regular Expression functions
- Surprise! Microsoft recommends Windows 11
- Goggles 🥽 emoji in Word, Excel, PowerPoint and Outlook
- Beware the unexpected when copying an image from Word/Office
- How to make a Gantt Chart in Excel
- A $125 Billion lesson in why cloud backups are vital
- How Word pastes into your document
- Make monsters and pipes with the Terantopia font
- Avoid the traps when adding Excel info into a Word document
- Circle & Sphere calculations in Excel using Pi 𝜋
- How to list all fonts in a Word document
- Face with rolling eyes 🙄 emoji in Word, Outlook, Office
- Glasses 👓 emoji in Word, Excel, PowerPoint and Outlook
- Calendar extras added to new Outlook
- Changes to PDFs made by Microsoft Office
- It's official - Calibri beats Aptos in font poll
- Vmware Workstation Pro is now free
- A quiet month of security fixes for Microsoft Office
- How Mark of the Web stops bad document infections
- Introducing Reading Coach to enhance Reading Fluency with AI
404 Not found

How to Loop a PowerPoint Slide Show to Repeat Automatically

Set up a PowerPoint Presentation That Loops or Repeats Continuously
by Avantix Learning Team | Updated November 12, 2021
Applies to: Microsoft ® PowerPoint ® 2013, 2016, 2019 and 365 (Windows)
You can set up a PowerPoint slide show to loop or repeat automatically. A looping presentation can be used at events, trade shows or even in a reception area in an office. The easiest way to set up a slide show to loop or replay continuously is to apply automatic transitions and then configure Slide Show settings.
Recommended article: 5 PowerPoint Keyboard Shortcuts to Run a Slide Show
Do you want to learn more about PowerPoint? Check out our virtual classroom or in-person PowerPoint courses >
Screenshots in this article are from PowerPoint 365 but are similar in older versions of PowerPoint.
Step 1: Apply transitions to automatically advance slides during a slide show
Transitions occur between slides when you run a slide show.
To apply transitions to automatically advance slides during a slide show:
- In Normal View or Slide Sorter View, display or select a slide.
- Click the Transitions tab in the Ribbon.
- Select a transition in the Transitions gallery (such as Fade).
- Click Effect Options and choose the desired option. Effect Options change depending on the transition you selected.
- In the Timing group, click the arrows beside Duration to set the timing you want (in seconds) for the transition. You may also type a duration.
- In the Timing group, under Advance Slides, deselect or uncheck On mouse click and beside After, select or click the up and down arrows to set the timing to transition to the next slide. You may also type a duration.
- In the Timing group, click Apply to All.
In the Transitions tab in PowerPoint, you can select the type of transition (such as Fade) as well as timing options:

Step 2: Set up a presentation to loop during a slide show
To set up a PowerPoint presentation to loop during a slide show:
- Click the Slide Show tab in the Ribbon and then click Set Up Slide Show. A dialog box appears.
- Under Show type, if you select Presented by a speaker (full screen), the speaker or those watching the slide show will have control over when they advance slides. This is the default setting for slide shows. If you select Browsed by an individual (window), those watching the slide show do NOT have control over when slides advance. If you select Browsed at kiosk (full screen), those watching the slide show do NOT have control over when slides advance and the presentation automatically loops until those watching press Escape (Esc).
- Under Show options, select Loop continuously until 'Esc'. You will be able to select this option if you selected one of the first two options under Show type.
Below is the Set Up Show dialog box with Presented by speaker selected and looping enabled:

If you want to set specific timings for slides to advance or to add narration, check out the article How to Run a PowerPoint Slide Show Automatically (Set Up a Self-Running Presentation) . If you have audio or video in the presentation, you'll need to set the media to play automatically (on the Playback tab in the Ribbon) and animations will also need to be set to run automatically.
Subscribe to get more articles like this one
Did you find this article helpful? If you would like to receive new articles, JOIN our email list.
More resources
How to Embed a YouTube Video in PowerPoint
How to Hide and Unhide Slides in PowerPoint (with Shortcuts)
How to Insert Video in PowerPoint (from a File on Your PC or a Shared Drive)
PowerPoint Keyboard Shortcuts to Play and Control Video During a Slide Show
How to Add Animation in PowerPoint (Animate Images, Text and Other Objects)
Related courses
Microsoft PowerPoint: Intermediate / Advanced
Microsoft PowerPoint: Design for Non-Designers
Microsoft PowerPoint: Animations Bootcamp
Microsoft Excel: Intermediate / Advanced
VIEW MORE COURSES >
Our instructor-led courses are delivered in virtual classroom format or at our downtown Toronto location at 18 King Street East, Suite 1400, Toronto, Ontario, Canada (some in-person classroom courses may also be delivered at an alternate downtown Toronto location). Contact us at [email protected] if you'd like to arrange custom instructor-led virtual classroom or onsite training on a date that's convenient for you.
Copyright 2024 Avantix ® Learning
You may also like

How to Insert or Type E with an Accent Mark in PowerPoint (È, É, Ê, Ë, è, é, ê, or ë)
You can insert or type e with an accent mark in PowerPoint using built-in tools or keyboard shortcuts (including Alt code shortcuts). The letter e can be inserted with an accent in both upper or lower case in text boxes or placeholders on slides, the slide master or layouts. The following are common accents in upper or lower case – È, É, Ê, Ë, è, é, ê, or ë.

How to Fade a Picture or Part of a Picture in PowerPoint (Using a Gradient)
You can fade a picture in PowerPoint by drawing a rectangle shape on top of the picture and then filling the rectangle with a gradient from opaque to transparent. This technique is often used to fade an image into the background of a slide. Since the rectangle is placed on top of the image and then text may be placed on top of the rectangle, you may need to reorder the objects.

How to Lock an Image, Shape or Other Object in PowerPoint
You can now lock an image, shape or other object in PowerPoint. Objects can be locked in Normal View or Slide Master View. Only PowerPoint 365 users can lock objects to prevent moving and resizing. This is helpful if you want to select and move other objects on the slide or prevent others from moving or resizing an object. You can lock items using the context menu or the Selection Pane.
Microsoft, the Microsoft logo, Microsoft Office and related Microsoft applications and logos are registered trademarks of Microsoft Corporation in Canada, US and other countries. All other trademarks are the property of the registered owners.
Avantix Learning |18 King Street East, Suite 1400, Toronto, Ontario, Canada M5C 1C4 | Contact us at [email protected]
Our Courses
Avantix Learning courses are offered online in virtual classroom format or as in-person classroom training. Our hands-on, instructor-led courses are available both as public scheduled courses or on demand as a custom training solution.
All Avantix Learning courses include a comprehensive course manual including tips, tricks and shortcuts as well as sample and exercise files.
VIEW COURSES >
Contact us at [email protected] for more information about any of our courses or to arrange custom training.
Privacy Overview
Pin it on pinterest.
- Print Friendly
- DynamicPowerPoint.com
- SignageTube.com
- SplitFlapTV.com

Creating a Self-Running Slideshow in PowerPoint
Apr 29, 2020 | DataPoint Real-time Screens , How-To
Most people use PowerPoint in meetings and they talk (a lot) while they have a PowerPoint slide show running in the background. They use a mouse or presentation remote to advance to the next slide for the next message.
But our audience are people looking at digital signage or information screens and then there is nobody to advance to the next slide. For our purpose of information delivery on television screens, we need self-running presentations!
This article will describe the options, and settings to get to a self-running and ever-running presentation for digital signage, created in PowerPoint.
PowerPoint Transitions between Slides
Not a real must but we recommend to choose a given transition between slides. In PowerPoint you have transitions and animations. Transitions are animation effects that you see when you advance from one slide to another. Animations in PowerPoint are the effects that you set on specific shapes to emphasize its movement or importance.
Without transitions and animations, a presentation is considered boring and slide advancing is sometimes barely visible. With PowerPoint transitions and animations, a message or presentation is more looking like a video. Just one piece of advice with transitions; use a consistent transition that you use on all slides. Use a smooth transition effect. Never use a random or complex transition effect that is too overwhelming.
To choose a transition effect, select your slide and click the Transitions option from the PowerPoint ribbon. E.g. select the Push transition. Open the Effect Options at the right of the transitions list and choose e.g. the more natural From Right . Preview the transition immediately. Now set an effect for every slide of your presentation.
PowerPoint Advance Slides
Digital signage presentations are mostly self-running presentations like a channel on television. By default, PowerPoint presentations advance manually so, you have to use a mouse to click on the presentation. A mouse click instructs PowerPoint that the current slide is over and that the presenter wants to move to the next slide or message.
To change the advance options, look again at the Transitions menu. At the right, you will find the Timing group with Advance Slide settings. Uncheck the On Mouse Click option. Then check the After option and set a time. Set this value to 00:12.00 when you want to show this slide for 12 seconds. You can check and set a different time for every individual slide. Or just click the Apply To All buttons.

Submit a Comment
Your email address will not be published. Required fields are marked *
Pin It on Pinterest
- StumbleUpon
- Print Friendly
PowerPoint: How to Launch a Presentation Automatically as a Slide Show

What is a PowerPoint Show?
By default, PowerPoint saves your slide presentation as a PowerPoint presentation file with the .pptx file extension which, when double-clicked, launches PowerPoint. The presentation opens in whatever view was open when you saved it, such as the Normal view or Slide Sorter view. If you want your slide show to immediately launch in the Slide Show view, however, you need to save your file as a PowerPoint Show. In this article, find out how to create a PowerPoint slide show file and learn 2 bonus tips .
To Save a PowerPoint Presentation as a PowerPoint Show:
- Choose the File tab.
- Select Save As .
- Pick the Save as type as PowerPoint Show .
- Type a name for your slide show in the File name text box (you can use the same name and location as your .pptx/presentation file) and click Save . Your PowerPoint slide show file is saved with a .ppsx extension.
Now, the next time you or anyone else opens your presentation from outside of PowerPoint, your slide show immediately launches in Slide Show view. When you navigate past the last slide, the file automatically closes. To open the file for editing, launch PowerPoint first and open it as you would a standard presentation. If you have access to the original presentation, you may prefer to open the .pptx file to edit and save it again as a slide show file. Most importantly, make sure to manage your files, so you are working with the most current version.
PowerPoint Presentation Tips
BONUS TIP: When I save my presentations as a PowerPoint Show, I save the file to my desktop for easy access during speaking and training engagements. If needed, I can also quickly close and re-open the file without launching PowerPoint and without showing everyone all of my slides. Working with a PowerPoint Show also saves a number of steps because it automatically launches with a simple double-click of the mouse.
To move to a specific slide in a presentation while in the slide show view (as either a presentation or show format), just type the slide number and press [Enter] . To make these moves easier, print out a handout of your presentation, which includes slide numbers of each slide for quick navigation. Or, create a simple manual cheat sheet to reference when you want to jump to different slides.
BONUS TIP #2: In addition to saving PowerPoint shows to my desktop, I also add a generic slide to the beginning. For instance, a slide with your organization logo or simply a black slide. Although this may not apply to your presentations, I often navigate in and out of my slide show as I am also demonstrating software features and facilitating discussions within my training classes and conference sessions. With a generic or simple slide at the start, I can launch the slide show with a neutral, blank slide and then use the keyboard shortcut to type the slide number and press [Enter] to move to a specific slide within the presentation.
Were these PowerPoint tips helpful? Grab your handout of other quick and easy PowerPoint shortcuts and discover more PowerPoint techniques here .
© Dawn Bjork, MCT, MOSM, CSP®, The Software Pro® Microsoft Certified Trainer, Productivity Speaker, Certified Speaking Professional

Related Posts
Improve Your Presentations: Sites for Paid & Free Images May 21, 2022
What’s the Worst Feature in PowerPoint? Hint…The Answer is AutoFit! May 12, 2022
PowerPoint Presentations: Dodging “Death by PowerPoint” May 13, 2022
Join Our Tips Newsletter
Receive 477+ shortcuts & more!
How-To Geek
How to loop a powerpoint presentation.
If you're showing off a lot of photos at a special event, set your presentation to progress at a continuous, automatic loop. Here's how.
Quick Links
Set up your slideshow to be looped, apply automatic slide transitions.
Slideshows are sometimes used to display images at events, such as weddings or trade shows. Whatever the occasion might be, you’ll want to loop your PowerPoint presentation so your guests aren’t staring at a blank screen. Here’s how it’s done.
First, open your PowerPoint presentation in which you would like to loop. Once open, navigate to the “Set Up” group of the “Slide Show” tab and then select the “Set Up Slide Show” button.
The “Set Up Show” window will appear. In the “Show options” group, check the box next to “Loop Continuously until Esc.” Once selected, click “OK” in the bottom-right corner of the window.
Now, when you play your slideshow, it will end only when you press the “Esc” key instead of when you've finished the last slide.
Related: How to Make YouTube Videos Loop Continuously
One caveat: With the way we currently have it set up, the slideshow will proceed only when someone clicks the mouse button. That’s fine if there will be a speaker present at all times. Otherwise, you’ll need to set up automatic slide transitions.
Head back to the “Set Up Show” window by selecting “Set Up Slide Show” in the “Set Up” group of the “Slide Show” tab.
There are a couple of options you need to select, but one important note is that you must first select “Using Timings, If Present” under the “Advance Slides” group.
The next option we select will lock a few things in place (which is why you need to select “Using Timings, If Present” first).
Under the “Show Type” group, select “Browsed at a Kiosk (Full Screen)." The “Loop Continuously until Esc” option will be enabled automatically if you haven’t already turned it on, and the option you’ve selected under “Advance Slides” will remain unchanged.
Select “OK” when ready to proceed.
Without the “Browsed at a Kiosk” option enabled, the automatic slide progressions would be disabled if someone were to press the Back key. With it enabled, the Forward and Back keys are locked, allowing the slideshow to automatically progress unattended without fear of someone breaking it.
Now it’s time to set the timings of the slides. Head over to the “Transitions” tab. In the “Timing” group, check the box next to “After” and set the timing at which you’d like each slide to progress. Note that it doesn’t matter if the box next to “On Mouse Click” is checked or not---it won’t work.
After that, select the “Apply to All” option in the same group.
Now, when you play your slideshow, it will continuously loop without interruption. To exit the slideshow, press the “Esc” button.
How to Make Slides Play Automatically in PowerPoint

Have you ever had to sit through a lengthy presentation and wished that the slides would just move on their own? Automatic slideshows can make presentations more engaging and professional-looking, and they can save you time and effort by letting you focus on your message instead of manually advancing your slides. In this article, we will explore the benefits of automatic slide playback in PowerPoint and show you how to set up and customize your own automatic slideshow.
Table of Contents
Why Automatic Slideshows are Important for Presentations
Automatic slideshows can keep your audience engaged and interested in your presentation by providing a seamless flow of information. When your slides are timed correctly, you can avoid awkward pauses or distractions that come from manually advancing your presentation. With an automatic slideshow, you can also save time by not having to worry about advancing slides or managing your presentation.
In addition, automatic slideshows can also help you to maintain a consistent pace throughout your presentation. This is especially important if you have a lot of information to cover in a limited amount of time. By setting the timing for each slide, you can ensure that you are able to cover all of your key points without rushing or running out of time. Furthermore, automatic slideshows can also be a great tool for accessibility, as they can be set up to include captions or audio descriptions for those who may have difficulty hearing or seeing the presentation.
Understanding the Benefits of Automatic Slide Playback in PowerPoint
Automatic slide playback in PowerPoint can improve your presentation in many ways. With automatic slideshows, you can:
- Keep your presentation on schedule by timing your slides in advance
- Provide a more professional look and feel to your presentation
- Make your presentation more engaging by using animations and transitions
- Reduce the stress of presenting by taking away the need to constantly manage your slides
Additionally, automatic slide playback can also help you to maintain a consistent pace throughout your presentation. By setting the timing for each slide, you can ensure that you are not spending too much time on one topic and rushing through another. This can help your audience to better understand and retain the information you are presenting.
How to Set Up an Automatic Slide Show in PowerPoint
Setting up an automatic slide show in PowerPoint is easy and can be done in just a few steps:
- Open your PowerPoint presentation
- Click on the “Transitions” tab in the ribbon
- In the “Timing” section, check “After” and enter the number of seconds you want each slide to appear
- Click “Apply to All Slides”
- Save your presentation
- When you’re ready to present, click “Slideshow” and then “From Beginning” to start your automatic slideshow
However, there are a few additional tips and tricks you can use to make your automatic slide show even more effective. Firstly, consider using a consistent theme throughout your presentation to make it look more professional. You can also add animations and transitions between slides to make your presentation more engaging.
Another useful feature in PowerPoint is the ability to add narration to your slides. This can be especially helpful if you’re presenting to a large audience or if you want to provide additional context for your slides. To add narration, simply click on the “Insert” tab in the ribbon, select “Audio,” and then choose “Record Audio.”
Customizing Your Automatic Slide Show Settings in PowerPoint
PowerPoint also provides several settings that you can customize to make your automatic slideshow more interesting and engaging.
- Choose different animations and transitions for each slide to create a more dynamic presentation
- Add music and sound effects to your presentation to enhance the viewer’s experience
- Apply different timings to individual slides for added interest and emphasis
Another way to customize your automatic slideshow is by adding narration to your presentation. This can be especially useful if you are presenting to an audience that may not be familiar with the topic. You can record your own voiceover or use a professional voiceover artist to add a personal touch to your presentation.
In addition, you can also customize the background of your slides to make them more visually appealing. You can choose from a variety of colors, patterns, and images to create a unique look for your presentation. This can help to keep your audience engaged and interested in your content.
Tips for Creating a Seamless Automatic Slide Show in PowerPoint
Creating a seamless and professional-looking automatic slideshow can take a bit of practice. Here are some tips to help you perfect your presentation:
- Use clear and readable fonts and text sizes
- Avoid overloading your slides with too much information or graphics
- Consider using high-quality images or videos to enhance your slides
- Use animations and transitions sparingly
Another important tip to keep in mind is to ensure that your slide show has a consistent theme or design. This means using the same color scheme, font style, and layout throughout your presentation. Consistency helps to create a cohesive and professional-looking slide show that is easy for your audience to follow. Additionally, it is important to rehearse your slide show beforehand to ensure that the timing and transitions are smooth and seamless. By following these tips, you can create an engaging and effective automatic slide show in PowerPoint.
Troubleshooting Common Issues with Automatic Slide Shows in PowerPoint
Despite the benefits and ease of use, automatic slideshows can sometimes encounter common issues. Here are some solutions to common problems:
- Slides not advancing: Make sure you have set the timings correctly in the “Transitions” tab
- Animations or transitions not working: Verify that you have applied them to the correct slide and that they are compatible with your version of PowerPoint
- Timing is off: Adjust the timings of your slides as needed to ensure a smooth flow
Another common issue with automatic slideshows is the presence of audio or video files that may not play properly. To fix this, ensure that the media files are compatible with your version of PowerPoint and that they are properly linked to the slides. Additionally, check that your computer’s audio and video settings are configured correctly.
Enhancing Your Presentation with Music and Sound Effects in an Automatic Slide Show
Adding music and sound effects to your automatic slideshow can make your presentation more engaging and memorable. To do so, go to the “Insert” tab and choose “Audio,” then select the audio file you want to use. From there, you can adjust the audio settings and timings in the “Audio Tools” tab.
When selecting music or sound effects for your presentation, it’s important to choose pieces that are appropriate for your audience and the topic of your presentation. For example, if you’re giving a presentation on a serious topic, you may want to choose more subdued music or sound effects, while a presentation on a fun topic may benefit from more upbeat and lively music.
It’s also important to consider the volume of your audio. You don’t want it to be too loud or too soft, as this can distract from your presentation or make it difficult for your audience to hear. Test the volume in advance and adjust it accordingly to ensure that it’s just right.
Best Practices for Using Automatic Slide Shows in Business Presentations
When using automatic slideshows for business presentations, consider the following best practices:
- Create a clear and concise message that is easy to deliver
- Use relevant and impactful graphics to support your message
- Keep your presentation short and focused on your key points
- Practice your presentation before presenting
Another important best practice for using automatic slide shows in business presentations is to ensure that your slides are visually appealing and easy to read. Use a consistent color scheme and font throughout your presentation to maintain a professional look. Additionally, avoid cluttering your slides with too much text or graphics, as this can distract from your message and make it difficult for your audience to follow along. By following these best practices, you can create a successful and engaging business presentation that effectively communicates your message.
Advanced Techniques for Creating Dynamic Automatic Slide Shows in PowerPoint
For more advanced users, consider using multimedia elements such as videos, animations, or interactive tools to create a more dynamic and engaging automatic slideshow. Utilize PowerPoint’s various settings and tools to create an interactive experience for your audience.
Another technique to consider is using custom animations to add movement and visual interest to your slides. You can animate individual elements such as text boxes, images, and shapes to appear, disappear, or move across the slide. This can help to emphasize key points and keep your audience engaged.
Additionally, you can use PowerPoint’s built-in collaboration tools to work with others on your slide show. This can be especially useful for larger projects or when working with a team. You can share your presentation with others, allow them to make edits or comments, and track changes to ensure everyone is on the same page.
Creating Interactive Presentations with Automatic Slideshows
Interactive automatic slideshows can take your presentations to the next level. Consider using tools such as clickable images, hyperlinks, or charts to let your audience engage with your presentation. By incorporating interaction into your automatic slideshow, you can create an engaging and memorable experience for your audience.
How to Time Your Presentation Using an Automatic Slideshow
When timing your presentation using an automatic slideshow, it’s important to consider your audience’s attention span and the amount of information you want to convey. To do this, practice your presentation with different timings to determine the most effective duration and pacing for your message. Aim to deliver your presentation in a way that is engaging, easy to follow, and memorable for your audience.
Sharing Your Automatic Slideshow Across Different Platforms and Devices
To share your automatic slideshow across different platforms and devices, save your presentation as a PowerPoint file or use one of PowerPoint’s sharing options. You can also convert your presentation to a PDF or video format for easy sharing and viewing on a variety of devices.
In-depth Guide to Animations and Transitions in an Automatic Slideshow
For an in-depth guide to using animations and transitions in an automatic slideshow, consult PowerPoint’s Help documentation or online resources. Utilize various types of animations and transitions to create a personalized, engaging experience for your audience.
The Future of Presentations: Automating and Personalizing Your Slideshows
The future of presentations is all about automation and personalization. With advancements in AI and machine learning, we can expect to see more personalized and interactive automatic slideshows in the years to come. These exciting developments will make presentations more engaging, memorable, and effective in conveying messages to your audience.
By humans, for humans - Best rated articles:
Excel report templates: build better reports faster, top 9 power bi dashboard examples, excel waterfall charts: how to create one that doesn't suck, beyond ai - discover our handpicked bi resources.
Explore Zebra BI's expert-selected resources combining technology and insight for practical, in-depth BI strategies.

We’ve been experimenting with AI-generated content, and sometimes it gets carried away. Give us a feedback and help us learn and improve! 🤍
Note: This is an experimental AI-generated article. Your help is welcome. Share your feedback with us and help us improve.

- Quick Answers
- Remote Teaching
How do I set a Powerpoint presentation to start automatically when opened?
Once you have completed a presentation in Powerpoint, you can save it as a PowerPoint Show.
This means your audience will see the slide show run when they open the file, rather than seeing the slides in edit mode.

- With your presentation open, click File , Save as .
- Name your presentation, and then click the Save as type dropdown menu underneath.
- Select Powerpoint Show (*ppsx)
You can then share your presentation with others. When the file is double-clicked, it opens as a slide show.
Share this article:
Was this article helpful.
How to loop a PowerPoint slideshow so that it automatically starts over as soon as it ends
- To loop a PowerPoint slideshow, you'll need to enable looping in the "Set Up Slide Show" menu.
- Once you set your PowerPoint to loop, it'll start over from the beginning automatically after playing the last slide.
- Visit Business Insider's Tech Reference library for more stories .
If you've designed a Microsoft PowerPoint presentation that's meant to be viewed repeatedly, such as on a kiosk or in a museum installation, you can adjust the settings in PowerPoint so that your slideshow "loops" instead of ending after one viewing.
Getting a PowerPoint to loop is easy. Read on to find out how, using PowerPoint for both Mac and PC.
Check out the products mentioned in this article:
Microsoft office (from $149.99 at best buy), apple macbook pro (from $1,299.00 at apple), acer chromebook 15 (from $179.99 at walmart), how to loop a powerpoint presentation.
1. Open the Microsoft PowerPoint presentation that you want to loop.
2. With your PowerPoint presentation open, click on the "Slide Show" tab, then click on "Set Up Slide Show."
3. In the pop-up window that appears, click on the box next to "Loop continuously until 'Esc'" so that a small checkmark appears inside the box. Feel free to adjust any other settings in this menu as well. Click "OK" when you're finished.
4. To test whether your PowerPoint can loop successfully, click on the "From Beginning" or "Play From Start" button in the Slide Show tab. Click through the slideshow until you reach the end. When your PowerPoint reaches its final slide, it should start over from the beginning automatically. When you're confident that looping is enabled, and you're ready to close the slide show, press the Esc key.
Related coverage from Tech Reference :
How to add a border to slides in powerpoint, and give your slideshow a sleek design, how to embed a youtube video into your microsoft powerpoint presentations using a mac or pc, how to convert google slides to a powerpoint presentation in 4 easy steps, how to create a custom powerpoint template to use or share with others, how to copy or duplicate a powerpoint slide and put it anywhere in your slideshow.
Insider Inc. receives a commission when you buy through our links.
Watch: We compared the $1,200 MacBook Air with the $500 Surface Go, and the results were a mess
- Main content
Contribute to the Microsoft 365 and Office forum! Click here to learn more 💡
April 9, 2024
Contribute to the Microsoft 365 and Office forum!
Click here to learn more 💡
PowerPoint Forum Top Contributors: Steve Rindsberg - John Korchok - Bob Jones AKA: CyberTaz ✅
May 10, 2024
PowerPoint Forum Top Contributors:
Steve Rindsberg - John Korchok - Bob Jones AKA: CyberTaz ✅
- Search the community and support articles
- Microsoft 365 and Office
- Search Community member
Ask a new question
Start powerpoint presentation on startup
I want a powerpoint presentation to start and run when I boot a computer.
I have created a *.cmd file with the only string
"C:\path-to-POWERPNT.exe" /S "c:\path-to-presentation.pptx"
and placed it in the startup folder (C:\Users\[username]\AppData\Roaming\Microsoft\Windows\Start Menu\Programs\Startup)
Only problem is that after the computer is finished booting and the slide show is running, the comp returns to Desktop (i.e. the bar is showing at the bottom of the screen).
Any suggestions?
Report abuse
Reported content has been submitted
Thank you for your answer.
I was referring to the task bar.
I tried another thing today which worked. I saved the presentation as a PowerPoint Slideshow with Macros enabled (*.ppsm) and put a shortcut to the ppsm-file in the startup folder. It worked as I wanted without the task bar showing up, so for me the problem is resolved.
It would, however, be interesting to hear if someone has a solution that works with a cmd or bat file.
7 people found this reply helpful
Was this reply helpful? Yes No
Sorry this didn't help.
Great! Thanks for your feedback.
How satisfied are you with this reply?
Thanks for your feedback, it helps us improve the site.
Thanks for your feedback.
Replies (2)
Question info.
- Norsk Bokmål
- Ελληνικά
- Русский
- עברית
- العربية
- ไทย
- 한국어
- 中文(简体)
- 中文(繁體)
- 日本語
How to make a slide show
Learn how to make a slide show with photos, videos, music, and custom settings using a slide show maker.
Learn how to make a slide show with PowerPoint
Discover how to make a slide show with photos, videos, music, and custom settings using a slide show app like PowerPoint.
What is a slide show maker?
To create a slide show, you’ll want to use a slide show maker—or slide show app—which is a software program or online service that enables you create digital slide shows with text, photos, videos, music, and other special effects. The full range of slide show features and functionality varies from program to program.
Once you’ve created a slide show, it can be published on the internet or shared with others as a video file. Additionally, you can use slide shows to create dynamic, interactive content on websites.
Slide show software can be used for a variety of purposes, such as creating presentations for work, school, and even your personal life. For instance, slide shows are often used to:

Display photos during an event
Slide shows are a great way to share photos and videos with guests at a wedding, birthday, or other special event.
Create a digital photo album
Some slide shows are created for personal reasons, such as sharing important memories with family or friends.

Highlight products or services
Businesses can use slide shows to showcase their products, promote special offers and sales, or pitch their services to potential clients.
Enhance teaching, training, and public speaking
Slide shows can also provide helpful visuals in educational settings, classroom presentations, and public speaking forums.
What you need to make a slide show
When it comes to creating a slide show, there are a few things you'll need to get started. First and foremost, you'll need a device equipped with presentation software or access to an online slide show app. Secondly, you’ll need a way to display your slide show, which usually means connecting your device to a projector or big screen TV. Beyond that, you’ll need some visual aids and other media to bring your slide show to life.
Explore each of these slide show requirements in more detail:
Devices and equipment —To create a slide show, you’ll use a computer or other device—such as a tablet or mobile phone—with PowerPoint or a similar program installed. You will also need a way to project the slides onto a screen or wall. This can be done with a projector, but if you don't have one available, you can use your TV or computer monitor. Simply connect your device to the TV or monitor using an HDMI cable and select the correct input. Your slides will now be projected onto the screen.
Media —Of course, creating a slide show requires media that adds visual and even audio elements to your presentation. This can be anything from photos and videos to music and text. You can use search engines to find copyright-free media to use in your slide show.
Another option is to purchase royalty-free stock footage, images, and audio files from online media libraries. This could be a bit more expensive, but it guarantees that you have the legal right to use the media in your presentation.
Finally, you can also use your own videos, images, and even music. While this can be a time-consuming process, it does allow you to create custom content specifically for your slide show.
Slide show creator —To bring your slide show together, you’ll need a slide show creator. The slide show software you choose will depend on your presentation requirements and preferences. There are many slide show makers on the market, with Microsoft PowerPoint being one of the most popular and widely used programs globally.
How to choose a slide show maker
When choosing slide show software, it's important to consider the features and specifications that are most important to you. Some of the questions you might ask when choosing a slide show maker include:
- How easy is the software to use?
- Is the software Mac or PC compatible?
- Can I access and edit my slide show on the cloud?
- What kind of slide shows can be created with the software?
- How many photos and/or videos can be included in a slide show?
- Can text and other elements be added to slide shows?
- Are transitions and effects available for slide shows?
- Is music accompaniment an option?
- What are the options for saving and sharing your slide show?
Building a slide show doesn't have to be difficult. With the right software, you can create an engaging presentation in no time.
Six steps for creating a slide show

1. Plan your slide show
Before getting too deep into your slide show project, it’s a good idea to select and save the photos and videos you want to use. This helps you create a slide show more efficiently and purposefully, ensuring a better outcome.
4. Import media
Start adding photos, videos, and other desired media to your slides. You can upload these from your device or online media libraries. If you planned your slide show in advance, you should have all your media saved in one place.

2. Launch your slide show app
Once you’ve decided on a slide show maker, you’ll want to launch the app from whatever device you’ll be using to create your presentation.
5. Add text, music, and transitions
After you’ve arranged the visuals in your slide show, you can provide additional information and communicate sentiment using custom text, music, and timed slide transitions.

3. Choose your theme
Most slide show software offers a variety of pre-set themes, colors, and designs. You can choose one that best suits your slide show or create a custom theme using the program’s various tools and features.
6. Record, save, and share your slide show
Now you’re ready to record your slide show, which can include a voiceover or Cameo . Once your slide show is complete, you can save it as a video to your device or to the cloud, such as OneDrive . You can access your saved slide show at any time to display at events, use in meetings, share online, or send directly to other people.
How to make a slide show with photos
Adding photos to your slide show is a great way to enliven your presentation and make it more visually interesting. Here are a few different ways you can add photos to your slide show in PowerPoint.

Add photos from your device
Whether you’re using a computer, tablet, phone, or other device, you can use photos that are saved to your device to create your slide show. In PowerPoint, simply select “Insert” then “Pictures” from the program menu, then choose “This Device.” This will open your photo library and allow you to find the photos you want to use. Once you’ve selected the photos that you want to import, just click on the "Insert" button and they will be added to your slide show. If you’re using a pre-made theme, you can also right-click the image in the slide show and select “Change Picture.” Again, you will choose “This Device” to access your photo library. After inserting your photo, you can reposition it on your slide or resize it however you like.

Use stock photos
Another way to add photos in PowerPoint is to follow the same process you would when adding photos from your device, but when prompted to choose your photo source, select “From Stock Images” instead of “This Device.” This will display a library of photos that you can use in your slide show without worrying about copyright infringement. There are thousands of stock images available in most slide show maker programs. Once the library is open, you can explore existing photo categories or use keywords to search for photos that fit your needs.

Explore online photo sources
Online photos are images you can insert into a PowerPoint slide show directly from the internet, as opposed to using those you have saved on your device. This is a convenient option if you don't have photos already prepared for your slide show, or if you can’t find the right kind of photo in the stock image library. However, there are some potential risks associated with using online photos, namely that you must be careful to use royalty-free images so not to infringe on any copyrights. In PowerPoint, there is a filtering option to ensure your search results only show royalty-free photos. Inserting photos from online sources follows the same process as the previous two methods, but this time, you’ll select “From Online Sources.”
How to add videos, music, and text

How to add videos to PowerPoint slide shows
Adding videos to your slide show involves accessing videos from your device, a stock video library, or online video sources—just as you would when adding photos. In this case, however, you’ll navigate to the menu in PowerPoint and select “Insert,” followed by “Media,” then “Video.” Once your video appears on your slide, you can resize or reposition it to fit your presentation needs. You can also set your video to play automatically in the slide show by selecting “Playback” on the menu and choosing “Start Automatically.”

How to add music to PowerPoint slide shows
Much like adding videos, you can add music to individual slides in PowerPoint by navigating to “Insert” on the menu, then “Media,” and finally “Audio.” You can then import music from your device, or you can record your own audio directly in PowerPoint. However, if you want your audio to play across multiple slides in your presentation—for example, as background music for a slide show—you’ll have to take a couple of extra steps. Once you’ve imported your audio file, select “Playback” from the menu and choose the “Play in Background” option. Your music will now play across all slides. You can set one song to loop for the duration of the slide show, or you can add more songs to play continuously throughout the slide show.

How to add text to PowerPoint slide shows
Premade themes in PowerPoint make adding text slide shows easy. On slides that already have templated content, you can simply click on the text and begin editing. In addition to changing what the text says, you can resize, recolor, reposition, and add special effects to the text. Of course, you can also change the font—or style—of the text. Most of this can be done from the “Home” tab on the menu while certain effects, such as shadows, can be found on the “Shape Format” tab. If you’re designing your presentation slides from scratch, or want to create additional text, find “Insert” on the menu, then choose “Text Box” or “Word Art,” depending on your desired text effect.
Discover custom slide show settings
Add even more effects to your PowerPoint slide show with custom settings like timing, transitions, and looping.

Set slide show timing
Adding timing to your slide show is a great way to control the pacing and flow of your presentation. To add timing in PowerPoint, go to the "Transitions" tab on the menu and find the "Advance Slide" area. Make sure the box next to “After:” is checked, then input the amount of time you’d like each slide to appear on-screen. The slides will automatically advance, creating a movie-like effect that’s great for events and special occasions.

Create slide show transitions
Now that you’ve added automatic timing to your slide show, you can make it more visually appealing by creating slide transitions. Transitions are special effects that allow you to animate the way your slides change from one to the next, and there are a variety of different transitions in PowerPoint that you can choose from. You can add these transitions to your slide show from the "Transitions” tab. From there, you’ll select the transition you want to add. To preview the transition, simply click on it. You can click “Apply To All” to automatically add the same transition to every slide in your slide show, or you can manually add different transitions to different slides.

Loop your slide show
If you want your slide show to play continuously until you choose to turn it off, you can set your PowerPoint presentation to loop. This will ensure your slide show automatically starts over from the beginning once it reaches the end. To get started, navigate to the “Slide Show” tab on the menu and select “Set Up Slide Show.” When the settings window opens, check the box next to “Loop continuously until ‘ESC’” and then click “OK.” When you’re ready to turn your slide show off, simply press the Esc key on your keyboard.
Slide show template and theme tips
Search themes and templates online.
With numerous slide show themes and templates available, it’s easy to find one that fits your needs.
Customize your design
If you can’t find the perfect theme or template, you can change things like colors and fonts.
Build a custom template
If you want a blueprint to use with future slide shows, you can create your own template.
Add new slides
If you need more slides, you can choose a specific layout and your theme will be carried over.
Edit your slide layouts
Even when using a theme or template, you can rearrange slide content to highlight key information.
Add photos, videos, and text
Themes and templates make adding media easy since most slides have designated content areas.
Change or resize your fonts
If your theme’s font is too small, you can resize it or choose a new font to make it easy to read.
Reorder your slide show
Some themes and templates have a predefined sequence, but you can reorder slides to meet your needs.
Create your own slide show
Slide shows are a great way to engage your audience and present important information. Whether you're creating a slide show for personal or professional reasons, slide shows are an essential tool for anyone who wants to share information in a visually appealing manner.
Discover more ways to improve your slide show
What options are available to create a slide show?
Slide show makers come in many forms. Some slide show software can only be used on specific devices, while other slide show creators can be accessed via the cloud from any device at any time.
It’s a good idea to evaluate a variety of slide show makers to ensure that you find one with all the features you need. For instance, some slide show software skews toward business use cases and others toward personal.
Microsoft PowerPoint is a popular slide show app that allows you to save presentations to your device or the cloud, and is widely used for personal, professional, and educational purposes.
Frequently asked questions
What are slide show apps and software.
Slide show apps and software are used to create and share slide shows. Slide show programs are typically used to communicate information, diagrams, plans, or processes. They can also be used to display photos and videos at events or retail stores. Usually, slide show makers have a range of built-in features and layouts, making them easy to use, regardless of technical skill levels.
What should a slide show include?
An effective slide show should be engaging, visually appealing, and informative. To achieve this, you'll want to make sure to include the following elements:
- A catchy headline or title. This will help grab your audience's attention and set the tone for the rest of your presentation.
- A variety of images. Don't just rely on text—incorporate photos, illustrations, or even video to maximize viewership.
- Bullet points or short blocks of text. Keep your slide content concise and easy to digest; too much information will only overwhelm your viewers.
How do I make a picture slide show?
There are a few different ways to make picture slide shows. You can use online programs, or you can create a slide show directly on your computer, phone, tablet, or other device using slide show software. Some programs, such as Microsoft PowerPoint, can be accessed on your personal device and on the cloud.
How long should a slide show be?
The length of your slide show will depend on several factors, such as the topic of your presentation, the audience you're presenting to, and the amount of time you have. That said, slide shows are generally between five and ten minutes long.
How can I make a slide show better?
Here are a few tips to make your slide show more engaging:
- Add images, videos, and music to bring your slide show to life.
- Use a font that is easy to read from a distance.
- Try not to use too many words on each slide.
- Use custom transitions and timing to make your slide show flow.
- Ensure a cohesive slide show by using a theme or template.
- For live presentations, practice with the Speaker Coach feature .
Follow Microsoft 365
Byte Bite Bit
How to Make Slides Automatically Transition in PowerPoint: Step-by-Step Guide
The modern workplace thrives on engaging presentations, and making your PowerPoint slides transition automatically can elevate your delivery . Whether crafting a sleek pitch for clients or a visually stimulating lecture for students, seamless transitions add that professional polish.

To set up automatic transitions, we simply navigate to the “Transitions” tab in PowerPoint. There, we can select our preferred transition style and specify timing to suit the rhythm and flow of our presentation. Click “Apply to All Slides” if we want a consistent transition across the board .
How often have we found ourselves manually advancing slides while juggling other tasks during a presentation? By scheduling transitions, we can focus on our narrative and engagement, rather than the tech. Plus, it’s as easy as checking a box and setting a timer!
- 1.1 Understanding Slide Transitions
- 1.2 Applying Transitions Effectively
- 1.3 Enhancing Transitions with Sound and Timing
- 2.1 Setting Up for Different Presentation Scenarios
- 2.2 Effective Use of Narration and Audio
- 3.1 Automating Slide Progression
- 4.1 Exploring the PowerPoint Ribbon for Transition Options
- 4.2 Mastering Animation and Transition Coordination
Crafting Engaging Transitions in PowerPoint Presentations
Creating engaging transitions in PowerPoint enhances the visual appeal and keeps the audience attentive. We’ll cover the essentials of slide transitions, applying them effectively, and adding sound and timing for a polished presentation.
Understanding Slide Transitions
Slide transitions are the effects we see when moving from one slide to the next. PowerPoint offers many options in the Transitions tab. From Fade to Wipe , each transition brings a unique visual effect. Choosing the right transition depends on the content and tone of our presentation.
The Transitions Gallery displays thumbnails, making it easy to preview and select transitions. Fade transitions, for instance, offer smooth and subtle changes, perfect for professional presentations. Meanwhile, more dynamic effects like Zoom can add excitement to more lively topics.
Applying Transitions Effectively
To apply transitions, we select the slide and navigate to the Transitions tab. Clicking on a transition effect applies it to the selected slide. To ensure consistency, we can use the Apply to All Slides option. This creates a uniform look throughout our presentation.
Customizing each transition adds a personal touch. By adjusting Effect Options , we can change the direction or style of the transition. For example, we might prefer our Fade transition to dissolve from the center or smoothly fade from one side. We can also adjust the transition speed through the Duration setting, making the transition slower or faster.
Enhancing Transitions with Sound and Timing
Adding audio can heighten the impact of our transitions. We can include sound effects from the Transitions tab by selecting Sound . PowerPoint offers a selection of built-in sounds, but we can also upload custom audio clips.
Timing our transitions is crucial for a polished presentation. Under the Advance Slide section, we select After and specify a delay. This ensures our slides advance automatically after a set time. Setting the Duration helps control the pace, making sure transitions aren’t too abrupt or too lengthy. Utilizing both sound and timing ensures a smooth flow and keeps the audience engaged.
Optimizing Presentation Flow and Impact
Navigate through presentation scenarios with ease by customizing your slide transitions in PowerPoint, and enhance your delivery with effective use of narration and audio elements. These elements can dramatically improve the flow and engagement of your presentation.
Setting Up for Different Presentation Scenarios
When prepping PowerPoint for various scenarios, tweaking transitions and timings for an optimal slide show is essential. Whether the presentation is conducted by a speaker**(full screen)**, viewed individually (window) , or displayed at a kiosk, each has unique needs.
If presented by a speaker, ensuring seamless transitions promotes professionalism. Make use of the “Rehearse Timings” feature. This allows practicing, recording, and adjusting the slide timings to suit the spoken content.
For individual browsing, adding interactive elements like hyperlinks or action buttons can engage viewers. Set up slide show options to allow self-navigation with brief pauses between slides.
Effective Use of Narration and Audio
Incorporating narration and audio can heighten a presentation’s impact. Recording narration allows us to convey the message even when we cannot be physically present. The “Record Slide Show” feature in PowerPoint helps us capture voiceovers for each slide, setting precise timing and flow.
Using a microphone ensures clarity and professional sound. Not every slide needs narration; mix narrated slides with key points displayed in text for variety. Optionally, include sound effects to highlight specific points.
To enhance engagement, combine narration with animations so that the audio complements the visual aspects.
Key steps for integrating narration :
- Click on the “Slide Show” tab.
- Select “Record Slide Show” .
- Use a microphone to start recording.
- Adjust timings as needed.
Lastly, remember to save your work frequently. This balance of visuals and audio ensures a compelling and engaging presentation experience for any scenario.
Managing Slide Show Settings for Optimal Performance
Properly configuring your slide show settings can make a huge difference in how your presentation is received by your audience. Here’s how we can ensure smooth and effective automatic transitions for our PowerPoint slides.
Automating Slide Progression
We can automate our slide progression to ensure a seamless flow during our presentations.
First, go to the Transitions tab. This is where we want to adjust slide timings. It’s crucial to set a consistent time for slides to advance. In the Timing group, choose a duration under the Advance Slide section. Make sure to uncheck “On Mouse Click” if we prefer not to manually advance slides.
Next, consider setting our presentation to Loop Continuously . This is perfect for kiosk displays or unattended presentations. We need to click on the Slide Show tab and select Set Up Slide Show . From here, we check the “Loop continuously until ‘Esc’” box.
Lastly, always preview our presentation. This ensures slides progress as intended, and gives us a chance to make any necessary tweaks. Using the Slide Sorter View can help us easily rearrange slides and check our transition settings at a glance.
Following these steps ensures our presentation runs like a well-oiled machine, with slides advancing smoothly and efficiently without a hitch.
Leveraging PowerPoint’s Advanced Features for Transitions
To create compelling presentations, we can utilize PowerPoint’s advanced features to master slide transitions and animations. Instead of default settings, we’ll dive into more powerful options.
Exploring the PowerPoint Ribbon for Transition Options
The PowerPoint Ribbon is where we begin our journey. By heading to the “Transitions” tab , we find various transition effects that can bring our presentation to life. We can see thumbnails of different transitions, which helps in visualizing the impact before applying them.
Here’s a quick step-by-step:
- Select the Slide : Pick the slide we want to work on.
- Transitions Tab : Click on the “Transitions” tab on the ribbon.
- Choose Transition : Select the desired transition effect from the thumbnails.
- Apply to All : If we want a uniform transition, we can click on “Apply to All Slides”.
Additionally, the Transition Settings allow us to tweak the duration and add sounds. This can be found right below the transition effects thumbnails.
Mastering Animation and Transition Coordination
Coordination between animations and transitions is key for a polished presentation. Utilizing the Animation Pane becomes essential when combining these effects. It helps us manage the sequence and timing of each element effectively.
Key tasks include:
- Add Animation : Navigate to the “Animations” tab and choose animations for slide elements.
- Animation Pane : Open the pane to see and organize all animations on our slide.
- Set Timings : Adjust when an animation should play—either “On Click” , “With Previous” , or “After Previous” .
- Advance Slide : Ensure automatic transition settings are enabled. This can be set under the “Advance Slide” options in the Transitions tab, choosing “After” a specific duration.
By syncing animations and transitions, our slideshow will run smoothly without manual intervention, impressively engaging our audience.
By fully utilizing these features, our presentation’s quality and professionalism are significantly enhanced.
Related posts:
- How to Add Music to PowerPoint: A Step-by-Step Guide for Seamless Presentations
- How to Curve Text in PowerPoint: Step-by-Step Guide
- How to Insert GIF into PowerPoint: A Step-by-Step Guide
- How to Present PowerPoint with Notes: Master Speaker Tips
- How to Create a PowerPoint Template: Step-by-Step Guide for Beginners
- How to Create an Org Chart in PowerPoint: Step-by-Step Guide for Beginners
- How to Wrap Text in PowerPoint: A Step-by-Step Guide
- How to Insert a Slide from Another PowerPoint: A Step-by-Step Guide
- How to Change Font on All Slides in PowerPoint: A Step-by-Step Guide
- How to Make a Graph in PowerPoint: Step-by-Step Guide
- How to Use Slide Master in PowerPoint: Streamline Your Presentation Design
- How to Present PowerPoint with Notes: Expert Tips for Seamless Delivery
Leave a Comment Cancel reply
Save my name, email, and website in this browser for the next time I comment.
IMAGES
VIDEO
COMMENTS
You can use a self-running presentation to run unattended in a booth or kiosk at a trade show or convention, or you can save it as a video and send it to a client. On the Slide Show tab, select Set Up Slide Show. Presented by a speaker (full screen) Allows the people watching your slide show to have control over when they advance the slides.
If you want to learn how to loop your slides in PowerPoint, follow these steps: Go to the Slide Show tab and select Set Up Slide Show. When the Set Up Show window appears, go to the Show options group and tick the Loop continuously until 'Esc' option. Don't forget to click OK to apply the new setup!
Click OK. To set up a presentation to run automatically, but those watching the slide show do NOT have control over when slides advance: Click the Slide Show tab in the Ribbon and then click Set Up Slide Show. A dialog box appears. Under Show type, select Browsed by an individual (window). Click OK.
With Microsoft PowerPoint, you can use a self-running presentation to run unattended in a booth or kiosk at a trade show or convention, or you can save it as...
Open your slideshow in PowerPoint on Windows or Mac and follow these steps to set up automatic play. Go to the Slide Show tab and select Set Up Slide Show. In the pop-up window, mark Browsed at a kiosk in the Show type section. This automatically loops the slideshow for continuous play and only stops when you press Esc.
Make a slide show that starts automatically when opened. Select File > Save as (or Save a Copy ). Click More options. Browse to the folder where you want to save your presentation. In the File name box, type a name for your presentation. Under Save as type, select PowerPoint Show. The file is saved as a .ppsx file.
In the editing view, right click the video you want to automate and select the down arrow to the right of the Start button. Select Automatically from the dropdown menu. Save the PowerPoint presentation. Now, it'll start playing automatically when you advance to the slide with your embedded video while in presenter view.
Table of Contents. Creating a self-running PowerPoint, as Microsoft calls it, can be a great addition to your company's booth at conventions or industry-wide conferences. By featuring photos ...
Instead of clicking to move between slides, PowerPoint will automatically display the slides going in an infinite loop … until someone presses Escape. Go to the Slide Show tab, Set up Slide Show … it's a PowerPoint dialog that hasn't changed for many years/versions. Choose ' Browsed at a kiosk (full screen) ' and click OK.
Easily Create a Self-Running PowerPoint Slide Show. by Avantix Learning Team | Updated November 12, 2021. Applies to: Microsoft ® PowerPoint ® 2013, 2016, 2019 and 365 (Windows) You can adjust up self-running PowerPoint slide shows to run automatically at trade shows, conventions, events or as web-based presentations.
Step 1: Apply transitions to automatically advance slides during a slide show. Transitions occur between slides when you run a slide show. To apply transitions to automatically advance slides during a slide show: In Normal View or Slide Sorter View, display or select a slide. Click the Transitions tab in the Ribbon.
By default, PowerPoint presentations advance manually so, you have to use a mouse to click on the presentation. A mouse click instructs PowerPoint that the current slide is over and that the presenter wants to move to the next slide or message. ... Run the Self-Running Slideshow. Still, at the Slide Show menu, click the From Beginning button to ...
2. From Microsoft's list of command line switches, you can use the /S switch to start a presentation: C:\path\to\POWERPNT.exe" /S "Presentation.pptx". To get the slideshow to start on boot-up create a shortcut to the path given above and put it in the Startup folder in the Start menu. Share.
Choose the File tab. Select Save As. Pick the Save as type as PowerPoint Show. Type a name for your slide show in the File name text box (you can use the same name and location as your .pptx/presentation file) and click Save. Your PowerPoint slide show file is saved with a .ppsx extension. Now, the next time you or anyone else opens your ...
After you confirm the arrangement and content, open the "Slide Show" tab and press the "Set Up Slide Show" button. You have the option to configure your presentation for three automatic play modes: "Presented by a speaker (full screen)," "Browsed by an individual (window)" and "Browsed at a Kiosk (full screen)."
Learn how to make your PowerPoint presentation loop or repeat itself automatically with this easy tutorial. Perfect for kiosks, exhibitions, or slideshows.
First, open your PowerPoint presentation in which you would like to loop. Once open, navigate to the "Set Up" group of the "Slide Show" tab and then select the "Set Up Slide Show" button. The "Set Up Show" window will appear. In the "Show options" group, check the box next to "Loop Continuously until Esc.".
Setting up an automatic slide show in PowerPoint is easy and can be done in just a few steps: Open your PowerPoint presentation. Click on the "Transitions" tab in the ribbon. In the "Timing" section, check "After" and enter the number of seconds you want each slide to appear. Click "Apply to All Slides". Save your presentation.
Once you have completed a presentation in Powerpoint, you can save it as a PowerPoint Show. This means your audience will see the slide show run when they open the file, rather than seeing the slides in edit mode. With your presentation open, click File, Save as. Name your presentation, and then click the Save as type dropdown menu underneath.
How to play PowerPoint slides automatically without clicking. Master the art of seamless presentations: Learn how to play PowerPoint slides automatically without clicking.
How to loop a PowerPoint presentation. 1. Open the Microsoft PowerPoint presentation that you want to loop. 2. With your PowerPoint presentation open, click on the "Slide Show" tab, then click on ...
I want a powerpoint presentation to start and run when I boot a computer. I have created a *.cmd file with the only string "C:\path-to-POWERPNT.exe" /S "c:\path-to-presentation.pptx" ... I saved the presentation as a PowerPoint Slideshow with Macros enabled (*.ppsm) and put a shortcut to the ppsm-file in the startup folder. ...
Six steps for creating a slide show. 1. Plan your slide show. Before getting too deep into your slide show project, it's a good idea to select and save the photos and videos you want to use. This helps you create a slide show more efficiently and purposefully, ensuring a better outcome. 4.
Here's a quick step-by-step: Select the Slide: Pick the slide we want to work on. Transitions Tab: Click on the "Transitions" tab on the ribbon. Choose Transition: Select the desired transition effect from the thumbnails. Apply to All: If we want a uniform transition, we can click on "Apply to All Slides". Additionally, the Transition ...