What are the different views of a presentation?
- Slide Sorter
Copyright 1997 by the Curators of the University of Missouri
- Irresistible Tech Gifts for That Special Dad
- Killer Smartphone Deals We Love

Different Ways to View Slides in PowerPoint
Use different views to design, organize, outline, and present your slideshow
- Brock University
Many people spend all their time in the Normal view when working on their PowerPoint presentations . However, there are other views that are useful as you put together and present your slideshow. In addition to Normal view (also known as Slide view), you'll find Outline view, Slide Sorter view, and Notes Page view.
Information in this article applies to PowerPoint 2019, 2016, 2013; PowerPoint for Microsoft 365, and PowerPoint for Mac.
Design Slides in Normal View
Normal view, or Slide view as it is often called, is the view you see when you start PowerPoint. It is the view where you'll spend most of your time in PowerPoint. Working on a large version of a slide is helpful when you're designing your presentation .
Normal view displays thumbnails of each slide, the slide where you enter your text and images, and an area to keep presenter notes.
To return to Normal view at any time, select View > Normal .
The four slide views are located on the View tab. Toggle between them to compare views.
Organize a Presentation in Outline View
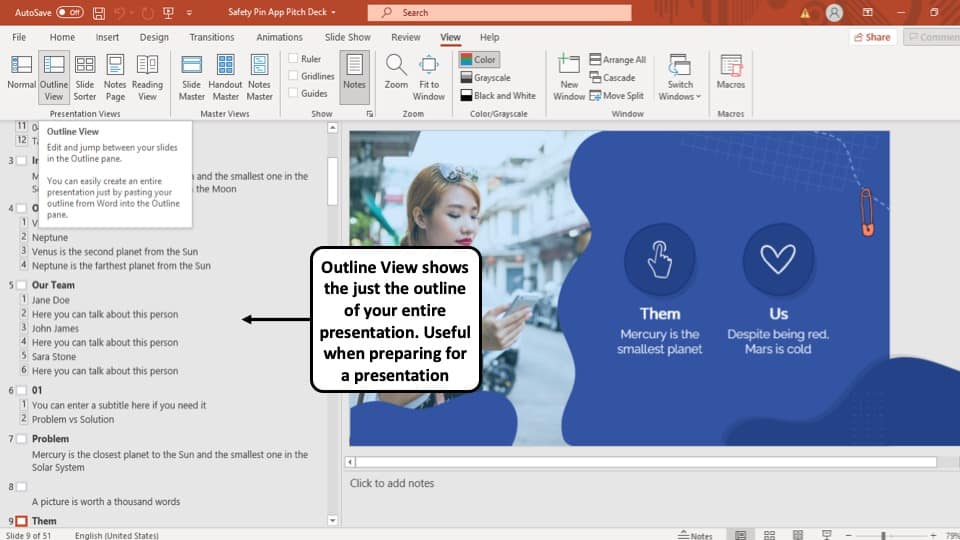
In the Outline view , your presentation is displayed in outline form. The outline contains the titles and main text from each slide. The graphics are not shown, although there may be a small notation that they exist. You can work and print in either formatted text or plain text.
Outline view makes it easy to rearrange your points and move slides to different positions. Outline view is useful for editing purposes. And, it can be exported as a Word document to use as a summary handout .
To view an outline of your presentation instead of thumbnails, select View > Outline View .
Rearrange a Presentation in Slide Sorter View
Slide Sorter view shows a miniature version of all the slides in the presentation in horizontal rows. These miniature versions of the slides are called thumbnails.
Use Slide Sorter view to delete or rearrange your slides by dragging them to new positions. Add effects, such as transitions and sounds, to several slides at the same time in Slide Sorter view. And, add sections to organize your slides. If you are collaborating with colleagues on a presentation, assign each collaborator a section.
To locate the Slide Sorter view, select View > Slide Sorter .
Keep Presentation Prompts in Notes Page View
When you create a presentation, add speaker notes that you refer to later while delivering the slideshow to your audience. Those notes are visible to you on your monitor, but they aren't visible to the audience.
Notes Page view shows a small version of a slide with an area below for speaker notes . Each slide is displayed on its own notes page. Print these pages to use as a reference while making a presentation or to hand out to audience members. The notes do not show on the screen during the presentation.
To locate the Notes Page view, select View > Notes Page .
Get the Latest Tech News Delivered Every Day
- Outline View in PowerPoint or OpenOffice
- Slide Layouts in PowerPoint
- The 10 Most Common PowerPoint Terms
- How to Select More Than One Slide in PowerPoint
- How to Print PowerPoint Slides
- How to Print PowerPoint Slides With Notes
- How to Use the Slide Sorter View in PowerPoint
- How to Use Speaker Notes in PowerPoint
- How to Hide and Unhide a Slide in PowerPoint
- How to Make a Slideshow on PowerPoint
- Converting PowerPoint Slides to Word Documents
- Thumbnails Are Used for Navigation in Digital Files
- Add, Delete or Change the Order of PowerPoint Slides
- How to Add Page Numbers in PowerPoint
- How to Use Copilot in Powerpoint
- Converting PowerPoint Presentations to Word Documents
The Ultimate Guide to Presentation Software

Presentation software is a technology that helps users create and deliver visual presentations. These programs allow users to create slideshows, which can include text, images, videos, and animations, and can be displayed at a meeting or conference or shared online.
In today's fast-paced business environment, effective communication is essential for success. Presentation software enables businesses to showcase their ideas and products in an engaging and visually appealing way, which can help to capture the attention of potential clients or investors. It also allows businesses to convey information in a clear and concise manner, making it easier for audiences to understand and remember key points.
As we move towards the future of work, the use of presentation software is likely to become even more important for businesses. With the rise of remote work and virtual meetings, it's vital for businesses to be able to present their ideas and products digitally. Additionally, as competition continues to increase across industries, businesses need to find new ways to stand out and make an impact. Presentation software can help them achieve this by creating dynamic and memorable visual presentations that leave a lasting impression on their audience.
Because of its ever growing importance, we’re seeing more and more presentation software companies popping up. So, where do you start in choosing the right software for your business needs?
Consider this your ultimate guide to the different types of presentation softwares .
Traditional presentation software
Traditional software refers to computer applications or programs that are typically used to create and deliver visual presentations. These programs are designed to allow users to create slideshows containing text, images, charts, graphs, and other visual aids. Some examples of traditional presentation software include Microsoft PowerPoint, Google Slides, and Apple Keynote.
These software programs often feature a linear structure where one slide follows another in a predetermined order. The user can customize each slide with their desired content and then present them live or share them digitally.
While traditional presentation software has been widely used for many years and remains popular, there are alternative options available that offer more advanced features and customization options.
Web-based or SaaS presentation software
Web-based or SaaS (Software as a Service) presentation software refers to programs that are accessed through a web browser and do not need to be installed on a user's device. These programs are hosted on the cloud and can be accessed from any internet-connected device.
Web-based or SaaS presentation software typically offers more flexibility and convenience than traditional presentation software like PowerPoint. They often include a wide range of customizable templates, as well as interactive features such as animations, videos, and audio. They also allow for easy collaboration between team members, as changes and updates can be made in real-time and accessed from any device.
Some popular examples of web-based or SaaS presentation software include Visme, Canva, and Beautiful.ai. These programs have become increasingly popular in recent years due to their ease of use, accessibility, and collaborative features, making them a preferred choice for many businesses and individuals.
Examples of SaaS presentation software
Visme’s PowerPoint-alternative presentation software helps users design slide decks, infographics, interactive charts and other visual content. The easy-to-use cloud-based tool allows users to move elements around the workspace, and new content can be added by dragging and dropping it into place. Visme users can build presentations from scratch by starting with a blank canvas, or they can customize a variety of templates. The presentation software also features a collection of thousands of icons, images and data visualizations, and users can even choose to boost engagement by adding elements like video, audio and GIF files.
- Canva Presentations
Canva offers much more than an alternative to PowerPoint. Users can rely on the visual design platform to create social media graphics, posters, invitations, business cards and all sorts of other documents along with presentations. Canva features thousands of professional templates, images and other content elements, as well as features to help teams collaborate with ease. The software tool’s drag-and-drop interface makes it simple for non-designers to customize templates and even edit photos with little experience.
- Beautiful.ai
We’re biased, but our presentation software is one of the best to help you work faster and smarter. By choosing advanced presentation software like Beautiful.ai, users are handing over the bulk of the design work to artificial intelligence. With powerful features like DesignerBot and Smart Slides, Beautiful.ai automates a lot of the presentation design process for you so you can create something brilliant in half the time. The design guardrails ensure teams stay on-brand , while allowing them to collaborate in the same deck at the same time.
AI presentation software
AI presentation software is a type of presentation software that uses artificial intelligence (AI) technology to help users create and design presentations. AI presentation software typically includes features such as automated design suggestions, layout recommendations and image recognition to streamline the presentation creation process.
Many AI presentation softwares will leverage generative AI to create fully customizable slides and decks from a text single prompt making the design process ridiculously fast. Other capabilities include image generation baked into the software, and content assistance to rewrite or adjust text.
Examples of AI presentation software include Beautiful.ai, Tome, and Slidesgo. These programs use AI technology to automate and streamline the presentation creation process, making it faster and more efficient for users to develop engaging and visually appealing presentations.
Examples of AI presentation software
With the recent buzz around AI, you’ve likely heard of Tome. Tome is a presentation app that generates your presentation for you with the help of AI. Simply type in a prompt and get a basic presentation to work with, edit, and customize in return. Tome also offers a few select templates for users to choose from if they don’t want to enter a prompt, which acts as a good jumping off point to get the bones of a presentation. While Tome leans heavily on technology and AI, users will still need some design skills to customize their decks once it’s generated.
Slidesgo is a Spanish-based company that provides high-quality presentation templates for individuals and businesses. The company offers a wide variety of templates, including business plans, marketing presentations, and educational materials. Slidesgo's templates are available for both Google Slides and PowerPoint, and can be easily customized to suit the user's needs. The company is known for its modern and creative designs, which help users create engaging and visually appealing presentations.
Beautiful.ai’s new DesignerBot makes it easier than ever for non-designers to create a new presentation from scratch, regardless of the content. Users can opt to create a new deck with DesignerBot by entering a short description (or prompt) based on what they need. Teams have the liberty to add as many keywords as they see fit to generate a fully built, totally customized presentation draft populated with appropriate text, layouts, photos, icons and design. Then, our powerful Smart Slides technology can be used to quickly edit slides by adding or removing content and automatically adapting, resizing and laying out the slides, all while maintaining corporate brand guidelines. With Beautiful.ai, businesses can generate entire decks in one click while Smart Slides and Team controls work together to preserve the integrity of the brand. It’s truly an automated zero-to-finish experience.
Video presentation software
Video presentation software is a type of software that allows users to create and deliver video presentations. These presentations can include a combination of video footage, images, text, and audio. Video presentation software typically includes features such as editing tools, visual effects, and transitions to help users create engaging and professional-looking presentations.
Examples of video presentation software include Powtoon and Lumen5. These programs allow users to record or import videos and then edit them with a variety of tools and effects. Video presentation software also enables users to add voice overs, music, and sound effects to their presentations.
Video presentation software is often used for business presentations, educational materials, and marketing campaigns. The use of video presentations has become increasingly popular in recent years due to the rise of remote work and virtual events, as well as the growing trend of online video content consumption. Video presentation software provides an effective way for users to communicate their ideas and messages in an engaging and dynamic way.
Examples of video presentation software
Powtoon— a British company that got their name by combining “PowerPoint” and “cartoon”— launched in 2012 as a more animated approach to otherwise stale presentations. They offer a wide variety of visual communication features like videos, doodles, presentations, animations, and screen recordings. However they’re most known for their ability to turn slides into video animations in an effort to make them more engaging and interactive for audiences.
Lumen5 is a Canadian-based technology company that provides an AI-powered video creation platform for businesses and individuals. The platform allows users to easily create engaging video content from articles, blog posts, or other written content without requiring any previous experience or special training. Lumen5's platform uses artificial intelligence and machine learning algorithms to automatically generate video content, including images, animations, and text overlays.
Nonlinear presentation software
A nonlinear presentation is a type of presentation where the viewer can navigate the content in a non-sequential order, rather than proceeding from one slide to the next in a linear fashion. In a nonlinear presentation, the content is organized using hyperlinks or other interactive elements that allow the viewer to jump back and forth between different parts of the presentation, depending on their interests and needs.
Nonlinear presentations are often used when presenting complex or interconnected information, or when the audience may have varying levels of interest or expertise in different areas. They can be created using specialized software, such as Prezi, or by manually creating hyperlinks within traditional presentation software like Microsoft PowerPoint or Google Slides.
Nonlinear presentations can be more engaging and interactive than traditional linear presentations, as they allow the viewer to take control of their own learning experience and explore the content in a way that suits them best. They can be particularly effective for educational and training purposes, as well as for sales and marketing presentations.
Examples of traditional presentation software
Prezi’s presentation software is a true alternative to PowerPoint. Rather than design standard slide decks, Prezi users create animated, non-sequential presentations that highlight topics and uncover subtopics with an engaging zoom feature. The PowerPoint-alternative software is an enticing alternative for creating visual presentations, but it’s probably better suited for experienced presentation designers thanks to its unique design. Still, Prezi is a perfect choice for presenters seeking a more creative way to capture an audience's attention.
Comparisons and considerations
Key differences between presentation software types.
The key differences between presentation software types are accessibility and technology. While most businesses are well versed in Microsoft and Google, other web-based (SaaS) softwares offer newer technologies and more flexible features. Each platform comes with its own pros and cons, and will vary based on the use case of the business.
Factors to consider when choosing presentation software
When choosing the right presentation software for your business, you first have to define what your goal is. Is it collaboration for your teams, design guardrails, leveraging AI to work faster, or accessibility and the ability to work in the cloud? Do you prefer linear or non-sequential presentations? What is your budget? These all play a major role in deciding which solution is the best fit for your workflow.
For more on presentation softwares, check out our recommendations for the top 2023 PowerPoint alternatives .

Jordan Turner
Jordan is a Bay Area writer, social media manager, and content strategist.
Recommended Articles
What is whiteboarding integrating collaborative brainstorming into presentations, a guide to getting started with affiliate marketing, beautiful.ai vs. powerpoint: a battle of presentation software, a guide to creating a unified sales and marketing plan that works for both teams.

Choose the right view for the task in PowerPoint

You can view your PowerPoint file in a variety of ways, depending on the task at hand. Some views are helpful when you're creating your presentation, and some are most helpful for delivering your presentation.
You can find the different PowerPoint view options on the View tab, as shown below.

You can also find the most frequently used views on the task bar at the bottom right of the slide window, as shown below.

Note: To change the default view in PowerPoint, see Change the default view .
Views for creating your presentation
Normal view

Normal view is the editing mode where you’ll work most frequently to create your slides. Below, Normal view displays slide thumbnails on the left, a large window showing the current slide, and a section below the current slide where you can type your speaker notes for that slide.

Slide Sorter view

Slide Sorter view (below) displays all the slides in your presentation in horizontally sequenced, thumbnails. Slide show view is helpful if you need to reorganize your slides—you can just click and drag your slides to a new location or add sections to organize your slides into meaningful groups.

For more information about sections, see Organize your PowerPoint slides into sections .
Notes Page view

The Notes pane is located beneath the slide window. You can print your notes or include the notes in a presentation that you send to the audience, or just use them as cues for yourself while you're presenting.

For more information about notes, see Add speaker notes to your slides .
Outline view
You can get to Outline view from the View tab on the ribbon. (In PowerPoint 2013 and later, you can no longer get to Outline view from Normal view. You have to get to it from the View tab.)
Use Outline view to create an outline or story board for your presentation. It displays only the text on your slides, not pictures or other graphical items.

Master views
To get to a master view, on the View tab, in the Master Views group, choose the master view that you want.
Master views include Slide , Handout , and Notes . The key benefit to working in a master view is that you can make universal style changes to every slide, notes page, or handout associated with your presentation.
For more information about working with masters, see:
What is a slide master?
Use multiple slide masters in one presentation
Change, delete, or hide headers and footers on slides, notes, and handouts
Views for delivering and viewing a presentation
Slide show view.

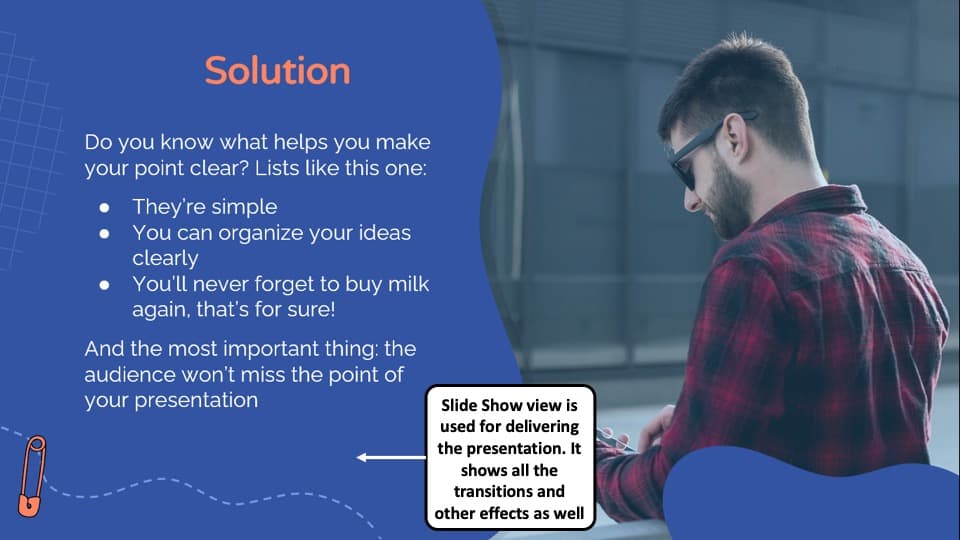
Use Slide Show view to deliver your presentation to your audience. Slide Show view occupies the full computer screen, exactly the way your presentation will look on a big screen when your audience sees it.
Presenter view

Use Presenter view to view your notes while delivering your presentation. In Presenter view, your audience cannot see your notes.

For more information about using Presenter view, see View your speaker notes as you deliver your slide show .
Reading view

Most people reviewing a PowerPoint presentation without a presenter will want to use Reading view. It displays the presentation in a full screen like Slide Show view, and it includes a few simple controls to make it easy to flip through the slides.
The views in PowerPoint that you can use to edit, print, and deliver your presentation are as follows:
Master views: Slide, Handout, and Notes
You can switch between PowerPoint views in two places:
Use the View menu to switch between any of the views

Access the three main views (Normal, Slide Sorter, or Slide Show) on the bottom bar of the PowerPoint window

Views for creating or editing your presentation
Several views in PowerPoint can help you create a professional presentation.
Normal view Normal view is the main editing view, where you write and design your presentations. Normal view has three working areas:
Thumbnail pane
Slides pane

Slide Sorter view Slide Sorter view gives you a view of your slides in thumbnail form. This view makes it easy for you to sort and organize the sequence of your slides as you create your presentation, and then also as you prepare your presentation for printing. You can add sections in Slide Sorter view as well, and sort slides into different categories or sections.
Notes Page view The Notes pane is located under the Slide pane. You can type notes that apply to the current slide. Later, you can print your notes and refer to them when you give your presentation. You can also print notes to give to your audience or include the notes in a presentation that you send to the audience or post on a Web page.
Outline view (Introduced in PowerPoint 2016 for Mac) Outline view displays your presentation as an outline made up of the titles and main text from each slide. Each title appears on the left side of the pane that contains the Outline view, along with a slide icon and slide number. Working in Outline view is particularly handy if you want to make global edits, get an overview of your presentation, change the sequence of bullets or slides, or apply formatting changes.
Master views The master views include Slide, Handout, and Notes view. They are the main slides that store information about the presentation, including background, theme colors, theme fonts, theme effects, placeholder sizes, and positions. The key benefit to working in a master view is that on the slide master, notes master, or handout master, you can make universal style changes to every slide, notes page, or handout associated with your presentation. For more information about working with masters, see Modify a slide master .
Views for delivering your presentation
Slide Show view Use Slide Show view to deliver your presentation to your audience. In this view, your slides occupy the full computer screen.
Presenter view Presenter view helps you manage your slides while you present by tracking how much time has elapsed, which slide is next, and displaying notes that only you can see (while also allowing you to take meeting notes as you present).
Views for preparing and printing your presentation
To help you save paper and ink, you'll want to prepare your print job before you print. PowerPoint provides views and settings to help you specify what you want to print (slides, handouts, or notes pages) and how you want those jobs to print (in color, grayscale, black and white, with frames, and more).
Slide Sorter view Slide Sorter view gives you a view of your slides in thumbnail form. This view makes it easy for you to sort and organize the sequence of your slides as you prepare to print your slides.
Print Preview Print Preview lets you specify settings for what you want to print—handouts, notes pages, and outline, or slides.
Organize your slides into sections
Print your slides and handouts
Start the presentation and see your notes in Presenter view
In PowerPoint for the web, when your file is stored on OneDrive, the default view is Reading view. When your file is stored on OneDrive for work or school or SharePoint in Microsoft 365, the default view is Editing view.
View for creating your presentation
Editing view.
You can get to Editing View from the View tab or from the task bar at the bottom of the slide window.
Editing View is the editing mode where you’ll work most frequently to create your slides. Below, Editing View displays slide thumbnails on the left, a large window showing the current slide, and a Notes pane below the current slide where you can type speaker notes for that slide.

The slide sorter lets you see your slides on the screen in a grid that makes it easy to reorganize them, or organize them into sections, just by dragging and dropping them where you want them.

To add a section right click the first slide of your new section and select Add Section . See Organize your PowerPoint slides into sections for more information.

Views for delivering or viewing a presentation
Use Slide Show view to deliver your presentation to your audience. Slide Show view occupies the full computer screen, exactly the way your presentation looks on a big screen when your audience sees it.
Note: Reading View isn't available for PowerPoint for the web files stored in OneDrive for work or school/SharePoint in Microsoft 365.
Most people reviewing a PowerPoint presentation without a presenter will want to use Reading view. It displays the presentation in a full screen like Slide Show view, and it includes a few simple controls to make it easy to flip through the slides. You can also view speaker notes in Reading View.

Need more help?
Want more options.
Explore subscription benefits, browse training courses, learn how to secure your device, and more.

Microsoft 365 subscription benefits

Microsoft 365 training

Microsoft security

Accessibility center
Communities help you ask and answer questions, give feedback, and hear from experts with rich knowledge.

Ask the Microsoft Community

Microsoft Tech Community

Windows Insiders
Microsoft 365 Insiders
Was this information helpful?
Thank you for your feedback.
Want to create or adapt books like this? Learn more about how Pressbooks supports open publishing practices.
Unit 1 Use a Theme Template and Slide Layouts to Create a Presentation
4 View and Save Presentations
view and save presentations, topics include:, open an existing presentation, correct text, view a presentation, save vs save as, view options, quit powerpoint, print a presentation.
To view an existing presentation, start PowerPoint, click on the File tab, select Open . Your Windows Explorer will open and allow you to choose an existing presentation. Note: This section is information only, you can work along exploring this feature. Later in this lesson you will use this PowerPoint open in the hands on practice activities.
In the first learning activity we learned that there are four buttons located in the View area that are used to view a presentation.
A useful way to view your presentations is in black and white or Grayscale . If you need to use a projector that can only handle Black & White or Grayscale you should view your presentation with a black and white command applied to be sure your text and layout is still readable.
To see how your slides would look in black and white, click the View tab, select Grayscale or Black and White in the Color/Grayscale group and scroll through your slides.
A new tab will then display. From the Black and White tab, select one of the various black and white settings.
A presentation can be printed in many formats. You can print the slides of your presentation, handouts for the audience, the notes page, or the outline view. Prior to printing the desired material, you may want to specify the page Orientation; select Slide Orientation located in the Page Setup group in the Design tab. The dialogue box will appear; this allows you to set the orientation either Portrait or Landscape.
The next step to printing your presentation is to display the print dialogue box. Click on the File tab, then Print . At the Print screen you have the the option to print all of the slides, or you can specify the slides that you would like to print.
The drop list beside Full Page Slides : displays a list of printing options such as print slides, handouts, notes pages and outline view.
The Color drop list includes the options to have your presentation print in Color, Grayscale and Pure Black and White.
Once you have determined how you want your presentation to print, you can then select the number of copies and click OK.
While viewing your presentation, you need to proofread your presentation for any errors. PowerPoint is equipped with a spell checking feature to check for and correct misspelled words. Keep in mind that the spell check only recognizes misspelled words not misused words. To check your presentation for any spelling mistakes, click on the Spelling button located in the Review tab. When PowerPoint recognizes a misspelled word it offers suggestions, you then have the option to choose the correct spelling or ignore the misspelled word.
When creating a presentation, you must save your files to a disk. When saving the presentation for the first time, you will use the Save As command located under the File tab.
You will then name your presentation and save it either on your hard drive or on a disk. When naming a PowerPoint presentation, you will notice that the new file will be named with the extension .pptx.
Once you have saved your presentation with a new name, when you make any additional changes you can use the Save command. The Save command saves any changes you make to the file in the same location you specified when you used the Save As command. Be sure to save your files frequently.
Once you have saved your PowerPoint Presentation, click on the X located to the right of the Title bar. This command will close the PowerPoint program.
Presentation Software Copyright © 2013 by bpayne is licensed under a Creative Commons Attribution 4.0 International License , except where otherwise noted.
Share This Book
- Interface and Basics
Views in PowerPoint 365 for Windows
Learn about various views that allow you to edit and show slides in PowerPoint 365 for Windows. Do you use all these views?
Author: Geetesh Bajaj
Product/Version: PowerPoint 365 for Windows
OS: Microsoft Windows 10 and higher
Date Created: December 13, 2019 Last Updated: September 12, 2023
Learn PowerPoint
Export Word Documents to PowerPoint Slides
Your slides are the same, yet various views in PowerPoint do allow you to see those same slides with a different viewpoint. This approach makes sense because viewing slides in Slide Show view gives an entirely different perspective than editing them in Normal view. Further, it's easier to reorder and work with multiple slides in Slide Sorter view, and make changes to individual slides in Normal view.
All put together, PowerPoint 365 for Windows provides you with ten different views. Eight of these views can be accessed from the View tab of the Ribbon , as shown highlighted in red within Figure 1 . You then click on any of the buttons in the Presentation Views and Master Views groups. All views are explained in more detail in separate, linked pages.

PowerPoint 365 views, accessible from the View tab of the Ribbon are:
- Normal view
- Outline view
- Slide Sorter view
- Notes Page view
- Reading view
- Slide Master view
- Handout Master view
- Notes Master view
We also explore two other views which are accessible from other tabs of the Ribbon , or elsewhere within the PowerPoint 365 interface :
- Slide Show view
- Presenter view
Other than the View tab of the Ribbon , you can also access most of these views by clicking the four small buttons towards the right side of the Status Bar , as shown highlighted in red within Figure 2 .
These four buttons (explained from left to right) allow quick access to the same views. In addition to just clicking these four buttons, you can also click them along with the Shift , Ctrl , and Alt keys. The table below provides these key combinations:

PowerPoint Keyboard Shortcuts
Do you want more keyboard shortcuts?
Explore our PowerPoint Keyboard Shortcuts and Sequences Ebook that is updated for all PowerPoint versions.
01 07 01 - Views: Views in PowerPoint (Glossary Page)
Views in PowerPoint 365 for Mac Views in PowerPoint 2019 for Windows Views in PowerPoint 2016 for Windows Views in PowerPoint 2016 for Mac Views in PowerPoint 2013 for Windows Views in PowerPoint 2011 for Mac Views in PowerPoint 2010 for Windows Views in PowerPoint 2007 for Windows Views in PowerPoint for the Web
You May Also Like: Is It, Like, OK To Say ‘Like’? | Parabolas PowerPoint Templates
Popular Posts

Jeopardy-Like PowerPoint Template (25 Questions)
Want to play a Jeopardy-like game using PowerPoint slides? Yes, this is absolutely doable but making PowerPoint slides with all the interactivity and layouts takes too much work. Fortunately, we have done the work for you. just download our Jeopardy-like 25 (5x5) question PowerPoint template, replace the placeholders provided for questions, answers, and categories, and you’re done! You'll still need a real human being to track scores and you could soon be playing this amazing game as part of a fun exercise, a training program, or even a quiz show.
Download and play your own Jeopardy-like game
Microsoft and the Office logo are trademarks or registered trademarks of Microsoft Corporation in the United States and/or other countries.
Home | PowerPoint | Photoshop | PowerPoint Templates | PowerPoint Tutorials | Blog | Notes | Ezine | Media Kit | Feedback | Site Map | About Us | Contact Us Link to Us | Privacy | Testimonials PowerPoint Backgrounds | Christian PowerPoint Backgrounds | Business PowerPoint Presentation Templates
Plagiarism will be detected by Copyscape
👀 Turn any prompt into captivating visuals in seconds with our AI-powered design generator ✨ Try Piktochart AI!
- Piktochart Visual
- Video Editor
- AI Design Generator
- Infographic Maker
- Banner Maker
- Brochure Maker
- Diagram Maker
- Flowchart Maker
- Flyer Maker
- Graph Maker
- Invitation Maker
- Pitch Deck Creator
- Poster Maker
- Presentation Maker
- Report Maker
- Resume Maker
- Social Media Graphic Maker
- Timeline Maker
- Venn Diagram Maker
- Screen Recorder
- Social Media Video Maker
- Video Cropper
- Video to Text Converter
- Video Views Calculator
- AI Brochure Maker
- AI Document Generator
- AI Flyer Generator
- AI Image Generator
- AI Infographic
- AI Instagram Post Generator
- AI Newsletter Generator
- AI Quote Generator
- AI Report Generator
- AI Timeline Generator
- For Communications
- For Education
- For eLearning
- For Financial Services
- For Healthcare
- For Human Resources
- For Marketing
- For Nonprofits
- Brochure Templates
- Flyer Templates
- Infographic Templates
- Newsletter Templates
- Presentation Templates
- Resume Templates
- Business Infographics
- Business Proposals
- Education Templates
- Health Posters
- HR Templates
- Sales Presentations
- Community Template
- Explore all free templates on Piktochart
- Course: What is Visual Storytelling?
- The Business Storyteller Podcast
- User Stories
- Video Tutorials
- Need help? Check out our Help Center
- Earn money as a Piktochart Affiliate Partner
- Compare prices and features across Free, Pro, and Enterprise plans.
- For professionals and small teams looking for better brand management.
- For organizations seeking enterprise-grade onboarding, support, and SSO.
- Discounted plan for students, teachers, and education staff.
- Great causes deserve great pricing. Registered nonprofits pay less.
The 11 Best Presentation Software to Use in 2023

The ability to effectively share ideas, illustrate a concept, and convince an audience is invaluable whether you’re a student or a C-level executive. These days, the presentation software you use to create presentations is just as important as your public-speaking skills.
On top of that, most companies have transitioned to remote work recently due to the current coronavirus situation, and now need to share their stories online through a virtual conference room with their distributed teams and external audience members.
That’s why we’ve come up with a list of some of the best presentation software available right now, so you can choose a compatible and innovative presentation maker that includes the best presentation tools to suit your specific needs.
Choose the best presentation software by weighing the pros and cons
You’ll see some of the most popular presentation apps: from free to paid subscription platforms, and slideshow applications to full-blown visual design presentation software with interactive features and more.
Each presentation software has its pros and cons, so it’s up to you to figure out which suits your needs best; consider the software learning curve, whether your company is made up of Mac users or Windows users and the software compatibility, if you need an enterprise account or free account, etc.
Let’s dive in!
1. Piktochart

Piktochart is a presentation software that can create a variety of design visuals, from infographics to social media stories.
An area in which Piktochart shines is crafting unique presentations.
On Piktochart, users can choose from a wide range of professionally-designed presentation templates .
These custom templates include everything from monthly marketing reports to employee onboarding templates.
This broad selection of customizable templates is especially useful for those who don’t have much design experience or know-how but need to create a visually stunning unique presentation in a pinch.
Piktochart’s presentation maker also makes it easy to edit presentations and include design elements such as lists, timelines, comparisons, graphs, and different types of charts through drag-and-drop tools.
You can even make visual maps and interactive charts to keep your audience engaged throughout your presentation.
And if your company uses a Piktochart TEAM plan , you can enjoy the platform’s ability to store brand assets , color schemes, and bespoke templates. Here, replicating company-branded visuals is a breeze.
Piktochart comes with a free version but with certain limitations. Active visuals are capped at five per month and published visuals have a Piktochart watermark.
If you want features such as team template collaboration, project sharing, and annotated commenting, you’ll have to get a Team account. To sum it up:
- Lots of professionally-designed templates
- Good for both design professionals and non-professionals
- Easy to store brand assets and bespoke templates for future presentations
- Access presentation tools from anywhere via a web browser
- Free presentation app version available
- Might take some getting used to if you’re used to PowerPoint presentations
2. Microsoft PowerPoint

Microsoft PowerPoint is often the first presentation software that comes to mind.
Once considered the “O.G.” and best presentation software available, it is still widely used and has a familiar interface—which means most users are comfortable with it.
This presentation app has everything you need to create a presentation: from animated transitions for interactive presentations to pre-installed fonts and graphic elements.
Users can also upload their own fonts, graphics, and images into their finished presentation.
Lastly, it’s available as part of the Microsoft Office software package; and you can work on your presentations via the web and mobile devices, for offline viewing as well as online.
However, PowerPoint is no longer considered the best presentation software, as it has very few templates to choose from, and these tend to fall quite flat compared to modern apps and software.
It’s easy to fall back into boring slideshow PowerPoint files if you don’t know what you’re doing.
And because most people use PowerPoint, you’re likely using the same template as the next guy.
As standalone presentation software, PowerPoint is pricey at US$139.99—and accessible through only one device unless you upgrade your package.
And while PowerPoint is primarily a slideshow application and presentation maker, its strengths are limited to this category.
So if you’re looking for the best presentation software, and bang for your buck for a robust presentation tool, you might want to look elsewhere.
- Market leader in slideshow applications to create slides
- Widely used and familiar interface for the presentation process
- Reliable and usable on most devices as well as being a desktop app
- Flat templates
- Limitations with its standalone-presentation software price
3. Google Slides

Google Slides is a slideshow application that is very similar to PowerPoint. But there are three main differences: it’s fully online (while also allowing for offline viewing), collaborative, and free.
The great thing about Google Slides (besides the fact that it’s completely free for anyone with a Google account) is that you can log on via your browser or through its official app.
You can access all Google Slides presentations from any device (mobile, tablet, and desktop), and share them with other people so you can collaborate in real-time.
Google Drive allows all your presentations to live on the cloud, accessible to all marketing and sales teams, with unparalleled ease of use.
And there’s no need to worry about disruptions as all changes are saved as they happen, as long as you have an active internet connection.
Additionally, anyone familiar with PowerPoint will be comfortable using Google’s iteration and likely be delighted by Google Drive and the slide library available.
It’s also a lot simpler, so even those new to presentation-making will find it easy to navigate.
However, some might find Google Slides too simple as it lacks the wealth of features available on PowerPoint.
These include embedding videos from sources other than YouTube, plus adding audio tracks and sound effects, limiting the ability to create unique interactive presentations.
Some users also encounter issues with downloading and exporting to different formats, including PowerPoint.
Some slides may even turn out completely different from the original version.
All in all, Google Slides is a great option for those who are looking for a free application and only need to create simple presentations.
- The free plan supports professional presentations
- Web-based and collaborative to create presentations
- Simple and familiar interface for an online presentation software
- Too simple for advanced presentation making
- Difficult to export to other formats
- Limited templates and customization options for interactive content

You could say Keynote is Apple’s version of PowerPoint. It’s also a slideshow application—but in typical Apple fashion, it comes with a sleek, minimalist interface and is considered one of the best presentation apps on the market.
There are 30 different themes to choose from, which serve as templates for those who need a quick fix. And it can do most of what PowerPoint can.
Keynote’s main perk is that it’s part of the Apple ecosystem.
That means it has built-in iCloud and Apple Watch support so users can control their presentation from their mobile device or even their wrists with just a click.
This presentation app comes pre-installed on most Mac devices. Otherwise, you can purchase it from the Apple store for just US$9.99 for mobile and US$19.99 for OS X.
The big downside is that Keynote is exclusive to Mac OS.
Non-Apple users can create, upload, and sync their own Keynote presentations through their iCloud Drive, but this presentation app is only truly helpful only for those who use multiple Apple devices.
And if you’re used to working on PowerPoint, you might find Keynote a bit confusing in the beginning, especially when editing presentations.
- Sleek, minimalist interface
- Free with most Apple devices
- No access for PC and Android devices except through iCloud
5. SlideDog
Sliding away from straightforward slideshow applications and other presentation apps, SlideDog is a web-based multimedia presentation tool that lets users combine different types of media to create and edit presentations.
This includes everything from PowerPoint decks to videos and even PDFs that can all be played side by side without any awkward transitions.
It’s also extremely easy to customize a SlideDog presentation.
You just need to upload the files into the SlideDog web browser application, and then drag and drop them according to the order in which you want them to play.
You can control your presentations and playlists from another device, and audience members can view your slideshow on their devices by clicking a link.
SlideDog has a free presentation app version that provides all of the basic features.
However, live sharing and premium support are only available with a Pro account that costs US$99 per year, and not via the free version alone.
While SlideDog is technically considered presentation software, you can’t actually create presentations on it.
You can simply stitch together different pre-made presentations in various formats into what is essentially a playlist.
Lastly, SlideDog supports only Windows devices, so Apple and Linux users can’t use it.
- Supports a lot of different media
- Provides live-sharing
- More dynamic compared to the usual slideshow presentation
- Only collates media; doesn’t create them
6. Haiku Deck

Ever come across presentations with size-eight fonts and blocks of indecipherable paragraphs on each slide?
You can avoid such an unfortunate scenario with Haiku Deck.
HaikuDeck is a web and mobile application that favors images over text.
It works by limiting the number of words users can put on each slide, and allowing them to search for images on their platform related to the slide’s main idea.
This makes it ideal for those who want to simplify their thoughts and let the images do all the talking.
Users have over 40 million royalty-free photos to choose from, plus dozens of simple slide layouts on the platform itself.
While this certainly simplifies the process of creating a visually rich presentation, it can be limiting for those who need to include more information into their slides.
It’s a great option for someone giving a TED Talk, for example.
But for others who need to pass on more facts and figures, having a built-in word limit might be too restrictive.
- Simple and easy to use
- Access to millions of royalty-free stock images
- May be too simple for some
- No Android support
- Limited features
7. Prezi Business

Among the other presentation software on this list, Prezi Business might be one of the most unique presentation tools.
Rather than offering a regular slideshow format, Prezi looks more like a 3D interactive mind map where viewers jump dynamically from one idea to the next.
You can zoom in on one “slide” and then zoom out for the next.
Prezi has over 100 templates to choose from and comes with a very simple interface and a drag-and-drop style of editing.
It’s compatible with both Mac and PC desktops as well as smartphones.
It’s also similar to a regular PowerPoint deck in that you can jump back and forth from one “slide” to the next.
And like SlideDog, you can send viewers the link to the presentation as you’re presenting.
Also, up to 10 people can work on a Prezi presentation at the same time, one of its main selling points.
This is great for collaboration, but having so many hands-on deck at once can get messy.
- Dynamic and immersive presentations
- Highly visual
- Easy to use
- May not be appropriate for all types of presentations

In a world of slides and presentations, standing out is the key. Ludus brings the flair of graphic design into the world of presentations.
At its core, Ludus is the bridge between presentation tools and design software. It enables users to infuse their slides with the kind of design elements you’d typically find in advanced design platforms.
Not only can you import assets from design giants like Adobe, but its seamless integration with tools like Unsplash and Giphy makes sourcing visuals a breeze.
It’s a fairly affordable tool for all its features compared to the other paid options in this list, as users pay 12.49 euros monthly (if billed annually).
However, while Ludus’ robust design capabilities can elevate the look of your presentation, those unfamiliar with design tools might find there’s a learning curve.
- Merges presentation creation with advanced design tools.
- Seamless integration with popular design platforms and visual databases.
- Offers a unique edge in presentation aesthetics.
- Might be a tad overwhelming for non-designers
- Can have a steeper learning curve for those used to more straightforward platforms
9. Slidebean

Crafting a compelling presentation demands not only compelling content but also a design that can captivate your audience. Enter Slidebean.
Slidebean offers an intelligent design solution, using AI to transform raw content into professionally styled presentations. This platform streamlines the design process, allowing you to focus on the message rather than fretting over aesthetics.
The basic plan is free and allows you to create a presentation. But if you want to share or download your presentations, as well as unlock the full suite of features, you’ll need to sign up for the All-Access plan priced at $199 per year.
While it provides a quick and efficient method to produce polished slides, it also offers features for sharing, collaboration, and viewer analytics, adding an edge to your presentation strategy.
However, for professionals who prioritize granular design control, the automated design might feel limiting at times.
- AI-driven design ensures visually appealing presentations.
- Features for collaboration and viewer insights.
- Efficient design process reduces time and effort.
- Might not offer the detailed design customization some users desire.
- Automated choices may not always align with specific branding or style preferences.
10. ClearSlide

Having great visuals to drive your point home can be the difference between getting a sale across the line or customers walking away. ClearSlide stands out in this area as a presentation tool for businesses laser-focused on boosting their sales and marketing game.
At its core, ClearSlide is all about leveling up business presentations. Whether you’re marketing a new product or tracking client engagement, it’s got tools that cater to every need.
Whether it’s a PowerPoint, a PDF, or something from Google Drive or Dropbox, ClearSlide makes it simple to upload and work with these files.
The unique edge? ClearSlide’s virtual meeting space pops open with just a click. It’s all about seamless, professional presentations without the hassle.
Beyond just slides, the platform dives deep into metrics and analytics, ensuring every presentation is backed by data-driven insights. And the tool is available for $35 per month, which isn’t too pricey for medium-sized businesses.
However, its complexity isn’t for everyone. For some, the variety of features might seem a tad overwhelming, and its focus on metrics might be a bit much for those just wanting a basic presentation tool.
- Seamless virtual meetings and presentations
- Integrates with popular platforms
- Offers insightful analytics for sales and marketing
- Might feel complex for some users
- Limited transition and design effects
- Mobile experience could be better

Stepping into the world of animation, Vyond, once known as GoAnimate, allows users to turn their narratives into professional animated videos. For those looking to elevate their content without diving deep into animation complexities, Vyond can be the go-to tool.
This platform is more than just drag-and-drop animations. It integrates AI capabilities with Vyond Go, which transforms text prompts into rough-cut videos.
Fancy a quick draft for your upcoming project? This AI assistant is up for the task. And if perfection is your game, take it to Vyond Studio, filled with an array of characters, templates, and backgrounds.
The Essential Plan at $25 per month is suitable for individuals on a budget. However, if you want to export videos at 1080p and above, have collaboration tools, or different export options, you’ll need to sign up for the Professional Plan at $92 per month.
As robust as the tool is, there are still some kinks to iron out. AI voiceovers might still need some tweaks, and detailed color customizations can be a bit tricky, but the tool’s strengths, especially for businesses, are undeniable.
- Hassle-free video creation for beginners to experts
- Generous library of pre-made assets
- AI-powered video and script creation with Vyond Go
- AI voiceovers might feel a bit robotic
- Some customization limitations for specific props and scenes
The best presentation software is…
…completely up to you!
When it comes to presentation software, the world is your oyster.
Each of these tools either has a free or trial version for you to check out, so you don’t have to commit just yet.
When it’s time to choose, consider the following aspects to find the right presentation software for you:
- Ease of use. Is it easy for you to understand or will it require lots of training before you can start creating presentations?
- Accessibility. Can you access your presentation software from any device or are you limited to carrying your laptop to every presentation?
- Real-time collaboration. Can multiple people work on the same project or do you have to keep downloading and emailing drafts?
- Create design tools. Can you create presentations with dynamic design elements or are you stuck with the same kind of slide each time?
- Template availability. Is this tool only accessible to a design professional or can anyone create stunning presentations through pre-designed and updated templates?
Piktochart , for example, would be a fantastic presentation software choice among the long list of PowerPoint alternatives for teams looking for a variety of eye-catching designs without requiring much technical know-how. Meanwhile, Microsoft PowerPoint might be the best presentation software for those who are just looking to play it safe.
Hopefully, this best presentation software list sheds some light on the tools at your disposal. Choose wisely!

Other Posts

How to Make a Presentation (2023 Guide With Tips & Templates)

How to Nail Your Brand Presentation: Examples and Pro Tips

Presentation Design: A Step-by-Step Guide
View Options in PowerPoint – A Complete Beginner’s Guide!
By: Author Shrot Katewa

There are many different types of presentations view available in PowerPoint including Normal View, Outline View, Presenter View, and Slide Show View to name a few. All these views serve different purposes and it is important to know how to use them appropriately to get the most out of PowerPoint!
In this article, we will talk about what each type of view does in PowerPoint and how to access them so that you can choose the best for your needs! So, let’s get started!
[ A Quick Note Before We Begin – for this article, I will be using one of the presentation templates from Envato Elements . With Envato Elements, you get access to thousands of presentation designs with unlimited downloads so you never run out of options again. Plus, you get free previews so you know exactly what you’re getting before buying! It is also very affordable. Check out their pricing here ]
1. What are the Different Type of View Options Available in PowerPoint?
Microsoft PowerPoint is equipped with a variety of Slide View options that can be used for different purposes.
These are the different view options available in PowerPoint –
- Normal View
- Slide Sorter View
- Notes Page View
- Reading View
- Outline View
- Slide Show View
- Presenter View
- Slide Master View
2. How to Access the Different View Modes in PowerPoint?
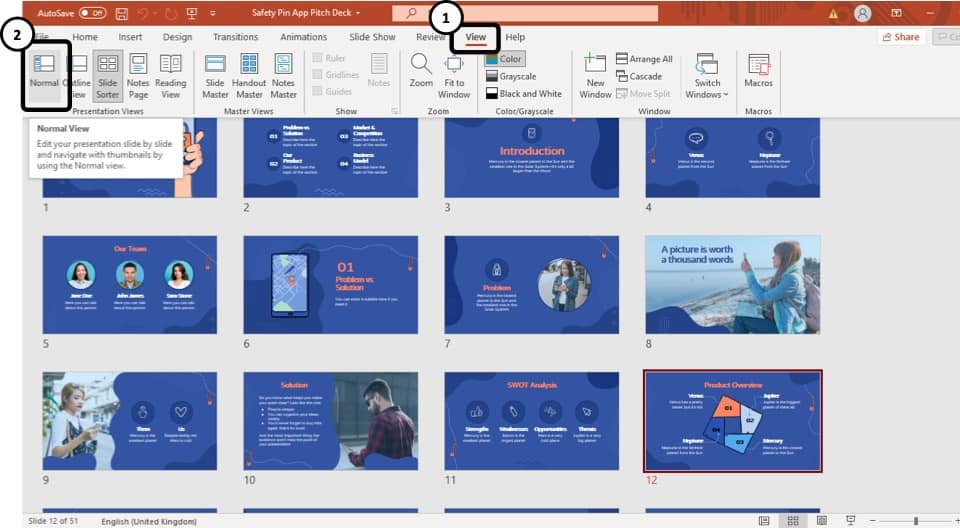
To access the different view modes in PowerPoint, you have to click on the ‘View’ tab in the ribbon. The 2-step process is described below.
Step-1: Click on the ‘View’ tab
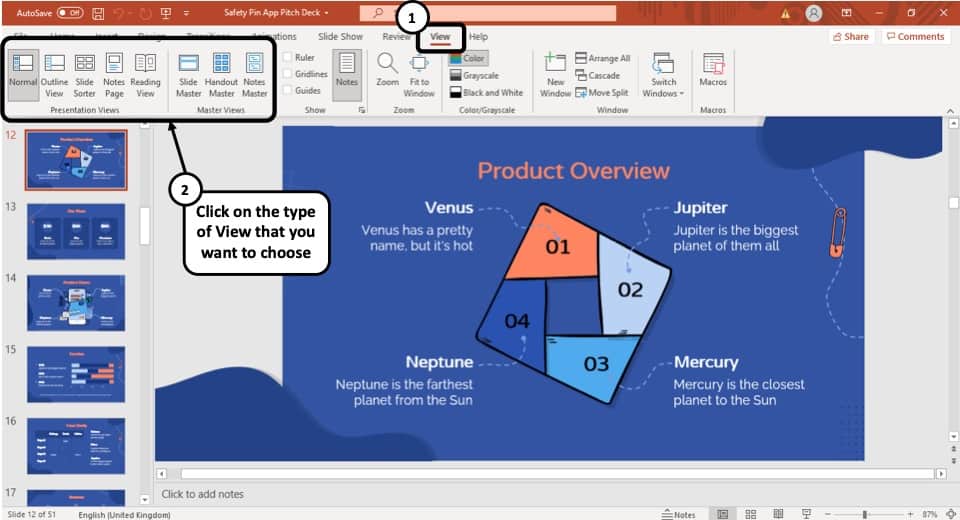
At first, select the ‘View’ tab, which is the second to last tab in the ribbon section of your PowerPoint Window.
Step-2: Select your preferred ‘View Mode’
Once you have access to the ‘View’ tab, you can select your preferred view mode such as the Outline View , Slide Sorter view, Slide Master view, etc. from the Presentation View section or the Master View section. (as shown in the image in step 1)
3. What is the Purpose of Various View Modes in PowerPoint?
Each view mode in PowerPoint has its own purpose. Let’s go through the purposes of the different slide view options one by one below –
1. Normal View
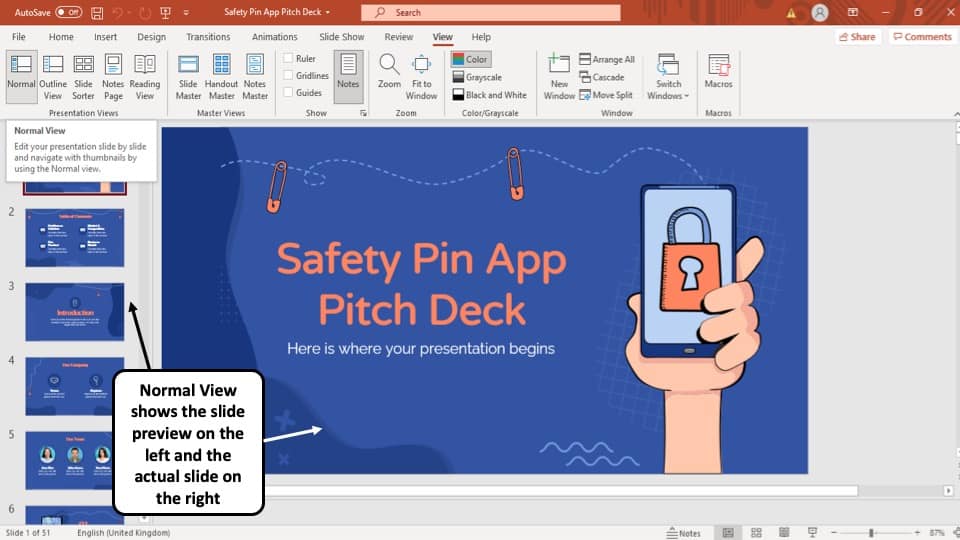
The ‘Normal View’ option is the first option in the ‘Presentation Views’ section of the ‘View’ tab. It is the most commonly used viewing option and is also the default slide view for PowerPoint.
The slides appear on the left of the PowerPoint window in the ‘Slide Navigation’ bar. Thumbnails of the slide are represented as boxes in the ‘Slide Navigation’ bar with its consecutive serial number to the left of it.
The main function of normal view mode in PowerPoint is to navigate through slides in a vertical grid while allowing you to add, design, or edit the slides while getting a preview of the slides on the left.
2. Slide Sorter View
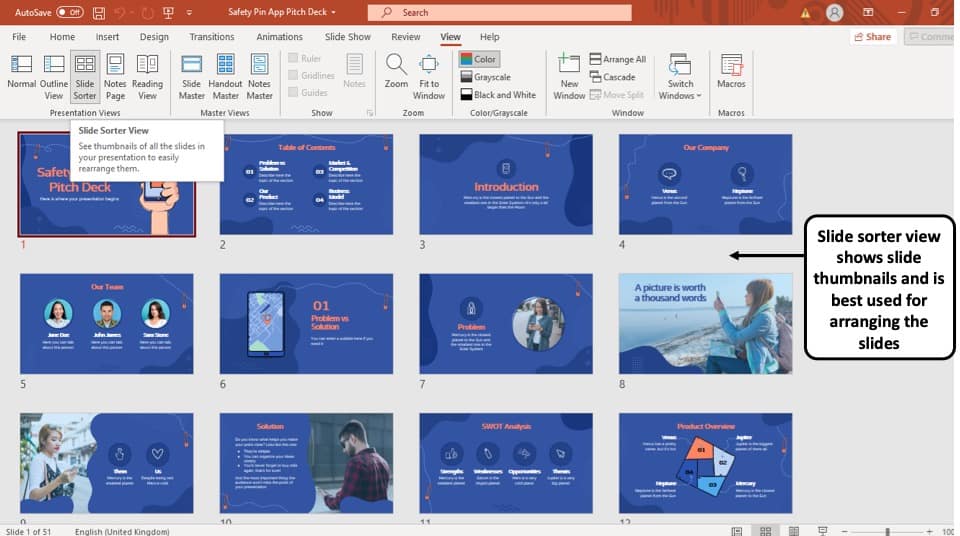
The ‘Slide Sorter’ option gives you an overview of all the slides in your PowerPoint presentation.
The slides are represented as thumbnails as a grid of boxes arranged side by side. The serial number of the slide is given on the bottom left corner of the slide thumbnail.
This option serves the purpose of viewing the slides together in one window making it easier to rearrange and organize them in a quick fashion.
3. Notes Page View

The ‘Notes Page View’ option gives you the view of each slide and its speaker notes in one page.
In this view, the slides appear at the top and the speaker notes are given on the bottom of the two sections. The serial number of the slide is not shown in this view. You can also edit speaker notes from here.
The main purpose of the notes page view in PowerPoint is to preview what each page will look like before you print the slides with speaker notes.
4. Reading View:
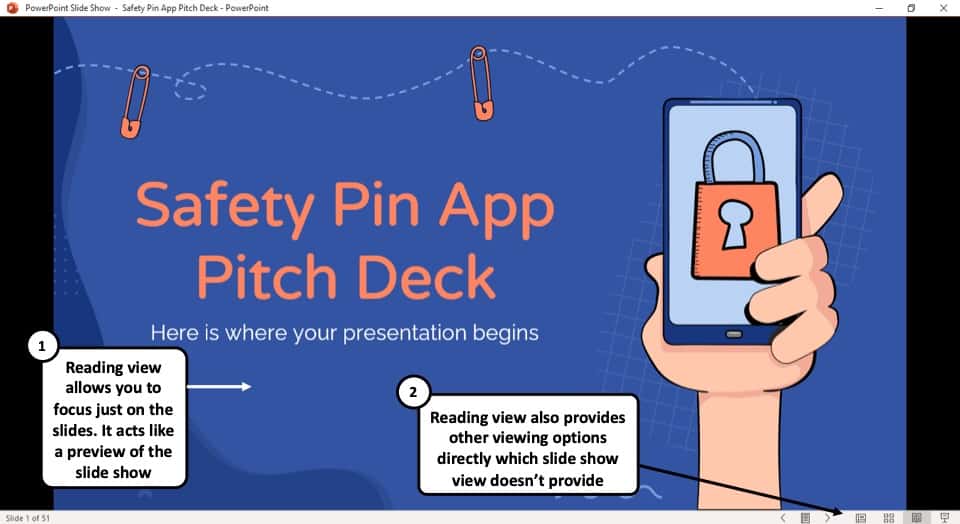
The Reading View option allows you to view your PowerPoint presentation without going into Full Screen mode. All the transitions and animations can be seen in this view. The serial number of the slide is given at the bottom right corner of the window.
It is used to preview the slide and review the slides with full focus. This mode also makes other view options easily accessible, which is not the case in ‘Slide Show’ mode where the presentation is shown in the full screen, and the options are not visible on screen.
The reading mode is actually more useful for word documents, as it allows the reader to focus just on the text. In my opinion, it adds little value to a PowerPoint presentation.
5. Outline View:
The ‘Outline View’ shows you the entire outline of your PowerPoint presentation in the ‘Slide Navigation’ bar.
In this view, there is no thumbnail of the presentation. Instead, there is an outline of all the data present in that slide. The serial number of the slide is at the left followed by a small white box that represents a slide and then the outline of that slide.
You can also create an entire slide in the pane of this view by copy and pasting data from Microsoft Word. However, you will have to design the slide separately once the data has been added to each slide.
6. Slide Show View:
The Slide Show View is the view that your audiences are going to see. This view shows each slide of your PowerPoint presentation in full screen.
All the transitions, animation, and multimedia files in your PowerPoint presentation are played here. Consecutive slides can be accessed using the direction keys on your keyboard or by clicking once on the slide.
7. Presenter View:
This is the view that you as a presenter are going to see while the audience is seeing the ‘Slide Show’ view.
Although you can give a presentation even in the slide show view, but it is always recommend to deliver the presentation using the “Presenter View” mode in PowerPoint as it provides you with additional features and benefits!
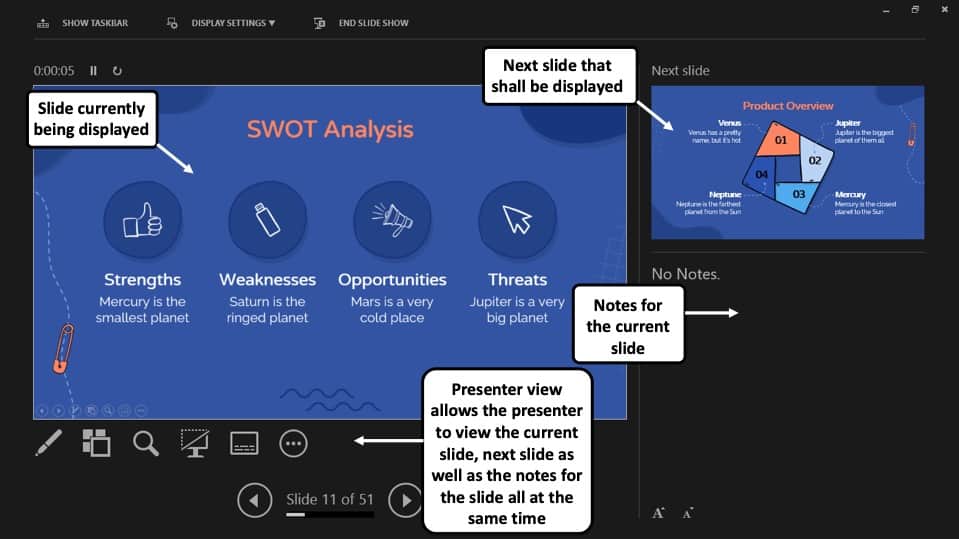
This view mode in PowerPoint will split the screen in multiple windows. The window on the left represents the current slide that is being displayed (the one that is visible to your audience).
The window in the top right section indicates the next slide in the queue. Whereas, the notes section displays the notes or key points made by each slide. Both, the notes section as well as the next slides window are only visible to the presenter and not to the audience!
The purpose of the “ Presenter View ” is to give the presenter all the aids to be prepared for the next slide and highlight the key points to be made on the current slide while delivering the presentation.
8. Slide Master View:
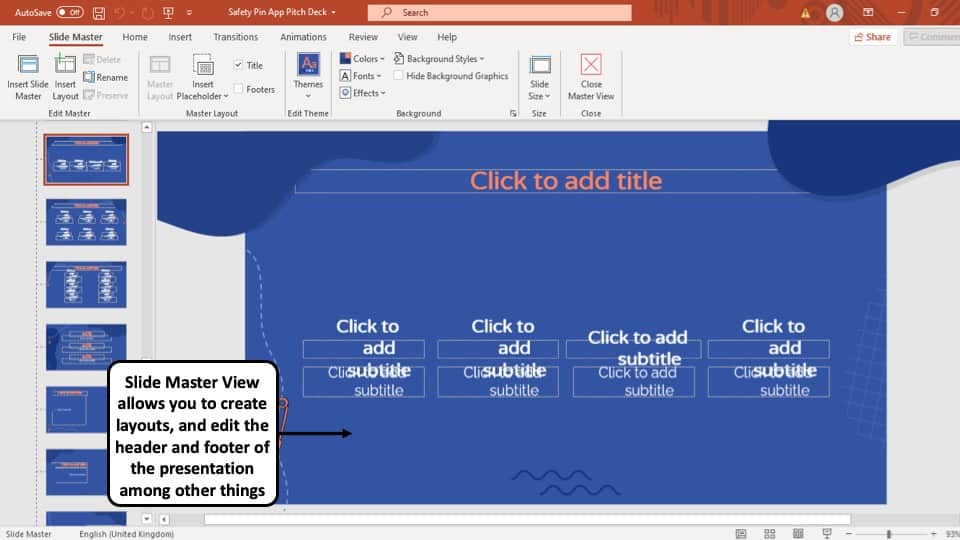
This view gives you a view of all the layouts used on the slides of your PowerPoint presentation.
The ‘ Slide Master View ’ option allows you to edit all the aspects of the layouts in your presentation such as fonts, background, color, and pretty much everything you can think of.
You can edit all the slide layouts of the presentation. Furthermore, you can also edit the header and footer of the presentation using the “ Slide Master View ” in PowerPoint.
4. How to Open the Presenter View in PowerPoint?
There are 2 different ways you can enter into Presenter View in PowerPoint –
- Using Slide Show View
- Using the short cut key i.e. Alt+F5
If you are using the Office 365 version of PowerPoint , you can actually directly access the “Presenter View” in the View section. Simply click on “View”. Then, click on “Presenter View”
Let’s look at both the methods quickly –
Method 1 – Using the Slide Show View
Step-1: Click on the ‘Slide Show’ button at the bottom right corner of the screen
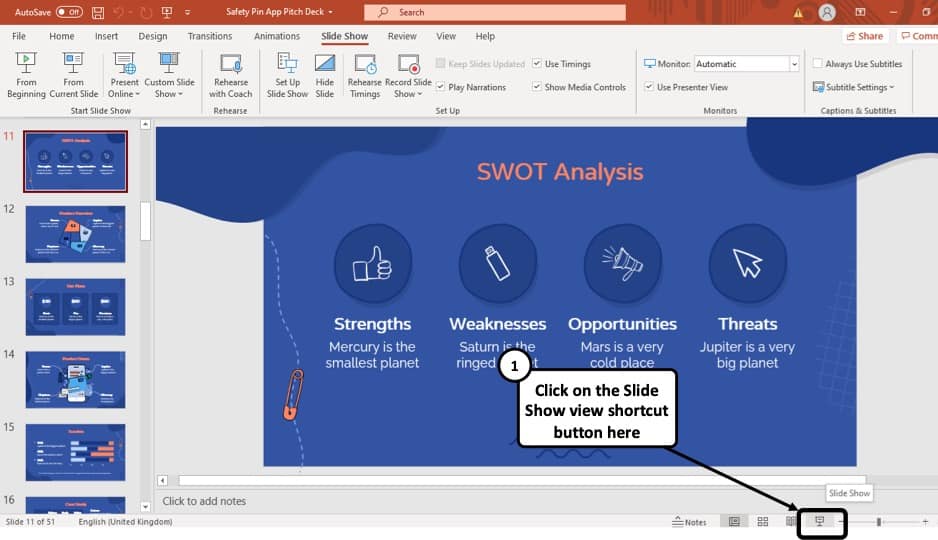
At first, you have to click on the ‘Slide Show’ button that looks like a projector screen which is located at the bottom right corner of your PowerPoint window. (as indicated in the image above)
Step-2: Right-click and choose “Show Presenter View”
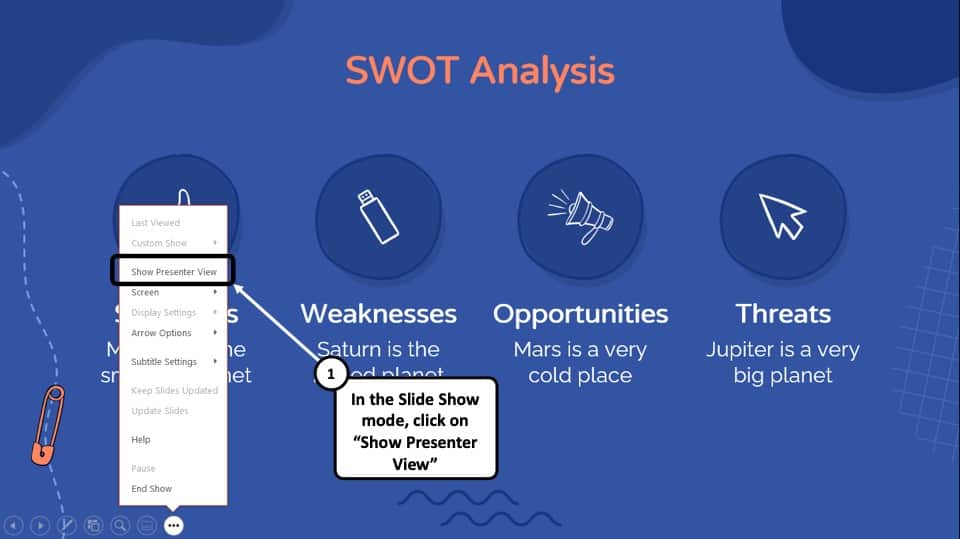
Once you are in the ‘Slide Show’ mode, using your mouse right-click anywhere on the screen. From the menu that appears, choose the “ Show Presenter View ” option
Method 2 – Using the Keyboard Shortcut
Alternatively, you can press ‘ Alt + F5 ’ on your keyboard and that will immediately open the ‘Presenter View’ mode.
The keyboard shortcut to open the “Presenter View” in PowerPoint on Mac is “Option+Enter” key.
5. How to Change PowerPoint Back to Normal View?
To change your PowerPoint back to ‘Normal View’ from ‘Slide Show’ mode, ‘Presenter View’ option or the ‘Reading View’ option, all you have to do is simply press the ‘ESC’ button on the keyboard of your computer. This will take you back to Normal View.
If you are using any other view apart from these 3 view modes in PowerPoint, you need to do the following –
If you are in a different viewing option, such as ‘Slide Sorter’ option, or the ‘Reading View’ option then you have to select the ‘Normal View’ option from the ‘View’ tab instead of the ‘Slide Sorter’ option or the different slide view option you are currently on.
More PowerPoint Related Topics
- How to Crop a Picture in PowerPoint? [Complete Step-by-Step Tutorial!]
- How to Give a Presentation on Zoom? A Helpful Resource!
- What is a Presentation Clicker? [And How to Use it!]
- How to Convert a PowerPoint to PDF? [A Simple Guide!]
- PowerPoint vs Google Slides: Which is Better? [ULTIMATE Test!]
- How to Change Bullet Style in PowerPoint? A Complete Guide
Credit to Pressahotkey (via Freepik) for the featured image of this article
Presentation Software

Learning Objectives
- Define functions of presentation graphics programs as used in business.
- Design, create, and execute an artistic presentation that includes graphics and animation.

Presentation software is designed to allow the user to present information in an engaging way with text, pictures, sound, and video. It is a way to communicate ideas in a powerful, organized manner. It utilizes sequences of slides that accompany a spoken presentation. The presentation may also be recorded and posted online. The slides are consolidated in virtual files called slide decks. Communication skills are necessary for many careers. Presentation software can help to deliver a message online or in-person to a large audience or small group. The goal is to create a presentation that will leave a lasting impression on the audience, and not distract them from the message you are delivering. The ultimate goal is to create dynamic, interesting presentations that engage your audience.
Common presentation software programs:
Going forward, we will focus primarily on Microsoft PowerPoint.
Since Microsoft PowerPoint is widely used in business, and we are using Microsoft Windows, we will focus on this presentation software. There are many similarities across presentation software, so the skills we are learning can be translated to other systems. Some of the tasks in PowerPoint may seem familiar because they were used in other applications. The following Practice It assignments are designed to be completed using Microsoft PowerPoint in Office 365 on a PC with Windows 10 or higher. You may need to download the Professional version of Office 365 (which is free to students) to access all features.
POWERPOINT PRACTICE 1

Prefer to watch and learn? Check out this video tutorial:
Complete the following Practice Activity and submit your completed project.
We will use PowerPoint to create a presentation that welcomes individuals to coding. We will build upon this presentation over the next 3 practice assignments. Key skills in this practice include creating and editing a new presentation, entering text, adding slides, presentation themes, bullets, adding and formatting pictures, transitions, and printing a presentation.
- Start PowerPoint and select the Design tab. Under Themes, select the Circuit theme. If the Circuit theme is not visible, use the search to locate it.
- Select File, Save As, Browse, and then navigate to your PowerPoint folder on your flash drive or other location where you save your files. Name the presentation as Yourlastname_Yourfirstname_PowerPoint_Practice_1.
- Take a moment to view the PowerPoint window:

- Notice that the layout of slide 1 is Title and Content. This is a common layout for the Title Slide . All text, graphics, videos, or anything that is on a slide must be in a placeholder . In the “Click to add title placeholder,” type Welcome to Coding! In the subtitle placeholder type Introduction to Python .
- On the Design tab, in the Themes group, ensure under Variants, Blue colors are selected.
- Although we only have our title slide added, most presentations have several slides. When creating your presentation, keep in mind the attention span of your audience, and the allotted amount of time. For this presentation, we have been allotted 10 minutes and will create 5 slides.
- Outline View
- Slide Sorter
- Notes Pages
- Reading View
- On the Home tab, in the Slides group, select the arrow next to New Slide and choose the Title and Content layout. In the “Click to add title” placeholder type: Student Life.
- With slide 2 still active, on the Home Tab, in the Slides Group, select the arrow next to Layout and select Two Content. Notice how the layout of slide 2 changed.
- Coding develops problem-solving skills
- Coding nurtures creativity
- Coding makes math more fun and engaging
- Coding promotes learning by doing
- Coding enables computational thinking
- Format the text as a bulleted list, with the default bullet. Change the font size of the text to 28.
- In the second placeholder, use the placeholder shortcut to insert a stock image. In the Insert Pictures dialog box, use the search bar and search the word Coding. Choose any picture, then return and insert it into the placeholder.
- With slide 2 still active, on the Transitions tab, select Fade.
- Computer Programmer
- Web Developer
- Software Application Developer
- Computer Systems Analyst
- Computer Systems Engineer
- Front and Back End Developer
- Resize the text to 28 pt and use the default bullet.
- With slide 3 still active, on the Insert tab in the Illustration group, select the arrow next to Shapes. Under Stars and Banners add the Explosion: 8 points shape to the right of the bulleted list. Click and drag the shape onto the slide.
- Inside the shape type: All High Paying Jobs.
- On the Home tab, in the Slides Group, select New Slide and choose Blank Layout. Ensure slide 5 is active.
- On the Insert tab, in the Text Group, select the arrow under WordArt , and select Word Art in the first row, first column Fill: White, Text color 1; Shadow. Type the text: Any Questions?
- Change the font size of the WordArt to 72.
- Change the font color to orange from the standard colors.
- Select the File tab to display Backstage view. Select Print to view the Print Options . Although PowerPoint slides are meant for presentations, there is the option to print slides for the presenter and participants. Under Setting, click Print All Slides.
- Under Slides, select 6 slides Horizontal. Notice how the data and page number display on the slide in Print Preview .
- Save your presentation and take note of where it is located. There should be a total of 4 slides in your slide deck. Compare your presentation to the image below and make any modifications if needed. Close out of PowerPoint and submit your entire presentation per your instructor’s instructions.

POWERPOINT PRACTICE 2


We will continue to work with the PowerPoint presentation we started in PowerPoint Practice 1. You have been asked by the Dean to add additional content to the presentation regarding Computer Science courses that require coding. Key skills in this practice include how to enhance a presentation, insert and format images, manage slides, add speaker notes and animations, and apply effects.
- Start PowerPoint; notice how it opens in Backstage View. Under Open, browse to locate your PowerPoint_Practice_1, and select Open.
- Select File, Save As, Browse, and then navigate to your PowerPoint folder on your flash drive or other location where you save your files. Name the presentation as Yourlastname_Yourfirstname_PowerPoint_Practice_2.
- There should be 4 slides in your slide deck. Ensure your presentation is in normal view.
- With a slide selected, on the Home tab in the slides group, select New Slide and then Duplicate Selected Slides .
- With slide 4 active, change the title to Coding Courses.
- Introduction to Programming I
- Introduction to Programming II
- Data Structures
- Database Management Systems
- Programming Languages
- Delete the shapes from the slide.
- At the bottom of the screen, click Notes.
- Type the following Presenter Notes: Remember other courses that may not require coding.
- With slide 4 active, move slide 4 above slide 3 in the thumbnail pane making slide 4 become slide 3, and vice versa.
- With slide 3 still active, on the Insert tab, in the Pictures group, select Online Pictures . In the Insert Pictures dialog box, in the search box, type coding course and then press enter. Choose any image you like that represents technology. Insert the image of your choice under the last bullet on slide 3. If necessary, resize the picture so that it fits on the slide without overlapping with the text.
- Select the image you just added. On the Animations tab, in the animation group, select the Wheel entrance effect. Once the animation is applied, notice the number 1 appears next to the image to indicate this is the first animation that will play.
- On the Animations tab, in the advanced animation group, turn on the Animation Pane by clicking it one time. The Animation Pane will open on the right side of the screen. Click the down arrow next to the first animation, Picture 1, and select Effect Options . In the Wheel dialog box, select the Effect tab, and under Sounds choose Applause. Click the speaker icon to hear the applause and ensure your volume is turned up, but not too loud. Select OK to hear the applause sounds you just applied. Close the Animation Pane.
- Save your presentation and take note of where it is located. There should be a total of 5 slides in your slide deck. Compare your presentation to the image below and make any modifications if needed. Close out of PowerPoint and submit your entire presentation per your instructor’s instructions.

POWERPOINT PRACTICE 3


We will continue to work with the PowerPoint presentation from PowerPoint Practice 2. After submitting your presentation to the Dean, she has asked you to make a few enhancements that incorporate multimedia. Key skills in this practice include screenshots, embedding videos, recording audio, and background images.
- Start PowerPoint; notice how it opens in Backstage View. Under Open, browse to locate your PowerPoint_Practice_2, and select Open.
- Select File, Save As, Browse, and then navigate to your PowerPoint folder on your flash drive or other location where you save your files. Name the presentation as Yourlastname_Yourfirstname_PowerPoint_Practice_3.
- Select slide 4 in the thumbnail pane. With slide 4 active, on the Home Tab, in the Slides Group, select New Slide and select Layout and Content.
- There should be 5 slides in your slide deck. Ensure your presentation is in normal view and select slide 5. In the title placeholder type: Why Learn Coding?
- In the content placeholder below the title, click the icon to insert an online video. To insert an online video, you can also use the Insert tab, Media group, video, online video. It may take a few moments for the Insert Video screen to load.
- Use the Search YouTube box by typing in Why Learn Coding? and then selecting the search icon or pressing enter on your keyboard. Scroll through the videos to find the video titled Why Learn Coding? If that video is not available, you can select a different one. Double-click the video or select Insert to add the video to slide 5.
- With the video selected, on the Video Tools, Format tab, resize the video so that it has a height of approximately 5″ and a width of approximately 9.4″. Move the video so that it is centered on the slide if necessary.
- On the Playback tab, select Play to watch the video.
- Another way to add an online video to a PowerPoint slide is by embedding it. Using your web browser, navigate to www.youtube.com . In the search window, type, Why Learn Coding? Locate the video Why Learn Coding? Select the Share icon, and then select embed. Copy the embed code.
- In PowerPoint, on slide 5, select the Insert tab, Media group, Video, Online Video. In the box next to From a Video Embed Code, paste the code you copied from YouTube and then press Enter. It may take a few moments for the video to preview. If necessary, right-click on the video, and then select Preview. You can put the video in the presentation either way.
- Select slide 5 in the thumbnail pane. With slide 5 active, on the Home Tab, in the Slides Group, select New Slide and select Layout and Content.
- With slide 6 still active, on the Insert tab, in the Pictures group, select Online Pictures . In the Insert Pictures dialog box, in the search box, type: computer languages. Choose any image you like that represents technology. Insert the image of your choice. If necessary, resize the picture so that it fits on the slide without overlapping with the text.
- Select slide 6 so that it is the active slide. On the Insert tab, Media group, select the arrow under Audio and select Record Audio. Record a short audio clip (about 20 seconds) and tell me what language you would like to learn.
- After recording your audio and playing it back, name it Coding. Then, close the Record Sound audio dialog box. Notice a speaker icon displays on slide 6. Move this icon to the upper left-hand corner of slide 6. Click the speaker once to play the audio.
- On slide 6, in the Notes pane, add the following note: Remember to play the audio.
- Select slide 1 so that it is the active slide. On the Design tab, customize group, and select Format Background. Under Fill, select the button next to Picture of texture fill. Under insert picture Online Picture, search for any coding picture and select Insert. Be sure to not select Apply to All, as we only want the background image applied to the title slide.
- Close the Format Background dialog box by clicking the x in the upper right-hand corner.
- Save your presentation and take note of where it is located. There should be a total of 9 slides in your slide deck. Compare your presentation to the image below and make any modifications if needed. Close out of PowerPoint and submit your entire presentation per your instructor’s instructions.

MASTER ACTIVITY 1

Complete the following Master Activity and submit your completed project.
All about me using Google Slides

You will need to be logged into your Google account to complete this assignment. Since Google Slides is web based , it changes frequently. The steps outlined here may be slightly different from what you see on your screen. If you do not already have a Google account, you will need to create one. Go to http://google.com and in the upper right corner, click Sign In. On the Sign In screen, click Create Account. On the Create your Google Account page, complete the form, read and agree to the Terms of Service and Privacy Policy, and then click Next step. On the Welcome screen, click Get Started.

- Family and pets
- 1-, 5-, and 10-year goals
- From the desktop, open your browser, navigate to http://google.com, and then sign in to your Google account. In the upper right corner of your screen, click Google apps, and then click Slides .
- Select the template gallery to browse templates . Take a moment to view General templates.
- Select the back arrow to go back to the main Slides page. Select the plus sign to start a new Blank presentation. If necessary, hit ESC on your keyboard to show the toolbar.
- In the Themes dialog box, select the Simple Dark theme.
- Name your presentation Yourlastname_Yourfirstname_PowerPoint_Master1, and save it in your Google Drive or other location as indicated by your instructor.
- With Slide 1 selected, enter your name as the title, and for the subtitle type All About Me.
- On the Slide tab, select New Slide to insert a new blank slide. Type My Hobbies as the slide title. In the textbox below, create a bulleted list with at least 5 hobbies. The bulleted list is found on the main menu, format, in Google Slides.
- On the main menu, select the plus button to add another new slide with the same layout as the previous slide.
- Type My Family and Pets for the slide title. In the textbox below the title, create a bulleted list with information on your family and pets.
- On the main menu, select the arrow next to the plus button to add a new slide with the title and two-column layout, then type My Work and Major for the title. In the textbox to the left create a bulleted list that contains at least 3 bullets about your work life. In the textbox to the right create a bulleted list that contains at least 2 bullets about your major or future career.
- My one-year goal is to…
- My five-year goal is to…
- My ten-year goal is to…
- Complete each sentence with your own personal goals.
- Select slide 1 so that it is the active slide. Ensure the entire slide is selected, not the textbox. On the main menu, select background. In the background dialog box, next to Image, select Choose image. Select the option for Google image search. Find an image that represents you, and add it to the background for the title slide.
- If necessary, change the text color, or move the text so that it stands out against the new background image. To change the text color, select the textbox, and on the main menu, select text color.
- Select slide 2 so that it is the active slide. On the main menu, select the Insert Image button, and select Search the Web. Search for an image that describes your hobbies, and then insert it into slide 2. If necessary resize the image by selecting it and using the resize handles.
- With the image selected, choose Animate on the main menu. Add an Object Animation to Fade in on click. Play the animation to preview it and close the Motion dialog box if necessary.
- Select slide 3 so that it is the active slide. In the empty space next to the bulleted list, add a shape from the Insert tab, then Shapes. Choose any shape to compliment slide 3, and add it to your slide. Then, add text and a fill color to the shape.
- Select slide 4 so that it is the active slide. On the Insert tab, select video, and use the YouTube search to embed a video related to your future career. Trim the video so it is 3 minutes or less. If necessary, close the Format video dialog box.
- Select slide 5 so that it is the active slide. Select the textbox with your goals listed. On the main menu, select a light blue fill color for the textbox. Then, select a darker blue Border Color, with a border weight of 8px. Ensure the solid borderline is selected.
- On the Tools tab, run spell check and make any corrections.
- In the upper right-hand corner, select the arrow next to Present, and then select Present from the beginning. Use the arrows on your keyboard to navigate each slide of the slide deck. When completed, press the ESC key on your keyboard.
- Make any final adjustments to your slide deck, and submit per your instructor’s instructions.
MASTER ACTIVITY 2

In this assignment, you are working as a Clinical Educator for a local healthcare company. You have been asked to make enhancements to a presentation that will be shared with employees on how to properly wash their hands. You have been asked to make the following enhancements to the presentation:
- Change the slide deck theme Droplet Third Variant
- Insert and edit an online video demonstrating proper handwashing
- Add a chart
- Add speaker notes
- Add professional quality images to add visual interest to the presentation
- Add transitions and animations
- Add sources
- Correct bulleted list and fonts
- Run spelling and grammar
- From your data files, open the file Starter_PowerPoint_Master2. If necessary, enable content . In Backstage view, under File, Save As, save the database as Lastname_Firstname_PowerPoint_Master_2 in your assignment files folder.
- Change the slide deck theme to Droplet, with the third color variant. The color variant should be light blue. Ensure the theme and variant are applied to all slides in the deck.
- On slide 3, ensure the hand washing video from YouTube is enabled. If not, insert an online video from YouTube from a reputable source that demonstrates the WHO proper handwashing technique.
- Format the video so that the Height is approximately 5″ and the Width is approximately 9″.
- With slide 4 active, insert a new slide with the Title and Content Layout. For the title, type Statistics. In the content placeholder below the title, select the Insert Chart icon and select Clustered Column.
- Enter the following data for the clustered column chart.
- On slide 5, select the vertical value axis and format the axis so that the minimum bounds is 0.0 and maximum bounds is 0.4.
- Apply Quick Style 6 to the clustered column chart and delete the chart legend.
- Insert a textbox below the chart, and enter the following text: Source: Am J Public Health. 2008 Aug;98(8):1372-81. doi: 10.2105/AJPH.2007.124610. Epub 2008 Jun 12.
- On slide 5, enter the following speaker note:
This data is based on the research study, Effect of hand hygiene on infectious disease risk in the community setting: a meta-analysis, and Improvements in hand hygiene resulted in reductions in gastrointestinal illness of 31% and reductions in respiratory illness of 21%.
- Select slide 2. Delete all of the text starting with “This helps prevent…” and all of the text following it. Remove the bullet from the first paragraph that begins with “Cleaning hands at key times…” and change the font size to 24.
- Under the paragraph, insert an online picture that represents the importance of handwashing. The image selected should be professional. Resize the image and center it under the paragraph. Apply the Drop Shadow Rectangle Quick Style to the picture.
- Select slide 4. With all of the text selected, remove the bullets (do not delete the text). Insert an online picture that represents FAQ, or Frequently Asked Questions. Insert the image in the upper right-hand corner next to the title. Resize the image if necessary so that it fits to the right of the title.
- Centers for Disease Control
- Federal Government
- Clean hands save lives
- World Health Organization
- The International Health Authority on Handwashing
- Infection, Prevention and Control
- Thurston County Public Health in Washington
- Local County Health and Wellness
- Handwashing Toolbox
- Ensure all text that was just added is a bulleted list and left justified.
- With slide 6 still active, insert an online picture that represents the importance of handwashing. The image selected should be professional. Resize the image and center it under the paragraph. Apply the Drop Shadow Rectangle Quick Style to the picture.
- With the picture on slide 6 selected, add the Shape Animation to the picture.
- With slide 1 active, apply the Reveal Transition to all slides in the slide deck.
- Run spelling and grammar check and make any corrections.
- View your slideshow.
- Save your presentation, and take note of where it is located. There should be a total of 6 slides in your slide deck. Compare your presentation to the image below, and make any modifications if needed. Close out of PowerPoint and submit your entire presentation per your instructor’s instructions.

MASTER ACTIVITY 3

In this activity, you will create a presentation regarding your plan of study. Your presentation should include:
- A title slide with your major or plan of study
- A slide explaining why you chose this major
- A slide detailing your graduation timeline
- A slide with post-graduation plans such as University Transfer, Jobs, Certifications, etc.
- A slide highlighting your dream job
- A slide that details your biggest influencers or motivators for completing your plan of study
Your presentation should be professional and collegiate and demonstrate effective presentation strategies. It should include the following elements:

- Professional quality graphics
- Transitions and animations
- A background image on the title slide
- Proper spelling and grammar
- Review your presentation slideshow view.
- Save your presentation as YourLastName_YourFirstName_PowerPoint_Master_3, and take note of where it is located. There should be a total of 6 slides in your slide deck. Close PowerPoint and submit your entire presentation per your instructor’s instructions.
CHALLENGE IT

Complete the following Challenge and submit your completed project.

In this challenge activity, you will complete a project that incorporates many of the key skills learned in the Presentation Software unit. For this project, you are the Marketing Director for the Arizona Tourism Office. The goal of the presentation is to educate visitors on all of the wonderful things Arizona has to offer. You will create a PowerPoint Presentation with the following:
- Animations and transitions
- 7 Themed slides
- Open PowerPoint and select Blank Presentation. In Backstage View, save the presentation in your PowerPoint folder, and name it Lastname_Firstname_PowerPoint_Challenge.
- On the Title Slide, in the Title Content Placeholder, add the following text: Arizona.
- In the content placeholder under the title, add the following text: The Grand Canyon State.
- Change the Font Color to Black, Background 1. Bold all of the text.
- Add a background picture to the title slide only. The background image is found in your data files and titled PowerPoint_Challenge_Step3. Change the transparency of the background picture to 25%.
- Change the Theme to Office Theme, with the third variant.
- Using Reuse slides, add slides 2-6 from the presentation in your data files titled PowerPoint_Challenge_Step_5.
- On Slide 2, insert an online picture of a cactus. Resize and reposition the picture so that it fits to the right of the text. Apply the Soft Edge Rectangle Quick Style.
- On Slide 2, show the speaker notes. In the notes pane, add a period after 2019. And then type the following note: Retrieved online on 1/26/2021 at https://tourism.az.gov
- On slide 3, insert the picture from your data files titled PowerPoint_Challenge_Step8. Resize and reposition the image so that it fits to the right of the text. Apply the Soft Edge Rectangle Quick Style.
- On Slide 3, show the speaker notes. In the notes pane, add the following note: The Grand Canyon is also located in Arizona and is a National Park.
- On Slide 3, insert an Oval Callout shape. Resize the shape so that it has a height of about 2.1″ and a width of about 3.4″. The shape should be located in the bottom portion of the slide, it is ok if it covers a portion of the text or picture. Apply the Colored Fill—Blue, Accent 5 Shape Style. In the shape, type: Which parks have you been to? Apply the Float In animation to the shape.
- On slide 4, insert a Line with Markers Chart. Use the following data:
- Apply Quick Style 3 to the Line Chart, and delete the Legend.
- In the speaker notes on slide 4, type the following note: Data provided by the Arizona Office of Tourism in collaboration with Northern Arizona University—The W.A. Franke College of Business.
- On slide 5, insert the alternating hexagon SmartArt. In each shape, enter one sports team per shape, in any order. Delete the Add a picture placeholder, and delete the bulleted list of sports teams. Move the SmartArt to the right of the title. Change the colors of the SmartArt to Transparent Gradient Range—Accent 1. Apply the 3-D polished Quick Style to the SmartArt.
- On slide 6, insert an online picture of a desert sunset. If necessary, resize and reposition the picture so that it fits to the right of the text. Apply the Soft Edge Rectangle Quick Style.
- After slide 6, add a new slide with the Blank Layout. Insert a Fill—Blue, Accent 1 Shadow WordArt with the words: We look forward to seeing you soon!
- Apply the Page Curl transition to all slides in the deck.
- View the slideshow.
- Save your presentation, and take note of where it is located. There should be a total of 7 slides in your slide deck. Compare your presentation to the image below, and make any modifications if needed. Close out of PowerPoint and submit your entire presentation per your instructor’s instructions.

Computer Applications Copyright © 2022 by LOUIS: The Louisiana Library Network is licensed under a Creative Commons Attribution 4.0 International License , except where otherwise noted.
Share This Book
6.5 Designing a Presentation in Google Slides
Learning objectives.
By the end of this section, you will be able to:
- Discuss similarities between Google Slides and Microsoft PowerPoint
- Review differences between Google Slides and Microsoft PowerPoint
- Explain the roles Google Slides and Microsoft PowerPoint play in a workplace
My Life in a Snapshot was intended to be a solo presentation, so you had no need to assemble a team. But what if you need to design a presentation on a different topic that does require a team? What if, for example, the presentation was a proposal for a new marketing campaign that you and four others have been working on? Is Microsoft PowerPoint still the best option? This section will introduce Google Slides as another tool you can use to create and build presentations.
Slides is the presentation application offered in the Google suite of products, which is a cloud-based system. To better understand the tool and its importance, let’s get started with the similarities it holds with PowerPoint .
Similarities between Google Slides and Microsoft PowerPoint
PowerPoint and Slides are both software programs that allow you to create and edit slideshows for presentations. When you begin to create a presentation with Slides , you will be presented with several themes and template s suitable for various applications in business, school projects, and general use. These designed templates can be customized with color, text, and style. Figure 6.41 shows Slides when first opening the program and selecting a new presentation; the default, a blank presentation, is circled. Next to the blank presentation option are the different themes and templates.
As in PowerPoint, once a presentation is either opened or begun in Slides, you will see a ribbon with tabs and options that are comparable with those in PowerPoint. In some cases, the programs even use identical word choices, such as the File, View, and Insert menus. It is a good idea to review the tabs in Slides before beginning a project. Look for the numerous overlaps in terminology and the familiar icons Slides shares with PowerPoint. However, one distinct feature of Slides is that it offers drop-down boxes from each tab, rather than a changing ribbon, as in PowerPoint.
There are other similarities between Slides and PowerPoint. For example, the thumbnails of the slides run down the left side with the highlighted slide in the center of the frame, and tabs across the top of the sidebar for navigation purposes. Both programs offer options for adding new slides, changing layouts, selecting design elements, and inserting text/images.
Both programs can create professional, high-quality electronic presentations. As technology continues to evolve, both programs adapt and continue to offer user-friendly tools. In general, both tools allow users to:
- add text, images, videos, charts, graphs, and links to any slide
- pick a custom font while selecting and using premade themes
- use basic transitions between slides and print to PDF
- collaborate with team members to greater or lesser degrees
Differences between Google Slides and Microsoft PowerPoint
Understanding some of the key differences between Slides and PowerPoint will help you decide which tool to use and when it can be most helpful while working at WorldCorp. To start, PowerPoint is a stand-alone software program that users can purchase or access through a provider such as a school, a company, or an organization to which they belong. Stand-alone software programs are typically installed on a computer’s hard drive and can be launched by double-clicking an icon on the desktop or by selecting the program from the list of installed programs in the operating system. Stand-alone software programs are self-contained and do not rely on external resources, such as a connection to the internet or services to function. They are referred to as “offline capable.” The application, or app, is just a click away for the user to begin their work, regardless of their internet connection. As the program has advanced and added new features, it has expanded to include online collaboration. PowerPoint now offers users online experiences through the combination of Microsoft OneDrive and Microsoft 365 .
Slides, by contrast, is a web-based software application that is part of the Google suite of productivity tools. As covered in the chapter on Essentials of Software Applications for Business , web-based software programs are hosted on a remote server and accessed over the internet using a web browser, rather than being installed on a computer’s hard drive. This makes it possible for users to access the software from any device with an internet connection, as the software and data are stored remotely and not on the user’s local machine. This helps ensure that there are no delays or negative experiences such as slowing down a user’s internet connection. They are often designed to be more lightweight, with fewer features compared with their desktop counterparts.
As a cloud-based application, Slides offers a unique advantage to offline applications when collaborating in a team. As with other Google programs, users can work on the same file in real time across multiple computers. This facilitates collaboration and eliminates the need to pass files back and forth between team members.
However, Google does offer an offline option for users as well. When using Google’s web browser, Chrome, users can install a browser extension that allows its online Google programs, such as Slides and Docs, to download the applications to their local computer, allowing users to work on their projects even without access to the internet. Additionally, Chrome operating systems typically come with other Google offline programs preloaded. Google offline functionality is available for some mobile devices and most desktop operating systems. It’s possible to use Google offline for some mobile devices and most desktop operating systems.
The most prominent difference between Slides and PowerPoint lies in their origins as a cloud-based application versus a desktop application, respectively. Slides has a minimal appearance and relatively fewer features, keeping things simple across their programs for ultimate user ease. Its goal is accessibility and collaboration in an online environment. In contrast, PowerPoint offers more robust features with more capabilities. In this respect, Slides works better than PowerPoint on mobile application devices.
However, it is still optimal to use a computer when creating a presentation in either program. Using a cell phone or a tablet poses challenges for users who want to harness the full potential of PowerPoint. To maximize the user experience, PowerPoint is recommended for use on a laptop or desktop computer due to its overall capability and processing needs. Having a larger screen with a more robust computer processor can make it easier to see subtle editorial changes or to handle large file size changes to a high-resolution image.
How Microsoft PowerPoint and Google Slides Function in a Workplace
Several features of Slides make it a unique and intriguing piece of software to have alongside PowerPoint . Both programs are commonly used in workplace settings, but may be used with different goals and audiences in mind. At WorldCorp, different teams use different tools in ways that work best for them; often, team members find that a project requires a combination of both programs.
A best practice for a collaborative presentation would be for a team to start working in Slides. Team members can work offline if they choose, or they can work together online constructing slides. Once the rough outline of the presentation has been accomplished and agreed upon through online collaboration, the Slides presentation can be saved as a PowerPoint file. Conveniently, Slides offers a way to quickly export presentations as PowerPoint files. A member of the team who is well-versed in PowerPoint and digital presentation development can then edit the slides if needed. They can work offline to unify and format each slide into a cohesive slideshow.
Conversely, you can also open a PowerPoint file in Slides. However, note that because Slides is less feature-rich than PowerPoint, you may not be able to preserve your slideshow exactly. Let’s look at converting the saved PowerPoint presentation that you have been working on, My Life in a Snapshot , to Slides. First, upload your PowerPoint presentation to your Google Drive . Then, open Slides; the PowerPoint most likely will be listed as a recently saved file on the opening screen. Select the file and begin. Figure 6.42 shows the warning that Slides wants to issue before you start editing: “Some PowerPoint features can’t be displayed and will be dropped if you make any changes” appears in a dialog box after selecting the saved file. There are fewer design options with Slides, and Google does not include all of the features that PowerPoint does, such as WordArt . This means that anything that was formatted as WordArt in PowerPoint will not appear correctly in the Google Slides version, or may even be deleted entirely. For this project, please go ahead and dismiss the warning to begin.
You may want to do this conversion process if you want to open your PowerPoint file for online collaboration, for instance. If your PowerPoint does not contain too many complex features, converting the file to Slides is usually an easy process that results in a Slides presentation that looks extremely similar to your original PowerPoint.
Sometimes, your choice of which program to use is determined by the software ecosystem that your company is part of. Workplaces will often choose one type of program—Google, Microsoft, or another large brand—to use at all levels of their company to streamline usage and file types. Preference and ecosystem requirements will typically be the key drivers in determining which tool to use for your presentation, but once you have learned one of the applications, you will have a faster learning curve when it comes to learning the other. Because Microsoft has traditionally dominated the office workplace, applications like Word and PowerPoint are more common in business settings. However, with schools and small businesses looking to offer free and affordable options for newer users (for example, Chromebooks are required in some classrooms), Slides continues to expand its reach. Its ease of use can attract those new to working with digital presentations or collaborating with teams on a project. Knowing and being confident in both programs removes the walls of an ecosystem, particularly if it is easy to change files from one type to the other. As we work in ever-diverse workgroups, the ability to move from one program to another becomes increasingly important.
This book may not be used in the training of large language models or otherwise be ingested into large language models or generative AI offerings without OpenStax's permission.
Want to cite, share, or modify this book? This book uses the Creative Commons Attribution License and you must attribute OpenStax.
Access for free at https://openstax.org/books/workplace-software-skills/pages/1-chapter-scenario
- Authors: Tammie Bolling, Angela Mitchell, Tanya Scott, Nyrobi Wheeler
- Publisher/website: OpenStax
- Book title: Workplace Software and Skills
- Publication date: Nov 29, 2023
- Location: Houston, Texas
- Book URL: https://openstax.org/books/workplace-software-skills/pages/1-chapter-scenario
- Section URL: https://openstax.org/books/workplace-software-skills/pages/6-5-designing-a-presentation-in-google-slides
© Jan 3, 2024 OpenStax. Textbook content produced by OpenStax is licensed under a Creative Commons Attribution License . The OpenStax name, OpenStax logo, OpenStax book covers, OpenStax CNX name, and OpenStax CNX logo are not subject to the Creative Commons license and may not be reproduced without the prior and express written consent of Rice University.
- School Guide
- Class 9 Syllabus
- Maths Notes Class 9
- Science Notes Class 9
- History Notes Class 9
- Geography Notes Class 9
- Political Science Notes Class 9
- NCERT Soln. Class 9 Maths
- RD Sharma Soln. Class 9
- Math Formulas Class 9
Layout and Views in Presentation Tool
- Types of Presentation Tools in MS Office
- How to Edit a Powerpoint Presentation?
- Horizontal Scrollview in Android
- What are Presentation Graphics?
- Views In Django | Python
- Change Page Orientation in MS Word
- Horizontal ListView in Android
- Explain the concept of Partials/Layout templates in Express Views.
- Different Ways to Fix "Android Studio Does not Show Layout Preview"
- How to Use ChatGPT to Create Presentations using Slides AI
- How to Change Slide Layout in MS PowerPoint ?
- Web Design Layouts | Types, Elements and Uses
- Relative Layout in Android
- How to Implement View Binding Inside Dialog in Android?
- Android- Hide or Show Specific Layout & Views Efficiently
- How to Take Sub-View Screenshot in Android?
- Createview - Class Based Views Django
- Detail View - Function based Views Django
- Creating and updating PowerPoint Presentations in Python using python - pptx
Microsoft PowerPoint provides different types of tools to make presentations presentable and interactive for different purposes like for business, for class, for projects, etc. Layout and Views tools are one of the presentation tools. The View in power points is the look of the working space that helps you to modify your slides as you desire. Slide Layout depicts the layout of your slide it contains placeholder boxes, various formatting and positioning contents like titles, body text, charts, SmartArt, videos, etc. In this article, we will discuss Layout and Views tools in detail.
View tool is all about looks that matter same with the presentation viewing presentation differs according to the need of users. Or we can say that this tool allows you to view your presentation in different ways according to your requirement. For example, if a user wants to read the presentation, wants to make a note of it, wants to sort the slides according to their use. Then he/she can use the presentation view.
Views in PowerPoint are divided into two parts:
1. Presentation Views: This part of views contains all the views that are required for the purpose of presenting your slides to others or as well as for you too. It is divided into five types and each of them has a specific purpose.

- Normal View: It’s the basic view when you start building your slides. It is generally used for writing and designing a presentation and consists of two default boxes one is for title or heading and the second is for multiple tasks.
- Outline View: It is made up of main text, titles, and any important images from each slide in an outline manner.
- Slide Sorter: Mainly used when user wants to sort their slides in a manner they desired. Or we can say that this view option is used when the user wants their slides in the thumbnail form.
- Notes Page: It is the important view among all the views. It makes the slides look like a page and using this view you can make your notes easily from the slides.
- Reading View: This view is used to read your slides in a way that you are reading some books.
2. Master Views: This part of view allows you to change the standard slide layouts that are in-built in PowerPoint. Or we can say that it allows modifying slide and slide layouts.
- Slide Master: It allows you to instantly modify your slides and allows you to apply various formatting styles on your slides.
- Handout Master: This view converts your slides into a page that has a by default header and footer. And you can print these slides into handouts as well. It contains 6 slides on one page. If you modify the handout master the same changes will appear on all the pages of the printed handout.
- Notes Master: This view is mainly used when user wants to take print of their slides and notes. It contains 2 slides on one page. Or we can say that it changes the look of the presentation into the notes pages view. You are allowed to change the content of the not master.
How to access the views tab in PowerPoint?
There are two ways to access views in PowerPoint:
1. Go to the views tab as shown below in the image.

2. Go to the quick access tab to access views in PowerPoint as shown in the below image.

How to apply slide sorter view?
To apply a sorter view on the current presentation follows the following steps:
Step 1: Open Microsoft PowerPoint and then create slides.

Step 2: Go to the View and choose slide sorter from the presentation view and you will get the following result.

Slide Layouts
Slide Layout shows all the available layouts for your slide containing placeholder boxes, various formatting and positioning contents like titles, SmartArt, body text, charts, videos, blank slides as well, etc. It also contains the color, fonts, effects, and backgrounds of the slides. Powerpoint provides a build-in slide layout and custom layouts so you can use them according to your requirements. For example, if you want to present your ideas for business growth, a class presentation, first page for the details, want to include different topics separately, want a blank ppt for rough work. For all these works and uses PowerPoint presentation slide layouts for you to make it easy to create presentations for varied types of works and people.
Parts of Slide Layouts
- Title Slide: It is a basic layout consisting of two placeholders by default when we open blank slides.
- Title and Content: It is a layout with two placeholders for title, headings, illustrations, or images.
- Section Header: This type of layout is used when you want to separate the major topics from other topics.
- Two Content: It consists of 3 placeholders one is for the title and the other is for content
- Comparison: As the name suggests it is used for making comparisons between different points in a slide.
- Title Only: It consists of only title and heading placeholders for the slides.
- Blank: This is one of the common layouts and it didn’t consist of any placeholders
- Content with Caption: This layout is for making content with captions available
- Picture with Caption: This layout is for describing pictures and images with captions available
How to access Slides Layout for your slides?
To access the slides layout for your slide follow the following steps:
Step 1: Open Microsoft PowerPoint.

Step 2: Now go to the Home and then click on the layout option and you will get a list of predefined layouts. Now choose one of them according to your requirement.

For example, here, we have selected a comparison layout so we will get the following output:


Please Login to comment...
Similar reads.
- Algo-Geek 2021
- School Learning
- School Programming
Improve your Coding Skills with Practice
What kind of Experience do you want to share?
- MS Powerpoint 2010 Basics
- PPT - Getting Started
- PPT - Explore Windows
- PPT - Backstage View
- PPT - Create Presentation
- PPT - Add New Slides
- PPT - Adding Text in Boxes
- PPT - Adding New Text Boxes
- PPT - Deleting Existing Slide
- PPT - Rearranging Slides
- PPT - Adding Slide Notes
- PPT - Managing Sections
- PPT - Working with Outlines
- PPT - Powerpoint Sidebar
- PPT - Presentation Views
- PPT - Setting Backgrounds
- PPT - Slide Orientations
- PPT - Saving Presentation
- PPT - Review Presentation
- PPT - Adding Slide Numbers
- PPT - Adding Header & Footer
- PPT - Running Slide Show
- PPT - Keyboard Shortcuts
- PPT - Get Context Help
- Editing Presentation
- PPT - Copy & Paste Content
- PPT - Find & Replace Content
- PPT - Undo Edited Changes
- PPT - Spelling Check
- PPT - Content Translation
- PPT - Setting Language Type
- PPT - Duplicating Content
- PPT - Special Characters
- PPT - Slides Zoom In-Out
- PPT - Special Symbols
- Formatting Presentation
- PPT - Font Management
- PPT - Setting Text Fonts
- PPT - Text Decoration
- PPT - Change Text Case
- PPT - Change Text Size
- PPT - Change Text Color
- PPT - Text Alignments
- PPT - Indent Paragraphs
- PPT - Set Line Spacing
- Borders and Shades
- PPT - Apply Formatting
- PPT - Using Slide Master
- PPT - Save Design Template
- Working with Multimedia
- PPT - Add Pictures to Slide
- PPT - Editing Added Pictures
- PPT - Format Added Pictures
- PPT - Inserting a Screenshot
- PPT - Adding Shapes to Slide
- PPT - Editing Added Shapes
- PPT - Format Added Shapes
- PPT - Adding Text to Shapes
- PPT - Arrange Shapes/Images
- PPT - Group/Ungroup Objects
- PPT - Adding Audio & Video
- PPT - Add & Format Tables
- PPT - Add & Format Charts
- PPT - Add & Format SmartArt
- PPT - Add & Preview Animations
- PPT - Add & Preview Transitions
- Sharing Presentation
- PPT - Create a PDF File
- PPT - Create a Video File
- PPT - Create Image File
- PPT - Printing Presentation
- PPT - Broadcast Slide Show
- PPT - Packaging Presentation
- PPT - Setting Document Password
- PPT - Email Slide Show
- MS Powerpoint Useful Resources
- PPT - Quick Guide
- PPT - Useful Resources
- PPT - Discussion
- Selected Reading
- UPSC IAS Exams Notes
- Developer's Best Practices
- Questions and Answers
- Effective Resume Writing
- HR Interview Questions
- Computer Glossary
Presentation Views in Powerpoint 2010
PowerPoint supports multiple views to allow users to gain the maximum from the features available in the program. Each view supports a different set of functions and is designed accordingly.
PowerPoint views can be accessed from two locations.
Views can be accessed quickly from the bottom bar just to the left of the zoom settings.

Views can also be accessed from the Presentation Views section in the View ribbon

Here is a short description of the various views and their features.
Normal View
This is the default view in PowerPoint and this is primarily used to create and edit slides. You can create/ delete/ edit/ rearrange slides, add/ remove/ modify content and manipulate sections from this view.

Slide Sorter View
This view is primarily used to sort slides and rearrange them. This view is also ideal to add or remove sections as it presents the slides in a more compact manner making it easier to rearrange them.

Reading View
This view is new to PowerPoint 2010 and it was created mainly to review the slideshow without losing access to rest of the Windows applications. Typically, when you run the slideshow, the presentation takes up the entire screen so other applications cannot be accessed from the taskbar. In the reading view the taskbar is still available while viewing the slideshow which is convenient. You cannot make any modifications when on this view.

This is the traditional slideshow view available in all the earlier versions of PowerPoint. This view is used to run the slideshow during presentation.

To Continue Learning Please Login
We use essential cookies to make Venngage work. By clicking “Accept All Cookies”, you agree to the storing of cookies on your device to enhance site navigation, analyze site usage, and assist in our marketing efforts.
Manage Cookies
Cookies and similar technologies collect certain information about how you’re using our website. Some of them are essential, and without them you wouldn’t be able to use Venngage. But others are optional, and you get to choose whether we use them or not.
Strictly Necessary Cookies
These cookies are always on, as they’re essential for making Venngage work, and making it safe. Without these cookies, services you’ve asked for can’t be provided.
Show cookie providers
- Google Login
Functionality Cookies
These cookies help us provide enhanced functionality and personalisation, and remember your settings. They may be set by us or by third party providers.
Performance Cookies
These cookies help us analyze how many people are using Venngage, where they come from and how they're using it. If you opt out of these cookies, we can’t get feedback to make Venngage better for you and all our users.
- Google Analytics
Targeting Cookies
These cookies are set by our advertising partners to track your activity and show you relevant Venngage ads on other sites as you browse the internet.
- Google Tag Manager
- Infographics
- Daily Infographics
- Popular Templates
- Accessibility
- Graphic Design
- Graphs and Charts
- Data Visualization
- Human Resources
- Beginner Guides
Blog Beginner Guides 8 Types of Presentations You Should Know [+Examples & Tips]
8 Types of Presentations You Should Know [+Examples & Tips]
Written by: Krystle Wong Aug 11, 2023

From persuasive pitches that influence opinions to instructional demonstrations that teach skills, the different types of presentations serve a unique purpose, tailored to specific objectives and audiences.
Presentations that are tailored to its objectives and audiences are more engaging and memorable. They capture attention, maintain interest and leave a lasting impression.
Don’t worry if you’re no designer — Whether you need data-driven visuals, persuasive graphics or engaging design elements, Venngage can empower you to craft presentations that stand out and effectively convey your message.
Venngage’s intuitive drag-and-drop interface, extensive presentation template library and customizable design options make it a valuable tool for creating slides that align with your specific goals and target audience.
Click to jump ahead:
8 Different types of presentations every presenter must know
How do i choose the right type of presentation for my topic or audience, types of presentation faq, 5 steps to create a presentation with venngage .

When it comes to presentations, versatility is the name of the game. Having a variety of presentation styles up your sleeve can make a world of difference in keeping your audience engaged. Here are 8 essential presentation types that every presenter should be well-acquainted with:
1. Informative presentation
Ever sat through a presentation that left you feeling enlightened? That’s the power of an informative presentation.
This presentation style is all about sharing knowledge and shedding light on a particular topic. Whether you’re diving into the depths of quantum physics or explaining the intricacies of the latest social media trends, informative presentations aim to increase the audience’s understanding.
When delivering an informative presentation, simplify complex topics with clear visuals and relatable examples. Organize your content logically, starting with the basics and gradually delving deeper and always remember to keep jargon to a minimum and encourage questions for clarity.
Academic presentations and research presentations are great examples of informative presentations. An effective academic presentation involves having clear structure, credible evidence, engaging delivery and supporting visuals. Provide context to emphasize the topic’s significance, practice to perfect timing, and be ready to address anticipated questions.

2. Persuasive presentation
If you’ve ever been swayed by a passionate speaker armed with compelling arguments, you’ve experienced a persuasive presentation .
This type of presentation is like a verbal tug-of-war, aiming to convince the audience to see things from a specific perspective. Expect to encounter solid evidence, logical reasoning and a dash of emotional appeal.
With persuasive presentations, it’s important to know your audience inside out and tailor your message to their interests and concerns. Craft a compelling narrative with a strong opening, a solid argument and a memorable closing. Additionally, use visuals strategically to enhance your points.
Examples of persuasive presentations include presentations for environmental conservations, policy change, social issues and more. Here are some engaging presentation templates you can use to get started with:

3. Demonstration or how-to presentation
A Demonstration or How-To Presentation is a type of presentation where the speaker showcases a process, technique, or procedure step by step, providing the audience with clear instructions on how to replicate the demonstrated action.
A demonstrative presentation is particularly useful when teaching practical skills or showing how something is done in a hands-on manner.
These presentations are commonly used in various settings, including educational workshops, training sessions, cooking classes, DIY tutorials, technology demonstrations and more. Designing creative slides for your how-to presentations can heighten engagement and foster better information retention.
Speakers can also consider breaking down the process into manageable steps, using visual aids, props and sometimes even live demonstrations to illustrate each step. The key is to provide clear and concise instructions, engage the audience with interactive elements and address any questions that may arise during the presentation.

4. Training or instructional presentation
Training presentations are geared towards imparting practical skills, procedures or concepts — think of this as the more focused cousin of the demonstration presentation.
Whether you’re teaching a group of new employees the ins and outs of a software or enlightening budding chefs on the art of soufflé-making, training presentations are all about turning novices into experts.
To maximize the impact of your training or instructional presentation, break down complex concepts into digestible segments. Consider using real-life examples to illustrate each point and create a connection.
You can also create an interactive presentation by incorporating elements like quizzes or group activities to reinforce understanding.

5. Sales presentation
Sales presentations are one of the many types of business presentations and the bread and butter of businesses looking to woo potential clients or customers. With a sprinkle of charm and a dash of persuasion, these presentations showcase products, services or ideas with one end goal in mind: sealing the deal.
A successful sales presentation often has key characteristics such as a clear value proposition, strong storytelling, confidence and a compelling call to action. Hence, when presenting to your clients or stakeholders, focus on benefits rather than just features.
Anticipate and address potential objections before they arise and use storytelling to showcase how your offering solves a specific problem for your audience. Utilizing visual aids is also a great way to make your points stand out and stay memorable.
A sales presentation can be used to promote service offerings, product launches or even consultancy proposals that outline the expertise and industry experience of a business. Here are some template examples you can use for your next sales presentation:

6. Pitch presentation
Pitch presentations are your ticket to garnering the interest and support of potential investors, partners or stakeholders. Think of your pitch deck as your chance to paint a vivid picture of your business idea or proposal and secure the resources you need to bring it to life.
Business presentations aside, individuals can also create a portfolio presentation to showcase their skills, experience and achievements to potential clients, employers or investors.
Craft a concise and compelling narrative. Clearly define the problem your idea solves and how it stands out in the market. Anticipate questions and practice your answers. Project confidence and passion for your idea.

7. Motivational or inspirational presentation
Feeling the need for a morale boost? That’s where motivational presentations step in. These talks are designed to uplift and inspire, often featuring personal anecdotes, heartwarming stories and a generous serving of encouragement.
Form a connection with your audience by sharing personal stories that resonate with your message. Use a storytelling style with relatable anecdotes and powerful metaphors to create an emotional connection. Keep the energy high and wrap up your inspirational presentations with a clear call to action.
Inspirational talks and leadership presentations aside, a motivational or inspirational presentation can also be a simple presentation aimed at boosting confidence, a motivational speech focused on embracing change and more.

8. Status or progress report presentation
Projects and businesses are like living organisms, constantly evolving and changing. Status or progress report presentations keep everyone in the loop by providing updates on achievements, challenges and future plans. It’s like a GPS for your team, ensuring everyone stays on track.
Be transparent about achievements, challenges and future plans. Utilize infographics, charts and diagrams to present your data visually and simplify information. By visually representing data, it becomes easier to identify trends, make predictions and strategize based on evidence.

Now that you’ve learned about the different types of presentation methods and how to use them, you’re on the right track to creating a good presentation that can boost your confidence and enhance your presentation skills .
Selecting the most suitable presentation style is akin to choosing the right outfit for an occasion – it greatly influences how your message is perceived. Here’s a more detailed guide to help you make that crucial decision:
1. Define your objectives
Begin by clarifying your presentation’s goals. Are you aiming to educate, persuade, motivate, train or perhaps sell a concept? Your objectives will guide you to the most suitable presentation type.
For instance, if you’re aiming to inform, an informative presentation would be a natural fit. On the other hand, a persuasive presentation suits the goal of swaying opinions.
2. Know your audience
Regardless if you’re giving an in-person or a virtual presentation — delve into the characteristics of your audience. Consider factors like their expertise level, familiarity with the topic, interests and expectations.
If your audience consists of professionals in your field, a more technical presentation might be suitable. However, if your audience is diverse and includes newcomers, an approachable and engaging style might work better.

3. Analyze your content
Reflect on the content you intend to present. Is it data-heavy, rich in personal stories or focused on practical skills? Different presentation styles serve different content types.
For data-driven content, an informative or instructional presentation might work best. For emotional stories, a motivational presentation could be a compelling choice.
4. Consider time constraints
Evaluate the time you have at your disposal. If your presentation needs to be concise due to time limitations, opt for a presentation style that allows you to convey your key points effectively within the available timeframe. A pitch presentation, for example, often requires delivering impactful information within a short span.
5. Leverage visuals
Visual aids are powerful tools in presentations. Consider whether your content would benefit from visual representation. If your PowerPoint presentations involve step-by-step instructions or demonstrations, a how-to presentation with clear visuals would be advantageous. Conversely, if your content is more conceptual, a motivational presentation could rely more on spoken words.

6. Align with the setting
Take the presentation environment into account. Are you presenting in a formal business setting, a casual workshop or a conference? Your setting can influence the level of formality and interactivity in your presentation. For instance, a demonstration presentation might be ideal for a hands-on workshop, while a persuasive presentation is great for conferences.
7. Gauge audience interaction
Determine the level of audience engagement you want. Interactive presentations work well for training sessions, workshops and small group settings, while informative or persuasive presentations might be more one-sided.
8. Flexibility
Stay open to adjusting your presentation style on the fly. Sometimes, unexpected factors might require a change of presentation style. Be prepared to adjust on the spot if audience engagement or reactions indicate that a different approach would be more effective.
Remember that there is no one-size-fits-all approach, and the best type of presentation may vary depending on the specific situation and your unique communication goals. By carefully considering these factors, you can choose the most effective presentation type to successfully engage and communicate with your audience.
To save time, use a presentation software or check out these presentation design and presentation background guides to create a presentation that stands out.

What are some effective ways to begin and end a presentation?
Capture your audience’s attention from the start of your presentation by using a surprising statistic, a compelling story or a thought-provoking question related to your topic.
To conclude your presentation , summarize your main points, reinforce your key message and leave a lasting impression with a powerful call to action or a memorable quote that resonates with your presentation’s theme.
How can I make my presentation more engaging and interactive?
To create an engaging and interactive presentation for your audience, incorporate visual elements such as images, graphs and videos to illustrate your points visually. Share relatable anecdotes or real-life examples to create a connection with your audience.
You can also integrate interactive elements like live polls, open-ended questions or small group discussions to encourage participation and keep your audience actively engaged throughout your presentation.
Which types of presentations require special markings
Some presentation types require special markings such as how sales presentations require persuasive techniques like emphasizing benefits, addressing objections and using compelling visuals to showcase products or services.
Demonstrations and how-to presentations on the other hand require clear markings for each step, ensuring the audience can follow along seamlessly.
That aside, pitch presentations require highlighting unique selling points, market potential and the competitive edge of your idea, making it stand out to potential investors or partners.
Need some inspiration on how to make a presentation that will captivate an audience? Here are 120+ presentation ideas to help you get started.
Creating a stunning and impactful presentation with Venngage is a breeze. Whether you’re crafting a business pitch, a training presentation or any other type of presentation, follow these five steps to create a professional presentation that stands out:
- Sign up and log in to Venngage to access the editor.
- Choose a presentation template that matches your topic or style.
- Customize content, colors, fonts, and background to personalize your presentation.
- Add images, icons, and charts to enhancevisual style and clarity.
- Save, export, and share your presentation as PDF or PNG files, or use Venngage’s Presentation Mode for online showcasing.
In the realm of presentations, understanding the different types of presentation formats is like having a versatile set of tools that empower you to craft compelling narratives for every occasion.
Remember, the key to a successful presentation lies not only in the content you deliver but also in the way you connect with your audience. Whether you’re informing, persuading or entertaining, tailoring your approach to the specific type of presentation you’re delivering can make all the difference.
Presentations are a powerful tool, and with practice and dedication (and a little help from Venngage), you’ll find yourself becoming a presentation pro in no time. Now, let’s get started and customize your next presentation!
Discover popular designs

Infographic maker

Brochure maker

White paper online

Newsletter creator

Flyer maker

Timeline maker

Letterhead maker

Mind map maker

Ebook maker
IMAGES
VIDEO
COMMENTS
In PowerPoint you can work with presentations in five different views: Slide. Outline. Slide Sorter. Notes Page. Slide Show. Each view is optimized for a specific purpose. (In the lower left-hand corner of the images below, notice how the view icons change for each view.
Normal view displays thumbnails of each slide, the slide where you enter your text and images, and an area to keep presenter notes. To return to Normal view at any time, select View > Normal . The four slide views are located on the View tab. Toggle between them to compare views.
Prezi has a free version for basic Prezi Presentations, but most of the advanced features are reserved for paid plans. 3. Microsoft PowerPoint. Microsoft PowerPoint is the incumbent in the category: nearly everybody has used it at some point, and most organizations are already paying for it as a part of Microsoft 365.
A main presentation feed for the auditorium or sanctuary. Image magnification (IMAG) of the speaker for the audience. A secondary "main" feed for other locations and live stream that includes video of the stage or speaker. A lobby feed that rotates Announcements or the live video of the service. A stage screen with presentation notes ...
Presentation software is a technology that helps users create and deliver visual presentations. These programs allow users to create slideshows, which can include text, images, videos, and animations, and can be displayed at a meeting or conference or shared online. In today's fast-paced business environment, effective communication is ...
You need high-quality business presentation software to take your slides to the next level. Some of the best presentation software include Visme, Haiku Deck, Prezi, Microsoft PowerPoint, Canva and Google Slides. In this comparison guide, we'll analyze each of these tools and many more to understand what the difference is between them so you ...
Slide Sorter view. You can get to Slide Sorter view from the task bar at the bottom of the slide window, or from the View tab on the ribbon. Slide Sorter view (below) displays all the slides in your presentation in horizontally sequenced, thumbnails. Slide show view is helpful if you need to reorganize your slides—you can just click and drag ...
To change views, find the View button on PowerPoint's ribbon and click on it. Then, find the section on the left labeled Presentation Views. This tutorial will walk you through each of these views and how you can use them. Click on the Views tab on the PowerPoint ribbon to find the option to change presentation views.
The third view is the Reading View. This view allows an inpidual to view the presentation in a window with simple controls that make the presentation easy to review on the computer. The fourth view is the Slide Show View. This view is used to deliver the presentation to an audience. With this view, you can see the slide transitions and timing.
You then click on any of the buttons in the Presentation Views and Master Views groups. All views are explained in more detail in separate, linked pages. Figure 1: View tab of the Ribbon. PowerPoint 365 views, accessible from the View tab of the Ribbon are: Normal view; Outline view; Slide Sorter view; Notes Page view; Reading view; Slide ...
Lastly, it's available as part of the Microsoft Office software package; and you can work on your presentations via the web and mobile devices, for offline viewing as well as online. However, PowerPoint is no longer considered the best presentation software, as it has very few templates to choose from, and these tend to fall quite flat ...
To access the different view modes in PowerPoint, you have to click on the 'View' tab in the ribbon. The 2-step process is described below. Step-1: Click on the 'View' tab. At first, select the 'View' tab, which is the second to last tab in the ribbon section of your PowerPoint Window. Step-2: Select your preferred 'View Mode'.
LEARN IT. Presentation software is designed to allow the user to present information in an engaging way with text, pictures, sound, and video. It is a way to communicate ideas in a powerful, organized manner. It utilizes sequences of slides that accompany a spoken presentation.
Presentation software allows users to combine text and visuals for display on devices or screens, often in public spaces during live performances or presentations. Most presentation apps support various media types, and allow you to create everything from basic slide shows or business presentations to complex multimedia synced to a full ...
The Best Slideshow Creation Apps. The slideshow format is the classic presentation option, and the best two apps in this category are Microsoft PowerPoint and Apple Keynote, which is a part of the ...
As in PowerPoint, once a presentation is either opened or begun in Slides, you will see a ribbon with tabs and options that are comparable with those in PowerPoint. In some cases, the programs even use identical word choices, such as the File, View, and Insert menus. It is a good idea to review the tabs in Slides before beginning a project.
How to apply slide sorter view? To apply a sorter view on the current presentation follows the following steps: Step 1: Open Microsoft PowerPoint and then create slides. Step 2: Go to the View and choose slide sorter from the presentation view and you will get the following result. Slide Layouts. Slide Layout shows all the available layouts for your slide containing placeholder boxes, various ...
Views can be access quickly from the bottom bar just to the left of the zoom settings. Views can also be access from the Presentation Views section in the View ribbon. Here is a short description of the various views and their features. Normal View. This is the default view in PowerPoint and this is primarily used to create and edit slides.
Situation-Complication-Resolution. One of the most popular presentation structures in the sales world is situation-complication-resolution. It's a very simple style, simply connected with the words "but" and "therefore.". You start with a neutral statement like, "The team is playing well lately.".
This video will explain the nine common slide layouts available in PowerPoint. In this YouTube channel, I highlight ways to improve your presentation skills and slide design by covering both basic and advanced presentation strategies such as highlighting animation techniques PowerPoint and Apple Keynote and doing reviews of software, books, and trends.
Presentation Views in Powerpoint 2010. PowerPoint supports multiple views to allow users to gain the maximum from the features available in the program. Each view supports a different set of functions and is designed accordingly. PowerPoint views can be accessed from two locations. Views can be accessed quickly from the bottom bar just to the ...
This is the view that your presentation opens up in as soon as you create a new presentation. The advantage of this view is that in this view, editing the slides is very easy. Adding pictures, formatting data, adding tables and graphs, etc., are some other tasks that are available in this view. Basically, all operations are very accessible in ...
CREATE THIS PRESENTATION. 2. Persuasive presentation. If you've ever been swayed by a passionate speaker armed with compelling arguments, you've experienced a persuasive presentation . This type of presentation is like a verbal tug-of-war, aiming to convince the audience to see things from a specific perspective.