Product Area
Feature impact.

- What Is Experience Cloud?
- Building Blocks of a Site
- Find Your Way Around
- Supported Browsers
- Site Vision & Purpose
- Frameworks & Templates
- Who Does What?
- Structure, Layout, & Design
- Customer Engagement
- Content Management Strategy
- Performance & Scale
- Promotion & Measurement
- Enable Digital Experiences
- Configure Digital Experiences Settings
- Configure a Custom Domain for Your Experience Cloud Site
- Configure Settings in Your Administration Workspace
- Set Up Customer Insights
- Considerations When Using Customer Insights
- Update Your Experience Cloud Site’s Name, Status, and Description
- Key Concepts in Page Redirection in Aura and LWR Sites
- Setup Checklist
- Brand Your Pages from the Administration Workspace
- Brand Your Experience Builder Pages
- Create a Custom Login Discovery Page
- Customize the Apex Login Controller
- Set Up Dynamic URLs with Experience Workspaces
- Redirect Users to a Custom Logout URL
- Customize Your Forgot Password and Reset Password Pages
- Configure Your Self-Registration Page
- Activate Your Site
- Deactivate Your Site
- Considerations for Archiving a Site
- Unarchive a Site
- Merge Fields for Experience Cloud Sites
- Customize the One-Time Password Email Template
- Customize the Device Activation Email Template
- Customize the User Lockout Email Template
- Customize the Email Address Change Template
- Customize the Headless Registration Email Template
- Customize the Passwordless Registration Welcome Email Template
- Manage Your Site Email Notifications
- Troubleshooting Steps If Site Members Don’t Receive Welcome Emails
- Experience Cloud Sites: What’s Different or Not Available in the...
- Enable Objects for Experience Cloud Site Users
- Hide Fields in Lightning Knowledge Search Results
- Set Up the Site Case Feed
- Emails in the Site Case Feed
- Enable Question-to-Case
- Restrict Experience Cloud Site User Access to Cases
- Send Emails to Leads and Contacts from an Experience Cloud Site
- Set Up Approvals for External Users in Your Experience Cloud Site
- Close a Conversation, Poll, or Question in an Aura Site
- Pin Posts in an Aura Site
- Add Groups to an Aura Site
- Move Feed Items from One Public Group Feed to Another
- Threaded Discussions in an Aura Site
- Chatter Streams in Aura Sites
- Enable Direct Messages in an Aura Site
- Verify Answers for Your Company
- Add Rich Publisher Apps to Your Feeds
- Enable Upvotes and Downvotes
- Migrate Peer-to-Peer Conversations to Your Experience Cloud Site
- File Visibility and Sharing in Experience Cloud Sites
- Customize Experience Cloud Site Libraries with Images
- Limit Files in Your Experience Cloud Site
- Make Files on Records Visible to Customers
- Display Images Faster on All Devices
- Display Optimized Images on Mobile Devices
- Enable Ideas in Your Experience Cloud Site
- Manage Users and Data Access
- The Customer Account Portal Template
- The Partner Central Template
- The Customer Service Template
- The Build Your Own Template (Aura)
- Standard Components for LWR Templates
- Considerations for Using Flows in LWR
- Actions Bar Considerations in LWR Sites
- Send Visitor Information to the Salesforce Case Object
- Create a Microsite
- Configure Microsite Layout and Create Navigation
- How Do Experience Cloud Forms Connect to Marketing Cloud Engagement?
- Connect a Form Component to Marketing Cloud Engagement
- Send Visitor Information to the Salesforce Lead Object
- Capture Visitor Information with the Lead Form Component
- Objects Supported by Out-of-the-Box Components and Pages in...
- Considerations for Changing Your Template
- Considerations Before You Migrate an Aura Site to Lightning Web...
- Migrate a Koa or Kokua Site to a New Template
- Account Brand Details
- Account Management
- Announcement Section
- Article Content
- Articles with This Topic
- Campaign Marketplace
- Case Comments Publisher
- Case Deflection
- Channel Menu
- CMS Collection
- CMS Connect (HTML)
- CMS Connect (JSON)
- CMS Single Item
- CMS Single Item (Detail)
- Contact Request Button & Flow
- Contact Support Button
- Contact Support & Ask Buttons
- Contact Support Form
- Migrate to the Contact Support Form and Case Deflection Components
- Create Record Button
- Create Record Form
- CRM Analytics Dashboard
- Customize Code for Lightning Components on Login Pages
- Customizable User Profile Menu
- Customizable User Settings
- Dashboard List
- Deflection Tracking
- Einstein Predictions
- Einstein Scoring
- Enhanced List View
- Embedded Appointment Management
- Embedded Messaging
- Embedded Service
- External Account Hierarchy List Card
- Featured Topics
- Featured Topics & Feeds
- Feed Compact
- Feed History
- Feed Post & Comments
- Feed Publisher
- Allow Guest Users to Access Flows
- Flow Orchestration Work Guide
- Follow Button
- Global Search Box
- Global Search for Peer-to-Peer Communities
- Global Search Results
- Group Banner
- Group Detail
- Group Related List
- HTML Editor
- Knowledgeable People
- Language Selector
- Manage Members Section
- Member Profile and Settings
- Message Notification
- Navigation Menu
- New Message Button
- Page Refresh
- Path (Experience Builder Site Component)
- Paused Flows
- Profile Header
- Recognition Badges
- Recommendations
- Recommendations Carousel
- Record Banner
- Record Detail
- Record Information Tabs
- Record List
- Record Related List
- Related Record List
- Related List - Single
- Related Articles List
- Related Questions List
- Related Topics List
- Report Chart
- Report List
- Report Summary
- Reputation Leaderboard
- Rich Content Editor
- Search Results
- Stream Detail
- Stream List
- Suggested Actions
- Top Article by Topic
- Topic Catalog
- Topic Description
- Topic Metrics
- Trending Articles by Topic
- Trending Topics
- Unanswered Questions
- User Profile
- Add Actions to Your User Profile
- User Profile Image
- User Profile Knows About
- User Profile Related List
- User Profile Menu
- User Profile Stats
- User Profile Summary
- User Profile Tabs
- Visualforce Page Component
- Brand the Login Pages
- Employee Login Link
- Forgot Password
- Self-Registration
- Set Icons for Social Login
- What Is the Enhanced Sites and Content Platform?
- How Many Experience Cloud Sites Can My Org Have?
- Find Your Way Around Experience Builder
- Add Contributors
- Update Roles
- Remove Contributors
- Prebuilt Experience Builder Themes
- Change the Theme of Your Experience Builder Site
- Use Branding Sets in Experience Builder
- Adjust the Style and Layout of Your Site Theme
- Theme Guidance: Header Components
- Theme Guidance: Hero Component
- Theme Guidance: Search Component
- Change the Theme Layout of Your Experience Cloud Site’s Pages
- Change the Content Layout in Experience Builder
- Find and Create Asset Files in Experience Builder
- Experience Builder Settings
- Update Your Experience Builder Site’s Template
- Preview Your Experience Builder Site
- Publish Your Experience Builder Site Customizations
- Page Properties and Types in Experience Builder
- Considerations for Page Hierarchy and URL Conflicts in Experience...
- Enable the App Launcher in Experience Builder Sites
- Use a Custom Service Not Available Page for Your Experience Builder...
- Use a Custom Too Many Requests Page for Your Experience Builder Site
- Assign Screen-Responsive Property Values in Custom Components in...
- Show or Hide Components on Mobile, Tablet, or Desktop for Enhanced...
- Hide Components on Mobile Devices with Experience Builder for Aura...
- Error Messages for Pages Without Data in Experience Builder
- Configuring Apex Data Providers in Experience Builder (Beta)
- Data Provider Considerations (Beta)
- Create a Flexible Layout
- Delete a Page in Experience Builder
- to Customize Your Experience Builder Site" data-is-link="true" id="community_builder_page_head_leaf" role="treeitem" aria-level="4" lwc-g4l6pknunt=""> Add Markup to the Page <head> to Customize Your Experience Builder...
- Create Component Variations in LWR Sites
- Create Dynamic Component Visibility in LWR Sites
- Expression-Based Visibility Rules in LWR Sites
- Build an Expression-Based Visibility Rule in LWR Sites Using Custom...
- Considerations for Audience Targeting in Aura Sites
- Criteria Types and Conditions for Audience Creation
- Assign an Audience to a Page Variation
- Assign an Audience to a Branding Set
- Assign an Audience to a Component
- Assign an Audience to a Component Variation
- Prioritize Audiences in Aura Sites
- Use Visualforce in Experience Builder Sites
- Add Streams to Your Experience Builder Site
- Configure Google Analytics™ for Experience Cloud Sites
- Create a Multilingual Site
- Set the Default Language for Your Aura Site
- Add Languages to Your Aura Sites
- Set Language Options
- Edit Language Content on the Page
- Export Language Content
- Import Translated Content
- Delete a Language
- Best Practices and Considerations for Multilingual Sites
- Add a Translate Button to Feed Items in Experience Builder Sites
- The Scale of Your Experience Cloud Sites
- Scale and Performance Optimization Tools for Experience Builder Sites
- Which Performance Tools Do I Need Based on My Experience Cloud Site?
- Use Apex to Configure Self-Registration in Batches for High-Volume...
- Use Apex to Configure Record Creation in Batches for High-Volume Sites
- Use Experience Builder to Configure Micro-Batching for High-Volume...
- High-Volume Registrations and Record Creation Fixes
- Progressive Rendering Guidelines
- Prioritize Component Display Order with Progressive Rendering
- Analyze and Improve Experience Builder Site Performance
- Improve Experience Cloud Site Performance with Browser Caching
- Apex Caching on the Salesforce CDN
- Set Up Your Experience Builder Site for SEO
- Identify Your Preferred Domain to Improve SEO Results
- SEO Page Properties in Experience Builder
- Create a Custom robots.txt File for Your Experience Builder Site
- Enable SEO-Friendly URLs in LWR Sites
- Create SEO-Friendly URLs in LWR Sites
- CSV File Format for Importing URL Slugs
- Make Objects Available for SEO
- Provide Search Engines with Fresh Content Snapshots
- Generate a Manual Sitemap Refresh for Your Experience Builder Site
- Reassign the Scheduled Jobs that Generate an Automatic Sitemap Refresh
- Best Practices and Tips for Using SEO in Experience Builder Sites
- SEO for Experience Builder Sites FAQ
- Connect Experience Cloud to Data Cloud
- Add Content to Your LWR Sites with Data Binding
- Use a Grid Component to Show Enhanced CMS Collections and List Views...
- Add an Image from Salesforce CMS to Your LWR Site
- Nest Content Components in Your LWR Site
- Bind Data to CMS Content Pages in Your LWR Site
- Create a Manual CMS Collection for Your Aura Site
- Edit a Manual CMS Collection in Your Aura Site
- Create a Conditional CMS Collection for Your Aura Site
- Salesforce CMS Topics for Aura Sites
- Show CRM Data in Your Aura or LWR Site Using Object Pages
- Show Record Lists in Your Aura or LWR Site Using Navigation Menus
- Bind Data to CRM Record Detail Pages in Your LWR Site
- Add CRM Connections to Your Aura Site
- Create a Salesforce CRM Collection for Your Aura Site
- Add a Salesforce CRM Collection to Your Aura Site
- External Data Sources in Your Experience Cloud Site
- Set Up CMS Content Search in an LWR Site
- Set Up CRM Object Search in LWR Sites
- Set Up Search Pages for Aura Sites
- Enable Search Autocomplete for Guest Users
- Add the Global Search Box to Your Customized Experience Cloud Site...
- Allow Users to Search Salesforce Tabs + Visualforce Sites
- Create a Branded Mobile App for Your Experience Cloud Site by Using...
- Create a Lightning Bolt Solution
- Export a Customized Experience Builder Template for a Lightning Bolt...
- Export a Customized Experience Builder Theme for a Lightning Bolt...
- Export a Customized Experience Builder Page for a Lightning Bolt...
- Add Flows to a Lightning Bolt Solution
- Export and Packaging Considerations for Lightning Bolt Solutions
- Requirements for Distributing Lightning Bolt Solutions
- Package and Distribute a Lightning Bolt Solution
- Rename the Chatter Tab
- Brand Your Salesforce Tabs + Visualforce Site
- Enable the Global Header for Salesforce Tabs + Visualforce Sites
- Choose a Landing Tab
- Enable Leads for Visualforce Sites
- Use a Custom Service Unavailable Page in Your Salesforce Tabs +...
- Configure the Default Login Page to Use a Custom Home Page
- Add Custom Pages That Don’t Require Login
- Help Center Set Up Tasks
- Create a Help Center
- Help Center Template Pages
- Change from Help Center to a New Template
- Partner Central—Build Lightning Partner Sites
- Create a Partner Site with Partner Central—Setup Tasks
- What’s Your Partner Experience Cloud Site Strategy?
- Migrate from a Partner Portal to an Experience Cloud Site
- Set Up the Channel Manager Role
- Disable Partner Accounts
- Create a Channel Program
- Create Channel Program Levels
- Manage Channel Program Members with Sharing Groups
- Channel Program Member Limits
- Assign Leads to Partners
- Create a Lead Process for Lead Distribution
- Create a Queue for Lead Distribution
- Create Page Layouts for Lead Distribution
- Create Lead Record Types for Lead Distribution

Create Assignment Rules for Lead Distribution
- Customize Partner Central for Lead Distribution
- Create Processes for Deal Registration
- Create Page Layouts for Deal Registration
- Create Lead Record Types for Deal Registration
- Create a Global Action to Let Partners Register Deals
- Customize Opportunities for Deal Registration
- Create Approval Workflows for Deal Registration
- Customize Partner Central for Deal Registration
- Create a Market Development Budget
- Customize Page Layouts for Partner Marketing Budgets
- Grant Channel Account Managers Access to Partner Marketing Budgets
- Share Partner Marketing Budgets with the Channel Account Manager
- Create Approval Workflows for Partner Marketing Budgets
- Create a Partner Fund Allocation
- Customize Page Layouts for Partner Fund Allocations
- Grant Channel Account Managers Access to Partner Fund Allocations
- Share Partner Fund Allocations with the CAM
- Create a Partner Fund Request
- Grant Channel Account Managers and Partner Users Access to Partner...
- Create Approval Workflows for Partner Fund Requests
- Customize Page Layouts for Partner Fund Requests
- Create a Partner Fund Claim
- Create Approval Workflows for Partner Fund Claims
- Customize Page Layouts for Partner Fund Claims
- Best Practices for Campaign Marketplace
- Configure Reports for Partner Scorecard
- Assign Cases to Partners
- Assign Tasks and Events to Partners
- Lead Distribution Reports
- Deal Registration Reports
- Market Development Fund Reports
- Build a Portal with the Customer Account Portal Solution
- Create a Customer Account Portal—Setup Tasks
- What’s Your Customer Account Portal Strategy?
- Extend Salesforce to Customers with the Correct Licenses
- Experience Cloud Journey Data Model
- Email Preferences
- Triggering Journeys Based on Events
- Triggering Journeys Based on Audiences
- Determine If an Object Can Trigger Journeys
- Sync an Object to the Marketing Cloud Engagement
- Experience Cloud Objects for Creating Member Journeys
- Sharing CRM Data in an Experience Cloud Site
- Enable Clickjack Protection in Experience Cloud Sites
- SAML for Experience Cloud Sites
- Configure SAML SSO Between Salesforce Orgs or Experience Cloud Sites
- Authentication Provider SSO with Salesforce as the Relying Party
- Encrypt Experience Cloud Site Data
- CSP and Lightning Locker Design Considerations
- Where to Allowlist Third-Party Hosts for Experience Builder Sites
- Select a Security Level in Experience Builder Sites
- Experience Cloud Cookies
- Deploy A Full Experience Cloud Site with Change Sets
- Deploy Partial Experience Cloud Site Content with Change Sets
- Considerations for Deploying Experience Cloud Sites with Change Sets
- Troubleshoot Metadata Deployment Errors in Experience Cloud Sites
- Assign an Experience Cloud Site Manager
- Assign a Moderator
- Track Experience Cloud Site Activity with the Moderation Overview Page
- Enable Members to Flag Items in Your Experience Cloud Site
- Create Criteria to Moderate Your Site
- Create Rules to Moderate Your Site
- Review and Approve Posts and Comments in Your Experience Cloud Site
- Set Up Apex Triggers for Flagging Items
- Experience Pulse
- Experience Cloud Site Moderation Limits and Limitations
- Manage Topics in Experience Cloud Sites
- Automatically Assign Topics to Articles
- Set Up Featured Topics
- Set Up Navigational Topics
- Set Up Content Topics
- See Your Site’s Topics and Subtopics in One Place
- Add Topics to Articles or Remove Them
- Translate Topics Names and Descriptions for Experience Cloud Sites...
- Create Audiences for Your Recommendations
- Recognition Badges Limitations
- Enable WDC Thanks
- Turn On Recognition Badges in Experience Workspaces
- Configure Who Can Create Recognition Badges
- Configure Who Can Assign Recognition Badges
- Use Components to Display Assigned Recognition Badges on Member...
- Create, Edit, and Delete Recognition Badges
- Manage Who Can Assign a Specific Recognition Badge
- Display the Full List of Assigned Recognition Badges on a Member’s...
- Create a Mission
- Display Unearned Mission Badges
- Assign Recognition Badges to Experience Cloud Site Members
- Delete Assigned Badges
- Use the API to Give Recognition Badges Sample Code
- Enable Reputation in Your Experience Cloud Site
- Set Up Reputation Levels
- Set Up Reputation Points
- How is my Experience Cloud site reputation calculated?
- Share a Link to Your Experience Cloud Site
- Switch Between Your Salesforce Org and Your Experience Cloud Sites
- Track User Engagement with Google Analytics 4
- Report on Experience Cloud Sites with AppExchange Packages
- Enable Analytics in Your Experience Cloud Site
- Track Site Activity with Custom Reports
- Enable and Map Dashboards
- Insights for Engagement
- Create a Report from Your Site with Report Builder
- Allow External Users to Access and Report on Tasks and Events
- Report and Dashboard Considerations for Sites
- How Experience Cloud Uses Lightning
- Experience Builder Site Limitations
- Experience Cloud Sites Usage Allocation
- Update Public Accessibility Settings for Standard Visualforce Pages...
- Additional Experience Cloud Site Limitations
You are here:
- Salesforce Help
- Experience Cloud
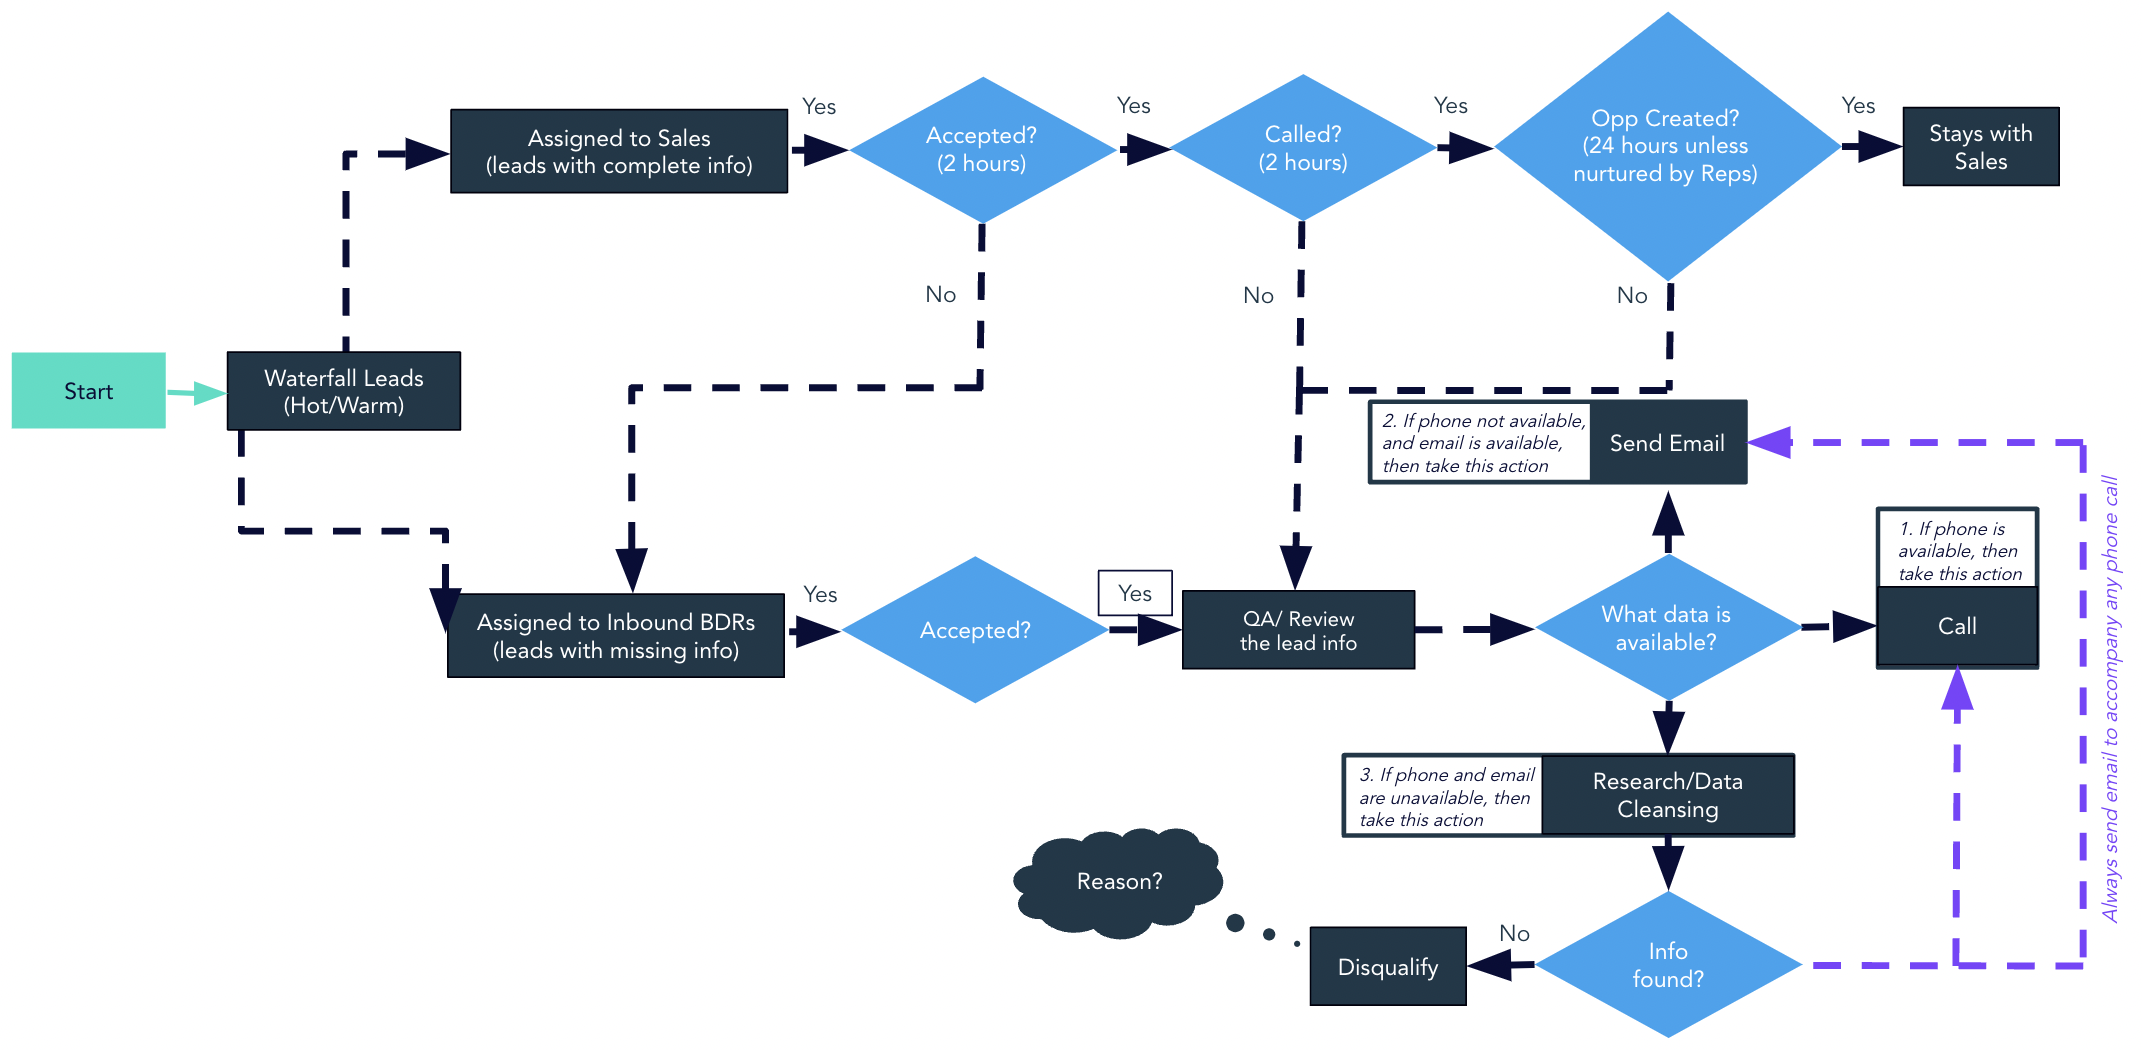
Assignment rules allow you to automatically apply criteria to sort, queue, or act on leads. For example, use assignment rules to automatically assign leads to the lead inbox queue for Partner Central.
Required Editions
For lead distribution, use assignment rules to define the criteria by which you want to distribute your leads, such as partner tier, geography, or specialization.
- From Setup, enter Leads in the Quick Find box, then select Lead Assignment Rules .
- Create a lead assignment rule, let’s call this All Channel Sales Leads.
- Create rules to filter leads by record field values or user criteria and assign them to the lead inbox queue. You can also create rules to directly assign leads to partner users.
- To send an email notification when a lead is assigned to the queue, select an email template. You can also create custom templates for partner email notifications .
Cookie Consent Manager
General information, required cookies, functional cookies, advertising cookies.
We use three kinds of cookies on our websites: required, functional, and advertising. You can choose whether functional and advertising cookies apply. Click on the different cookie categories to find out more about each category and to change the default settings. Privacy Statement
Required cookies are necessary for basic website functionality. Some examples include: session cookies needed to transmit the website, authentication cookies, and security cookies.
Functional cookies enhance functions, performance, and services on the website. Some examples include: cookies used to analyze site traffic, cookies used for market research, and cookies used to display advertising that is not directed to a particular individual.
Advertising cookies track activity across websites in order to understand a viewer’s interests, and direct them specific marketing. Some examples include: cookies used for remarketing, or interest-based advertising.
Cookie List

How to Re-run Salesforce Lead Assignment Rules: Flows & Apex
Salesforce Lead assignment rules ensure Leads are assigned to the appropriate user or queue for follow up. They also liberate marketers from trying to maintain sales territory logic within their Marketing Automation Platform (MAP).
>> Related: How to Build a SLA Alert in Salesforce <<
When a new Lead is created, Salesforce will use logic you’ve configured to assign the record to the appropriate user or queue. But what if you need to re-run that logic on existing records ?
In this post:
Re-running Lead Assignments for just a few Leads
If you only need to do this for a single Lead record, the solution is simple. Edit the record and select the optional “ Assign using active assignment rule “ checkbox.

If you need to do a one-time batch reassignment of a number of records, export the relevant Lead Ids. Then use the Apex Data Loader to trigger assignment rules to fire. You can grab the ID of the appropriate Lead Assignment Rule from the URL bar when viewing the rule in Setup. It will always start with the prefix “01Q” .

But you may want to automatically re-run Salesforce Lead Assignments
But you may want to re-run assignment rules automatically under certain conditions. For example: you may assign Leads under a certain Lead Score to a Queue. When the Lead Score increases over the threshold, you then want to re-run assignment rules to assign to an inside sales rep for follow up.
To do this, we combine Flow and an Apex Invocable method. We take advantage of the power of Apex with the flexibility to declaratively (clicks, not code!) control the logic of when to re-run the assignment rules, without having to edit any code.
Using Apex for Salesforce Lead Assignment Rules
Let’s start with the code.
Since we’re writing code here, we’ll need to start in a sandbox org first before deploying to production. You’re smart and already knew that you’d NEVER make changes in production without first testing in a sandbox ( right?! ), but in this case, Salesforce doesn’t trust you either way and forces you to write your code in a sandbox org before moving to production.
We’ll be creating an Apex class with a single method with the @InvocableMethod annotation, which allows us to call our Apex from within a Flow. The method accepts a single parameter (a list of the Lead Ids to be assigned) that you’ll pass into the method from your Flow.
That’s it. Just those four lines are all you need in your code. The logic for firing the assignment rules will be configured in one or more Flows.
Now, in order to actually deploy this to your production org, you’ll also need to create a test class to cover your code and ensure that it functions as expected in your environment. A sample test class might look like this (but this is extremely basic):
Work with a developer to ensure you’re accounting for any requirements specific to your Salesforce instance.
Using Salesforce Flows for Lead Assignment Rules
Now we’ll create our declarative logic of when to fire the code, using a Flow.
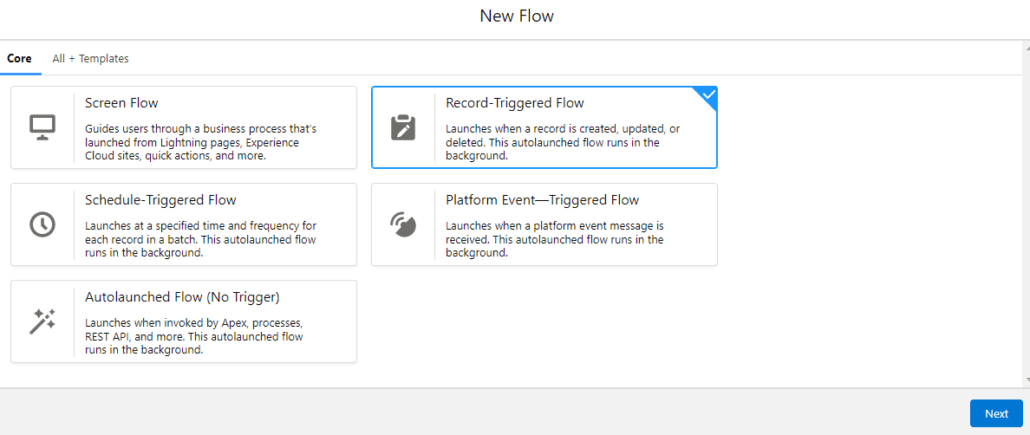
1) Create a new Flow by searching for Flows under Setup and clicking the New Flow button in the top right. This example is for a Record-Triggered Flow , but you can design it a number of ways.
2) Select the Lead object for your Flow and configure the trigger for when a record is created or edited .
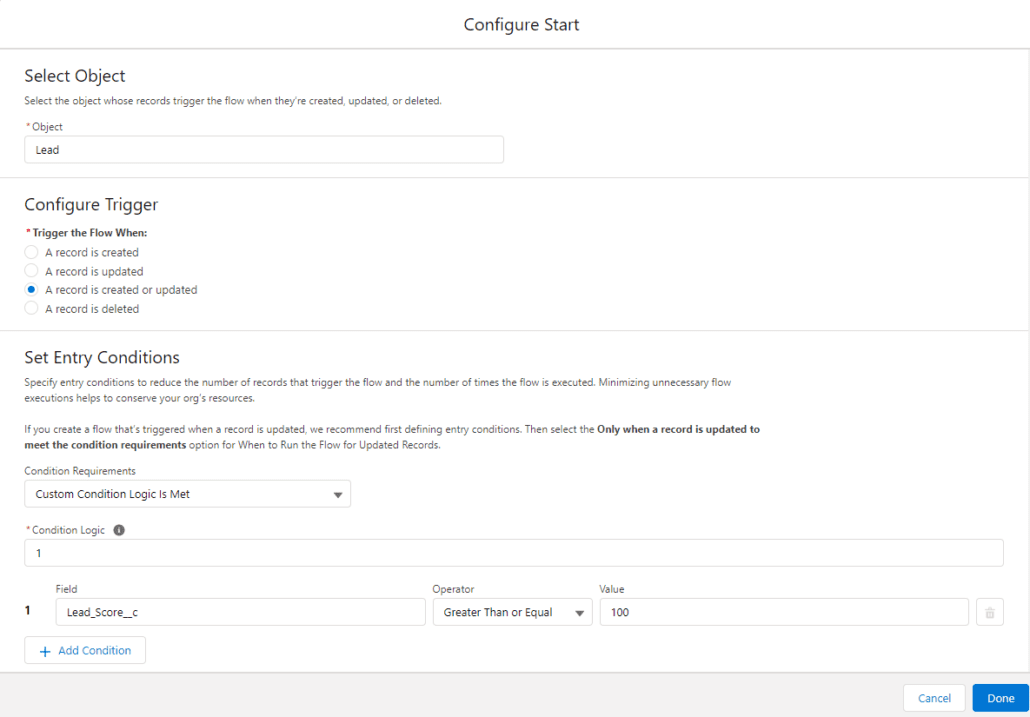
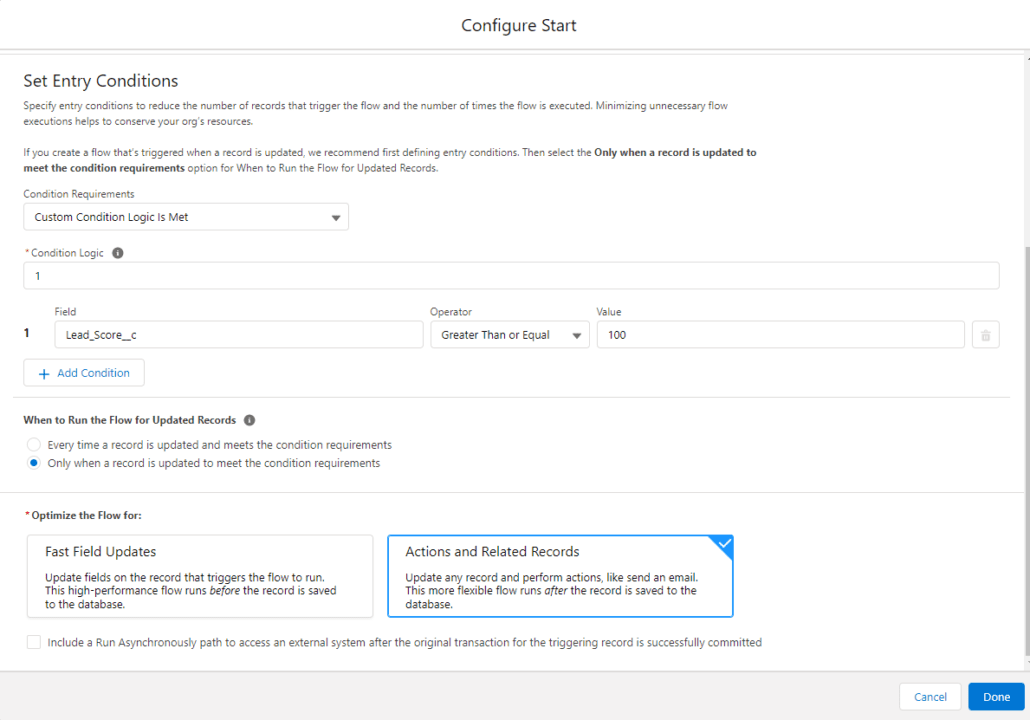
3) Then set the Entry Conditions. In this use case, we want to re-assign Leads after they meet a certain Lead Score. Select “custom condition logic is met. ” Set the condition that the Lead Score is greater than or equal to 100.
Under the “When to Run the Flow for Updated Records” section, select the option to only execute when a record is updated to meet the condition requirements . This means we’ll only execute the actions if the record previously did not meet the criteria, but now does after being updated.
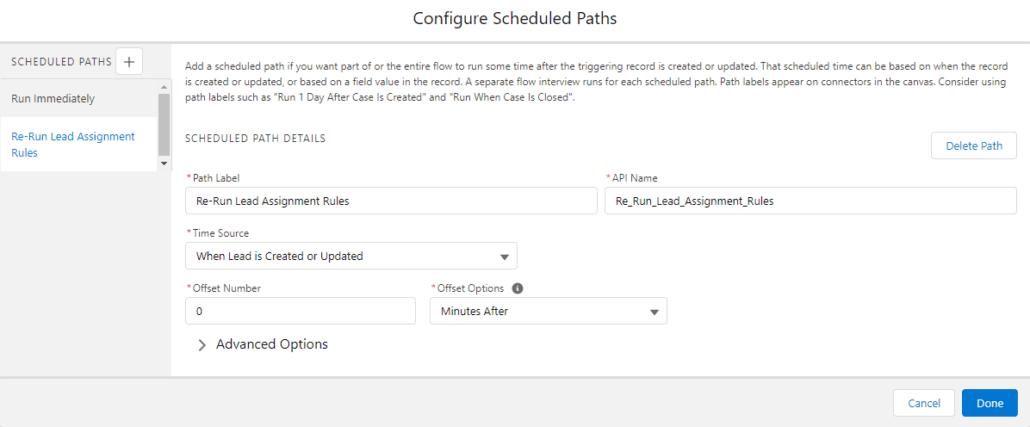
4) Without getting into too much detail, because of Triggers and Order of Execution , we can’t call our code in an immediate action. Instead, we’ll create a scheduled path to call our Apex method.
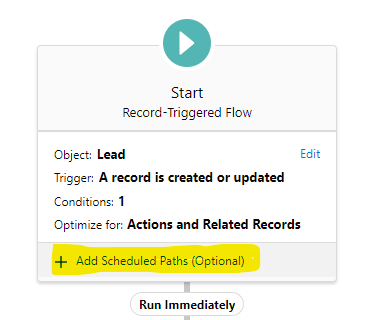
In this case, we want the logic to execute ASAP, so we’ll set the schedule for 0 minutes from now.
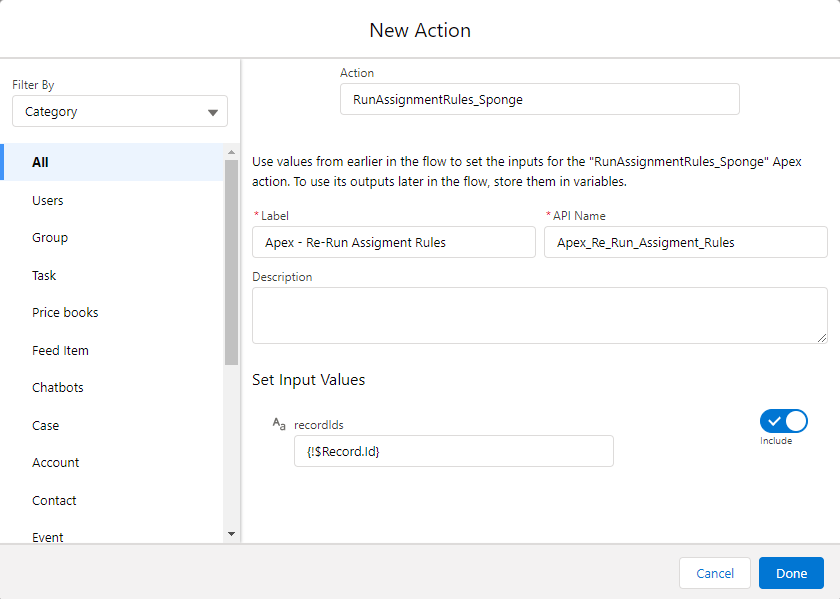
5) Once saved, we can create a new action. Click to Add a New Element , and select an Action type. Give your action a name, and select the Apex class you created earlier. Set the Apex Variables leadIds using the Field Reference of the Lead Id that started the process.
6) After saving, your Flow looks like this:

Activate your flow, test in your sandbox, and deploy to your production org. Since the code is fired under a scheduled action, there is a slight delay before the reassignment happens. In my experience, it’s usually <2 minutes, but you can monitor this under Setup > Flows and viewing the Paused and Waiting Interviews section.

The nice part about this approach is that if your requirements change – for example if your Lead Score threshold changes to 150 instead of 100 – you can change the logic in your Flow (Step 3) without having to touch any code.
You might also like
Sales Funnel ROI Calculator
8 Lead Management Process Samples
How to Measure Lead Follow-Up Beyond First Touch
Get our newsletter.
Get tips, tutorials, best practices, and other cool stuff delivered to your inbox every quarter.
- Name * First Last
Get a System Audit
Whether you inherited a new instance or just want a second opinion, we'll dive in and benchmark your tech stack.
- Full Name *
- Job Title *
- What systems and challenges do you have?* *
- Hidden utm_medium
- Hidden utm_source
- Hidden utm_campaign
- Hidden utm_content
- Hidden utm_term
Download Resource
Use this form to recieve your free resource in your inbox today!

Automation Champion
Automating Salesforce One Click at a Time

Running Lead Assignment Rules From Salesforce Flow
Last Updated on February 14, 2022 by Rakesh Gupta
To understand how to solve the same business use case using Process Builder . Check out this article Getting Started with Process Builder – Part 49 (Running Lead Assignment Rules From Process Builder) .
Big Idea or Enduring Question:
How do you run the lead assignment rule from the Salesforce flow? Lead assignment rules allow us to automatically assign Leads to the appropriate queue or user. A Lead assignment rule consists of multiple rule entries that define the conditions and order for assigning cases. From a Salesforce User interface, a user can trigger assignment rules by simply checking the Assign using the active assignment rules checkbox under the optional section.
The problem arises when you need to insert or update the Leads from Salesforce Flow and wants to trigger assignment rules. Using the Salesforce Flow a Lead will be inserted or updated but the assignment rule will not be triggered as there is no check box to use the organization’s assignment rule or a prompt to assign using the active assignment rule.
Let’s start with a business use case.
Objectives:
After reading this blog post, the reader will be able to:
- Running the lead assignment rules from Salesforce Flow
- Understand @InvocableMethod Annotation
- How to call an Apex method using Salesforce Flow
Business Use Case
Pamela Kline is working as a System administrator at Universal Containers (UC) . She has received a requirement from the management to update the following Lead fields when Lead Source changed to Partner Referra l .
- Status = Working – Contacted
- Rating = Hot
As data changed by the process, she wants to fire the assignment rule as soon as the process updates the lead record.
Automation Champion Approach (I-do):

Guided Practice (We-do):
There are 4 steps to solve Pamela’s business requirement using Salesforce Flow and Apex. We must:
- Setup a lead assignment rule
- Create Apex class & Test class
- Define flow properties for record-triggered flow
- Add a decision element to check the lead source
- Add an assignment element to update status & rating
- Add a scheduled path
- Add a decision element to check if lead source changed
- Add action – call an Apex class to invoke lead assignment rule
Step 1: Setting Up Lead assignment Rule
- Click Setup .
- In the Quick Find box, type Lead Assignment Rules .
- Click on the Lead Assignment Rules | New button .
- Now create an assignment rule, as shown in the following screenshot:

Step 2: Create an Apex class and Test class
Now, we have to understand a new Apex annotation i.e . @InvocableMethod . This annotation lets us use an Apex method as being something that can be called from somewhere other than Apex . The AssignLeadsUsingAssignmentRules class contains a single method that is passing the ids of the Leads whose Lead Source changed to Partner Referral . Create the following class in your organization.
- In the Quick Find box, type Apex Classes .
- Click on the New button .
- Copy code from GitHub and paste it into your Apex Class.
- Click Save.

Step 3.1: Salesforce Flow – Define Flow Properties for Before-Save Flow
- In the Quick Find box, type Flows .
- Select Flows then click on the New Flow .
- How do you want to start building : Freeform
- Object : Lead
- Trigger the Flow When : A record is created or updated
- Condition Requirements: None
- Optimize the Flow For : Fast Field Updates
- Click Done .

Step 3.2: Salesforce Flow – Using Decision Element to Check the Lead Source
Now we will use the Decision element to check the lead source to ensure that it is equal to Partner Referral.
- Under Toolbox , select Element .
- Drag-and-drop Decision element onto the Flow designer.
- Enter a name in the Label field; the API Name will auto-populate.
- Under Outcome Details , enter the Label the API Name will auto-populate.
- Resource: {!$Record.LeadSource}
- Operator: Equals
- Value: Partner Referral
- When to Execute Outcome : Only if the record that triggered the flow to run is updated to meet the condition requirements

Step 3.3: Salesforce Flow – Adding an Assignment Element to Update Rating and Status
- Drag-and-drop the Assignment Element element onto the Flow designer.
- Enter a name in the Label field- the API Name will auto-populate.
- Field: {!$Record.Rating}
- Add Condition
- Field: {!$Record.Status}
- Value: Working – Contacted

- Click Save .
- Enter Flow Label the API Name will auto-populate.
- Click Show Advanced .
- API Version for Running the Flow : 53
- Interview Label : Record-Trigger: Lead Before Save {!$Flow.CurrentDateTime}

Step 4.1: Salesforce Flow – Define Flow Properties for After-Save Flow
- Field : Lead Source
- Operator: Euqals
- Optimize the Flow For : Action and Related Records

Step 4.2: Salesforce Flow – Add Scheduled Paths

- Under SCHEDULED PATHS , click on the New Scheduled Path .
- Under Scheduled Path Details , enter the Label the API Name will auto-populate.
- Time Source : Lead: Last Modified Date
- Offset Number : 1
- Offset Options : Minutes After

Step 4.3: Salesforce Flow – Adding an Action to Call Apex class to Trigger Lead Assignment Rule
- Drag-and-drop the Actions element onto the Flow designer.
- Select the AssignLeadsUsingAssignmentRules Apex class.
- Field: LeadIds
- Value: {!$Record.Id}

- Interview Label : Record-Trigger: Lead After Save {!$Flow.CurrentDateTime}

Proof of Concept
Now onward, if a business user updates the Lead Source to Partner Referral , Process Builder will automatically update Status , Type , and Assign it to the right user or queue based on the lead assignment rule.

Monitor Your Schedule Flow
To monitor Flows that are scheduled, navigate to the following path:
- Navigate to Setup (Gear Icon) | Environments | Monitoring | Time-Based Workflow .

- Use the Delete button to delete the time-based Flow job from the queue.
Formative Assessment:
I want to hear from you! What is one thing you learned from this post? How do you envision applying this new knowledge in the real world? Let me know by Tweeting me at @automationchamp , or find me on LinkedIn.
Submit Query!
Similar Posts

Elevate Your Screen Flows with a Customizable Counter Component

Dynamic Progress Bar for Form Completion in Salesforce Flow

Launch a Flow from CRM Analytics Dashboard Text Widget
9 thoughts on “ running lead assignment rules from salesforce flow ”.
It ran repeatedly, every minute, over and over again. I was getting notification email every minute when testing. I did the same steps as you mentionned, with a record triggered flow containing the apex action.
I found that this ran repeatedly, every minute, over and over again. Was easy to spot because I modified the Apex to include sending the user notification email as well – so I was getting notification email every minute when testing.
When I updated the ‘Time Source’ in the flow scheduled path from ‘Time Source: Lead: Last Modified Date’ to ‘Time Source: When Lead is Created or Updated’ that seems to have solved the problem.
Was curious if you had the same experience or if there was some other nuance happening.
It also looks like you had originally intended to use a decision element in step 4.3 but changed that to flow entry requirements, likely because the scheduled path can’t assess the prior and current values the same way the starting node can.
Thank you for sharing your valuable feedback. I have a quick question for you: When executing the Apex class, do you utilize a Record-triggered Flow or a Scheduled-triggered Flow?
after the apex class fires, noticed the lead owner is assigned to default lead owner, instead of using lead assignment rule. Any clue?
Thank you for an excellent tutorial 🙂 you solved my problem! Very much appreciated
Anyone getting issues with an error on mass updates “Apex error occurred: System.QueryException: List has more than 1 row for assignment to SObject “? if each one is called individually, I don’t understand how there is more than 1 row for assignment. Sometimes I get an email with this error only to see that the trigger actually worked for the specified record so a bit odd. Thanks!
Thank you for the great tutorial. Why add the 1 minute wait? Is that just to take avoid too much synchronous automation? Or is it required for another reason?
You’re right Kevin (to make the process asynchronous).
- Pingback: Getting Started with Process Builder – Part 49 (Running Lead Assignment Rules From Process Builder) - Automation Champion
Leave a Reply Cancel reply
This site uses Akismet to reduce spam. Learn how your comment data is processed .
Discover more from Automation Champion
Subscribe now to keep reading and get access to the full archive.
Type your email…
Continue reading
Salesforce is closed for new business in your area.
- Salesforce Training
Salesforce Data + AI
Salesforce administrator, salesforce developers, salesforce consultants, salesforce marketer, salesforce architects, salesforce industries.
- Corporate Training
- Testimonials
Live Classes
Free Expert Led Sessions
1-1 learning and career support
Bite size updates on Salesforce
Salesforce Internship
Get job-ready with Virtual Internships
Salesforce Scholarship
Earn up to 75% scholarships
InterviewGPT
Free unlimited interview Practise
Refer & Earn
Up to $ 200 on every referral
- IIT Kanpur Programs
Lead Assignment Rules in Salesforce
- ⏱️ 4 minutes
One of the significant aspects of the Salesforce solution is its ability to have automated workflows or process flows for most of the day-to-day business use cases. In a sales process, leads can be generated in volumes daily, and assigning those leads to the right agent or team is a cumbersome task. Leads can be created via different channels. For example, people can enquire about the service through the company website (Web to lead) or leads can be uploaded using import data wizard (Bulk upload), or leads can be created manually in the CRM application.
The leads generated through different channels have to be assigned properly, considering the priority of the leads based on certain factors. Thus lead assignment rule is paramount because it automates the process of assigning the lead to the proper team or agent.
So, what is Assignment Rules in Salesforce?
Salesforce Assignment Rules automate lead and case distribution by routing them to specific users or queues based on criteria like geography or record type. Rules can be customized to meet your organization’s unique needs.
How to Set Up Lead Assignment Rules in Salesforce?
1. From Setup, “Quick Find” search box, type “Lead assignment.” You will be able to see “Lead Assignment Rules.”

2. Select the “New” button to create a new lead assignment rule.
3. Enter the rule name and activate the “Active” checkbox.

4. To specify your rule criteria, open your newly created rule and select New in the Rule Entries section.
5. On this page, you have 3 tasks.
a. Step 1: Determine the order in which the rule entry will be processed – you only need to specify the sort order here. Let’s give 1 now.
b. Step 2 – Select the criteria for the rule entry – In our example, let’s take an assignment based on geography. Leads originating from the USA have to be assigned to the ‘USA Lead Management team.’ Leads generated outside the USA need to be handled by the ‘Other Countries’ team. In sort order 1, we will manage USA-based leads. So select the conditions as in the below image.
c. Step 3 – Select the user or queue to assign the lead to – here, we can assign the lead to either a user or a queue. In our example, we will assign USA-based leads to the ‘USA Lead Management queue. When you select the email template, all the members in the queue will get notified if a new lead is assigned to them.

6. Repeat processes in (5) to assign leads generated in countries other than the USA. Here, the sort order should be 2. Country NOT EQUAL to the USA.

Lead Assignment Rule: Did You Know?
- Only one active assignment rule is possible at a time. You can create multiple assignment rules, but only one can be active at a time.
- The Group, Essentials, Professional, Enterprise, Performance, Unlimited, and Developer Editions all include lead assignment rules.
- Typically an admin user with a System administrator profile will be able to set up lead assignment and routing. However, a user with a less privileged profile will need to check if they have “View Setup and Configuration” permission enabled to view the assignment rules. To create or change assignment rules, one must have “Customize Application” permission in their profile or permission set.
- In the lead page layout, if you select ‘Layout Properties,’ you can see an option for the ‘Lead Assignment Checkbox.’ You can show this option on the lead edit page.

So, basically, lead assignment rules can help ensure that your leads are handled efficiently and effectively, and they can help distribute leads evenly among your sales team.
Now, that’s all about the Lead Assignment Rules in Salesforce. If you wish to learn more about Lead assignments or anything about Salesforce, join our saasguru Slack community and talk with seasoned Salesforce professionals.
Take that first step towards your Salesforce career, enroll in our Salesforce Admin course and get certified on your first attempt. Get personalized study plans, free mock exams, quizzes, flashcards and much more. Do check out our Salesforce Certification Courses .

Subscribe & Get Closer to Your Salesforce Dream Career!
Get tips from accomplished Salesforce professionals delivered directly to your inbox.

Looking for Career Upgrade?
Book a free counselling session with our Course Advisor.
By providing your contact details, you agree to our Terms of use & Privacy Policy
Unlock Your AI -Powered Assistant
Gain Exclusive Access to Your Salesforce Copilot

Related Articles

Discover Chamil Madusanka’s inspiring journey in Salesforce, from unexpected beginnings to MVP Hall of Fame recognition. Read now!

Salesforce’s integrated ecommerce storefronts help SMBs build D2C stores, unify operations, and boost digital revenue seamlessly. Read now!

Salesforce’s Government Cloud Premium offers Top Secret security and innovation for U.S. national security and intelligence agencies. Read now!

Supercharge your SaaS career
Partnership
GradVantage Holding Pty Ltd , 20 Isobell Ave, West Pennant Hills NSW 2125, Australia +61 466149529
GradVantage India Pvt. Ltd. , M-309, Sector-82, Vivek Vihar, Noida, Gautam Buddha Nagar, Uttar Pradesh 201305 +91 9353241823
saasguru, 136 Madison Avenue, 5th & 6th Floors, New York City • NY 10016 • USA +16264270290

Getting Started with Lead Assignment Rules in Salesforce

Lead Assignment Rules in Salesforce are a powerful tool that allow your GTM (Go-To-Market) teams to automate the process of generating leads and assigning them to the most suitable sales representatives based on specific criteria. Managing and assigning leads becomes key, particularly when dealing with high daily volumes and considering the priority of leads based on various factors. And, as we all know, speed to lead is crucial : if you waste even one minute, your conversion plummets by a shocking 391%.
Ideally, your organization should employ different lead assignment rules tailored to your go-to-market strategies and motions. For instance, the assignment rules for leads generated from a demo request on your website may differ from those for leads obtained through downloading an ebook.
A lead assignment rule consists of a prioritized set of rule entries that dictate how leads are assigned throughout your go-to-market motions, either to a specific user or to a Salesforce Queue. These rules are automatically triggered when leads are created and can also be applied to existing records.
However, there is one significant constraint with Salesforce assignment rules: only one can be active at any given time. This means that as your business scales and you implement multiple business processes, you'll need to consolidate all the complex logic into a single comprehensive assignment rule with multiple rule entries. As you can imagine, managing, maintaining, and updating such an operation can become increasingly challenging over time.
Salesforce Lead Assignment Rules Examples
- Leads from Enterprise Accounts with ARR greater than $200M are assigned to Enterprise SDR Queue.
- Leads from accounts with ARR greater than $50M (and less than $200M) are assigned to Mid Market SDR Queue.
- Leads reaching Nurture Lead Status are directed to SDR 1.
- Irrelevant leads with a ‘gmail.com’ domain are routed to a dummy user and disregarded.
- Distribute leads to reps based on their respective sales territories.
Salesforce Lead Assignment Rules: A step-by-step guide
Here is a step-by-step guide to help you set up Salesforce Lead Assignment Rules in keeping with your business needs and sales strategies.
Step 1: Log in to Salesforce:
Access your Salesforce account using your credentials.
Step 2: Navigate to Setup:
Click on the gear icon in the screen's upper-right corner to access the Setup menu.
Step 3: Access Lead Assignment Rules:
In the Setup menu, search for "Lead Assignment Rules" in the Quick Find box. Click on "Lead Assignment Rules" under the "Leads" section.
Step 4: Create a New Rule:
Click on the "New Lead Assignment Rule" button to create a new rule.
Step 5: Define Rule Entry Criteria:
Enter a suitable name for the rule and specify the rule's entry criteria.
You can decide whether to write a formula or build a prioritized set of rule entry criteria. The logic you define determines the conditions that need to be met for the rule to trigger.
Step 6: Specify Rule Assignments:
Choose the desired assignment method for your leads. Salesforce provides different assignment options, such as assigning leads to Queues or specific users. Select the appropriate option based on your business requirements, and (optionally) choose an email template to be sent to the new owner of the lead.
Step 7: Save and Activate the Rule:
Once you have configured all the necessary settings, click the "Save" button to save the lead assignment rule. After saving, activate the rule to make it operational.
Step 8: Test and Validate:
It is essential to test the rule and ensure that leads are being assigned as expected. Create test leads and verify their assignments based on the defined criteria. Make any necessary adjustments or refinements to the rule if required.
Salesforce editions and permissions for Lead Assignment Rules
After gaining an understanding of how lead assignment rules can benefit your business and determining their suitability, you may wonder, "Do I have the appropriate Salesforce edition?" The short answer is, “Yes.” Salesforce has now made this feature available in every edition.
In terms of user permissions, certain requirements must be met to view and edit lead assignment rules in Salesforce. Users must have the "Manage Leads" permission and the ability to "View Setup and Configuration" in order to access lead assignment rules. For editing purposes, users need the "Customize Application" permission along with either the "Modify All Data" or "Modify Leads" permission. If you are unable to locate this section in Salesforce or encounter difficulties with viewing or editing assignment rules, reach out to your Salesforce administrator to verify that you have the necessary permissions in place.
Assignment rules limits and challenges
Salesforce Lead Assignment Rules, while suitable for small teams with straightforward rules, come with significant limitations that can hinder efficiency for larger teams. These limitations become more apparent as the volume of leads increases and more complex use cases arise.
One major drawback is the stringent limits imposed by Salesforce on the number of rules, entries, and actions allowed per rule. These limits are illustrated in the following table:

However, there are additional factors to consider when utilizing assignment rules in Salesforce. It is crucial to be aware of the following challenges before embarking on building your entire logic using Salesforce's native functionality:
- Limited to Leads and Cases: Assignment rules only apply to the lead and case objects. While this may suffice for simple and initial use cases, it falls short when implementing ABM (Account Based Marketing) strategy or when the need to route Opportunities arises.
- Complex QA and Audit: Salesforce's native functionality lacks versioning or debugging tools, making testing and troubleshooting assignments a laborious task. Additionally, there is no built-in record of why a lead was assigned in a particular way, further complicating the auditing process.
- Limited Assignment Options: When using assignment rules, you can only assign a Lead record to a specific user or a Salesforce Queue. Managing more intricate assignments, such as round-robin distribution, becomes challenging and costly to implement within the confines of assignment rules.
- Single Active Rule: As mentioned previously, Salesforce restricts the use of only one active lead assignment rule at a time. This means that despite having multiple processes with distinct underlying logic, you are forced to consolidate them into a single, busy rule, making management and updates cumbersome.
Considering these challenges, it becomes evident that relying solely on assignment rules may not provide the flexibility and functionality required for more complex lead management scenarios.
How Sweep Simplifies Salesforce Lead Assignment
Although assignment rules in Salesforce offer a powerful solution with a short learning curve, we recognize that the drawbacks can become a significant pain point as businesses grow and the native Salesforce tools may not fully support your team's needs.
To address these challenges, we have developed Sweep's Assignment tool, a visual no-code solution designed to simplify the implementation of assignment logic within Salesforce. This empowers organizations to build their go-to-market motions while maximizing assignment efficiency. The benefits of using Sweep's Assignment capabilities include:
- Assigning any object: From Opportunities to Accounts & Contacts and custom objects, you can apply assignment logic across various Salesforce objects.
- Achieving full visibility: Gain a comprehensive understanding of your business processes and easily track where assignments are taking place.
- Managing round-robin groups: Distribute leads equally among sales representatives using round-robin assignment to ensure fairness, or add weights to better control assignments between reps.
- Simplifying territory management and assignment: Streamline the process of managing territories and assigning leads based on specific territories.
- End-to-end lead routing capabilities: Enhance the lead routing process with advanced features such as Lead Deduplication and Lead-to-Account Matching, ensuring that leads always receive a seamless buying experience.
If you have any questions or would like to learn more about how Sweep Assignment can assist your business as it scales, please don't hesitate to contact me at [email protected]. I would be delighted to show you around or provide further insights into Salesforce Lead Assignment Rules.

TutorialKart
- Salesforce Admin Tutorials
- Salesforce Administration
- Getting Started
- What is Salesforce.com
- What is login.Salesforce.com
- Enabling Caching and Automcomplete at Salesforce login
- Overview of ERP and CRM
- What is Cloud Computing
- Why Salesforce CRM is #1 on Demand
- Building Data Model
- Understanding Salesforce.com application
- How to create an App in SFDC?
- How to create custom object in SFDC
- Creating fields using different field types in Salesforce.com
- Overview on Salesforce Object Relationships
- How to create Master Detail relationship in SFDC?
- Cannot create Master Detail Relationship?
- How to create Lookup relationship in salesforce.com?
- How to create Many to Many Relationship in Salesforce?
- What is Schema Builder
- Implementing Business Logics
- What is a Formula Filed?
- What are Cross Object Formulas?
- What are Validation Rules?
- Roll up Summary Fields
- Field Dependencies
- Setting up User Interface
- Page Types and Page Elements
- What are page Layouts?
- Home page layouts and components
- Why Documents are used in Salesforce
- Customizing Standard Salesforce Application
- How to Customise Standard Salesforce application
- Salesforce Security Model
- Overview on Salesforce security Model
- How to create New Users in SFDC?
- What is SAML?
- Public groups in Salesforce
- Role Hierarchies in Salesforce.com
- How to create and manage Profiles
- What is Field Level Security?
- How to use Permission Sets?
- Control Record visibility using Organisation wide Defaults
- Control Record visibility using Role Hierarchy
- Control Record visibility using Sharing Rules
- What are Record Types and how can we configure
- What are Page Types and page Elements
- Data Management
- Different Data Management Tools
- How to Import/Update/Upsert data using Data Import Wizard
- How to install Apex Data Loader in macOS and Windows
- How to Insert a record using Apex Data Loader
- How to Update and Insert records Apex Data Loader
- How to Delete and Export records Apex Data Loader
- Salesforce.com Audit
- Field History Tracking
- Setup Audit Trail
- Automate Business Process
- How to create New Email Template in Salesforce
- Salesforce Workflow Rules Overview
- Creating Workflow rules with Rule Criteria & Workflow actions
- Configuring Approval Process
- Assignment rules for Leads and Cases
- Reports and Dashboards
- What is a report in Salesoforce and how we create them?
- Salesforce Reports and Dashboards Overview
- How to use report builder?
- How to create Summary reports?
- How to create matrix reports?
- Salesforce Dashboards
- Creating Dashboards with Dashboard Components for Tabular and Joined Reports
- Salesforce Service Cloud
- Overview on Salesforce Service Cloud
- How to create service cloud console
- Configuring Agent console in Salesforce
- Section 13 : Portal and Sites
- Developing Force.com Sites
- How to enable and use Customer Portal
- How to enable and use Partner Portal
- Integrate Salesforce with websites
- How to create Web to Lead forms in Salesforce
- How to create Web to Case forms in Salesforce?
- AppExchange
- What is Salesforce AppExchange.
- Managing Sandboxes
- What is Salesforce Sandbox?.
- Different Sandboxes and Sandbox Environment Types.
- How to create Salesforce Sandbox template?.
- How to create Salesforce Sandbox?
- How to login Salesforce Sandbox?
- Salesforce lightning
- How to create Salesforce custom domain?
- What is Salesforce lightning Experience?
- What is Salesforce lightning component Framework?
- Creating first Salesforce lightning App
- Styling Salesforce lightning App
- Lightning Componnet : aura:attribute tag
- What is Salesforce DX?
- Create Salesoforce DX project
- Salesforce Dev Hub Setup step-by-step
- Creating Sratch Org
Salesforce lead assignment rules – Salesforce Tutorials
Creating and managing salesforce lead assignment rules .
In this Salesforce tutorial we are going to learn about What is an assignment Rules , How can we create and manage Salesforce lead assignment rules, and why should we create assignment rules in Salesforce.
What is an Assignment Rule?
Assignment Rules are used to assign Leads and Cases automatically to the assigned users based on criteria. There are two types of Assignment Rules in Salesforce they are
- Lead Assignment Rules and
- Case Assignment Rules.
What are Salesforce lead assignment rules?
Salesforce lead assignment rules defines the administrators to assign a lead to users and queues based on criteria. A lead can be generated either by manually or generated from the web.
What are case Assignment Rules?
Salesforce lead assignment rules defines the administrators to assign a Case to users and queues based on criteria. A Case can be generated by manually , generated from the web to case, Email to case etc.
How to create Salesforce lead assignment rules?

Creating and Managing Salesforce lead assignment rules are very important. Let us learn how to create lead assignment rules in Salesforce.com. To create assignment rules login Salesforce and navigate to Setup | Build | Customize | Lead | Lead Assignment Rules.
- Click on Lead assignment rules as shown above.

Click on New Button to create new Salesforce lead assignment rule.

- Enter Rule name.
- The assignment rule must be activated as shown above.
- Click on Save button.
There are only one standard rule in our salesforce. If we create new Assignment rule in Salesforce the first standard rule will be automatically deactivated. At a single point of time only one assignment rule is active. For a single rule there can be multiple rule entries.

- When creating Rule entry we have to learn about these three Order number, Criteria and Assigned to.

How to create New Rule entries in Salesforce Lead Assignment Rules.
In Salesforce we can create many rule entries for single Assignment Rule.

- Click on New Button to create new Rule entry.

- In step 1 :- Enter Sort order as #1.
- In Step 2 :- Enter rule criteria as shown above.
- In Step 3 :- Select the user or queue to assign the lead.
- Select user and Email template as shown above.
Learn how to create Email template in Salesforce.

We have created two Rule entries with order 1 and Order 2. In this Salesforce lead assignment rules, Generated leads will be automatically assigned to the country United State and Country United Kingdom.
Conclusion :
In this Salesforce Tutorial we have learned about What is Assignment rule and How to create Salesforce lead assignment rules. Like wise case assignment rules are also similar to lead assignment rules.
Popular Courses
- Salesforce Admin
- Salesforce Developer
- Visualforce
- Informatica
SAP Resources
- Kafka Tutorial
- Spark Tutorial
- Tomcat Tutorial
- Python Tkinter
Programming
- Julia Tutorial
- MongoDB Tutorial
- PostgreSQL Tutorial
- Android Compose
- Flutter Tutorial
- Kotlin Android
- Bash Script
Web & Server
- Selenium Java
- Definitions
- General Knowledge
IMAGES
VIDEO
COMMENTS
Assignment rules automate your organization’s lead generation and support processes. Use lead assignment rules to specify how leads are assigned to users or queues. Use case assignment rules to determine how cases are assigned to users or put into queues. Required Editions and User Permissions.
Salesforce Lead Assignment Rules are a numbered set of distribution rules that determine which owner a Lead record should be assigned (either a specific user or to a Salesforce Queue).
By following the below steps, every time a user creates a case/lead when a specific record type is selected, the 'Assign using active assignment rules' will be enabled by default on the case/lead creation page.
Create Assignment Rules for Lead Distribution. Assignment rules allow you to automatically apply criteria to sort, queue, or act on leads. For example, use assignment rules to automatically assign leads to the lead inbox queue for Partner Central.
If you need to do a one-time batch reassignment of a number of records, export the relevant Lead Ids. Then use the Apex Data Loader to trigger assignment rules to fire. You can grab the ID of the appropriate Lead Assignment Rule from the URL bar when viewing the rule in Setup.
How do you run the lead assignment rule from the Salesforce flow? Lead assignment rules allow us to automatically assign Leads to the appropriate queue or user. A Lead assignment rule consists of multiple rule entries that define the conditions and order for assigning cases.
Also known as lead assignment, lead routing is an automated process of distributing inbound leads to the department or sales rep best-equipped to handle that lead. More sophisticated lead routing systems take in consideration a variety of lead assignment rules determined by the company.
So, what is Assignment Rules in Salesforce? Salesforce Assignment Rules automate lead and case distribution by routing them to specific users or queues based on criteria like geography or record type. Rules can be customized to meet your organization’s unique needs. How to Set Up Lead Assignment Rules in Salesforce? 1.
A lead assignment rule consists of a prioritized set of rule entries that dictate how leads are assigned throughout your go-to-market motions, either to a specific user or to a Salesforce Queue. These rules are automatically triggered when leads are created and can also be applied to existing records.
What are Salesforce lead assignment rules? Salesforce lead assignment rules defines the administrators to assign a lead to users and queues based on criteria. A lead can be generated either by manually or generated from the web.