Critical PowerPoint Shortcuts – Claim Your FREE Training Module and Get Your Time Back!

How to Present a PowerPoint Slideshow (w/ Shortcuts)
- PowerPoint Tutorials
- Shortcuts & Hacks
- May 11, 2019
There are a variety of ways to start a PowerPoint presention, depending on:
- Where you start your presentation (from beginning or from current)
- Which PowerPoint view you prefer to present in (Slide Show view or Presenter view)
- How comfortable you are with keyboard shortcuts
Why would Microsoft include so many ways to present a presentation? My guess is that everyone learns PowerPoint differently, and has personal presentation styles. The more options you have, the easier your life will be as there will always be a way to start your presentation the way you want to (or jump back into it when you need to).
See all the options below and find the method that works best for you and let the slide show begin !
NOTE: If you are running two presentations side-by-side, each presentation needs to be started as it’s own slide show. To see how to set up two PowerPoint presentations to run side-by-side like this before you start your slide show, read my guide here .
Table of Contents
Start slide show from beginning.

To start a slideshow from the beginning of your presentation using the ribbon, simply.
- Navigate to the Slide Show tab
- Select From Beginning
Selecting From Beginning starts your presentation from the very first non-hidden slide in your presentation, regardless of which slide you are currently inside of your deck.

You can also start your slide from the beginning of your presentation by hitting the Slideshow From Beginning keyboard shortcut, F5 .
Regardless of which method you use, this is the classic way to start your presentation in full screen from your first title slide (regardless of where you are in your slide deck).
Let the slide show begin!
NOTE: To expand your knowledge and learn how to use PowerPoint’s FREE and HIDDEN built-in laser pointer to point things out during your presentation, read my guide here .
Take your PPT skills to the next level
Start slide show from current.

To begin your slide show from the slide you are currently on using the ribbon, simply
- Navigate to the Slide Show tab
- Select From Current Slide
Selecting From Current Slide starts your slide show from whatever slide you are currently on, even if the slide is hidden.

You can also start your slide from the current slide you are on by hitting the Shift+F5 keyboard shortcut.
Because it’s often easiest to catch errors when building your slides in this full screen mode, I highly recommend learning the Shift+F5 shortcut and using it frequently as you build your slides to spot them for errors.
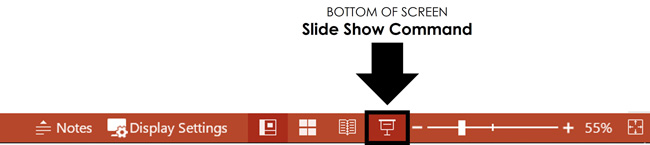
If you don’t want to bother learning the From Current Slide shortcut, you can also start your slideshow by clicking the Slide Show icon at the bottom of your screen.
This is a fantastic way to spot check your slides as you are building them. On top of that, it’s a fast and uncomplicated way to re-start your presentation from where you left off after demoing something on screen.
Start a mini-slide show in PowerPoint
You can also use the following hidden PowerPoint shortcut to run a mini slide show over the top of your current deck.

To run a mini slide show, simply:
- Hold down the Alt key on your keyboard
- With your mouse, click the Slide Show icon
Doing so starts a small slide show of your presentation that you can see below, from the current slide you are on.

Presenter View
The Presenter View is an alternate way to run your presentation in PowerPoint. In this view, your slides are projected on screen, and the details of your presentation are displayed on your computer as pictured below.

The presenter view includes your next (non-hidden) slides that is coming up, your current slide projected on screen, how long you’ve been talking and your speaker notes.

To launch the Presenter View from the beginning of your presentation using your Ribbon, simply:
- Navigate to the Slide Show tab
- Hold down the Alt key on your keyboard
- Click From Beginning
Holding down the Alt key and clicking From Beginning , the Presenter View will launch from the very first (non-hidden) slide in your presentation.

You can also launch the presenter view from the beginning of your presentation at any time by clicking Alt + F5 on your keyboard.
Start Presenter View in PowerPoint From Current Slide

Did you know that you can access different views in PowerPoint by adding keys as you click commands in the PowerPoint ribbon?
To start the Presenter view from your current slide using your Ribbon, simply:
- Hold down the Alt key on your keyboard
- Click From Current Slide
Holding the Alt key and clicking From Current Slide launches the Presenter View from your current slide. So, this is another way you can quickly practice your presentation, see your speaker notes and see what’s coming up next.
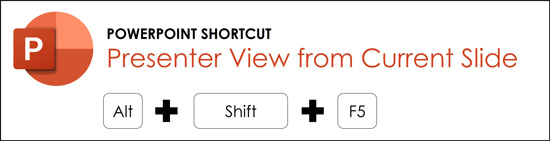
You can also launch the Presenter View from the beginning of your presentation at any time by hitting Alt+F5 on your keyboard.
Showing and Hiding Presenter View
Regardless of which view you start your PowerPoint slide show; you can switch between the two different slide show views without exiting presentation.

To switch between the two slideshow views (while giving your presentation), simply:
- Right-click your slide in whichever presentation view you are currently in
- Select either Show Presenter View or Hide Presenter View
When would you use a feature like this during a presentation? One example is if you want to view your notes without leaving the slide show mode.
NOTE: The letter r for both Show Presenter View and Hide Presenter View is underlined. This means that it is a keyboard shortcut. So, if you want to quickly flip between these two presentation views, you can simply right-click your slide and hit the letter r on your keyboard. Doing so automatically switches the view you are in.
Controlling how your presentation runs
Another way to control how your presentation runs (including the default laser pointer and pen color), is the Set Up Slide Show dialog box.

To open the Set Up Slide Show dialog box, simply:
- Select the Set Up Slide Show command
Doing so, opens all your PowerPoint slide show settings and options as pictured below.
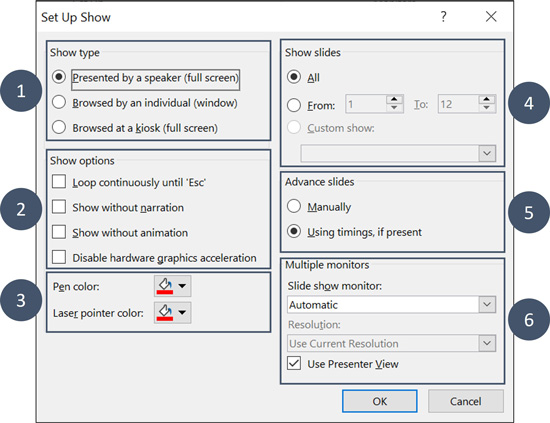
Inside the slide show settings dialog box, you can select:
- How your presentation runs (full screen, window or in kiosk mode).
- Your default pen and laser pointer color options ( see our laser pointer article here ).
- Which slide you want start from, or which slides you want to show. You can also setup a custom show here.
- How your slides progress (manually or using slide timings).
- Which of your computer monitors (or screens) your slide show runs on.
The Set Up Slide Show dialog box is also the secret to running multiple presentations at the same time in PowerPoint. To expand your knowledge and learn how to set this up, read our guide here .
Setup Slide Show SECRET Shortcut

To use the SECRET shortcut to open the Set Up Slide Show dialog box, simply:
- Hold down the Shift key on your keyboard
- With your mouse, click the Reading View icon at the bottom of your screen
This is useful when you need to quickly cycle through lots of PowerPoint presentations and change how those presentations run. Instead of wasting time clicking through the Ribbon, simply hold the Shift key and click the Reading View icon. This is also a friendly conversation starter with a fellow PowerPoint enthusiast at Happy Hour.
NOTE: The color of your Reading View icon might be different than in the picture above, as it is dependent on the Office Theme you selected for PowerPoint.
How to exit a PowerPoint presentation early?

Regardless of how you start your full screen presentation, you can end your presentation at any time by hitting the Esc key on your keyboard.
Hitting Esc immediately takes you out of the PowerPoint presentation mode and back to the normal editing view of your slides, on whatever slide you were last presenting.
Here is how you can use a combination of all the different keyboard shortcuts to spot check and practice your presentation in full screen before you finalize your presentation.
- Hit F5 on your keyboard to start your presentation in full screen from the very first slide in your presentation. You can then use your arrow keys to advance, spot checking your slides for errors.
- When you find an error, simply hit Esc key to return to the normal PowerPoint editing view to fix your slide.
- When you are done, hit Shift + F5 to return the full screen presentation mode from the slide you just updated. You can then continue spot checking your presentation (without having to start over from the beginning).
In this way you can quickly work your way through your slides and practice your presentation, fixing and adjusting your content as you go.
Understanding how to run your presentations is CRITICAL to the success of your presentation. Not only in presenting them live, but also in knowing how to spot check your slides as you build them.
I personally find it easiest to spot check your slides and quickly fix errors by running your presentation in slide show mode (or full screen). The last place you want to discover an error is during your presentation.
Using the commands and shortcuts above, you can quickly start, exit and step back into your slide show. Once you have these commands and features down, you will also look like a whiz during your presentations.
If you enjoyed the depth of this article, you will love our other PowerPoint training courses and free resources. To learn more, visit us here .
🔒 Unlock the PowerPoint Shortcuts Trusted by Industry Leaders KKR, American Express, HSBC, and More!
Join over 114,880 professionals from diverse fields including consulting, investment banking, advertising, marketing, sales, and business development who have supercharged their PowerPoint game with our proven methods.
✅ Customize compelling presentations effortlessly.
✅ Master time-saving techniques for faster deck creation.
✅ Boost your career prospects with top-notch PowerPoint skills.
Get FREE access to the Critical PowerPoint Shortcuts module of our premium training course by entering your name and email below.
DISCLAIMER: PC Users Only!
We respect your privacy and will keep your info safe and confidential.
Related Articles
About the author.

Popular Tutorials
- How to Strikethrough Text (l̶i̶k̶e̶ ̶t̶h̶i̶s̶) in Word, Excel & PowerPoint
- How to Make Animated Fireworks in PowerPoint (Step-by-Step)
- Strikethrough Shortcut (l̶i̶k̶e̶ ̶t̶h̶i̶s̶) for Word, Excel & PowerPoint
- How to Create a Flash Card Memory Game in PowerPoint (Like Jeopardy)
- Keyboard Shortcuts Not Working: Solved
PowerPoint Tutorial Categories
- Strategies & Opinions
- Presentation Design
- Pictures, Icons, Videos, Etc.
- New Features
- Miscellaneous
- Charts & Data Viz
We help busy professionals save hours and gain peace of mind, with corporate workshops, self-paced courses and tutorials for PowerPoint and Word.
Work With Us
- Corporate Training
- Presentation & Template Design
- Courses & Downloads
- PowerPoint Articles
- Word Articles
- Productivity Resources
Find a Tutorial
- Free Training
- For Businesses
We help busy office workers save hours and gain peace of mind, with tips, training and tutorials for Microsoft PowerPoint and Word.
Master Critical PowerPoint Shortcuts – Secure Your FREE Training Module and Save Valuable Time!
⌛ Master time-saving expert techniques.
🔥 Create powerful presentations.
🚀 Propel your career to new heights.
We value your privacy – we keep your info safe.
Discover PowerPoint Hacks Loved by Industry Giants - KKR, AmEx, HSBC!
Over 114,880 professionals in finance, marketing and sales have revolutionized their PPT skills with our proven methods.
Gain FREE access to a full module of our premium PowerPoint training program – Get started today!
We hate spam too and promise to keep your information safe.
You are currently viewing a placeholder content from Facebook . To access the actual content, click the button below. Please note that doing so will share data with third-party providers.

5 PowerPoint Keyboard Shortcuts to Start a Slide Show

Try These Useful PowerPoint Shortcuts to Start a Slide Show
by Avantix Learning Team | October 16, 2021
Applies to: Microsoft ® PowerPoint ® 2013, 2016, 2019 and 365 (Windows)
You can start a slide show in PowerPoint using several keyboard shortcuts. In this article, we'll review shortcuts to start a show using function keys or by using key tips.
Recommended article: How to Strikethrough or Cross Out Text in PowerPoint (4 Ways with Shortcuts)
If the function key shortcuts don't work, you may need to press the Fn key on your keyboard at the same time.
Typically, you would start a slide show from Normal View or Slide Sorter View. To exit a slide show, press ESC.
If Presenter View is selected on the Slide Show tab in the Ribbon, the show will start in Presenter View. If you have two monitors and Automatic is selected as the Monitor setting on the Slide Show tab, the show will display as a standard slide show on the second monitor and will display Presenter View on the presenter's screen by default.
1. Start a presentation from the beginning using a function key
2. start a presentation from the current slide using a function key.
Press Shift+F5.
3. Start the presentation in Presenter View using a function key
Press Alt + F5.
4. Start a presentation from the beginning using key tips
Press Alt > S > B (press Alt, then S, then B).
5. Start a presentation from the current slide using key tips
Press Alt > S > C (Alt, then S, then C).
There are many shortcuts you can use during a PowerPoint slide show as well. Check out the article PowerPoint Slide Show Shortcuts (50+ Keyboard Shortcuts).
Subscribe to get more articles like this one
Did you find this article helpful? If you would like to receive new articles, JOIN our email list.
More resources
How to Insert Slide Numbers in PowerPoint
How to Crop a Picture in PowerPoint (4 Ways)
How to Change the Background of Your PowerPoint Slides
How to Remove the Background of a Picture in PowerPoint (2 Ways)
How to Add Animation in PowerPoint (Animate Images, Text or Other Objects)
Related courses
Microsoft PowerPoint: Intermediate / Advanced
Microsoft PowerPoint: Design for Non-Designers
Microsoft PowerPoint: Animations Bootcamp
Microsoft Excel: Intermediate / Advanced
VIEW MORE COURSES >
Our instructor-led courses are delivered in virtual classroom format or at our downtown Toronto location at 18 King Street East, Suite 1400, Toronto, Ontario, Canada (some in-person classroom courses may also be delivered at an alternate downtown Toronto location). Contact us at [email protected] if you'd like to arrange custom instructor-led virtual classroom or onsite training on a date that's convenient for you.
Copyright 2024 Avantix ® Learning
You may also like

How to Insert or Type E with an Accent Mark in PowerPoint (È, É, Ê, Ë, è, é, ê, or ë)
You can insert or type e with an accent mark in PowerPoint using built-in tools or keyboard shortcuts (including Alt code shortcuts). The letter e can be inserted with an accent in both upper or lower case in text boxes or placeholders on slides, the slide master or layouts. The following are common accents in upper or lower case – È, É, Ê, Ë, è, é, ê, or ë.

How to Fade a Picture or Part of a Picture in PowerPoint (Using a Gradient)
You can fade a picture in PowerPoint by drawing a rectangle shape on top of the picture and then filling the rectangle with a gradient from opaque to transparent. This technique is often used to fade an image into the background of a slide. Since the rectangle is placed on top of the image and then text may be placed on top of the rectangle, you may need to reorder the objects.

How to Lock an Image, Shape or Other Object in PowerPoint
You can now lock an image, shape or other object in PowerPoint. Objects can be locked in Normal View or Slide Master View. Only PowerPoint 365 users can lock objects to prevent moving and resizing. This is helpful if you want to select and move other objects on the slide or prevent others from moving or resizing an object. You can lock items using the context menu or the Selection Pane.
Microsoft, the Microsoft logo, Microsoft Office and related Microsoft applications and logos are registered trademarks of Microsoft Corporation in Canada, US and other countries. All other trademarks are the property of the registered owners.
Avantix Learning |18 King Street East, Suite 1400, Toronto, Ontario, Canada M5C 1C4 | Contact us at [email protected]

Our Courses
Avantix Learning courses are offered online in virtual classroom format or as in-person classroom training. Our hands-on, instructor-led courses are available both as public scheduled courses or on demand as a custom training solution.
All Avantix Learning courses include a comprehensive course manual including tips, tricks and shortcuts as well as sample and exercise files.
VIEW COURSES >
Contact us at [email protected] for more information about any of our courses or to arrange custom training.
Privacy Overview
Pin it on pinterest.
- Print Friendly
Top PowerPoint Keyboard Shortcuts to Present Like a Pro!

From business consultants to sales reps and entrepreneurs, anyone who works with presentations can benefit from knowing some PowerPoint keyboard shortcuts. Today, I’ll show you 20+ handy commands to help you shine before and during your presentations.

But First, What Are PowerPoint Shortcuts?
PowerPoint shortcuts are keys or keyboard combinations that quickly allow you to perform an action in the program . Otherwise, you’d have to use your mouse or navigate through multiple menus and toolbars until finding the right command. In other words, PowerPoint keyboard shortcuts help you reduce steps and optimize your experience when working in a presentation.
Now, let’s see which are the top shortcut keys you should know:
Useful PowerPoint Keyboard Shortcuts for Last-minute Changes
Even the most experienced speakers find themselves making last-minute changes in their slides' appearance or presentation structure. It’s just part of the presenter’s life. But there’s no reason to panic, the following keyboard shortcuts will give you a hand in those moments.
PowerPoint Shortcuts for a Quick Formatting
1) use “alt+w+m” to enter slide master view.
For last-minute changes in the layout of your presentation, your slide master is the place to go.

Let’s say you want to replace the logo in your footer, change the color palette, or replace the font of your headlines. When you have only a few minutes available before presenting, this seems like an impossible task but here’s the secret: Anything that you put in your slide master will apply to all your slides so that you don’t need to go fixing them one by one.
If you’re not familiar with this type of slides, we’ve got a complete guide for you on how to create and use your master slides in PowerPoint .
2) Use “Shift” to keep objects in proportion
Have you ever resized a circle in PowerPoint and it ended up looking like an oval? When you resize by sight it’s hard to obtain perfect symmetry but the “Shift” key can help with that.
Simply press and hold “Shift” while resizing your elements. This comes in handy to make your objects bigger or smaller without losing their proportions. It works for shapes, images, and any other object in your slides.
3) Align your text
Alignment is essential to provide a clean and professional aspect to your documents. However, as formatting is one of the last steps in the making of a presentation, people tend to forget it. If this happens to you often, these are the PowerPoint shortcuts you need for a quick text alignment before starting your slide show:
- Use “Ctrl + J” to justify your text
- Press “Ctrl+E” to center the text
- Use “Ctrl+L” for left alignment
- Press “Ctrl+R” to right-align your text.
4) Use F7 to check your spelling
Most people don’t know this but you can actually check your presentation’s spelling in PowerPoint. It’s pretty simple: Once you enter the last words in your slides, press F7 . A new section will appear at the right of your screen showing misspelled words and giving you some options you can replace them with.
In some cases, you might need to try with “Fn + F7” to activate the check spelling shortcut.
5) Fix Up your Slides
Not exactly a PowerPoint keyboard shortcut but definitely a hack that will save you time and effort in the making of your slides.
If you work with presentations constantly, you’ll be happy to learn that you don’t need to design them yourself. You can have your deck quickly polished (or completely redesigned!) by professional PowerPoint designers . Check out some examples from the 24Slides team:
Want to get results like these? Learn more about the 24Slides’ presentation design services .
PowerPoint Keys To Edit Your Presentation Structure
1) use “ctrl + m” to insert a new slide.
Sometimes new information appears right before the big moment and you need to quickly update your presentation. Whenever you find yourself in this situation, select a slide and press “Ctrl+M'' to insert a new one. You’ll have a fresh title slide to keep adding content.
2) Use “Ctrl + D” to duplicate
But if you want to have similar slides, use “Ctrl + D” to duplicate them. This way, instead of working from a blank slide, you’ll be able to use one as your base and replace as much information as you want. This PowerPoint shortcut works for slides and objects alike.
3) Move slides
Arrange your presentation structure by using “Ctrl + Up arrow” to move a slide up or “Ctrl + Down arrow” to move it down.
I find this PowerPoint shortcut very useful especially when working with long presentations. Here’s why: Dragging slides one by one makes the thumbnails pass quickly and if you have 30+ slides, you’ll need more than a few seconds to land your slide in the spot that you want. Save yourself some time with this simple trick.
PowerPoint Shortcut Keys to Use During a Presentation
There are other PowerPoint keyboard shortcuts that only work in the slide show mode. We’ll go from my favorite basic commands to some advanced keyboard shortcuts to help you manage your presentation like a pro.
Basic PowerPoint Commands
1) use f5 to start a slideshow.
Done editing and ready to present? Press F5 to start your Slideshow from the first slide.
2) Use “Shift + F5” to start from the current slide
If you want to start from a specific slide, press “Shift+F5” . Let’s say you made a pause in your presentation to review some slides and want to pick up where you left off. Just select the last slide you were at and use this shortcut. It will save you tons of time because you won’t have to go through all your slides again.
3) Zoom in and Zoom out
Whenever you want to show an area of your slide in detail, press “+” to zoom in. You’ll be able to get a closer view of any element in your slide just by dragging the pointer. And when you’re finished zoom out with “-”
Advanced PowerPoint Shortcuts to Wow your Audience
1) annotate in your slides.
Did you know that you can mark up your slides during a live presentation? Yes, PowerPoint has some secret tools that help you grab and hold your audience’s attention while on a slideshow. And here are the shortcuts you need to activate them:
- Use “Ctrl + P” for a Pen Tool
You’ll be able to draw free lines and scribble across your slide. The PowerPoint pen tool comes in handy when you want to explain a process or show how to get from one point to another.
- Use “Ctrl + i” for a Highlighter
The PowerPoint highlighter pen uses a yellow color to help you annotate and draw attention to your slide’s key points.
- Use “Ctrl + L” for a Laser
A laser pointer is always useful to highlight specific aspects of your presentation. But don’t worry if you didn’t bring yours, PowerPoint lets you turn your cursor into a cool laser pointer.
- Extra: The PowerPoint Eraser tool
Now that you know how to annotate in your presentation, it’s fair that I share with you how to erase the marks you made in your slides. Use “Ctrl + E” to activate the Eraser tool. And if you want all the marks to vanish at once, just press the E key .
2) Show a black or white screen
Sometimes you’re elaborating on a concept and want people to focus all their attention on you and not your slides. In those moments, use the key “B” to change the screen to black during a slideshow or “W” to turn it white. You can go back to your slides by pressing the same key again.
3) Use “G” to display all the slides
You’ll open a nice visualization of all your slides so you can easily go back and forth through your presentation in a matter of seconds. Try it and check your audience’s reaction!

How to See Your Keyboard Shortcuts in PowerPoint?
I know. There are so many PowerPoint shortcuts that it’s impossible to remember them all. But that shouldn’t be a problem for presenters like you because PowerPoint offers some help.
A) In Presentation Mode
Whenever you need to check how to use keyboard shortcuts during your presentation, press F1 . A slide show help dialog box will display a list of your PowerPoint shortcuts available.

B) In Normal View
There are other types of shortcuts in PowerPoint called Key Tips or Access Keys which allow you to navigate through the ribbons and main menu. To activate them, press Alt or F10 .

C) Help Box
If you want to get the full list of PowerPoint shortcuts and further information about them, use the Help box. Just press F1 and search for “shortcuts”.

Note that this option only works when you’re connected to a WiFi network.
INFOGRAPHIC: Top PowerPoint Keyboard Shortcuts Every Presenter Should Know
The 24Slides team created this incredible infographic that summarizes all the PowerPoint keyboard shortcuts we’ve seen.

Save it, share it, and don’t forget to practice before your live presentation!
Create professional presentations online
Other people also read

6 Presentation Styles of Famous Presenters
How to create and deliver a powerful presentation introducti...

The seven worst presentations of all time and why they went ...

How-To Geek
How to start a powerpoint slideshow.
Let the slideshow begin!
Quick Links
Start a slideshow in powerpoint's desktop app, start a slideshow in powerpoint's web app, start a slideshow in powerpoint's mobile app, key takeaways.
To start a PowerPoint slideshow on your desktop, open your slideshow and click "Start Slide Show" in the "Slide Show" tab. If you're using the web app, select "From Beginning" in the "Slide Show" tab. On mobile, simply tap the Monitor icon at the top of your screen.
There's nothing quite like finishing a presentation after spending hours getting it just right. Now, show off your hard work by starting your Microsoft PowerPoint slideshow on desktop, web, and mobile using the methods below.
Related: How (and Why) to Start Microsoft PowerPoint from the Command Prompt
To play a slideshow in PowerPoint's desktop app, all you have to do is click an option or press a shortcut on your keyboard .
Start the process by opening your presentation with PowerPoint. Then, in the app's ribbon at the top, select the "Slide Show" tab.

In the "Slide Show" tab, from the "Start Slide Show" section, choose "From Beginning" (or press F5). Now your presentation will play from the very first slide.
If you'd like to start the slideshow from your current slide, choose the "From Current Slide" option. Alternatively, press Shift+F5 on your keyboard.

While your presentation is playing, you can perform various tasks, like moving to the next slide or ending the show. You can reveal these options by right-clicking anywhere on the slide.

Alternatively, you can use the following keyboard shortcuts while viewing your slideshow:
- Spacebar or Right Arrow Button: Go to the next slide in the presentation.
- Left Arrow Button: Go to the previous slide in the presentation.
- Esc: End the show.
- W: Hide your current slide and display a white screen. Press the same key again to bring back the slide's content.
- B: Hide your current slide and display a black screen. Revert back to the slide's content by pressing the same button.
- Ctrl+Left Mouse Button: Activate the laser point tool to point at things in your slides.
- Ctrl+P: Launch the pen tool to annotate your slide's content during your show. You can choose if you'd like to keep these annotations when you end the show.
- Ctrl+i: Access the highlighter tool to highlight items in your slides.
If you'd like to jump to a specific slide while presenting, press that slide's number on your keyboard and hit Enter. For example, press 12 and hit Enter to access that slide quickly.
To access the Presenter view, where you can see the upcoming slides and other options, right-click anywhere on your slide and choose "Show Presenter View."

With these options, you can start a slideshow and have it play exactly how you want.
To play a slideshow on the web, launch your preferred web browser and access PowerPoint on the web . Then, open your presentation.
From PowerPoint's ribbon at the top, select the "Slide Show" tab.

In the "Slide Show" tab, start your slideshow from the first slide by clicking the "From Beginning" option. To have your show play from your current slide, choose "From Current Slide."

Your presentation is now playing.
To reveal the options for moving slides, annotating items, and using Presenter Coach , bring your cursor to your screen's bottom-left corner. Then, click the appropriate icon.

Related: How to Practice Your Presentations with PowerPoint's Presenter Coach
To start a slideshow in the PowerPoint mobile app , launch the app on your phone and open your presentation.
On the presentation screen, at the top, tap the Monitor icon to play the slideshow.

Your presentation has now begun.
To move to the next slide, swipe left on your screen. To go to the previous slide, swipe right.

You can reveal PowerPoint's presentation options, like annotation and black screen tools, by tapping at the top of your presentation. Then, choose the option you'd like to use.

And that's it. Happy presenting!
Want to learn a few tips to help you make the best PowerPoint presentations ? If so, check out our guide.
Related: 8 Tips to Make the Best PowerPoint Presentations
Stack Exchange Network
Stack Exchange network consists of 183 Q&A communities including Stack Overflow , the largest, most trusted online community for developers to learn, share their knowledge, and build their careers.
Q&A for work
Connect and share knowledge within a single location that is structured and easy to search.
What is the shortcut key for starting the slideshow from the selected or active slide?
- microsoft-powerpoint
3 Answers 3
To start a presentation from the current slide:
- in PowerPoint 2003 or later, press Shift + F5
- in PowerPoint X/Macintosh, press Control + Shift + B
To start a presentation from the beginning:
- in PowerPoint for Windows, press F5
- in PowerPoint X/Mac, press Control + Shift + S
- Mine is Microsoft Powerpoint 2002 and Shift+F5 is not working in it :( – Anto Varghese Aug 29, 2010 at 11:07
- I installed 2007 and now it is working. – Anto Varghese Aug 31, 2010 at 4:03
- I have a multi-monitor Windows setup, and F5 and/or Shift+F5 both launch as one monitor with presentation, but also with one with presenter view. How do you just show the presentation without the presenter view? – J-Dizzle Jul 9, 2015 at 18:13
- ALT, W, D does show Reading View though. This somewhat solves my question above :) – J-Dizzle Jul 9, 2015 at 18:14
- And how can you jump to the next page without going through all the animations? – skan Sep 19, 2015 at 17:20
Powerpoint 2016 has the following keyboard shortcuts to play a slideshow.
From the current slide:
- Windows: Shift + F5
- Mac: Command + Return
From the first slide:
- Windows: F5
- Mac: Command + Shift + Return
References: Windows and Mac
In LibreOffice Impress Shift + F5 works fine.
You must log in to answer this question.
Not the answer you're looking for browse other questions tagged slideshow microsoft-powerpoint ..
- The Overflow Blog
- Introducing Staging Ground: The private space to get feedback on questions...
Hot Network Questions
- I'm looking for a series where there was a civilization in the Mediterranean basin, which got destroyed by the Atlantic breaking in
- How to make sub "array" to aligned with the outer "array" in equation in LaTeX?
- Why does the proposed Lunar Crater Radio Telescope suggest an optimal latitude of 20 degrees North?
- Sci-Fi book about an Indian warrior on a mission in a post apocalyptic earth
- Are there any jobs that are forbidden by law to convicted felons?
- How do you keep the horror spooky when your players are a bunch of goofballs?
- What is the frequentist's Bayesian prior for a coin with unknown bias
- What is the difference in meaning between the two sentences?
- Asymptotic behavior of a ratio involving Bessel K functions
- Show this process is Brownian motion
- Romans 3:22 – ‘of’ or ‘in’? Old translations differ from modern ones. Why?
- How to create an enumerate environment with Case 1, Case 2,
- Can I paraphrase an conference paper I wrote in my dissertation?
- How to underline several empty lines
- How to remind myself of important matters in the heat of running the game?
- Is obeying the parallelogram law of vector addition sufficient to make a physical quantity qualify as a vector?
- Matter currents
- Inductance after core saturation
- An application of the (100/e)% rule applied to postdocs: moving on from an academic career, perhaps
- c++ or Mathematica for large eigenvalue problem
- Is this a valid PZN?
- Do we know how the SpaceX Starship stack handles engine shutdowns?
- What’s the history behind Rogue’s ability to touch others directly without harmful effects in the comics?
- Can LLMs have intention?
- Skill Assessments
- AI Course Builder
- Free Courses
- PowerPoint 2019 Basic
How to Start a Slideshow in PowerPoint

Start Free Trial
Or log in with:

There are multiple ways you can deliver a PowerPoint presentation, such as distributing paper handouts or by running the presentation on a computer. Running a presentation on a computer is the preferred method because it gives you the most control over the presentation and allows you to use multimedia, animation, and other effects.
Start and End a Slide Show
- Click the Slide Show tab on the ribbon.

- To exit the presentation and return to normal view, click the Options button.

Move Through Slides
There are navigation buttons located at the bottom-left of a slide when presenting. You can use these to navigate a presentation or use navigation keystroke shortcuts on the keyboard.

Keyboard Shortcuts for Presenting a Slide Show
| Action | Keyboard Shortcut |
|---|---|
| Click the left mouse button or press any of the following keys on the keyboard: , , , , , or . | |
| Press any of the following keys on the keyboard: , , , or . | |
| Type the slide number and press . | |
| Press . | |
| Press . | |
| Hold the key and click and hold the left mouse button. | |
| Press + . | |
| Press the key. |
Switch Programs
Sometimes when you're in a presentation, you'll need to switch to a different program to present information.
- While presenting, click the Options button.
- Select Screen .

The taskbar pops up at the bottom and now you are free to navigate.
- Click the program you need to jump to.
- When you’re ready to switch back, just click the PowerPoint icon in the taskbar.

FREE Quick Reference
Free to distribute with our compliments; we hope you will consider our paid training.
- LinkedIn-ready certificate
- Skill assessments
- Bite-sized, interactive lessons
- Saved progress
How to Start and Navigate a PowerPoint Slideshow
Use the method you're most comfortable with
A successful slideshow isn’t just about creating it, it’s about presenting it to your audience when it’s time. Here, we’ll show you the right keys to press, the action buttons to use, and the mouse clicks you need to start and navigate a Microsoft PowerPoint presentation.

How to Start a PowerPoint Slideshow
You have a few ways to start a slideshow in PowerPoint. The one you use depends on which slide you want to begin with or if you want to use Presenter View. Plus, you can use the options in PowerPoint’s ribbon or keyboard shortcuts.
Ribbon Options
- Go to the Slide Show tab.
- To use Presenter View automatically, check the box in the Monitors section of the ribbon.
- Select From Beginning or From Current Slide to begin the show.

Keyboard Shortcuts
- Start from the beginning: F5
- Start from the current slide: Shift + F5
- Start in Presenter View: Alt + F5
How to Navigate a PowerPoint Slideshow
When it comes to navigating the presentation, you can use the toolbar buttons in Slide Show view or Presenter View, the shortcut (right-click) menu, or keyboard shortcuts.
Next Slide or Animation
- Select the right arrow button in the toolbar.
- Click on the current slide.
- Use the keys N , Enter , Page Down , Right Arrow , Down Arrow , or Spacebar .
Previous Slide or Animation
- Select the left arrow button in the toolbar.
- Right-click the current slide and pick Previous .
- Use the keys P , Page Up , Left Arrow , Up Arrow , or Backspace .

Specific Slide
- Type the slide number and press Enter .
- Select the See All Slides button in the toolbar and choose the slide.
Show a Hidden Slide
- Use the H key on the slide before the hidden one.
- Select See All Slides and choose the slide.
Go to the First Slide
- Type slide number 1 and press Enter .
- Use the Home key.
Go to the Last Slide
- Type the last slide number and press Enter .
- Use the End key.

Open the Screen Tools
- Select the Pen and Laser Pointer icon in the toolbar and choose the tool.
- Right-click, move to Pointer Options , and pick the tool.
- Use the tool keyboard shortcuts:
- Laser pointer: Ctrl + L
- Pen: Ctrl + P
- Arrow: Ctrl + A
- Eraser: Ctrl + E

Display a Blank Black Slide
- Select the Black or Unblack Slide Show icon in the Presenter View toolbar.
- Right-click the slide and pick Screen > Black Screen .
- Select the three dots and pick Screen > Black Screen .
- Use the B or Period key.
Display a Blank White Slide
- Right-click the slide and pick Screen > White Screen .
- Select the three dots and pick Screen > White Screen .
- Use the W or Comma key.

End the Presentation
- Right-click and pick End Show .
- Select the three dots and pick End Show .
- Use the Escape key.

When you’re ready to present your PowerPoint slideshow, you have plenty of options for starting and navigating the show. Use what you’re most comfortable with at the time for a winning presentation.
For more, look at these tips to improve your PowerPoint presentation .

Sandy Writtenhouse is a freelance technology writer and former Project, Department, and Program Manager. She turned her education, job experience, and love of technology into a full-time writing career. With all sorts of gadgets in her home and her hands, she seeks to help others make life easier through technology. Read Sandy's Full Bio
Read More Posts:

Leave a Reply
Your email address will not be published. Required fields are marked *
PowerPoint Tips Blog
Helping you with presenting, PowerPoint, and speaking
Start a presentation at a specified time
December 15, 2004 by Ellen Finkelstein 6 Comments
Karen e-mailed me the following question:
“Is there a way to run a presentation at a specific time? For example at 11:00 am and 2:00 pm for PowerPoint to automatically show the presentation without the presenter .”
At the time, I responded that the Windows Task Scheduler might be able to do this, but when I tried it out, I discovered that this is easier said than done. So I decided to explain the steps in detail.
The Windows Task Scheduler lets you open programs or documents at a specific time or repeatedly according to a schedule . However, there are lots of details that you need to be aware of to make it work.
Here are the steps:
- Start by creating your presentation. Be sure to add automatic timing so that the presentation advances by itself. Write down its complete location; for example, c:\articles & presentations\intro.ppt.
- Check that the date and time on your computer are accurate. You can find it in the system tray . Double-clcik the time to change it. (If you don’t see the time, right-click the Start button and choose Properties. Then click the Taskbar tab and check the Show the Clock check box.)
- Open the Scheduled Tasks folder by choosing Start > All Programs > Accessories > System Tools > Scheduled Tasks.
- Double-click the Add Scheduled Task item to open the Scheduled Task Wizard and click Next.
- In the next window, you can choose a program from the list. Interestingly, PowerPoint wasn’t on my list. (Neither was Word or Excel, but Outlook was.) In this situation, you want to find the PowerPoint executable file, so click the Browse button. (Note: You can also choose a presentation file, but it will open in Normal view, not Slide Show view. You might think that you could point to a PPS file, but unfortunately, this doesn’t work — it still opens in Normal view!)
- Browse to your PowerPoint executable file. It’s called powerpnt.exe. Mine was in c:\Program Files\Microsoft Office \Office 11, but your path may be different. Click Open.
- Your wizard now lists POWERPNT as the task name. Since you want to play a particular presentation, change the name to something more meaningful and choose the One Time Only option, unless you want to run the presentation every day, week, or month. Click Next.
- On the next screen, enter the start time and date. (You can use the the arrows and the pop-up calendar.) Click Next.
- On the next screen, you enter the login name and password. If you’re the only one using your computer, leave the password blank but make sure to note the instruction pertaining to this situation in Step 12. Click Next.
- On the next screen, make sure to check the Open Advanced Properties for This Task When I Click Finish check box. You still have several adjustments to make! Then click Finish.
- You now see the Properties of the scheduled task. (You can access this at any time by going to the Scheduled Tasks folder and double-clicking the task.) You need to change the command line switch to tell PowerPoint to open the specific presentation you want and to open it in Slide Show view. To do this, you add the following after the existing command in the Run text box .
/s “c:\articles & presentations\intro.ppt”
Of course, the location and name of your presentation will be different. In my case, the entire command read as follows:
“C:\Program Files\Microsoft Office\OFFICE11\POWERPNT.EXE” /s “c:\articles & presentations\intro.ppt”
(Note: The original command is enclosed in quotes. The /s must be outside the quotes. Your path should be in quotes.For a complete list of command line switches, see Steve Rindsberg’s Command Line Switches – PowerPoint and PowerPoint Viewers page. )
- Check the Run Only If Logged On check box. You must check this box to run the presentaton if you didn’t include a password. Then the task will run as long as you’re logged on to your computer.
- Click the Schedule tab where you can finalize or change the schedule. For more options, click the Advanced button where you can repeat the task every x minutes or hours until a specific time or for a specific duration. For example, to run the presentation at 11:00 am and 2:00 pm, you could set it to start at 11 and repeat it every 3 hours until 2:30 pm, assuming that the presentation runs for 1/2 hour. Click OK to close the Advanced Schedule Options dialog box . If you want to repeat the presentation continuously, time it and set the time in the Every text box to a little longer than the length of the presentation. Here you see a setting that repeats the presentation every 10 minutes for an hour.
- Check the If the Task Is Still Running, Stop It at This Time check box. If you don’t check this text box, the black “End of Slide Show, Click to Exit” screen remains at the end of all the repetitions.
- There’s still a problem. When the presentation completes one run-through that black “End of Slide Show, Click to Exit” screen remains. This interferes with the next run-through. If you click or press Esc right after a run-through, the task will repeat properly. But if you won’t be there to do that, you need to do one more step. Click the Settings tab.
- In the Scheduled Task Completed section, check the Stop the Task If It Runs for check box and enter a time that is longer than the length of the presentation but shorter than the repetition time. For example, if the presentation is 8 minutes long and you’re repeating it every 10 minutes, set the task to stop every 9 minutes. If, as in our original example, you’re repeating a presentation every 3 hours, and it runs for 1/2 hour. set the task to stop after 31 minutes.
You’re done! Now your presentation will start on schedule in Slide Show mode, repeat as you specified, and end when you specified.
What if you don’t want the desktop to show between repetitions? You might try a second presentation with one slide that says “Introductory Presentation at 11:00 am and 3:00 pm” and try setting the timings so that it displays the rest of the time. You’ll have to be very precise in your settings.
If you’re having trouble getting this to work, try creating two separate tasks that start the presentation at the two times. But be sure to stop each task on the Settings tab.
This is a complex process, but it can work well. I suggest that you start, as I did, with a 4 second presentation and set it to repeat every 2 minutes 3 times, stopping the task after 1 minute. That way you won’t waste too much time getting it to work. Once you have the technique down, you’ll find it easier to start and repeat longer presentations automatically.
Related posts:
- Add taped narration to a presentation
- Add notes in PowerPoint in Slide Show view
- Put a presentation on a CD that runs automatically
- Reduce the size of your presentation files
6 Leave a Reply
Question on the above.
I have followed your process and Powerpoint automatically starts at the specified time, but it won’t start the slide show running. I have to click start slide show. Can this be resolved?

Try File> Save As and choose PPSX instead of PPTX. The PPSX format automatically opens in slide show view. Let me know if it works.
I had already done this and it made no difference! Very frustrating. I must have done something wrong along the way! I have it programmed for 6:30 start and the programme opens at that time, but it just sits on the first slide and doesn’t start the slideshow.

worked well for 2010 as well. Thanks. program\script:”C:\Program Files (x86)\Microsoft Office\Office14\POWERPNT.EXE”
add argument:/S “C:\Users\pritchie\Desktop\LnI SlipsTripsFallsMod1.ppsx”
Getting the files path and argument right was by far the most difficult so Im leaving what I entered as alternative example.

Do you know of a way to display a specific slide at a specific time, irrespective of when the slide show was started? For example, display slide 3 at 14:00 every day (assuming the slide show is already running).

- Get started with computers
- Learn Microsoft Office
- Apply for a job
- Improve my work skills
- Design nice-looking docs
- Getting Started
- Smartphones & Tablets
- Typing Tutorial
- Online Learning
- Basic Internet Skills
- Online Safety
- Social Media
- Zoom Basics
- Google Docs
- Google Sheets
- Career Planning
- Resume Writing
- Cover Letters
- Job Search and Networking
- Business Communication
- Entrepreneurship 101
- Careers without College
- Job Hunt for Today
- 3D Printing
- Freelancing 101
- Personal Finance
- Sharing Economy
- Decision-Making
- Graphic Design
- Photography
- Image Editing
- Learning WordPress
- Language Learning
- Critical Thinking
- For Educators
- Translations
- Staff Picks
- English expand_more expand_less
PowerPoint 2016 - Presenting Your Slide Show
Powerpoint 2016 -, presenting your slide show, powerpoint 2016 presenting your slide show.

PowerPoint 2016: Presenting Your Slide Show
Lesson 12: presenting your slide show.
/en/powerpoint2016/printing/content/
Introduction
Once your slide show is complete, you'll need to learn how to present it to an audience. PowerPoint offers several tools and features to help make your presentation smooth, engaging, and professional.
Optional: Download our practice presentation .
Watch the video below to learn more about presenting your slide show.
Presenting a slide show
Before you present your slide show, you'll need to think about the type of equipment that will be available for your presentation. Many presenters use projectors during presentations, so you might want to consider using one as well. This allows you to control and preview slides on one monitor while presenting them to an audience on another screen.
To start a slide show:
There are several ways you can begin your presentation:

To advance and reverse slides:
You can advance to the next slide by clicking your mouse or pressing the spacebar on your keyboard. Alternatively, you can use or arrow keys on your keyboard to move forward or backward through the presentation.
You can also hover your mouse over the bottom-left and click the arrows to move forward or backward.

To stop a slide show:
You can exit presentation mode by pressing the Esc key on your keyboard. Alternatively, you can click the Slide Show Options button in the bottom-left and select End Show .

The presentation will also end after the last slide . You can click the mouse or press the spacebar to return to Normal view.

Presentation tools and features
PowerPoint provides convenient tools you can use while presenting your slide show. For example, you can change your mouse pointer to a pen or highlighter to draw attention to items in your slides. In addition, you can jump around to slides in your presentation or access other programs from your taskbar if needed.
To show the taskbar:
Sometimes you may need to access the Internet or other files and programs on your computer during your presentation. PowerPoint allows you to access your taskbar without ending the presentation.
- Locate and select the Slide Options button in the bottom-left corner.

Slide options
You can also access any of the menu items above by right-clicking anywhere on the screen during your slide show.

To skip to a nonadjacent slide:
You can jump to slides out of order if needed.

- The selected slide will appear.
To access drawing tools:
Your mouse pointer can act as pen or highlighter to draw attention to items in your slides.
- Locate and select the Pen Tools button in the bottom-left corner.

You can also use the laser pointer feature to draw attention to certain parts of your slide. Unlike the pen and highlighter, the laser pointer will not leave markings on your slides. To use the laser pointer, select it from Pen Tools, or press and hold the Ctrl key and the left mouse button.

To erase ink markings:

When you end a slide show, you'll also have the option to Keep or Discard any ink annotations made during your presentation. If you keep ink markings, they'll appear as objects on your slides in Normal view.

Presenter view
If you're presenting your slide show with a second display—like a projector—you can use Presenter view . Presenter view gives you access to a special set of controls on your screen that the audience won't see, allowing you to easily reference slide notes , preview the upcoming slide , and much more.
To access Presenter view:
Start your slide show as you normally would, then click the Slide Options button and select Presenter View . Alternatively, you can press Alt+F5 on your keyboard to start the slide show in Presenter view.

Click the buttons in the interactive below to learn more about using Presenter view.

End Slide Show
Click here to end the presentation.
Display Settings
From here, you can customize your d isplay settings , including the option to duplicate—or mirror—the slide show on two screens and swap the monitors if Presenter view is appearing on the wrong screen.
Show Taskbar
Click here to show the taskbar and access other programs without closing the presentation.
Here, you can see how long you've been giving the presentation. You can also pause and restart the timer if necessary.
Current Slide
This is the current slide being shown to the audience.
Slide Options
Here, you can access the same slide options you would find in normal presentation mode, including the Pen Tools and See All Slides buttons.
Advance and Reverse Slides
Use the arrows to move forward and backward through your presentation.
Here, you'll see any speaker notes for the current slide. You can use the Increase and Decrease buttons below to make the notes larger or smaller.
Here, you can preview the next slide that will appear in the presentation.
Slide show setup options
PowerPoint has various options for setting up and playing a slide show. For example, you can set up an unattended presentation that can be displayed at a kiosk and make your slide show repeat with continuous looping.
To access slide show setup options:

- The Set Up Show dialog box will appear. From here, you can select the desired options for your presentation.
Click the buttons in the interactive below to learn about various options for setting up and playing a slide show.

Here, you can choose a show type .
Show Options
Here, you choose playback settings and disable certain features if desired.
Show Slides
Here, you can choose which slides you want to show during the presentation. All is selected by default, but you can choose to show only certain slides or use any custom shows you have created from your original presentation.
Advance Slides
If you have set timings in your slide show, they will play automatically. However, if you want to disable the timings and control the slides yourself, select Manually .
Multiple Monitors
If you have more than one monitor, you can choose which one to display the slide show on. It's usually best to leave this setting on Automatic .
To advance slides automatically, you'll need to customize the slide timing on the Transitions tab. Review our lesson on Applying Transitions to learn how.

- Open our practice presentation .
- In the Set Up Slide Show options, change the pen color to purple.
- Start your slideshow, then access Presenter view .
- Advance to slide 8.
- Use the pen tool to circle the fundraising amounts for the 2015-2016 school year. These are the amounts over the green bars.

/en/powerpoint2016/lists/content/
How to Run PowerPoint From a Command Line: A Step-by-Step Guide
Running PowerPoint from the command line might sound like a task for tech gurus only, but it’s quite doable with the right guidance. Simply put, you’ll open your command prompt, navigate to the directory where PowerPoint is installed, and execute a command with the desired PowerPoint file’s name. It’s a speedy way to launch presentations without the usual point-and-click routine.
After completing this action, PowerPoint will open directly to the specified presentation, bypassing the usual startup screen and potential distractions along the way. This can be especially useful for quickly starting a presentation without the need for navigating through folders or clicking on multiple icons.
Introduction
PowerPoint presentations are a staple in academic, business, and personal settings, offering a visually engaging way to convey information. But did you know there’s a quicker way to open your PowerPoint presentations than the typical double-click? That’s right! We’re talking about running PowerPoint from the command line. While this might sound a bit technical, it’s a simple process that can save you time and streamline your presentation setup.
This technique is particularly useful for individuals who are comfortable using command prompts and those who need to open presentations frequently or as part of a scripted sequence. It’s a great trick for presenters, IT professionals, or anyone looking to add a bit of efficiency to their computer operations. Plus, it’s an excellent skill to have up your sleeve for situations where traditional methods might not be as practical. So, let’s dive in and learn how to run PowerPoint from the command line – it’s easier than you think!
Step by Step Tutorial: Running PowerPoint from the Command Line
Before we dive into the steps, it’s important to know what we’re aiming for. By following the steps below, you’ll be able to command your computer to open a specific PowerPoint presentation through the command line interface, saving you time and streamlining your process.
Step 1: Open Command Prompt
Open the command prompt by typing “cmd” in the Windows search bar and clicking on the Command Prompt app.
The command prompt is a powerful tool that lets you communicate with your computer using text-based commands. It might seem a bit old-school, but it’s incredibly efficient once you get the hang of it.
Step 2: Navigate to PowerPoint Directory
Type “cd” followed by the path to the directory where PowerPoint is installed (usually “C:Program FilesMicrosoft OfficeOfficeXX,” where XX is your Office version number) and press Enter.
This step is like using a map to find your way to the PowerPoint application’s home within your computer’s file system. It’s all about location, location, location!
Step 3: Run the PowerPoint Application
Type “powerpnt” followed by the “/S” switch and the path to your PowerPoint file, then press Enter.
This is where the magic happens! By using the “powerpnt” command, you’re telling your computer to wake up PowerPoint and get it ready for action.
Step 4: Enjoy Your Presentation
Your PowerPoint presentation should now open directly, ready for you to impress your audience.
Bask in the glory of your newfound command line skills and enjoy the smooth start to your presentation!
| Benefit | Explanation |
|---|---|
| Speed | Running PowerPoint from the command line is significantly faster than the traditional method of opening presentations. |
| Efficiency | This method streamlines the process, especially when dealing with multiple presentations or a scripted setup. |
| Automation Potential | Power users can incorporate this technique into scripts for automated tasks, making it incredibly useful for repetitive presentations. |
| Drawback | Explanation |
|---|---|
| Learning Curve | For users unfamiliar with command prompts, there’s a bit of a learning curve that might initially slow things down. |
| Error Prone | A simple typo could result in failure to launch the presentation, which might be frustrating for beginners. |
| Limited Appeal | Casual users might not find this method as beneficial as those who use PowerPoint more frequently or for professional purposes. |
Additional Information
Running PowerPoint from the command line can seem daunting at first, but it’s a handy skill that can save you time and hassle. Remember, the key to success with command line tasks is precision – one wrong character and your command might not work.
It’s also worth noting that you can open PowerPoint in different modes from the command line, such as safe mode, which can be useful for troubleshooting issues. Additionally, if you’re a fan of keyboard shortcuts, mastering the command line can feel like leveling up in your computer skills.
When learning new technical skills like this, it’s important to be patient with yourself. Practice makes perfect, and before you know it, you’ll be running PowerPoint from the command line like a pro!
- Open Command Prompt
- Navigate to PowerPoint Directory
- Run the PowerPoint Application
- Enjoy Your Presentation
Frequently Asked Questions
What is the command prompt.
The command prompt is a text-based interface that allows you to interact with your computer by typing commands.
Can I run PowerPoint from the command line on a Mac?
Yes, but the process and commands differ slightly since you would use the Terminal app and different file paths.
What does the “/S” switch do?
The “/S” switch tells PowerPoint to start with the specified presentation immediately upon launching.
Can I use this method to open other Microsoft Office applications?
Yes, similar commands can be used to run other Office applications from the command line as well.
What if my PowerPoint file is on a different drive?
You’ll need to include the drive letter in the command, such as “D:PresentationsMyPresentation.pptx”.
Running PowerPoint from the command line is a nifty trick that can save you time and make you feel like a tech wizard. While it may not be necessary for everyone, it’s a great addition to your digital toolkit, especially if you’re looking to streamline your workflow or dazzle your colleagues with your command line prowess.
So, why not give it a try? Who knows, you might just find yourself preferring this method over the traditional click-and-open routine. Happy presenting!

Matthew Burleigh has been writing tech tutorials since 2008. His writing has appeared on dozens of different websites and been read over 50 million times.
After receiving his Bachelor’s and Master’s degrees in Computer Science he spent several years working in IT management for small businesses. However, he now works full time writing content online and creating websites.
His main writing topics include iPhones, Microsoft Office, Google Apps, Android, and Photoshop, but he has also written about many other tech topics as well.
Read his full bio here.
Share this:
Join our free newsletter.
Featured guides and deals
You may opt out at any time. Read our Privacy Policy
Related posts:
- How to Save Powerpoint as PDF with Notes
- Can I Convert My Powerpoint to Google Slides?
- How to Insert a Horizontal Line in Google Docs
- How to Change Line Spacing in Powerpoint for Every Slide at Once
- How to Drag Slides From One PowerPoint to Another: A Step-by-Step Guide
- How to Use Command Line Parameters in Excel: A Guide
- How to Email a PowerPoint Slideshow: A Step-by-Step Guide
- How to Convert PowerPoint Presentations to HTML: A Step-by-Step Guide
- How to Make a Powerpoint Slide Vertical in Powerpoint 2013
- Merge CSV Files Into One Large CSV File In Windows 7
- How to: Effortlessly Create PowerPoint Looping Presentations
- How to Loop a Slideshow on Powerpoint 2013
- How to Run Powerpoint in Kiosk Mode: A Step-by-Step Guide
- How to Copy a PowerPoint to a New PowerPoint: A Step-by-Step Guide
- How to Change Hyperlink Color in Powerpoint 2010 (An Easy 5 Step Guide)
- How Is Microsoft PowerPoint Used in Business: A Comprehensive Guide
- Can You Save a Powerpoint as a Video in Powerpoint 2013?
- What Are Benefits of PowerPoint? A Comprehensive Guide
- How to Set Time for Slides in Powerpoint
- How to End Powerpoint on Last Slide in Powerpoint 2010

PowerPoint Shortcut Start Presentation / Full Screen
| Command | Keyboard Shortcut | |
|---|---|---|
| | F5 | |
| | Alt + F5 | |
How to Run PowerPoint From a Command Line
- Small Business
- Business Technology & Customer Support
- ')" data-event="social share" data-info="Pinterest" aria-label="Share on Pinterest">
- ')" data-event="social share" data-info="Reddit" aria-label="Share on Reddit">
- ')" data-event="social share" data-info="Flipboard" aria-label="Share on Flipboard">
How to Copy a List of Files in a Windows Folder Into an Excel List
How to convert eml to mbox for a mac, how to save in powerpoint using the function keys.
- How to Bulk Insert CSV Into SQL
- How to Delete a Registry Entry to Reconfigure Office PowerPoint
When you open a program on your computer by double-clicking its icon, you are activating that program's .exe file and, thus, launching the program. When you launch PowerPoint, for example, you're likely to see the PowerPoint splash screen before the program opens the default window, from which you can select a file you've been working on or a new file.
Double-clicking an icon, however, isn't the only way to open a program. In days of old, before Windows, Microsoft made the DOS operating system, which didn't even have clickable icons. If you wanted to open a program, you typed commands in a command line. This takes a bit more time, but has a few advantages in that you can tell your computer exactly how you want the program to open and what you want it to do when it does.
Command line entries have always been a part of Microsoft's operating systems, including Windows 10. You can launch PowerPoint using a command line, and customize what it does by using subcommands, or switches.
Understanding Commands
In older versions of Windows, if you wanted to type out commands, you would first have to open the Command Prompt utility, or CMD. In Windows 10, you can still open CMD and use it to type commands. To do this, just type "cmd" in the Start menu and press Enter.
As you might have guessed, if you can run the CMD.exe file from the Start menu, you can also run PowerPoint from the Start menu by typing "powerpoint." To be more precise, you can also type the name of PowerPoint's .exe file, either in the CMD window or in the Start menu: powerpnt.exe (that's "pnt" instead of "point"). Typing "powerpnt" without the .exe also opens the program.
Commands are not case-sensitive. You can use uppercase, lowercase or a combination of the two.
Office File Names and Locations
Before you can run a program from a command line, you need to know its name and, if you use the CMD utility, its location. Files for Office 2016 are located in the following nest of folders, provided you installed Office in its default location:
- Windows 32-bit: C:\Program Files (x86)\Microsoft Office\root\Office16\
Windows 64-bit: C:\Program Files\Microsoft Office\
root\Office16\
If you have an older version of Office, it's likely in the Office15 or Office14 folders. Future releases of Office will likely be in a folder with a higher number.
The .exe files for each of the office programs are:
- PowerPoint: powerpnt.exe
- PowerPoint Viewer: pptview.exe
- Word: winword.exe
- Excel: excel.exe
- Outlook: outlook.exe
- Access: msaccess.exe
Typing any of these file names in the Windows Start menu will launch the program.
Opening PowerPoint from the CMD utility is just a bit more complicated because CMD goes to a specific folder when it opens – your user folder. Your PowerPoint program isn't in that folder so you need to open the right folder first. In CMD, folders are called directories.
How to Get to PowerPoint's folder in CMD
Open a File Explorer window and type "powerpnt.exe" in the Search menu in the top of the window. After a few moments, File Explorer will show you the file with its location below it, such as: C:\Program Files (x86)\microsoft office\root\Office 16
In the command prompt, type "cd\" and press Enter. This is a change directory command that puts you in the computer's C: drive, rather than your user folder.
- Type "cd" followed by a space, followed by the first folder, such as "cd program files," and press Enter to change to that folder.
- Continue going through the folders until you get to the one that PowerPoint is located, such as "cd program files (x86)" and then "cd microsoft office," etc.
- Type "dir" to see the contents of your current folder (known as the directory), and press Enter to see if powerpnt.exe is in this folder. Once you're in the right folder, typing "powerpnt.exe" will open PowerPoint.
Understanding Start Command Switches
A command line switch or sub-command adds one additional instruction, telling your computer exactly how you want the program to open. A switch follows the primary command and a space, beginning with a forward slash. For example, to open PowerPoint and have it immediately create a new blank file, you would type: powerpnt.exe /b
You can also use a switch to open a specific file. However, you will need to specify exactly where that file is so PowerPoint can find it. PowerPoint files you create are normally given the .pptx extension. So, if your files are in your Documents folder, the location of a file called "presentation" would be: C:\Users\YourName\Documents\presentation.pptx
Anything you type after a switch is called a parameter. Unlike commands, parameters are sometimes case-sensitive.
Using PowerPoint Commands and Switches
Following are several of the most commonly used commands with PowerPoint switches.
/B: Launches PowerPoint with a new blank presentation.
Example: "powerpnt.exe /b
/C: Launches PowerPoint with the specified file and also opens Microsoft Windows NetMeeting conferencing.
Example: powerpnt.exe /C C:\Users\YourName\Documents\netmeetingfile.pptx
/EMBEDDING: Launches PowerPoint without showing you the Office PowerPoint program window. This is usually used by developers when testing add-ins.
Example: powerpnt.exe /EMBEDDING
/M: This switch runs a macro in a specified presentation file.
Example: powerpnt.exe /M C:\Users\YourName\Documents\test.pptx MyMacro
In this example, the macro "MyMacro" is used in the test.pptx file.
/N: Opens PowerPoint and creates a new presentation based on a template you specify.
Example: powerpnt.exe /N Path\customtemplate.potx
In this example, "Path" represents the template's location.
/O: Launches PowerPoint and specifies a list of files to open, rather than just one.
Example: powerpnt.exe" /O File presntation1.pptx, File presentation2.pptx
/P: This print switch prints the presentation to your default printer. The print dialog box opens.
Example: powerpnt.exe /p MyFile.pptx
/PT: This print-to switch prints the presentation to a printer you specify without opening a dialog box.
Example: powerpnt.exe" /PT "PrinterName" "" "" "MyFile.pptx"
Note that you should include the empty quotation marks.
/RESTORE: If PowerPoint crashed, you can use this switch to restore PowerPoint to the way it was before it closed. PowerPoint will attempt to restore the presentation you were working on.
Example: powerpnt.exe /RESTORE
/S: This switch opens a file you specify as a slide show.
Example: powerpnt.exe /S C:\Users\YourName\Documents\show.pptx
Creating Command Line Shortcuts
If you plan to use a command line switch more than once, you can create a shortcut for it and place it on your desktop.
- Right-click the Windows desktop. Select "New" and then click "Shortcut" to open the Create Shortcut Wizard.
- Click "Browse" and locate the POWERPNT.EXE file, or type its location and file name inside quotation marks. This must be case-sensitive: "C:\Program Files (x86)\Microsoft Office\root\Office16\POWERPNT.EXE"
- Type a space and then type the switch you want to use and any parameters needed. For example, to open a new blank presentation you would use: "C:\Program Files (x86)\Microsoft Office\root\Office16\POWERPNT.EXE" /b
- Click Next and then enter a name for the shortcut.
- Double-click the shortcut to open PowerPoint with your switch.
- Microsoft Office Support: Command-Line Switches for Microsoft Office Products
- Digital Citizens Life: Command Prompt: 11 Basic Commands You Should Know
- Microsoft Office Support: Description of the Startup Switches for Excel
- Laptop Mag: How to Make Desktop Shortcuts in Windows 10
- Microsoft Office: Command-Line Switches for PowerPoint 2007 and the PowerPoint Viewer 2007
- Press the Windows key and "R" to launch the Run dialog box from your keyboard. Test your shortcut command using the run or command prompt first. Launch PowerPoint from the Run dialog by simply typing "powerpnt" (without quotation marks here and subsequent commands) and pressing "Enter." You can also launch PowerPoint from the Start menu by clicking "Start" and typing "PowerPoint" and then pressing "Enter." You can use many of the same switches for the PowerPoint Viewer application.
A published author and professional speaker, David Weedmark has advised businesses on technology, media and marketing for more than 20 years. He has taught computer science at Algonquin College, has started three successful businesses, and has written hundreds of articles for newspapers and magazines and online publications including About.com, Re/Max and American Express.
Related Articles
How to write a cmd script, how to use command line parameters in microsoft excel, can i run python from notepad, how to restart outlook 2007 when it has stopped working, how to search ppt, how to disable wordpad, how to mount a program to dosbox, how to create an autoexec.bat file, how to transfer from powerpoint to flash drives, most popular.
- 1 How to Write a CMD Script
- 2 How to Use Command Line Parameters in Microsoft Excel
- 3 Can I Run Python From Notepad?
- 4 How to Restart Outlook 2007 When It Has Stopped Working
- Presentations
- Most Recent
- Infographics
- Data Visualizations
- Forms and Surveys
- Video & Animation
- Case Studies
- Design for Business
- Digital Marketing
- Design Inspiration
- Visual Thinking
- Product Updates
- Visme Webinars
- Artificial Intelligence
How to Start a Presentation: 12 Ways to Keep Your Audience Hooked

Written by: Nayomi Chibana
Wondering how to start a presentation that makes your audience sit up in their seats with excitement?
"Today, you will learn something that will add 10 years to your life."
"20 years from now, your job won't exist."
"Did you know that more people have access to a mobile phone than a toilet?"
Presentation starters like these are key to grabbing your audience's attention and making the most of the time allotted to you.
Instead of thanking the audience, making an unrelated joke or apologizing for a technical issue, why not dive right into the subject matter with a gripping statement or thought-provoking question?
To help you craft your own killer presentation starters, we've sorted through some of the most popular TED talks in history and created this list of the most effective ways to start your next presentation .
Many of these presentation starters are successful because they appeal to human emotions such as curiosity, awe, surprise or fear. You can read more on creating viral content that triggers emotional responses in this post .
Better yet, check out the video version of this blog post. This video distills 12 killer strategies to start your presentation and keep the audience's attention throughout.

- Knowing how to start a presentation is crucial because it sets the tone for the rest of the presentation. A strong and engaging opening can capture the audience's attention and generate interest in your presentation.
- There are many ways to start a presentation: make a provocative statement, incite curiosity; shock the audience; tell a story, be authentic; quote a famous or influential person.
- Here are other presentation opening strategies: Begin with a captivating visual; ask a question; use silence; start with a prop; tell a relevant joke; use the word "imagine.
- Take advantage of Visme's free online presentation software to create attention-grabbing presentations that align with your branding and engage your audience.
- If you're short on time, tap into the power of Visme's AI presentation maker to create stunning presentations in minutes. Simply describe what you want to create, select your preferred design option and let the tool do the heavy lifting.
How to Start a Presentation
Knowing how to start a presentation is just as crucial as the message you're trying to convey. If you can't start it effectively, you might not be able to leave a strong enough impact by the end of it.
TED speakers are some of the best presenters in the world, and there's a lot you can learn from their talks. Below, we've handpicked some of these presentations that start with a bang and manage to keep the audience hooked till the very end.
1 Make a provocative statement.
"I want to discuss with you this afternoon why you're going to fail to have a great career."
One surefire way to get your audience's attention is to make a provocative statement that creates interest and a keen desire to know more about what you have to say.
The presentation above, for example, does just that by making a surprising first statement that inspires surprise, amusement, curiosity and fear at the same time.
With 4.8 million views and counting, this talk by an economics professor draws you in precisely because it steers clear of the traditional talk, using blunt humor to enumerate all the irrational excuses people make for not pursuing their dreams and passions.
2 Incite curiosity.
"I need to make a confession at the outset here. A little over 20 years ago, I did something that I regret, something that I'm not particularly proud of. Something that, in many ways, I wish no one would ever know, but here I feel kind of obliged to reveal."
Another way to grab your audience by the collar is to incite curiosity. In this popular TED talk viewed over 15.4 million times, career analyst Dan Pink succeeds at getting the entire audience to look at him intently, waiting for his next word, by resorting to an opening statement that builds suspense.
Since human beings are by nature curious creatures, most people in the audience were probably asking themselves "What did he do?" and imagining all sorts of possible scenarios.
3 Shock the audience.
"You will live seven and a half minutes longer than you would have otherwise, just because you watched this talk."
In many ways related to the previous two presentation starters, this hook involves making a counter-intuitive or paradigm-shifting statement that goes against a popular belief or simply shocks due to the perceived impossibility of the proposed statement.
This introduction by game designer Jane McGonigal, for example, achieves a level of surprise by making a seemingly improbable assertion. After hearing this kind of statement, most people will want to listen to your entire talk, if not out of genuine interest, then at least for the sake of pacifying their incredulity.
(By the way, she makes good on her promise by revealing a game she designed to boost resilience, which is backed by scientific research.)
4 Tell a story.
"When I was seven years old and my sister was just five years old, we were playing on top of a bunk bed..."
As covered in a previous post , storytelling is the key ingredient that separates good, engaging presentations from bad ones that lack a clear message and persuasive delivery.
In his popular talk on the secret to being more productive, psychologist Shawn Achor tells a childhood story to lead into the effectiveness of positive psychology. He then goes on to provide concrete evidence backing his claim that pursuing happiness, rather than productivity for its own sake, actually makes you more--not less--productive.
Create a stunning presentation in less time
- Hundreds of premade slides available
- Add animation and interactivity to your slides
- Choose from various presentation options
Sign up. It’s free.

5 Be authentic.
"I'm going to tell you a little bit about my TEDxHouston Talk. I woke up the morning after I gave that talk with the worst vulnerability hangover of my life. And I actually didn't leave my house for about three days."
Another way to draw your audience into your own world is to tell a revealing personal story. This is certainly not easy but, when done right, can quickly spark interest in your topic and build an emotional connection between you and your audience.
In Brene Brown's talk on confronting shame, she begins by admitting that she felt embarrassed over the revelations she had made in her massively popular TED talk on embracing vulnerability.
6 Quote an influential person.
One of the easiest ways to start a presentation is to quote an influential person. In these cases, it's best to use a pithy, short and relevant quote to catch your audience's attention.
In the widely viewed video above, for example, writer Andrew Solomon quotes Emily Dickinson to begin his talk on depression, an illness he asserts affects many more people than the official figures suggest.
The quote is particularly powerful and effective because it eloquently describes the state of depression from the point of view of a person who is feeling all the emotions associated with it.
7 Begin with a captivating visual.
To introduce this fascinating TED talk on how movements really get started, entrepreneur Derek Sivers uses some surprising footage to support his statements. They are especially captivating because they debunk widely held beliefs on the matter, proving that it takes more than just a charismatic leader to start a revolution of any sort.
8 Ask a question.
"Do you think it's possible to control someone's attention? Even more than that, what about predicting human behavior?"
In this attention-grabbing presentation on the flaws in human perception, world-famous pickpocket Apollo Robbins starts off by asking the audience a question that leads right into the meat of his talk, which has been viewed worldwide more than 10.5 million times.
In these cases, it's best to pose a question that will really get your audience thinking and, in the best possible scenario, challenge their prevailing beliefs or preconceptions on a certain topic.
51 Best Presentation Slides for Engaging Presentations (2024)
9 Use silence.
Another effective technique--which should only be used if you're a seasoned presenter and are able to maintain your composure throughout--is to leverage silence to command a room.
Watch, for example, how musician Amanda Palmer starts off her talk by not saying a word, simply breathing in and out and using props to communicate her message.
Although you may not want to resort to both silence and using a prop in your presentation, this is a very effective dramatic technique that, if done right, quickly draws all eyes to you.
10 Start with a prop.
Considering that the audience's gaze is attracted by motion and visual objects, another way to hook them right from the outset is to use a prop.
Take a look at how best-selling author Susan Cain uses a physical object to visually complement her opening story on her first summer camp experience. It not only adds a dramatic effect, it also keeps viewers eyes on her while on stage.
11 Tell a relevant joke.
"Okay, now I don't want to alarm anybody in this room, but it's just come to my attention that the person to your right is a liar."
Humor is not only a good way to break the ice and endear the audience to you right from the outset, it can also be very effective in getting your point across if it's relevant to your talk.
Lie detector Pamela Meyer, for example, deftly uses both humor and an element of surprise in her opening statement as she tells the audience that the person to their right is probably a liar. This gets the audience to laugh and then focus on her topic at the same time.
She goes on to give some shocking statistics (such as that on any given day, we're lied to up to 200 times) and delivers an intriguing talk that has been seen close to 13 million times.
12 Use the word "imagine."
"Imagine a big explosion as you climb through 3,000 ft. Imagine a plane full of smoke. Imagine an engine going clack, clack, clack. It sounds scary."
Lastly, there are times when leading your audience to use their imaginations is the best bet. You can prompt them to do this by using the commands "imagine," "think of" or "picture this." These are just a few of the most powerful opening words for presentation.
Plane crash survivor Ric Elias, for example, uses this technique in the video above to quickly thrust his audience into the central scene of his harrowing story.
Learn How to Start a Presentation Effectively
What about your next presentation? Have you thought about how you're going to set the mood for your talk? We've rounded up some of the best way to start a presentation.
When you're ready to get started creating your presentation, give Visme's presentation software a try! The tool comes with an AI writer that helps you generate killer content for your next presentation in seconds.
Plus, check out our post on how to end a presentation so you both start and end your speech with a bang.
And if you want to learn all our secrets on how to deliver an unforgettable presentation, as well as how to create visual slides with impact, grab our free e-book below.

Create beautiful presentations faster with Visme.

Trusted by leading brands
Recommended content for you:
![15 Best AI Presentation Makers in 2024 [Free & Paid]](https://visme.co/blog/wp-content/uploads/2023/11/Best-AI-Presentation-Makers-in-2024-Thumbnail-500x280.jpg "presentation start command")
Create Stunning Content!
Design visual brand experiences for your business whether you are a seasoned designer or a total novice.
About the Author
Nayomi Chibana is a journalist and writer for Visme’s Visual Learning Center. Besides researching trends in visual communication and next-generation storytelling, she’s passionate about data-driven content.
How to Start a Presentation [+ Examples]
Published: September 13, 2023
The first step in mastering the art of delivering powerful presentations is understanding how to start a presentation properly.

In this post, you'll discover strategies for crafting a solid presentation opening, designing an impactful opening slide, and delivering a memorable presentation.
![→ Free Download: 10 PowerPoint Presentation Templates [Access Now]](https://no-cache.hubspot.com/cta/default/53/2d0b5298-2daa-4812-b2d4-fa65cd354a8e.png "presentation start command")
Table of Contents
Why Your Presentation Opening Matters
How to start a presentation, opening slide examples, best practices for starting a presentation.
The opening of your presentation sets the tone for your entire session.
Within the first few minutes, most of your audience will decide whether they find your expertise, experience, and topic compelling enough to warrant their attention.
Think of it this way: Your opening is a preview of your presentation like a trailer is a preview of a movie. If the five-minute trailer isn’t engaging or impactful, why should the audience bother sitting through the half-hour movie?
Your opening shapes the expectations of your audience and entices them to stay engaged throughout the session.
And although you’ll still need to work to maintain their attention, getting it right from the start will spare you the challenge of re-engaging a disinterested audience right from the beginning of your presentation.

This opening statement is powerful because rather than lead with his “credentials” or “accolades,” as the audience most likely expects, he defies that expectation.
He creates a sense of intrigue that instantly piques the audience's curiosity and compels them to pay closer attention.
Infuse humor.
In Tom Thum's TedTalk titled Beatbox Brilliance , he sets a lighthearted tone by stepping on stage wearing oversized sunglasses and declaring, “My name is Tom, and I've come here today to come clean about what I do for money.”
As you might expect, this humorous approach not only elicits laughter but also surprises the audience, who are intrigued and pleasantly surprised at the tone he sets for the presentation.
Ask a question.
Graham Shaw's presentation titled “ Why people believe they can’t draw - and how to prove they can ” begins with, “Hi, I've got a question for you - how many people here would say they can draw?”
Seeing as this is a relatively lighthearted question that’s simple to answer, the audience responds immediately.
Now, what makes this a powerful opening technique is that Graham then goes on to say:
“When people say they can’t draw, I think it's more to do with beliefs rather than talent and ability. When you say you can’t draw, that’s just an illusion, and today I’d like to prove that to you.”
By immediately challenging a widely held belief among the audience and promising to debunk it during the presentation, he employs a powerful technique that keeps the audience fully engaged.
This approach makes the audience feel “invested” in the outcome of the presentation and curious as to whether he can back up his claim.
2. Tell your audience why they should be listening to you.
Getting your audience’s attention is just one part of the equation. Once you have it, you must also explain why they should “keep” listening to you. Here are some ways to do this:
Highlight relevant personal experience.
In Phil Waknell’s opening section, he talks about how he’s spent the last ten years helping conference speakers, business leaders, and entrepreneurs prepare and deliver powerful presentations .
This immediately signals to the audience that he’s someone worth listening to and positions him as a credible source of insights based on the wealth of experience he has gathered.
Highlight your expertise.
During the opening section of Dr. Lara Boyd’s presentation titled “ After watching this, your brain will not be the same ,” she says, “I’m Dr. Lara Boyd, and I’m a brain researcher here at the University of British Columbia.”
Sharing her credentials as a brain researcher is crucial to gaining her audience's trust — especially considering the technicality of her topic.
But even while creating presentations outside fields like brain research, sharing qualifications and credentials in your opening section can be a powerful technique.
This helps you position yourself as a credible authority and reinforcing your audience's confidence in your ability to deliver valuable information.
Tell your audience what’s in it for them.
In Mel Robbins’ opening section for her presentation titled “ How to stop screwing yourself over ,” she ends her introduction by saying:
“I’m here for you. I’m going to tell you everything I know in less than 18 minutes about how to get what you want.”
Although she started the section by highlighting her experiences and expertise, she went further by explicitly stating the benefits her audience can expect from her presentation.
Doing this is a great way to create a compelling reason for your audience to invest their time and attention and emphasize the value of the presentation you’re about to deliver.
3. Introduce your topic.
If your topic is relatively simple to grasp or your audience is particularly knowledgeable, introducing your topic can be as easy as “Today, I’m going to be talking to you about how we’ve built a six-figure software company in 6 months.”
However, if your topic is more complex or unfamiliar to the audience, you must do a bit more heavy lifting in your opening section.
For example, Sam Bern’s “ My philosophy for a happy life ” presentation discusses how he lives a happy life despite having Progeria disease.
However, because this condition might be unfamiliar to some audience members, he takes some time in his opening section to talk about the illness before delving into the meat of his presentation.
Similarly, if you’re presenting on a complex topic or to an audience that isn’t knowledgeable, it’s essential to consider this when crafting your opening section.
4. Leverage storytelling.
Stories can create immersive experiences that captivate the audience and convey a core message.
For example, in the opening section of Sam Bern's presentation, he tells a story about his struggles while trying to achieve his goal of becoming a drummer in his school marching band, despite living with Progeria disease.
This sets the tone for his entire presentation by conveying an inspiring message of fighting against and succeeding despite the odds.
Another great example is the opening section of Josh Kaufman’s presentation, titled “ The First 20 Hours — how to learn anything ,” where he tells a story about his experience as a time-strapped first-time parent.
This story enhances the presentation as Josh eventually shares that this experience triggered his interest in studying how to become an efficient learner.
Finally, Amy Morins’s presentation “ The Secret of Becoming Mentally Strong ” is another excellent example of leveraging storytelling.
Amy starts her presentation with a thought-provoking story about observing a Facebook friend's seemingly perfect life.
She then highlights how such comparisons can lead to negative thought patterns and emphasizes the importance of cultivating mental resilience.
This relatable story not only resonates with her audience but also sets the stage for her message on building inner strength.
All these presentations are great examples that highlight how incorporating story-telling in your openings can be a powerful tool for creating memorable and impactful presentations.
Your presentation slides play a crucial role in determining the impact and effectiveness of your presentation.
In this section, you’ll find examples of 8 powerful opening slides across various use cases that not just support but enhance the presentation openings:
1. “ Blackboard is Getting an Upgrade ”

Although these are very different methods of injecting humor at the start of a presentation, they show how infusing humor can be a powerful tool for adding a touch of personality and creating a more enjoyable presentation for the audience.
4. Keep it short and sweet.
While it's important not to rush through the start of your presentation, keeping your opening concise is equally important. But remember, concise does not mean sacrificing substance; it simply means delivering information efficiently.
Essentially, you want an opening section that allows you to create a solid initial impression without losing the audience's interest.
So, how long should this opening secretion be?
Most successful presentation openings are under three minutes, and many are shorter, often clocking in at under one minute.
5. Embrace authenticity.
Contrary to popular belief, there isn't a specific personality that makes someone a better presenter. In fact, the most impactful presentations have been delivered by individuals with diverse characters.
Take, for instance, the contrasting styles of Tom Thum’s irreverent humor and animated mannerisms and Sam Bern, who adopts a relaxed and conversational approach. Despite their differences, both speakers have garnered millions of views for their talks.
So, rather than emulating or mimicking their presentations, the key takeaway is to embrace authenticity.
Allow your personality to shine through, lean on your strengths, and be human in your delivery.
Mastering the Art of Captivating Presentations
Starting a presentation is a skill that is as much an art as it is a science. Thankfully, it is also a skill that can be learned and honed.
By implementing the strategies in this guide and refining them through experience, you’ll become a master at delivering impactful presentations that command attention and leave a lasting impression.
All from the moment you step onto the stage.
![Blog - Beautiful PowerPoint Presentation Template [List-Based]](https://no-cache.hubspot.com/cta/default/53/013286c0-2cc2-45f8-a6db-c71dad0835b8.png "presentation start command")
Don't forget to share this post!
Related articles.
![How to Create the Best PowerPoint Presentations [Examples & Templates]](https://blog.hubspot.com/hubfs/powerpoint.webp "presentation start command")
How to Create the Best PowerPoint Presentations [Examples & Templates]
![17 PowerPoint Presentation Tips From Pro Presenters [+ Templates]](https://blog.hubspot.com/hubfs/powerpoint-design-tricks_7.webp "presentation start command")
17 PowerPoint Presentation Tips From Pro Presenters [+ Templates]
![How to Write an Ecommerce Business Plan [Examples & Template]](https://blog.hubspot.com/hubfs/ecommerce%20business%20plan.png "presentation start command")
How to Write an Ecommerce Business Plan [Examples & Template]
![How to Create an Infographic in Under an Hour — the 2024 Guide [+ Free Templates]](https://blog.hubspot.com/hubfs/Make-infographic-hero%20%28598%20%C3%97%20398%20px%29.jpg "presentation start command")
How to Create an Infographic in Under an Hour — the 2024 Guide [+ Free Templates]
![20 Great Examples of PowerPoint Presentation Design [+ Templates]](https://blog.hubspot.com/hubfs/powerpoint-presentation-examples.webp "presentation start command")
20 Great Examples of PowerPoint Presentation Design [+ Templates]

Get Buyers to Do What You Want: The Power of Temptation Bundling in Sales

How to Create an Engaging 5-Minute Presentation

120 Presentation Topic Ideas Help You Hook Your Audience

The Presenter's Guide to Nailing Your Next PowerPoint
![How to Create a Stunning Presentation Cover Page [+ Examples]](https://blog.hubspot.com/hubfs/presentation-cover-page_3.webp "presentation start command")
How to Create a Stunning Presentation Cover Page [+ Examples]
Download ten free PowerPoint templates for a better presentation.
Marketing software that helps you drive revenue, save time and resources, and measure and optimize your investments — all on one easy-to-use platform
At the edge of tweaking
Advertisement
Command Line Options
The Presentation Mode feature is implemented via an executable file, presentationsettings.exe .
By simply running it, you will open the Settings dialog shown above.
It supports the following command line options:
This command will directly enable Presentation Mode.
The next command will disable it:
Winaero greatly relies on your support. You can help the site keep bringing you interesting and useful content and software by using these options:
If you like this article, please share it using the buttons below. It won't take a lot from you, but it will help us grow. Thanks for your support!
Author: Sergey Tkachenko
Sergey Tkachenko is a software developer who started Winaero back in 2011. On this blog, Sergey is writing about everything connected to Microsoft, Windows and popular software. Follow him on Telegram , Twitter , and YouTube . View all posts by Sergey Tkachenko
4 thoughts on “Enable Presentation Mode in Windows 10”
Does this also prevent reboots from Windows 10 crappy updates?
I doubt that
I generally use the “pause updates” feature the day before I give a presentation. It should stop windows doing any updates/reboots while you’re delivering a talk :)
Sadly, it seems that the presentationsettings.exe is only available on Windows 10 PRO, not on home.
Leave a Reply Cancel reply
Your email address will not be published. Required fields are marked *

Privacy Overview
Run Node.js scripts from the command line
The usual way to run a Node.js program is to run the globally available node command (once you install Node.js) and pass the name of the file you want to execute.
If your main Node.js application file is app.js , you can call it by typing:
Above, you are explicitly telling the shell to run your script with node . You can also embed this information into your JavaScript file with a "shebang" line. The "shebang" is the first line in the file, and tells the OS which interpreter to use for running the script. Below is the first line of JavaScript:
Above, we are explicitly giving the absolute path of interpreter. Not all operating systems have node in the bin folder, but all should have env . You can tell the OS to run env with node as parameter:
To use a shebang, your file should have executable permission. You can give app.js the executable permission by running:
While running the command, make sure you are in the same directory which contains the app.js file.
- Pass string as argument to node instead of file path
To execute a string as argument you can use -e , --eval "script" . Evaluate the following argument as JavaScript. The modules which are predefined in the REPL can also be used in script.
On Windows, using cmd.exe a single quote will not work correctly because it only recognizes double " for quoting. In Powershell or Git bash, both ' and " are usable.
- Restart the application automatically
As of nodejs V16, there is a built-in option to automatically restart the application when a file changes. This is useful for development purposes. To use this feature, you need to pass the `--watch' flag to nodejs.
So when you change the file, the application will restart automatically. Read the --watch flag documentation .

Basic tasks for creating a PowerPoint presentation
PowerPoint presentations work like slide shows. To convey a message or a story, you break it down into slides. Think of each slide as a blank canvas for the pictures and words that help you tell your story.
Choose a theme
When you open PowerPoint, you’ll see some built-in themes and templates . A theme is a slide design that contains matching colors, fonts, and special effects like shadows, reflections, and more.
On the File tab of the Ribbon, select New , and then choose a theme.
PowerPoint shows you a preview of the theme, with four color variations to choose from on the right side.
Click Create , or pick a color variation and then click Create .

Read more: Use or create themes in PowerPoint
Insert a new slide
On the Home tab, click the bottom half of New Slide , and pick a slide layout.

Read more: Add, rearrange, and delete slides .
Save your presentation
On the File tab, choose Save .
Pick or browse to a folder.
In the File name box, type a name for your presentation, and then choose Save .
Note: If you frequently save files to a certain folder, you can ‘pin’ the path so that it is always available (as shown below).

Tip: Save your work as you go. Press Ctrl+S often or save the file to OneDrive and let AutoSave take care of it for you.
Read more: Save your presentation file
Select a text placeholder, and begin typing.

Format your text
Select the text.
Under Drawing Tools , choose Format .

Do one of the following:
To change the color of your text, choose Text Fill , and then choose a color.
To change the outline color of your text, choose Text Outline , and then choose a color.
To apply a shadow, reflection, glow, bevel, 3-D rotation, a transform, choose Text Effects , and then choose the effect you want.
Change the fonts
Change the color of text on a slide
Add bullets or numbers to text
Format text as superscript or subscript
Add pictures
On the Insert tab, select Pictures , then do one of the following:
To insert a picture that is saved on your local drive or an internal server, choose This Device , browse for the picture, and then choose Insert .
(For Microsoft 365 subscribers) To insert a picture from our library, choose Stock Images , browse for a picture, select it and choose Insert .
To insert a picture from the web, choose Online Pictures , and use the search box to find a picture. Choose a picture, and then click Insert .

You can add shapes to illustrate your slide.
On the Insert tab, select Shapes , and then select a shape from the menu that appears.
In the slide area, click and drag to draw the shape.
Select the Format or Shape Format tab on the ribbon. Open the Shape Styles gallery to quickly add a color and style (including shading) to the selected shape.

Add speaker notes
Slides are best when you don’t cram in too much information. You can put helpful facts and notes in the speaker notes, and refer to them as you present.

Click inside the Notes pane below the slide, and begin typing your notes.

Add speaker notes to your slides
Print slides with or without speaker notes
Give your presentation
On the Slide Show tab, do one of the following:
To start the presentation at the first slide, in the Start Slide Show group, click From Beginning .

If you’re not at the first slide and want to start from where you are, click From Current Slide .
If you need to present to people who are not where you are, click Present Online to set up a presentation on the web, and then choose one of the following options:
Broadcast your PowerPoint presentation online to a remote audience
View your speaker notes as you deliver your slide show.
Get out of Slide Show view
To get out of Slide Show view at any time, on the keyboard, press Esc .
You can quickly apply a theme when you're starting a new presentation:
On the File tab, click New .
Select a theme.

Read more: Apply a design theme to your presentation
In the slide thumbnail pane on the left, select the slide that you want your new slide to follow.
On the Home tab, select the lower half of New Slide .
From the menu, select the layout that you want for your new slide.
Your new slide is inserted, and you can click inside a placeholder to begin adding content.
Learn more about slide layouts
Read more: Add, rearrange, and delete slides
PowerPoint for the web automatically saves your work to your OneDrive, in the cloud.
To change the name of the automatically saved file:
In the title bar, click the file name.
In the File Name box, enter the name you want to apply to the file.
If you want to change the cloud storage location, at the right end of the Location box, click the arrow symbol, then navigate to the folder you want, then select Move here .
On the Home tab, use the Font options:

Select from other formatting options such as Bold , Italic , Underline , Strikethrough , Subscript , and Superscript .
On the Insert tab, select Pictures .
From the menu, select where you want to insert the picture from:

Browse to the image you want, select it, then select Insert .
After the image is inserted on the slide, you can select it and drag to reposition it, and you can select and drag a corner handle to resize the image.
On the slide canvas, click and drag to draw the shape.
Select the Shape tab on the ribbon. Open the Shape Styles gallery to quickly add a color and style (including shading) to the selected shape.

A horizontal Notes pane appears at the bottom of the window, below the slide.
Click in the pane, then enter text.

On the Slide Show tab, select Play From Beginning .

To navigate through the slides, simply click the mouse or press the spacebar.
Tip: You can also use the forward and back arrow keys on your keyboard to navigate through the slide show.
Read more: Present your slide show
Stop a slide show
To get out of Slide Show view at any time, on the keyboard, press Esc.
The full-screen slide show will close, and you will be returned to the editing view of the file.
Tips for creating an effective presentation
Consider the following tips to keep your audience interested.
Minimize the number of slides
To maintain a clear message and to keep your audience attentive and interested, keep the number of slides in your presentation to a minimum.
Choose an audience-friendly font size
The audience must be able to read your slides from a distance. Generally speaking, a font size smaller than 30 might be too difficult for the audience to see.
Keep your slide text simple
You want your audience to listen to you present your information, instead of reading the screen. Use bullets or short sentences, and try to keep each item to one line.
Some projectors crop slides at the edges, so that long sentences might be cropped.
Use visuals to help express your message
Pictures, charts, graphs, and SmartArt graphics provide visual cues for your audience to remember. Add meaningful art to complement the text and messaging on your slides.
As with text, however, avoid including too many visual aids on your slide.
Make labels for charts and graphs understandable
Use only enough text to make label elements in a chart or graph comprehensible.
Apply subtle, consistent slide backgrounds
Choose an appealing, consistent template or theme that is not too eye-catching. You don't want the background or design to detract from your message.
However, you also want to provide a contrast between the background color and text color. The built-in themes in PowerPoint set the contrast between a light background with dark colored text or dark background with light colored text.
For more information about how to use themes, see Apply a theme to add color and style to your presentation .
Check the spelling and grammar
To earn and maintain the respect of your audience, always check the spelling and grammar in your presentation .
Top of Page

Need more help?
Want more options.
Explore subscription benefits, browse training courses, learn how to secure your device, and more.

Microsoft 365 subscription benefits

Microsoft 365 training

Microsoft security

Accessibility center
Communities help you ask and answer questions, give feedback, and hear from experts with rich knowledge.

Ask the Microsoft Community

Microsoft Tech Community

Windows Insiders
Microsoft 365 Insiders
Was this information helpful?
Thank you for your feedback.
'Erratic in the zone': Medina struggles with command in A's loss

Martin Gallegos
OAKLAND -- The excitement over Luis Medina ’s return from the injured list was only enhanced by the sharpness displayed in his first game back, when he dazzled with six strikeouts and only an unearned run allowed in 5 2/3 innings against the Braves.
Medina’s second start off the IL was a reminder of the highs and lows that are still likely to come his way as he develops his electric arm at the Major League level. The 25-year-old battled command issues throughout Saturday’s 7-0 A’s loss to the Blue Jays at the Coliseum, as he allowed six runs on five hits and five walks with one strikeout in 4 2/3 innings.
“It’s part of the development,” said A’s manager Mark Kotsay. “These young pitchers can come out and throw a game like he did in Atlanta where he was crisp and pounding the zone with all his pitches for strikes. Today, he came out fighting his command and not confident out there with his ability to land and execute pitches.”
In that outing last week in Atlanta, Medina thrived with his ability to get ahead in the count with first-pitch strikes and work his curveball off his high-velocity fastball, which maxed out at 97.6 mph that day.
Saturday was a stark contrast from Medina’s previous outing. This time around, he struggled to locate any of his pitches in the zone, especially early on. Medina began the game by walking three of his first four batters faced, and though he limited the damage to one run in the opening frame, Toronto stuck to its plan of challenging him to consistently come into the zone with his pitches, something Medina had trouble with throughout an up-and-down 2023 rookie campaign.
“Medina, he’s got great stuff,” said Blue Jays manager John Schneider. “He can be a little bit erratic in the zone. So you want to be ready for something in the middle, whether it’s a fastball or a breaking ball, and kind of just be stubborn with it. You can’t budge on pitches on the corners. Again, if he’s showing that he has command of everything, then you have to adjust a little bit. But you have to be stubborn in the middle and you’ve got to do some damage.”

Despite the control issues, Medina battled and even saw some success pitching through traffic to keep the Blue Jays off the board from the second through the fourth. The fifth, however, was his downfall, as he allowed back-to-back RBI hits to Bo Bichette and Danny Jansen before getting pulled following a two-out walk issued to Daniel Vogelbach.
Medina’s one strikeout was a career-low for a start. His average fastball velocity of 94.3 mph on Saturday was also nearly two ticks down from his yearly average of 96.1 mph, though Kotsay did not believe there was anything physically wrong with the right-hander -- it just came down to a lack of comfort on the mound.
“He was just trying to throw strikes any way possible today,” Kotsay said of Medina. “He didn’t look comfortable. After the first, he settled in a little bit and got through three innings. Then that fifth inning, he left balls in the middle of the plate and got touched up a bit.”

Sign up to receive our daily Morning Lineup to stay in the know about the latest trending topics around Major League Baseball.
Coming away with a victory on Saturday was going to be a challenge regardless based on the performance of Toronto’s Kevin Gausman. The right-hander twirled a complete-game shutout on 109 pitches, marking the first complete-game shutout thrown against Oakland since Domingo German’s perfect game on June 28, 2023.
“He established the fastball at the bottom of the zone,” Kotsay said of Gausman. “When you’re throwing the fastball at the bottom of the zone with the splitter he has, it makes it tough because you don’t want to swing at the ball down. … He played his pitches really well, and the result was probably his best performance of his career today.”
Gausman, who struck out 10, stole the show with his devastating splitter. Of his 38 splitters thrown, he generated 25 swings and 14 whiffs, stifling A’s hitters by throwing it any time in any count.
Saturday marked the second time the A’s have been held scoreless in three days. On Thursday, Seattle’s Bryan Woo shut them down for six scoreless frames.
“I think everyone in here expects higher of themselves, no matter who is on the mound,” A’s designated hitter Brent Rooker said. “The work is constant. Every one of us will continue to work hard and I know we’ll be able to put up some better offensive performances.”
Version 1.90 is now available! Read about the new features and fixes from May.
Introduction to Git in VS Code
Want to easily manage your source code and collaborate with others? Git and GitHub are the tools you need! And with Visual Studio Code, you can set up and use them in a snap. Even if you're a beginner, VS Code's user-friendly interface guides you through common Git actions like pushing and pulling code, creating and merging branches, and committing code changes. And if you're a pro, you'll love the ability to perform Git actions directly within the editor, saving you time and effort compared to using the Git command line. Plus, the seamless workflow between VS Code and Git means you can stay in your editor and get more done.
Set up Git in VS Code
To use Git and GitHub in VS Code, first make sure you have Git installed on your computer . If Git is missing, the Source Control view shows instructions on how to install it. Make sure to restart VS Code afterwards.
Additionally you can sign into VS Code with your GitHub account in the Accounts menu in the lower right of the Activity bar to enable additional features like Settings Sync , but also cloning and publishing repositories from GitHub.

Open a Git repository
VS Code provides several ways to get started in a Git repository, from local to remote cloud-powered environments like GitHub Codespaces .
Clone a repository locally
To clone a repository, run the Git: Clone command in the Command Palette ( ⇧⌘P (Windows, Linux Ctrl+Shift+P ) ), or select the Clone Repository button in the Source Control view.
If you clone from GitHub, VS Code prompts you to authenticate with GitHub. Then, select a repository from the list to clone to your machine. The list contains both public and private repositories.

For other Git providers, enter the repository URL, select Clone , and pick a folder on your local machine to clone the files into. VS Code opens the folder once the repository is cloned on your local machine.

Initialize a repository in a local folder
To initialize a new local Git repository:
Pick an existing or new folder on your computer and open it in VS Code.
In the Source Control view, select the Initialize Repository button.
This creates a new Git repository in the current folder, allowing you to start tracking code changes.
This action is equivalent to running git init on the command-line.

Publish local repository to GitHub
You can also initialize and local repository and publish it directly to GitHub. This creates a new repository on your GitHub account, and pushes your local code changes to the remote repository. Having your source code on a remote repository is a great way to back up your code, collaborate with others, and automate your workflow with GitHub Actions .
Use the Publish to GitHub command button in the Source Control view. You can then choose a name and description for the repository, and whether to make it public or private.

Once the repository has been created, VS Code pushes your local code to the remote repository. Your code is now backed up on GitHub, and you can start collaborating with others with commits and pull requests.
Open a GitHub repository in a codespace
GitHub Codespaces lets you open a GitHub repository in a fully configured cloud-based development environment, enabling you to develop in a browser without having to install any software on your local computer. GitHub Codespaces allows free usage for individuals, which makes it easy to get started working on open source projects.
To create a codespace for your GitHub repository:
Install the GitHub Codespaces extension in VS Code and sign in with your GitHub account.
Run the Codespaces: Create New Codespace command.
Select the repository and branch you want to open.
VS Code opens a new window, which is connected to the codespace. The source code, terminal, and running and debugging are hosted in the remote cloud-based development environment.
Notice that the File Explorer and Status Bar indicate that the workspace is opened in a codespace.

Alternatively, you can also start from a codespace template on the GitHub Codespaces website .
If you already have a codespace open in your browser, run the Codespaces: Open in VS Code Desktop command in the browser to connect to the codespace from your local VS Code Desktop.
You can learn more about GitHub Codespaces, including customization such as forwarding ports, in the Developing in a codespace documentation.
Open a GitHub repository remotely
VS Code's remote repository support allows you to browse and edit a GitHub repository without cloning it to your local computer. This is useful for quickly making changes to a remote repository without having to clone the entire codebase to your machine.
First install the GitHub Repositories extension.
Run the command Remote Repositories: Open Remote Repository... or use the Open Remote Repository button the Explorer view.
Search and select the GitHub repository that you want to open.

Tip: If you need to execute code or run terminal commands, you can seamlessly switch from a remote repository to a codespace with the command Continue Working on .
Staging and committing code changes
Once you have a Git repository set up, you can start tracking code changes by staging and committing your newly created and edited code.
Tip : Commit your changes early and often. This makes it easier to revert back to previous versions of your code if needed.
You can access the Source Control view from the Activity Bar to list all changed files in your workspace. You can toggle between a tree view or list view by using the tree/list icon in the Source Control view header.

When you select a file in the Source Control view, the editor shows a diff view that highlights the file changes, compared to the previously committed file.

To stage a file, select the + (plus) icon next to the file in the Source Control view. This adds the file to the Staged Changes section, indicating that it will be included in the next commit.

You can also stage all pending changes at once by selecting the + (plus) icon next to Changes in the Source Control view.
Staged changes can also be discarded by selecting the − (minus) icon next to the file. Similarly, you can discard all staged changes by selecting the − (minus) icon next to Staged Changes in the Source Control view.

To commit your staged changes, type a commit message in the upper text box, and then select the Commit button. This saves your changes to the local Git repository, allowing you to revert to previous versions of your code if needed.
Tip : If you have a GitHub Copilot subscription, and installed the Github Copilot extension, you can use the sparkle icon to generate a commit message .
You can navigate through and review all local file changes and commits in the Timeline view available in the bottom of the Explorer view.

Pushing and pulling remote changes
Once you have made commits to your local Git repository, you can push them to the remote repository. The Sync Changes button indicates how many commits are going to be pushed and pulled. Selecting the Sync Changes button downloads (pull) any new remote commits and uploads (push) new local commits to the remote repository.

Tip: You can enable the Git: Autofetch setting to always get an up-to-date remote commit indicator.
Push and pull can also be performed individually by using their respective commands. You can access these commands from the Source Control menu.

Using branches
In Git, branches allow you to work on multiple versions of your codebase simultaneously. This is useful for experimenting with new features or making large code changes without affecting the main codebase.
The branch indicator in the Status bar shows the current branch and lets you switch to new and existing branches.

To create a new branch, select the branch indicator and choose to create it from the current branch or another local one. Type a name for the new branch, and confirm. VS Code creates a new branch and switches to it, allowing you to make changes to your code without affecting the main branch.

Tip: If you use the GitHub Pull Requests and Issues extension, you can create a branch directly from an issue, which gets you started working in a new local branch and automatically prefills the pull request for you.
After you create a local branch, you can push the branch to the remote repository by selecting Publish Branch in the Source Control view. This creates a new branch on the remote repository, allowing you to collaborate with others in that branch.
Creating and reviewing GitHub pull requests
In Git and GitHub, pull requests (PRs) are a way for collaborators to review and merge code changes from separate branches into the main branch. This enables teams to review and approve code changes before they are incorporated into the main codebase, ensuring that only high-quality changes are merged.
To use pull requests in VS Code, you need to install the GitHub Pull Requests and Issues extension. This extension adds PR and issue tracking functionality to VS Code, allowing you to create, review, and merge PRs from within the editor.
To create a PR, make sure you are on a separate branch from the main branch, and push your code changes to the remote repository. In the Source Control view, select the Create Pull Request button. This opens the PR creation form, where you can enter a title and description for the PR, and choose which branch to merge the changes into. Select Create to create the PR.

To review a PR, select the Review Pull Request button in the Source Control view, and select the PR you want to review. This opens the PR in a new editor window, where you can review the code changes and leave comments. Once you are satisfied with the code changes, you can select the Merge button to merge the PR into the targeted branch.
Learn more about pull requests in VS Code's GitHub documentation .
Using Git in the built-in terminal
As all Git state is kept in the local repository, you can easily switch between VS Code's UI, the built-in terminal , or external tools like GitHub Desktop . You can also set up VS Code as your default Git editor , allowing you to use VS Code to edit commit messages and other Git-related files.
Git Bash on Windows
Git Bash is a popular shell environment for Windows that provides a Unix-like command-line interface for working with Git and other command-line tools. Visual Studio Code's integrated terminal supports Git Bash as a shell, allowing you to seamlessly integrate Git Bash into your development workflow. Installing Git on your Windows machine also installs Git Bash, if it wasn't deselected during the installation steps.

Start by opening View > Terminal ( ⌃` (Windows, Linux Ctrl+` ) ). Select the dropdown arrow next to the + icon in the terminal panel to pick a new shell to open. If Git Bash is installed, it's shown in the list of terminals and shells. You can toggle between different terminals and shells in the Terminal sidebar. With Git Bash configured in Visual Studio Code, you can now use all of your favorite Git commands directly from the terminal in your code editor.
If you want to set Git Bash as your default shell, open the Terminal dropdown (next to the + icon) and select Select Default Profile . This opens a list of available shells, including Git Bash. Selecting Git Bash sets it as your default shell, and all future terminals will be opened with Git Bash. More advanced terminal tips are available in the terminal documentation .
COMMENTS
Make a slide show that starts automatically when opened. Select File > Save as (or Save a Copy ). Click More options. Browse to the folder where you want to save your presentation. In the File name box, type a name for your presentation. Under Save as type, select PowerPoint Show. The file is saved as a .ppsx file.
From Microsoft's list of command line switches, you can use the /S switch to start a presentation: C:\path\to\POWERPNT.exe" /S "Presentation.pptx". To get the slideshow to start on boot-up create a shortcut to the path given above and put it in the Startup folder in the Start menu. Share. Improve this answer.
Start a presentation from the beginning. F5. Start a presentation from the current slide. Shift+F5. Start the presentation in Presenter View. Alt+F5. Perform the next animation or advance to the next slide. N. Enter. Page down. Right arrow key. Down arrow key. Spacebar. Perform the previous animation or return to the previous slide. P. Page up ...
How your presentation runs (full screen, window or in kiosk mode). Your default pen and laser pointer color options (see our laser pointer article here). Which slide you want start from, or which slides you want to show. You can also setup a custom show here. How your slides progress (manually or using slide timings).
Start the presentation in Presenter View using a function key. Press Alt + F5. 4. Start a presentation from the beginning using key tips. Press Alt > S > B (press Alt, then S, then B). 5. Start a presentation from the current slide using key tips. Press Alt > S > C (Alt, then S, then C).
First, open a Command Prompt window. You can do this by typing "cmd" in the Windows Search bar (located on the taskbar next to the Windows icon). Press Enter or click the "Command Prompt" application in the search results. When you first open the Command Prompt, you'll start in your user account folder.
2) Use "Shift + F5" to start from the current slide. If you want to start from a specific slide, press "Shift+F5". Let's say you made a pause in your presentation to review some slides and want to pick up where you left off. Just select the last slide you were at and use this shortcut.
Start a Slideshow in PowerPoint's Web App. To play a slideshow on the web, launch your preferred web browser and access PowerPoint on the web. Then, open your presentation. From PowerPoint's ribbon at the top, select the "Slide Show" tab. In the "Slide Show" tab, start your slideshow from the first slide by clicking the "From Beginning" option.
Open a presentation. ⌘+O. Close a presentation. ⌘+W. Print a presentation. ⌘+P. Save a presentation with a different name, location, or file format. ⌘+Shift+S. Cancel a command, such as Save As. Esc. Move through multiple open presentations. ⌘+Tilde sign (~) Open a recent file. ⌘+Shift+O
To start a presentation from the current slide: in PowerPoint 2003 or later, press Shift+F5; in PowerPoint X/Macintosh, press Control+Shift+B; To start a presentation from the beginning: in PowerPoint for Windows, press F5; in PowerPoint X/Mac, press Control+Shift+S
Start and End a Slide Show. Click the Slide Show tab on the ribbon. Select From Beginning or From Current Slide. You can also press F5 on your keyboard or click the Slide Show button in the status bar to start the presentation. To exit the presentation and return to normal view, click the Options button. Select End Show.
Open the Screen Tools. Select the Pen and Laser Pointer icon in the toolbar and choose the tool. Right-click, move to Pointer Options, and pick the tool. Use the tool keyboard shortcuts: Laser pointer: Ctrl + L. Pen: Ctrl + P. Arrow: Ctrl + A. Eraser: Ctrl + E.
Click Open. Your wizard now lists POWERPNT as the task name. Since you want to play a particular presentation, change the name to something more meaningful and choose the One Time Only option, unless you want to run the presentation every day, week, or month. Click Next. On the next screen, enter the start time and date.
Click the Start From Beginning command on the Quick Access Toolbar, or press the F5 key at the top of your keyboard. The presentation will appear in full-screen mode. ... From here, you can start the presentation from the current slide and access advanced presentation options. To advance and reverse slides:
By using the "powerpnt" command, you're telling your computer to wake up PowerPoint and get it ready for action. Step 4: Enjoy Your Presentation. Your PowerPoint presentation should now open directly, ready for you to impress your audience. Bask in the glory of your newfound command line skills and enjoy the smooth start to your ...
Command. Keyboard Shortcut. Start Slideshow from Current Slide. F5. Start Slideshow from First Slide. Alt + F5. For more shortcuts try PowerPoint ShrotcutTools.>All PowerPoint Keyboard Shortcuts...All Shortcuts... PowerPoint ShortcutTools www.shortcuttools.comPowerPoint ShortcutTools is an add-in to control PowerPoint with keyboard shortcuts ...
How to Get to PowerPoint's folder in CMD. Open a File Explorer window and type "powerpnt.exe" in the Search menu in the top of the window. After a few moments, File Explorer will show you the file ...
1. Open the Windows Mobility Center (mblctr.exe). 2. Click/tap on the available Turn on or Turn off button for Presentation Settings. (see screenshots below) 3. When finished, you can close the Windows Mobility Center if you like. OPTION TWO.
You can show your presentation to an audience with PowerPoint Mobile. Start presenting. On the Slide Show tab, in the Start Slide Show group, select From Beginning or From Current Slide.. Presenter View. If you have a two-screen setup in which you are projecting from your device to a large screen, you can see Presenter View visible on your device while your audience sees the slide show on the ...
1 Make a provocative statement. "I want to discuss with you this afternoonwhy you're going to fail to have a great career." One surefire way to get your audience's attention is to make a provocative statement that creates interest and a keen desire to know more about what you have to say. The presentation above, for example, does just that by ...
Although these are very different methods of injecting humor at the start of a presentation, they show how infusing humor can be a powerful tool for adding a touch of personality and creating a more enjoyable presentation for the audience. ... you'll become a master at delivering impactful presentations that command attention and leave a ...
Right click the Start button. Instead of the context menu of the taskbar, Windows 10 shows Win + X menu. Or, press Win + X shortcut keys on the keyboard. Click on the Mobility Center item. Under Presentation Settings click on the Turn on button to enable it. Presentation Mode is now enabled. You can customize its settings by using the tray icon.
Tasks in VS Code can be configured to run scripts and start processes so that many of these existing tools can be used from within VS Code without having to enter a command line or write new code. ... Tasks that belong to the test group can be executed by running Run Test Task from the Command Palette. presentation: Defines how the task output ...
Select a profile. You can launch VS Code with a specific profile via the --profile command-line interface option. You pass the name of the profile after the --profile argument and open a folder or a workspace using that profile. The command line below opens the web-sample folder with the "Web Development" profile:. code ~/projects/web-sample --profile "Web Development"
The usual way to run a Node.js program is to run the globally available node command (once you install Node.js) and pass the name of the file you want to execute. If your main Node.js application file is app.js, you can call it by typing: node app.js. Bash Copy to clipboard. Above, you are explicitly telling the shell to run your script with node.
Under Drawing Tools, choose Format. Do one of the following: To change the color of your text, choose Text Fill, and then choose a color. To change the outline color of your text, choose Text Outline, and then choose a color. To apply a shadow, reflection, glow, bevel, 3-D rotation, a transform, choose Text Effects, and then choose the effect ...
AI Assistant add-on available starting at . Early access pricing extended to September 4, 2024. Buy now. Available on desktop, web, and mobile. View, print, share, and comment. Edit text and images, export, secure, and organize documents. Collect legally binding. e-signatures and track responses.
The 25-year-old battled command issues throughout Saturday's 7-0 A's loss to the Blue Jays at the Coliseum, as he allowed six runs on five hits and five walks with one strikeout in 4 2/3 innings. "It's part of the development," said A's manager Mark Kotsay. "These young pitchers can come out and throw a game like he did in Atlanta ...
Pick an existing or new folder on your computer and open it in VS Code. In the Source Control view, select the Initialize Repository button. This creates a new Git repository in the current folder, allowing you to start tracking code changes. This action is equivalent to running git init on the command-line.