

How to Crop an Image into a Circle in Google Slides

Crop a Picture into a Circle in Google Slides Using Crop to Shape
by Avantix Learning Team | Updated August 1, 2021
Applies to: Google Slides ® (Windows or Mac)
You can achieve some interesting effects by cropping an image into a shape in Google Slides. However, if you want to crop an image into a circle, you'll need to use a few tricks.
To crop an image into a circle, you'll need to:
- Crop the image to a square
- Change the square to a circle
- Adjust if necessary
You can also adjust an oval into a circle as an alternative method.
Recommended article: How to Crop a Picture in PowerPoint (4 Ways)
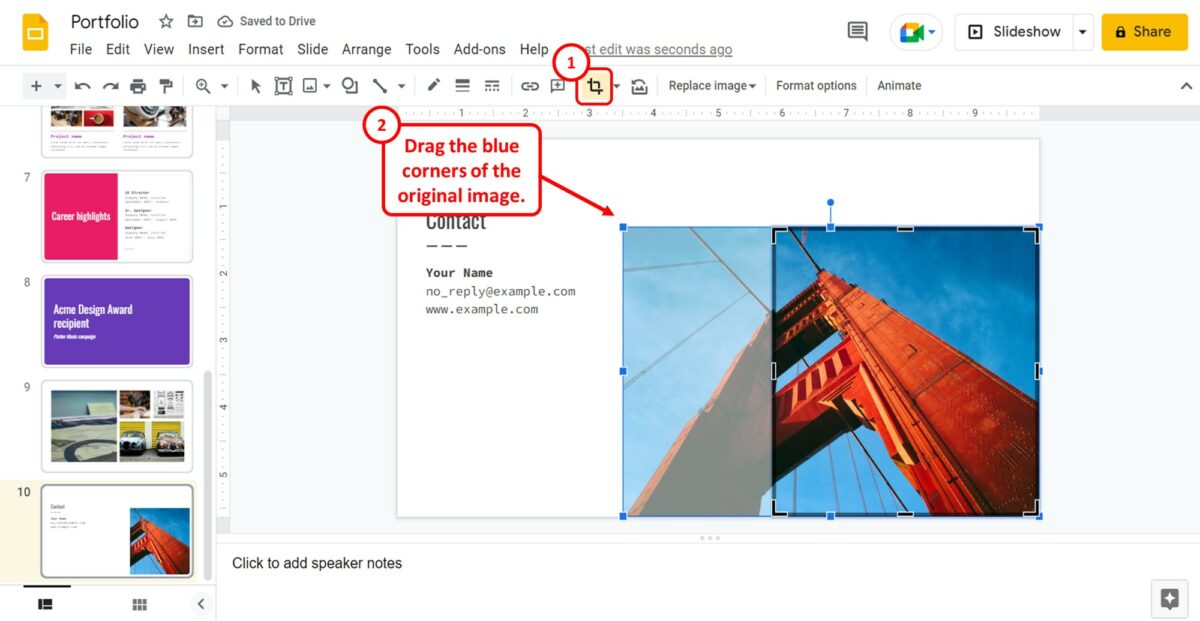
When you crop an image, the image will appear in crop mode with two sets of handles (black crop handles and square blue sizing handles):

Step 1: Crop an image to a square
There are 4 ways to crop an image in Google Slides:
- Using the menu
- Using the Crop command on the Toolbar
- By right-clicking
- By double-clicking
To crop an image into a square in Google Slides using the menu:
- Select the image on the slide.
- Click Format in the menu, select Image and then Crop Image. The image appears in crop mode.
- Drag the black cropping handles to create a perfect square (it's usually best to use a corner cropping handle).
- Drag the square blue sizing handles to resize the image within the cropped area (it's usually best to use a corner sizing handle).
- Drag the image within the cropped area to the desired location.
- Click outside the image to exit crop mode.
The following menu appears with you select Format > Image > Crop Image:

To crop an image into a square in Google Slides using the Crop command on the Toolbar:
- Click Crop on the Toolbar. The image appears in crop mode.
The Crop command appears in the Toolbar when an image is selected:
To crop an image into a square in Google Slides by right-clicking:
- Right-click the image on the slide. A drop-down menu appears.
- Click Crop Image. The image appears in crop mode.
The following menu appears when you right-click an image:

To crop an image into a square in Google Slides by double-clicking:
- Double-click the image on the slide. The image appears in crop mode.
Step 2: Crop the image into a circle
The next step is to crop the image into a circle.
To crop an image into a circle in Google Slides using the Crop command on the Toolbar:
- Click the arrow beside Crop in the Toolbar. A drop-down menu appears.
- Select Shapes and then click the oval shape in the Shapes Gallery.
- If the cropped area does not appear to be a perfect circle, double-click the image and drag the crop handles until it appears as a circle.
You can create some really interesting effects in your presentation when you try cropping to a shape.
Subscribe to get more articles like this one
Did you find this article helpful? If you would like to receive new articles, join our email list.
More resources
How to Add Audio in Google Slides
How to Change Margins in Google Docs (2 Ways)
How to Do a Hanging Indent in Google Docs (3 Ways)
How to Superscript in Google Docs (Mac or Windows)
How to Strikethrough or Cross Out Text in Google Docs (with Shortcuts)
Related courses
Microsoft PowerPoint: Intermediate / Advanced
Microsoft PowerPoint: Design for Non-Designers
Microsoft PowerPoint: Accessible PowerPoint Presentations
Microsoft PowerPoint: Animations Bootcamp
VIEW MORE COURSES >
Our instructor-led courses are delivered in virtual classroom format or at our downtown Toronto location at 18 King Street East, Suite 1400, Toronto, Ontario, Canada (some in-person classroom courses may also be delivered at an alternate downtown Toronto location). Contact us at [email protected] if you'd like to arrange custom instructor-led virtual classroom or onsite training on a date that's convenient for you.
Copyright 2024 Avantix ® Learning
You may also like

How to Insert or Type A with an Accent Mark in Google Docs (À, Á, Â, Ä, à, á, â, or ä) – 6 Ways
You can insert or type a with an accent mark in Google Docs in several ways. You can use built-in tools, online tools, add-ons or keyboard shortcuts (including Alt code shortcuts). The letter a can be inserted with an accent in both upper or lower case. The following are common accents in upper or lower case – À, Á, Â, Ä, à, á, â, or ä.

How to Insert or Type U with an Accent Mark in Google Docs (Ù, Ú, Û, Ü, ù, ú, û, or ü) – 6 Ways
You can insert or type u with an accent mark in Google Docs in several ways. You can use built-in tools, online tools, add-ons or keyboard shortcuts (including Alt code shortcuts). The letter u can be inserted with an accent in both upper or lower case. The following are common accents in upper or lower case – Ù, Ú, Û, Ü, ù, ú, û, or ü

How to Insert or Type O with an Accent Mark in Google Docs (Ò, Ó, Ô, Õ, Ö, ò, ó, ô, õ or ö) – 6 Ways
You can insert or type o with an accent mark in Google Docs in several ways. You can use built-in tools, online tools, add-ons or keyboard shortcuts (including Alt code shortcuts). The letter o can be inserted with an accent in both upper or lower case. The following are common accents in upper or lower case – Ò, Ó, Ô, Õ, Ö, ò, ó, ô, õ or ö.
MORE GOOGLE TOOLS ARTICLES >
Google, the Google logo and related Google Drive applications and logos are registered trademarks of Google LLC in Canada, US and other countries.
Microsoft, the Microsoft logo, Microsoft Office and related Microsoft applications and logos are registered trademarks of Microsoft Corporation in Canada, US and other countries. All other trademarks are the property of the registered owners.
Avantix Learning |18 King Street East, Suite 1400, Toronto, Ontario, Canada M5C 1C4 | Contact us at [email protected]
Our Courses
Avantix Learning courses are offered online in virtual classroom format or as in-person classroom training. Our hands-on, instructor-led courses are available both as public scheduled courses or on demand as a custom training solution.
All Avantix Learning courses include a comprehensive course manual including tips, tricks and shortcuts as well as sample and exercise files.
VIEW COURSES >
Contact us at [email protected] for more information about any of our courses or to arrange custom training.
Privacy Overview
Pin it on pinterest.
- Print Friendly
How To Make a Picture a Circle in Google Slides [Easy Guide]
- Last updated July 3, 2023
Tired of the usual rectangular or square-shaped images in your presentations? Why not learn how to make a picture a circle in Google Slides instead?
To crop an image into a circle, simply select the image you wish to work with and click the “ mask image ” icon (in a downward arrow) next to the “ crop ” icon. Choose the oval shape from the drop-down menu, adjust it, and press “ Enter .”

Table of Contents
Easy Ways to Make a Picture a Circle in Google S lides
Making a “circle crop image” can add a visually appealing touch to your presentation and enhance its overall design. Here’s how to do it:
- Open your Google Slides presentation and navigate to the slide where you want to insert the picture.
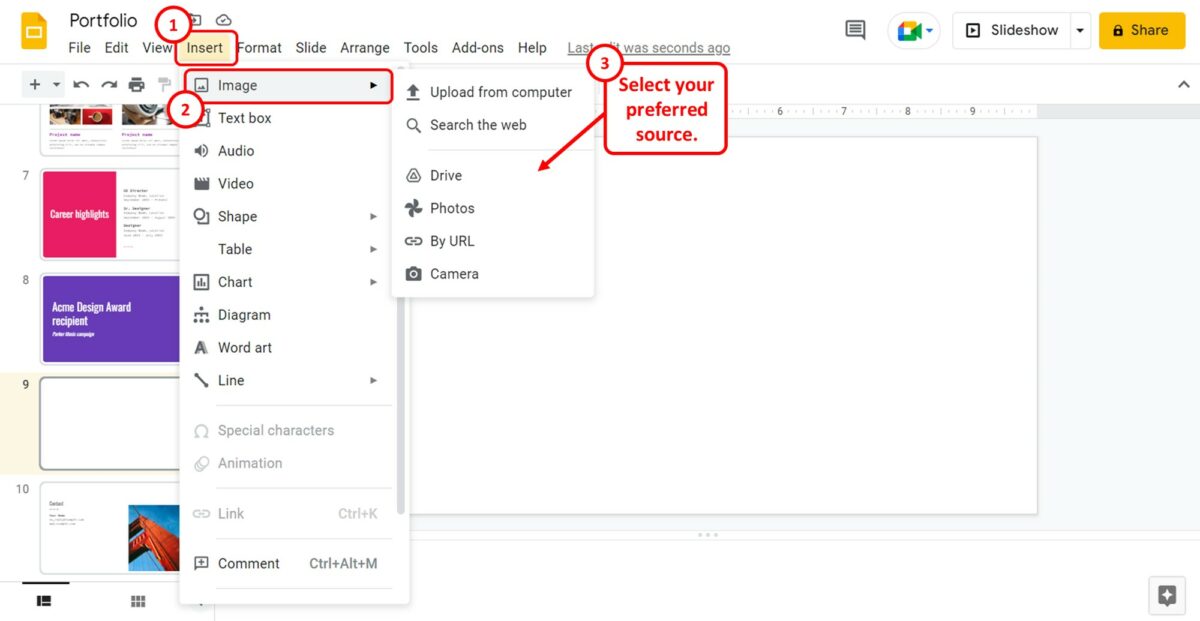
- Select “Insert” > “Image” from the drop-down menu.
- Choose an image source from your computer, the web, your Google Drive, or your Google Photos account.

- Once inserted, click on the file. You should see a blue border around the image, indicating it’s selected.

- Select “Format” > “Image” > “Crop Image” from the drop-down menu. You can also click the “ Crop ” icon on the top toolbar.

- Alternatively, just double-click on the photo to display the cropping grips.
- Crop the image to a 1:1 ratio by adjusting the grips on the sides.

- Click outside the image to save your crop changes.
- Click the drop-down arrow (i.e., the “Mask image” option) beside the crop icon in the toolbar.
- From the “ Shapes ” menu, select the oval shape. When you click on it, your image will instantly transform into a perfect circle.

- Once you’re satisfied with the positioning, press “ Enter” to finalize the circular crop.

That’s it! You’ve successfully cropped an image into a circle. Repeat these steps for any other images you want to reshape in your presentation.
How To Download a Cropped Image in Google Slides
Now that you know how to make an image circular in Google Slides, it’s time to discuss saving cropped images for future use. Unfortunately, Google Slides doesn’t offer a direct way to download images — you have to take an alternative approach.
There are three easy ways to download cropped images in Google Slides. Choose the one that suits your needs and preferred workflow.
Related : How To Download an Image From Google Docs (3 Easy Ways)
Method 1: Downloading Individual Slides as an Image
Google Slides allows you to download the current slide in order to view your presentation offline. You can download it as either a JPEG or PNG file. This will download whatever content is available on that slide, including the image.
Here’s how you can download the current slide:
- Click on the “ File ” menu.
- In the submenu, click on “ Download .”
- You can choose to download the current slide as a JPEG or PNG file.

Tips to Keep in Mind
- Download your image as a JPEG file if you intend to use it on the web. JPEG files are lighter but also loss. This means they may gradually degrade in quality if you frequently modify or edit them.
- PNG files are lossless and support transparency, making them ideal for frequent modification (e.g., creating a logo). However, PNG files are larger in size and require more storage space.
Method 2: Save to Keep
Google Keep is a versatile note-keeping tool (similar to Microsoft OneNote) that also offers a mobile version. You can add images, create handwritten notes, and make to-do lists. In Google Slides, this feature is directly accessed by right-clicking on an image.
Note: This method is applicable only to normal and cropped images. It will not work for the circle crop image.
To save an image in Google Keep and download it to your computer:
- Select your image and right-click on it.
- Scroll down the context menu until you find “ Save to Keep .”

- The Google Keep panel will appear on the right side (as shown in the screenshot below).
- Right-click on the image within the Google Keep panel and choose “ Save Image as .”

- Save the image to your preferred location on your computer (e.g., desktop) and click “ Save .” This will save the image as a PNG file.

Method 3: Take a Screenshot

What you see above is a screenshot of a screenshot, also known as a “screenshot caption”!
A screenshot is the simplest way to save an image on your computer. To start, simply follow the steps below:
- Crop the image to the desired shape or size within Google Slides.
- For Windows, you can use the “ Print Screen ” button or press Win + Shift + S to capture a specific area.
- On Mac, use Command + Shift + 4 .
- Open an image editing software or any program that allows image insertion (e.g., Microsoft Paint, Microsoft Word, email compose window).
- Paste the screenshot into the program.
- Crop or adjust the image if needed.
- Save the image using the image editing software’s “ Save ” or “ Export ” function.
To ensure the best quality and compatibility, we recommend selecting either JPEG or PNG formats. Refer to the screenshot below for reference:

Final Thought s
Knowing how to make a picture a circle in Google Slides is just one way to make your presentation more remarkable. The next time you step up to present, unleash your creative skills and deliver the most memorable presentation your audience has ever witnessed.
Looking for spreadsheet templates to kickstart your work? Our premium templates are 50% OFF with the code “SSP.”
Get Premium Templates
- How to Convert Google Slides to PowerPoint: 3 Easy Methods
- Learn How to Draw on Google Slides in 2 Minutes (Too Easy)
- How To Use Google Slides Speaker Notes [Easy Guide]
- How To Group in Google Slides [Step-by-Step Guide]
- How To Save an Image from Google Slides [4 Easy Ways]
- How To Insert Google Slides Icons [4 Simple Methods]
Most Popular Posts

How To Highlight Duplicates in Google Sheets

How to Make Multiple Selection in Drop-down Lists in Google Sheets

Google Sheets Currency Conversion: The Easy Method
A 2024 guide to google sheets date picker, related posts.
- Sumit Bansal
- May 16, 2024
- May 2, 2024
How to Insert a Google Sheets Hyperlink in 5 Seconds
- Chris Daniel
- April 15, 2024
How to Import Stock Prices into Google Sheets
- April 2, 2024
Thanks for visiting! We’re happy to answer your spreadsheet questions. We specialize in formulas for Google Sheets, our own spreadsheet templates, and time-saving Excel tips.
Note that we’re supported by our audience. When you purchase through links on our site, we may earn commission at no extra cost to you.
Like what we do? Share this article!
- PC & Mobile
- Google Slides
How To Make an Image Round in Google Slides
Lee Stanton Lee Stanton is a versatile writer with a concentration on the software landscape, covering both mobile and desktop applications as well as online technologies. Read more September 27, 2023
Google Slides allows you to create fun and exciting presentations for school projects, business meetings, social events, and more. Furthermore, Slides are connected to other Google apps to make linking all aspects of projects even more seamless. And with customization options like the ability to change the shape of an image, you can take your projects to another level.
For instance, you can change the shape of an image frame to a circle or an oval shape. This can highlight the content and make it appear more noticeable
Read on to learn how to make your image round in Google Slides.
How to Crop Image Into Circle Shape
If you need the images you plan to use to have a circle shape for your presentation, there isn’t a straightforward way to choose this shape. Instead, you have to crop the image into a square, adjust the size and then choose an oval frame.
First, upload the image you want to shape. This is how you can do that:

The options for adding the image are to upload from a computer, search for the image on the web, insert one from Google Drive, Google Photos, by URL, or from a camera.
Now that you’ve added the image to your slide on this Google app, you have a couple of ways to access the cropping feature:
- You can use the “Format” option in the menu in the top right corner of the screen.
- Click on the crop icon in the toolbar.
- Right-click on the image you want to crop to access the menu.
- Double-click on the image and automatically enter the cropping feature.
Follow the steps below to begin cropping the picture into a round shape:

- Click anywhere outside of the image.

After Step 7, you have the option to choose many different shapes and features. The available options are Shapes, Arrows, Callouts, and Equations. You can use all these to adjust and customize your images and parts for your presentation.
Furthermore, if you’ve set the image to the desired ratio when you click on the oval shape, the picture will have a perfect round shape.
Saving Cropped Round Image
If you like how the image is shaped and you want to use it for something besides the slideshow on Google Slides, you can save the image. There are a few ways to save your photo: on your PC or by taking a screenshot. You can also save the cropped image on Google Keep, but you can’t do it if it is round-shaped.
The most straightforward way to save your cropped photo from Google Slides is by downloading it to your computer. This is how you can do that:

If you want to take a screenshot of your cropped round image, follow the steps below:

Cropping Images for Presentations Using Slideshow Maker Apps
If you feel like Google Slides aren’t fulfilling your editorial needs, and you need more shapes and options to customize your presentation, try using free online slideshow makers or apps for your PC such as iMovie, Movavi Slideshow Maker, DaVinci Resolve 18, FlexClip, Vimeo Slideshow Maker and more.
For example, follow the steps below to see how to make a circle image with FlexClip :

You don’t have to perform any additional actions to fit the image into your desired shape. As you drag it toward the circle shape, the image automatically fills the space.
Furthermore, with these apps, you can do more than just shape the pictures; you can add animations, effects, overlays, filters, and more.
Can I add audio to Google Slides?
Yes, apart from adding and cropping pictures, you can also add audio for your presentations. All you need to do is open the presentation where you want to add the audio and navigate to the “Insert” option at the top of your screen. Then you have to find the “Audio” option and tap on “My Drive” to insert your desired audio. You can add audio to one slide or all of them.
What features can I use on Google Slides?
There are various features Google Slides allows you to use. You can create a master slide, use templates for presentations, insert audio and audio playbacks, create a theme for your presentation, share it, add YouTube videos, regular videos, and more.
Create Unique Slide Shows
Cropping images for your slide shows are just the basic features Google Slides contains. Besides round shapes, you can crop your pictures to various shapes, not only geometric, and make various adjustments. And if you can’t find enough customizing options on Google Slides, try using slideshow maker software online or download it for Windows or Mac.
Which image shapes do you most frequently use for highlighting content in your Google Slides presentations? Let us know in the comments section below.
Related Posts
Disclaimer: Some pages on this site may include an affiliate link. This does not effect our editorial in any way.

Lee Stanton September 29, 2023
Lee Stanton September 14, 2023
Send To Someone
Missing device.
Please enable JavaScript to submit this form.
How To Make A Picture A Circle In Google Slides

Visual elements play a crucial role in enhancing presentations, capturing attention, and conveying information effectively. One artistic technique that can significantly elevate the impact of your presentations is the use of circular images. By incorporating circular pictures, you can infuse your slides with a touch of elegance, creativity, and harmony.
Whether you want to highlight specific details, create stunning visual effects, or simply break away from the traditional square or rectangular shape, mastering the art of making a picture a circle in Google Slides is a valuable skill to acquire.
In this blog post, we will walk you through a step-by-step guide on how to transform your images into captivating circles within the Google Slides platform.
Cropping a Picture into a Circle in Google Slides
Cropping a picture into a circle in Google Slides involves a few easy-to-follow steps that will significantly enhance your presentation. Here’s a step-by-step guide to help you achieve this transformation with ease:
1. Begin by inserting the desired image into your slide. You can do this by clicking on “ Insert ” in the toolbar, followed by “ Image “, and selecting the source of your image.

2. Once the image is added, resize your image to the correct size. Now click “Mask Image’ > ‘Shape’ > ‘Circle’.

3. Now, adjust the circular mask by dragging the handles to resize and reposition the circle, ensuring the desired portion of your image is visible.

6. You can also further customize the appearance of your image by adding borders, adjusting the color, etc.

By following these simple instructions, you can easily convert any picture into a circle in Google Slides, adding a touch of style and personalization to your presentation.
Creating circle-shaped images in Google Slides is an effective way to add visual interest and style to your presentation. By following a step-by-step guide to crop your picture into a circle and making use of additional customizations such as borders, you can transform ordinary images into engaging visuals. So, go ahead and try this out on your next presentation!
Related Posts:

How To Make an Image Round in Google Slides

Making images round in Google Slides is a great way to add visual interest to your presentations. Rounded images stand out from standard square or rectangular images.
Rounding the corners of images also makes them look more polished and professional. It’s a simple design tweak that can elevate the overall aesthetic of your slides.
In this step-by-step guide, I’ll show you three easy methods for making an image round in Google Slides, using built-in formatting options.
Method 1: Use the “Crop” Tool
The quickest way to make an image round is by using the “Crop” tool. Here’s how:
- Insert the image you want to edit onto your slide.
- Select the image to pull up the formatting options.
- Click on the “Crop” icon (it looks like a triangle with a dot in the middle).
- Choose “Circle” from the crop options.
- Use the handles to adjust the size and position of the circular crop.
- Click outside the image when you’re done to see the rounded result.
The benefit of using the Crop tool is it only takes a few seconds. The downside is you lose parts of the image that get cropped out.
Method 2: Add a Circular Picture Border
If you don’t want to lose any of the image, add a circular picture border instead:
- Insert the image and pull up the formatting options.
- Click “Picture border” > “Picture styles”.
- Choose the style called “Circular”.
- Adjust the thickness and color of the border if needed.
Adding a circular picture border keeps the entire image intact. The border blends seamlessly with the image, so it appears rounded on all sides.
Method 3: Use a Shape as a Photo Frame
For more customization options, use a shape from the Shapes menu as a photo frame:
- Insert your image on the slide.
- Select the oval or circle shape from the Shapes menu.
- Size and position the shape so it frames the image.
- Right click the shape and choose “Order > Send backward” so the image is on top.
- Then adjust the shape’s fill color/transparency so that only the outline shows.
The benefit of using a shape as a frame is you can customize the thickness, color, and style of the outline. Plus, you won’t lose any of the image like the Crop tool.
Tips for Rounding Images
- Pay attention to proportions when sizing circular images. Images that are too wide or tall may appear distorted when made round.
- Be consistent with round images throughout your presentation. Don’t mix both rounded and square image shapes.
- Don’t overdo it. Use rounded images sparingly for emphasis. Too many circles can make slides look cluttered.
- Try rounding only some corners for a unique effect. Use the Crop tool and choose the “Rounded rectangle” option.
Making images round in Google Slides only takes a few clicks. Experiment with the methods in this guide to create visually appealing slides. Let me know in the comments if you have any other tips for formatting images!
About The Author
Vegaslide staff, related posts.

How to Convert Google Slides to PowerPoint for Free

How to Create a Google Slides Template

How to Add a Header or Footer in Google Slides

How to Zoom In & Zoom Out in Google Slides

How to Change the Shape of an Image in Google Slides: A Step-by-Step Guide
Changing the shape of an image in Google Slides is a nifty trick that can add some pizzazz to your presentations. Whether you want to turn a square photo into a circle or give your images a more unique look, this process is a breeze. Just follow these simple steps and you’ll be on your way to a more visually appealing slideshow in no time.
Step by Step Tutorial: Changing the Shape of an Image in Google Slides
Before we dive into the steps, let’s understand what we’re aiming for. Google Slides offers a variety of predefined shapes that you can use to alter the appearance of your images. By the end of these steps, your image will take on a whole new form that better suits your presentation’s aesthetic.
Step 1: Open Your Google Slides Presentation
Open the Google Slides presentation that contains the image you want to change.
When you’re in, make sure you’re on the slide with the image you want to edit. It’s important to note that these steps work with images you’ve already inserted into your presentation.
Step 2: Select the Image
Click on the image that you want to change the shape of.
Once you click on the image, you’ll notice a blue border appear around it. This indicates that the image is selected and you’re ready to move on to the next step.
Step 3: Click on the Crop Image Button
Find and click on the “Crop image” button in the toolbar.
This button looks like a square with two overlapping right angles and is usually located at the top of your screen in the toolbar. If you hover over it, it’ll say “Crop image.”
Step 4: Choose a Mask Shape
Select “Mask image” from the drop-down menu, then choose the shape you want to use.
After clicking the crop button, you’ll see a variety of shapes to choose from. Take your pick from circles, stars, arrows, or even thought bubbles!
Step 5: Adjust the Image Within the Shape
Adjust the position and size of the image within the new shape by dragging the corners and edges.
You might find that your image doesn’t fit perfectly within the new shape. In this case, you can click and drag the corners of the image to resize it or move it around until it’s just right.
After completing these steps, your image will have transformed from its original rectangle or square shape into the shape you selected. It’s a simple yet effective way to spice up your slides and make them more engaging.
Tips for Changing the Shape of an Image in Google Slides
- If you’re using a shape that doesn’t fit your image perfectly, try resizing the image first before applying the mask.
- Play around with different shapes to see which one complements your image and slide design the best.
- Remember, you can always undo the shape change by clicking the “Reset image” button if you’re not happy with the result.
- Consider the overall theme of your presentation when choosing a shape. A more formal presentation might benefit from subtle changes, while a creative one can handle more whimsical shapes.
- Use high-quality images to ensure they don’t become pixelated when you resize or adjust them within the new shape.
Frequently Asked Questions
Can i use custom shapes to mask images in google slides.
No, Google Slides currently only allows you to use the predefined shapes available in the “Mask image” menu.
Will changing the shape of my image affect its quality?
If you use a high-quality image and don’t enlarge it too much within the shape, the quality should remain intact.
Can I apply the same shape to multiple images at once?
Unfortunately, you need to change the shape of each image individually in Google Slides.
Can I change the border of the new shape?
Yes, once you’ve applied a new shape to your image, you can change the border color, weight, and style in the image options menu.
What if I change my mind and want to revert to the original shape?
You can always click the “Reset image” button to go back to the original shape of your image.
- Open your Google Slides presentation.
- Select the image you want to change.
- Click on the “Crop image” button.
- Choose “Mask image” then select your desired shape.
- Adjust the image within the new shape.
Changing the shape of an image in Google Slides is a fantastic way to add visual interest and keep your audience engaged. It’s a simple feature that can make a big difference in the overall look and feel of your presentation. And the best part? It’s incredibly easy to do. Just a few clicks and you can completely transform an ordinary image into something that fits perfectly with the theme of your slides. So why not give it a try? Play around with different shapes and see how they change the dynamic of your presentation. With these steps and tips, you’ll be a Google Slides shape-shifting wizard in no time.

Matthew Burleigh has been writing tech tutorials since 2008. His writing has appeared on dozens of different websites and been read over 50 million times.
After receiving his Bachelor’s and Master’s degrees in Computer Science he spent several years working in IT management for small businesses. However, he now works full time writing content online and creating websites.
His main writing topics include iPhones, Microsoft Office, Google Apps, Android, and Photoshop, but he has also written about many other tech topics as well.
Read his full bio here.
Share this:
Join our free newsletter.
Featured guides and deals
You may opt out at any time. Read our Privacy Policy
Related posts:
- Can I Convert My Powerpoint to Google Slides?
- How to Change the Font on All Slides in Google Slides
- How to Insert Text Box in Google Docs
- How to Add a Border to a Picture in Google Slides
- How to Crop Image in PowerPoint 2019: A Step-by-Step Guide
- How to Insert a Circle in Google Slides
- How to Delete Multiple Slides in Google Slides
- How to Make a Shape on Microsoft Word 365: A Step-by-Step Guide
- How to Crop a Picture on Microsoft Word for Mac: A Step-by-Step Guide
- How to Save a Slide from Google Slides as a Picture
- How to Crop Many Pictures at Once in Photoshop
- How to Crop a Photo in iOS 7 on the iPhone
- How to Drag Slides From One PowerPoint to Another: A Step-by-Step Guide
- How to Do a Hanging Indent on Google Docs
- How to Crop a Picture on the iPhone 5
- How to Place Shapes in a Semi-Circle in PowerPoint: A Step-by-Step Guide
- How to Make All Columns the Same Width in Excel 2013
- How to Add Bullet Points in Google Slides
- How to Save Powerpoint as PDF with Notes
- How to Print 4 Slides Per Page in Google Slides
AppsThatDeliver
How-Tos, B2B Software Ratings & Reviews
Google Slides Round Corners

Are you interested in learning how to create rounded corners in Google Slides?
There are many shapes available in Google Slides, including the popular “Rounded Rectangle” shape.
You can use this tool to create shapes with rounded corners.
In this article, we will guide you through the steps to create rounded corners in Google Slides.
Also read: (opens in new tab) How to Lock an Image in Google Slides How to Insert SVG in Google Slides How to Blur an Image in Google Slides Google Slides Error Rendering Shape
Step 1: Drag and drop the image onto the slide

In this tutorial, we will show you how to make the corners of an image rounded.
If you want to insert a rounded rectangle or square, first go to Insert > Shape > Shapes > Rounded Rectangle.
Then, draw a rectangle or square and proceed to step 4 to adjust the corner radius of the shape.
To begin, open the slide where you want to insert the image.
Then, drag and drop the image onto that slide and proceed to the next step.
Step 2: Click on the image and select the “Mask image” tool

After inserting the image, simply click on it to select it.
Then, click the small down arrow located on the toolbar next to the “Crop image” tool (refer to the screenshot above).
Step 3: Go to Shapes and select “Rounded Rectangle”

After clicking on the “Mask image” tool, you’ll see a drop-down menu with four options: Shapes, Arrows, Call outs, and Equations.
Select “Shapes” then choose the “Rounded Rectangle” shape from the library.
Step 4: Adjust the corner radius by moving the yellow handle

The image will now have rounded corners.
If you feel that the corner radius is too big or too small, you can easily adjust it.
To do so, click on the “Yellow” handle located in the top left corner of the image.
While still holding the click, drag it to the right or left until you achieve the desired rounded corner.
Release the mouse click to apply the changes.
Yes, you can easily create rounded corners for an image in Google Slides by using the “Mask image” tool and selecting a “Rounded Rectangle” shape from the “Shapes” menu. After adjusting the corner radius, you can release the mouse click to apply the changes.
Yes, you can easily round corners in Google Slides. To do so, follow these simple steps:
- Go to Insert > Shape > Shapes.
- Select the Rounded Rectangle shape.
- Draw the shape on your slide.
- Adjust the size and position of the shape as needed.
To make a rounded rectangle in Google Slides, go to Insert > Shape > Shapes > Rounded Rectangle. Then, draw a rectangle or square and adjust the corner radius by moving the yellow handle.
Creating rounded corners in Google Slides is a quick and easy way to add a professional touch to your presentations.
To insert a rounded rectangle or square, go to Insert > Shape > Shapes > Rounded Rectangle.
Here’s how to make the corners of an image round in Google Slides:
- Drag and drop an image onto the slide
- Click on the image and select the “Mask image” tool
- Go to Shapes and select “Rounded Rectangle”
- Adjust the corner radius by moving the yellow handle
Author: Shubham Calmblay
Shubham Calmblay, founder of appsthatdeliver.com, has a decade of experience with various Google products. He has authored 1,000+ guides for ATD, published on prestigious tech blogs. His work has garnered recognition from Protocol.com, Leadsbridge.com, MadMobile.com, and numerous other leading publications and corporations.
All Posts by Shubham Calmblay
- Slidesgo School
- Google Slides Tutorials
How to Insert, Crop or Mask Images in Google Slides

In this new Slidesgo School tutorial, you’ll learn how to insert images or GIFs into your Google Slides presentations . You’ll also find out how to crop or mask pictures so that they better suit your needs. Are you ready to begin?
Adding an Image or GIF
Cropping images, masking images.
- Open your presentation in Google Slides.
- Select the slide where you want to add an image or GIF file.
- Click Insert → Image. You’ll see a list in which you can choose from where you want to add the image. You can even look for images directly in Google and add them to the presentation.
- To add an image from your computer, select Upload from computer. A new window will open, where you must locate the image. Once selected, click Open.
- If you want to add an image from Google Images, select Search the web. A new panel will open on the right side of the screen, where you can search for images. Once the image is selected, click Insert.
- You can also add images stored in your Google Drive account. To do so, choose Drive, select the image that you need and click Insert to add it to your presentation.
- There are other options:
- Photos. Get images from your Google Photos account.
- By URL. Enter the URL of any image found on the internet.
- Camera. Add a picture from a camera that is connected to your computer.
- Lastly, you can just drag the image from your computer directly to the slide. Once done, it will be inserted into your presentation.
- Select the image that you want to crop.
- Double-click the image or click the Crop button, located on the toolbar. Use the black handles to adjust the cropping. Once you’re done, press Enter or click the Crop button again. You can just click outside the image too.
- If you want to reset the image to its original state, right-click → Reset image, or just click the Reset image button, located on the toolbar.
- Select the image you want to mask.
- Click the drop-down arrow next to the Crop button.
- Select the shape that you want the mask to have. Once selected, the image will be masked according to this shape. You can further adjust it using the handles.
- If you want to reset the image to its original state, click the Reset image button or right-click → Reset image.
Do you find this article useful?
Related tutorials.

How to Make a Banner in PowerPoint
The uses that a banner has are almost endless: from ads to sections for websites, or even signatures for certain types of emails. The purpose is up to you, but the thing is: how to design one? If you think that you need expensive software to make banners, think again. Here at Slidesgo, we know a lot about presentations and, thus, about programs such as PowerPoint. The truth is that PowerPoint is all you need to create your own design! Keep reading to learn how!

How to Create a Banner in Google Slides
Banners have been around us (at least, when it comes to browsing the net or participating in forums, among other things) for a long time. Creating one is by no means a difficult task, and you can do it with free software such as Google Slides. The steps that you’ll need to follow are very simple, so we’re sure you’ll start creating banners one after another in a few minutes. Let’s see how to proceed!

Storyset by Freepik: Awesome illustrations for creative presentations
With inspiration and the adequate resources, a PowerPoint or Google Slides presentation can be the most creative slide deck your audience has ever been, regardless of topic. In this Slidesgo School article, we’re going to introduce Storyset, a new Freepik project where you’ll find illustrated concepts to visually reinforce the message you want to convey, turning your work into a memorable experience.

How to Add a Watermark in Google Slides
A watermark is a little identifying image used as a fixed element in digital creations such as photos, documents, videos or, in this case, presentations. It helps protect that creation and prevents plagiarism or uses without attribution. In this Slidesgo School tutorial, you’ll learn, step by step, how to insert a watermark into your presentation.
- Help Center
- Google Docs Editors
- Privacy Policy
- Terms of Service
- Submit feedback
How to Crop an Image in Google Slides? [An EASY Guide!]
By: Author Shrot Katewa
![How to Crop an Image in Google Slides? [An EASY Guide!]](https://artofpresentations.com/wp-content/uploads/2022/11/Featured-Image-5.jpg "google presentation round image")
As they say, an image is worth more than a thousand words. That’s why, most of us like to use less text and more images while creating a presentations. But not every image you choose needs to be presented as it is. Sometimes, you want to cut some part of that image just to make it more engaging and to the point. But, how exactly do you crop an image in Google Slides?
To crop an image in Google Slides, first, insert the image by choosing your preferred image source in the “Image” option of the “Insert” tab. Then, “Right-click” on the image and choose “Crop image” from the menu. Drag the corner of the image sideways or inward to finally crop it.
You can also use the “Crop” icon in the toolbar or “Double-click” the image to crop the unwanted parts of the image.
This article will also help you to learn about resizing a cropped image or adjusting the image in the cropped area. Besides, making the image fit to the slides and masking the image into a circle will be a bonus to your knowledge.
That, and much more. So, let’s get started!
1. How to Crop a Picture in Google Slides?
The “Crop image” option in Google Slides allows you to quickly crop an image added to the presentation slide. By cropping an image, you can remove any part of the inserted picture that you do not want to show in the presentation. To crop an image on a slide, all you have to do is follow the 3 simple steps.
Step-1: Insert an image
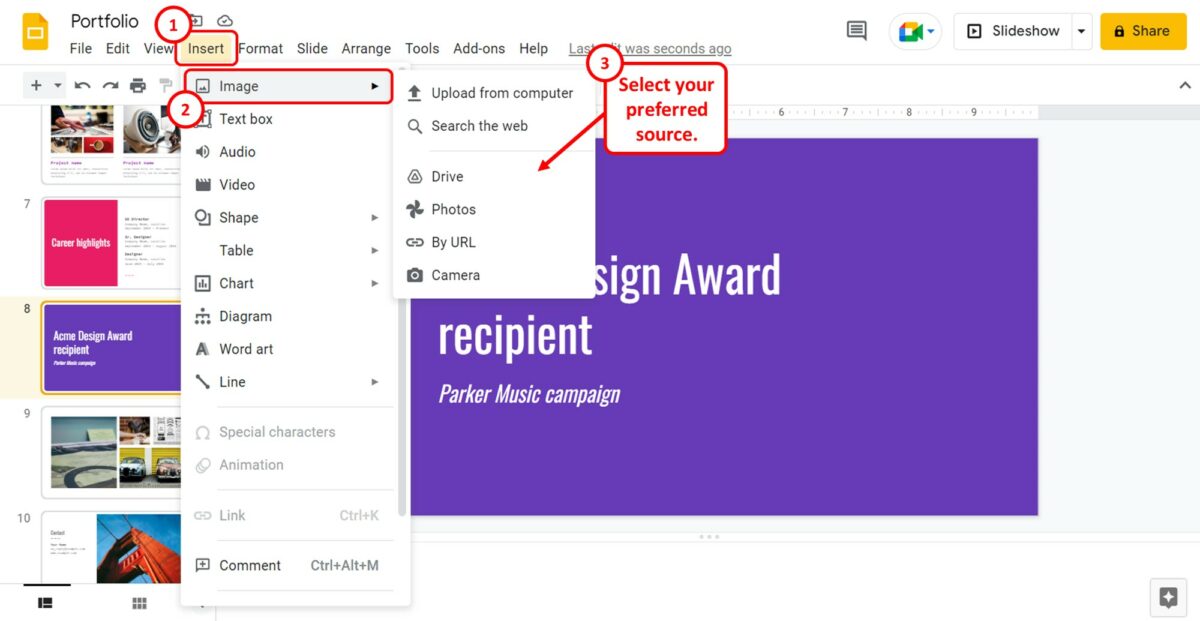
The first step is to insert an image into the Google Slides slide. To do so, click on the “Insert” tab in the menu bar at the top of the screen. In the “Insert” menu, click on the “Image” option.
You can read my article here to learn how to insert a picture in Google Slides from different sources.
Step-2: Click on the “Crop image” option
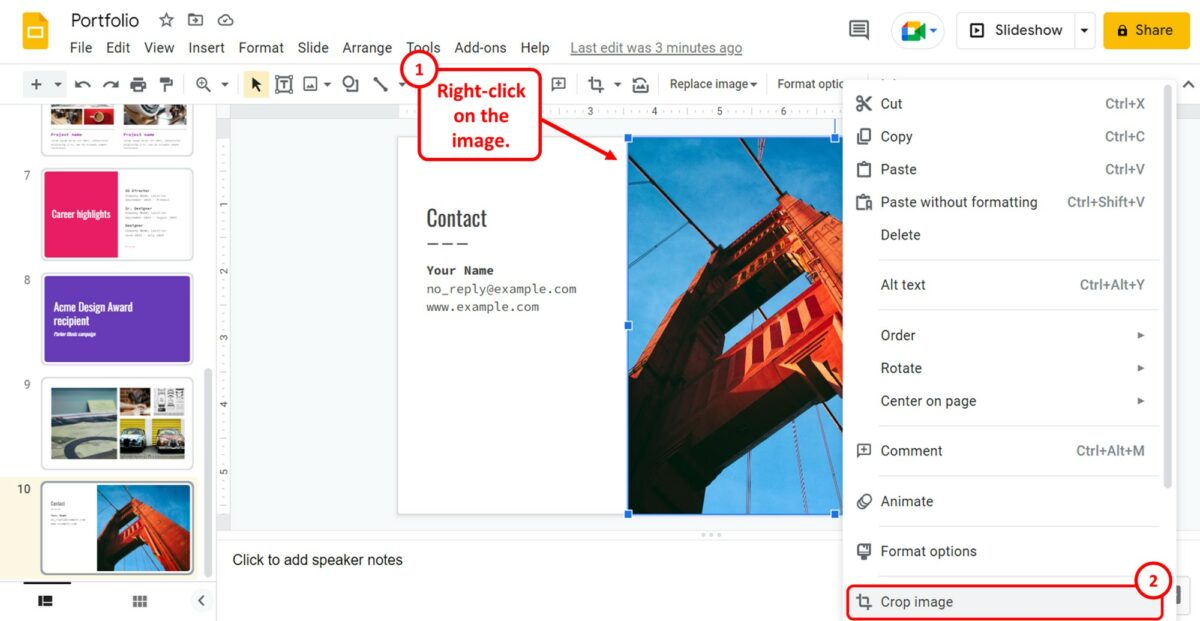
The next step is to “Right Click” on the image that you want to crop. In the right-click menu, click on the “Crop image” option.
Alternatively, you can click on the “Crop” icon in the toolbar under the menu bar located at the top of the screen. You can also “Double Click” a picture in a slide to crop it.
Step-3: Drag the corners
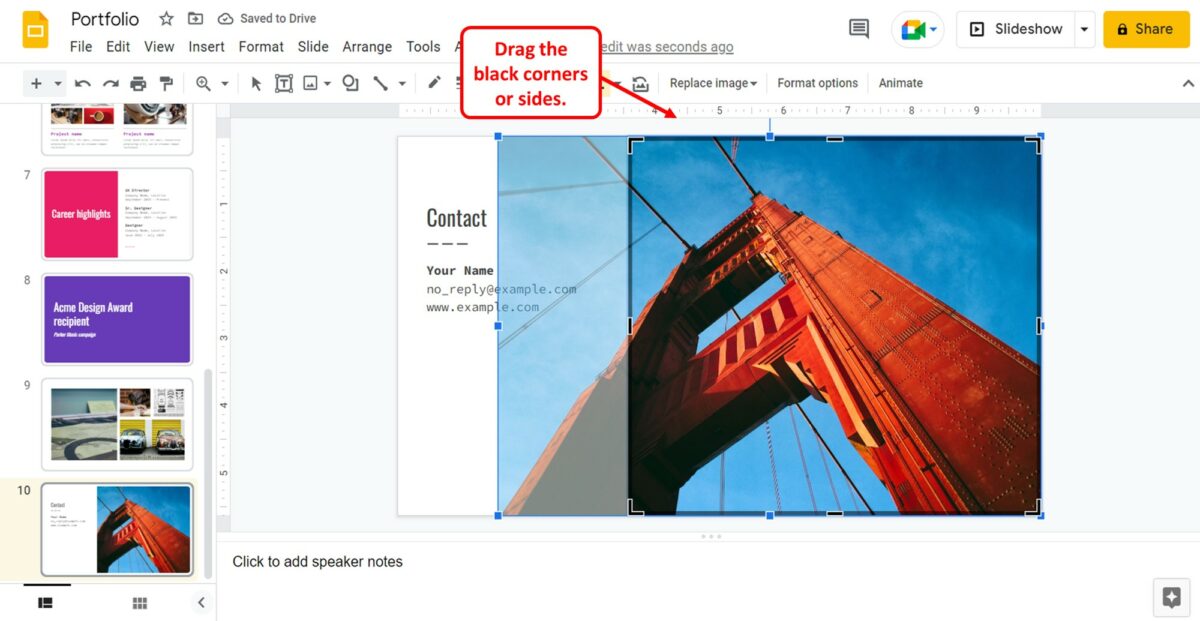
To crop the image, drag the black corners of the clear part of the image. You can also drag the sides to crop the image. The blurred part of the image will be cropped out in the presentation.
1.1 How to Adjust the Image in the Cropped Area?
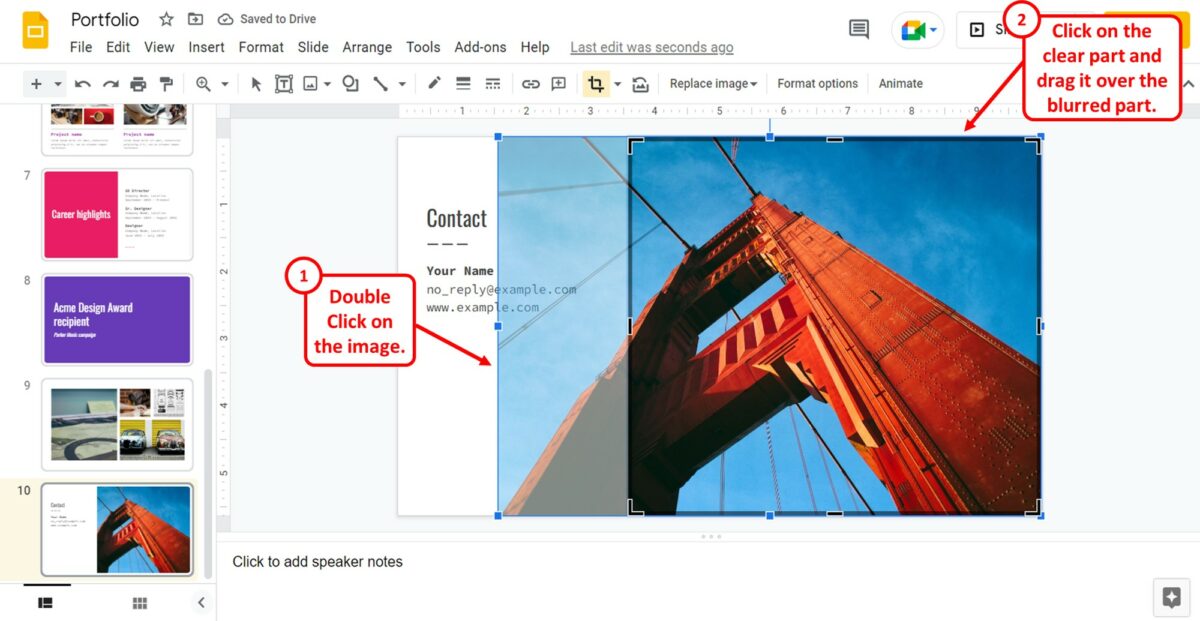
To adjust the image in the cropped area, you have to first access the uncropped image. To do so, “Double Click” the image on the slide. Then all you have to do is click on the clear part of the image and drag it over the blurred part.
You can place the clear part on your preferred part of the image. The rest of the image will be cropped out.
1.2 How to Resize Cropped Images in Google Slides?
To resize cropped images in Google Slides, you have to adjust the size of the original uncropped image.
First, you have to click on the “Crop” option in the toolbar to get the uncropped image. Then you have to drag the corners of the original image corners instead of the cropped image corners. The corners of the original image have small blue squares.
2. How to Make Image Fit to Slide in Google Slides?
In Google Slides, there is no option to autofit an image to the slide. However, you can move and resize an inserted image to fit to the slide. All you have to do is follow the 2 easy steps.
Step-1: Click on the “Insert” tab
The first step is to insert the image into the presentation slide. To do so, click on the “Insert” menu in the menu bar at the top of the screen. Then click on the “Image” option in the “Insert” menu to insert a picture into the slide.
Step-2: Drag the image corners
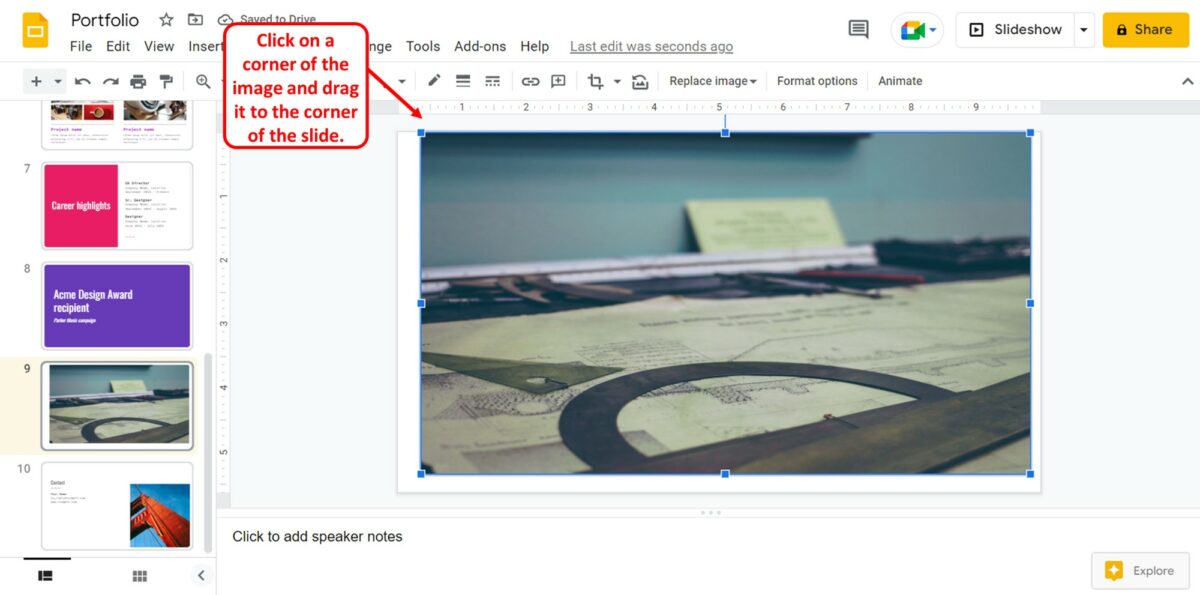
The next step is to move the image to fit to the slide. Click on a corner of the image and drag it to the corner of the slide. You will see a red line appear at the edge of the slide to indicate that the image is resized to fit to the slide.
3. How to Mask Image into a Circle in Google Slides?
The “Mask image” option in Google Slides allows you to add any shape to a picture inserted into the presentation slide. You can insert the picture into any of the pre-designed shapes available in Google Slides. To mask an image into a circle, follow the 3 simple steps.
Step-1: Click on the “Mask image” option
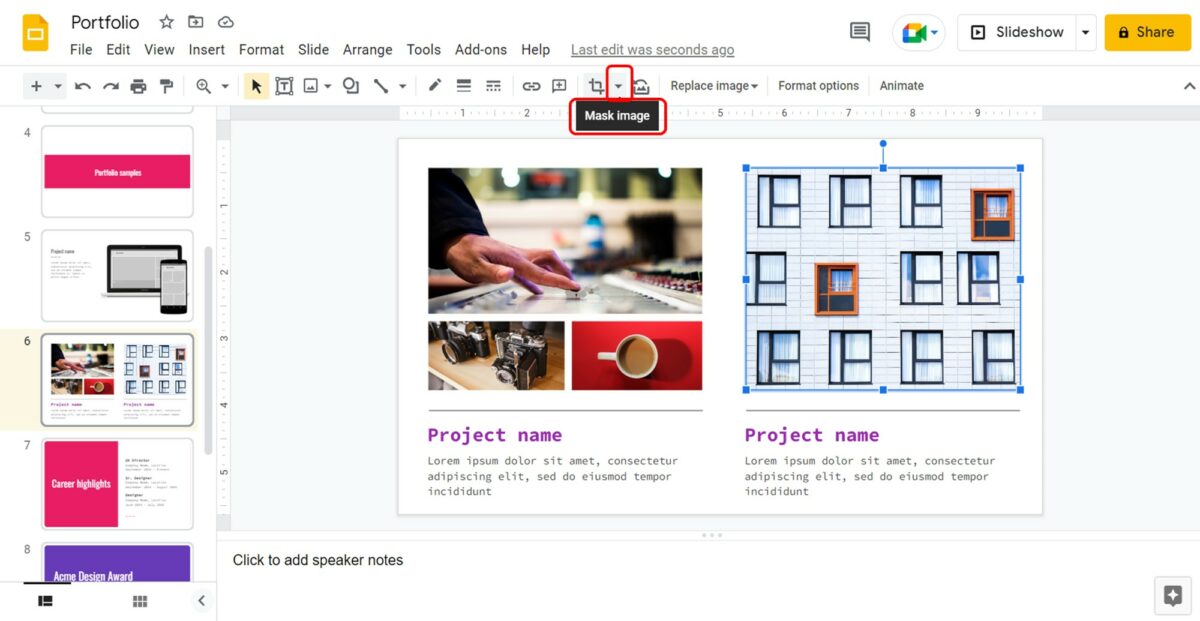
In the open slide, click on the image that you want to mask into a circle. Then click on the “Mask image” icon which is the down arrow by the “Crop” option in the toolbar located at the top of the screen.
Step-2: Click on the “Oval” option
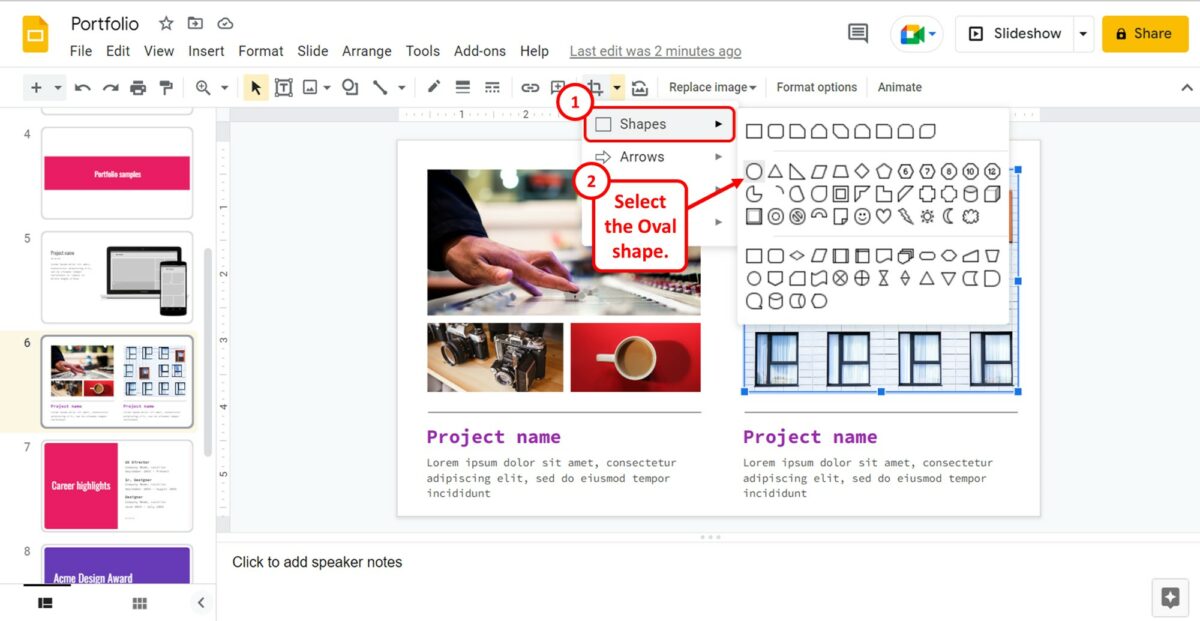
The next step is to click on the “Shapes” option in the dropdown menu under the “Mask image” option. From the pop-up list by the “Shapes” option, click on the “Oval” shape.
Step-3: Adjust the shape to a circle
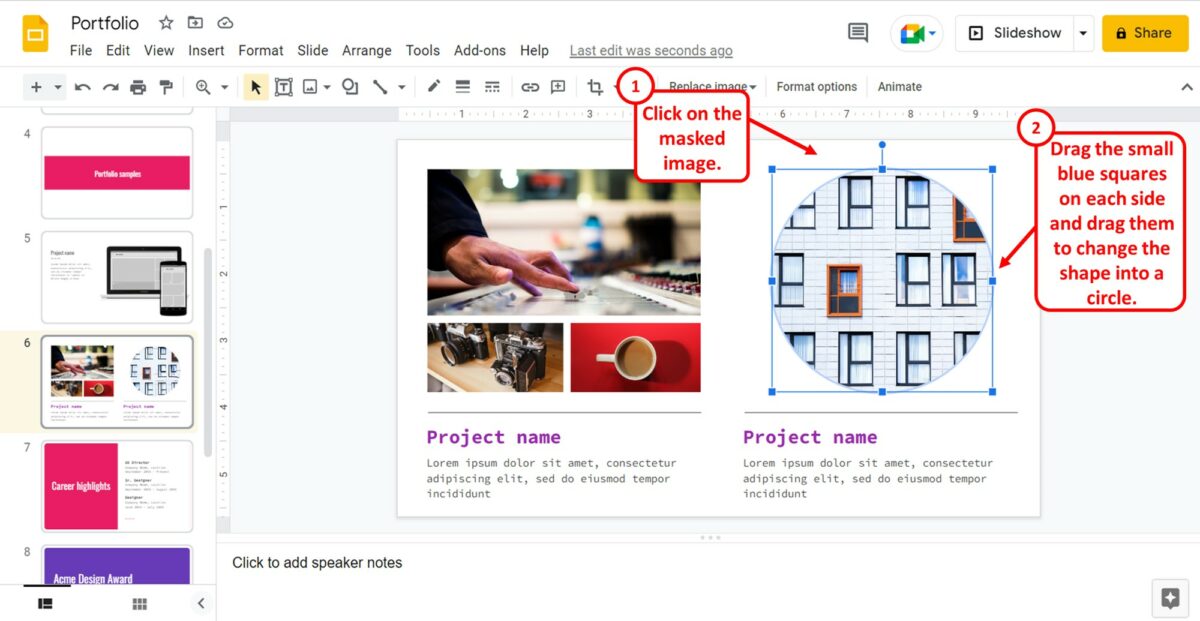
Now all you have to do is adjust the oval shape into a circle. To do so, click on the image masked into the oval shape. Then click on the small blue squares on each side of the image and drag them to change the shape into a circle.
4. How to Crop an Image into Any Shape in Google Slides?
In Google Slides, there are numerous preset shapes available. You can insert an image into any of those shapes. To crop an image into any shape, follow the 2 quick steps.
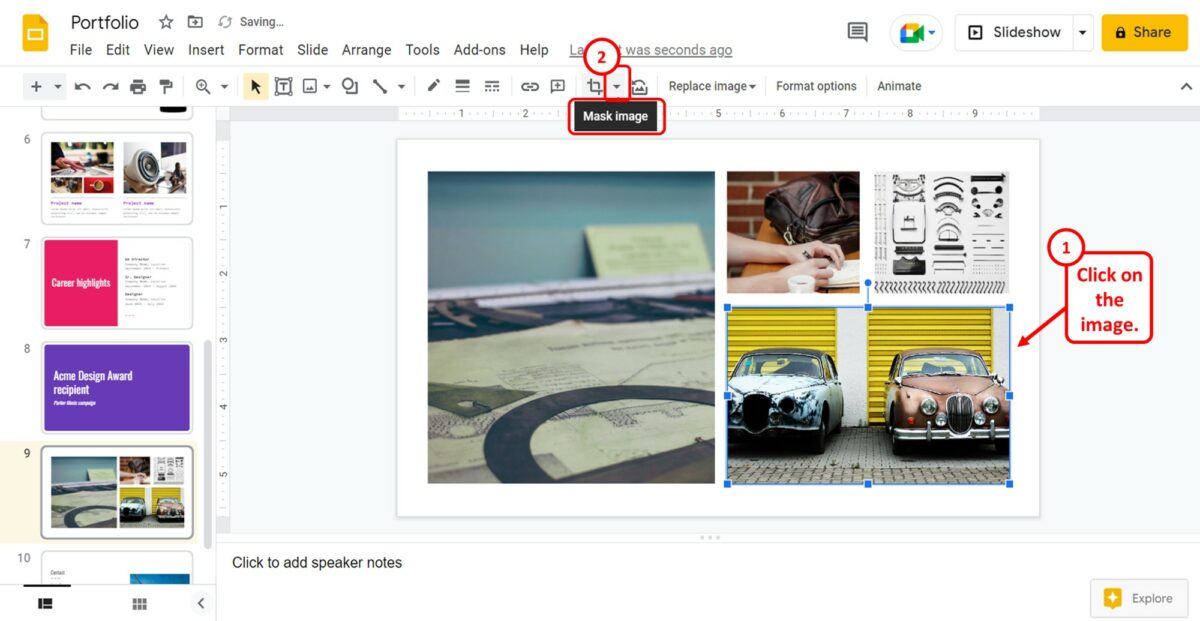
The first step is to click on the image that you want to crop. Then click on the “Mask image” option. It is the down arrow option beside the “Crop” option in the toolbar under the menu bar located at the top of the screen.
Step-2: Click on your preferred shape
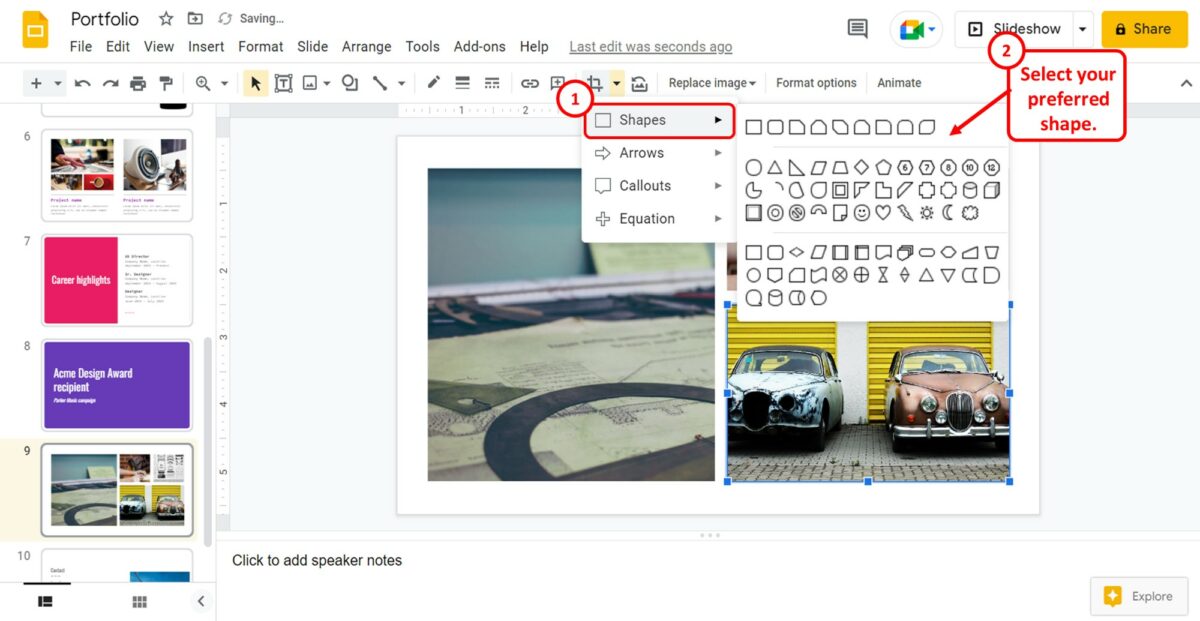
In the dropdown menu under the “Mask Image” option, click on the type of shape that you want to crop the image into. The available options are “Shapes” , “Arrows” , “Callouts” and “Equations” .
Then all you have to do is select your preferred shape from the pop-up list to crop the selected picture into that shape.
5. How to Crop the Background of an Image in Google Slides? [Link to Existing Article
In Google Slides, you cannot crop the background of an image. Unlike Microsoft PowerPoint, there is no feature that allows you to remove the background of an image in Google Slides.
To crop the background of an image, you can use other third-party software before inserting the picture into your presentation slide. Read my other article for a step-by-step guide to removing the image background in Google Slides .

- Get started with computers
- Learn Microsoft Office
- Apply for a job
- Improve my work skills
- Design nice-looking docs
- Getting Started
- Smartphones & Tablets
- Typing Tutorial
- Online Learning
- Basic Internet Skills
- Online Safety
- Social Media
- Zoom Basics
- Google Docs
- Google Sheets
- Career Planning
- Resume Writing
- Cover Letters
- Job Search and Networking
- Business Communication
- Entrepreneurship 101
- Careers without College
- Job Hunt for Today
- 3D Printing
- Freelancing 101
- Personal Finance
- Sharing Economy
- Decision-Making
- Graphic Design
- Photography
- Image Editing
- Learning WordPress
- Language Learning
- Critical Thinking
- For Educators
- Translations
- Staff Picks
- English expand_more expand_less
Google Slides - Adding Pictures and Shapes
Google slides -, adding pictures and shapes, google slides adding pictures and shapes.

Google Slides: Adding Pictures and Shapes
Lesson 11: adding pictures and shapes.
/en/googleslides/text-basics/content/
Adding pictures and shapes
Adding pictures and shapes can make your presentations more interesting and engaging. The picture and shape tools in Google Slides also let you customize your images by cropping, reordering, changing colors, and adding other formatting.
Inserting pictures
You can insert a picture from a file on your computer onto any slide. Google Slides even includes tools for finding online pictures and adding screenshots to your presentation.
To insert a picture:

Formatting pictures
There are a variety of ways to format the pictures in your slide show. Google Slides has tools to resize and rotate the picture, crop the picture, adjust the image, and more.
To crop an image:

To crop an image to a shape:

After cropping the image to a shape, you can click the crop button again to use the cropping handles and adjust the size and proportions of the shape.
Image options
You can adjust an image's transparency , brightness , contrast , and more. To do this, select the image, then click Format options on the toolbar or in the Format menu. The Format options pane will open.

Moving and resizing pictures

Inserting shapes
Shapes are a great way to make your presentation more interesting. Google Slides gives you a lot of different shapes to choose from, and they can be customized to suit your needs, allowing you to use your own color palette, preferences, and more.
To insert a shape:

Formatting shapes
In Google Slides, you can modify shapes in a variety of ways to suit your needs. Shapes can be moved and resized just like images, and they have a few other options for adjustment.
Some shapes have the option to change their dimensions and proportions. To adjust the proportion of a shape, select it, then click and drag the diamond handle .

You can further customize shapes by changing their fill color , line color , line weight , and line dash . Select a shape, then click one of the four shape format commands to see the menu for that option.

Reordering objects
In Google Slides, each slide may have multiple items, such as pictures, shapes, and text boxes. When objects are inserted into a slide, they are placed on levels according to the order in which they were inserted into the slide.
In our example, we drew a teardrop shape on the top level, obscuring the robot picture behind it. We can reorder it to put it behind the other objects.
To reorder an object:
- Select the object you want to reorder.

You can arrange multiple overlapping objects using the Order commands. In our example, we selected the robot image and used the Send backward command. The robot image is behind the cloud, but in front of the teardrop shape.

- Open our example file . Make sure you're signed in to Google, then click File > Make a copy .
- Select slide 15 and resize the picture of the robot so it's as tall as the slide.
- Crop the robot so the robot's hands and everything below them are no longer showing.
- Move the robot to the lower-right part of the slide.
- To the left of the robot picture, insert a speech bubble shape . Hint : Speech bubbles can be found in the callout category.
- With the shape still selected, drag the yellow diamond handle toward the robot's mouth, then type the words Go forth and be safe!
- Change the font size of the text to 30 pt and the alignment of the text to center align .
- Change the fill color of the shape.

/en/googleslides/adding-transitions-and-animations/content/
4 Best Ways to Put a Border Around a Picture in Google Slides

Mehvish Mushtaq is a computer engineer by degree. Her love for Android and gadgets led her to develop the first Android app for Kashmir. Known as Dial Kashmir, she won the prestigious Nari Shakti award from the President of India. She has been writing about technology for 6+ years and her favorite categories include how-to guides, explainers, tips and tricks for Android, iOS/iPadOS, social media, and web apps.
A presentation with just text is boring, and adding images can make it attractive. However, using simple images can become monotonous. To give a different look to your slides, you can edit and customize images in Google Slides . One of the ways to customize pictures is to add a border to them. This post shall help you in achieving that.

Google Slides comes with a border tool of its own. But the options are limited. In this post, we have covered the native border tool and other methods to add a border around images in Google Slides. You can have both simple and decorative backgrounds.
Let’s check the various methods.
Note: The steps are shown for a computer but the same methods can be used on Android and iOS as well.
Method 1: Using Border Tool
This is one of the easiest ways to outline a picture in Google Slides. Start by adding the required picture to your slide. Then click on the image to select it. Once selected, three border tools will be activated in the ribbon. Those are – Border color, weight, and dash. The latter is used to change the style of the border.

Click on any of the tools to add the border. Then customize the border by changing its style, size, and color using the three options.

Method 2: Using Shapes
If you don’t like the above method’s borders, you can create your own custom borders using shapes. In this method, we will be adding an image on top of the shape or using a shape as the image’s background. The final image looks like a picture with a customized border.
Here’s how to go about it:
Step 1 : Add the image to the slide.
Step 2 : Click on the Insert option in the menu bar and select Shape. Choose the required shape from the available options.

Step 3: With your mouse, draw the required shape on the slide. You will notice that the shape appears on top of the image.

To bring the image to the front, right-click on the shape and go to Order > Send backwards.

Step 4: Drag the image on the top of the shape. You can rotate, resize, or move the shapes according to your requirement.

Tip: To simplify the process, you can add the shape first, followed by adding an image on top of it.
Step 5: You can keep the default shape color or add a new color. Click on the shape to select it. Then click on the Fill color icon in the ribbon. Choose your desired color.

Tip 1: Add Double Border
To further customize the border, you can have two of them. When you add a shape, it has its border. You can either remove it completely, as shown in the next tip, or customize it to have multiple borders.

Click on the shape. Use the Border tools – color, weight, and dash that appear in the ribbon to customize it.

Tip 2: Remove Shape Border
To remove the black outline from the shape, click on the shape. Then click on the Border color icon in the ribbon. Hit the Transparent option.

Tip 3: Replace Shape
If you don’t like the current shape (or border) used for the image, you can replace it quickly. Right-click on the shape used as a border. Select Change shape from the menu and choose the new shape. Similarly, you can try different border shapes for your picture without starting afresh.

Tip 4: Group Shape and Image
If you want to move or resize the picture and shape, grouping them comes in handy. Check how to group and ungroup elements in Google Slides .
Tip : Check out similar cool tips related to shapes in Google Slides .
Method 3: Using Mask Tool
In this method, we will be taking the help of the Mask and Border tools. First, you will need to mask the picture in shape followed by customizing its border. Here are the steps:
Step 1 : Click on the image for which you want to add a stylish border.
Step 2: Click on the tiny arrow next to the Crop icon in the Ribbon. Select the desired shape.

The image will take the required shape automatically.

Step 3: With the image selected, use the Border tools to add the required border.

Method 4: Add Decorative Border
Lastly, you can add decorative borders to your image. You will need to download them from the internet. Go to Insert > Image > Search the web.

Search for decorative borders. Choose the border that you want to use. Now resize or move it to fit the picture.

Tip: Check out 11 animation tips and tricks for Google Slides .
Google Slides Tips and Tricks
Google Slides is loaded with creative options to spice up your presentations. You need to discover and use them. We have covered 11 such tips and tricks for Google Slides that you might find useful.
Was this helpful?
Last updated on 13 July, 2021
The above article may contain affiliate links which help support Guiding Tech. However, it does not affect our editorial integrity. The content remains unbiased and authentic.

The article above may contain affiliate links which help support Guiding Tech. The content remains unbiased and authentic and will never affect our editorial integrity.
DID YOU KNOW

More in Internet and Social

4 Ways to Transfer Playlists From Spotify to YouTube Music

How to Create Phone Number Link on Telegram
Join the newsletter.
Get Guiding Tech articles delivered to your inbox.

Cloud Storage

Custom Business Email

Video and voice conferencing

Shared Calendars

Word Processing

Spreadsheets
Presentation Builder

Survey builder

Google Workspace
An integrated suit of secure, cloud-native collaboration and productivity apps powered by Google AI.
Tell impactful stories, with Google Slides
Create, present, and collaborate on online presentations in real-time and from any device.
- For my personal use
- For work or my business

Jeffery Clark
T h i s c h a r t h e l p s b r i d g i n g t h e s t o r y !

E s t i m a t e d b u d g e t

Make beautiful presentations, together
Stay in sync in your slides, with easy sharing and real-time editing. Use comments and assign action items to build your ideas together.

Present slideshows with confidence
With easy-to-use presenter view, speaker notes, and live captions, Slides makes presenting your ideas a breeze. You can even present to Google Meet video calls directly from Slides.

Seamlessly connect to your other Google apps
Slides is thoughtfully connected to other Google apps you love, saving you time. Embed charts from Google Sheets or reply to comments directly from Gmail. You can even search the web and Google Drive for relevant content and images directly from Slides.

Extend collaboration and intelligence to PowerPoint files
Easily edit Microsoft PowerPoint presentations online without converting them, and layer on Slides’ enhanced collaborative and assistive features like comments, action items, and Smart Compose.

Work on fresh content
With Slides, everyone’s working on the latest version of a presentation. And with edits automatically saved in version history, it’s easy to track or undo changes.

Make slides faster, with built-in intelligence
Assistive features like Smart Compose and autocorrect help you build slides faster with fewer errors.

Stay productive, even offline
You can access, create, and edit Slides even without an internet connection, helping you stay productive from anywhere.
Security, compliance, and privacy

Secure by default
We use industry-leading security measures to keep your data safe, including advanced malware protections. Slides is also cloud-native, eliminating the need for local files and minimizing risk to your devices.
Encryption in transit and at rest
All files uploaded to Google Drive or created in Slides are encrypted in transit and at rest.
Compliance to support regulatory requirements
Our products, including Slides, regularly undergo independent verification of their security, privacy, and compliance controls .
Private by design
Slides adheres to the same robust privacy commitments and data protections as the rest of Google Cloud’s enterprise services .

You control your data.
We never use your slides content for ad purposes., we never sell your personal information to third parties., find the plan that’s right for you, google slides is a part of google workspace.
Every plan includes

Collaborate from anywhere, on any device
Access, create, and edit your presentations wherever you are — from any mobile device, tablet, or computer — even when offline.

Get a head start with templates
Choose from a variety of presentations, reports, and other professionally-designed templates to kick things off quickly..

Photo Album

Book Report

Visit the Slides Template Gallery for more.
Ready to get started?
How-To Geek
How to wrap text around images in google slides.
Improve the layout of the content in your slides.
Quick Links
How to wrap text in google slides presentations.
When a slide contains both text and images, you may want to wrap the text around those images to improve the readability and overall aesthetics of the slide. Here's what you need to do.
Unlike Google Docs or Microsoft Word , which have built-in text wrap options, you'll need to make use of a small workaround to wrap text around your image in Google Slides. For this to work, you're actually going to have to rearrange the positions of your text boxes.
Related: How to Wrap Text Around Pictures and Other Illustrations in Microsoft Word
To get started, open your Google Slides presentation and then navigate to the slide that contains the image and text you'll be working with. If you haven't already inserted your image, click Insert > Image, and then choose the location of the photo. If you don't already have text in your slide, you can add a text box via Insert > Text box.
When everything is on the slide, it may look something like this:
The issue is that all of the text to the right of the image is in a single text box. In this case, you won't be able to put the last paragraph of text under the image, giving it the illusion of text wrapping, while it's still in that same text box. The solution here is to simply add a new text box, copy and paste the bottom paragraph in the new text box, and then position it so that it has the appearance of wrapping around the image.
To copy the text to your clipboard, click and drag your cursor over the text to select it, and then press Ctrl+C (Command+C on Mac). Text is highlighted in blue when selected.
Next, insert a new text box by clicking "Insert" in the menu bar and clicking "Text Box" in the drop-down menu.
Your cursor will turn into crosshairs once selected. Draw the text box on the slide by clicking and dragging your cursor.
Next, press Ctrl+V (Command+V on Mac) to paste the text. Be sure to delete the text you copied and pasted over from the other text box.
Now you may have something that looks like this:
The next step is to adjust the bottom text box to align with both the left side of the image and the right side of the right text box. Click the text box to select it, and then click and drag the handles to adjust it.
[video width="476" height="304" mp4="https://www.howtogeek.com/wp-content/uploads/2021/09/Adjust-the-text-box..mp4"]
After some fine-tuning, you'll be able to make your text wrap around the image, just as if you were using a built-in tool.
While this may seem like an awkward workaround for wrapping text around images, this actually just takes advantage of some of the most basic functions of Google Slides . Keep learning these basics and you'll eventually become a master of creating professional-looking presentations.
Related: The Beginner's Guide to Google Slides
IMAGES
VIDEO
COMMENTS
You can achieve some interesting effects by cropping an image into a shape in Google Slides. However, if you want to crop an image into a circle, you'll need to use a few tricks.
Want to make image circular in Google Slides? Learn how to crop an image into a circle in Google Slides on web, Android, and iPhone.
Want to make images perfectly round while enhancing the visual appeal of your presentations? Discover how to make a picture a circle in Google Slides!
Google Slides allows you to create fun and exciting presentations for school projects, business meetings, social events, and more. Furthermore, Slides are
For additional help, take a look at our tutorial for editing images in Google Slides. And for more ways to work with pictures in your presentation, check out how to wrap text around images or how to make an image transparent in Google Slides .
Creating circle-shaped images in Google Slides is an effective way to add visual interest and style to your presentation. By following a step-by-step guide to crop your picture into a circle and making use of additional customizations such as borders, you can transform ordinary images into engaging visuals.
In this lesson, you'll learn how to crop an image into a circle in Google Slides.
Making images round in Google Slides is a great way to add visual interest to your presentations. Rounded images stand out from standard square or rectangular images.
Learn to easily alter image shapes in Google Slides with our step-by-step guide. From circles to stars, customize visuals to fit your presentation!
You can achieve interesting effects by inserting an image into a shape (like a circle) in Google Slides. This article shows you the detailed steps on how to make an image a circle and put the image in more shapes in Google Slides. Check out and find more.
Google Docs is a versatile tool that lets you play with plenty of elements. This article will show you how to crop an image into a circle or square using Google Docs.
Learn how to create rounded corners in Google Slides to give your presentations a professional touch. Follow these steps to get started!
In this new Slidesgo School tutorial, you'll learn how to insert images or GIFs into your Google Slides presentations. You'll also find out how to crop or mask pictures so that they better suit your needs. Are you ready to begin?
Click to Subscribe: http://bit.ly/19vzAMH There are loads of ways to edit images within Google Slides itself. No need to spend extra ti ...more
Don't like adding flat images in google slides, and want to round the corners or do some masking to make your images look better?Let me show you how to beaut...
Click the image you want to mask. At the top, next to Crop , click the Down arrow . Click the shape you want. Your shape will mask your image. To adjust your shape, click and drag the colored handles. On your computer, open a document or presentation. Click the image you want to add a border to. Click Border color .
Google Docs Editors Send feedback about our Help Center
The "Crop image" option in Google Slides allows you to quickly crop an image added to the presentation slide. By cropping an image, you can remove any part of the inserted picture that you do not want to show in the presentation. To crop an image on a slide, all you have to do is follow the 3 simple steps.
Adding pictures and shapes can make your presentations more interesting and engaging. The picture and shape tools in Google Slides also let you customize your images by cropping, reordering, changing colors, and adding other formatting.
Interesting in adding a border to your images in Google Slides? Check out 4 methods to outline a picture in Google Slides.
Learn how to round corners in Google Slides in this quick tutorial! Subscribe to my channel for more Google Slides tips & tricks: https://youtube.com/@SlideW...
Use Google Slides to create online slideshows. Make beautiful presentations together with secure sharing in real-time and from any device.
Unlike Google Docs or Microsoft Word, which have built-in text wrap options, you'll need to make use of a small workaround to wrap text around your image in Google Slides. For this to work, you're actually going to have to rearrange the positions of your text boxes.