Home Single Slide

Effective Communication With Single Slide (One Slide) Presentation PPT Templates
If you are looking for a way to create presentations that are concise and memorable, then our single slide (one slide) presentation ppt templates are a great option. it can help you summarize your ideas or key points in a way that is easy to understand and remember by your target audience. it is a more effective way to present your message to a small group or when you have limited time . it is possible to convey your message effectively and create a powerful presentation in mere minutes by using these one-page slides. try now.

- They are more concise and impactful. One-slide presentations will help you focus on your key message and avoid unnecessary mess-ups. This makes your presentation more impactful and easier for your audience to remember.
- One slide presentation ideas are more engaging than traditional presentations, because they are an interesting way to present your information. You can use them to grab your audience's attention and keep them engaged.
- They are more versatile. One-slide presentations can be used in a variety of different settings, from business meetings and sales pitches to classroom lectures. They are also easy to share and distribute, which makes them a great tool for reaching a wide audience.
- Start with a strong impression: It is the first thing your audience will see, so make sure it will grab their attention. You can use a bold statement, a question, or a powerful image to get your audience hooked.
- Focus on your key message: Make sure that your key message is clear and concise, and that it is supported by the rest of your slide.
- Use visuals to support your message: Visuals can help to make your presentation easily memorable. Use images, graphs , and charts to illustrate your details and make your message more productive.
- Tell a story: Information presented in a narrative format tends to be more memorable and engaging. Try to incorporate storytelling into a single page to make them memorable.
- End with a call to action: What's the next step after your presentation? Let your audience know, and guide them towards it.
- Elevator pitch: You can summarize your business or idea in a clear way.
- Product overview: It will help you outline the key features and benefits of your product.
- Project summary: It will help you recap the progress of your project and highlight any key achievements.
- Company overview: Using this slide, you can summarize your company's mission, vision, values, and key products or services.
- Executive Summary
- 30-60-90 Day Plans
- Brainstorming
- Business Plan
- Business Proposals
- Business Analysis
- Case Studies
- Corporate Slides
- Birthday Slides
- School Theme ,etc.
We're here to help you!
What is a single slide presentation template.
A single slide presentation template is a PowerPoint template or Google Slides theme that is designed to be used for a presentation with only one slide. They are often used to communicate a single key message or idea in a clear and concise way.
What are the benefits of using a one slide presentation template?
There are many benefits to using a one slide presentation template, including saving time and effort, ensuring a professional and polished look, providing a clear and concise structure for your content, easy to communicate your message in a way that is easy for your audience to understand.
What types of single slide templates do you offer?
We offer a wide variety of single slide templates, including templates for business presentations, educational presentations , marketing presentations , sales presentations , product demos, pitch decks , and more!
How can I find the right single slide presentation template for my presentation?
To find the right single slide presentation template for your presentation, you can browse our collection by category or niche. You can also use our search bar to search for templates by keyword.
How can I customize a one slide presentation template to fit my needs?
All of our one slide presentation templates are fully customizable. You can easily change the colors, fonts, images, layout, and text to fit your specific needs. You can also add or remove elements from the template, as needed.
How can I use a single slide presentation to effectively communicate my message?
To use a single-slide presentation to communicate your message effectively, follow these tips: start with a strong hook, clearly state your key message, use visuals and data to support your key message, and end with a call to action.
Critical PowerPoint Shortcuts – Claim Your FREE Training Module and Get Your Time Back!
How to Make a PowerPoint Presentation (Step-by-Step)
- PowerPoint Tutorials
- Presentation Design
- January 22, 2024
In this beginner’s guide, you will learn step-by-step how to make a PowerPoint presentation from scratch.
While PowerPoint is designed to be intuitive and accessible, it can be overwhelming if you’ve never gotten any training on it before. As you progress through this guide, you’ll will learn how to move from blank slides to PowerPoint slides that look like these.

Table of Contents
Additionally, as you create your presentation, you’ll also learn tricks for working more efficiently in PowerPoint, including how to:
- Change the slide order
- Reset your layout
- Change the slide dimensions
- Use PowerPoint Designer
- Format text
- Format objects
- Play a presentation (slide show)
With this knowledge under your belt, you’ll be ready to start creating PowerPoint presentations. Moreover, you’ll have taken your skills from beginner to proficient in no time at all. I will also include links to more advanced PowerPoint topics.
Ready to start learning how to make a PowerPoint presentation?
Take your PPT skills to the next level
Start with a blank presentation.
Note: Before you open PowerPoint and start creating your presentation, make sure you’ve collected your thoughts. If you’re going to make your slides compelling, you need to spend some time brainstorming.
For help with this, see our article with tips for nailing your business presentation here .
The first thing you’ll need to do is to open PowerPoint. When you do, you are shown the Start Menu , with the Home tab open.
This is where you can choose either a blank theme (1) or a pre-built theme (2). You can also choose to open an existing presentation (3).
For now, go ahead and click on the Blank Presentation (1) thumbnail.

Doing so launches a brand new and blank presentation for you to work with. Before you start adding content to your presentation, let’s first familiarize ourselves with the PowerPoint interface.
The PowerPoint interface

Here is how the program is laid out:
- The Application Header
- The Ribbon (including the Ribbon tabs)
- The Quick Access Toolbar (either above or below the Ribbon)
- The Slides Pane (slide thumbnails)
The Slide Area
The notes pane.
- The Status Bar (including the View Buttons)
Each one of these areas has options for viewing certain parts of the PowerPoint environment and formatting your presentation.
Below are the important things to know about certain elements of the PowerPoint interface.
The PowerPoint Ribbon

The Ribbon is contextual. That means that it will adapt to what you’re doing in the program.
For example, the Font, Paragraph and Drawing options are greyed out until you select something that has text in it, as in the example below (A).

Furthermore, if you start manipulating certain objects, the Ribbon will display additional tabs, as seen above (B), with more commands and features to help you work with those objects. The following objects have their own additional tabs in the Ribbon which are hidden until you select them:
- Online Pictures
- Screenshots
- Screen Recording
The Slides Pane

This is where you can preview and rearrange all the slides in your presentation.
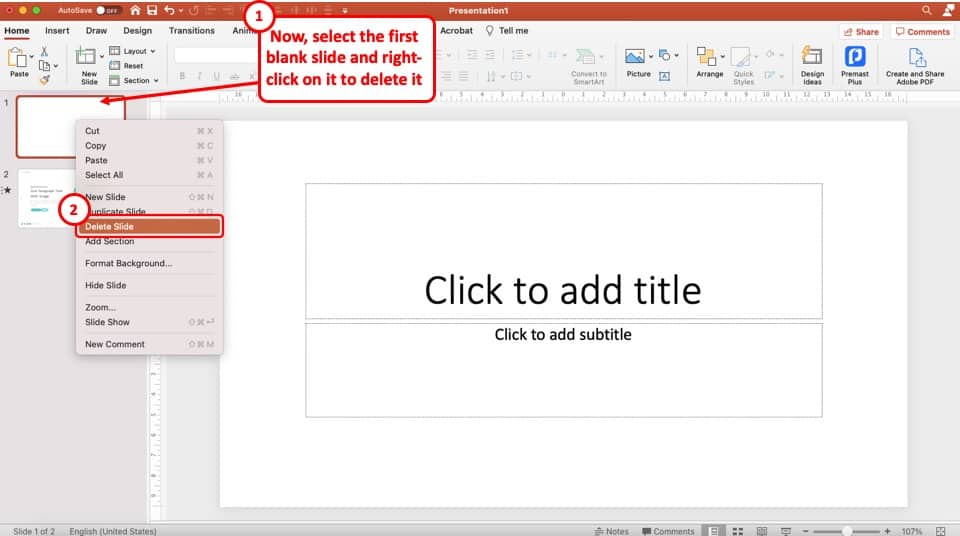
Right-clicking on a slide in the pane gives you additional options on the slide level that you won’t find on the Ribbon, such as Duplicate Slide , Delete Slide , and Hide Slide .

In addition, you can add sections to your presentation by right-clicking anywhere in this Pane and selecting Add Section . Sections are extremely helpful in large presentations, as they allow you to organize your slides into chunks that you can then rearrange, print or display differently from other slides.

The Slide Area (A) is where you will build out your slides. Anything within the bounds of this area will be visible when you present or print your presentation.
Anything outside of this area (B) will be hidden from view. This means that you can place things here, such as instructions for each slide, without worrying about them being shown to your audience.

The Notes Pane is the space beneath the Slide Area where you can type in the speaker notes for each slide. It’s designed as a fast way to add and edit your slides’ talking points.
To expand your knowledge and learn more about adding, printing, and exporting your PowerPoint speaker notes, read our guide here .
Your speaker notes are visible when you print your slides using the Notes Pages option and when you use the Presenter View . To expand your knowledge and learn the ins and outs of using the Presenter View , read our guide here .

You can resize the Notes Pane by clicking on its edge and dragging it up or down (A). You can also minimize or reopen it by clicking on the Notes button in the Status Bar (B).
Note: Not all text formatting displays in the Notes Pane, even though it will show up when printing your speaker notes. To learn more about printing PowerPoint with notes, read our guide here .
Now that you have a basic grasp of the PowerPoint interface at your disposal, it’s time to make your presentation.
Adding Content to Your PowerPoint Presentation
Notice that in the Slide Area , there are two rectangles with dotted outlines. These are called Placeholders and they’re set on the template in the Slide Master View .
To expand your knowledge and learn how to create a PowerPoint template of your own (which is no small task), read our guide here .

As the prompt text suggests, you can click into each placeholder and start typing text. These types of placeholder prompts are customizable too. That means that if you are using a company template, it might say something different, but the functionality is the same.

Note: For the purposes of this example, I will create a presentation based on the content in the Starbucks 2018 Global Social Impact Report, which is available to the public on their website.
If you type in more text than there is room for, PowerPoint will automatically reduce its font size. You can stop this behavior by clicking on the Autofit Options icon to the left of the placeholder and selecting Stop Fitting Text to this Placeholder .
Next, you can make formatting adjustments to your text by selecting the commands in the Font area and the Paragraph area of the Home tab of the Ribbon.

The Reset Command: If you make any changes to your title and decide you want to go back to how it was originally, you can use the Reset button up in the Home tab .

Insert More Slides into Your Presentation
Now that you have your title slide filled in, it’s time to add more slides. To do that, simply go up to the Home tab and click on New Slide . This inserts a new slide in your presentation right after the one you were on.

You can alternatively hit Ctrl+M on your keyboard to insert a new blank slide in PowerPoint. To learn more about this shortcut, see my guide on using Ctrl+M in PowerPoint .
Instead of clicking the New Slide command, you can also open the New Slide dropdown to see all the slide layouts in your PowerPoint template. Depending on who created your template, your layouts in this dropdown can be radically different.

If you insert a layout and later want to change it to a different layout, you can use the Layout dropdown instead of the New Slide dropdown.
After inserting a few different slide layouts, your presentation might look like the following picture. Don’t worry that it looks blank, next we will start adding content to your presentation.

If you want to follow along exactly with me, your five slides should be as follows:
- Title Slide
- Title and Content
- Section Header
- Two Content
- Picture with Caption
Adding Content to Your Slides
Now let’s go into each slide and start adding our content. You’ll notice some new types of placeholders.

On slide 2 we have a Content Placeholder , which allows you to add any kind of content. That includes:
- A SmartArt graphic,
- A 3D object,
- A picture from the web,
- Or an icon.
To insert text, simply type it in or hit Ctrl+C to Copy and Ctrl+V to Paste from elsewhere. To insert any of the other objects, click on the appropriate icon and follow the steps to insert it.
For my example, I’ll simply type in some text as you can see in the picture below.

Slides 3 and 4 only have text placeholders, so I’ll go ahead and add in my text into each one.

On slide 5 we have a Picture Placeholder . That means that the only elements that can go into it are:
- A picture from the web

To insert a picture into the picture placeholder, simply:
- Click on the Picture icon
- Find a picture on your computer and select it
- Click on Insert
Alternatively, if you already have a picture open somewhere else, you can select the placeholder and paste in (shortcut: Ctrl+V ) the picture. You can also drag the picture in from a file explorer window.

If you do not like the background of the picture you inserted onto your slide, you can remove the background here in PowerPoint. To see how to do this, read my guide here .
Placeholders aren’t the only way to add content to your slides. At any point, you can use the Insert tab to add elements to your slides.
You can use either the Title Only or the Blank slide layout to create slides for content that’s different. For example, a three-layout content slide, or a single picture divider slide, as shown below.

In the first example above, I’ve inserted 6 text boxes, 3 icons, and 3 circles to create this layout. In the second example, I’ve inserted a full-sized picture and then 2 shapes and 2 text boxes.
The Reset Command: Because these slides are built with shapes and text boxes (and not placeholders), hitting the Reset button up in the Home tab won’t do anything.
That is a good thing if you don’t want your layouts to adjust. However, it does mean that it falls on you to make sure everything is aligned and positioned correctly.
For more on how to add and manipulate the different objects in PowerPoint, check out our step-by-step articles here:
- Using graphics in PowerPoint
- Inserting icons onto slides
- Adding pictures to your PowerPoint
- How to embed a video in PowerPoint
- How to add music to your presentation
Using Designer to generate more layouts ideas
If you have Office 365, your version of PowerPoint comes with a new feature called Designer (or Design Ideas). This is a feature that generates slide layout ideas for you. The coolest thing about this feature is that it uses the content you already have.
To use Designer , simply navigate to the Design tab in your Ribbon, and click on Design Ideas .

NOTE: If the PowerPoint Designer is not working for you (it is grey out), see my troubleshooting guide for Designer .
Change the Overall Design (optional)
When you make a PowerPoint presentation, you’ll want to think about the overall design. Now that you have some content in your presentation, you can use the Design tab to change the look and feel of your slides.
For additional help thinking through the design of your presentation, read my guide here .
A. Picking your PowerPoint slide size
If you have PowerPoint 2013 or later, when you create a blank document in PowerPoint, you automatically start with a widescreen layout with a 16:9 ratio. These dimensions are suitable for most presentations as they match the screens of most computers and projectors.
However, you do have the option to change the dimensions.
For example, your presentation might not be presented, but instead converted into a PDF or printed and distributed. In that case, you can easily switch to the standard dimensions with a 4:3 ratio by selecting from the dropdown (A).
You can also choose a custom slide size or change the slide orientation from landscape to portrait in the Custom Slide Size dialog box (B).

To learn all about the different PowerPoint slide sizes, and some of the issues you will face when changing the slide size of a non-blank presentation, read my guide here .
B. Selecting a PowerPoint theme
The next thing you can do is change the theme of your presentation to a pre-built one. For a detailed explanation of what a PowerPoint theme is, and how to best use it, read my article here .
In the beginning of this tutorial, we started with a blank presentation, which uses the default Office theme as you can see in the picture below.

That gives you the most flexibility because it has a blank background and quite simple layouts that work for most presentations. However, it also means that it’s your responsibility to enhance the design.
If you’re comfortable with this, you can stay with the default theme or create your own custom theme ( read my guide here ). But if you would rather not have to think about design, then you can choose a pre-designed theme.
Microsoft provides 46 other pre-built themes, which include slide layouts, color variants and palettes, and fonts. Each one varies quite significantly, so make sure you look through them carefully.
To select a different theme, go to the Design tab in the Ribbon, and click on the dropdown arrow in the Themes section .

For this tutorial, let’s select the Frame theme and then choose the third Variant in the theme. Doing so changes the layout, colors, and fonts of your presentation.

Note: The theme dropdown area is also where you can import or save custom themes. To see my favorite places to find professional PowerPoint templates and themes (and recommendations for why I like them), read my guide here .
C. How to change a slide background in PowerPoint
The next thing to decide is how you want your background to look for the entire presentation. In the Variants area, you can see four background options.

For this example, we want our presentation to have a dark background, so let’s select Style 3. When you do so, you’ll notice that:
- The background color automatically changes across all slides
- The color of the text on most of the slides automatically changes to white so that it’s visible on the dark background
- The colors of the objects on slides #6 and #7 also adjust, in a way we may not want (we’ll likely have to make some manual adjustments to these slides)

Note: If you want to change the slide background for just that one slide, don’t left-click the style. Instead, right-click it and select Apply to Selected Slides .
After you change the background for your entire presentation, you can easily adjust the background for an individual slide.

Inside the Format Background pane, you can see you have the following options:
- Gradient fill
- Picture or texture fill
- Pattern fill
- Hide background
You can explore these options to find the PowerPoint background that best fits your presentation.
D. How to change your color palette in PowerPoint
Another thing you may want to adjust in your presentation, is the color scheme. In the picture below you can see the Theme Colors we are currently using for this presentation.

Each PowerPoint theme comes with its own color palette. By default, the Office theme includes the Office color palette. This affects the colors you are presented with when you format any element within your presentation (text, shapes, SmartArt, etc.).

The good news is that the colors here are easy to change. To switch color palettes, simply:
- Go to the Design tab in the Ribbon
- In the Variants area, click on the dropdown arrow and select Colors
- Select the color palette (or theme colors) you want
You can choose among the pre-built color palettes from Office, or you can customize them to create your own.
As you build your presentation, make sure you use the colors from your theme to format objects. That way, changing the color palette adjusts all the colors in your presentation automatically.
E. How to change your fonts in PowerPoint
Just as we changed the color palette, you can do the same for the fonts.

Each PowerPoint theme comes with its own font combination. By default, the Office theme includes the Office font pairing. This affects the fonts that are automatically assigned to all text in your presentation.

The good news is that the font pairings are easy to change. To switch your Theme Fonts, simply:
- Go to the Design tab in the Ribbon
- Click on the dropdown arrow in the Variants area
- Select Fonts
- Select the font pairing you want
You can choose among the pre-built fonts from Office, or you can customize them to create your own.
If you are working with PowerPoint presentations on both Mac and PC computers, make sure you choose a safe PowerPoint font. To see a list of the safest PowerPoint fonts, read our guide here .
If you receive a PowerPoint presentation and the wrong fonts were used, you can use the Replace Fonts dialog box to change the fonts across your entire presentation. For details, read our guide here .
Adding Animations & Transitions (optional)
The final step to make a PowerPoint presentation compelling, is to consider using animations and transitions. These are by no means necessary to a good presentation, but they may be helpful in your situation.
A. Adding PowerPoint animations
PowerPoint has an incredibly robust animations engine designed to power your creativity. That being said, it’s also easy to get started with basic animations.
Animations are movements that you can apply to individual objects on your slide.

To add a PowerPoint animation to an element of your slide, simply:
- Select the element
- Go to the Animations tab in the Ribbon
- Click on the dropdown arrow to view your options
- Select the animation you want
You can add animations to multiple objects at one time by selecting them all first and then applying the animation.
B. How to preview a PowerPoint animation

There are three ways to preview a PowerPoint animation:
- Click on the Preview button in the Animations tab
- Click on the little star next to the slide
- Play the slide in Slide Show Mode
To learn other ways to run your slide show, see our guide on presenting a PowerPoint slide show with shortcuts .
To adjust the settings of your animations, explore the options in the Effect Options , Advanced Animation and the Timing areas of the Animation tab .

Note: To see how to make objects appear and disappear in your slides by clicking a button, read our guide here .
C. How to manage your animations in PowerPoint

The best way to manage lots of animations on your slide is with the Animation Pane . To open it, simply:
- Navigate to the Animations tab
- Select the Animation Pane
Inside the Animation Pane, you’ll see all of the different animations that have been applied to objects on your slide, with their numbers marked as pictured above.
Note: To see examples of PowerPoint animations that can use in PowerPoint, see our list of PowerPoint animation tutorials here .
D. How to add transitions to your PowerPoint presentation
PowerPoint has an incredibly robust transition engine so that you can dictate how your slides change from one to the other. It is also extremely easy to add transitions to your slides.
In PowerPoint, transitions are the movements (or effects) you see as you move between two slides.

To add a transition to a PowerPoint slide, simply:
- Select the slide
- Go to the Transitions tab in the Ribbon
- In the Transitions to This Slide area, click on the dropdown arrow to view your options
- Select the transition you want
To adjust the settings of the transition, explore the options in the Timing area of the Transitions tab.
You can also add the same transition to multiple slides. To do that, select them in the Slides Pane and apply the transition.
E. How to preview a transition in PowerPoint

There are three ways to preview your PowerPoint transitions (just like your animations):
- Click on the Preview button in the Transitions tab
- Click on the little star beneath the slide number in the thumbnail view
Note: In 2016, PowerPoint added a cool new transition, called Morph. It operates a bit differently from other transitions. For a detailed tutorial on how to use the cool Morph transition, see our step-by-step article here .
Save Your PowerPoint Presentation
After you’ve built your presentation and made all the adjustments to your slides, you’ll want to save your presentation. YOu can do this several different ways.

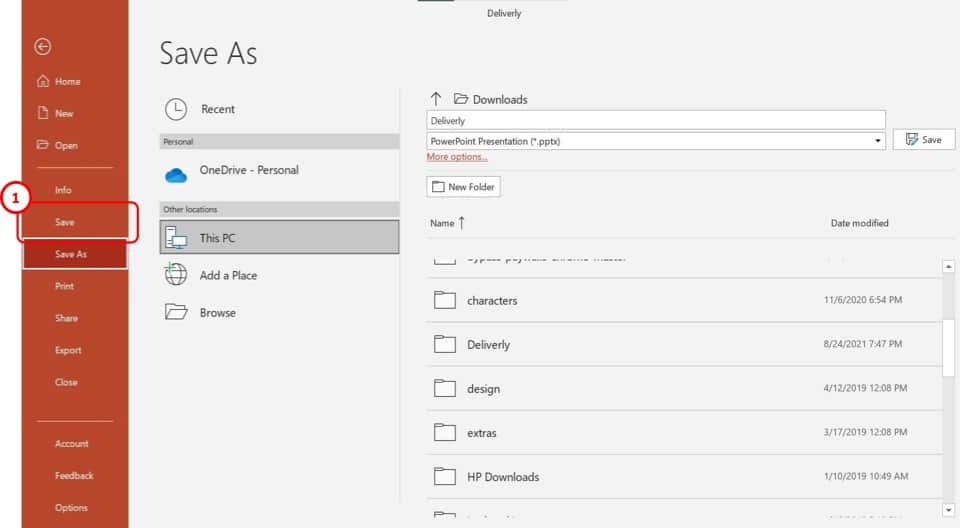
To save a PowerPoint presentation using your Ribbon, simply:
- Navigate to the File tab
- Select Save As on the left
- Choose where you want to save your presentation
- Name your presentation and/or adjust your file type settings
- Click Save
You can alternatively use the Ctrl+S keyboard shortcut to save your presentation. I recommend using this shortcut frequently as you build your presentation to make sure you don’t lose any of your work.

This is the standard way to save a presentation. However, there may be a situation where you want to save your presentation as a different file type.
To learn how to save your presentation as a PDF, see our guide on converting PowerPoint to a PDF .
How to save your PowerPoint presentation as a template
Once you’ve created a presentation that you like, you may want to turn it into a template. The easiest – but not technically correct – way, is to simply create a copy of your current presentation and then change the content.
But be careful! A PowerPoint template is a special type of document and it has its own parameters and behaviors.
If you’re interested in learning about how to create your own PowerPoint template from scratch, see our guide on how to create a PowerPoint template .
Printing Your PowerPoint Presentation
After finishing your PowerPoint presentation, you may want to print it out on paper. Printing your slides is relatively easy.

To open the Print dialog box, you can either:
- Hit Ctrl+P on your keyboard
- Or go to the Ribbon and click on File and then Print

Inside the Print dialog box, you can choose from the various printing settings:
- Printer: Select a printer to use (or print to PDF or OneNote)
- Slides: Choose which slides you want to print
- Layout: Determine how many slides you want per page (this is where you can print the notes, outline, and handouts)
- Collated or uncollated (learn what collated printing means here )
- Color: Choose to print in color, grayscale or black & white
There are many more options for printing your PowerPoint presentations. Here are links to more in-depth articles:
- How to print multiple slides per page
- How to print your speaker notes in PowerPoint
- How to save PowerPoint as a picture presentation
So that’s how to create a PowerPoint presentation if you are brand new to it. We’ve also included a ton of links to helpful resources to boost your PowerPoint skills further.
When you are creating your presentation, it is critical to first focus on the content (what you are trying to say) before getting lost inserting and playing with elements. The clearer you are on what you want to present, the easier it will be to build it out in PowerPoint.
If you enjoyed this article, you can learn more about our PowerPoint training courses and other presentation resources by visiting us here .
🔒 Unlock the PowerPoint Shortcuts Trusted by Industry Leaders KKR, American Express, HSBC, and More!
Join over 114,880 professionals from diverse fields including consulting, investment banking, advertising, marketing, sales, and business development who have supercharged their PowerPoint game with our proven methods.
✅ Customize compelling presentations effortlessly.
✅ Master time-saving techniques for faster deck creation.
✅ Boost your career prospects with top-notch PowerPoint skills.
Get FREE access to the Critical PowerPoint Shortcuts module of our premium training course by entering your name and email below.
DISCLAIMER: PC Users Only!
We respect your privacy and will keep your info safe and confidential.
About The Author

Popular Tutorials
- How to Strikethrough Text (l̶i̶k̶e̶ ̶t̶h̶i̶s̶) in Word, Excel & PowerPoint
- How to Make Animated Fireworks in PowerPoint (Step-by-Step)
- Strikethrough Shortcut (l̶i̶k̶e̶ ̶t̶h̶i̶s̶) for Word, Excel & PowerPoint
- How to Create a Flash Card Memory Game in PowerPoint (Like Jeopardy)
- Keyboard Shortcuts Not Working: Solved
PowerPoint Tutorial Categories
- Strategies & Opinions
- Shortcuts & Hacks
- Pictures, Icons, Videos, Etc.
- New Features
- Miscellaneous
- Charts & Data Viz
We help busy professionals save hours and gain peace of mind, with corporate workshops, self-paced courses and tutorials for PowerPoint and Word.
Work With Us
- Corporate Training
- Presentation & Template Design
- Courses & Downloads
- PowerPoint Articles
- Word Articles
- Productivity Resources
Find a Tutorial
- Free Training
- For Businesses
We help busy office workers save hours and gain peace of mind, with tips, training and tutorials for Microsoft PowerPoint and Word.
Master Critical PowerPoint Shortcuts – Secure Your FREE Training Module and Save Valuable Time!
⌛ Master time-saving expert techniques.
🔥 Create powerful presentations.
🚀 Propel your career to new heights.
We value your privacy – we keep your info safe.
Discover PowerPoint Hacks Loved by Industry Giants - KKR, AmEx, HSBC!
Over 114,880 professionals in finance, marketing and sales have revolutionized their PPT skills with our proven methods.
Gain FREE access to a full module of our premium PowerPoint training program – Get started today!
We hate spam too and promise to keep your information safe.
You are currently viewing a placeholder content from Facebook . To access the actual content, click the button below. Please note that doing so will share data with third-party providers.
- PRO Courses Guides New Tech Help Pro Expert Videos About wikiHow Pro Upgrade Sign In
- EDIT Edit this Article
- EXPLORE Tech Help Pro About Us Random Article Quizzes Request a New Article Community Dashboard This Or That Game Popular Categories Arts and Entertainment Artwork Books Movies Computers and Electronics Computers Phone Skills Technology Hacks Health Men's Health Mental Health Women's Health Relationships Dating Love Relationship Issues Hobbies and Crafts Crafts Drawing Games Education & Communication Communication Skills Personal Development Studying Personal Care and Style Fashion Hair Care Personal Hygiene Youth Personal Care School Stuff Dating All Categories Arts and Entertainment Finance and Business Home and Garden Relationship Quizzes Cars & Other Vehicles Food and Entertaining Personal Care and Style Sports and Fitness Computers and Electronics Health Pets and Animals Travel Education & Communication Hobbies and Crafts Philosophy and Religion Work World Family Life Holidays and Traditions Relationships Youth
- Browse Articles
- Learn Something New
- Quizzes Hot
- This Or That Game
- Train Your Brain
- Explore More
- Support wikiHow
- About wikiHow
- Log in / Sign up
- Computers and Electronics
- Presentation Software
- PowerPoint Presentations
Simple Steps to Make a PowerPoint Presentation
Last Updated: April 28, 2024 Fact Checked
Creating a New PowerPoint
Creating the title slide, adding a new slide, adding content to slides, adding transitions, testing and saving your presentation.
This article was co-authored by wikiHow staff writer, Darlene Antonelli, MA . Darlene Antonelli is a Technology Writer and Editor for wikiHow. Darlene has experience teaching college courses, writing technology-related articles, and working hands-on in the technology field. She earned an MA in Writing from Rowan University in 2012 and wrote her thesis on online communities and the personalities curated in such communities. This article has been fact-checked, ensuring the accuracy of any cited facts and confirming the authority of its sources. This article has been viewed 4,327,606 times. Learn more...
Do you want to have your data in a slide show? If you have Microsoft 365, you can use PowerPoint! PowerPoint is a program that's part of the Microsoft Office suite (which you have to pay for) and is available for both Windows and Mac computers. This wikiHow teaches you how to create your own Microsoft PowerPoint presentation on a computer.
How to Make a PowerPoint Presentation
- Open the PowerPoint app, select a template and theme, then like “Create.”
- Click the text box to add your title and subtitle to create your title slide.
- Click the “Insert” tab, then “New Slide” to add another slide.
- Choose the type of slide you want to add, then add text and pictures.
- Rearrange slides by dragging them up or down in the preview box.
Things You Should Know
- Templates make it easy to create vibrant presentations no matter your skill level.
- When adding photos, you can adjust their sizes by clicking and dragging in or out from their corners.
- You can add animated transitions between slides or to individual elements like bullet points and blocks of text.

- If you don't have a Microsoft Office 365 subscription, you can use the website instead of the desktop app. Go to https://powerpoint.office.com/ to use the website version.
- You can also use the mobile app to make presentations, though it's easier to do this on a computer, which has a larger screen, a mouse, and a keyboard.

- If you don't want to use a template, just click the Blank option in the upper-left side of the page and skip to the next part.

- Skip this step if your selected template has no themes available.

- If you're creating a PowerPoint presentation for which an elaborate title slide has been requested, ignore this step.

- You can change the font and size of text used from the Home tab that's in the orange ribbon at the top of the window.

- You can also just leave this box blank if you like.

- You can also click and drag in or out one of a text box's corners to shrink or enlarge the text box.

- On a Mac, you'll click the Home tab instead. [1] X Research source

- Clicking the white slide-shaped box above this option will result in a new text slide being inserted.

- Title Slide
- Title and Content
- Section Header
- Two Content
- Content with Caption
- Picture with Caption

- Naturally, the title slide should be the first slide in your presentation, meaning that it should be the top slide in the left-hand column.

- Skip this step and the next two steps if your selected slide uses a template that doesn't have text boxes in it.

- Text boxes in PowerPoint will automatically format the bulk of your text for you (e.g., adding bullet points) based on the context of the content itself.
- You can add notes that the Presentation will not include (but you'll still be able to see them on your screen) by clicking Notes at the bottom of the slide.

- You can change the font of the selected text by clicking the current font's name and then clicking your preferred font.
- If you want to change the size of the text, click the numbered drop-down box and then click a larger or smaller number based on whether you want to enlarge or shrink the text.
- You can also change the color, bolding, italicization, underlining, and so on from here.

- Photos in particular can be enlarged or shrunk by clicking and dragging out or in one of their corners.

- Remember to keep slides uncluttered and relatively free of distractions. It's best to keep the amount of text per slide to around 33 words or less. [2] X Research source

- Slide content will animate in the order in which you assign transitions. For example, if you animate a photo on the slide and then animate the title, the photo will appear before the title.
- Make your slideshow progress automatically by setting the speed of every transition to align with your speech as well as setting each slide to Advance . [3] X Trustworthy Source Microsoft Support Technical support and product information from Microsoft. Go to source

- If you need to exit the presentation, press Esc .

- Windows - Click File , click Save , double-click This PC , select a save location, enter a name for your presentation, and click Save .
- Mac - Click File , click Save As... , enter the presentation's name in the "Save As" field, select a save location by clicking the "Where" box and clicking a folder, and click Save .
Community Q&A
- If you save your PowerPoint presentation in .pps format instead of the default .ppt format, double-clicking your PowerPoint presentation file will prompt the presentation to open directly into the slideshow view. Thanks Helpful 5 Not Helpful 0
- If you don't have Microsoft Office, you can still use Apple's Keynote program or Google Slides to create a PowerPoint presentation. Thanks Helpful 0 Not Helpful 0

- Your PowerPoint presentation (or some features in it) may not open in significantly older versions of PowerPoint. Thanks Helpful 1 Not Helpful 2
- Great PowerPoint presentations avoid placing too much text on one slide. Thanks Helpful 0 Not Helpful 0
You Might Also Like

- ↑ https://onedrive.live.com/view.aspx?resid=DBDCE00C929AA5D8!252&ithint=file%2cpptx&app=PowerPoint&authkey=!AH4O9NxcbehqzIg
- ↑ https://www.virtualsalt.com/powerpoint.htm
- ↑ https://support.microsoft.com/en-us/office/set-the-timing-and-speed-of-a-transition-c3c3c66f-4cca-4821-b8b9-7de0f3f6ead1#:~:text=To%20make%20the%20slide%20advance,effect%20on%20the%20slide%20finishes .
About This Article

- Send fan mail to authors
Reader Success Stories
Artis Holland
Sep 22, 2016
Is this article up to date?
Oct 18, 2016
Jul 23, 2016
Margery Niyi
Sep 25, 2017
Jul 21, 2016

Featured Articles

Trending Articles

Watch Articles

- Terms of Use
- Privacy Policy
- Do Not Sell or Share My Info
- Not Selling Info
Keep up with the latest tech with wikiHow's free Tech Help Newsletter

Basic tasks for creating a PowerPoint presentation
PowerPoint presentations work like slide shows. To convey a message or a story, you break it down into slides. Think of each slide as a blank canvas for the pictures and words that help you tell your story.
Choose a theme
When you open PowerPoint, you’ll see some built-in themes and templates . A theme is a slide design that contains matching colors, fonts, and special effects like shadows, reflections, and more.
On the File tab of the Ribbon, select New , and then choose a theme.
PowerPoint shows you a preview of the theme, with four color variations to choose from on the right side.
Click Create , or pick a color variation and then click Create .

Read more: Use or create themes in PowerPoint
Insert a new slide
On the Home tab, click the bottom half of New Slide , and pick a slide layout.

Read more: Add, rearrange, and delete slides .
Save your presentation
On the File tab, choose Save .
Pick or browse to a folder.
In the File name box, type a name for your presentation, and then choose Save .
Note: If you frequently save files to a certain folder, you can ‘pin’ the path so that it is always available (as shown below).

Tip: Save your work as you go. Press Ctrl+S often or save the file to OneDrive and let AutoSave take care of it for you.
Read more: Save your presentation file
Select a text placeholder, and begin typing.

Format your text
Select the text.
Under Drawing Tools , choose Format .

Do one of the following:
To change the color of your text, choose Text Fill , and then choose a color.
To change the outline color of your text, choose Text Outline , and then choose a color.
To apply a shadow, reflection, glow, bevel, 3-D rotation, a transform, choose Text Effects , and then choose the effect you want.
Change the fonts
Change the color of text on a slide
Add bullets or numbers to text
Format text as superscript or subscript
Add pictures
On the Insert tab, select Pictures , then do one of the following:
To insert a picture that is saved on your local drive or an internal server, choose This Device , browse for the picture, and then choose Insert .
(For Microsoft 365 subscribers) To insert a picture from our library, choose Stock Images , browse for a picture, select it and choose Insert .
To insert a picture from the web, choose Online Pictures , and use the search box to find a picture. Choose a picture, and then click Insert .

You can add shapes to illustrate your slide.
On the Insert tab, select Shapes , and then select a shape from the menu that appears.
In the slide area, click and drag to draw the shape.
Select the Format or Shape Format tab on the ribbon. Open the Shape Styles gallery to quickly add a color and style (including shading) to the selected shape.

Add speaker notes
Slides are best when you don’t cram in too much information. You can put helpful facts and notes in the speaker notes, and refer to them as you present.

Click inside the Notes pane below the slide, and begin typing your notes.

Add speaker notes to your slides
Print slides with or without speaker notes
Give your presentation
On the Slide Show tab, do one of the following:
To start the presentation at the first slide, in the Start Slide Show group, click From Beginning .

If you’re not at the first slide and want to start from where you are, click From Current Slide .
If you need to present to people who are not where you are, click Present Online to set up a presentation on the web, and then choose one of the following options:
Broadcast your PowerPoint presentation online to a remote audience
View your speaker notes as you deliver your slide show.
Get out of Slide Show view
To get out of Slide Show view at any time, on the keyboard, press Esc .
You can quickly apply a theme when you're starting a new presentation:
On the File tab, click New .
Select a theme.

Read more: Apply a design theme to your presentation
In the slide thumbnail pane on the left, select the slide that you want your new slide to follow.
On the Home tab, select the lower half of New Slide .
From the menu, select the layout that you want for your new slide.
Your new slide is inserted, and you can click inside a placeholder to begin adding content.
Learn more about slide layouts
Read more: Add, rearrange, and delete slides
PowerPoint for the web automatically saves your work to your OneDrive, in the cloud.
To change the name of the automatically saved file:
In the title bar, click the file name.
In the File Name box, enter the name you want to apply to the file.
If you want to change the cloud storage location, at the right end of the Location box, click the arrow symbol, then navigate to the folder you want, then select Move here .
On the Home tab, use the Font options:

Select from other formatting options such as Bold , Italic , Underline , Strikethrough , Subscript , and Superscript .
On the Insert tab, select Pictures .
From the menu, select where you want to insert the picture from:

Browse to the image you want, select it, then select Insert .
After the image is inserted on the slide, you can select it and drag to reposition it, and you can select and drag a corner handle to resize the image.
On the slide canvas, click and drag to draw the shape.
Select the Shape tab on the ribbon. Open the Shape Styles gallery to quickly add a color and style (including shading) to the selected shape.

A horizontal Notes pane appears at the bottom of the window, below the slide.
Click in the pane, then enter text.

On the Slide Show tab, select Play From Beginning .

To navigate through the slides, simply click the mouse or press the spacebar.
Tip: You can also use the forward and back arrow keys on your keyboard to navigate through the slide show.
Read more: Present your slide show
Stop a slide show
To get out of Slide Show view at any time, on the keyboard, press Esc.
The full-screen slide show will close, and you will be returned to the editing view of the file.
Tips for creating an effective presentation
Consider the following tips to keep your audience interested.
Minimize the number of slides
To maintain a clear message and to keep your audience attentive and interested, keep the number of slides in your presentation to a minimum.
Choose an audience-friendly font size
The audience must be able to read your slides from a distance. Generally speaking, a font size smaller than 30 might be too difficult for the audience to see.
Keep your slide text simple
You want your audience to listen to you present your information, instead of reading the screen. Use bullets or short sentences, and try to keep each item to one line.
Some projectors crop slides at the edges, so that long sentences might be cropped.
Use visuals to help express your message
Pictures, charts, graphs, and SmartArt graphics provide visual cues for your audience to remember. Add meaningful art to complement the text and messaging on your slides.
As with text, however, avoid including too many visual aids on your slide.
Make labels for charts and graphs understandable
Use only enough text to make label elements in a chart or graph comprehensible.
Apply subtle, consistent slide backgrounds
Choose an appealing, consistent template or theme that is not too eye-catching. You don't want the background or design to detract from your message.
However, you also want to provide a contrast between the background color and text color. The built-in themes in PowerPoint set the contrast between a light background with dark colored text or dark background with light colored text.
For more information about how to use themes, see Apply a theme to add color and style to your presentation .
Check the spelling and grammar
To earn and maintain the respect of your audience, always check the spelling and grammar in your presentation .
Top of Page

Need more help?
Want more options.
Explore subscription benefits, browse training courses, learn how to secure your device, and more.

Microsoft 365 subscription benefits

Microsoft 365 training

Microsoft security

Accessibility center
Communities help you ask and answer questions, give feedback, and hear from experts with rich knowledge.

Ask the Microsoft Community

Microsoft Tech Community

Windows Insiders
Microsoft 365 Insiders
Was this information helpful?
Thank you for your feedback.

- Get started with computers
- Learn Microsoft Office
- Apply for a job
- Improve my work skills
- Design nice-looking docs
- Getting Started
- Smartphones & Tablets
- Typing Tutorial
- Online Learning
- Basic Internet Skills
- Online Safety
- Social Media
- Zoom Basics
- Google Docs
- Google Sheets
- Career Planning
- Resume Writing
- Cover Letters
- Job Search and Networking
- Business Communication
- Entrepreneurship 101
- Careers without College
- Job Hunt for Today
- 3D Printing
- Freelancing 101
- Personal Finance
- Sharing Economy
- Decision-Making
- Graphic Design
- Photography
- Image Editing
- Learning WordPress
- Language Learning
- Critical Thinking
- For Educators
- Translations
- Staff Picks
- English expand_more expand_less
PowerPoint - Slide Basics
Powerpoint -, slide basics, powerpoint slide basics.

PowerPoint: Slide Basics
Lesson 5: slide basics.
/en/powerpoint/saving-presentations/content/
Introduction
Every PowerPoint presentation is composed of a series of slides . To begin creating a slide show, you'll need to know the basics of working with slides. You'll need to feel comfortable with tasks like inserting a new slide, changing the layout of a slide, arranging existing slides, changing the slide view , and adding notes to a slide.
Optional: Download our practice presentation .
Watch the video below to learn more about slide basics in PowerPoint.
Understanding slides and slide layouts
When you insert a new slide , it will usually have placeholders to show you where content will be placed. Slides have different layouts for placeholders, depending on the type of information you want to include. Whenever you create a new slide, you'll need to choose a slide layout that fits your content.

Placeholders can contain different types of content, including text, images, and videos. Many placeholders have thumbnail icons you can click to add specific types of content. In the example below, the slide has placeholders for the title and content .

To insert a new slide:
Whenever you start a new presentation, it will contain one slide with the Title Slide layout. You can insert as many slides as you need from a variety of layouts.

To change the layout of an existing slide, click the Layout command, then choose the desired layout.

To quickly add a slide that uses the same layout as the selected slide, click the top half of the New Slide command.

Organizing slides
PowerPoint presentations can contain as many slides as you need. The Slide Navigation pane on the left side of the screen makes it easy to organize your slides. From there, you can duplicate , rearrange , and delete slides in your presentation.

Working with slides

- Delete slides : If you want to remove a slide from your presentation, you can delete it. Simply select the slide you want to delete, then press the Delete or Backspace key on your keyboard.
To copy and paste slides:
If you want to create several slides with the same layout, you may find it easier to copy and paste a slide you've already created instead of starting with an empty slide.

Customizing slide layouts
Sometimes you may find that a slide layout doesn't exactly fit your needs. For example, a layout might have too many—or too few—placeholders. You might also want to change how the placeholders are arranged on the slide. Fortunately, PowerPoint makes it easy to adjust slide layouts as needed.
Adjusting placeholders

- To delete a placeholder : Select the placeholder you want to delete, then press the Delete or Backspace key on your keyboard.
To add a text box:
Text can be inserted into both placeholders and text boxes . Inserting text boxes allows you to add to the slide layout. Unlike placeholders, text boxes always stay in the same place, even if you change the theme.

Using blank slides
If you want even more control over your content, you may prefer to use a blank slide , which contains no placeholders. Blank slides can be customized by adding your own text boxes, pictures, charts, and more.

While blank slides offer more flexibility, keep in mind that you won't be able to take advantage of the predesigned layouts included in each theme.
To play the presentation:
Once you've arranged your slides, you may want to play your presentation. This is how you will present your slide show to an audience.

- The presentation will appear in full-screen mode.
- You can advance to the next slide by clicking your mouse or pressing the spacebar on your keyboard. You can also use the arrow keys on your keyboard to move forward or backward through the presentation.
- Press the Esc key to exit presentation mode.
You can also press the F5 key at the top of your keyboard to start a presentation.
Customizing slides
To change the slide size:.
By default, all slides in PowerPoint 2013 use a 16 - by-9 —or widescreen —aspect ratio. You might know that widescreen TVs also use the 16-by-9 aspect ratio. Widescreen slides will work best with widescreen monitors and projectors. However, if you need your presentation to fit a 4-by-3 screen, it's easy to change the slide size to fit.

To format the slide background:
By default, all slides in your presentation use a white background . It's easy to change the background style for some or all of your slides. Backgrounds can have a solid , gradient , pattern , or picture fill.

- The background style of the selected slide will update.

To apply a theme:
A theme is a predefined combination of colors, fonts, and effects that can quickly change the look and feel of your entire slide show. Different themes also use different slide layouts , which can change the arrangement of your existing placeholders. We'll talk more about themes later in our Applying Themes lesson.

Try applying a few themes to your presentation. Some themes will work better than others, depending on your content.
- Open our practice presentation .
- Change the theme of the presentation.
- Delete slide 7. This slide should be blank.
- Add a new slide with the Title and Content layout to the end of the presentation.
- In the Title placeholder, type Adoption Event Dates .
- Select the Content placeholder and delete it.
- Insert a text box and type July 17, 2017 inside it.
- Change the slide size to Standard (4:3) . A dialog box will appear asking if you want to maximize or ensure fit. Choose Ensure Fit .

/en/powerpoint/text-basics/content/

Cloud Storage

Custom Business Email

Video and voice conferencing

Shared Calendars

Word Processing

Spreadsheets
Presentation Builder

Survey builder

Google Workspace
An integrated suit of secure, cloud-native collaboration and productivity apps powered by Google AI.
Tell impactful stories, with Google Slides
Create, present, and collaborate on online presentations in real-time and from any device.
- For my personal use
- For work or my business

Jeffery Clark
T h i s c h a r t h e l p s b r i d g i n g t h e s t o r y !

E s t i m a t e d b u d g e t

Make beautiful presentations, together
Stay in sync in your slides, with easy sharing and real-time editing. Use comments and assign action items to build your ideas together.

Present slideshows with confidence
With easy-to-use presenter view, speaker notes, and live captions, Slides makes presenting your ideas a breeze. You can even present to Google Meet video calls directly from Slides.

Seamlessly connect to your other Google apps
Slides is thoughtfully connected to other Google apps you love, saving you time. Embed charts from Google Sheets or reply to comments directly from Gmail. You can even search the web and Google Drive for relevant content and images directly from Slides.

Extend collaboration and intelligence to PowerPoint files
Easily edit Microsoft PowerPoint presentations online without converting them, and layer on Slides’ enhanced collaborative and assistive features like comments, action items, and Smart Compose.

Work on fresh content
With Slides, everyone’s working on the latest version of a presentation. And with edits automatically saved in version history, it’s easy to track or undo changes.

Make slides faster, with built-in intelligence
Assistive features like Smart Compose and autocorrect help you build slides faster with fewer errors.

Stay productive, even offline
You can access, create, and edit Slides even without an internet connection, helping you stay productive from anywhere.
Security, compliance, and privacy

Secure by default
We use industry-leading security measures to keep your data safe, including advanced malware protections. Slides is also cloud-native, eliminating the need for local files and minimizing risk to your devices.
Encryption in transit and at rest
All files uploaded to Google Drive or created in Slides are encrypted in transit and at rest.
Compliance to support regulatory requirements
Our products, including Slides, regularly undergo independent verification of their security, privacy, and compliance controls .
Private by design
Slides adheres to the same robust privacy commitments and data protections as the rest of Google Cloud’s enterprise services .

You control your data.
We never use your slides content for ad purposes., we never sell your personal information to third parties., find the plan that’s right for you, google slides is a part of google workspace.
Every plan includes

Collaborate from anywhere, on any device
Access, create, and edit your presentations wherever you are — from any mobile device, tablet, or computer — even when offline.

Get a head start with templates
Choose from a variety of presentations, reports, and other professionally-designed templates to kick things off quickly..

Photo Album

Book Report

Visit the Slides Template Gallery for more.
Ready to get started?
How to Save a Slide in PowerPoint Individually? [Quick Tip!]
By: Author Shrot Katewa
![How to Save a Slide in PowerPoint Individually? [Quick Tip!]](https://artofpresentations.com/wp-content/uploads/2021/09/Featured-Image-Save-Just-One-Slide-in-PowerPoint.jpg "1 slide powerpoint presentation")
There are times when we want to either just print or share just a single slide from our PowerPoint presentation. It might seem a bit difficult to do so initially, but the process is actually quite simple!
To save a slide in PowerPoint, select the slide from the slide preview panel on the left part of your screen. Press “Ctrl+C” to copy it. Now, click on the “File” tab, and open a “Blank PowerPoint Presentation”. Press “Ctrl+V” to paste the slide. Press “Ctrl+S” to save the single slide presentation.
In this article, I will share with you how you can save just one slide from an existing PowerPoint presentation.
Plus, I will also show you how to save a single slide as an image so that you can avoid the changes in the color and the look of the slide when you move it to a new presentation.
So, without further adieu, let’s get started!
1. How to Save a Single Slide in PowerPoint?
There are actually two different ways in which you can save a single slide in PowerPoint. The first method is where you copy the slide into a new presentation and save it separately. Another method is where you can save a single slide as an image!
Let’s take a look at both the methods below –
Method 1 – Save a Single Slide Using a New Presentation
If you want to extract and save a single slide from an existing PowerPoint presentation, the best thing for you to do is to copy the slide and paste it into a blank PowerPoint presentation.
Related Read – Check out my other article on How to Copy and Paste in PowerPoint that provides you with tips to help retain the design and formatting of your original slide.
Then, save the Powerpoint presentation that contains the single slide that you just pasted in it.
This method allows you retain editing capabilities to the single slide that you move into a new presentation.
Here are the steps that you need to follow –
Step 1 – Copy the Slide
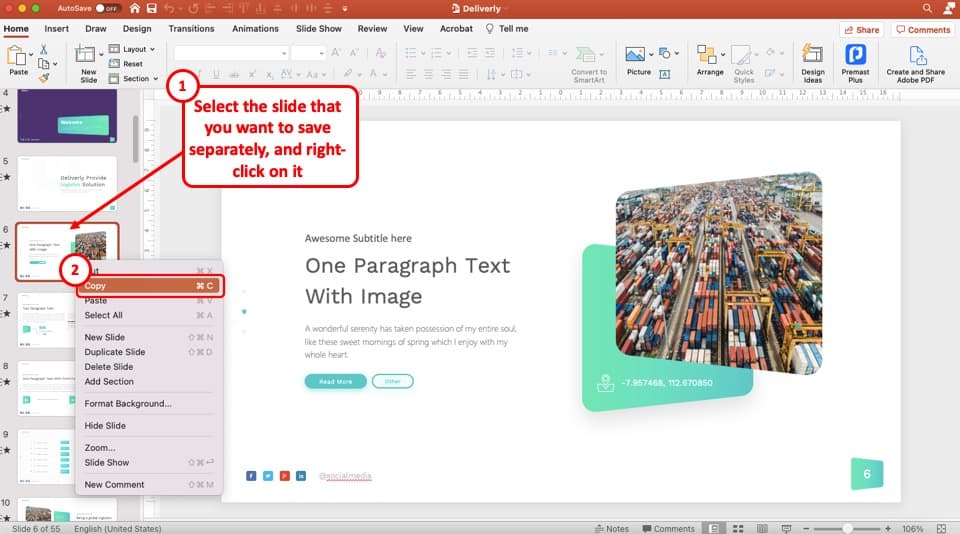
The first step is to copy the slide that you want to save as a presentation. To do that, first, select the slide from the “ Slide Thumbnail View ” on the left part of your PowerPoint window by clicking on it.
Then, “right-click” on the slide. From the options that are displayed in the menu, click on “ Copy “.
You can also use the keyboard shortcut “ Ctrl+C ” to copy the slide once it has been selected.
Step 2 – Open a Blank Presentation
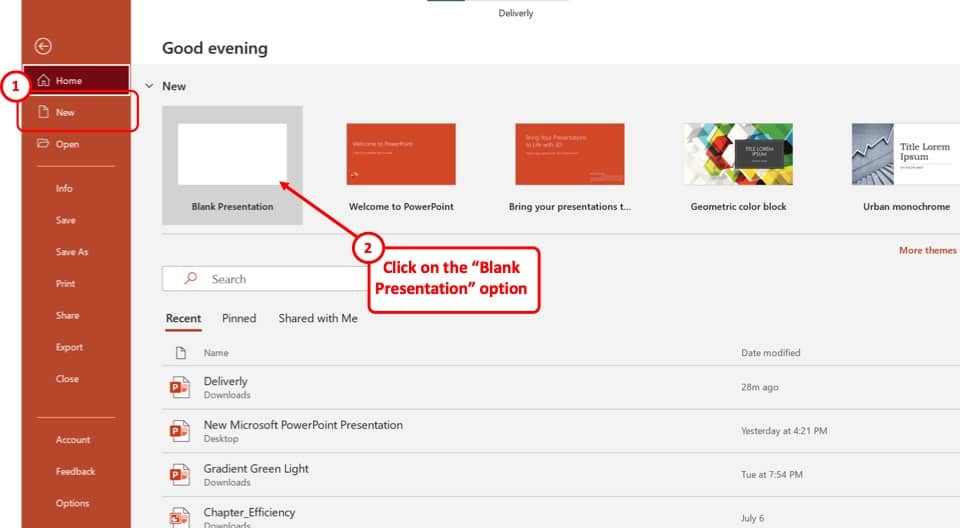
The next step is to move this slide into a new presentation. For that, first, we will need to open a blank presentation.
To open a blank presentation in PowerPoint, click on the “ File ” tab on the top. You will be taken to the backend view.
From the backend view, simply click on the “ New ” option on the left, and then select the “ Blank Presentation ” option.
This will open a new blank PowerPoint presentation.
You can also press “ Ctrl+N ” to open a new PowerPoint presentation and avoid all the above steps.
Step 3 – Paste the Copied Slide
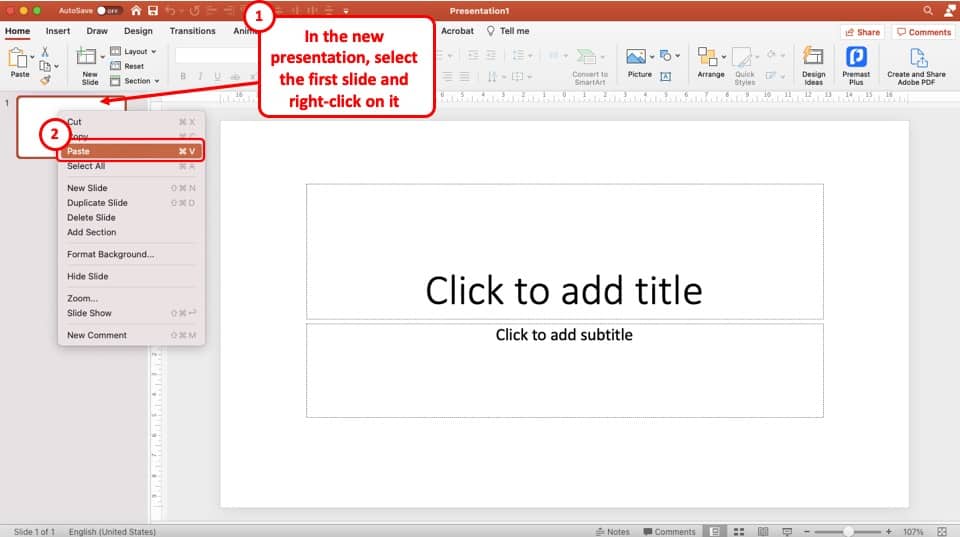
Once the new presentation is open, simply click on the first slide in the new presentation, and paste the slide that you have copied from the original presentation.
You can “ right-click ” on the first slide, and from the options that appear, click on “ Paste “.
Alternatively, you can also simply click on the first blank slide in the new presentation and press “ Ctrl+V ” to paste the copied slide.
Step 4 – Choose the “Keep Source Formatting” option
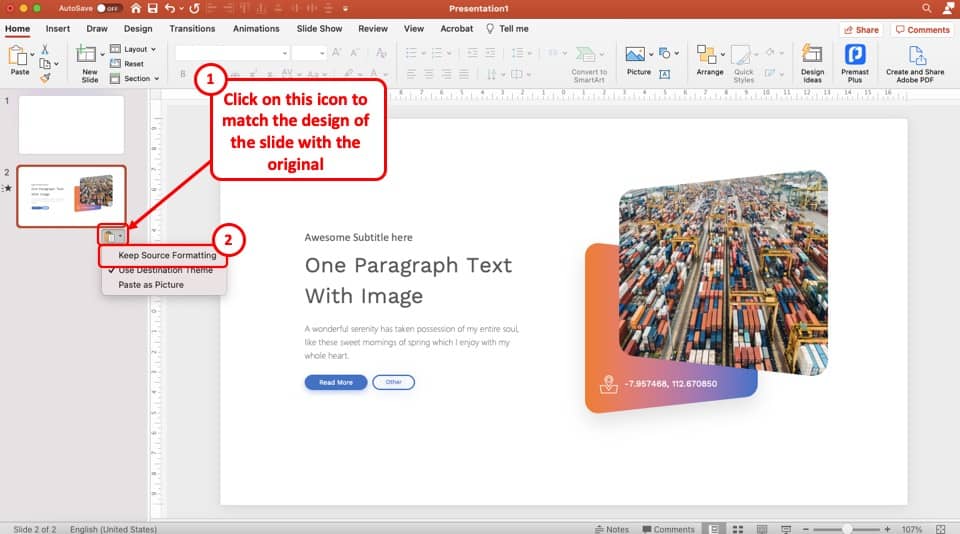
Once you’ve pasted the slide from the original presentation into a new blank presentation, you will notice that sometimes the formatting of the slide (meaning the color and font) doesn’t get carried over.
This can be annoying as you really don’t want to spend time recreating the slide!
To solve this problem, click on the small “clipboard” icon underneath the slide that you just pasted in the new presentation. A dropdown menu will appear.
Simply, choose the “ Keep Source Formatting ” option from the dropdown.
This option will basically retain the way text, image and other elements were formatted in the original presentation.
Step 5 – Delete Additional Slides
Now, all you are left to do is delete any additional slides that may be present in the new presentation.
To delete the slides from the presentation, select it by clicking on it. Then, right-click and choose the “ Delete Slides ” option.
You should be left with only a single slide that you copied from the original presentation.
Step 6 – Save the Presentation
The last step of the process is the make sure that you save the presentation.
To save a PowerPoint presentation, click on the “ File ” tab. Then, from the backend view, click on “ Save “.
You can also use the keyboard shortcut “ Ctrl+S ” to save a PowerPoint presentation.
You will be prompted with a new window asking you to choose a destination to save the file. Navigate to the specific folder where you want to save the file. Then, click “ Save “.
Method 2 – Save a Single Slide as an Image
If you are in a hurry and don’t really care about being able to edit the slide once it has been moved separately, then perhaps you should use this method.
Saving an individual slide as an image in Microsoft PowerPoint is quite an easy process.
It requires 4 easy steps as follows:
Step-1: “Right-click” on the slide
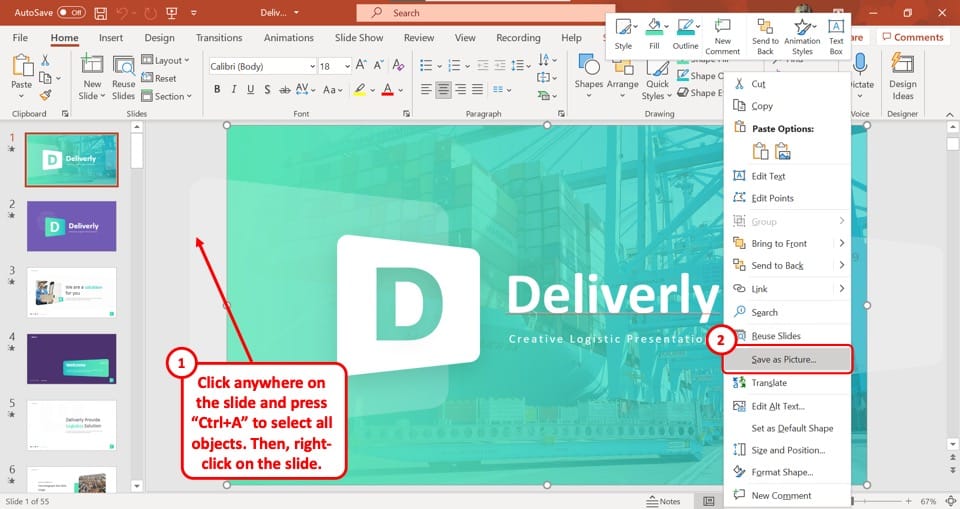
The first step is to go to the slide you want to save as an image and “Right Click” anywhere on the slide. This will open a drop-down menu.
Step-2: Select the “Save as Picture…” option
From the drop-down menu, click on the “Save as Picture…” option. This will open a new window.
In this window, you can select the folder you want to save the slide as a picture in. You can also rename the image by typing in the “File name” box.
Step-3: Select your preferred image format
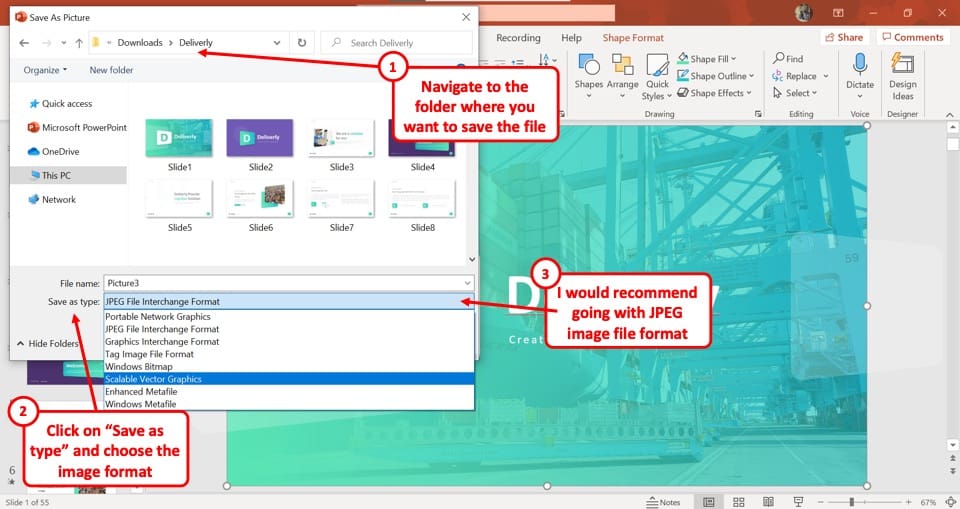
Below the “File name” box, click on the “Save as type” option. This will open a dropdown menu containing all the standard image format options. Click on your preferred format to select it.
I would recommend using the “ JPEG ” file format especially if you only plan to email this to a client or a team member.
If you plan to project it on a screen or print this slide on a huge paper, you would perhaps be better off going with the “PNG” file format.
Step-4: Click on the “Save” button
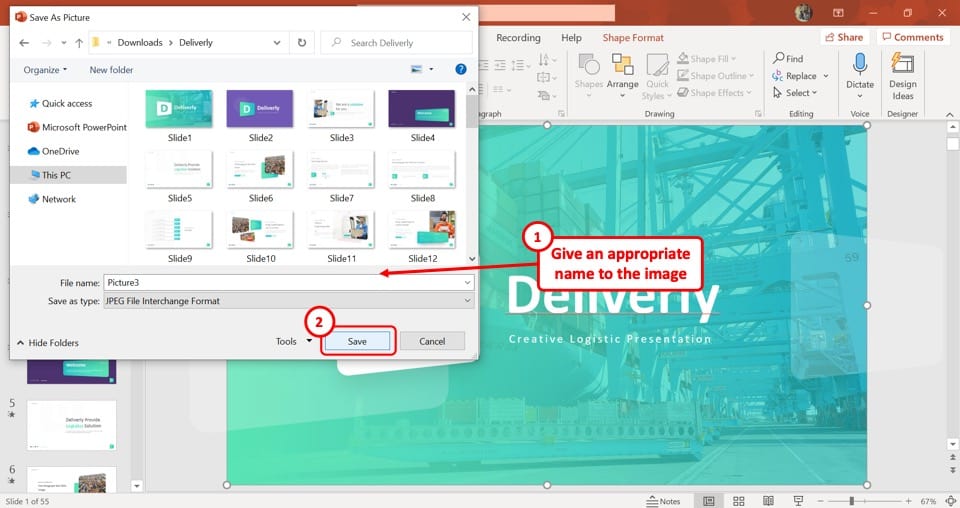
After naming your slide and selecting the image format, click on the “Save” button at the bottom of the new window. This will save the selected single slide as an image.
How to Save One Slide in PowerPoint as a Picture on Mac?
You can follow a similar process to the one mentioned in the previous section even on Mac. However, you can also use the export function and save just one slide as a picture in PowerPoint on Mac.
Here’s how to save just one slide as a Picture in PowerPoint on Mac –
Step-1: Select your preferred slide
First, click on the specific slide you want to save as a picture. Be sure to select the entire slide rather than a single element in the slide.
Step-2: Click on the “Export” option
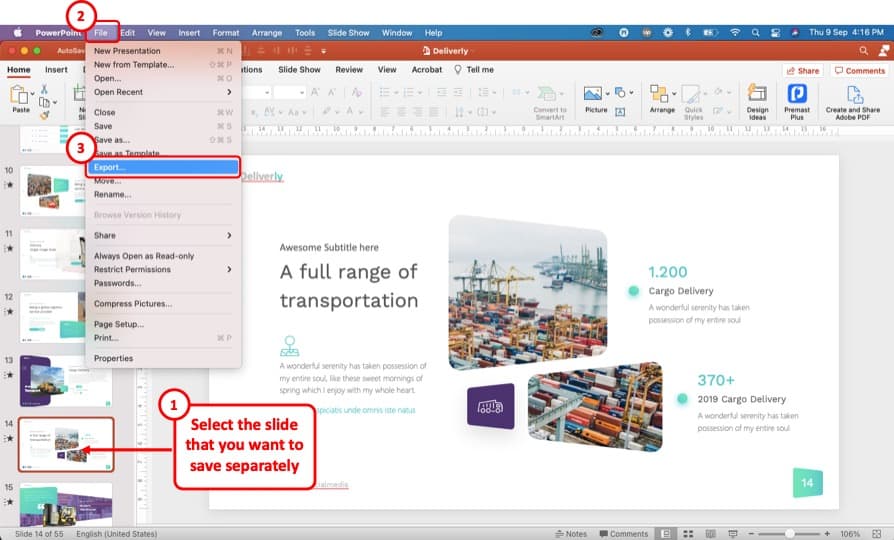
In the “Primary Menu” bar at the top of your screen, click on the “File” option, which will open a dropdown menu. From the dropdown menu, select the “Export” option.
Step-3: Click on the “File Format” box
Clicking on the “Export” option will open a pop-up menu. At the bottom of the pop-up menu, click on the “File Format” box. This will open a dropdown menu containing various file formats.
Step-4: Select the preferred file format
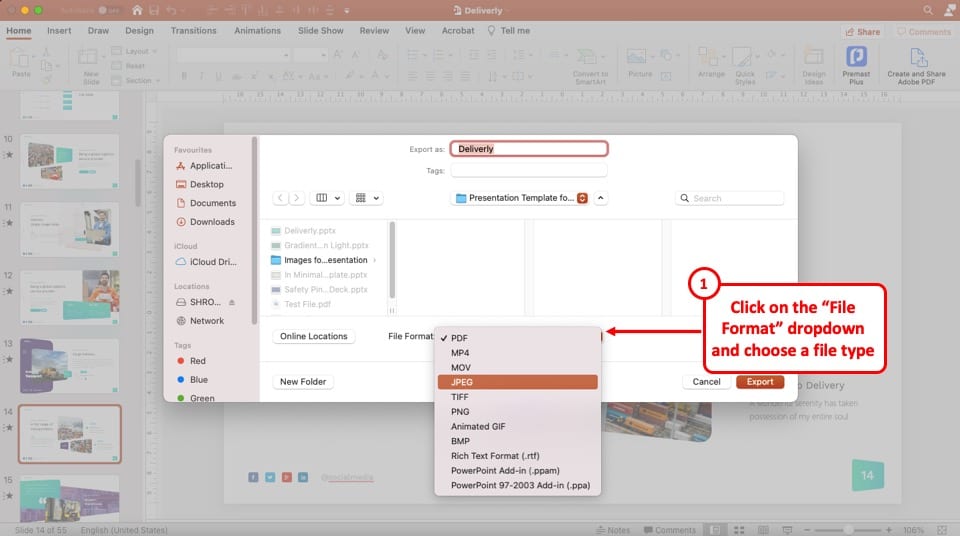
In the dropdown menu under the “File Format” box, there are three image formats which are “JPEG” , “TIFF” and “PNG.” Select your preferred image format.
My recommendation would be to choose the “JPEG” file format as that doesn’t significantly increase the size of the image and also maintains a decent quality for most purposes.
Step-5: Click on the “Save Current Slide Only” option
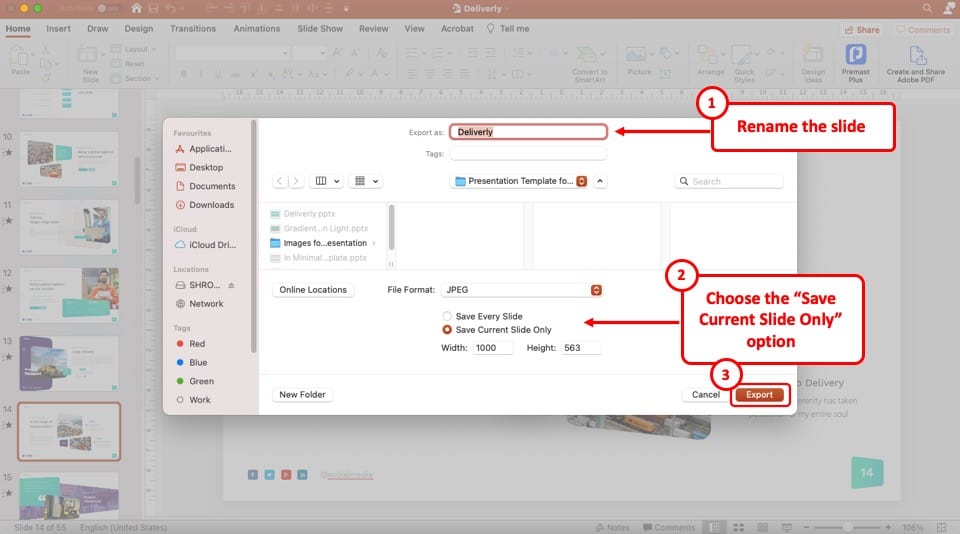
Once you select your desired file format, you will see two new options appear below the “File Format” box. Among the two options, click on “Save Current Slide Only.”
Step-6: Click on the “Export” button
To complete the process, click on the “Export” button which is located at the bottom of the pop-up window. Thus, the selected individual slide will be saved as a picture on your computer.
2. How to Save a Single Slide in PowerPoint as a PDF?
Another option is to save a single slide in PowerPoint as a PDF file. This is great especially when you want to send the slide to a client. Sending a file in a PDF format looks more professional.
Here’s what you need to do to save a single slide in PowerPoint as a PDF –
Step-1: Select the Slide
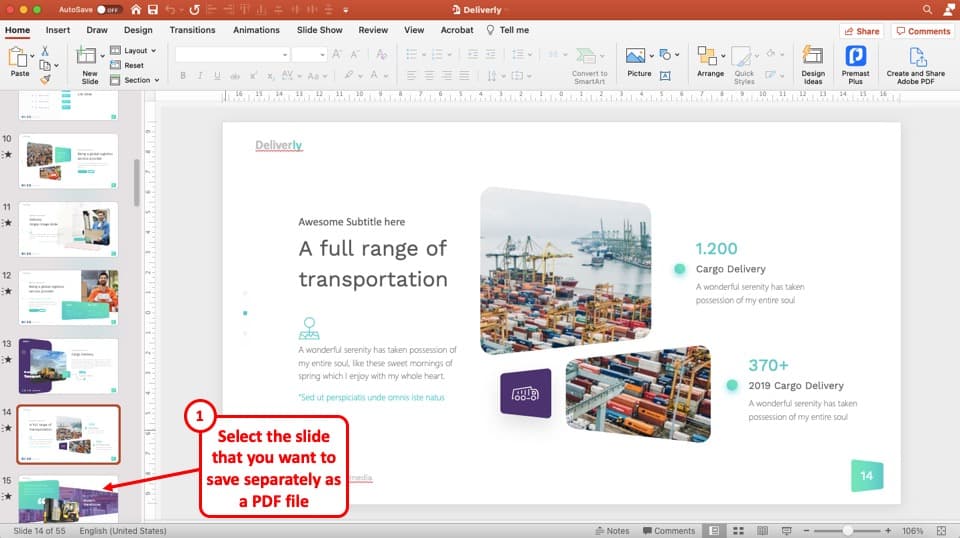
The first step is to select the slide that you want to save as a PDF file.
Step-2: Click on the “File” Tab and choose “Print”
At the top left corner of your screen, click on the “File” menu to open it. In the “File” menu, select the “Print” option from the sidebar at the right side of your screen.
Step-3: Select the “Microsoft Print to PDF” option
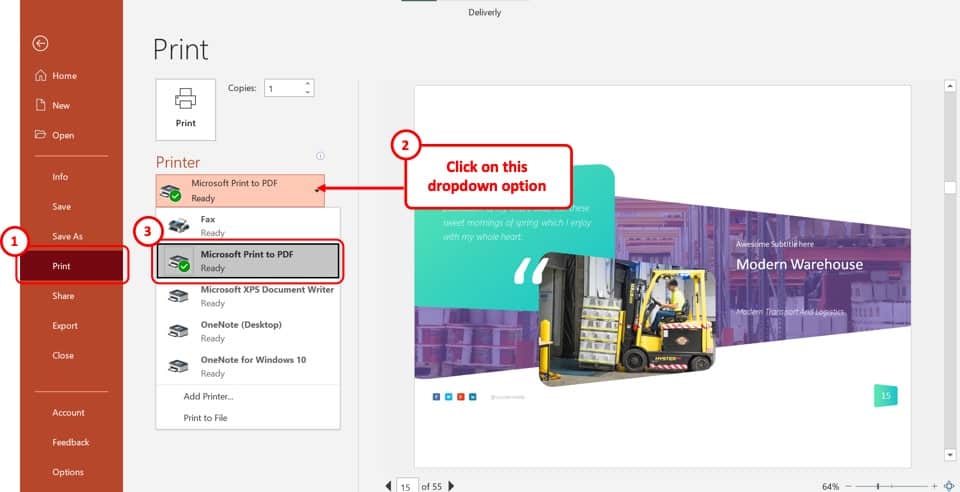
Once the “Print” option is open, click on “Printer” and select the “Microsoft Print to PDF” option from the dropdown menu.
Step-4: Click on the “Custom Range” button
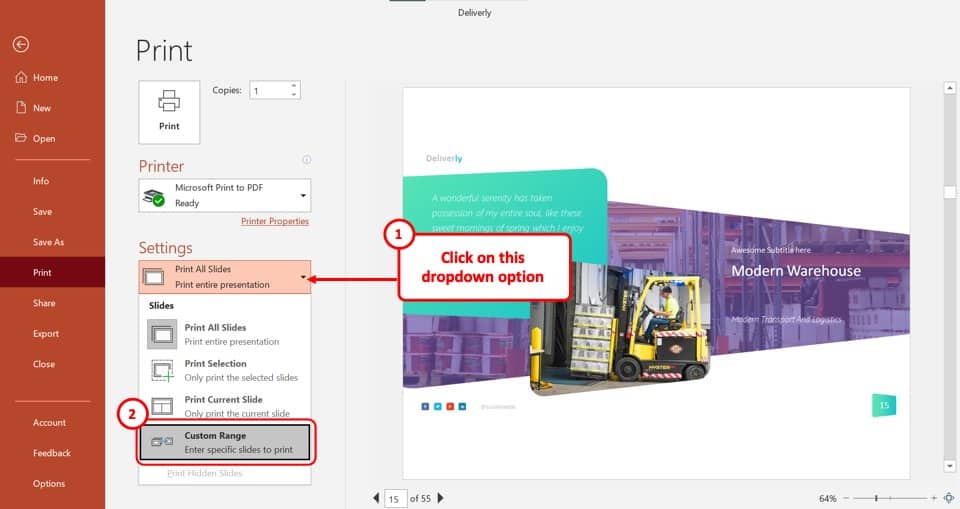
Now, under the “Settings” section, click on the top-most option which says “Print All Slides.” From the dropdown menu, click on the “Custom Range” button.
After that, click on the “Slides” box and type in the slide number of the slides that you want to save as PDF.
Step-5: Click on the “Print” button
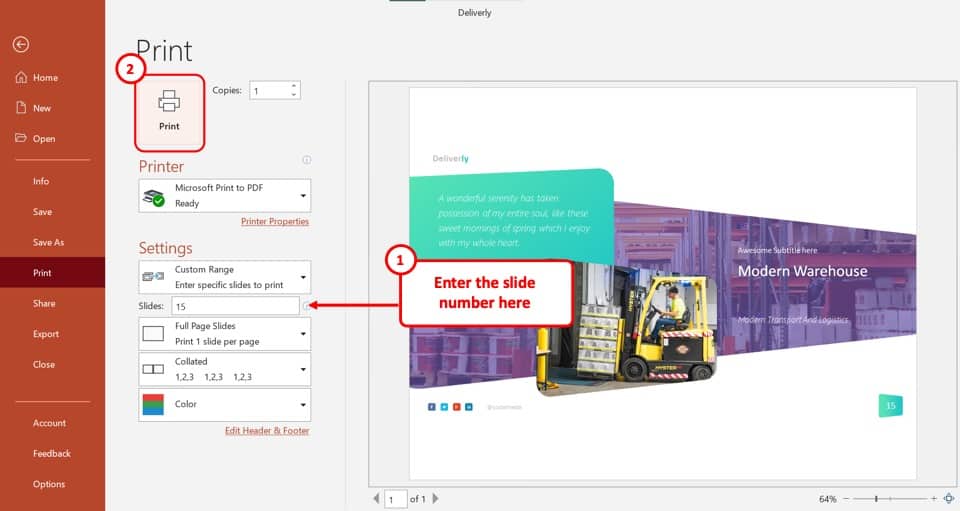
Now, click on the “Print” button to open a pop-up window. Type in the name of the PDF in the “File name” box and click on the “Save” button to save the selected slide as a PDF.
3. How to Save All Slides in PowerPoint as a Picture?
In Microsoft PowerPoint, you can save either an individual slide or an entire presentation as image files. Check out my other article where I’ve gone in-depth on how to save a PowerPoint as a picture . Make sure you check out the article for all the visual references and tips.
I’m also highlighting the process below but if you need to see the process with visual aids, check out the article linked above.
Step-1: Open the “File” menu
At the top-left corner of your PowerPoint window, you will find the “File” tab, which is the first option in the ribbon. Click on the “File” option to open a variety of options.
Step-2: Click on the “Save As” option
With the “File” menu opened, click on the “Save As” option from the sidebar located at the left side of your screen and select the folder where you want to save the pictures in.
To save the slides as pictures in a new folder, click on the “New Folder” button and type in the folder name.
Step-3: Click on “Save As Type”
The “Save As Type” drop-down menu is located in the text box that says “PowerPoint Presentation (*.pptx).”
Click on the text box to open a dropdown menu. Scroll down the menu and select your desired image format from “JPEG File Interchange Format (*.jpg)” , “PNG Portable Network Graphics Format (*.png)” , “TIFF Tag Image File Format (*.tif)” or “Scalable Vector Graphics Format (*.svg).”
After selecting your preferred image file format, click on the “Save” button beside the “Save As Type” box. This will open a new dialogue box.
Step-5: Click on the “All Sides” button
Now, all you have to do is click on the “All Slides” button from the dialogue box to save all the slides of your presentation as image files.
Please Note – Each slide will be saved as a separate image arranged serially by slide number in your selected folder when you save a complete PowerPoint presentation as an image.
4. How to Print a Single Slide in PowerPoint?
In Microsoft PowerPoint, the process of printing an individual slide is similar to the process of saving the slide as a PDF file. Open the “Print” option from the “File” tab and then follow the 3 basic steps:
Step-1: Select the “Add Printer…” option
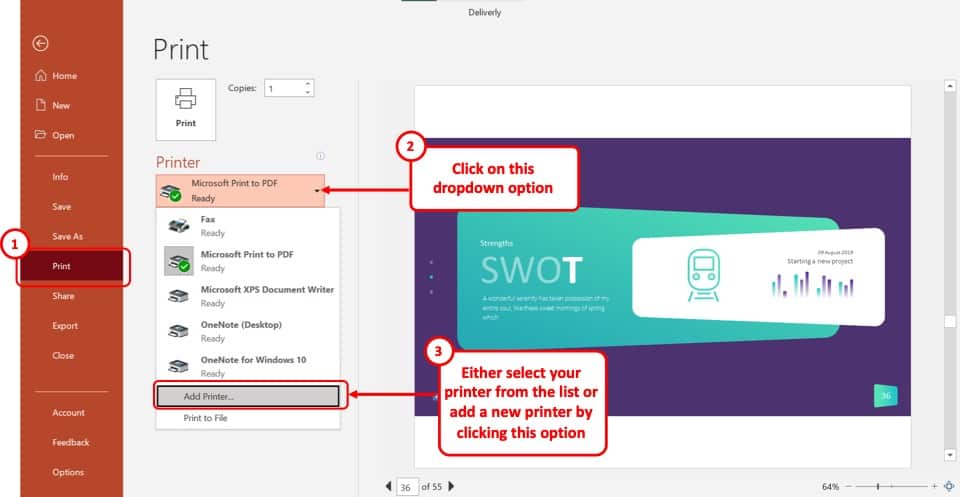
In the “Print” menu, click on the “Printer” box. From the dropdown menu, select the “Add Printer…” option.
This will prompt you to connect your printer to the computer. If your printer is already connected to your computer, click on it to select it.
Step-2: Select your preferred slide
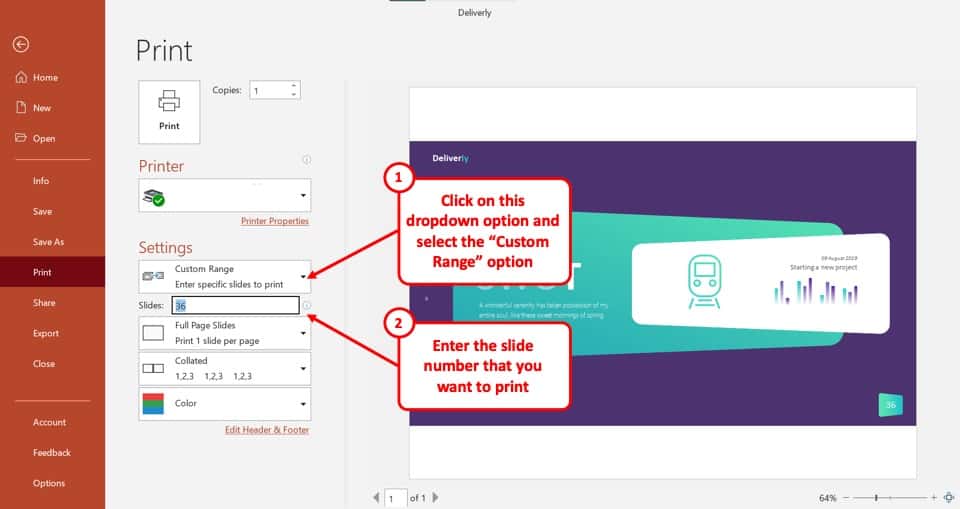
Next, click on the “Settings” button and select the “Custom Range” option from the drop-down menu. In the “Slides” box below, type in the slide number of your preferred slide.
Step-3: Click on the “Print” button

Now, all you have to do is click on the “Print” button for your printer to print the single PowerPoint slide you have selected.
Credit to cookie_studio (on Freepik) for the featured image of this article (further edited)
- PC & Mobile
- Microsoft Powerpoint
How to Make Just One Slide Portrait in PowerPoint Using a Workaround
Lee Stanton Lee Stanton is a versatile writer with a concentration on the software landscape, covering both mobile and desktop applications as well as online technologies. Read more August 28, 2021
When creating presentations, PowerPoint allows you to choose between the portrait or landscape orientation. Once selected, it’ll be applied throughout all slides. What if you want to mix it up?

We’ll discuss whether it’s possible to make one of the slides portraits in PowerPoint and more.
Can I Make Just One Slide Portrait in PowerPoint?
Unfortunately, PowerPoint doesn’t allow you to change the orientation for certain slides. You’d have to change the orientation of your entire presentation.
You can always insert a portrait-oriented image or crop your photos to make them fit the screen. In addition, PowerPoint allows you to fit the size of your slides to your monitor.
Although PowerPoint doesn’t allow mixed orientations, there’s a workaround that involves two presentation decks.
How to Make Just One Slide Portrait in Windows
Windows users can follow the steps below to insert one portrait slide:
- Create two presentation files. The first file is the master deck in landscape mode and the second file should contain that one portrait slide.

When you enter the slide show and go to the linked text, picture, or object, hover over or click it, depending on the option chosen. The portrait slide will appear on your screen. When you want to exit the portrait slide, press “Esc” and you’ll return to the landscape presentation.
If you want to use multiple portrait slides, we recommend creating a separate PowerPoint file for all of them and linking them to the main file.
Tip: When creating the two presentation files, do it in the same folder for easier navigation.
How to Make Just One Slide Portrait on a Mac
As with Windows, there’s a workaround. Follow the steps below:
- Create two PowerPoint files: one for your official presentation and the other for the single portrait slide to be inserted. Keep both in the same folder.
- Open the presentation deck and go to where you want to insert the portrait slide. Select the text, object, or picture to be connected to the portrait slide.
- Go to the “Insert” tab and press “Action.” If you have an older Mac, go to the “Slide Show” tab and press “Action.”
- Choose when you would like the portrait slide to appear. You can select “Mouse Click” or “Mouse Over.” For the latter, the portrait slide will open when you hover over the linked location.
- Press “Hyperlink to.”
- Choose “Other PowerPoint presentation” from the drop-down menu.
- Find the presentation that you want to link and press “Ok” twice.
Link Two or More Presentations to Switch Orientations
Unfortunately, PowerPoint doesn’t allow you to combine portrait and landscape in one file. But you can create just one portrait slide in a PowerPoint file and link it to your landscape presentation. Although it may seem complicated, this is the best solution available so far and it works for both Windows and Mac.
How did you manage this problem? Have you found any other solution or are you satisfied with the method as discussed above? Let us know in the comments.
Related Posts

Disclaimer: Some pages on this site may include an affiliate link. This does not effect our editorial in any way.

Lee Stanton February 9, 2024

Lee Stanton September 13, 2023

Lee Stanton July 21, 2023
Send To Someone
Missing device.
Please enable JavaScript to submit this form.
Home Blog PowerPoint Tutorials PowerPoint Slide Size: What is the Best Size for a Presentation
PowerPoint Slide Size: What is the Best Size for a Presentation

Whether you’re a business professional, educator, or public speaker, understanding what are the optimal slide dimensions can enhance the impact of your presentation. This guide will walk you through everything you need to know about the size of your PowerPoint presentation, from the basics to advanced tips.
What is the PowerPoint Slide Size?
PowerPoint slide size refers to the dimensions of the slides within your PowerPoint presentation. These dimensions determine how your content is displayed in a monitor or projector, and can significantly affect the overall look and feel of your presentation.
The most common slide sizes in PowerPoint are 16:9 (widescreen) and 4:3 (standard).
Choosing the right slide size is essential as it impacts how your content is perceived and ensures compatibility with various display devices. Once you define the optimal slide size for your next presentation, you can change the slide dimensions in PowerPoint following the steps described in our article.

It is important to understand the differences between Aspect Ratio and Pixel Dimensions.
The specific pixel dimensions for a standard 16:9 slide are 1920 pixels in width by 1080 pixels in height.
Understanding Aspect Ratio vs. Pixel Dimensions
Aspect ratio vs. pixel dimensions: what’s the difference.
When defining the optimal slide size for your presentation, it’s important to understand the difference between aspect ratio and pixel dimensions, as these terms often cause confusion but are critical for creating well-designed presentations.
Aspect Ratio
The aspect ratio refers to the proportional relationship between the width and height of your slide. It’s expressed as two numbers separated by a colon, such as 4:3 or 16:9. The aspect ratio defines the shape of your slide and how it will appear on different screens.
Pixel Dimensions:
Pixel dimensions, on the other hand, specify the total number of pixels in the width and height of your slide. This measurement determines the resolution and quality of your images and text in your PowerPoint slide size. For example:
- 1920 x 1080 pixels: This is a common dimension for a 16:9 aspect ratio, known as Full HD. It provides high clarity and detail, making it suitable for large screens and high-resolution displays.
- 1024 x 768 pixels: This dimension matches a 4:3 aspect ratio and is often used for smaller screens or lower resolution displays. It’s less detailed than 1920 x 1080 but can be effective for standard printouts or older projectors.
Why both slide size definitions matter? Understanding both aspect ratio and pixel dimensions is important because they impact how your PowerPoint slide size is viewed across different devices and formats. Here’s why:
- Consistency Across Devices: Ensuring your aspect ratio is compatible with the display device prevents issues like black bars on the sides (letterboxing) or content being cut off (cropping).
- Clarity and Detail: Choosing appropriate pixel dimensions ensures that your images and text appear sharp and clear, avoiding pixelation or blurriness.
- Professional Appearance: Matching the right aspect ratio and pixel dimensions helps maintain a polished and professional look, whether you’re presenting on a large screen, sharing a PDF handout (as we will see later), or displaying your slides online.
The Impact of Slide Size on Different Industries
Different industries have unique needs when it comes to presentation slide sizes. For instance:
- Business: Corporate presentations often require widescreen formats (16:9 slide size) to showcase detailed charts and data on modern projectors and screens. However, in some environments there are still projectors using the traditional 4:3 aspect ratio format for slide sizes.
- Education: Lectures and workshops benefit from both 16:9 and 4:3 formats, depending on the teaching aids and screen setups used.
- Design: Creative professionals need to create visually appealing slides that may require custom dimensions to stand out and effectively communicate their ideas.
Best Practices for Choosing a Proper Slide Size for your Presentation
When selecting an optimal PowerPoint slide size, consider the following:
- Audience and Venue: Tailor your slide size to the screen size and setup of your presentation venue. Widescreen (16:9) is typically best for large screens, while standard (4:3) works well for print distributions.
- Presentation Type: Webinars and online presentations held via Zoom or Teams , for example, often benefit from widescreen formats, while in-person meetings might require flexibility.
- Aesthetics vs. Functionality: Balance visual appeal with readability and content integrity.
When creating PDF handouts from your PowerPoint presentation, it’s also important to choose a convenient slide size that ensures readability and clarity in print.
The 4:3 aspect ratio is generally preferred for printed handouts as it aligns well with standard paper sizes such as A4 or Letter. This format ensures that your content fits neatly onto the page without excessive margins or cropping.
Additionally, using 4:3 for print ensures that text and graphics are appropriately scaled, maintaining the legibility and professional appearance of your handouts. This consideration is essential for creating effective printed materials that complement your live presentations.
Overcoming Challenges with Slide Size
Adapting content for different slide sizes.
Resizing images and adjusting layouts can be challenging. Here are some tips:
- Resizing Images: Ensure that images maintain their aspect ratio to avoid distortion.
- Text Adjustments: Modify font sizes and text boxes to fit the new slide dimensions without compromising readability.
- Consistency: Keep a consistent layout throughout your presentation to maintain a professional look.
Dealing with Mixed Slide Sizes in a Presentation
Sometimes, you may need to integrate slides with different dimensions. Here’s how:
- Transition Techniques: Use smooth transitions to blend slides of varying sizes seamlessly.
- Tools and Add-Ins: You can use PowerPoint add-ins that help manage and standardize slide sizes across your presentation.
Advanced Tips for Custom Slide Sizes
When it is time to innovate, the PowerPoint slide size can also play an important role. If you are considering to create a presentation for digital signage, or non traditional devices, choosing a custom PowerPoint slide size can help to achieve this. Here are some ideas and ways you can innovate by choosing a different slide size:
- Unique Dimensions: Create custom slide sizes for branding or special events.
- Custom Branding: Use non-standard slide sizes to align with your brand identity and marketing materials.
- Innovative Uses: Experiment with different dimensions to create unique visual experiences.
For example, to create high-quality digital signage content, you’d need to set the PowerPoint slides to a 1920×1080 resolution in vertical (portrait) or horizontal (landscape) mode, which are the typical digital sign screen sizes.
Understanding what is the optimal slide size and how to configure it is essential for creating effective and engaging presentations. By optimizing your slides, and overcoming common challenges, you can ensure your visual aids are impactful and professional. Keep experimenting with different sizes and formats to find what works best for your needs. Remember, the key to a successful presentation lies in the details—choosing the right slide size is one of them.

Like this article? Please share
Presentation Tips Filed under PowerPoint Tutorials
Related Articles

Filed under Google Slides Tutorials • May 22nd, 2024
How to Add Audio to Google Slides
Making your presentations accessible shouldn’t be a hard to accomplish task. Learn how to add audios to Google Slides and improve the quality and accessibility of your presentations.

How to Translate Google Slides
Whereas Google Slides doesn’t allow to natively translate slides, such process is possible thanks to third-party add-ons. Learn how to translate Google Slides with this guide!

Filed under PowerPoint Tutorials • May 22nd, 2024
How to Insert a Word Document into PowerPoint
If you asked yourself how to link research data in .doc format into your presentations, then don’t miss our guide on how to insert a Word document into a PowerPoint file.
Leave a Reply
How to use Google Slides, Google's free slideshow presentation maker
- Google Slides is Google's slideshow presentation program that allows real time collaboration.
- Google Slides is part of the Google Workspace suite, which also includes Google Docs and Gmail.
- Google Slides differs from Microsoft PowerPoint in its simplicity and collaboration options.
Google Slides is a presentation program that's part of Google Workspace, a group of productivity apps that also includes Gmail, Google Sheets, Goole Docs, Google Meet , and more. Workspace has more than 3 billion users worldwide.
With Google Slides, users can create, present, and collaborate via online presentations from various devices. You can present during Google Meet calls directly from Slides and embed charts from Google Sheets. You can also add YouTube videos to Slides presentations.
Google recently announced plans to add artificial intelligence features like its Gemini AI tool to its Workspace programs, which include Slides. Users will be able to use Gemini to create images or written content for slides, or even reference other files in their Drives or emails in their Gmail accounts.
What is Google Slides?
Google Slides is a cloud-based presentation program that's part of the Google Workspace. Google Slides can be used to create and deliver presentations online.
Several different themes are available in Slides for designing presentations. Users can customize Slides presentations in a variety of colors and styles. You can add photos, videos from YouTube, charts from Google Sheets , and information from many other sources. Different members of a team can contribute and collaborate on the presentation in real time.
There's no specific limit on how many slides you can add to your Google Slides presentation, but there is a 100 MB file size limit.
How to download Google Slides
To access Google Slides, visit slides.google.com .
Related stories
You can also open Slides while Gmail or Google Chrome is open by clicking on the Google Apps icon in the upper-right corner (shown as three rows of dots) and selecting Slides.
Another option is to download the Google Slides app for your Apple or Android device. Search for Google Slides in the Apple App Store or Google Play Store.
What templates are available?
Dozens of Google Slides templates are available, depending on your needs. For instance, there are general presentation templates, photography portfolios, pitch decks, case studies, science fair projects, and more.
To browse the templates available, open Google Slides. Then, click Template Gallery in the upper-right corner. Scroll through the options, choose the one that meets your needs, and start creating a presentation.
What's the difference between Google Slides and PowerPoint?
Both Google Slides and PowerPoint are presentation programs. Google Slides is a program within Google Workspace, and PowerPoint is a Microsoft program. PowerPoint is an offline program, while Slides is online which allows for real time collaboration.
The programs share many features that allow for presentation creation and delivery, but PowerPoint may offer more advanced design features.
You can convert Google Slides into PowerPoint presentations, and vice versa. From the top menu in Slides, click File, Download, and choose Microsoft PowerPoint.
How to learn to use Google Slides
Through Google Workspace, you can access several quick-start guides, cheat sheets, and troubleshooting resources to help you learn to use Google Slides. There are also many YouTube videos with tutorials for using Slides.
On February 28, Axel Springer, Business Insider's parent company, joined 31 other media groups and filed a $2.3 billion suit against Google in Dutch court, alleging losses suffered due to the company's advertising practices.
- Main content
The Best Free PowerPoint Templates to Download in 2022
- Share on Facebook
- Share on Twitter
By Al Boicheva
in Freebies
2 years ago
Viewed 143,188 times
Spread the word about this article:

Updated: May 18, 2022
If you wish to pair your well-prepared speech with an equally engaging visual presentation , PowerPoint is software that offers many opportunities for creativity. In today’s article, same as every year, we have selected for you a collection of the best free PowerPoint templates to download in 2022 . All are fully customizable. Most of the freebies are multipurpose and you could adapt them to any kind of project. However, we also included presentations suitable for more specialized topics such as education, online teaching, business, and more.
In the meantime, we also refreshed and updated all links for the selection of the best free templates for PowerPoint that you can download in 2021 , all still high-quality designs that check out well in 2022.
1. Free Multipurpose Business PowerPoint Presentation

This is a dark blue and grey business presentation suitable for multiple purposes. It’s especially valuable for students and schoolchildren, as it fits any topic. In terms of slides, the free presentation contains 4 slides – with a title, 35 slides – with photos, 18 slides – with text, 11 slides – with infographics, 4 slides with a calendar, 6 slides with diagrams, 6 slides with gadgets.
- Theme: Multi-purpose
- Slides: 50 free slides
2. Free Educational Presentation Templates for Online Lessons by Graphic Mama

This free educational PowerPoint template features 20 free presentation slides that, are all editable and compatible with PowerPoint and Google Slides . Perfect for online lessons and home-school presentations.
- Slides: 20 Free Slides
- Theme: Education, Classes, Lessons, Online teaching
3. Minimalism Presentation Free Template for PowerPoint and Google Slides

A smooth, minimalist, and elegant template that will serve as the basis for all your presentations. It features black and white colors, inspirational quotes, simple monochrome grids, infographics, and royalty-free tasteful images.
- Slides: 24 Free Slides
4. Animated Solar System Free Presentation Template for PowerPoint and Google Slides

This presentation template focuses on the curiosities of our solar system. Available for PowerPoint and Google Slides, it features futuristic graphic elements for immersion of your presentation (videos available in the PPT version).
- Slides: 25 Free Slides
- Theme: Astronomy, Science, Space
Did you know, that you can create amazing creative presentations with audio in PowerPoint? Take a look at our article How to Add Audio to PowerPoint: The Quick Step-by-Step Guide
5. Free Hand-Drawn PowerPoint Presentation

Including 8 different slides , designed with hand-drawn illustrations and sketches in a pencil style, this free Powerpoint template will give you an excellent base to make a lasting impression.
- Slides: 8 Free Slides
- Theme: Multi-purpose, Business, Marketing, Planning
6. Free Flow Chart PowerPoint Template

The main features of the free flow chart PowerPoint template include a well-designed presentation structure, graphic images in the text blocks, and animation effects of turning the slides.
- Theme: Infographics, Thesis, Analysis
7. Free Doodle Animated Infographics Template

This presentation packs 8 animated infographics templates for your presentation in a hand-drawn doodle style. All elements are grouped and easy to edit.
8. Dark Blue Free Presentation for Agencies

This template features 9 free slides for presenting your company or agency, goals, values, services, and values.
- Slides: 9 Free Slides
- Theme: Agencies, Startups, Business
9. Build Creative Agency Free Presentation

Build Creative Powerpoint Presentation Template. Fully customization & super easy to use to fit any kind of business use.
- Slides: 106 Free Slides
- Theme: Creative Agencies, Business
10. Free Pitch Deck PowerPoint Template

A free pitch deck PowerPoint template helps you to make this process easy as pie.
- Slides: 15 Free Slides
- Theme: Pitch Deck, Marketing, Analysis
11. Free Timeline Presentation Template

A free timeline presentation featuring timeline and process infographics for your project.
- Theme: Analysis, Marketing, Multi-purpose
12. Free Superhero PowerPoint Template

An easy-to-use layout that you can easily edit and get creative with. Everybody loves superheroes and so will your audience.
- Theme: Multi-purpose, Superhero
13. Free Chalkboard PowerPoint Template

Ideal for teachers who urgently need to prepare a report presentation, lesson, or lecture in Powerpoint and present it to their students.
- Theme: Education, Online teaching
You can also take a look at our collection of 25 Free Education PowerPoint Templates For Lessons, Thesis, and Online Lectures
14. 20 Free Infographic PowerPoint Templates

This infographic templates bundle with over 500 premade infographics includes 20 absolutely free templates for PowerPoint. Editable in many software products such as PowerPoint, Google Slides, Adobe CC, and more.
- 20 free infographics (539 infographic templates in total)
- Theme: Business, Analysis, Marketing, Comparison, Ecology
- Editable in PowerPoint , Google Slides, Keynote, Adobe CC
15. Free Business PowerPoint Presentation Template

A free Powerpoint template with 6 business slides that will give you the opportunity to create amazing, professional presentations. Perfect for reports, business plans, analysis, or product introduction.
- Slides: 6 Free Slides
- Theme: Business, Analysis, Marketing
16. Free Thesis PowerPoint Presentation

You will find slides dedicated to introductions, research, results, and discussion. The covers of the slides are specially designed to introduce each phase of your thesis.
- Slides: 35 Free Slides
- Theme: Analysis, Thesis, Education
17. Alpha: Gradient Design Free Template

Perfect for a wide range of presentation uses. This template is extremely easy to edit and you can use it for whatever you would like. It features 30 slides and a modern gradient design.
- Slides: 30 Free Slides

18. Free Minimalist Presentation Template

A free Powerpoint template, designed in a modern minimalist style. Perfect for presenting your brand, company, or startup with this fresh-looking template.
- Theme: Multi-Purpose
19. eCommerce Fast Delivery Free PowerPoint Templates to Download in 2022

This template shows fast delivery made by mobile phone, a concept of a delivery service using e-commerce in the app.
- Slides: 48 Free Slides
- Theme: eCommerce, Delivery Services
20. Contactless Payment Free PowerPoint Templates to Download in 2022

This template will help you present concepts related to online payments.
- Theme: Payment Security, Online Payment, Online Banking
21. Colorful Light Bulbs Free PowerPoint Template and Google Slides Theme

Whatever topic you’re going to talk about, this design will make your presentation shine. A multi-purpose template with light bulbs is always a good metaphor for creativity and innovation.
- Theme: Multi-Purpose, Innovation
22. Purple Hexagons Free Science PowerPoint Template and Google Slides Theme

A free design suited for scientific or technological topics. Its professional design with hexagonal shapes will attract your audience’s attention right away.
- Theme: Science, Medical, Educational
23. Artificial Intelligence (AI) Startup Business Plan Presentation

This template combines elegant colors with cool illustrations of technology and visual resources so that you can captivate the attention of potential investors.
- Theme: Artificial Intelligence, Science, Technology
You may also be interested in these 28 Free Technology PowerPoint Templates for Presentations from the Future
24. Animated Chemistry Lesson Educational PowerPoint Presentation

When you move from one slide to another there is a chemical reaction that gives the magic to this design. Great for teachers to make awesome and engaging chemistry presentations for their students.
- Slides: 13 Free Animated Slides
- Theme: Chemistry, Education, Science
25. Colorful 3D People Free PowerPoint Template and Google Slides Theme

3D illustrations are all the rage right now and this design makes the most of them and makes your content shine.
26. Blue Marketing Free PowerPoint Template and Google Slides Theme

The template’s design offers isometric illustrations on business, marketing, and technology topics. You can change the blue tones in the global theme colors and the illustrations will adapt.
27. Health Sciences Major for College: Mental Health Free Template

This specialized creative design will allow you to present mental health technician university or college training.
- Slides: 36 Free Slides
- Theme: Health, Mental Health, Psychology, Education
28. Spring Season in Fashion MK Plan Free PowerPoint Presentation

You can organize your marketing plan and analyze what will be trendy this spring with this beautiful template.
- Theme: Marketing, Sales, Fashion, Fashion Collections
29. Silver Waves Meeting Free Business Presentation

25 professional and elegant slides with a central stylistic element that gives the name to this layout, its silver waves.
- Theme: Multi-purpose, Business
30. Atoms and the Periodic Table Free Presentation

You can make it easy for your high school students is learning the Periodic Table of Elements or the structure of the atom.
- Theme: Chemistry, Science, Education
31. Modern Pitch Deck Free PowerPoint Template and Google Slides Theme

This design feels fresh and dynamic thanks to its slanted shapes and bright color details. You can change the green tone in the theme color palette in one click and adapt the presentation to your brand.
- Theme: Multi-purpose, Business, Marketing
32. Winning Company Culture Project Proposal Free Presentation Free Template

The Winning Company Project Proposal template sports a creative design that conveys the values of an ever-growing, innovative company.
- Theme: Business, Startup, Growing Company, Project Proposal
Do you want to browse more free templates? Take a look at these 30 Free Modern Powerpoint Templates for Your Presentation
33. Strategic Analysis: Business Environment Infographics Free Presentation

Among the 32 infographic resources included, you will find analysis tools such as PESTEL or SWOT analysis.
- Slides: 32 Free Slides
- Theme: Marketing, Strategic Analysis, Business, Corporate
34. Subtle Diagonals Free PowerPoint Template and Google Slides Theme

The design resembles a texture looking like carved stone with light reliefs. This stylish design is easily customizable to match your brand identity by simply changing the background color.
- Theme: Corporate, Business, Project Proposal
35. Floral Watercolor Free PowerPoint Template and Google Slides Theme

This free template has an elegant design that follows the latest trends, with hand-drawn flowers, golden details, and watercolor textures.
- Theme: Multi-purpose, Wedding Planning, Lifestyle, Gathering, Events
36. Silver Chrome 3d Elements Free Presentation Theme for Business

The creative modern silver decorations and 3D elements will give your project a futuristic appearance that looks up to date.
37. Improving Self-Esteem Free Presentation

This presentation is most suitable for an audience of younger students, to learn the importance of self-esteem.
- Theme: Psychology, Pedagogy, Education
38. Counseling and Student Services Major for College Free Presentation

Here we have a presentation ideal for counseling and pedagogy educational materials and counseling college majors.
- Theme: Psychology, Counseling
39. Youth Mental Health First Aid Workshop Free Presentation

Template for Google Slides and PowerPoint for lessons on how to give some first aid to people who suffer from bad mental health.
- Slides: 28 Free Slides
- Theme: Psychology, Education
Final Words
We hope you enjoyed our hand-picked selection of the best free PowerPoint templates to download in 2022. You can use these templates the way they are or completely transform them to match your personal style and make your next presentation spectacular.
It seems you are interested in finding more free PowerPoint resources. Or why not learn something new on the topic. In this case, make sure you check out some of the following articles:
- 16 Free Vector Infographic Design Templates: On Different Themes in Different Styles
- How to Convert Your PowerPoint Presentation into Google Slides
- Digital Marketing Trends 2022: How To Win An Audience and Keep It

Add some character to your visuals
Cartoon Characters, Design Bundles, Illustrations, Backgrounds and more...
Like us on Facebook
Subscribe to our newsletter
Be the first to know what’s new in the world of graphic design and illustrations.
- [email protected]
Browse High Quality Vector Graphics
E.g.: businessman, lion, girl…
Related Articles
Adobe character animator puppets by graphicmama (+freebies), 30 free vector images on pixabay by graphicmama, 50+ doodle illustrations for your designs (free and paid), 30+ free comparison infographic templates: amazing free collection, the best free powerpoint templates to download in 2019, 500+ free and paid powerpoint infographic templates:, enjoyed this article.
Don’t forget to share!
- Comments (0)

Al Boicheva
Al is an illustrator at GraphicMama with out-of-the-box thinking and a passion for anything creative. In her free time, you will see her drooling over tattoo art, Manga, and horror movies.

Thousands of vector graphics for your projects.
Hey! You made it all the way to the bottom!
Here are some other articles we think you may like:

47 Free PSD Infographic Templates to Download Right Now
by Iveta Pavlova

Create with GraphicMama
How to create a powerpoint presentation with cartoon character.
by Bilyana Nikolaeva

Free Vectors
20 beautiful isometric & 3d illustrations for your designs: free and paid.
by Lyudmil Enchev
Looking for Design Bundles or Cartoon Characters?
A source of high-quality vector graphics offering a huge variety of premade character designs, graphic design bundles, Adobe Character Animator puppets, and more.
How-To Geek
Why i prefer google slides to microsoft powerpoint.
Your presentations (and your sanity) will thank you.
Quick Links
- Ease of Collaboration
- Offline Access
- Integration With Other Google Tools
- More Storage Space
- Compatibility With PowerPoint
- AI Features
- Provide Detailed Version History
- Customization Features and Template Options
PowerPoint and Google Slides are two popular options for presentations, but which one is best? As someone who has used both programs for a long time, I've found that Google Slides offers many advantages that make it my go-to choice.
Let's be clear: I'm comparing the web-based PowerPoint and Google Slides versions. It's unfair to compare Google Slides to the desktop version of PowerPoint, isn't it? Here are some reasons why Google Slides is my favorite presentation tool.
1. Ease of Collaboration
Ease of collaboration was the central reason I switched to Google Slides for my presentation needs. As a content creator, I always aim for a seamless collaboration experience while dealing with my clients and team members. Google Slides offered exactly that, and I was in love with it.
So, is Google Slides better than PowerPoint for collaboration? It certainly has advantages that make it an ideal choice for a lot of users.
With Google Slides, you can efficiently work with others and share your work , no matter what kind of computer or phone you use. If you have a Google account and the link to the presentation, you can join in and make changes simultaneously with other members.
In contrast, to collaborate in PowerPoint, you have to consider various external factors, such as the user's working device and storage locations. For example, you might not be able to easily collaborate with someone who has an older version of PowerPoint, or with someone using a PowerPoint mobile due to feature limitations. Some things that are restricted in the free web and mobile version compared to PowerPoint on desktop include limited commenting tags, editing options, and more.
Additionally, Google Slides also has built-in chat and commenting features. This feature allows all your team members to stay on the same page and communicate with each other to streamline editing. In PowerPoint, you're limited to comments only.
2. Offline Access
Another important reason for my switch to Google Slides is the offline access feature. With this feature, you can create, edit, and present presentations to others even without an internet connection. Any changes you apply offline are synced automatically once you're back online, so you can keep working even without an internet connection.
You can activate offline access by checking the offline mode option in your Google Drive settings.
Also, with Google Slides, you don't need software installed on your computer to access your presentations offline. However, Microsoft PowerPoint requires an internet connection to save changes to OneDrive storage. No internet, no autosave!
3. Integration With Other Google Tools
Switching to Google Slides is easy if you already use Google apps like Docs, Sheet, Meet, and Gmail. They all work well together. You can import charts and tables from Google Sheets into your presentations with just a few clicks. Any modifications to the original data in Google Sheets will automatically be reflected in your Google Slides presentation.
For example, on Google Slides, open the "Insert" tab and navigate to the "Chart" option. From there, click on the "From Sheets" option and import a chart from Google Sheets.
Furthermore, you can add Google Keep notes to your Slides and share your content in Google Meet with Smart Canvas without switching between tabs.
On the other hand, Microsoft PowerPoint integrates with other Microsoft tools, but it's not as seamless as Google Slides and has limited integration capabilities. For example, unlike Google Sheets, which updates data automatically in Slides, PowerPoint requires you to manual refresh to update Excel charts. This means you need to copy and paste the updated chart from Excel to PowerPoint.
4. More Storage Space
Google Slides offers more storage space through Google Drive. With a Google account, you get 15GB of storage shared across Google Photos, Drive, and Gmail. This is significantly more than what Microsoft offers with its free PowerPoint Web version, which only provides 5GB of OneDrive storage. If you create large presentations with many images or videos, Google's extra storage space can be a significant advantage.
Additionally, Google offers affordable plans to upgrade your storage if needed. For example, you can get 100GB of storage for a $20 annual fee, which is perfect for those who create and store a lot of presentations. However, it's important to note that pricing for additional storage might be different depending on your region.
For detailed information, it's best to check your plans manually by clicking the "Get More Storage" option in Drive.
5. Compatibility With PowerPoint
I know what you're thinking—what if I need to work with someone who only uses Microsoft PowerPoint? Fear not; Google Slides has got you covered. You can import and export PowerPoint presentations into Google Slides, making switching between the two platforms easy.
This feature has been a lifesaver for me when I work with my clients or colleagues who use PowerPoint. I can easily collaborate with them and edit their files without any hassle. After making changes, I can save the Google Slides file again as a PowerPoint file.
You can add your PowerPoint file to Google Slides by either uploading it on Drive or directly opening it from the File > Open option.
6. AI Features
You can also use Google AI tools like Gemini to improve your presentations. For example, the Gemini AI feature in Google Slides allows users to generate images and slides based on their prompts. You can access Gemini from the Slides side panel and input your prompts, such as "Create a slide about," and it will generate slides accordingly.
This feature lets you quickly add relevant and visually appealing presentation content without leaving the Google Slides platform. Using Gemini AI, you can also generate background images in various styles, such as Vector art, Photography, Watercolor, and others.
In contrast, Microsoft AI feature tools like Copilot are not available on the PowerPoint web version. To use Copilot and other AI features in PowerPoint requires a paid subscription to either Microsoft 365 or Copilot Pro.
7. Provide Detailed Version History
Both Google Slides and Microsoft PowerPoint allow you to view and restore previously edited versions of your presentation. However, Google Slides stands out with its detailed version history feature. This feature groups certain versions of your presentation together if you make multiple changes over a short period. This makes it easy to find and select the version you need. These group versions are displayed under the Version History panel.
Another notable feature of Google Slides is the ability to name the modified versions. This is quite useful when working on large documents with multiple collaborators, as it can take time to find the version you want, among many others. To rename a version, open the "Version History" panel, click the three-dot icon, and then select "Name This Version" from the dropdown menu.
Once you've named important versions of your presentation, you can filter them by selecting the "Named Versions" option from the drop menu. This will highlight only the renamed versions, along with the current version of the document, making it easy to locate the version you need.
8. Customization Features and Template Options
The web version of Microsoft PowerPoint has limited features compared to the PowerPoint desktop app, which can sometimes be helpful while designing presentations. For example, you can't insert charts or equations in the web version. Additionally, you can't add hyperlinks to pictures or shapes. On the other hand, you can add equations, charts, and hyperlinks to images in Google Slides.
While both platforms offer a good selection of templates, I prefer Google Slides because its templates are user-friendly and easy to customize. It also provides more flexibility when working with themes compared to the web version of PowerPoint.
Google Slides isn't a flawless tool, but for me and many other presentation creators, it not only gets the job done but also has some advantages over PowerPoint. Whether you're a student, team, or regular user, you can use it to make clear and effective presentations.
Contribute to the Microsoft 365 and Office forum! Click here to learn more 💡
April 9, 2024
Contribute to the Microsoft 365 and Office forum!
Click here to learn more 💡
PowerPoint Forum Top Contributors: Steve Rindsberg - John Korchok - Bob Jones AKA: CyberTaz ✅
May 10, 2024
PowerPoint Forum Top Contributors:
Steve Rindsberg - John Korchok - Bob Jones AKA: CyberTaz ✅
- Search the community and support articles
- Microsoft 365 and Office
- Search Community member
Ask a new question
Source formatting not kept even when pasting with "Keep source formatting" option in PowerPoint
I am having an issue pasting slides from one presentation to another. When I paste a slide into a new presentation, the formatting is incorrect (shapes resized, text overflow, etc.) even when I paste with "Keep source formatting". The font sizes and types are the same in both versions of the slide, and the slide master for the slide in each presentation is the same. What could be causing this and how can it be fixed?
Original slide:

Pasted into new presentation:

- Subscribe to RSS feed
Report abuse
Reported content has been submitted
Replies (2)
- Microsoft Agent |
Dear Jessica James3,
Good day. Thank you for posting to Microsoft Community.
Based on the information you provided, I tested it on my side, and it seems correctly for me. I can’t reproduce the scenario you said.
To narrow down the issue and focus on the specific scenario you encountered, could you provide me some information below?
Could you tell me which version of PowerPoint do you use? Please provide me the screenshot about it. File > Account and capture the screenshot of the product information.
Do you have the same issue on other presentations?
Do your colleagues have the same issue?
At the same time, please repair your Office application and check if it works correctly for you.
Reference: Repair an Office application - Microsoft Support
I searched the similar situation in this forum and found a thread you could refer to: How to keep slide formatting when copying between ppt presentations? - Microsoft Community .
Thank you for your patience and understanding.
Claire | Microsoft Community Moderator
Was this reply helpful? Yes No
Sorry this didn't help.
Great! Thanks for your feedback.
How satisfied are you with this reply?
Thanks for your feedback, it helps us improve the site.
Thanks for your feedback.
- Volunteer Moderator
Check the slide size of the presentation you're pasting INTO vs the slide size of the presentation you're pasting FROM.
If they're wildly different, that might be the cause of what you're seeing.
If so, instead of copy/pasting entire slides, create a new blank slide in the "target" presentation, then select everything on the "source" slide (CTRL + A), copy it then paste into the new "target" slide.
Question Info
- For business
- Norsk Bokmål
- Ελληνικά
- Русский
- עברית
- العربية
- ไทย
- 한국어
- 中文(简体)
- 中文(繁體)
- 日本語

5 Free Alternatives To Microsoft PowerPoint
M icrosoft PowerPoint has always been the default choice for creating professional meeting briefs or fun little project demonstrations in schools. Its inclusion as a free service for students or working professionals makes it a no-brainer to use. However, for the general public, it can get quite expensive to pay for a subscription just to be able to create simple presentation slides. Although you can subscribe to Microsoft's Office Suite and get more bang for your buck, the pricing still doesn't hit the affordable range for most.
Fortunately, completion has been growing, and a sea of strong contenders offer similar services to PowerPoint. After considering feature sets, here are five of the best free alternatives to Microsoft PowerPoint. At the end of the article, you can find a detailed explanation of why we've chosen the services, alongside useful comparisons that may help you make your decision easier.
Read more: The 20 Best Mac Apps That Will Improve Your Apple Experience
When it comes to productivity apps, Zoho makes some of the better ones in the market. Zoho Sheet, for example, is one of the best Microsoft Excel alternatives out there — owing to its extensive product catalog, there is a great way to view and edit presentations. The aptly named Zoho Show lets you design and demonstrate professional-looking slides, all without having to download the program.
Zoho takes a minimal approach to most of its services, and its PowerPoint application is no different. You'll find that most menus are contextually aware of what tasks you're currently performing, which helps keep unnecessary tools out of the way and bring the important ones in focus. There is also a huge library of customizable templates you can choose from, making it easier to kickstart your presentation work.
Zoho Show is completely free to use for individuals and offers unlimited cloud storage. No features are locked behind a paywall, and rest assured, you can fully rely on this online presentation-making tool for all your needs, be it for school or work.
Canva is a service that can easily climb up to becoming everyone's favorite once they start using it. While most applaud it for its graphic designing prowess, there are many other things Canva can do that you probably aren't aware of . Among them is the ability to craft beautiful slides for your presentations and projects.
By creating a free account, you can access thousands of templates on Canva. You can filter these by use case—maybe you need one for a professional business briefing or a casual one explaining why your pet dog is the best canine. There is a whole section of ready-to-use templates dedicated to mobile-friendly viewing as well, which is something you don't usually find to be as accessible with other tools.
Like most presentation apps, Canva lets you collaborate with your team members and work across devices seamlessly. The Canva app for mobile also lets you control your slides remotely during your presentation. Some menus also feature AI-featured tools to add one-click enhancements to your slides -- unfortunately, these are locked behind premium subscription tiers. However, for the cent percent of the population, Canva can be used without spending a dime to meet a plethora of creative needs.
Apple takes great pride in developing in-house solutions to meet every user requirement. While most of its products dominate the competition in popularity, the same cannot be said for Keynote , the company's version of Microsoft PowerPoint. The program was first released in 2003 with macOS Big Sur and has largely remained one of those icons you glance over and forget about.
However, recent versions of Keynote have made it a compelling alternative to PowerPoint. Not only is it pre-installed on every Apple device, including your iPhone, but it also works best with the iPad touchscreen. Keynote has a largely clean and professional approach to the built-in templates, but nothing is stopping you from going creative. Animations are one of Keynote's strongest suits, allowing you to create near cinematic-looking presentations with just a few clicks.
While you can still use Apple Keynote through iCloud on Windows devices, this alternative is clearly meant for people surrounded by the walled garden of Apple technology. It makes use of features like AirDrop, Live Photos, and VoiceOver — all of which are technologies available across Apple devices. Using Apple Keynote is completely free, and the app has easy exporting tools that make working with Microsoft PowerPoint less of a hassle.
WPS Presentation
WPS Office makes some of the best solutions for creating and editing documents on smartphones , but their service offerings extend to Windows, macOS, and even Linux. WPS Presentation is perhaps the closest you'll get to Microsoft PowerPoint in terms of the user interface and how most tools are bundled in familiar locations.
This PowerPoint app offers real-time collaboration where you can invite your team members and work on the same document remotely. Like most collaboration tools, users can leave comments to suggest changes or add information for other people on the team.
WPS Presentation is not the only free product; you can utilize every app in the WPS Office suite. Unlike most competitors, you don't need to download or use a separate mini-app to make presentations. WPS Office has a document editor, PowerPoint creator, spreadsheet manager, and other tools all within its umbrella. Premium plans for this service exist, but they mostly cater to unlocking features for editing PDFs.
Google Slides
As a netizen, you most likely already have a Google account. Not only is it required to make any meaningful use of your Android phone, but popular services that we take for granted, like Gmail and Drive, all fall under Google's umbrella. One such free service that the tech giant has at its disposal is Google Slides . While the barebones UI might seem lackluster at first, Slides has nearly the same level of functionality as Microsoft PowerPoint and can even be supercharged by add-ons.
All of Google's workspace apps, such as Docs, Sheets, and Slides, provide an intuitive way to work in a team. You can add comments, use annotations, and share the presentation with limited access to others. You can use one of the many predesigned Google Slides templates for simple presentations , or browse for templates that cater to specific needs. Being part of a bigger service catalog has its obvious advantages, such as seamless integration with Google Meet, Gmail, and other products from Google that you already use.
We recommend Google Slides to anyone who needs to create and edit PowerPoint presentations on the go and can't be bothered with working in a complicated environment. The service is also available as an app for Android and iOS, and you can export your presentations in a wide range of formats, including PPT, PDF, or PNG for individual slides.
To Pay Or Not To Pay?
You'll notice that all the services we've mentioned on this list are free to use. In fact, you can use Office 365 apps online for free — including PowerPoint, which makes purchasing a standalone subscription to the Microsoft PowerPoint app quite redundant. However, nearly every free alternative here short of Keynote also offers premium plans, but should you consider buying one?
For the vast majority of people who are looking for a robust software to create, edit, and share presentations with — these free options deliver exceptionally well in every aspect. Some apps like Google Slides and Apple Keynote let you work in smaller teams with the free tier as well. Apps like WPS Office and Canva tend to lock new and exciting features like AI tools behind a paywall, and while these are nice to have, you definitely can do without them.
If you're looking for a presentation tool for a company with multiple people, you can scale up using any of the alternatives mentioned on this list. Both Google Workspace and Zoho offer reliable and enterprise-level plans you can upgrade to. For everyone else — enjoy creating and demonstrating your PowerPoint presentations for free.
Read the original article on SlashGear .

Got any suggestions?
We want to hear from you! Send us a message and help improve Slidesgo
Top searches
Trending searches

26 templates

great barrier reef
17 templates

15 templates

football soccer
22 templates

18 templates

49 templates
Movie Background Infographics
It seems that you like this template, premium google slides theme, powerpoint template, and canva presentation template.
Download the Movie Background Infographics template for PowerPoint or Google Slides and discover the power of infographics. An infographic resource gives you the ability to showcase your content in a more visual way, which will make it easier for your audience to understand your topic. Slidesgo infographics like this set here are very simple to use. Just download the template, select your favorite infographics and edit them and they're ready to paste into your presentation (or use them independently if you wish). Move towards clarity thanks to these infographics.
Features of this template
- 100% editable and easy to modify
- Different infographics to boost your presentations
- Includes Flaticon’s extension for further customization
- Designed to be used in Google Slides, Canva, and Microsoft PowerPoint
- Includes information about how to edit and customize your infographics
- Supplemental infographics for the template Movie Background
How can I use the infographics?
What are the benefits of having a Premium account?
What Premium plans do you have?
What can I do to have unlimited downloads?
Combines with:
This template can be combined with this other one to create the perfect presentation:

Don’t want to attribute Slidesgo?
Gain access to over 25400 templates & presentations with premium from 1.67€/month.
Are you already Premium? Log in
Related posts on our blog

How to Add, Duplicate, Move, Delete or Hide Slides in Google Slides

How to Change Layouts in PowerPoint

How to Change the Slide Size in Google Slides
Related presentations.

Premium template
Unlock this template and gain unlimited access

Register for free and start editing online
IMAGES
VIDEO
COMMENTS
Create a presentation. Open PowerPoint. In the left pane, select New. Select an option: To create a presentation from scratch, select Blank Presentation. To use a prepared design, select one of the templates. To see tips for using PowerPoint, select Take a Tour, and then select Create, . Add a slide.
4 Ps Of Marketing PPT Presentation Template & Google Slides. Beautiful Presentation Slides PPT With Arrow Model. Free. Stunning Process Infographic Template Presentation. Free. Innovative Multiple Chart PowerPoint And Google Slides. Free. Reflective PPT Presentation And Google Slides Themes.
Microsoft PowerPoint is a presentation design software that is part of Microsoft 365. This software allows you to design presentations by combining text, images, graphics, video, and animation on slides in a simple and intuitive way. Over time, PowerPoint has evolved and improved its accessibility to users.
To create this shape, you can follow the below steps -. On the menu bar, click on "Insert" and then click on "Shapes". Under the basic shapes option, select the trapezium shape. Next, create the shape on your slide. Make sure that the size of the trapezium is good enough to cover about ⅔ parts of the slide.
Create a blank presentation. Open PowerPoint. Select one of the Blank Presentation and start typing. Note: Microsoft 365 subscribers will find Design Ideas based on the words you type. You can browse and select a new look.
To do that, simply go up to the Home tab and click on New Slide. This inserts a new slide in your presentation right after the one you were on. You can alternatively hit Ctrl+M on your keyboard to insert a new blank slide in PowerPoint. To learn more about this shortcut, see my guide on using Ctrl+M in PowerPoint.
Open the PowerPoint app, select a template and theme, then like "Create.". Click the text box to add your title and subtitle to create your title slide. Click the "Insert" tab, then "New Slide" to add another slide. Choose the type of slide you want to add, then add text and pictures. Rearrange slides by dragging them up or down in ...
Select the text. Under Drawing Tools, choose Format. Do one of the following: To change the color of your text, choose Text Fill, and then choose a color. To change the outline color of your text, choose Text Outline, and then choose a color. To apply a shadow, reflection, glow, bevel, 3-D rotation, a transform, choose Text Effects, and then ...
In PowerPoint, you can create a presentation from scratch, or from a theme with built-in graphics, fonts, and placeholders for your text, images, and content...
Meet our selection of One Slide Presentation Templates for PowerPoint and Google Slides, a solution to condense your presentation speech in an easy-to-remember format. These repurposable slides are entirely compatible with any presentation software, for Windows and Mac users. Customize them and let the audience talk about your high-end ...
From the Home tab, click the bottom half of the New Slide command. Choose the desired slide layout from the menu that appears. The new slide will appear. Click any placeholder and begin typing to add text. You can also click an icon to add other types of content, like a picture or chart.
7) Limit bullet points. Keep your bullet points to a maximum of 5-6 per slide. In addition, the words per bullet point should also be limited to 5-6 words. It's also wise to vary what you present in each slide, such as alternating between bullet points, graphics, and graph slides, in order to sustain the interest and focus of your audience.
Get started with PowerPoint for Beginners. Follow this 20-Minute step by step PowerPoint tutorial to start creating presentations smoothly.Contents of this v...
#powerpoint #advanced_powerpoint_animation #powerpoint_animation_tutorial Create a parachute using microsoft PowerPoint https://youtu.be/uITNr2ehOJoDesign a...
Best Practice PowerPoint Presentation Tips. Use A Consistent Presentation Design. One Topic Per Slide. Avoid information overwhelm by using the "Rule of Three". Display one bullet at a time. Presentation Blunders To Avoid. Avoid unnecessary animations. Only add content that supports your main points.
Use Google Slides to create online slideshows. Make beautiful presentations together with secure sharing in real-time and from any device.
Free online presentation maker. Try our new tool to edit this selection of templates for people that want to let their creativity run free. Create interactive resources easily, quickly and without the need for any software. A really useful tool for teachers and students. Move the content, add images, change colors and fonts or, if you prefer ...
Persuade your audience using this various employees working together as one team icon ppt powerpoint presentation professional master slide. This PPT design covers three stages, thus making it a great tool to use. It also caters to a variety of topics including various employees working together in a small cabin.
Pictures. Use this option if you want to insert 1 or more images that are saved on your computer. You can CTRL+click on the images you want to add. Likewise, you can also hold down the SHIFT key if you want to add images that are saved right next to each other. Insert one or more pictures to your slide.
Step-1: "Right-click" on the slide. The first step is to go to the slide you want to save as an image and "Right Click" anywhere on the slide. This will open a drop-down menu. Step-2: Select the "Save as Picture…" option. From the drop-down menu, click on the "Save as Picture…" option. This will open a new window.
Open the presentation deck and go to where you want to insert the portrait slide. Select the text, object, or picture to be connected to the portrait slide. Go to the "Insert" tab and press ...
PowerPoint slide size refers to the dimensions of the slides within your PowerPoint presentation. These dimensions determine how your content is displayed in a monitor or projector, and can significantly affect the overall look and feel of your presentation. The most common slide sizes in PowerPoint are 16:9 (widescreen) and 4:3 (standard).
To browse the templates available, open Google Slides. Then, click Template Gallery in the upper-right corner. Scroll through the options, choose the one that meets your needs, and start creating ...
3. Minimalism Presentation Free Template for PowerPoint and Google Slides. A smooth, minimalist, and elegant template that will serve as the basis for all your presentations. It features black and white colors, inspirational quotes, simple monochrome grids, infographics, and royalty-free tasteful images.
On one hand, a sales presentation is designed to persuade potential customers about the value of your product or service. It typically includes detailed information about your product, its features, benefits, pricing, case studies, testimonials, and more. On the other hand, a sales deck is essentially a condensed version of a sales presentation.
Here are some reasons why Google Slides is my favorite presentation tool. 1. Ease of Collaboration. Ease of collaboration was the central reason I switched to Google Slides for my presentation needs. As a content creator, I always aim for a seamless collaboration experience while dealing with my clients and team members.
When I paste a slide into a new presentation, the formatting is incorrect (shapes resized, text overflow, etc.) even when I paste with "Keep source formatting". The font sizes and types are the same in both versions of the slide, and the slide master for the slide in each presentation is the same.
Using Apple Keynote. is completely free, and the app has easy exporting tools that make working with Microsoft PowerPoint less of a hassle. WPS Presentation. WPS Presentation app on different ...
Download the Movie Background Infographics template for PowerPoint or Google Slides and discover the power of infographics. An infographic resource gives you the ability to showcase your content in a more visual way, which will make it easier for your audience to understand your topic. Slidesgo infographics like this set here are very simple to ...