How-To Geek
How to record voiceover narration in powerpoint.
If you're not able to physically present your slideshow, record a voiceover narration to make sure no points are missed.

Quick Links
Preparation, record a voiceover for your presentation.
If you’re sending out your presentation instead of giving it in front of an audience, but you feel adding a vocal explanation would better help to deliver the message, record a voiceover narration. Here’s how to do it.
Before you begin your PowerPoint narration, you’ll need to make sure you’ve made the proper preparations.
Set Up Your Mic
First, you’ll need a microphone. Most modern computers have a built-in microphone that gets the job done, but investing in a USB microphone will increase the audio quality of the narration by quite a bit.
The built-in microphone will be set as your input device by default, so if you plan on using it for the PowerPoint narration, you don’t need to take any additional steps in setting it up. However, if you plan to use a USB microphone for the narration, be sure to set it as the input device.
To do this on Windows, right-click the volume icon found on the right of the taskbar. In the menu that appears, select “Open Sound Settings.”

The “Sound Settings” window will appear. Here, scroll down to the “Input” section and click the box under “Choose your input device.”

If you’re using a USB microphone, it will appear here. Select it to set it as the input device.
The steps for Mac users are extremely similar. The only difference is you should go to "System Settings" and select "Sound" instead of right-clicking the volume icon like on Windows. From there, the steps are the same.
Take Notes and Rehearse
With your mic set up, you’re ready to start recording, right? Well, not quite. While you may not be physically standing in front of the audience delivering this presentation, you still need to treat it as though you are. This means going through the basics---taking notes and rehearsing your delivery.
One thing you can do to help you record a successful narration is to write out a script. As with a live presentation, though, you don’t want to sound like you’re reading straight from your notecards. Practice reading through the script a few times so that it sounds natural and fluid.
Once you’re confident in your delivery, it’s time to start recording.
Open the PowerPoint presentation in which you would like to record a voiceover narration. Head over to the “Slide Show” tab and, in the “Set Up” group, select “Record Slide Show.” Once selected, a drop-down menu will appear. Here, you can choose to start the narration from the beginning or from the current slide. If you choose to start recording from the current slide, make sure that you’re on the slide you’d like to start recording from.
Related: How to Record Your Screen with Microsoft PowerPoint
In this example, we’ll choose “Record from Beginning.”

Now, you’ll be in full-screen mode. You’ll notice a few extra tools appear, including a record button at the top-left corner of the screen. When you’re ready to start recording, click this button.

When you select the record button, a countdown timer will appear, giving you a three-second delay between clicking the button and starting your recording.

You can now start recording your voiceover narration! Continue through the presentation by clicking the right arrow to go to the next slide.

You can pause the recording at any time by pressing the pause button in the top-left corner of the window. The recording will automatically end when you make it to the last slide. Alternatively, you can press the stop button, also located at the top-left corner of the screen.

If you want to play your narration back, you can select the replay button.

A speaker icon will appear at the bottom-right corner of each slide that has a recorded narration. You can also play your narration back on each slide by hovering over the icon and pressing the play button.
If you’re not satisfied with the narration, simply repeat these steps to re-record.
How to Record a PowerPoint Presentation with Narration
Can be helpful in creating a dramatic narrative
Microsoft PowerPoint has a built-in recording tool that allows you to narrate your presentations using recorded audio. You can export and share recorded presentations as video files.
This tutorial covers everything about recording PowerPoint presentations on Windows and Mac computers.

Record PowerPoint Presentation with Narration
Open the PowerPoint file/presentation you want to record and follow the steps below.
Record PowerPoint Presentation on Windows
- Select the slide you want to start recording from on the slide thumbnail pane.

- Head to the Record tab on the ribbon and select the Record button to start recording from the current/selected slide.

To record from the first slide, select the down-facing arrow icon below the Record button and select From Beginning .

You can also record a presentation from the Slide Show tab. Select Slide Show on the ribbon and select Record , From Current Slide , or From Beginning .

That’ll open PowerPoint’s presentation recorder in a fullscreen window.
- Select the Record icon and start speaking after the three seconds countdown.

PowerPoint records the presentation window and captures your voice and webcam feed as you navigate the slides. Select the left-facing and right-facing arrows to move to the previous and next slides in the presentation.
Record PowerPoint Presentation in macOS
- Open the Slide Show tab and select Record Slide Show .

- Select the Record button on the toolbar to start recording your narration.

Use your keyboard arrow keys to move back and forth between slides. Press N or Space Bar to move to the next slide or animation in the presentation. Press P or Backspace to return to the previous slide or animation.
Select Tips in the top-left corner for more keyboard shortcuts and other presentation tips.

Note: The narration tool doesn’t record slide transitions. When moving between slides, wait for the destination slide to appear on the screen before speaking.
PowerPoint Recorder Control/Settings
You’ll find a handful of controls and options on the recording tool. We’ll show you how to use these controls to include voiceovers or audio recordings in your presentation.

Using Presentation Pointer Tools
PowerPoint provides several tools to mark up your slides when narrating your presentation. There’s a pen tool, eraser, laser pointer, and highlighter.
With the Pen tool, you can draw on slides during narration/recording. Press Ctrl + P (Windows) or Command + P (Mac) to use the pen tool. You can also select the Pen icon to convert the pointer to a pen.

The Laser pointer tool converts your cursor to an onscreen laser. Use the laser pointer to draw attention to something on a slide/presentation.
Press Ctrl + L (Windows) or Command + L (Mac) to use the laser pointer. There’s also a Laser pointer icon on the toolbar.

Pressing Ctrl + I (or selecting the Highlighter tool ) converts your cursor to a highlighter.

Use the Eraser tool to remove inks and highlight from slides. Select the Eraser icon or press Ctrl + E and select the ink to erase.

On macOS, select the Erase Pen icon (or press E ) to erase all drawings and highlights on the slide.

You can change the pointer tools ink from the color selection boxes. However, one major limitation is that you can’t change the size of these pointer tools.
Pause and Resume Your Recording
In Windows, press I on your keyboard or select the Pause button in the top-left corner to pause your recording.

Press I again or select the Record icon to resume the recording.

If you use a Mac, select the Pause icon in the top toolbar to pause the recording.

Unmute or Mute Microphone
Check that your microphone is unmuted before recording. Select the microphone icon in the bottom-right corner to mute or unmute your mic.

PowerPoint for Windows allows you to mute and unmute your microphone in real time while recording video/audio narrations. The macOS version of PowerPoint only lets you configure your camera and microphone settings before recording.
Switch Microphone or Camera
Want to record your presentation with an external microphone or camera? Press Ctrl + M or select the audio/camera settings icon in the top-right corner and choose your preferred microphone/camera.

In macOS, select the microphone icon to mute or unmute your microphone. Select the arrow-down icon next to the microphone or camcorder icons to switch input devices.

Enable and Disable Camera
The recorder displays your camera or webcam feed in the bottom-right corner of the presentation slides.
Select the camcorder icon to remove your webcam feed from the recording. Select the icon again to display your webcam feed in the presentation.

You can also use the Ctrl + K keyboard shortcut on Windows computers to enable or disable your camera.
On Mac computers, you’ll find the video control icon on the top toolbar.

Note: The recording tool greys out the camcorder icon if your microphone is turned off.
Enable or Disable Camera Preview
PowerPoint allows you to disable the camera preview without turning off your camera or webcam.
Press Ctrl + J (Windows) or select the Camera Preview icon in the bottom-right corner to disable or enable the camera preview.

End a Recording
Press S on your Windows keyboard or select the Stop icon to end the recording.

Replay or Preview Your Recording
When you end a narration, press V on your keyboard or select Replay to preview or watch the recording.

The recorded narration will include all pen inks, highlights, and laser pointer gestures made during the presentation.
You can also preview/replay the narration outside the recording tool. Open the Slide Show tab and choose to watch the playback From Beginning or From Current Slide .

PowerPoint allows you to preview the playback on individual slides. A speaker/audio icon appears in the bottom-right of PowerPoint slides with narrations.
Choose the slide you want to preview, hover your cursor on the speaker icon in the bottom-right corner, and select Play .

Delete Current Narration/Recording
Did you spot an error when previewing your presentation? Want to delete the current narration and start from scratch?
Select the Clear existing recordings icon and choose whether to Clear Recordings on Current Slide or Clear Recordings on All Slides .

On Mac, select the Bin icon to delete the entire narration/recording.

Close the Narration Tool
Select the X icon on the title bar to close the presentation narration tool and return to Powerpoint.

Select End Show in the top-left corner to close the recording tool on a Mac computer.

Delete Narrations from Slides
Want to delete the narration or timing on an individual slide or the entire presentation? Select the slide with the narration you want to delete and follow the steps below.
- Open the Record tab and select the down-facing arrow below the Record icon.
- Select Clear and choose to clear timing or narration on current or all slides.

Export Recorded or Narrated Presentation
You can export a narrated PowerPoint presentation as a video file. The video output includes ink strokes, recorded audio/video, laser pointer gestures, and webcam/camera recording.
- Open the Record tab and select Export to Video .

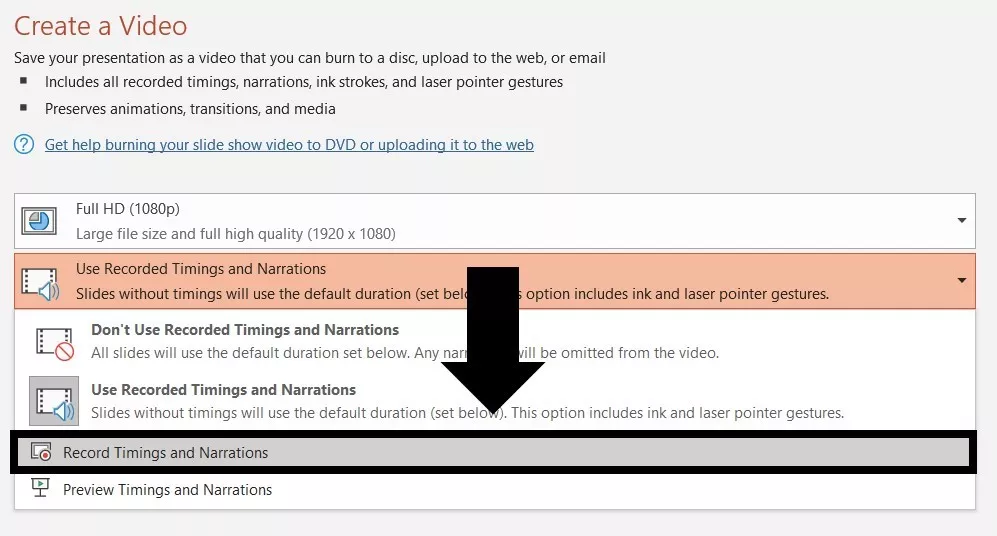
Alternatively, open the File menu, select Export on the sidebar, and select Create a Video .

- Choose the quality of the video export in the first drop-down box—Ultra HD (4K), Full HD (1080p), HD (720p), Standard (480p).

- Choose Use Recorded Timings and Narrations in the next drop-down box and select Create Video .

- Give the recorded presentation a file name and select Save .

Narrate Your PowerPoint Presentations
The Microsoft PowerPoint web app doesn’t have a recording tool. As a result, you can only record presentations with narrations using PowerPoint for Windows or Mac.
You might meet issues recording a slide show if you use an outdated version of PowerPoint. Also, the recording tool on older versions of PowerPoint has a different interface and lacks some controls. Update PowerPoint and restart your computer if you cannot record a slide show.

Sodiq has written thousands of tutorials, guides, and explainers over the past 4 years to help people solve problems with Android, iOS, Mac, and Windows devices. He also enjoys reviewing consumer tech products (smartphones, smart home devices, accessories, etc.) and binge-watching comedy series in his spare time. Read Sodiq's Full Bio
Read More Posts:
Blog > Record voice narration for PowerPoint
Record voice narration for PowerPoint
01.11.21 • #presentation #powerpoint #voiceover #narration.
In this blog post, you'll learn how you can add a narration for your PowerPoint presentation. Adding audio or video narration can be very helpful, especially in a time where many seminars and meetings have to be conducted online. If you would rather give your presentation using a live stream (which has many benefits), scroll down to the bottom and learn how you can do that!
Here's what you need for recording:
- a microphone (your computer's microphone should do)
- a finished set of PowerPoint slides
- a video camera (only if you want to record video as well)
- Open your PowerPoint presentation or create a new one.
- In the taskbar, select Slide Show . Then click Record Slide Show .
- Choose the option Record from Beginning .

- You'll now get to a different view, which we'll call "Recorder View". Here's an overview:

- In the bottom right corner, you'll see three icons. The one on the left is for switching the microphone on/off. Make sure this function is turned on. The icon in the middle is for turning on/off your camera. You can choose if you want to switch the video recording on or not. The last icon is only available if you've chosen the video recording function. If the function is enabled, you'll be able to see a video preview.
- In the top right corner under "Settings", you can choose what microphone (and camera) you'd like to use. This is only relevant if you have an external recording device that you would like to use. If you're recording with your computer, you don't have to set anything here.
- Now it's time to record. Click the big red Record button on the top left and start speaking.
- Tip: You can either record all the slides at once without pressing pause, or you record each slide individually, then click pause, then go on to the next slide and record again. However, it's important to note that PowerPoint creates an individual audio file for each slide, even if you record all at once.
- Important : PowerPoint does not record during transitions, so only speak when you're on a slide.

- You can also draw on your slides with the painting tools on the bottom. These drawings will be saved to your presentations.
- On the bottom left corner, you'll see what slide you're on. You can also see two time counts. The first one is for the recording on the current slide, the second one is for the recording of the presentation overall.
- If you want to delete the whole voiceover, click Clear and Clear Recordings on all Slides . If you only want to delete the recording on the specific slide you are on, click Clear Recording on current Slide.
- If you want to re-record the audio from one slide after deleting it, just go to that slide and click Record again. Record what you want to say, then click Stop when you're done.
- Once you're done, leave the Recorder View. Click the small x in the top right corner or hit Esc .
- You can now either save the presentation as a regular PowerPoint file (just click Save and you're done) or as a video. If you'd like a video, follow the instructions below:
Save Presentation as Video
- Go to File in the PowerPoint taskbar

- Choose Export on the left, then Create a Video .

- Select the quality you'd like. We recommend Full HD (1080p).
- In the following drop-down menu, make sure Use Recorded Timings and Narrations is selected.

- The setting Seconds spent on each slide is only for the slides where there is no recording (if you have recordings on all of your slides, you can just ignore this setting.)
- Click Create Video and choose where the video should be saved. The video creation might take a while, so don't close PowerPoint right away!

Live interaction with polls & quizzes
If you prefer to give a talk where you can also interact with your audience, then the free software SlideLizard is the ideal solution! Using live polls , Q&A and feedback , your presentations will become even more exciting and interactive. SlideLizard integrates directly with PowerPoint, making it a breeze to use.

Can I record a presentation in PowerPoint?
Yes, PowerPoint also allows you to record your presentation with voice and video narration. You can read about how this works in our blog .
How can I record a presentation in PowerPoint with audio and video?
At first create your presentation. For the recording you will need a microphone (the one on your computer should do), your finished presentation and a video camera (if you also want to record a video). We have created a tutorial on our blog where you can read the further steps.
Related articles
About the author.

Pia Lehner-Mittermaier
Pia works in Marketing as a graphic designer and writer at SlideLizard. She uses her vivid imagination and creativity to produce good content.

Get 1 Month for free!
Do you want to make your presentations more interactive.
With SlideLizard you can engage your audience with live polls, questions and feedback . Directly within your PowerPoint Presentation. Learn more
Top blog articles More posts

Create an animated timeline in PowerPoint + Free Template

How to use the morph transition in PowerPoint

Get started with Live Polls, Q&A and slides
for your PowerPoint Presentations
The big SlideLizard presentation glossary
Internal preview.
An Internal Preview is a statement, which is made in the body of the speech, so that the audience knows what the speaker is going to discuss next.
Leading Questions
Leading questions subconsciously make the respondent think in a certain direction.
.pptm file extension
A .pptm file is a macro-enabled presentation created by MS PowerPoint which contains slides with layout, images, texts and embedded macros.
Internal Communication
Internal communication is particularly important for corporate communication. It communicates important information from leadership to staff so that they can do their jobs in the best possible way and work processes run well.
Be the first to know!
The latest SlideLizard news, articles, and resources, sent straight to your inbox.
- or follow us on -
We use cookies to personalize content and analyze traffic to our website. You can choose to accept only cookies that are necessary for the website to function or to also allow tracking cookies. For more information, please see our privacy policy .
Cookie Settings
Necessary cookies are required for the proper functioning of the website. These cookies ensure basic functionalities and security features of the website.
Analytical cookies are used to understand how visitors interact with the website. These cookies help provide information about the number of visitors, etc.
Unsupported browser
This site was designed for modern browsers and tested with Internet Explorer version 10 and later.
It may not look or work correctly on your browser.
- Presentations
How to Record Narration in a PowerPoint Presentation (New Video)
- Bahasa Indonesia
You might think of PowerPoint as the app you use when you're speaking to an audience. But what if that audience can't be in the same room as you? You can do just that as we learn how to narrate a PowerPoint presentation.
You can record audio inside of PowerPoint. Then, your viewer can play it back at their convenience. Best of all, the audio stays synced to the slide timings you set while recording the audio.
If you send a presentation on its own, your audience may flip through the slides and miss the point. But if you can add narration to your presentation, you have the chance to reinforce your key points. In this tutorial, you'll learn how to record narration in PowerPoint.
Need Help? Download Our New eBook on Making Great Presentations (Free)
We also have a useful compliment to this tutorial. Download our FREE eBook: The Complete Guide to Making Great Presentations , which will help you write, design, and deliver the perfect presentation. Quickly grab it before you read on.

When you narrate PowerPoint presentations, your best bet is to use a premium template. With thousands of designs Envato Elements has you covered. Here are some of the very best:

Now let's learn all about how to record quality PowerPoint audio narration:
How to Quickly Record Narration in PowerPoint (Watch & Learn)
Watch this quick, two minute screencast below for a guided tour on recording narrations in PowerPoint. In it, you'll learn how to add narration to your presentation or on selected slides:

Prefer a written set of instructions for how to narrate a PowerPoint? Keep reading to walk through the steps to add narration to your PowerPoint presentation.
3 Audio Recording Best Practices for Proper PowerPoint Narration
With an affordable microphone you can add the commentary your audience should hear. It's easy to include it with the final PowerPoint presentation file so that your commentary follows the PPTX file.
You may not have access to a professional recording studio, but that doesn't mean that you can't improve the audio quality of your voiceover.

There are quick wins to improve the quality of your presentation narration. Great narrated PowerPoint examples have clear, easy-to-understand audio. Here are my favorite tips on how to narrate a PowerPoint presentation better:
- As a presenter, I always like to write an outline or script for my recorded audio. Use the speaker notes section in PowerPoint or print your notes to keep your audio on track.
- Purchase an inexpensive USB microphone as a major upgrade over your laptop's built-in microphone. I like this Samson Go Mic that clips to the top of my laptop. You can even use wireless headphones like Apple AirPods to narrate PowerPoint. Remember: the best microphone is the one that you have with you.
- As always, remove background noise when possible. Turn off fans, devices, and close the door to avoid distractions.
Record Narration for PowerPoint (Tutorial Steps)
Now, let's walk through how to set up for proper audio recording. You'll learn how to professionally record your narration. Then, you'll add it to your PowerPoint slides.
As you follow along with how to add narration to PowerPoint, it helps to have a great design. We’ll be using the beautiful Sora - Multipurpose Presentation from Envato Elements to demonstrate.

Download it today to follow along as we build a narrated PowerPoint example. Let's get started!
Step 1. Set Up Your Microphone
Before you start to record audio inside PowerPoint, start off by making sure that your microphone is plugged in and ready to record.
Whether you're on Windows or macOS, you'll want to access the audio device settings and set your default microphone at a system level. Select your external microphone to ensure it's utilized instead of the built-in mic.

Step 2. Press Record in PowerPoint
To record narrations in PowerPoint, start off by finding the Slide Show tab on PowerPoint's ribbon. Click on the Slide Show tab to change the available options.

Make sure that you start on the first slide in PowerPoint to record audio and timings for the entire presentation.
Now, find the Record button and click on it. PowerPoint launches the Recording menu. You’ll see thumbnails of your slides below, and a menu bar at the top.
This menu dashboard lets you control your recording settings. In a few clicks, you can set things up to narrate PowerPoint exactly how you want.
Make sure you're ready before you press Start Recording. As soon as you click on it, you can narrate PowerPoint as it records both audio and the screen.
Step 3. Start Recording Your Narration
When you click Record , PowerPoint won’t immediately be recording audio. Notice the round red Record button in the top center.
To capture audio, you’ll need to click this. When you do, a three-second countdown clock appears on your slideshow preview. Once it reaches zero, your microphone is live and all of your narration and audio records automatically.
At the top, you’ll see the Recording menu with a runtime counter. This is a handy way to keep track of time as you present.

Now, begin speaking and navigating through your slide deck. I like to use the arrow keys on my keyboard to move through my slides. Use the right arrow to jump to the next slide, or the left arrow to move to the previous PowerPoint slide.
PowerPoint is recording exactly what's on your screen along with the audio you speak into your microphone.
When you’re finished, click on the red Record button again. The recording stops.
It's ideal if you have a dual monitor setup and you can use Presenter View, which puts a preview of your next slide with your speaking notes on a second screen. Turn on Presenter View on the Slide Show tab by checking Use Presenter View.

Step 4. Use Annotations (Optional)
While you're recording your presentation, you can also add annotations to your PowerPoint. You can use a digital pen, highlighter or laser pointer to add markings.
To use annotations, go to the row of buttons below your slide previews. The annotation controls are on the left side: laser, pen, and more. Click on one of these to activate it.

After you select a tool, you can draw on the slide to add the annotation. Viewers will see these annotations drawn in while watching the recorded version of your presentation.
Step 5. Reset Presentation Timings as Needed
Let's say that you had the perfect audio take, but the timings of your slide changes were off by a bit. That's no problem. We can readily restart the process of setting your slide timings.
To do that, make sure that you're on the Slide Show tab and click on Rehearse Timings . Your presentation will go into full screen mode. Usese the arrow keys to change slides to set new timings.

Now that you're finished, you can send your presentation onto a viewer with your narration embedded. When they play the presentation, your recorded narration will play with it, timed how you've set it up while rehearsing.
How to Add Audio (Narration) for Selected PowerPoint Slides
If you don't want to record audio with timings for an entire presentation, another option is to add audio to a selected slide.
To do this, click on the Insert tab on the PowerPoint ribbon. On the right side of the ribbon, find the Audio button and click on it. Again, you'll want to make sure that your microphone is selected in your system settings before choosing this option.

On this drop-down menu, you can actually add audio clips that you've recorded in other apps using the Audio on My PC... option, or record audio right inside PowerPoint by clicking Record Audio.

If you choose to Record Audio , you'll see a new window. Press the red Record button to capture audio inside PowerPoint and place it on a slide directly.
Discover More Great PowerPoint Tutorials (On Envato Tuts+)
You've got a new skill in your tool belt: how to record voiceover on PowerPoint presentations. Why stop now that you know how to narrate PowerPoints?
We've built out a comprehensive learning resource, How to Use PowerPoint (Ultimate Tutorial Guide.) You can teach yourself PowerPoint with this deep set of tutorials. Check out a few of our favorites below:

More Top Templates for Microsoft PowerPoint
As you learned how to add narration to PowerPoint, we featured a premium template. But this is just one of many PowerPoint pre-built slide designs. Thanks to great templates, you'll have more time to build a narrated PowerPoint example!
We regularly feature top PowerPoint templates on Envato Tuts+. Check out more of the top templates below. They work perfectly with our steps to narrate PowerPoint slides, too!

Download Our New eBook on Making Great Presentations (Free PDF)
We have the perfect complement to this tutorial, which will walk you through the complete presentation process. Learn how to write your presentation, design it like a pro, and prepare it to present powerfully.
Download our new eBook: The Complete Guide to Making Great Presentations . It's available for FREE with a subscription to the Tuts+ Business Newsletter.

You Just Learned How to Record a Voiceover on PowerPoint
I love voiceovers as a way to share your commentary with viewers, even when you aren't in the same room. Add your audio to create professional, spoken versions of your presentation.
Now, it's your turn to practice how to add narration to PowerPoint. Re-open a slide deck you've built in the past, and narrate PowerPoint slides. Then, send your narrated PowerPoint example. I'll bet they understand the content better than ever!
Editorial Note: This post has been updated and a new video added with help from Andrew Childress . Andrew is a freelance instructor for Envato Tuts+.

Critical PowerPoint Shortcuts – Claim Your FREE Training Module and Get Your Time Back!
How to Narrate a PowerPoint Presentation (Step-by-Step)
- PowerPoint Tutorials
- Shortcuts & Hacks
- October 29, 2019
In this article you’ll learn how to narrate a PowerPoint, with either just your voice or using the new video narration feature.
Firstly, there are two different tools you can use to narrate your PowerPoint slides.

#1: Record Audio is the legacy PowerPoint narration tool. Although this tool doesn’t have as many features, it is faster to open and use, and is handy if you want to drop a voice note on a slide.
Features of this tool include:
- Voice narration only
- Adds narration to one slide at a time only
#2: Record Slide Show is the NEWEST (and best) narration tool in PowerPoint, giving you two different types of narration options plus a variety of other options.
The features here are:
- Voice narration
- Video narration (so your audience can also see your face)
- Allows you to narrate an entire presentation in one sitting
- Automatically sets slide timings for you if you later want to convert PowerPoint into a video
And before you get lost in either tool, let’s cover a few things which will help you out (trust me).
Narration definition in PowerPoint

In PowerPoint, narration simply means recording your presentation as you walk someone through it, so that you can easily share the whole thing with someone else.
On top of that, if you get creative, you can use your narrated PowerPoint files to:
- Share your presentation with team members around the world
- Create a library of best practices for your company
- Build training materials for new hires
1. You don’t need fancy recording equipment
Don’t let fancy equipment or a professional recording studio hold you back from narrating your presentation. For most situations, using the built-in microphone on your personal computer is enough.
For example, if you are doing something relatively informal, such as walking a colleague through something in PowerPoint, the quality of your audio doesn’t need to be extremely high.
If you are creating training materials or giving an important presentation, I recommend getting a decent USB microphone (you can see a list of top rated microphones here ).
That’s because they will help remove any background noise.
2. Find a quiet space and tell people you are recording
Regardless of the quality of your microphone, I recommend finding the quietest place possible to record your narration and let everyone know not to bother you.
When evaluating a quiet place, here are some things to be careful of and to spot check:
- Noisy air conditioners or refrigerators
- Street noise (cars, planes or pedestrians)
- Loud background office or cafe noise
- Cell phones, doorbells or other pinging noises
- Your kids playing in the background
For instance – imagine you are in the middle of narrating your presentation. All of a sudden a colleague knocks on your door or the doorbell rings, and you’re interrupted. It’s not the end of the world, but it will throw you off and likely annoy you.
In addition, if there is too much background noise (like a running air conditioner), the noise can be very distracting to whoever is watching the recording.
3. Check your microphone
The last thing you want to do is walk through your entire presentation, and then discover that your microphone wasn’t working.
Therefore, before narrating your PowerPoint, I recommend double-checking your recording equipment every time before you hit record. This includes ensuring that your equipment is properly plugged in (it happens).

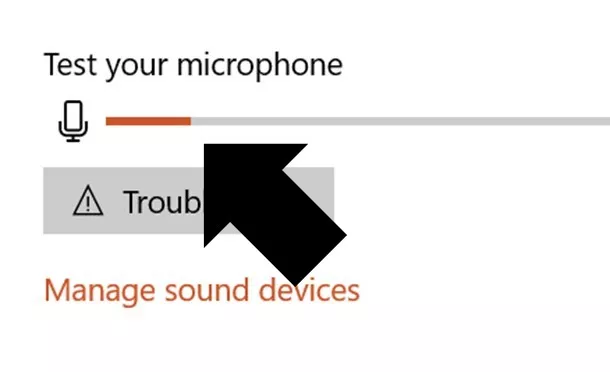
- Right-click the speaker icon in the task bar (lower right-hand corner of your desktop)
- Select Open Sound settings
- Choose your Input device
- Click on Troubleshoot under T est and troubleshoot
Note: If you don’t see the audio bar filling up with color as you talk, that means that your input device is either not selected or not properly connected.
- Connect all your audio and video equipment to your computer
- Restart your computer: Start, Power, Restart
#1. Record audio (audio narration only)
While this is the legacy narration tool in PowerPoint, I want to cover it first.
That’s because even if you decide not to use it to narrate your PowerPoint presentation, it is extremely useful for dropping voice notes on your slides.
When used this way, you can quickly capture your thoughts and ideas about a slide without having to get bogged down editing or building it out on the spot.
Below I’ve detailed how to use this tool to narrate PowerPoint slides.
1. Open the Record Sound dialog box

To open the Record Sound dialog box, simply:
- Navigate to the Insert tab
- Open the Audio drop down
- Select Record Audio
Keep in mind that you can only narrate one slide at a time using this tool. Hence why it’s great for dropping voice notes on a slide, one by one.
2. Record your audio narration

Inside the Record Sound dialog box you can narrate your PowerPoint slide. Simply:
- Type in a Name for your Audio Clip
- Select the Record button (the red dot) to begin narrating
- Click Stop (the square) to stop your narration
- Hit Play (the triangle) to listen to your narration
- Click OK to save the narration to your slide
As a result, you will see a little audio object added to your slide that you can move around and resize if you like.

The audio file can also be played (simply click on the play icon) in both the Normal View and Slide Show View of your presentation.
In this way, you can work your way through your presentation, adding voice notes to your PowerPoint slides that you or your colleagues can play back from within your presentation.
To learn all about adding music to PowerPoint and how to loop your audio files, read our article here .
3. Playing your PowerPoint narration
By default, your audio file will be set to play In Click Sequence (explained below).
That means it will be added at the end of any animation sequences, trigger actions, etc.. If you don’t have any of these on your slide, it will automatically play when you to to advance to the next slide.
All you need to do is advance your slide (click, hit the space bar or arrow keys, etc.) and it will play.

To change when your audio file plays, simply:
- Select your Audio file
- Navigate to the Playback tab
- Open the Start drop down
- Choose either In Click Sequence , Automatically or When Click On
In Click Sequence means that your audio file plays as part of the click sequence of actions that happen on your slide. This includes animated sequences, trigger actions, and videos, all of which you can set in the Animations Pane.
If you do not have any sequences set up on your slide, your audio file will play right before you advance to the next slide in your presentation.
Automatically means your audio file plays as soon as you get to that slide in your presentation, instead of playing right before you advance to the next slide.
When Clicked On means your audio file will only play if someone clicks on it during the presentation in Slide Show mode. For example, you can use this option for a piece of audio that you may not have the time to play, allowing you to choose in the moment whether to play it or not.
4. Delete or overwrite a previous narration file
To delete an audio file narration, simply select the object on your slide and hit Delete on your keyboard.
If you want to overwrite or change an existing narration, simply use the Record Audio dialog box again (as described above). Doing so will overwrite the existing audio file on your slide.
Warning: Two narration audio files cannot exist on a slide at the same time. That means that if you narrate a PowerPoint slide a second time, the first recorded file will be overwritten.
To be clear, that means you will need to start over – from scratch – for the individual slide where you want to change the narration.
While you can trim an audio file in PowerPoint, you cannot split apart or merge different audio files like you could if you used dedicated audio editing software.
#2. Record Slide Show (audio + video narration)
The Record Slide Show command is the NEWEST and BEST way to narrate a PowerPoint presentation for a few reasons, including:
- Record both audio and/or video narrations
- Narrate your entire presentation in one sitting (you are not limited to creating slide-by-slide narrations)
- You can use the pen, highlighter and laser pointer commands and have them captured in your narration too
- The tool allows you to pause and restart your recording
- All your slide timings are automatically recorded, allowing you to use them to turn your PowerPoint presentation into a video (see how to do that here )
In short, unless you have a really good reason not to use the Record Slide Show command to narrate your presentation, this is what you should be using.
As you will see below, there are a lot more settings you can toggle on and off, but don’t let this stop your from recording your presentation.
1. Open the Record Slide Show dialog box

To open the Record Slide Show dialog box, simply:
- Navigate to the Slide Show tab
- Open the Record Slide Show command
- Choose Record from Beginning
If you simply click the Record Slide Show command in the Ribbon (instead of opening up the drop down) it will begin recording from the current slide.
Wait a couple of seconds, and the Record Slide Show commands will load, and you can start narrating your presentation.
2. Record your slide show narration
There are a lot more options you can choose from in the Slide Show dialog box that that I will explain below, but recording your narration is still pretty easy and straight forward

To start recording your slide show narration, simply:
- Choose your Camera and/or Microphone
- Make sure your Camera and/or Microphone is turned on
- Use the Record , Stop and Replay commands to start and stop your narrations
- Use the Arrow (or use your arrow keys) to advance to the next slide
Once you start recording, you get the option to pause the recording. This allows you to pause and collect your thoughts whenever you need to, and continue narrating your presentation when you are ready.

When you are finished, the individual video and/or audio file narrations are added to the lower right-hand corners of each individual slide, as you can see below.

As you can see in the picture above, your audio and video narrations are recorded and saved on a slide-by-slide basis. That means you can review and record narrations on any slide within your presentation.
Warning: You can only have one narration file per slide.
If you re-record an audio or video narration, it automatically overwrites any previous narrations you had on that slide.
The only way to have two different narration files on the same slide, is to record one with the Record Slide Show dialog box, and record the second with the Record Audio command.
3. Set your narration to Play
Your Record Slide Show narrations are set to play Automatically .
That means that whenever you run your presentation (from beginning or from current), your audio and/or video narration will automatically play.

To change when your audio or video narration plays, simply:
- Select the Narration file on your slide
- Choose either In Click Sequence , Automatically or When Clicked On
4. Record Slide Show options

Record (or hit R) to start recording your narration.
Pause (or hit I) to pause your narration and collect your thoughts. This button only displays once you’ve started recording.
Stop (or hit S) to end your narration. If you hit Record again, your new narration will overwrite the existing one.
If you want to stop narrating your current slide before starting on the next one, don’t use the Stop button. Instead, simply navigate to your next slide using your arrow keys or the forward arrow on screen.
Replay to replay your narration for the current slide. This button only becomes active after you have recorded a narration for that slide.
B. Speaker Notes options

Notes (or hit N) to open or close your speaker notes for that slide. The Notes window is fairly small and you cannot resize it very well.
Your action of opening and closing the speaker notes pane will not show up in your recorded narration.
Font Size commands increase and decrease the font size of your speaker notes so that you can see them better.
In my opinion the speaker notes pane is too small and not flexible enough for reviewing lots of speaker notes.
To learn how to print your speaker notes in PowerPoint, read our guide here .
C. Clear Recordings options

Clear Recordings allows you to clear your previous recording on either the current slide or on all the slides in your presentation.
You can also overwrite your recording and slide timings by simply recording over the top of your narrations.
Note: Using Clear Recordings removes both your slide timings and narrations.
That means that if you want to remove your narrations but keep your slide timings, you will want to clear recordings outside of the Record Slide Show dialog box. See how to clear timings and narrations below.
D. Input options: Camera and Microphone

Microphone allows you to choose which microphone you want to record with. So if you are using a microphone other than your computer’s built-in one, this is where you want to select your microphone before you begin recording your narration.
Camera allows you to choose which camera or webcam you want to use if you are recording video narrations. If you are using a camera other than your computer’s built-in one, this is where you want to select it before you begin your narration.
E. Advance Slide options

Next Slide advances the click sequence of your presentation, the same way hitting the right arrow key or clicking your slide with your mouse does.
If you have animated sequences or music that is supposed to play, clicking forwards will trigger those sequences, and eventually advance you to the next slide.
Previous Slide moves you back one slide in your presentation, but it is only available to you when you are not recording.
That’s because re-recording a narration automatically overwrites the previous narration. So once you start your recording, you can only move forward in your presentation.
F. On / Off: Camera and microphone

Microphone (on/off) turns your selected microphone on or off. You can turn your microphone off and still click through your presentation if you want to mute your sound in the recording.
Camera (on/off) turns your selected camera on or off. This allows you to add or remove video recording in your narration.
Camera Preview displays what your camera is recording during your narration. If seeing yourself onscreen while you narrate your presentation bothers you, simply turn camera preview off.

G. Ink options: Eraser, Pen and Highlighter

The Pen (Ctrl + P), Highlighter (Ctrl + I), and Eraser (Ctrl + E) allow you to draw and highlight things on your slides during your presentation.
To change the color of your ink, simply click on one of the colors at the bottom of your screen.
Anything that you draw on your slides during your narration will be recorded as you draw them. That means that someone watching the recording will see you draw on the slide, as you narrate your presentation.
H. Slide Timings options

Slide Timings show you how long you have spent on each slide, and which slide you are on within your presentation.
Therefore, if you are converting your PowerPoint presentation into a video, these slide timings determine how long you spend on each slide.
To learn all about how to convert PowerPoint to video, read our guide here .
I. Close / Minimize options

Close / Minimize allows you to close out of (or minimize) the Record Slide Show app.
Use the Close icon (the x) to exit out of the Record Slide Show dialog box and return to the Normal View of your presentation. You can also hit the Esc key on your keyboard to close out of the dialog box.
#3. How to clear your Timings and Narrations

To clear your Timings and Narrations from the Normal View of PowerPoint, simply:
- Open the Slide Show tab
- Open the Record Slide Show drop down
- Select Clear
- Choose the Timings or Narrations you want to clear
If the Clear command is grayed out when you open the Record Slide Show drop down, that means that you do not have any Narrations or Timings (same as for transitions) set for your presentation.
Clear Timing on Current Slide removes the set transition timing for the current slide.
Clear Timings on All Slides removes the set transition timings on all the slides within your presentation.
Clear Narration on Current Slides removes any voice or video narration you’ve recorded on the current slide.
Clear Narration on All Slides removes any voice or video narrations from your entire presentation.
Note: You can also clear the Timings and Narrations for your slides at the same time from inside the Record Slide Show dialog box.

Inside the dialog box, simply click the X and choose to Clear Recordings on Current or Clear Recordings on All .
#4. How to compress your PowerPoint narrations

Adding audio and video narrations to PowerPoint significantly increases the size of your presentation as you can see in the picture above.
Therefore, I recommend compressing your file after you’re done recording narrations.
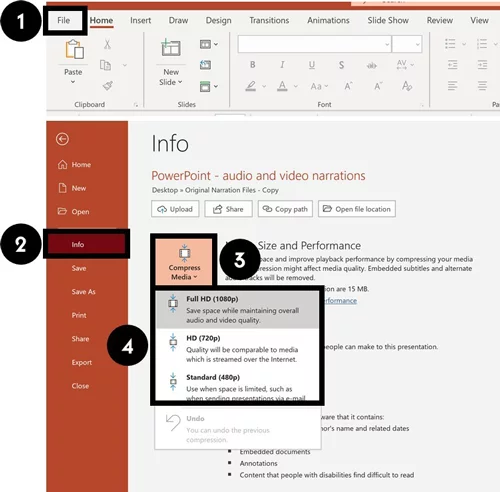
After narrating your PowerPoint, you can compress your audio and video narrations. To do that, simply:
- Navigate to the File tab
- Select the Info group
- Open the Compress Media drop-down
- Choose a compression quality
PowerPoint automatically uses the Full HD (1080p) when recording your voice and video. So if you are tight for space, you will need to choose either the HD (720p) or Standard (480p) options .
To learn a variety of other ways you can reduce your PowerPoint file size, read our compression guide here .
That’s how to narrate a PowerPoint, and the different options you have using the Record Audio and Record Slide Show options.
If you have the latest version of PowerPoint, I highly recommend using the Record Slide Show option as it gives you the most options to work with.
Just keep in mind that narrating your PowerPoint with audio and video can greatly increase the size of your presentation. Therefore, you may end up needing to consider compress it.
If you enjoyed this article, you can learn more about how to improve your PowerPoint skills by visiting us here
What’s Next?
Related articles, about the author.

Popular Tutorials
- How to Strikethrough Text (l̶i̶k̶e̶ ̶t̶h̶i̶s̶) in Word, Excel & PowerPoint
- How to Make Animated Fireworks in PowerPoint (Step-by-Step)
- Strikethrough Shortcut (l̶i̶k̶e̶ ̶t̶h̶i̶s̶) for Word, Excel & PowerPoint
- How to Create a Flash Card Memory Game in PowerPoint (Like Jeopardy)
- Keyboard Shortcuts Not Working: Solved
PowerPoint Tutorial Categories
- Strategies & Opinions
- Presentation Design
- Pictures, Icons, Videos, Etc.
- New Features
- Miscellaneous
- Charts & Data Viz
We help busy professionals save hours and gain peace of mind, with corporate workshops, self-paced courses and tutorials for PowerPoint and Word.
Work With Us
- Corporate Training
- Presentation & Template Design
- Courses & Downloads
- PowerPoint Articles
- Word Articles
- Productivity Resources
Find a Tutorial
- Free Training
- For Businesses
We help busy office workers save hours and gain peace of mind, with tips, training and tutorials for Microsoft PowerPoint and Word.
Master Critical PowerPoint Shortcuts – Secure Your FREE Training Module and Save Valuable Time!
⌛ Master time-saving expert techniques.
🔥 Create powerful presentations.
🚀 Propel your career to new heights.
We value your privacy – we keep your info safe.
Discover PowerPoint Hacks Loved by Industry Giants - KKR, AmEx, HSBC!
Over 114,880 professionals in finance, marketing and sales have revolutionized their PPT skills with our proven methods.
Gain FREE access to a full module of our premium PowerPoint training program – Get started today!
We hate spam too and promise to keep your information safe.
You are currently viewing a placeholder content from Facebook . To access the actual content, click the button below. Please note that doing so will share data with third-party providers.
How to Narrate a PowerPoint Presentation (And Record Your Voice)
For a presentation that you aren’t actually giving in person, you can narrate it within PowerPoint, recording your voice so that others can play it back when they watch the presentation.
It’s a nifty trick that popular with slide shows and presentations on networks such as SlideShare, YouTube, and even individual websites. And it can even help you when rehearsing your presentation as well.
Here’s how to narrate a PowerPoint presentation by recording your voice, in a few quick steps!
2 Million+ PowerPoint Templates, Themes, Graphics + More
Download thousands of PowerPoint templates, and many other design elements, with a monthly Envato Elements membership. It starts at $16 per month, and gives you unlimited access to a growing library of over 2,000,000 presentation templates, fonts, photos, graphics, and more.

Maximus Template

Animated PPT Templates
Fully animated.

Modern PPT Templates
New & innovative.

Pitch PowerPoint

BeMind Minimal Template
Explore PowerPoint Templates
Create and Design Your Presentation
The first step to preparing a narrated or recorded PowerPoint presentation is to design the presentation and refine the content. During this step you may even want to think about how you will script the presentation so that you are designing with a flow in mind.
Make sure to include any specific transitions you want to use from slide to slide, and don’t forget to read our guide on how to design a professional presentation for tips and pointers.
Prepare for Recording
Before recording a narration, it is advised to write out a script and check your computer microphone to ensure that the sound is correct and that recordings will be at an appropriate volume. You can do this with a short test recording.
Now it is time to record the narration. You can record narration for all slides or select slides.
Open your presentation and navigate to the Slide Show tab.

If you are recording narration for all of the slides, you are ready. If you plan to record a voiceover for only some of the slides, you want to hide the slides you won’t have a recording for.
You can do this by selecting the slides you don’t want to include, right- or ctrl-click and then Hide Slide.

The other option is to create a custom show. From the menu select Custom Show > Custom Slide Show > use the + to add slides. You will need to know which slide numbers you want for this option because you can’t see previews.
Record the Narration

Now you are ready to record. (Good luck!)
In the Slide Show tab, click the Record Slide Show Button from the first slide in your presentation.

Recording starts automatically. (You’ll notice the screen shifts into full presentation mode.) As you record the narration, you can use the navigation tools on the screen to advance slides. This will override any previous timing settings so that slides advance in tandem with your voice narration.
When you are finished, click End and you will be prompted to save the recording. Only one recording can be saved at a time. A new recording will override any previously saved recorded narrations.
You can preview the recording using the start button.
Helpful Keyboard Shortcuts
Using keyboard shortcuts during recording can make it a little easier.
Some shortcuts you might use include:
- Click, spacebar or right arrow: Advance to the next slide
- Delete or left arrow: Go back one slide
- B: Toggle to black screen
- Esc: End slide show recording
Choose a Playback Option

Finally, you’ll want to determine how the presentation will be played back for users.
Click on Set Up Slide Show from the menu and make your selections from the options on the screen. Then you can save or export to a desired file format.
A PowerPoint presentation with a narrated recording can be a useful tool to help get your information in front of more people. All you need to do it is a quiet room to record and a microphone attached to your computer.
Don’t forget to take a look at our full PowerPoint templates guide , or our collection of the best PowerPoint templates for your next project!
- Irresistible Tech Gifts for That Special Dad
- Killer Smartphone Deals We Love
How to Do a Voiceover on PowerPoint
Narrate your presentations with ease
:max_bytes(150000):strip_icc():format(webp)/ColettaTeske-af57404a91b342578a97252b7dbd720f.jpg "how to record powerpoint presentation with voice")
- Central Washington University
What to Know
- Single slide: Select a slide. Go to Insert > Audio > Record Audio . Type a name, select Record , then read your script. Select Stop .
- Entire slideshow: Select View > Normal and choose the first slide. Select Slide Show > Record Slide Show > Record from Current Slide .
- To review the recording, click the sound indicator (it looks like a speaker) and then select Play to hear your recording.
This article explains how to record a voiceover on PowerPoint for a single slide or for the entire slideshow. The instructions apply to PowerPoint for Microsoft 365 , PowerPoint 2019, PowerPoint 2016, and PowerPoint 2013.
How to Record a Voiceover for a Single Slide
Before narrating your PowerPoint presentation, be prepared:
- You’ll need a microphone attached to, or built into, your computer. Test the microphone to make sure it is working. Set the sound level so your audio is easy to hear.
- Prepare yourself for the narration. Write a script you can follow while recording the voiceover. Practice the presentation a couple of times so your voiceover will sound smooth.
- Decide whether to record the voiceover one slide at a time or record a voiceover for the entire presentation in one go.
The simplest way to record audio for a voiceover is to record one slide at a time. To get started, select the slide where you want to add the narration, then go to Insert > Audio > Record Audio .
Here’s how to record a voiceover on the slide:
Type a Name for the voiceover narration.
Select Record (the button with a red dot).
Read your script or ad-lib the narration.
Select Stop when you’re finished recording.
The Record Sound dialog box disappears, and a speaker indicating sound appears in the center of the slide.
To review the recording, click that sound indicator and then select Play to hear your recording.
When you're finished, click anywhere outside the playback controls to accept the recording.
You’ll see an audio icon in the middle of the slide. Move this icon anywhere on the slide to get it out of the way of other elements on the slide.
How to Record a Voiceover for an Entire Presentation
The voiceover for the entire presentation can be recorded at one time. In addition to recording a voiceover, you can record a video of yourself giving your presentation.
To set up your presentation when you want to narrate an entire slideshow:
Select View > Normal
Select the first slide in the presentation where you want to record audio.
Select Slide Show > Record Slide Show > Record from Current Slide .
In PowerPoint 2019, the Recording window opens.
In PowerPoint 2016 and earlier versions, a Record Slide Show dialog box prompts you for further options. In the Record Slide Show box, select options to set up the slideshow:
- Slide and animation timings: When recording, PowerPoint automatically tracks the timing of slide changes and any animations that occur.
- Narrations, ink, and laser pointer: When recording, PowerPoint automatically tracks when narrations, any inking, or laser pointing occurs.
Leave both checked to make automating your slideshow easier.
Select Record .
In PowerPoint 2016, select Start Recording .
Select Pause to temporarily stop the recording if you need a break.
If you made a mistake and want to start over, select Clear > Clear Recordings.
In PowerPoint 2016 select Clear > Clear Recordings on Current Slide .
When you’ve finished recording a slide, select the Advance button to advance to the next slide or press the spacebar on your keyboard.
When you’re done recording your narration on the slide, select Stop and close the recording window to return to the presentation.
You may have noticed some controls at the bottom left side of the screen. These are a few controls to aid you in your presentation.
These handy handy tools include the Laser Pointer , Highlighter , and Eraser . As you advance through your presentation, mark or highlight parts of your slides as you narrate. PowerPoint records the timing of these marks (if you left the boxes checked) to go along with your narration. Likewise, using the laser pointer shows a simulated red laser dot so that you can point out different things on your slides as you narrate your presentation.
How to Listen to the Recorded Voiceover
Once you’ve recorded your narration, you can go back to the slides and listen to your voiceover.
Here’s how to play a narration:
Select the slide containing the voiceover you want to hear.
Look for the recording icon on the slide. It should appear as either a small video screenshot or a speaker icon on the slide.
Hover over select this icon and then click Play to preview the recording.
How to Turn a Voiceover Off
If you don’t want to hear your narrations when playing a slideshow, but want to keep the narrations with the slide, turn voiceover off.
To turn voiceover off, select Slide Show and click to deselect the Play Narrations checkbox.
How to Delete a Voiceover
There are a couple of ways to delete voiceover audio in your presentation. To delete the audio on a single slide, find and select the recording on that slide, then press the Delete key.
To delete the voiceover from all the slides in a presentation: Select Slide Show and then select the down arrow to open the Record Slide Show menu. Then, select Clear Narration on All Slides .
Embedding Versus Linking Audio Files in PowerPoint
When you use the PowerPoint tools to record a voiceover narration, the audio file is embedded in PowerPoint. This means the audio is part of the PowerPoint file and not stored in a separate file, making it easy to play your presentation on any device.
If you have audio you recorded using other software and it's stored on your computer, you can link to the audio file. Linked files keep your presentation size smaller, but links can be broken if the audio file isn't available to the PowerPoint presentation. To prevent broken links, store the presentation file and the audio files in the same folder on your computer.
Get the Latest Tech News Delivered Every Day
- How to Add Audio to PowerPoint
- How to Make a Slideshow on PowerPoint
- Adding Sounds, Music or Narration to PowerPoint Slide Shows
- How to Use Copilot in Powerpoint
- Edit Music, Sound, or Other Audio Settings in PowerPoint
- How to Get PowerPoint on a Mac
- Loop a PowerPoint Slide Show
- How to Convert PowerPoint to Video
- How to Make and Add Your Own Sound on TikTok
- Using Design Themes in PowerPoint
- How to Use Speaker Notes in PowerPoint
- Change Order of Animations for PowerPoint Slides
- How to Add Music to PowerPoint
- How to Change a Black-and-White Picture to Color in PowerPoint
- How to Add Page Numbers in PowerPoint
- How to Print PowerPoint Slides
3 Simple Ways to Record Audio on PowerPoint Presentations

Sara Wanasek

Enhance your PowerPoint presentations by incorporating music and adding your own narration or unique sound bites. This not only keeps your audience engaged but also complements your written content. Learning how to add and record audio in PowerPoint is a valuable skill, enabling you to create compelling presentations for professional, educational, and personal purposes.
Recording audio in PowerPoint offers significant advantages, especially when delivering remote or asynchronous presentations. You can:
- Record yourself giving the presentation and share the recording for viewers to access at their convenience, or
- Include audio clips to emphasize transitions, key points, or significant moments within your presentation.
Continue reading to discover how to record audio live in PowerPoint on Windows devices, add pre-recorded audio, and find useful tips for editing!
Step-by-step guide: How to Record Audio on PowerPoint
In PowerPoint, you have the capability to record two types of audio:
- Recording for exporting as a video: This method is ideal for narrating your presentation, making it perfect for sharing with others to watch at their own pace.
- Recording short audio clips: This method allows you to incorporate audio into your live presentation.
Let’s walk you through both methods of recording audio directly within PowerPoint:
Option 1: Record Narration for All Slides
Step 1: Open Your PowerPoint Presentation
Launch PowerPoint and open a new or existing PowerPoint file. If your are starting from scratch, make sure to complete the slides with design and interactive elements (make sure your presentation is engaging !) before adding your audio.
Step 2: Choose the Starting Position
- Go to the ‘SlideShow’ tab and click on the arrow next to ‘Record Slide Show.’
- Choose between ‘From Current Slide’ or ‘From Beginning’ based on your requirements.
- This will open the recorder window, where you can make necessary adjustments to the settings.

Step 3: Adjust Settings
You can select the microphone, view your notes, and toggle your camera on or off.

Step 4: Begin Recording
When you are ready, click the ‘Play’ button to begin recording. You will see a 3-second countdown, then the recording will start and you can begin speaking.

Use the side arrows for smooth navigation through your presentation while recording. Pause or stop the recording at any point. To review the recorded audio, click ‘ Replay .’ To delete any recordings, click the ‘x’ next to the speaker icon.
At the bottom left, you’ll find two timers: one for the entire presentation and one for the specific slide, helping you keep track of the recording length.

Step 5: Stop Recording
When done, click the ‘X’ in the top right-hand corner. Your audio recordings will be saved to each slide, indicated by the speaker icon at the bottom right corner of your slide.
Step 6: Share Recording
To share your recording, export the PowerPoint file as a video , selecting ‘Use Recorded Timings and Narrations.’ Then, easily share it via email or add it to a Learning Management System for convenient viewing.

Option 2: Record Audio for Specific Slides
Step 1: Navigate to the Desired Slide
Select the specific slide where you want to record audio. This could be for narration, background music, or sound effects, depending on your presentation’s needs.
Step 2: Insert Audio
To add audio, click the ‘Insert’ tab on your PowerPoint ribbon. Then in the Media section, select ‘Audio’ then ‘Record Audio’.

Step 3: Name Audio Sound
Name the sound uniquely for easy future retrieval.

- Click the red ‘Recording’ button to start.
- Use the green ‘Play’ button to review the audio.
- If it’s satisfactory, click ‘OK.’
- The speaker icon will be added to your slide, and you can reposition it as needed.
Step 5: Set Audio Playback Options
After adding audio to your slide, you can specify how and when you want it to play. Click on the Audio icon and select the ‘Playback’ tab in the PowerPoint ribbon.

In PowerPoint, utilize editing tools to refine your audio. Trim, adjust volume, and apply fade-in or fade-out effects for a professional touch. You can also set the start and stop points for the audio and save it for future use.
Step 6: Test Your Audio
Before your important presentation, test the audio to ensure it works smoothly. Play through your presentation to confirm that everything sounds and plays correctly.
Option 3: Adding Pre-Recorded Audio to PowerPoint
Already have the audio you want to use? No problem! Adding audio to your PowerPoint can be done in 4 simple steps:
Step 1: Navigate to the Slide
Select the slide where you want to addyour pre-recorded audio.
Click the ‘Insert’ tab and choose ‘Audio’ from the Media Section. Select ‘Audio on My PC’ and search for your pre-recorded audio to be uploaded.

Step 3: Configure Playback Options
Customize your playback settings to suit your needs, such as when the audio should start and how it should play.
Step 4: Test it out
Ensure that the audio plays well and syncs up with your slide transitions and animations for a seamless presentation.
Expert Tips for the Best Recording
Use these tips to get the best recording in PowerPoint:
- Choose the Right Microphone: Opt for a high-quality microphone for clear and professional audio. For frequent recordings, consider an external microphone.
- Minimize Ambient Noise: Record in a quiet space to reduce background noise. Close doors and windows, and use noise-canceling software if necessary.
- Prepare Your Narration: Outline your narration to ensure a structured delivery, preventing pauses or monotony. Avoid reading line by line.
- Practice Your Delivery: Practice your narration multiple times for improved flow and clarity. Utilize PowerPoint’s Speaker Coach for help with pace, tone, and filler words.
- Edit Minor Mistakes: Don’t worry about small errors during recording; you can edit them out later using PowerPoint’s editing tools.
- Enhance Accessibility: When recording the entire presentation, add closed captions or subtitles to make it accessible to a broader audience, including those with hearing impairments.
Bonus: Recording Interactive PowerPoint Presentations
Want to take your PowerPoint recordings to the next level? Include interactive elements in your PowerPoint recordings to engage your audience more effectively with ClassPoint.
ClassPoint is an interactive teaching tool that integrates directly into PowerPoint, Coffering live presentation engagement features such as interactive questions , gamification , and presentation tools !
When recording your presentation, use third-party recording software like Zoom, Teams, Loom, or Screencast-O-Matic, and incorporate ClassPoint features alongside your audio narration, like so:
1. Live Annotations
Use Pens , Highlighters , Shapes , and even Text Boxes to add notes and highlight the important information on your slides while recording.
2. Added Whiteboard Slides
Add variety to your presentation by annotating on a blank whiteboard slide of your choosing.
3. Laser Pen
ClassPoint’s laser can be used as a pen with disappearing ink and a spotlight when you press the ‘S’ key on your keyboard, allowing you to guide your audience’s attention more effectively.
4. Draggable Objects
Enhance audience understanding by moving objects on your slide as you explain , emphasize key concepts, and create visual associations.
5. Embedded Browser
If you need to search the web to emphasize a key point or show a video, simply open a browser within your presentation without interrupting your seamless presentation and recording.
6. Timer or Stopwatch
If you want your audience to reflect on a question or complete an activity independently, use the timer or stopwatch to create a brief pause before resuming your recording.
Final Thoughts
Whether you’re narrating a presentation for asynchronous viewing or incorporating audio into a live session, you’re now equipped with the knowledge of how to record audio on PowerPoint in the best way.
With added audio, you can engage your audience in a way that ensures your message resonates, no matter where or when they access your content.
Begin experimenting with these techniques, and see how recording audio on PowerPoint and leveraging ClassPoint can transform your PowerPoint presentations, both live and virtually.
Recommended Readings
3 Ways to Watch & Insert Videos in PowerPoint
How to Add Notes to PowerPoint Presentations: A Comprehensive Guide
About Sara Wanasek
Try classpoint for free.
All-in-one teaching and student engagement in PowerPoint.
Supercharge your PowerPoint. Start today.
500,000+ people like you use ClassPoint to boost student engagement in PowerPoint presentations.
- Slidesgo School
- PowerPoint Tutorials
How to Add, Record or Edit Audio or Music in PowerPoint

Do you want to set the right mood and keep your audience engaged and entertained during your next presentation? In this new Slidesgo School tutorial, you’ll learn how to add audio or music to your presentations . You’ll also find out how to edit them to your liking .
Adding Audio from your Computer
Recording audio from powerpoint, editing audio, adding online audio, adding music from youtube, playing several clips in succession during your presentation.
- Before we begin, please note the following: in PowerPoint 2010 or older, you should use .wav or .wma files in Windows, and .wav files in Mac. If you’re using a newer version, we recommend that you work with AAC .m4a files.
- Open your PowerPoint presentation and select the slide where you want to add audio.
- On the Insert tab, in the Media group, click the Audio drop-down arrow. You’ll see two options: the first one allows you to add audio from your PC, whereas the second one allows you to record audio (you’ll need to have a microphone set up in your computer).
- Select Audio from My PC. A new window will open, where you have to locate the audio file you want to add to your presentation.
- Once located, click the drop-down arrow next to Insert. You’ll see two options:
- If you choose Insert , the audio will be directly inserted into your presentation, increasing the size of the document.
- If you choose Link to File , a link to the file will be created, reducing the size of the document. However, there could be issues if you use the presentation in a different computer, forcing you to link the audio file to the presentation again.
- Select the option that best suits your needs.
- If you want to export any audio included in your PowerPoint presentation, right-click its icon → Save Media As (you can only do this with audio inserted from your PC).
- Please note that if you want to play a different audio in each slide, you’ll need to add the audio files one by one. You’ll also need to uncheck “Play Across Slides”. You can refer to the “ Editing Audio ” section in this tutorial if you want more information.
- On the Insert tab, in the Media group, click the Audio drop-down arrow. Select Record Audio. A new window will open.
- Enter the name of the audio file you’re about to record.
- Press Record to start recording. To stop, press the Stop button. To play what you’ve recorded, press Play.
- If you’re happy with what you’ve recorded, click OK. If that’s not the case, click Cancel.
- Select the audio whose format you want to adjust. A new set of tabs, called Audio Tools, will appear on the toolbar.
- In the Bookmarks group, you’ll find an option to add bookmarks, which will be visible in the timeline. These can be helpful if you want to quickly find the main points in your audio during the presentation.
- In the Editing group, there are options to add a fade in and a fade out. You’ll also find the Trim Audio option. If you click it, a new window will open, where you can set the start point and the end point of the audio clip.
- In the Audio Options group, you’ll find the following options to adjust the behavior of the audio clip:
- Volume: It allows you to set the volume of the clip.
- Start: Click the drop-down arrow to choose how you want the audio to start. If you’re using Office 2010, you’ll also find an option here to play the audio clip during the entire presentation.
- Loop until Stopped: Once the audio clip finishes, it starts again indefinitely until you stop it.
- Play Across Slides: If you enable this, the audio clip will be played during the entire presentation. If “Loop until Stopped” is enabled too, it won’t stop playing until you reach the end of the presentation.
- Hide During Show: Check this option if you want to hide the icon.
- Rewind after Playing: Check this option if you want the timer of the audio clip to go back to the beginning when it reaches the end.
- If you’re using newer versions of PowerPoint, you’ll find a group called Audio Styles. Choose “No Style” if you don’t want additional effects. Choose “Play in Background” if you want the audio clip to be played in the background during your presentation.
- You can change the icon of the audio clip. To do so, on the Format tab, in the Adjust group, click Change Picture.
- Insert an icon or a picture. We’ll use it to link the online audio. Please refer to the How to Add and Modify Icons tutorial to learn how to insert icons.
- Add the link to the online audio resource. If you don’t know how to do it, please refer to the How to Insert a Hyperlink in PowerPoint tutorial.
- Once added, click the icon of this audio. A new window will open, where you must click the Play button. Some audio platforms, such as Soundcloud, allow you to generate an autoplay sharing link. With that, you just need to click the icon to play the audio automatically.
- If you want to pause the playback, you’ll need to exit the presentation mode and do it manually.
- Insert the video containing the audio or music you want. If you don’t know how, please refer to the How to Add a Video in PowerPoint tutorial.
- Decrease the size of the video and place it outside the visible part of the slide.
- We need to set it to automatically play in presentation mode. To do this, on the Playback tab, in the Video Options group, click the Start drop-down arrow and select “Automatically”. If you need more information, please refer to the How to Add a Video in PowerPoint tutorial.
- Please note that the audio will stop when changing slides.
To create a playlist that plays across all slides during your presentation, you need to use an audio editing software, such as Audacity or Adobe Audition, and edit the clips so that they come one after another. When you’re done, export it as a single audio file, which you can now use in your presentation.
Do you find this article useful?
Related tutorials.

New feature available: edit our templates with Canva
Whenever you need to create, Slidesgo is there. We’re continually enhancing your presentation design process with templates that are primed to impress for any occasion. And in order to let your ideas flow best, comfort is key. How could Slidesgo help you with this? By making you feel right at home with our resources, no matter your preferred platform.You spoke, and we listened. Now, your favorite slides can be accessed on a new platform: Canva! This new format adds to our existing options (PowerPoint and Google Slides), expanding your ways to utilize our first-rate presentation content. We’ve started with a selection of Canva-ready...

How to print PowerPoint notes
Crafting an impactful PowerPoint slideshow and delivering a captivating presentation are distinct skills. The first focuses on designing appealing visuals to convey a clear message, while the second involves employing effective presentation techniques to ensure the audience grasps the idea. The content of this article will help you with the latter part of this process, guiding future presenters on how to print PowerPoint with speaker notes to enhance your presentations success and effectiveness.

Discover Our Online Presentation Software for Free
We have great news for you today! If you’ve been a Slidesgo fan for years (or months, or weeks, or days, or mere hours, we welcome everyone!), you’ll probably know for now that our templates are available mostly in two formats: for use in Google Slides and PowerPoint.Google Slides is a free tool, since you only need a Google account in order to use it. PowerPoint, on the other hand, is part of the Microsoft Office suite, so it’s not a free program, but that didn’t stop it from being one of the most popular options in the world!What if we...

Webinar: Presentation Audit
With more than 15,000 templates released on Slidesgo and a user base composed of millions of people, we estimate that the total number of presentations created adds up to… um, a lot! Our team of professional designers work very hard to provide you with editable slides so that the only thing you need to do is, well, customize the elements to your liking. Starting from any given template, the results may vary a lot depending on the person who edited the contents.Have you ever wondered “Is my presentation good enough?” and wished that an expert on presentations looked at your template...
How to do a voiceover on a PowerPoint presentation and add pre-recorded audio to your slides
- You can record a voiceover in PowerPoint and insert it into your next presentation using the software's Audio recording feature through the Insert menu.
- Recording and inserting a voiceover into PowerPoint is a relatively similar process on an Apple Macbook and Windows PC.
- Once you've recorded your audio, you can click the microphone icon that appears on your slide and playback your recording.
- Visit Business Insider's Tech Reference library for more stories .
Public speaking is a valid and common fear. And although you might be trying to hone your public speaking with your free time at home , there's a way you can incorporate your voice into your next PowerPoint presentation without the pressure of speaking on the spot.
How? Microsoft PowerPoint has a feature that lets you create narration for all slides as you see fit. This way, you can record — and re-record — voiceovers for your presentations that won't make you cringe.
The process is virtually identical for both Mac and PC users and you can use your computer's built-in mic or a headset. Whatever your operating system of choice is, easily record narration over a PowerPoint slide in a few quick steps.
Check out the products mentioned in this article:
Microsoft office (from $149.99 at best buy), apple macbook pro (from $1,299.00 at apple), acer chromebook 15 (from $179.99 at walmart).
SteelSeries Arctis 1 Wireless Headset (From $92.49 at Amazon)
How to record a voiceover for PowerPoint on a PC
1. Open a new or existing or presentation in PowerPoint.
2. From the top toolbar, select "Insert."
3. Toward the far right side, click "Audio."
4. Choose "Record Audio…"
5. Name your audio file.
6. Click the circle icon when you're ready to start recording.
7. Select "OK" when you're done recording.
8. A microphone icon will indicate the narration has been added to the slide.
How to record a voiceover for PowerPoint on a Mac
1. Open a new or existing or presentation in PowerPoint for Mac.
2. Find and select "Insert" from the top toolbar.
4. Select "Record Audio…"
5. Name the audio file, and click the circle icon when you're ready to start recording.
6. Click "Insert" when you're ready to finalize.
7. You can click the microphone icon on the slide to hear your recording.
Related coverage from Tech Reference :
How to download and access microsoft powerpoint on your mac computer, how to add a border to slides in powerpoint, and give your slideshow a sleek design, how to change and format the background of your powerpoint slides to custom designs, how to change your language settings in microsoft powerpoint in 3 different ways, how to copy or duplicate a powerpoint slide and put it anywhere in your slideshow.
Insider Inc. receives a commission when you buy through our links.
Watch: Apple just launched a $6,000 Mac Pro, available this fall
- Main content
Filter by Keywords
How to Video Record Yourself Presenting a PowerPoint?
Praburam Srinivasan
Growth Marketing Manager
June 7, 2024
PowerPoint presentations are an effective means to communicate with your remote team members, pitch investors or clients, and share learning material with employees or students.
However, a PowerPoint presentation can be boring, even after you add animations or images.
One way to make them more engaging and personalized is to add videos. You can also demonstrate processes and explain complex concepts better through video presentations.
So, it’s time to move from traditional static decks, project presentations, or sales pitches and create interactive video presentations with PowerPoint or other video recording software.
This blog will walk you through the steps to record yourself while giving a PowerPoint presentation.
How to Record Your Presentation in PowerPoint?
How to insert a youtube video or other multimedia resources:, tips for effective use of advanced features:, preparing your slides and talking points:, importance of rehearsal, making the content engaging and effective, limitations of recording powerpoint presentations within powerpoint, recording presentations in clickup, record clips anywhere on clickup, benefits of recording in clickup.
Before you start the recording process, ensure your presentation is polished and ready to go. Resolve any errors, formatting issues, or misplaced elements.
Now, let’s see how to video record yourself in a PowerPoint presentation.
1. Open PowerPoint
Launch the PowerPoint app and open the presentation you want to record.
2. Navigate to the ‘Record’ tab
Click on the ‘Record’ tab in the ribbon at the top of the screen to record a PowerPoint presentation.

3. Select ‘Record’ dropdown
In the ‘Record’ tab, click on the dropdown arrow.
4. Choose recording options:
You will see the following two options:
- Start recording from the beginning: Choose this option to record a presentation from the beginning
- Start recording from the current slide: Select this option to record the slide that you’re currently on
Click on the option that suits you and go to the recording section.

5. Record your presentation
After selecting your preferred option, PowerPoint will direct you to the recording section.
Go to the buttons on the lower-right corner of your screen to switch on the camera and microphone and add video narrations.
Once you are good to go, start recording. Select the ‘Record’ button to begin a three-second countdown, after which the screen recording will start.

Speak clearly and confidently as you navigate through your PowerPoint slides. You can also use the onscreen laser, colored pens, or highlighters in the tray below markup slides to explain ideas visually during the presentation.

Navigate through the next or previous slides by clicking on the arrows appearing on the side of the slide.

6. Pause or stop recording
If you need to take a break, pause the video recording by simply clicking on the ‘Pause’ button in the recording toolbar. To stop recording the presentation altogether, click on ‘Stop’.
7. Review your recording
After recording, review your video presentation to ensure everything looks and sounds as intended. You should also play your video recording back to check for any errors or issues using the ‘replay’ button.

8. Save your presentation
Once you’re satisfied with your presentation recording, save it to preserve your changes. Click on the ‘Export Video’ button to export the deck.
Using Slideshow timings and narrations
Let’s discuss Microsoft PowerPoint’s key features—the timings and narrations.
- Slideshow timing: Set specific times for each slide while rehearsing, and the slides will automatically advance at the set time, ensuring your presentation flows smoothly. When recording, Microsoft PowerPoint slides automatically save these times, making it easier to synchronize your narration with your slides. Slideshow timing is for personal timekeeping to ensure that you can explain each slide.
- Narrations: Adding narrations to your presentation can enhance engagement and understanding for your audience. You can record the presentation in your voice, providing context, explanations, and insights that complement your slides. Narrations are a more engaging way to provide information to your audience instead of blandly making them read all the PowerPoint slides.
Making Use of Advanced Features
With PowerPoint, you can easily integrate multimedia resources into your presentation to make your content more interesting and impactful. For example, you can embed a YouTube video in the presentation and play it live while recording.
Let’s see the advanced presentation recording features—writing, drawing, and annotating during the presentation
- Inking tools: Write or draw directly on your slides during a presentation by accessing inking tools in the ’Draw’ tab in the ribbon
- Pen and highlighter: Choose from different pen colors and thicknesses to emphasize critical points or underline important information
- Eraser: Correct mistakes or remove annotations quickly with the ‘Eraser’ tool
- Laser pointer: Use the laser pointer feature to draw attention to particular areas of your slide, guiding your audience’s focus and enhancing clarity
- Navigate to the slide: Select the slide where you want to insert the video or multimedia resource
- Insert tab: At the top of the screen, click the ‘Insert’ option in the ribbon.
- Video or audio: Depending on your multimedia resources, choose ‘Video’ or ‘Audio’ from the toolbar
- Select ‘Online Video’
- A dialog box will pop up, prompting you to enter the URL of the YouTube video you want to insert
- Paste the URL of the YouTube video and click ‘Insert’
- PowerPoint will embed the video into your slide
- If you have a video or audio file saved on your computer, choose ‘Video’ or ‘Audio’ and then select ‘Video on My PC’ or ‘Audio on My PC,’ respectively.
- Navigate to the file location, select the video or audio file, and click ‘Insert’
- After inserting, you can resize and reposition the multimedia resource on your slide. In the ‘Playback’ tab, you can customize the playback options to play the video or audio during your presentation
To effectively use advanced features in your PowerPoint presentation, remember to:
- Practice: Familiarize yourself with the advanced features before the presentation to ensure smooth execution
- Use sparingly: Avoid overusing advanced features as they may distract from your message
- Test compatibility: Test multimedia resources to ensure they play seamlessly on the presentation computer before presenting
Tips for a Successful PowerPoint Presentation
Creating a successful PowerPoint presentation requires careful planning, preparation, and execution. Here are some tips to ensure your PowerPoint slides captivate your audience and effectively deliver your message:
- Keep it simple: Avoid cluttering slides by keeping minimal text. Use concise bullet points and visuals to convey the key ideas effectively
- Ensure consistency: Maintain a uniform presentation theme by using consistent fonts, colors, and slide layouts
- Focus on key points: Use slides as visual aids to highlight the main points and reinforce your message. The slides should complement your verbal presentation, not overshadow it.
Pro tip: Use the ClickUp Presentation Template to create effective PowerPoint presentations in less time. It helps you design the presentation outline to quickly arrange and format the slides. Moreover, the customized tasks, statuses, and views let you visualize the presentation and track the progress of each slide.

- Practice, practice, practice: Rehearse your presentation multiple times to become familiar with the content and flow. Keep notes handy for presentation and refer to them to maintain proper flow
- Time yourself: Time your rehearsal to ensure your presentation fits the allotted time frame. Adjust your pacing as needed to avoid rushing or dragging out certain sections
- Anticipate questions: Anticipate potential questions from your audience and add a short FAQ or summary towards the end for a quick recap of the essential details
- Tell a story: Structure your presentation like a narrative, with a clear beginning, middle, and end. Engage your audience by including examples and case studies in your presentation
- Use visuals wisely: Incorporate relevant infographics such as charts, graphs, images, and videos to enhance understanding and retention. Break text-heavy slides into different sections to explain complex information
- Inject energy: Maintain a lively and enthusiastic delivery throughout your presentation. Use formal hand gestures to keep your audience engaged and attentive
- Know your audience: Consider your audience’s knowledge level and interests to tailor your content and delivery style
These tips will help you create and deliver an informative, well-structured, engaging, and impactful PowerPoint presentation. Remember to stay confident, adaptable, and responsive to your audience’s needs throughout the presentation.
Recording a PowerPoint presentation is convenient and straightforward. However, there are certain limitations you should be aware of:
- Limited editing capabilities: PowerPoint does not support advanced editing. So you will have to re-record the presentation if you need a lot of changes
- Inability to incorporate advanced multimedia features: PowerPoint supports basic multimedia insertion, such as videos and audio files. However, it’s challenging to add advanced multimedia features while recording
- File size and compatibility issues: PowerPoint presentations have large file sizes, especially if they contain embedded multimedia elements. Sharing the presentation via email or other platforms is difficult because of file size limitations. You may also face compatibility issues while sharing recorded presentations with others with different PowerPoint versions or alternative presentation software
- Limited customization options: PowerPoint offers limited control over video resolution, audio quality, and playback settings. It restricts the ability to tailor the recording to specific audience preferences or technical requirements
- Limited interactivity: PowerPoint presentations offer limited interactive elements, which reduces the effectiveness of the presentation, especially for training or educational purposes
How to Video Record PowerPoint Presentations in ClickUp
Creating presentations on PowerPoint and then recording, editing, and sharing them takes a lot of time.
Instead, you can use quick video and screen recording tools on platforms like ClickUp for effective communication. ClickUp is a versatile tool that enables seamless project management, collaboration, and documentation. With ClickUp Clips , you can instantly record and send a screen recording to give feedback, share ideas, or collaborate with your team. You can also convert Clips into tasks.

Go to ClickUp Brain to transcribe your Clips and find information from them.

Here’s how you can record presentations on ClickUp:
- Go to any task that you want to record
- Head to the comment for which you want to record the video and click on the video icon

- Choose your mic from the given options to record audio

- Select the presentation tab that you want to record and start presenting

- Once you are done recording, your clip is automatically added to the comment so you can send it to the team in one go.
- You can download the video file for future use
You can also record Clips anywhere on Clickup by following the below steps:
1. Click on the global action tool of video recording on your ClickUp page

2. Once you have recorded a video, you can easily access it in your Clips Hub

- Transparent communication: Streamline collaboration and share quick feedback with your team
- Efficiency and productivity: Eliminate the need for external meeting minutes software, saving time and eliminating endless comment threads
- AI-powered transcription: Send videos automatically transcribed using ClickUp Brain to provide clear context to the viewers and enable quick search
Level up Your Interactive Communication with ClickUp
Skip the traditional and boring ways of pitching your ideas and ensure interactive communication with modern tools like ClickUp. It also eliminates the need for multiple software to create, present, record, or take meeting minutes. Sign Up for free on CickUp to get an all-in-one app for all your presentation needs.
Questions? Comments? Visit our Help Center for support.
Receive the latest WriteClick Newsletter updates.
Thanks for subscribing to our blog!
Please enter a valid email
- Free training & 24-hour support
- Serious about security & privacy
- 99.99% uptime the last 12 months
Your current User-Agent string appears to be from an automated process, if this is incorrect, please click this link:
How to Add Voice-Overs to Canva Presentations

Namrata Gogoi is an author covering Buying Guides and device-related tips and tricks. She loves learning and writing about gadgets and accessories that are functional, innovative, and have a positive impact on people's lives. Since 2016, she has covered smartphones, computer accessories, household electric appliances, and any product that helps bring convenience to one's life. Previously, she worked as an IT Analyst at TCS but found her calling at Guiding Tech.

Ashish, Computer Engineer by profession, has been writing about tech for 16 years, with a primary focus on Windows and Smartphones. He has a keen interest in writing about social media, as it constantly evolves, introducing new features to explore.
- You cannot edit uploaded audio files in Canva.
- Present and Record may be unavailable in every country.
- AI Voice-over apps will have limitations on the number of minutes in the free version.
Method 1: Add Audio Files
Since Canva has limited customization options, you must ensure the audio files are trimmed before uploading. Also, all your files must be appropriately named and uploaded to avoid confusion later.
Step 1: Open the presentation and select the slide where you want to add the voice-over.
Step 2: Click the Uploads section on the left and switch to the Audio tab to reveal all the audio files.
Step 3: Drag and drop the audio at the bottom of the selected slide, and position it appropriately using drag.

Repeat the above steps for all the slides. Once everything is in place, tap the Play button to view and hear your voice-overs. If you have missed uploading an audio file, you can manually do it when editing the presentation.
This method comes in handy when you cannot access the Present and Record option, which we have explained next.
Method 2: Present and Record
Canva has a built-in method—Present and Record—for adding voice-overs to already-made presentations. One of the most significant drawbacks is that you need a quiet room and don’t have the option to trim the recorded audio.
Step 1 : Open the presentation and click on the three-dot menu at the extreme right corner.
Step 2 : Select Present and Record from the list of options > Start Recording.

Step 3: It will prompt you to allow access to the camera and microphone. Since you only need to perform a voice-over, skip the camera permission and give access to your microphone. Once done, click on the Start recording button.

Step 4: Now, record your voice for all the slides. The slides with recorded audio are marked in red. Remember to move along the slides as the presentation asks.

When you need to pause, click on Pause . This way, you can also skip a few slides where you do not want any voice-overs.
Step 5 : Once the recording is complete, click on Done at the top right corner.

Depending on the length of the audio and the presentation’s content, the download might take time.

In addition to the direct download, Canva allows you to copy and share the link to the presentation directly.
Method 3: Using AI
Many voice-over AI apps can connect to Canva and help you convert text to voice using multiple voice profiles. Here, we are using Murf AI.
Step 1: Open Canva, go to Apps , and search for Murf AI .
Step 2: Click on it, sign in using your existing account, or sign up.
Step 3: Once done, it will prompt you to use it in the existing or new design .

Step 4: In the Canva presentation editor, you will have access to Murif AI on the left , where you can select language , a voice profile , and a text box where you can type the text and choose style , speed , and pitch.

Step 5: Select the slide where you want to add the voice-over, click on Generate voiceover , and Add to the design .

It’s easy to add voice-over using AI apps, but there are limitations when using a free account. For example, Murf AI limits voice-over time to 12-15 minutes.
Was this helpful?
Last updated on 29 April, 2024
The above article may contain affiliate links which help support Guiding Tech. However, it does not affect our editorial integrity. The content remains unbiased and authentic.
Leave a Reply Cancel reply
Your email address will not be published. Required fields are marked *

The article above may contain affiliate links which help support Guiding Tech. The content remains unbiased and authentic and will never affect our editorial integrity.
DID YOU KNOW

Namrata Gogoi
More in internet and social.

How to See Friendship History on Facebook

13 Ways to Fix It if You Can’t Post on Instagram
Join the newsletter.
Get Guiding Tech articles delivered to your inbox.
Byte Bite Bit
How to Play Slide Show in PowerPoint: Step-by-Step Guide for Smooth Presentations
Playing a slideshow in PowerPoint is a fundamental skill that can truly upgrade our presentations. Whether we’re presenting in a business meeting, teaching a class, or sharing vacation photos, knowing how to effectively run a slideshow is crucial . This post will walk us through the steps seamlessly, ensuring we’re ready for the spotlight.

We’ve all been there, fumbling with buttons, trying to get the slides to advance smoothly. No worries, though! Setting up a slideshow in PowerPoint is actually a piece of cake. From selecting the “Slide Show” tab to choosing “From Beginning,” the process is straightforward and designed to be user-friendly.
For anyone looking to get a bit more advanced, there’s also the option to loop slides continuously for unattended presentations. By ticking the “Loop continuously until ‘Esc'” option under the Slide Show settings, our slides will keep playing without any manual intervention. This can be a lifesaver for events and exhibitions where we need the content to keep rolling without us being glued to the computer. Let’s dive into the details and get those slideshows running like a charm!
- 1.1 Setting Up the Slide Show
- 1.2 Navigating Through Slides
- 1.3 Utilizing Presentation Tools and Effects
- 2.1 Incorporating Multimedia
- 2.2 Annotation and Emphasis Techniques
- 3.1 Custom Slide Show Timings
- 3.2 Rehearsal and Narration Tools
Mastering PowerPoint Slide Shows
Understanding how to play and manage a slide show in PowerPoint is essential for creating effective presentations. This section covers setting up your slide show, navigating through slides, and utilizing various presentation tools and effects.
Setting Up the Slide Show
First, we need to set up the slide show. Navigate to the Slide Show tab on the ribbon. From here, you can choose to start your presentation From Beginning or From Current Slide .
Ensure the presentation is set to full screen for a professional look. If you want the slide show to loop continuously, select the Set Up Slide Show button and check the Loop continuously until ‘Esc’ option. This is particularly useful for presentations running unattended.
PowerPoint’s flexibility extends to different versions: Microsoft 365, PowerPoint 2019, 2016, 2013, Mobile , and even the web browser . Each offers slightly different interfaces, but the core functionality remains the same.
Navigating Through Slides
Navigating through your slides smoothly is crucial. During a presentation, you’ll be in slide show mode where you can advance slides by clicking the mouse or using the arrow keys.
You may need to move quickly to a specific slide. Pressing the number key of the slide you want to display and then pressing Enter brings you directly to that slide. To exit the slide show at any time, press the Esc key, which brings you back to the Slide Show view .
Use Presenter View (available in PowerPoint 2013 and later) to access speaker notes and thumbnails while presenting. This helps in navigating large decks efficiently.
Utilizing Presentation Tools and Effects
PowerPoint isn’t just about static slides; we can enhance our presentations with tools and effects. The Slide Show tab offers options like Pen and Laser Pointer Tools to highlight key points. Select See All Slides to jump to any slide directly without exiting the slide show.
Zoom is a nifty feature that lets us create a visual summary of all slides. It’s particularly useful for non-linear presentations where audience questions can guide the flow.
In PowerPoint for Microsoft 365 , the Morph transition smoothly animates between slides. This grabs attention and maintains flow. Use the Animation Pane to control timings and effects, making transitions look polished and professional.
Remember: Practice is key! Run through your presentation multiple times to ensure smooth delivery and familiarity with navigation.
Enhancing Slide Show Interactivity
To make your PowerPoint presentations truly engaging, you need to add elements that captivate your audience. This means incorporating multimedia and using annotation tools effectively.
Incorporating Multimedia
Integrating multimedia elements such as videos , audio clips , and animations can turn a dry slide show into a compelling story. When we add a video, it helps break the monotony and keeps the audience’s attention sharp.
Using the Insert tab, we can quickly embed videos directly from our files or even embed online content. Animations, when used sparingly, highlight key points without overwhelming the slide.
Furthermore, we should take advantage of the Record Slide Show feature. By recording narrations using a microphone , we can provide explanations and context, which makes the presentation more interactive and self-explanatory.
| Multimedia Element | Tool | Purpose |
| Video | Insert Tab | Engagement |
| Audio Clips | Insert Tab | Emphasis |
| Narration | Record Slide Show | Context |
Annotation and Emphasis Techniques
Annotations are game changers for interactive presentations. Using the pen tool , we can draw directly on our slides to emphasize key points during the presentation. Imagine you’re explaining a complex process; simply circling or underlining the section with a virtual pen can create a laser pointer effect that guides your audience’s focus.
In Presenter View , we have the flexibility to annotate without disrupting the flow. Switching between the pen and highlighter is easy and can be done on the fly using arrow keys or mouse clicks .
Utilizing the annotations tab , we can pre-plan our points of emphasis. This allows us to seamlessly switch between prepared annotations and impromptu highlights, ensuring a smooth and professional delivery.
Integrate these tools, and your slide show won’t just convey information—it will interact with and engage your audience effectively.
- Laser Pointer
- Highlighter
- Annotations Tab
Advanced Slide Show Features
Efficiently utilizing advanced slide show features in PowerPoint can enhance your presentation experience. We’ll discuss scheduling precise timings for each slide and using tools for rehearsing and adding narration.
Custom Slide Show Timings
Setting custom timings allows slides to advance at predetermined intervals without manual intervention. You can access this feature via the Slide Show tab.
Select Rehearse Timings to practice your presentation, which records the time spent on each slide. This feature is practical for creating a polished, automated slideshow. Save these timings by clicking Yes when prompted after rehearsal.
For continuous presentations, such as those shown at kiosks, choose Browsed at a kiosk in the set-up options. This ensures the slideshow loops seamlessly. Adjust individual slide timings in the Transitions tab, where you find the Advance Slide After option.
Rehearsal and Narration Tools
Rehearsal tools in PowerPoint help in delivering a fluent presentation. Trigger this feature from the Slide Show tab under Rehearse Timings . It enables practicing, with a timer tracking each slide’s duration. This function is ideal for synchronizing your speech with your slides.
Narrations can be added to each slide. Record these by selecting Record Slide Show from the same tab. This feature is particularly useful for creating self-running presentations, ensuring your message is clear even in your absence.
Speaker notes can be viewed by clicking Presenter View . This control bar helps keep your presentation on track without revealing notes to your audience.
| Custom Timings | Set exact slide durations | Slide Show tab |
| Rehearse Timings | Practice and record timings | Slide Show tab |
| Narrations | Add voice-overs | Slide Show tab |
Related posts:
- How to Do Hanging Indent on PowerPoint: Step-by-Step Formatting Guide
- How to Embed a YouTube Video in PowerPoint: Step-by-Step Guide
- How to Add a Video to PowerPoint: Step-by-Step Tutorial
- How to Add Speaker Notes in PowerPoint for Effective Presentations
- How to Add Music to PowerPoint: A Step-by-Step Guide for Seamless Presentations
- How to Curve Text in PowerPoint: Step-by-Step Guide
- How to Record a PowerPoint Presentation: Step-by-Step Guide for Professionals
- How to Crop a Picture into a Circle in PowerPoint: A Step-by-Step Guide
- How to Copy a Slide from One PowerPoint to Another: A Step-by-Step Guide
- How to Save PowerPoint as Video: Step-by-Step Guide for Beginners
- How to Make a Picture a Circle in PowerPoint: Step-by-Step Guide
- How to Print Notes in PowerPoint: A Step-by-Step Guide
Leave a Comment Cancel reply
Save my name, email, and website in this browser for the next time I comment.
Record your Audio for Free
Quick and easy way to record professional videos and share them instantly.
Free Online Recorder
Share, without downloading
1080p High-res recordings
Simple Editor
Free online voice recorder app!
Try our awesome new digital voice recording app - online, free. Our voice recorder allows you to record audio through the microphone in your computer, phone, tablet, or any device. Excellent quality voice recording - simple to use software that works on windows pc, mac, android, iphone, and any operating system. What’s more, with our voice recorder, you can record your screen and webcam too! Create amazing videos with your audio recordings. Save and download your voice recordings as files, or share them with friends and colleagues via the unique link (stored in the cloud).
How to Record Your Voice:

Select ‘Audio Only’
If you want to record only the audio from your microphone, click ‘Audio Only’. Otherwise select the screen & webcam recording format you need. (You may need to click ‘Allow’ permission to record your microphone)

Press the red button!
A countdown (3...2...1…) will appear to warn you that your voice recording is about to start. When you’re ready to stop, simply hit the red button again.

Download, Save, Share!
You can hit ‘Download’ to save your voice recording as a file, ‘Edit’ to adjust volume, add sound effects and more, or ‘Share’ to copy the link and send your recording to friends and colleagues without the need to download!
'Audio & Video Recording' Tutorial

Voice notes for business
Quickly and easily record voice notes that you can download or share via a link with your colleagues and customers. In the age of remote working it has never been more important (or easier!) to record voice memos and internal team communications that you can share with multiple people with a single click. Colleagues and customers can even leave comments on your voice recording, making collaboration and feedback an even more fluid process

Transcribe your voice recordings
After you’ve finished your voice recording, with just a few clicks you can create an automatic text transcription. Simply press ‘Edit’ when the voice recording is finished, then click ‘Subtitles’ on the sidebar, and ‘Auto Transcribe’. Wait for your transcript to be generated, hit ‘Options’ and ‘Download Subtitles’, choose ‘TXT’ format, and you can save all your voice recordings as searchable transcripts, or share with others!

Clean Background Noise
If you are in a noisy environment - an office, outside, or while travelling - then you can clean the background noise from your sound recordings automatically, with just one click. Simply hit ‘Edit’ when the recording is finished, click the Audio track in the timeline, and then press ‘Clean Audio’ in the sidebar menu. That’s it! Your sound recording will automatically be cleaned of background noise. Easy!

Simple. You just hit the red button! After you’ve chosen ‘Audio Only’ and pressed that magic red record button, a countdown timer will appear. Once your recording starts simply speak as you would normally. (You might need to press ‘Allow’ permission to record your microphone)
Yes! VEED’s voice recorder works with all types of microphone, all versions of operating software, across all devices. If you are having any trouble, don’t hesitate to contact us via the Live Chat. (You may also need to ‘Allow’ permission to record from your microphone)
Only if you want to. If you want to record video (via your webcam or portable device’s camera) simply click ‘Webcam Only’. This will record video from your webcam and sound from your microphone together, and save it as one single file. You can also choose to mute the sound, or even record your webcam, screen, and sound at the same time!
If you want to, yes! Simply select ‘Screen Only’, and your screen will be recorded at the same time as audio from your microphone. You can create amazing explainer videos and video presentations via screen recording.
Easy! Yes! Just select one of the options with the screen and webcam - you will appear on video in the corner of the screen, while your desktop image is recorded, and audio is captured by the microphone. Pretty handy, right?
VEED’s voice recorder is able to record audio to an extremely high bitrate (quality). However, the final sound will also depend on what microphone you are using, and if there is any background noise. If you want to clean the audio of background noise, you can do that automatically, just read the next FAQ!
Discover more
- Browser Audio Recorder
- Call Recording Online
- Cloud Audio Recorder
- MP3 Recorder
- Song Recorder
What they say about VEED
Veed is a great piece of browser software with the best team I've ever seen. Veed allows for subtitling, editing, effect/text encoding, and many more advanced features that other editors just can't compete with. The free version is wonderful, but the Pro version is beyond perfect. Keep in mind that this a browser editor we're talking about and the level of quality that Veed allows is stunning and a complete game changer at worst.
I love using VEED as the speech to subtitles transcription is the most accurate I've seen on the market. It has enabled me to edit my videos in just a few minutes and bring my video content to the next level
Laura Haleydt - Brand Marketing Manager, Carlsberg Importers
The Best & Most Easy to Use Simple Video Editing Software! I had tried tons of other online editors on the market and been disappointed. With VEED I haven't experienced any issues with the videos I create on there. It has everything I need in one place such as the progress bar for my 1-minute clips, auto transcriptions for all my video content, and custom fonts for consistency in my visual branding.
Diana B - Social Media Strategist, Self Employed
More from VEED

11 Best Free Screen Recorders to Try in 2023
Recording your screen is a necessity for content creators, freelancers, and teachers, to name a few. So, we’ve compiled a list of 11 best free screen recorders to try this year!

11 Easy Ways to Add Music to Video [Step-By-Step Guide]
Not sure where to find music for video whether free or paid? Want to learn how to find it, pick the right song, and then add it to your video content? Then dig in!
Top 5 Best Music Visualizers [Free and Paid]
Here are some of the best music visualizers available on the internet and how to use them!
More than Voice Recording
You can do a whole lot more than just create audio recordings online using VEED. You can create screen recordings, webcam recordings, Instagram videos, videos for YouTube and more! VEED is a full-suite online video editing platform that allows you to edit your video and audio files however you want! Try it out for free, now!

6 Best AI Presentation Tools in 2024 (Compared)
Pricing: $15 per month Standout Features: Generative AI Presentation Builder, Advanced Analytics Tracking, Extensive Stock Image Access
Pricing: $10 per month Standout Features: Comprehensive Creative AI Tools, Advanced Image Edit Capabilities, Professional Presentation Generation
Pricing: $6.99 per year Standout Features: One-Click AI Presentation, Rich Template Collection, PowerPoint Integration
If you’ve ever been tasked with creating a presentation for your business or a client, you know how time-consuming it can be. Sitting in front of a blank page, combing through endless templates, or spending hours on a presentation likely isn’t high on your list of priorities. Thanks to artificial intelligence (AI) , there’s a better way to create presentations. In this post, we’ll delve into the best AI presentation tools so you can spend more time on other tasks.
Let’s dive in.
- 1 What is an AI Presentation Tool?
- 2 What to Look for in an AI Presentation Maker
- 3.1 1. Simplified
- 3.2 2. Slides AI
- 3.3 3. PowerPoint
- 3.4 4. Gamma
- 3.5 5. Beautiful AI
- 3.6 6. Tome
- 4.1 Top 3 Best AI Presentation Tool Feature Comparison
- 4.2 Best AI Presentation Tool Price Comparison
- 5 What is the Best AI Presentation Tool?
- 6 Frequency Asked Questions
What is an AI Presentation Tool?

Image created with Divi AI
An AI presentation tool is a system that uses machine learning generative AI that allows you to create presentations in minutes rather than hours. These revolutionary tools will enable you to craft your presentation from script to finished product, all with a descriptive text prompt.
What to Look for in an AI Presentation Maker
As we explore the top AI presentation makers available, it’s best to look for features that will make your life easier, not harder. Here are a few things that your chosen tool should offer:
- Ease-of-use: If you want to incorporate an AI presentation tool into your workflow, you’ll want to find something easy to use. After all, you seek a less time-consuming way to create presentations. You shouldn’t have to spend hours learning a new interface.
- Integration with popular software: Those in the business world know that there are three primary presentation tools that almost everyone uses: Microsoft PowerPoint, Adobe Keynote, and Google Slides. When shopping for AI presentation tools, look for products that can easily export your creations for those popular programs.
- Customization options: Another essential factor to consider is how easily you can customize your presentation. Look for programs that won’t force you to stick with cookie-cutter AI-generated templates. Make sure you can make design and text edits as you need them.
- Tutorials: Learning new software can be intimidating, so choose a platform with plenty of tutorials and support should you encounter any problems.
6 Best AI Presentation Tools in 2024
Subscribe To Our YouTube Channel
We evaluated over a dozen AI presentation tools. While some decent ones didn’t make our list, we wanted to focus on tools that are easy to use, work with popular programs like PowerPoint or Google Slides, and offer the most features. Without further ado, here are our top picks for the best AI presentation tools money can buy. Most offer free versions or a free trial, so feel free to try all of them out to find the best fit for your situation.
The AI Presentation Tools Listed In Order
- Beautiful AI
1. Simplified
🥇 best ai presentation tool overall.

Simplified is one of the most robust AI tools on the market today. Generative artificial intelligence can create presentations, images, memes, thumbnails, social media quotes, and more. What makes it unique is its wealth of AI features that appeal to creatives and content creators across different mediums, including digital art, writing, videos, and online advertising through social media.
Edit Images With AI

Another cool feature of Simplified is the image editing feature. You can remove or replace the background, erase elements, magically remove artifacts or other imperfections, autofocus, or use generative fill to add additional details to your photos. The generative fill feature works much like Photoshop AI , where you can select an area of a photograph and fill it with a new element you describe with a text prompt.
What We Like About Simplified
- Multimedia: Generate presentations and other forms of media
- Editing: Edit images and text with AI
- Branding: Create logos and design elements with AI
- Simple to Use: One-click editing tools for image editing
What Could Be Improved
- Translations: The AI sometimes struggles with translating other languages
- No Interactive Features: Unlike other AI presentation tools, Simplified doesn’t offer any interactive tools
🥇 Why We Picked It
We chose Simplified due to the sheer number of AI tools available with the platform. In addition to making AI presentations, users can use an AI image generator, AI writer, video editor, memes, and more. The interface is easy to understand, the price is affordable, and you can accomplish everything you need in one place as a content creator.
Who Is Simplified Best For?
Simplified may be for you if you’re in the market for an all-in-one design tool. With AI tools for generating presentations and all their elements, you can design like the pros for a very affordable price.
Community Reviews And Ratings
Simplified is praised for its user-friendly interface, integrations, and free plan. However, some say it lacks advanced writing tools compared to other platforms.
Simplified offers a limited free plan with pro plans starting at $15 monthly .
➡️ Read Our Complete Simplified Review .
Try Simplified
2. Slides AI
🥈 best ai presentation tool for google.

Slides AI is an extension for Chrome designed to work inside Google Slides. Provide it with a topic, including any requested elements, and Slides AI will create up to a 10-page presentation in minutes. There are limited features, but it adds slides, generates text, and sets formatting based on your prompt. In addition to generating slides, Slides AI has a Magic Write feature, which allows you to paraphrase sentences, suggests images for your presentations, and helps you search for citations for your work.
Slides AI Works as an Extension

Slides AI has a simple interface, allowing you to focus more on creating content than learning new software. Since it works as an extension within Google Slides, you simply have to click a button and type in some text, and Slides AI will do the rest.
What We Like About Slides AI
- Magic Write: Generate text through the power of AI
- Generate Slides: Create new slides based on original content
- Topic-Based: Create slides from a topic
- Software Limitations: There aren’t a lot of creative tools with Slides AI so presentations may look generic
🥈Why We Picked It
For those using Google Slides or PowerPoint, Slides AI is an excellent choice. It allows you to streamline slide creation through a simple interface, AI writing, and AI-generated themes. The plans are affordable so that budget-conscious people will get a lot of bang for their buck.
Who Is Slides AI Best For?
If you are a regular Google Slides user, Slides AI is a no-brainer. You can save time creating your slides and give them a fresh look in seconds. The downside to Slides AI is that there is no text generator. That said, plenty of AI writers , such as Rytr or Jasper , can help.
Those who like Slides AI call it a “game changer” for creating presentations. However, the AI-slide generation is a bit vanilla.
➡️ Read Our Complete Slides AI Review .
Slides AI is available for free , with pro plans starting at $10 per month .
Try Slides AI
3. PowerPoint
🥉 best ai presentation tool for business professionals.

Microsoft is the founding father of business software, including the widely popular PowerPoint . Sure, there are other products out there that are geared toward businesses, but PowerPoint is the gold standard for making presentations. Did you know that it comes with AI features built right in? Companies that already use Microsoft products will be pleased to know that you can generate incredible designs for your presentations through integration with Copilot.
Practice Delivering Your Presentations

One of the best features of PowerPoint is the Rehearse with Coach AI tool. It records your voice and image on video to evaluate your performance. It allows you to read through your presentation and then get a professional critique of how you did. You’ll get a rehearsal report that analyzes your body language, notes how many filler words you used, and analyzes your pace and pitch.
What We Like About Microsoft 365
- AI Designer: AI-powered design suggestions for generating slides
- Automatic Slide Generation: Uses AI to add additional slides based on the original design
- Rehearsal Reports: Generate rehearsal reports to get feedback on presentation delivery
- Lack of Interactivity: PowerPoint only allows for text, images, and graphics but nothing else
🥉 Why We Picked It
Microsoft is the go-to for professional business software. Between its highly collaborative nature, design flexibility, and overall visual impact, PowerPoint has been a top contender for years. Now, with artificial intelligence on board, presenters can easily design slides faster, practice their delivery, and get feedback on how well they perform during rehearsal.
Who Is Microsoft 365 Best For?
If you make presentations for a living or your company requires PowerPoint, check out their AI tools. The Rehearsal Report feature is well worth the cost, especially if you are the one who has to give the presentation you create. Microsoft will even give you a 30-day risk-free trial to try it out. The downside is that you can’t edit the images it generates, but you can get around that by adding an AI art generator to your arsenal of tools.
Fans of PowerPoint note its ease of use, flexibility, and stability. On the other hand, consumers wish there were more interactive features.
Microsoft offers a 30-day free trial with prices starting at $6.99 per month per person.
Try Microsoft 365

Gamma is one of the most intuitive platforms on our list. It uses generative AI to build your presentation from a text prompt, complete with visual aids, such as charts, graphs, images, and other visual elements – automatically. One of our favorite features is the interface. Once Gamma creates your presentation, you can easily add more elements. It functions much like a page builder or Gutenberg for WordPress , where you can drag and drop visual elements into your pages and then tweak them accordingly.

Gamma creates presentations on the fly simply by typing in a text prompt. One of our favorite features is watching in real-time as Gamma makes your presentation. Once completed, you can use generative AI to edit, improve, or change any presentation aspect to match your branding and style. Another unique feature is Gamma’s analytics feature, which allows you to see who’s viewed your presentation and track engagement down to the element level.
What We Like About Gamma
- Analytics Tracking:
- Web Sharing: Share over the web and solicit feedback through comments
- Simple Interface: Drag-and-drop visual editor
- Export Options: Export to PowerPoint or PDF
- It’s Internet Dependent: Gamma is web-based, so you must have an internet connection to use it. While this may not be a con for most, it eliminates the possibility of working on presentations while offline
Who Is Gamma Best For?
Gamma’s intuitive interface and quick start wizard make getting started a breeze. Plus, with their AI-powered text editing feature, you can tweak the content as much as you’d like. They offer access to millions of royalty-free stock images and an AI-powered image generator that suggests a relevant prompt based on your content.
Gamma offers a free plan and two paid plans starting at $10 monthly .
5. Beautiful AI

Another popular choice is Beautiful AI , a feature-packed AI presentation tool that allows you to create stunning presentations with one click. They offer several AI-powered design elements you can edit to match your branding. Plus, it’ll even line these up automatically, so you don’t have to spend time on tedious tasks. Suppose you’d rather start from a previously created presentation. In that case, you can easily import a PowerPoint file and then use AI to improve it.

One of the best features of Beautiful AI is the millions of royalty-free stock images at your disposal. Sure, you can create your own AI images, but if you’re familiar with AI Art generators , you know that sometimes the photos they produce don’t look very natural . It’s nice they thought to include this feature because it saves you the time and cost of signing up for a stock photography service.
What We Like About Beautiful AI
- 1-Click Presentations: Create AI-generated presentations with one click
- AI Design: AI-powered design elements
- AI Text Generator: Rewrite and improve text with AI
- Lots of Templates: 110+ pre-designed templates
- PowerPoint Support: Integrates with PowerPoint (import/export)
- Exporting: When exporting to PowerPoint or as a PDF, graphics are not editable
Who Is Beautiful AI Best For?
If you’re tasked with creating presentations for your company or corporate freelance clients and must use PowerPoint, Beautiful AI is an excellent choice. While they don’t have a free plan, they offer a 14-day free trial, so you’ll have plenty of time to play with it and decide if it’s right for you.
Beautiful AI users love how easy it is to create presentations but say there are text editing limits and presentations don’t look great on mobile devices.
Beautiful AI offers two plans, Pro and Team, with prices starting at $12 per month (billed annually).
Get Beautiful AI

Tome is one of the most popular AI presentation tools on the market. Since its release in late 2022, it has raced to become one of the fastest-growing platforms in record time, with over 1 million users. It allows you to create live, interactive presentations, mood boards, design portfolios, pitch decks, webpages, and more. Tome offers over 25 templates for a good starting point and a great time-saving feature. Its intuitive generative AI allows you to create scripts, text, images, charts, and more.
If you already have an outline in mind, you can easily paste it into Tome, allowing it to convert your thoughts into structured presentations in a single click. Does your business require a multi-lingual solution? Tome has you covered with support languages other than English, so you can translate your text to share your presentations with anyone, anywhere.

Tome is web-based and provides a sharable link for your creations. Not only that, it integrates with popular platforms, such as Figma, Spline, YouTube, Twitter, Google Sheets, and other popular AI website builders like Framer . With these integrations, you can import videos, layouts, text, and even full web pages.
What We Like About Tome
- Interactive: Creates live, interactive presentations
- Cross-Device Support: Responsive layouts for any screen size
- Multiple AI Tools: Generates text, images, graphs, 3D models, and more
- Multi-Language Support:
- Limited Language Support: As of now, Tome’s AI actions only offer support for English. It would be nice to see them add more languages
Who Is Tome Best For?
Tome is an excellent platform for creating web-based presentations, landing pages, interactive pitch decks, and more. It does a pretty good job of text and image generation, but its integrations are the best features. Try Tome if you want an easy way to incorporate Figma layouts or YouTube videos into your presentations.
Tome offers a free trial with prices starting at $20 per month .
Comparing the Best AI Presentation Tools
Before deciding on which AI presentation tool to choose, take the time to compare prices and the features of every tool on our list. As previously mentioned, our featured tools include a free trial or a free version to assist you in making gorgeous presentations.
Top 3 Best AI Presentation Tool Feature Comparison
To make the most informed decision, knowing the pricing and comparing the features is essential. Here’s a feature comparison table for the top three AI presentation tools on our list so you can decide which is the best fit.
| 🥇 Simplified | 🥈 Slides AI | 🥉 PowerPoint | |
|---|---|---|---|
| AI Image Generation | ✔️ | ✔️ | ✔️ |
| AI Image Editing | ✔️ | ✔️ | ❌ |
| AI Text Generation | ✔️ | ✔️ | ✔️ |
| AI Text Editing | ✔️ | ✔️ | ✔️ |
| One-Click Presentation | ✔️ | ✔️ | ✔️ |
| Free Plan | ✔️ | ✔️ | ❌(free trial) |
| Price | $15/month | $10/month | $6.99/month |
Best AI Presentation Tool Price Comparison
We’ve created this hand comparison table to help you decipher pricing for each of our recommended AI presentation tools.
| Plugin | Price | Free Option | User Reviews (avg) | ||
|---|---|---|---|---|---|
| 🥇 | $15/month | ✔️ | ⭐⭐⭐⭐⭐ (4.65/5) | ||
| 🥈 | $10/month | ✔️ | ⭐⭐⭐⭐⭐ (4.5/5) | ||
| 🥉 | $6.99/month | ❌ (free trial) | ⭐⭐⭐⭐⭐ (4.65/5) | ||
| $10/month | ✔️ | N/A | |||
| $12/month (billed annually) | ❌ | ⭐⭐⭐⭐⭐ (4.65/5) | |||
| $20/month | ✔️ | N/A |
What is the Best AI Presentation Tool?
After thoroughly testing over a dozen AI presentation tools, we feel that Simplified and Slides AI offer the best features. Simplified stands out for its intuitive interface, logo, and other design element generation. It also gets the nod for its one-click editing tools. On the other hand, Slides AI is a close second due to its wealth of AI tools. You can create presentations, write content, and create on-topic slides effortlessly. Either way, if you’re in the market for a good AI assistive tool to speed up creating presentations, you can’t go wrong with either.
Frequency Asked Questions
What is an ai presentation tool, how do ai presentation tools work, how is ai used in microsoft products for presentations, how can ai presentation tools streamline the workflow, what should users consider when choosing an ai presentation tool.
Need more AI tools? Check out these articles featuring the best AI tools to use for your business:
- 16 Best AI Assistants to Make You More Productive
- 11 Best AI Marketing Tools to Boost Your Business
- 10 Best AI Audio Tools (For Podcasts, Music & More)
- 9 Best AI Design Tools (Reviewed & Compared)
Featured Image via Nattasid Thapsang / shutterstock.com

Explore Our Top Picks
Here are our favorites! 👇
Get Simplified Today!
With so many great options available, it can be hard to pick one. find out why simplified is our favorite. 👇.
By Deanna McLean
Deanna McLean is a blog author, and web developer. She studied graphic design at the University of Mississippi and loves all things, Hotty Toddy. (If you know, you know.) As an adventurous creative, there is nothing Deanna loves more than taking her son and two dogs on excursions in her Jeep.
Explore Divi, The Most Popular WordPress Theme In The World And The Ultimate Page Builder

Check Out These Related Posts

- Wix vs Divi AI: Which AI Website Builder to Choose in 2024?
Posted on June 5, 2024 in Business
Are you tired of AI website builders that don’t deliver? Are you looking for AI features that actually work? In this post, we will discuss two of the best and most popular AI site builders available: Wix (the AI website builder) and Divi (the AI-powered WordPress theme). Both can build...

How to Make a Small Business Website with WordPress in 2024
Updated on June 4, 2024 in Business
Building a brand new website for your business is an excellent step to creating a digital footprint. Modern websites do more than show information—they capture people into your sales funnel, drive sales, and can be effective assets for ongoing marketing. Luckily, WordPress offers flexibility,...

Shopify vs Etsy: Which One’s Better for eCommerce? (2024)
Posted on May 28, 2024 in Business
Have you ever dreamed of selling your crafts online? Two popular platforms, Shopify and Etsy, have the potential to turn those dreams into reality. But which one is right for you? Buckle up because we’re diving into Shopify vs. Etsy to see which fits your unique business goals! Let’s...
Leave A Reply Cancel reply
- Recent Posts
- How to Make a Church Website with WordPress (2024 Tutorial)
- Do You Need a WordPress Page Builder in 2024?
- Download a Free Spa Theme Builder Pack for Divi
- WordPress Pricing: How Much Does WordPress Cost? (2024)
- Divi Resources
- Theme Releases
- Tips & Tricks
974,872 Customers Are Already Building Amazing Websites With Divi. Join The Most Empowered WordPress Community On The Web
We offer a 30 Day Money Back Guarantee, so joining is Risk-Free!
Divi Features
- All Features Explore Divi
- Divi Modules
- Divi Layouts
- No-Code Builder
- Ecommerce Websites
- Theme Builder
- Marketing Platform
- Speed & Performance
- Premium Support
- Divi Marketplace
- Divi AI Brand New!
- Divi Hosting
- Extra Theme
- Bloom Plugin
- Monarch Plugin
- Plans & Pricing Get Divi Today
- Documentation
- Help Articles & FAQ
- 24/7 Support
- Developer Docs
- System Status
- Product Updates
- Best Plugins
- Best Hosting
- Divi Meetups
- Divi Facebook Group
- Divi Examples
- Divi Integrations
- Divi Reviews
- Community Forum
- Affiliate Program
- Terms of Service
- Privacy Policy
Copyright © 2024 Elegant Themes ®
- How to Login
- Use Teams on the web
- Join a meeting in Teams
- Join without a Teams account
- Join on a second device
- Join as a view-only attendee
- Join a breakout room
- Join from Google
- Schedule a meeting in Teams
- Schedule from Outlook
- Schedule from Google
- Schedule with registration
- Instant meeting
- Add a dial-in number
- See all your meetings
- Invite people
- Meeting roles
- Add co-organizers
- Hide attendee names
- Tips for large Teams meeting
- Lock a meeting
- End a meeting
- Manage your calendar
- Meeting controls
- Prepare in a green room
- Share content
- Share slides
- Share sound
- Apply video filters
- Mute and unmute
- Spotlight a video
- Multitasking
- Raise your hand
- Live reactions
- Take meeting notes
- Customize your view
- Laser pointer
- Cast from a desktop
- Use a green screen
- Join as an avatar
- Customize your avatar
- Use emotes, gestures, and more
- Get started with immersive spaces
- Use in-meeting controls
- Spatial audio
- Overview of Microsoft Teams Premium
- Intelligent productivity
- Advanced meeting protection
- Engaging event experiences
- Change your background
- Meeting themes
- Audio settings
- Manage attendee audio and video
- Reduce background noise
- Voice isolation in Teams
- Mute notifications
- Use breakout rooms
- Live transcription
- Language interpretation
- Live captions
- End-to-end encryption
- Presenter modes
- Call and meeting quality
- Meeting attendance reports
- Using the lobby
- Meeting options
- Record a meeting
- Meeting recap
- Play and share a meeting recording
- Delete a recording
- Edit or delete a transcript
- Switch to town halls
- Get started
- Schedule a live event
- Invite attendees
- organizer checklist
- For tier 1 events
- Produce a live event
- Produce a live event with Teams Encoder
- Best practices
- Moderate a Q&A
- Allow anonymous presenters
- Attendee engagement report
- Recording and reports
- Attend a live event in Teams
- Participate in a Q&A
- Use live captions
- Schedule a webinar
- Customize a webinar
- Publicize a webinar
- Manage webinar registration
- Manage what attendees see
- Change webinar details
- Manage webinar emails
- Cancel a webinar
- Manage webinar recordings
- Webinar attendance report
- Get started with town hall
- Attend a town hall
- Schedule a town hall
- Customize a town hall
- Host a town hall
- Use RTMP-In
- Town hall insights
- Manage town hall recordings
- Cancel a town hall
- Can't join a meeting
- Camera isn't working
- Microphone isn't working
- My speaker isn’t working
- Breakout rooms issues
- Immersive spaces issues
- Meetings keep dropping

Share slides in Microsoft Teams meetings with PowerPoint Live
PowerPoint Live in Teams gives both the presenter and audience an inclusive and engaging experience, combining the best parts of presenting in PowerPoint with the connection and collaboration of a Microsoft Teams meeting.

When you’re the presenter, you have a unique view that lets you control your presentation while staying engaged with your audience, seeing people’s video, raised hands, reactions, and chat as needed.
And if you’re an audience member, you can interact with the presentation and personalize your viewing experience with captions, high contrast slides, and slides translated into your native language.
Here’s how it works:
Tip: Are you an audience member? Jump down to learn more about how you can interact during the presentation.
Presenter view

Present your slides

If you're in PowerPoint for the web, select Present > Present in Teams .
Your slides will appear in the Teams meeting, with your Notes next to them.
Navigate through the slides

Use the navigation arrows to go forward and backward.
Use the thumbnail strip to jump ahead or backwards.
Select Go to slide to see a grid view of all slides in the presentation. Select one to jump to it.
Stay connected to the audience
One of the benefits of using PowerPoint Live to present instead of sharing your screen is that you have quick access to all your meeting tools you need to engage with the audience and to read the room in one view. This is especially true if you’re presenting from a single screen.
Turn Chat on or off to view what your audience is saying.
See audience reactions and raised hands in real-time.
Change the Layout of your presentation and choose how your live camera feed appears in your presentation, like Standout or Cameo . It helps the audience read your non-verbal cues and keeps them engaged.
Use the Laser pointer , Pen , Highlighter , or Eraser to clearly reference items on your slides.
Audience view
As an audience member, you’re able to personalize your experience without affecting anyone else. Try these options to find what works best for you:

Note: If presenters don't want people to be able to independently navigate through a PowerPoint file they are sharing, use the Private view toggle to turn it off.
Click any hyperlink on slides to get more context right away.
Interact with videos on slides to adjust the volume or jump to a timestamp and consume it at your own pace.
Use a screen reader to get full access to the slide content.

Switch to a high contrast view to make the slides easier to view if you have low vision. Select More options > View slides in high contrast .
Your viewing experience will be at a higher fidelity, letting you see crisp text and smooth animations. PowerPoint Live also requires significantly less network bandwidth than typical sharing, making it the best option when network connectivity is a problem.
Independent magnifying and panning
You can zoom in and pan on a presentation slide without affecting what others see. Use your mouse, trackpad, keyboard, touch, or the Magnify Slide option as applicable.
To zoom in or out on a slide, do any one of the following:
Hover over the slideshow and pinch or stretch on trackpad.
Pinch or use the stretch touch gesture (on a touch-enabled device).
Press the + or – keys.
Hover over slide, hold down Ctrl key and scroll with mouse wheel.
In the More Actions menu, click the + or – buttons.
To pan around your slide, do any one of the following:
Press the arrow keys.
Click and drag using a mouse.
Click and drag on a trackpad.
Use one finger to touch and drag (on touch-enabled device).
When done zooming and panning, press Esc to reset your screen.
Important:
PowerPoint Live is not supported in Teams live events, CVI devices, and VTC devices.
If you're using Teams on the web, you’ll need Microsoft Edge 18 or later, or Google Chrome 65 or later, to see the presenter view.
Presenter view is hidden by default for small screen devices but can be turned on by selecting More options below the current slide and then Show presenter view (or by selecting the sharing window and then pressing Ctrl+Shift+x).
Meetings recordings won’t capture any videos, animations, or annotation marks in the PowerPoint Live session.
When you share from Teams, the PowerPoint Live section lists the most recent files you've opened or edited in your team SharePoint site or your OneDrive. If you select one of these files to present, all meeting participants will be able to view the slides during the meeting. Their access permissions to the file outside of the meeting won't change.
If you select Browse and choose to present a PowerPoint file that hasn't been uploaded to Teams before, it will get uploaded as part of the meeting. If you're presenting in a channel meeting, the file is uploaded to the Files tab in the channel, where all team members will have access to it. If you're presenting in a private meeting, the file is uploaded to your OneDrive, where only the meeting participants will be able to access it.

Need more help?
Want more options.
Explore subscription benefits, browse training courses, learn how to secure your device, and more.

Microsoft 365 subscription benefits

Microsoft 365 training

Microsoft security

Accessibility center
Communities help you ask and answer questions, give feedback, and hear from experts with rich knowledge.

Ask the Microsoft Community

Microsoft Tech Community

Windows Insiders
Microsoft 365 Insiders
Was this information helpful?
Thank you for your feedback.
IMAGES
VIDEO
COMMENTS
In the Options dialog box, click the Customize Ribbon tab on the left. Then, in the right-hand box that lists the available ribbon tabs, select the Recording check box. Click OK. To get ready to record, select Record on either the Recording tab or the Slide Show tab of the ribbon.
Record a Voiceover for Your Presentation. Open the PowerPoint presentation in which you would like to record a voiceover narration. Head over to the "Slide Show" tab and, in the "Set Up" group, select "Record Slide Show.". Once selected, a drop-down menu will appear. Here, you can choose to start the narration from the beginning or ...
In this step-by-step tutorial, learn how to add a voice over / narration to a PowerPoint slide presentation. You'll learn three different methods to adding a...
Record narration and timings for your presentation in Microsoft PowerPoint to give it a professional and polished feel. Record narration and timings:1. Selec...
In this you will learn how to record a voice over a PowerPoint presentation, how to edit that audio snippet in PowerPoint and how to save the presentation ...
Select the Record button on the toolbar to start recording your narration. Use your keyboard arrow keys to move back and forth between slides. Press N or Space Bar to move to the next slide or animation in the presentation. Press P or Backspace to return to the previous slide or animation.
Tutorial. Open your PowerPoint presentation or create a new one. In the taskbar, select Slide Show. Then click Record Slide Show. Choose the option Record from Beginning. You'll now get to a different view, which we'll call "Recorder View". Here's an overview: In the bottom right corner, you'll see three icons.
Step 2. Press Record in PowerPoint. To record narrations in PowerPoint, start off by finding the Slide Show tab on PowerPoint's ribbon. Click on the Slide Show tab to change the available options.. On the Slide Show tab, click Record to start the recording process.. Make sure that you start on the first slide in PowerPoint to record audio and timings for the entire presentation.
Record your audio narration. Inside the Record Sound dialog box you can narrate your PowerPoint slide. Simply: Type in a Name for your Audio Clip. Select the Record button (the red dot) to begin narrating. Click Stop (the square) to stop your narration. Hit Play (the triangle) to listen to your narration.
Open your presentation and navigate to the Slide Show tab. If you are recording narration for all of the slides, you are ready. If you plan to record a voiceover for only some of the slides, you want to hide the slides you won't have a recording for. You can do this by selecting the slides you don't want to include, right- or ctrl-click and ...
To get started, select the slide where you want to add the narration, then go to Insert > Audio > Record Audio . Here's how to record a voiceover on the slide: Type a Name for the voiceover narration. Select Record (the button with a red dot).
No problem! Adding audio to your PowerPoint can be done in 4 simple steps: Step 1: Navigate to the Slide. Select the slide where you want to addyour pre-recorded audio. Step 2: Insert Audio. Click the 'Insert' tab and choose 'Audio' from the Media Section.
Open your PowerPoint presentation and select the slide where you want to add audio. On the Insert tab, in the Media group, click the Audio drop-down arrow. Select Record Audio. A new window will open. Record Audio option. Enter the name of the audio file you're about to record. Entering the file name. Press Record to start recording.
Today's video will show you how to add and record audio narration to your slides in Microsoft PowerPoint. You'll need to make sure you have a recording devic...
How to record a voiceover for PowerPoint on a PC. 1. Open a new or existing or presentation in PowerPoint. 2. From the top toolbar, select "Insert." 3. Toward the far right side, click "Audio ...
Open the program and navigate to the "Insert" tab in the toolbar. The toolbar is the menu that runs along the top of the screen. Select "Audio" within the "Insert" tab and choose the "Record Audio" option. In the dialog box, name the audio file before clicking "Record." Record the audio by speaking or playing the sound you wish the program to ...
More than a PowerPoint recorder. VEED is a complete browser-based tool that lets you do so much more than just record and share your Microsoft PowerPoint presentations. You can annotate your videos to make your presentation more informative. Edit your recording to add images, subtitles, and more. It is a professional all-in-one video-creation ...
1. Open PowerPoint. Launch the PowerPoint app and open the presentation you want to record. 2. Navigate to the 'Record' tab. Click on the 'Record' tab in the ribbon at the top of the screen to record a PowerPoint presentation. 3. Select 'Record' dropdown. In the 'Record' tab, click on the dropdown arrow.
One person. Sharing and real-time collaboration. PowerPoint for the web and PowerPoint desktop app for offline use. Premium templates, fonts, icons, and stickers with thousands of options to choose from. Dictation, voice commands, and transcription. Advanced spelling and grammar, in-app learning tips, use in 20+ languages, and more.
Step 1: Open the presentation and select the slide where you want to add the voice-over. Step 2: Click the Uploads section on the left and switch to the Audio tab to reveal all the audio files ...
To record and hear any audio, your computer must be equipped wi... You can add audio, such as music, narration, or sound bites, to your PowerPoint presentation.
Setting Up the Slide Show. First, we need to set up the slide show. Navigate to the Slide Show tab on the ribbon. From here, you can choose to start your presentation From Beginning or From Current Slide. Ensure the presentation is set to full screen for a professional look.
Try our awesome new digital voice recording app - online, free. Our voice recorder allows you to record audio through the microphone in your computer, phone, tablet, or any device. Excellent quality voice recording - simple to use software that works on windows pc, mac, android, iphone, and any operating system.
Learn how to record a PowerPoint Presentation with audio and video simply by using the build-in PowerPoint functionalities and tools. You will learn how to...
4. Gamma. Gamma is one of the most intuitive platforms on our list. It uses generative AI to build your presentation from a text prompt, complete with visual aids, such as charts, graphs, images, and other visual elements - automatically. One of our favorite features is the interface.
If you're already in a Teams meeting, select Share and then under the PowerPoint Live section, choose the PowerPoint file you're wanting to present. If you don't see the file in the list, select Browse OneDrive or Browse my computer. If your presentation is already open in PowerPoint for Windows or Mac, go to the file and select Present ...
Adding narration to PowerPoint presentations is easier than it sounds. You can record your voice to narrate your slide show and then link to or embed the sou...