- Slidesgo School
- Google Slides Tutorials

How to Use the Presenter View in Google Slides

Google Slides, like PowerPoint, has different presentation modes that can come in handy when you’re presenting and you want your slideshow to look smooth. Whether you’re looking for slides only, speaker notes or the Q&A feature, in this new Google Slides tutorial, you’ll learn about these and their respective settings. Ready? Then let’s explore the presenter view!
Types of presentation modes in Google Slides
Presenter view, start from beginning, present on another screen.
There are three presentation modes in Google Slides.
If you click the “Slideshow” button or press Ctrl/Cmd + F5, your presentation will start directly without any speaker notes. This is the most widely used and the simplest option.
Next to the “Slideshow” button, there’s a drop-down arrow. Click on it to see the different presentation modes:
In this mode, you’ll be able to see the speaker notes, check the timer and adjust other settings, such as questions from the audience. For more information about the speaker notes, please refer to this Google Slides tutorial .
To view the different tools, after clicking “Presenter View”, move your mouse to the lower left-hand corner of the screen. You’ll see the slide number, previous and next slide arrows and three dots. Click on the dots and here are your options:
Open speaker notes
This enables the speaker notes and makes them visible. If you click this button, you might exit fullscreen mode. To go back to fullscreen, press Ctrl/Cmd + Shift + F or click the “Fullscreen” button. For more information, please refer to this Google Slides tutorial .
Turn on the laser pointer
You’ll see a red dot on the screen, which you can move around to point out any element from your presentation.
Full screen
Click this button (or press Ctrl+Shift+F) to enter or exit fullscreen mode.
Click this button to finish the presentation or just press Esc.
If you click on “Auto-play,” more options will appear: Click “Play” and the slides will advance automatically (by default, every two seconds, but there are other options available. You can also choose to play the slideshow on a loop).
Captions preferences
If you have a mic set up, you can enable captions. Click the drop-down arrow to adjust the size of the text and its position on the screen.
If you click on “more”, you can enable the Audience Q&A panel by clicking on the first option that appears. For more information, please refer to this Google Slides tutorial .
More: Downloads, printing, info and options
Under the “More” tab, you can also choose different download formats for your slideshow or print it out. This tab also contains a handy list of keyboard shortcuts (if you prefer handling keys to using your mouse) and the possibility to report problems.
Your presentation will begin from the first slide (Ctrl/Cmd + Shift + F5).
Your presentation will be shown on a different screen via a media display device, such as Chromecast. This option will be available only if there’s another screen available.

Now you’ve mastered the presenter view in Google Slides, which, with a bit of practice, will be a game-changer! Not only will it make you look like a presentation pro, but it will also streamline the process of nailing those crucial talking points. So go out there and strut your stuff – with presenter view on your side, you are unstoppable! And if you’ve found this tutorial helpful, check out more of them on our blog !
Do you find this article useful?
Related tutorials.

Top 10 tips and tricks for creating a business presentation!
Slidesgo is back with a new post! We want your presentations and oral expositions to never be the same again, but to go to the next level of presentations. Success comes from a combination of two main ingredients: a presentation template suitable for the topic and a correct development of the spoken part. For templates, just take a look at the Slidesgo website, where you are sure to find your ideal design. For tips and tricks on how to make a presentation, our blog contains a lot of information, for example, this post. We have focused these tips on business presentations, so that, no matter what type of company or...

How to present survey results in PowerPoint or Google Slides
A survey is a technique that is applied by conducting a questionnaire to a significant sample of a group of people. When we carry out the survey, we start from a hypothesis and it is this survey activity that will allow us to confirm the hypothesis or to see where the problem and solution of what we are investigating lies.We know: fieldwork is hard work. Many hours collecting data, analyzing and organizing it until we have our survey results.Well, we don't want to discourage you (at Slidesgo we stand for positivism) but this is only 50% of the survey work....

Best 10 tips for webinar presentations
During the last couple of years, the popularity of webinars has skyrocketed. Thousands of people have taken advantage of the shift to online learning and have prepared their own webinars where they have both taught and learned new skills while getting to know more people from their fields. Thanks to online resources like Google Meet and Slidesgo, now you can also prepare your own webinar. Here are 10 webinar presentation tips that will make your speech stand out!

How to create the best presentation for an onboarding process
Slidesgo was once a small project with a handful of people working on it. We’re not making this up! But our passion and effort has brought us to where we are today. In the process, our staff has also grown, and let us tell you: it has grown a lot!Do you remember that time when you were the newly-hired employee? You went to the office and thought that everything was too much for you to handle. Lots of faces you’ve never seen before. Lots of tasks that are suddenly your responsibility. Nearly as much new information as a library could...

How to Use Present and Edit Modes in Google Slides
Whether you’re new to Google Slides , or already have some tricks up your sleeves like adding fancy fonts and adding backgrounds , it’s important to understand presenter view and edit mode. Just like any digital tool, knowing the best way to use each of these will make your teacher life easier.
Present or Edit: That Is the Question
Edit mode in google slides.

So, what’s the difference between these two options in Google Slides? The answer is pretty simple. “Edit” mode allows you to create and make changes to the slides. This mode isn’t just for you as a teacher though. If you want students to complete any activity, move pieces, or type on a Google Slides presentation, they need to be in Edit mode. (With one exception, but I’ll get to that in a moment.)
Edit mode is the default mode when you create a new slideshow. It’s also the default when you are sharing a presentation with students. Typically, if you want your students to DO anything with the presentation, they will be working in Edit Mode.
Presentation Mode in Google Slides

Presentation mode is exactly what it sounds like. It’s where information is presented full screen. You can play videos and listen to audio through presentation mode, but students can’t complete any activities in present mode. (With one exception, but we’ll talk about that next.)
Presentation mode is great if you want to share information with your students. And, if you are sending them a presentation, you can share it with them so they can’t edit it. Here’s how.
- Copy the share link (in the top, right hand corner of your Google Slideshow.
- Paste it into the address bar.
- Close to the end of the URL, you’ll see the word “edit”. Remove the word edit and replace it with “present”.
- Copy the new URL, and share it with your students.
When students open the URL, it will automatically open in present mode. Be sure not to change any other part of the URL, or it won’t work. Also, I always recommend testing your URL before sending it out to students.
Presentation Mode Exception

I’ve said that you can’t edit activities in presentation mode, but there is one exception. In the Chrome Web Store, there’s a chrome extension (meaning, students will need to be using the Chrome Web Browser), called Fullscreen Interactive Google Slides (TM) . This extension allows students to edit Google Slides activities in present mode! The benefits of this extension is that it removes all of the things from the sides, which makes it less distracting for your students. However, if they’re doing just fine working in edit mode, it’s probably not necessary.
Feel free to join my FREE Facebook Club for k-2 teachers here!
Find me on Instagram , Facebook , Twitter , and Pinterest !

- Google Slides

Primary Paradise
You may also like.

How to Add Hyperlinks in Google Slides

3 Easy Steps to Quickly Digitize a Worksheet You Already Have

How to Add Multiple Backgrounds at Once to Google Slides
How to Use the Presenter View in Google Slides
Elevate your presentations with Google Slides' Presenter View maximize control, engagement, and confidence seamlessly for success.
Step 1: Open Your Presentation:

Step 2: Activate Presenter View:

Step 3: Utilize Slide Preview and Speaker Notes:

Step 4: Interact with Audience Tools:

Step 5: Navigate Seamlessly:
Step 6: end with confidence:, conclusion:, frequently asked questions:, create ppt using ai.
Just Enter Topic, Youtube URL, PDF, or Text to get a beautiful PPT in seconds. Use the bulb for AI suggestions.
character count: 0 / 6000 (we can fetch data from google)
upload pdf, docx, .png
less than 2 min
Sanskar Tiwari
Founder at MagicSlides
How to group shapes in PowerPoint
30 April 2024
What do text boxes allow you to do in a PowerPoint Presentation?
How to use copilot in PowerPoint
29 April 2024
How to change master slide in PowerPoint
5 AI PowerPoint Generators Who Are Transforming Presentation Creation
How to flip a shape in PowerPoint?
26 April 2024
How to create flow chart in PowerPoint
How to remove all animations from PowerPoint
24 April 2024
How to change border color in PowerPoint
Stunning presentations in seconds with AI
Install MagicSlides app now and start creating beautiful presentations. It's free!

Get AI-Generated Presentations Ready in Seconds
Free AI PPT Tools
- Customer Help
- X (Twitter)
Use the presenter view in Google Slides
While some people might need help developing and customizing a Google Slides presentation, others are quite fluent in the skills required to present a well-organized, cohesive display. However, there are also quite a few ways to present your slides.
In this tutorial, you’ll get an introduction to the different types of presentation modes and then get an in-depth understanding of the Presenter View that you can use.
Presentation modes
There are three different options when presenting your Google Slides presentation. To see these options and select the one you wish to use, go up to your screen’s upper right corner, a tab labeled “Present.” You can also press Ctrl (Cmd) and F5 to open the most accessible, simplest presentation option.
If you want to choose another option, click on the dropdown arrow beside the “Present” tab to avoid doing the same old thing as everyone else. There are three options for presenting under this dropdown arrow. The opportunities presented to you will depend on the devices you have set up and available for use.
These three options are
- Presenter view – When you choose this option, a window will appear, which will allow you to utilize different settings. You’ll also be able to see your speaker notes.
- Present from the beginning. With this option, your presentation will begin on the first slide.
- Present on another screen. To present a different screen, you need to access a media display device, such as Chromecast.
Options and settings under presenter view
Once you’ve opened the presentation mode under “Presentation View,” you’ll have access to a toolbar as well as a window that allows you to make changes to settings and alternate options.

Here’s a list of options and settings available for altering under Presenter View:
- “Previous slide” will allow you to move back to a slide already passed in the presentation.
- “Next slide” will allow you to move on to the next slide in the presentation line-up.
- “Play” will begin playing your slideshow, flipping through them automatically. to change the interval times between the changing slides, go under settings.
- “List of slides” will allow you to choose a particular slide.
- “Q&A” If your Audience Q&A is enabled, you can open the panel with this option.

- “Notes” Clicking this will make any speaker notes visible.
- “Pointer” Choosing this option will create a red pointer you can control to direct attention during your presentation.
- “Captions” You can only use this option if you have a mic, and by choosing the dropdown arrow, you can adjust the caption settings.
- “Tips” will make a window appear that offers useful keyboard shortcuts.
- “Settings” Under this option, you’ll be able to do things like open your notes, adjust the times, and download your presentation.
- “Fullscreen” You can exit and enter a full screen with this option.
- “Exit” Use this to exit your presentation or press the Esc on your keyboard.
Understanding how to open and utilize all these options under Presenter View will enable you to make the most out of your presentation’s experience.
You must be logged in to post a comment.
- Business articles (22)
- Google Slides (57)
- Keynote (27)
- PowerPoint (83)
- Support (2)
- MyU : For Students, Faculty, and Staff
Language Center Tip of the Day
Presenting with Google Slides and Presenter View
When you project a slide deck created in Google Slides (or a PowerPoint that is now located in your Google Drive), you have the option to see and show only the slides themselves, or to also see the presenter's notes. If you select "Presenter View," the presenter notes appear in a separate window alongside the slides.

The problem occurs when you want to "hide" the presenter notes from your audience. Google slides doesn't provide a quick solution here. If your laptop is set to present everything that is on your laptop screen to the classroom system, the audience sees both the slides window and the presenter notes window, exactly as they appear on your laptop screen. They see what you see. The simple solution is to not use Presenter View, because you have your "notes" on paper or you are so familiar with your slides that you don't need any notes at all.
If you are dependent on the notes or want to have a preview of the next slide, then you will want to use Presenter View. This is not as simple, but it is possible with some additional set-up on your laptop when you are connected to the classroom system. You will need to change the display setting so that the image on your screen is no longer mirrored onto the projector screen. By changing display settings, you will see your presenter notes on your laptop, but your audience will see the slides on the projector screen. You each have a different view.
How do you change the display settings?
How to stop mirroring screens (i.e. display a different, not the same, image on two different screens) For more information, see the previous tip Using more than one screen.
On a Windows computer
- Connect your computer to a projector or second screen
- Open Display Settings
On a Mac computer
- Open System Preferences under the apple menu
- Click Displays
- Click Display Settings
- Click on the laptop icon, then set "Use As" to Main Display
- Click on the icon of the other screen, then set Use As to Extended Display

Now you are ready to position your presenter notes on the laptop screen and the slides on the extended display (i.e. the projector screen).
- Open your Google Slides presentation
- Click on Presenter View
- Drag the window with the slides to the side , off your laptop screen, and then watch it appear on the large projector screen (i.e. the extended display )
- Resize and Position the Presenter View window on your laptop according to your own preferences
Sharing the screen with a remote audience
If you also have a Zoom audience, you will need to share a screen with them. After clicking the green "Share Screen" icon in Zoom , select the icon representing the extended display. On a Mac, this is called Desktop 2 . Now your remote audience will see the same screen as your physical audience, while you see the presenter notes on your laptop.
- Diversity, Equity and Inclusion
- Google Workspace
- Screenshots and Images
- Current Posts
AppsThatDeliver
How-Tos, B2B Software Ratings & Reviews
How to Share Google Slides in Presentation Mode

Would you like to learn how to share Google Slides in presentation mode?
When you copy the file link and share it with others, the file typically opens in edit mode.
However, what if you want to share it in presentation mode?
Fortunately, it is possible to do so in Google Slides!
In this article, you will learn how to share Google Slides in presentation mode, step-by-step.
Also read: (opens in new tab) How to Track Changes in Google Slides How to Time Google Slides for 20 Seconds Google Slides Semi Transparent Shape Google Slides Animate Bullets How to Lock an Image in Google Slides
How to Share Google Slides in Presentation Mode?
Step 1: click on the “share” button.

To get started, open the Google Slides file.
Once opened, you’ll find the “Share” button located at the top right corner of the screen.
Click on the “Share” button, and then proceed to the next step.
Step 2: Under “General access” select “Anyone with the link”

A pop-up window with sharing options will appear.
By default, the “Restricted” option will be selected under the “General access” settings.
Click on this option, and then choose “Anyone with the link” from the drop-down menu.
Ensure that the role is set to “Viewer”.
Once done, proceed to the next step.
Step 3: Click “Copy link”

On the pop-up, you will see the “Copy link” button in the bottom left corner.
Click on this button to copy the presentation link to your clipboard.
However, do not share this link yet.
We need to make some changes to the link so that the slides open in presentation mode instead of edit mode.
Step 4: Paste the link in a text editor

After clicking the “Copy link” button, the link will be copied to your clipboard.
Paste the link into your favorite text editor so that you can edit it.
Alternatively, you can paste the link into the URL bar of your browser, but do not press the enter key on your keyboard; simply paste the link and proceed to the next step.
Step 5: Replace “edit?usp=sharing” with “present?usp=sharing”

The pasted link should look something like this:
Now, focus on the last part of the link.
You’ll notice the text edit?usp=sharing . Replace that text with present?usp=sharing
After making the change, your final link should look something like this:
Step 6: Share the link
Before sharing the link, make sure to open it in your browser.
Check if the slides load properly, especially in presentation mode.
If the slides open correctly, you are all set to share the link.
Yes, you can share a Google Slide in presentation mode. To do so, click the “Share” button, select “Anyone with the link” and “Viewer” role, copy the link, replace “edit” with “present” in the URL, and share.
To share a Google Slide presentation in presentation mode, click the “Share” button, select “Anyone with the link” and “Viewer” role, copy the link, replace “edit” with “present” in the URL and share.
Sharing your Google Slides in presentation mode is a simple process that can make all the difference in how your audience experiences your presentation.
By following these steps, you can share your Google Slides in presentation mode:
- Click on the “Share” button
- Under “General access,” select “Anyone with the link”
- Click “Copy link”
- Paste the link into a text editor
- Replace “edit?usp=sharing” with “present?usp=sharing”
- Share the link
Remember, always check if the slides load properly before sharing the link.
Author: Shubham Calmblay
Shubham Calmblay, founder of appsthatdeliver.com, has a decade of experience with various Google products. He has authored 1,000+ guides for ATD, published on prestigious tech blogs. His work has garnered recognition from Protocol.com, Leadsbridge.com, MadMobile.com, and numerous other leading publications and corporations.
All Posts by Shubham Calmblay
How to Make Your Presentation More Interactive With Google Slides' Presenter View

Your changes have been saved
Email is sent
Email has already been sent
Please verify your email address.
You’ve reached your account maximum for followed topics.
Yes, You Can Convert PDF to Excel—Without Third-Party Software!
I've found the perfect to-do list app for my needs: here's why it's amazing, why checkboxes are excel's most underrated feature.
When making a presentation, it would be helpful to have notes and other information readily available on the screen. However, if you add notes to your slideshow directly, your audience will see it.
So, how can you add notes that only you can see on Google Slides? Let’s explore the Speaker Notes feature in the browser and mobile apps.
1. How to Add Speaker Notes in Google Slides
Adding notes to each slide will help you have a smoother presentation. This feature ensures that you don’t have to use an external app, sticky notes, or a physical notebook, thus reducing distractions. But how do you add notes when you’re creating a presentation in Google Slides ? Find out below.
Using Google Slides for the Web

When using the browser version on your PC, you can add notes by clicking on the Click to add speaker notes subwindow at the bottom of the screen. After clicking on it, you’re free to type and add notes for that slide. Once you’re done, you only need to click away, and your notes are automatically saved.
When you move to another slide, you’ll notice that the speaker notes field is empty. You can click on this again to fill it with notes for this specific slide.
Using the Google Slides iOS and Android App

Adding speaker notes on the app version is a bit more complicated. First, open the Slides app and the presentation you want to work on. Tap on the slide you want to add notes to, then choose Edit slide .
Once the slide loads into the edit view, tap on the menu in the upper-right corner, then choose Show speaker notes . You’ll then see a Tap to add speaker notes subwindow appear at the bottom of the screen. Tap on it, and it will fill your screen. You are then free to type the notes you need.
Once you’ve finished adding your notes, tap on the Check Mark on the upper-left corner of the screen. You will return to the edit view with your notes shown at the bottom. To add notes to other slides, you need to swipe to the slide you want to edit, then repeat the process noted above.
2. Viewing Speaker Notes While Presenting
When you’re launching your presentation, you have to launch it under Presenter view to see the notes you added earlier. Here’s how you can open your presentation in the said view.
Opening Presenter View on Your Browser

When you’re ready to show your presentation, don’t click on the Slideshow button. Instead, click on the down-pointing arrow beside it to show a dropdown menu, then choose Presenter view .
Once the slideshow starts, you’ll see your presentation appear on the main tab; then, you’ll see a Presenter view window open. In the small window, you should see your notes appear under the Speaker Notes tab on the right side. You can also control your slideshow by clicking on the Next and Previous slide previews on the left side of the Presenter view window .
Opening Presenter View on the Mobile App

If you’re using the mobile app, you can only see your notes if you present at a Google Meet meeting. To do so, tap on the Play icon at the top menu. In the options that appear, choose Present to a meeting . You then have to input the Meeting ID of the Google Meet you’re presenting to. Once you have typed the correct code, tap on Done .
You’ll then join the Google Meet room in presentation mode. Your slide will appear as the main window, but you’ll see your notes on the lower part of your mobile device’s screen.
3. Asking Your Audience
One way you can interact with your audience is to answer their questions. However, this isn’t easy if you’re presenting to a large crowd. You may not be able to get to all the participants, or some might be too intimidated to ask a question publicly. So, to help you interact with your audience, you can launch Audience Tools .
How to Ask for Questions With the Browser

In the presenter view, click on the Audience Tools tab. Under it, you’ll see a Start New button. Click on it, and this flag will appear on top of your presentation:
Ask a question at slides.app.goo.gl/[code] .
All your audience needs to do is type the link on their browser, and they’ll be redirected to a new tab where they can type their questions. There, they can type in their questions and submit them to you. They can even ask anonymous questions by clicking on the Ask anonymously check box .

When your audience sends their questions, you’ll receive them under the Audience Tools tab. If you find a particular question interesting, you can click on the Present button under the question, so you can flash it on your presentation. You’ll also see audience reactions to the question, with the number of positive or negative reactions the audience has to it.
If you want to move on and want to stop receiving questions, click on the On slider to switch it off.
How to Ask for Questions With a Mobile App

When you’re in the presenter view, tap on the Audience Q&A icon. It’s in the upper-right corner of your screen, the one before the right-most speaker notes icon. You must then tap Start New in the next view.
Once you’ve turned on Audience Q&A, your audience will see the Ask a question flag on top of your presentation. They then need to type that address on a browser to see the questions page.
You will see the questions they typed on your mobile device, and you can then tap on it to flash it on your presentation. If you want to move to the next slide, you must press the back button in the upper-left corner of the screen. Once you’re done answering questions, you can slide the toggle at the upper-right corner of the Audience Q&A view.
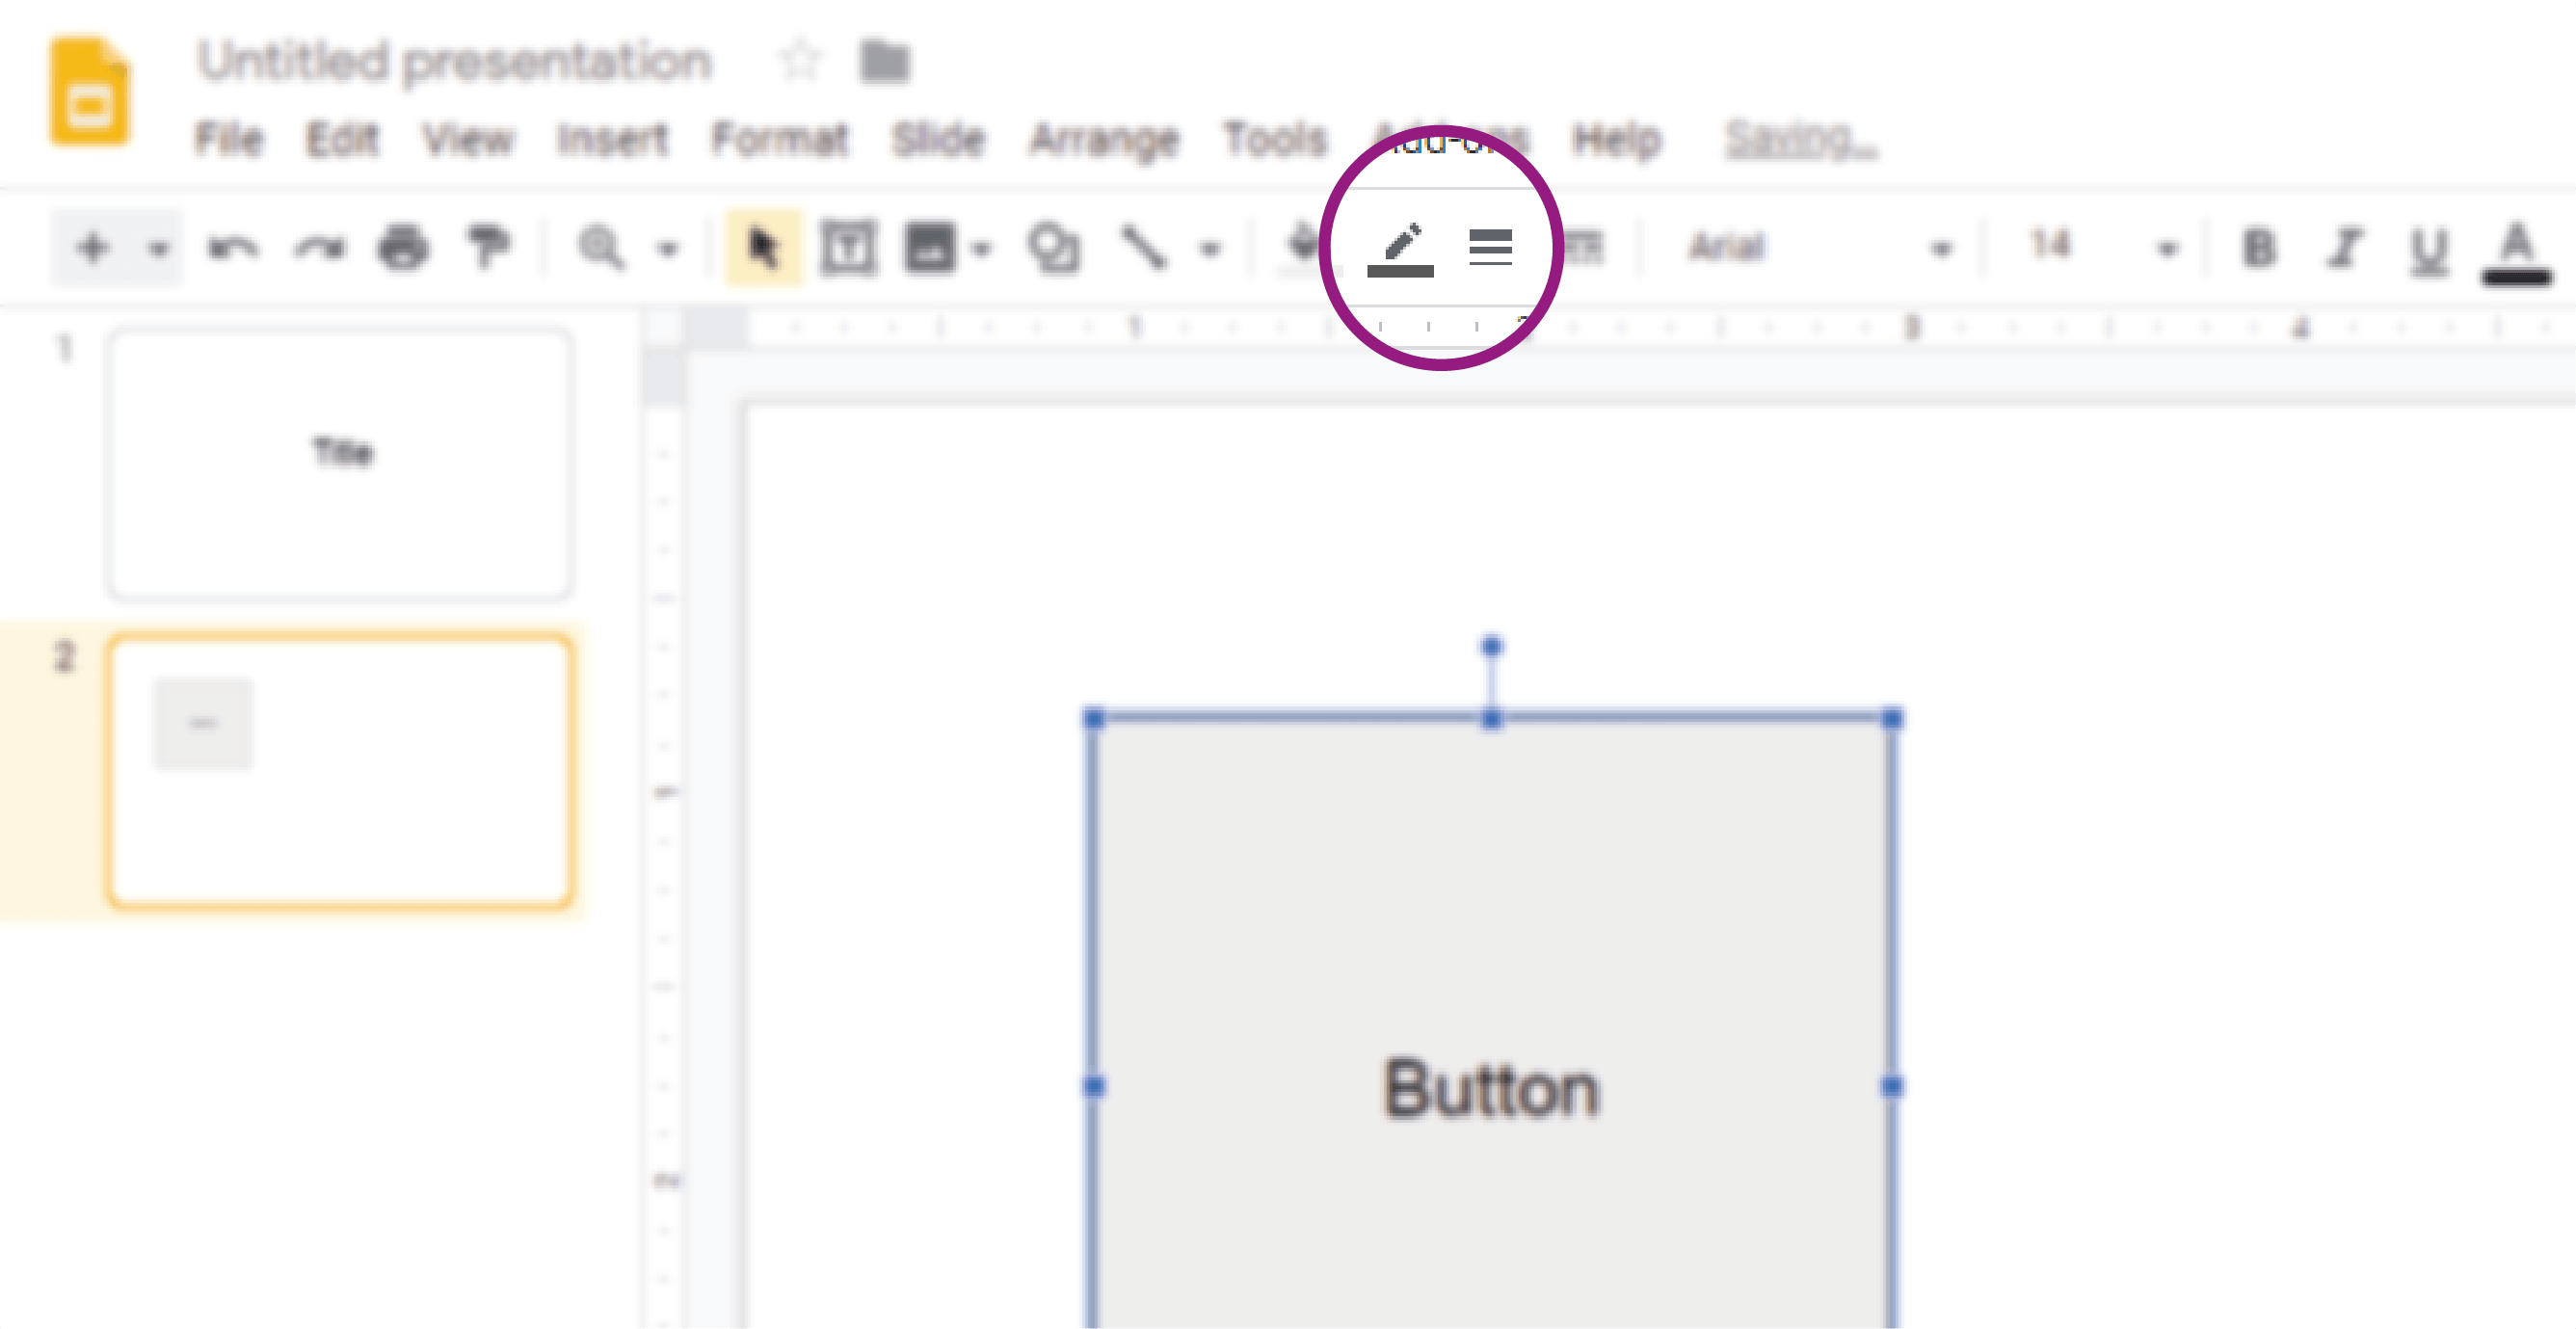
4. Draw on the Screen in Your Google Slides

One other nifty feature of Google Slides is that it allows you to draw on the presentation screen. However, you can only do it from a tablet, like an iPad. To use this feature, you must again launch your presentation under Present to a meeting .
Once you’re in the presenter view, tap on the pen icon in the upper-right corner of the screen, beside the Q&A icon. After it’s activated, you’re free to scribble on the active slide. However, once you change slides, all your on-screen annotations will disappear. To turn off the feature, you just need to tap on the pen icon again.
Create an Interactive Presentation With Google Slides
Google Slides provides many features that let you have an interactive presentation. You can become an effective speaker and pass your knowledge to others more efficiently with these tools. And if you’re having difficulty creating a design, why not check out these sources for Google Slides themes.
- Productivity
- Google Slides
- Presentations
How to make an interactive presentation in Google Slides
- Categories: Google Slides
- Comments: 46

When you’re giving a presentation, you want to impress your audience and make sure they see you as credible. Whether you want to win the next big contract or simply inform, a well-designed presentation can make all the difference. One way to make your presentation stand out is by making it interactive. Interactive presentations are a great way to present information while keeping your audience engaged.
Before we dive in, it’s important to define what we mean by ‘interactive presentation’. ‘Interactive’ is sometimes used to describe presentations that include quiz questions or audience participation – that’s not what we’re talking about here. When we say ‘interactive’ we’re talking about a clickable presentation that uses hyperlinks to help users navigate to different sections. A presentation with hyperlinks is ‘interactive’ because it allows the user to choose what information they view, and in what order. As a general rule of thumb, an interactive presentation works well when your audience needs to engage directly with what’s on the screen, putting them in control of how they digest the information. In this blog post, we’ll walk through how to make an interactive presentation in Google slides.
Technical aspects, step-by-step
Now that we’re on the same page, let’s delve into how to actually create an effective interactive presentation in Google Slides. It’s easier than you might think.
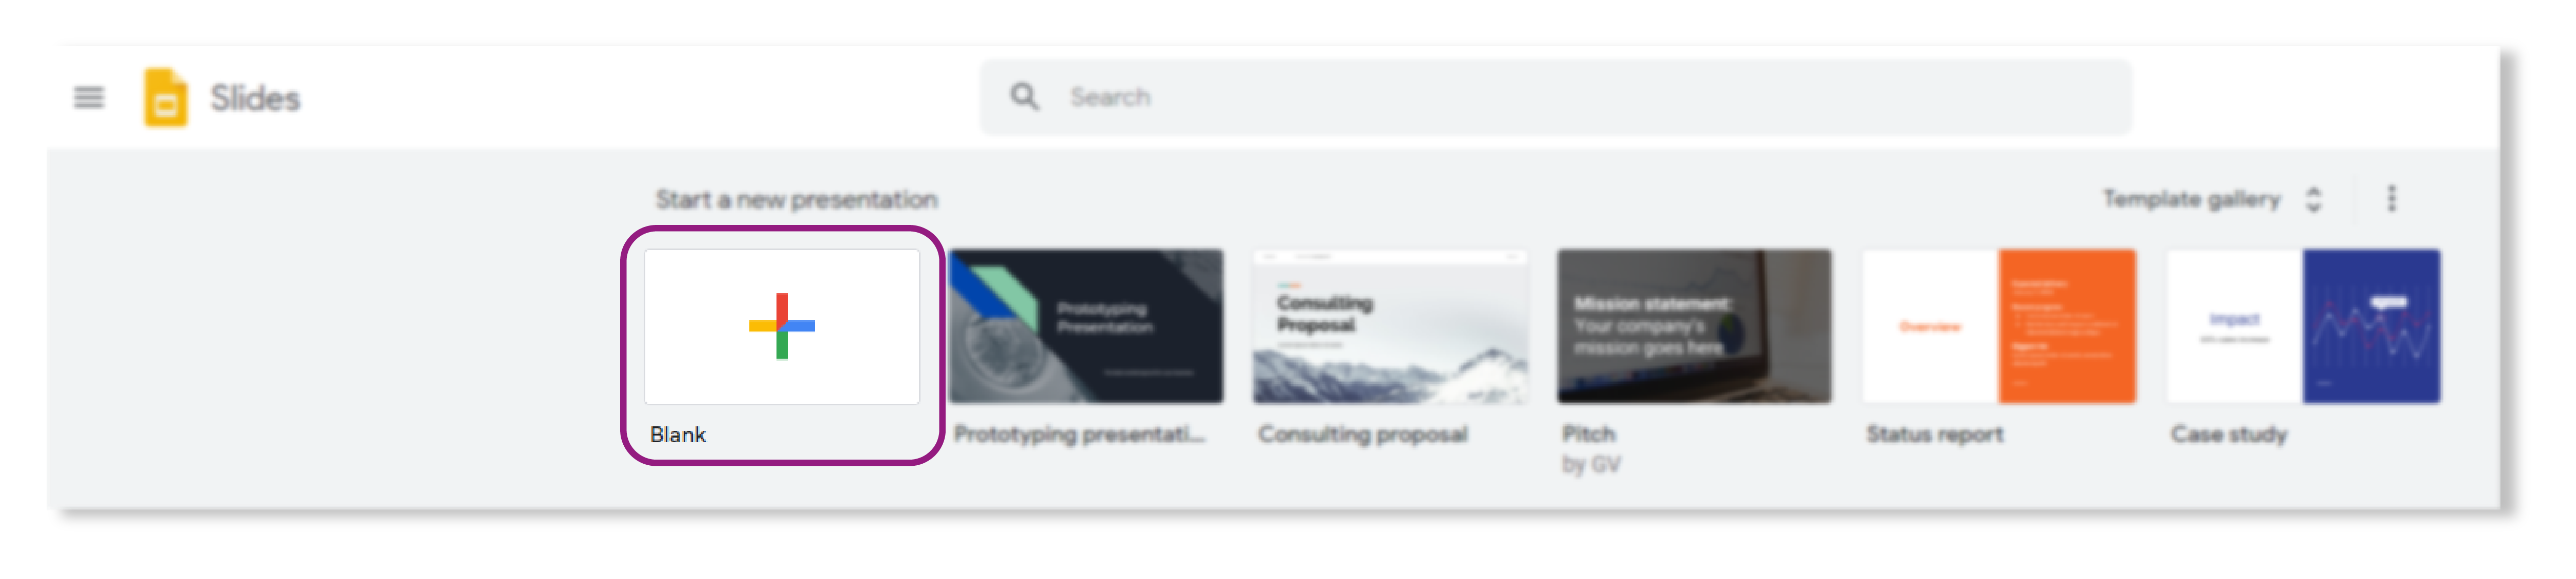
Start by opening a new presentation! From the Google Slides homepage , look to the top left and click the Blank button to open a new presentation. This is your blank slate from which to create an outstanding interactive presentation!
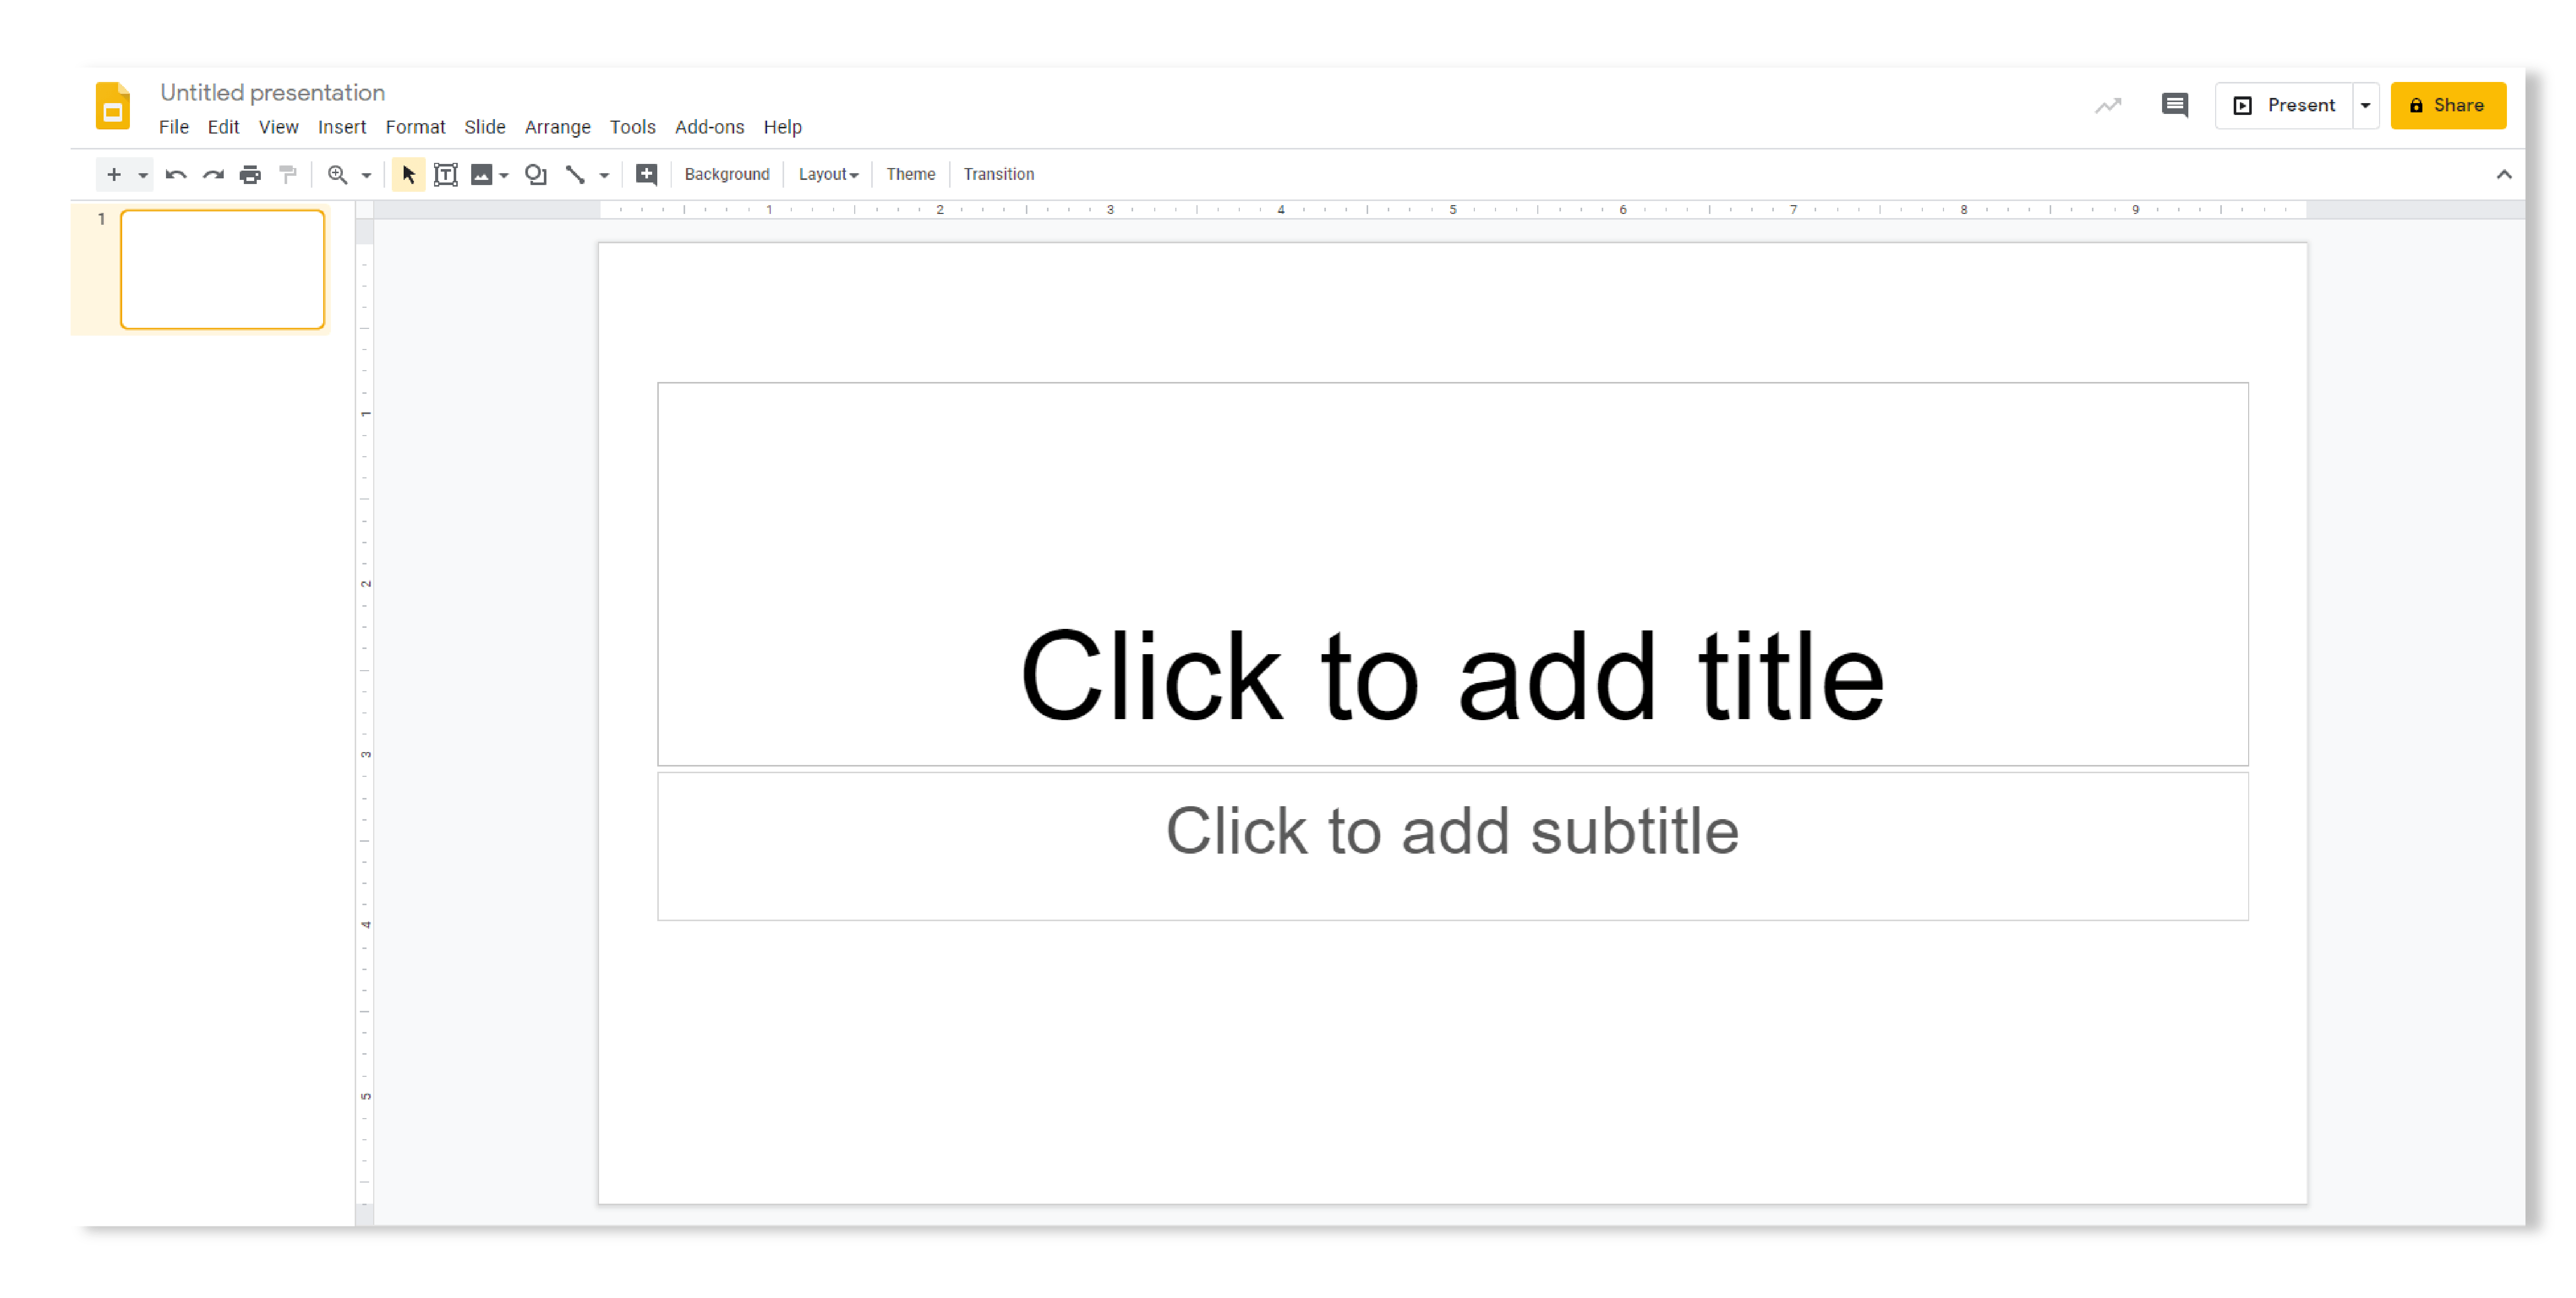
Google Slides automatically inserts a title slide when you open a new presentation, so all you need to do is click on the title text box and type in a title. Make the title something clear and catchy, that your audience can easily understand.
Now, let’s move on to the all-important menu slide. We’re going to create something that looks like a button, so that your audience knows it’s clickable. Later on, we’ll add in hyperlinks. You can use any shape for your button, but rectangular shapes with rounded corners often look the most ‘button-like’. First, locate the Shape button on the toolbar in slides, and select a shape. Then, double click on the slide and that shape will appear. Click and drag using the nodes along the edges of the shape to change its size.
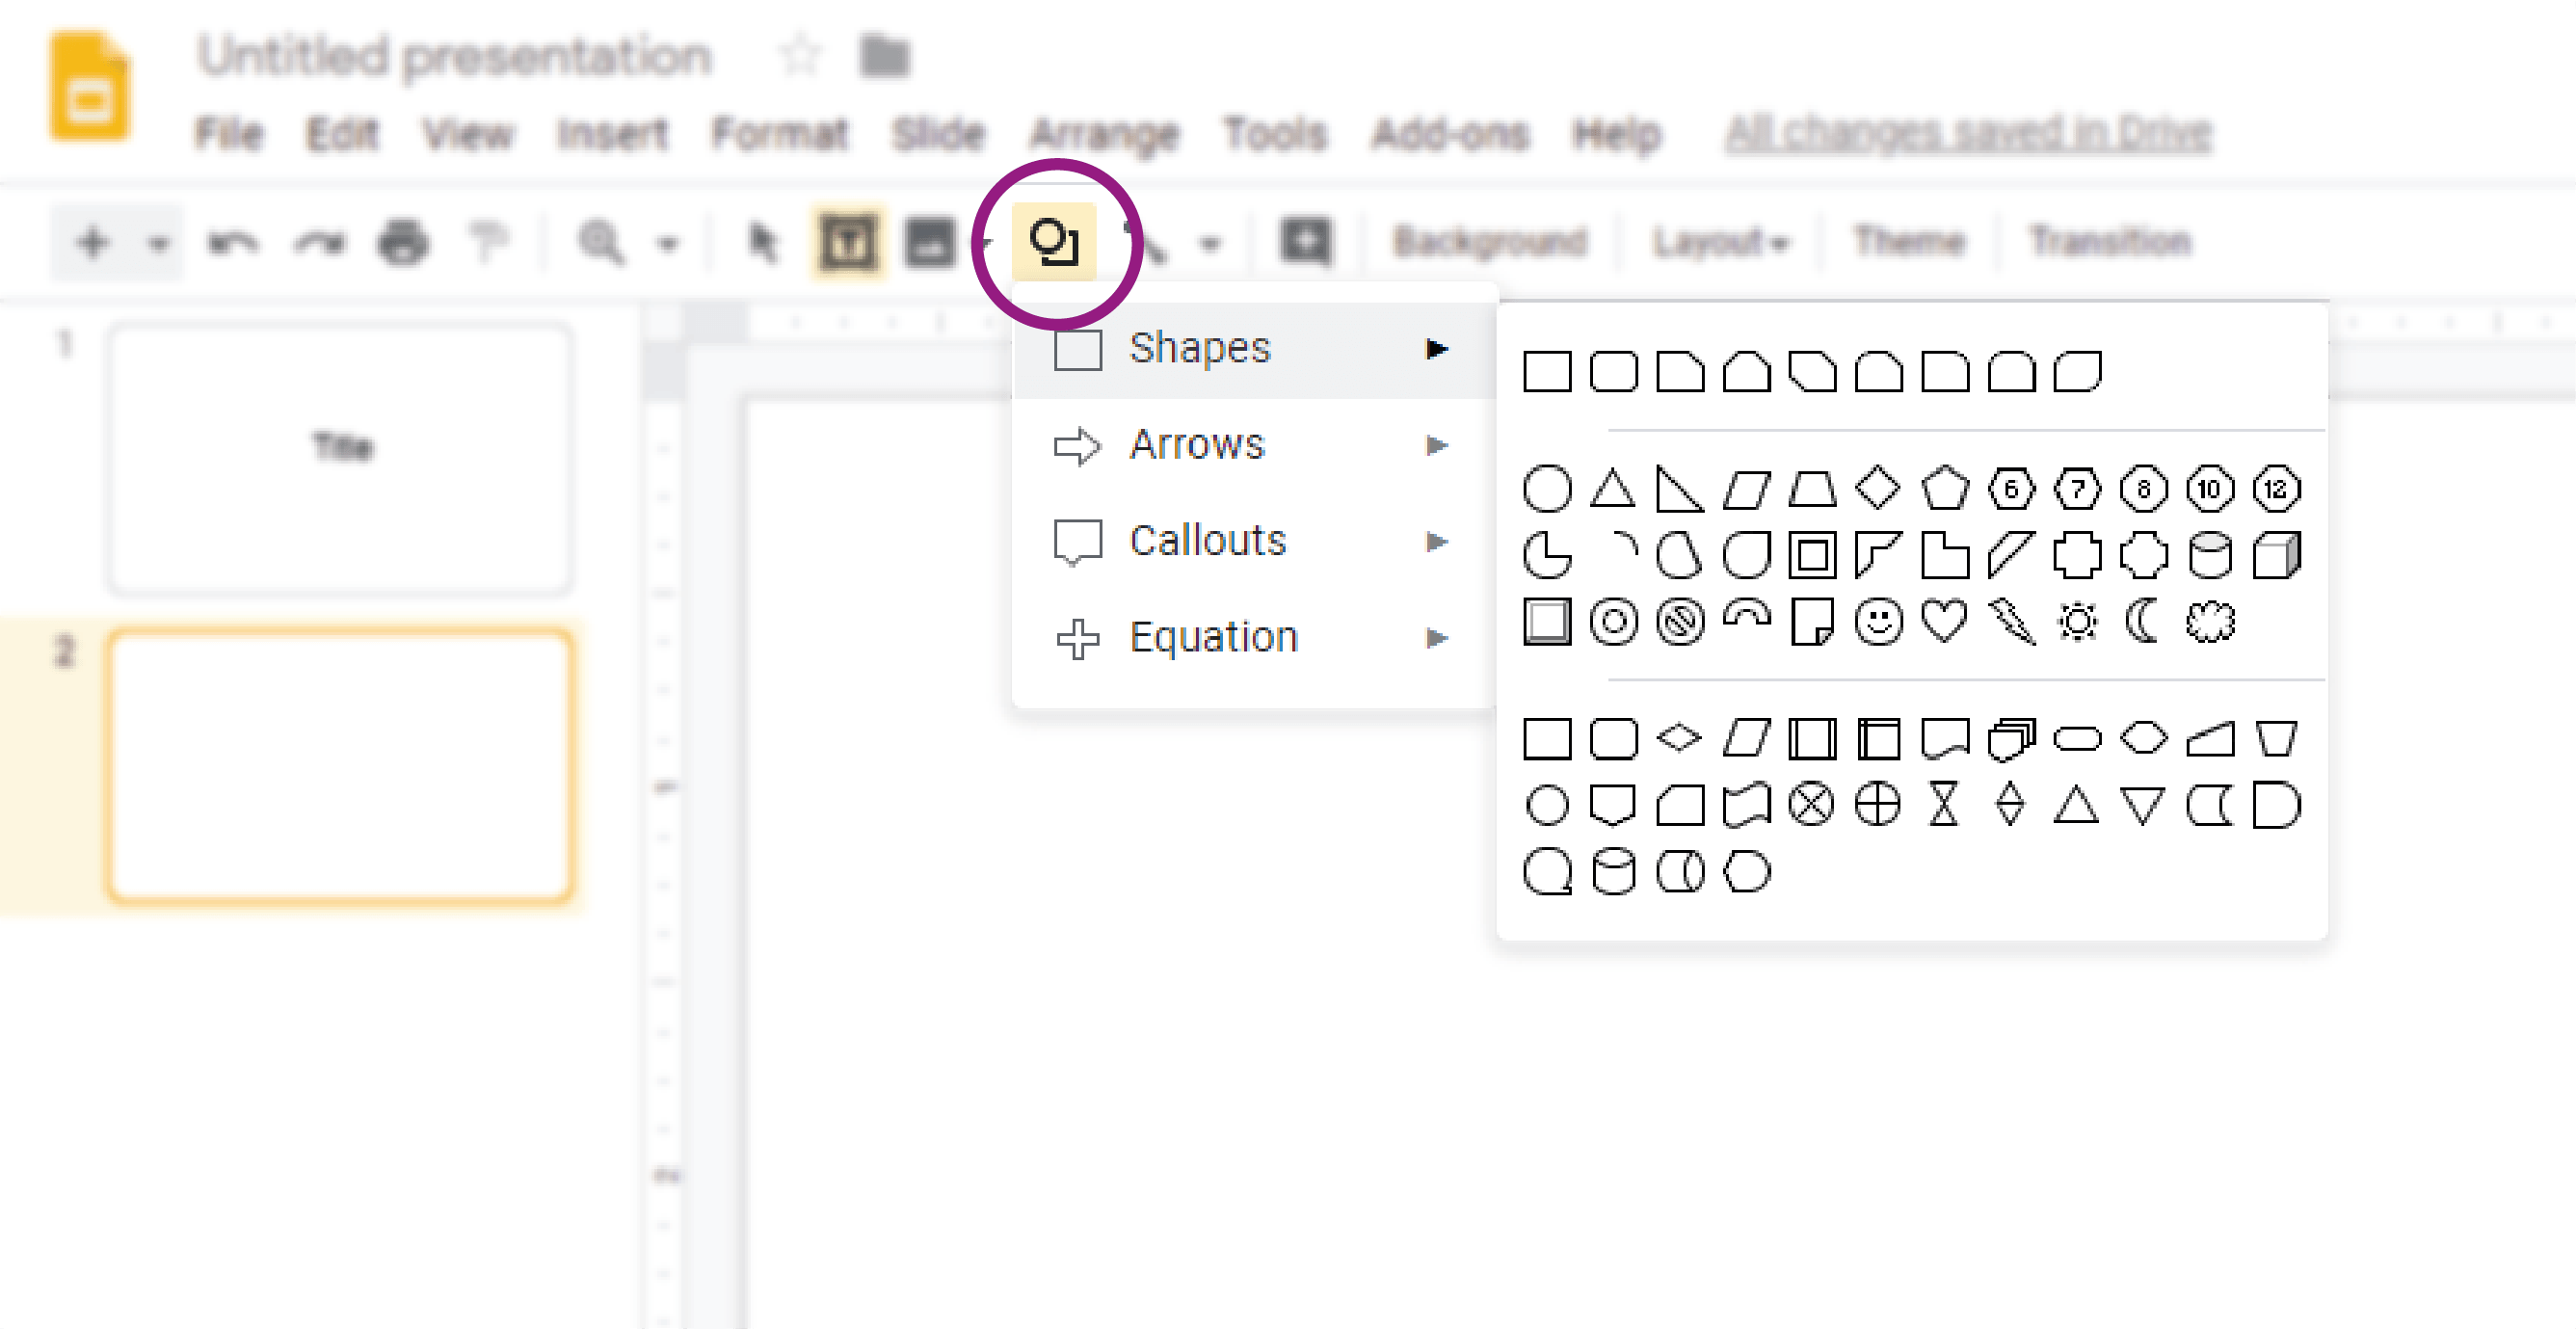
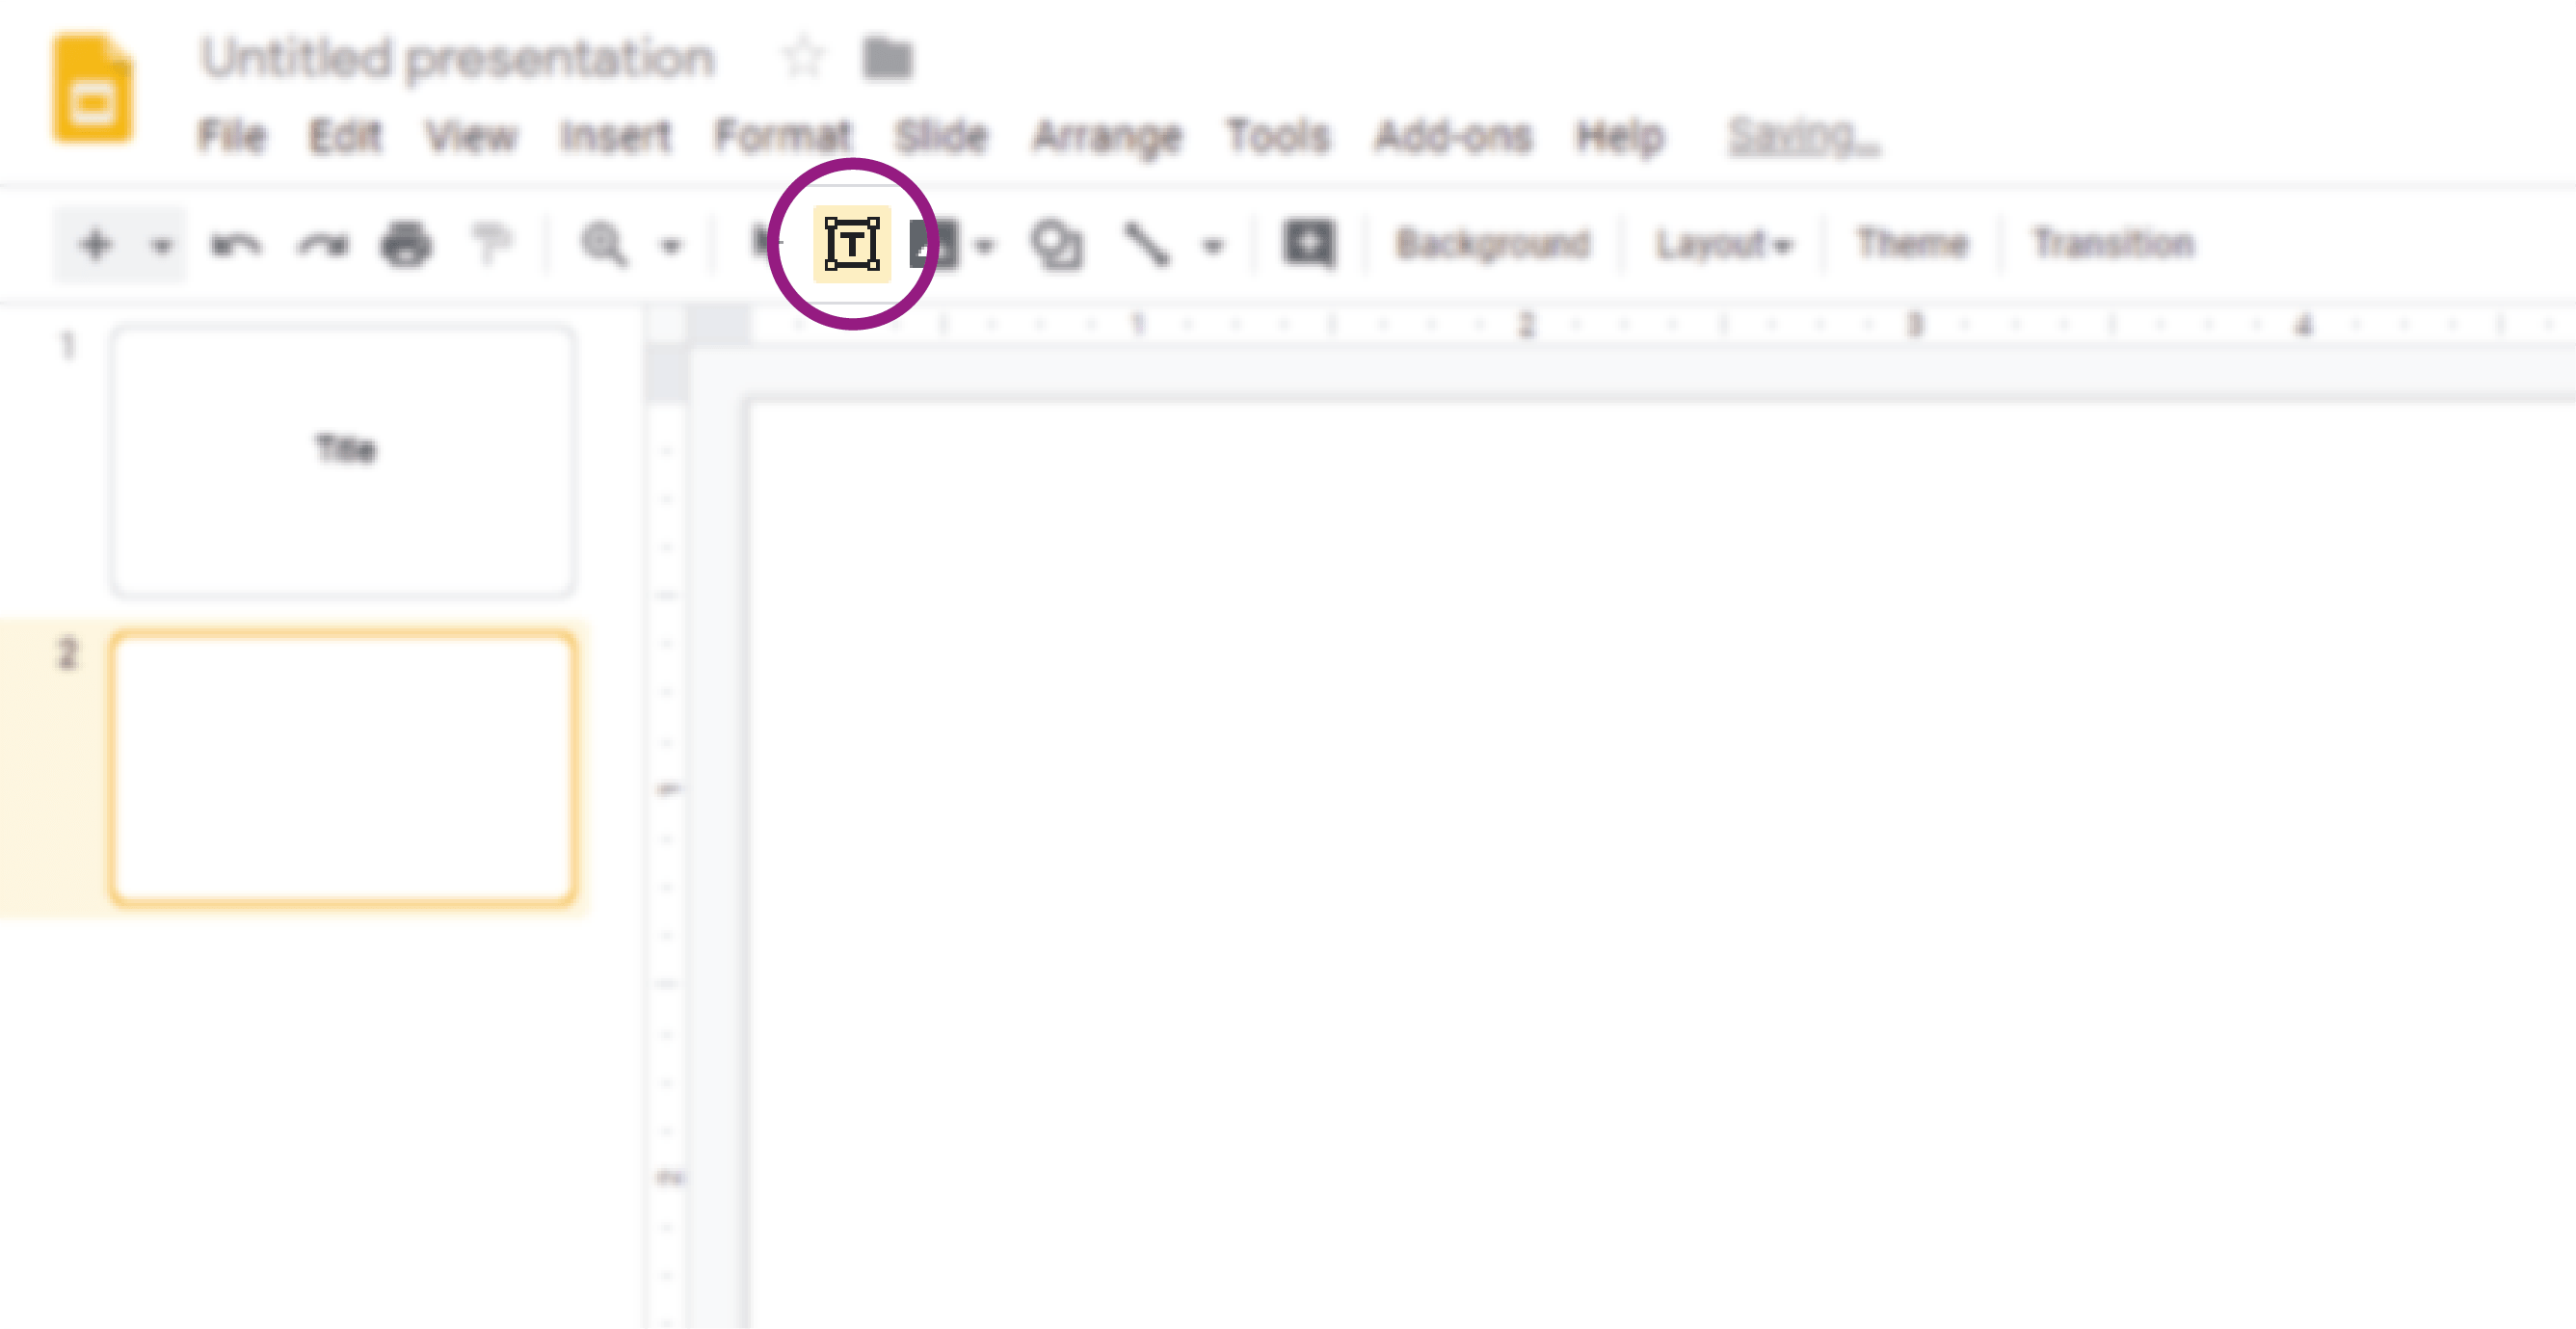
You can add labels either by typing directly on to the shape, or by clicking the text box button (also on the toolbar) and positioning a text box on top of the shape. You might also want to add a small arrow shape on top of your button, to help show that the button is clickable.
If you’ve got a more artistic temperament, this is an opportunity to be creative! Your button doesn’t have to be made from shapes. The buttons on the menu slide in our example presentation are actually images. Feel free to get those artistic juices flowing, but keep in mind that your buttons need to look clickable. One way of doing this is by adding a drop shadow or border. To add a border, use the border color and border weight buttons, found on the toolbar.
To insert a drop shadow just right click , then select Format options , and check the box for Drop shadow .
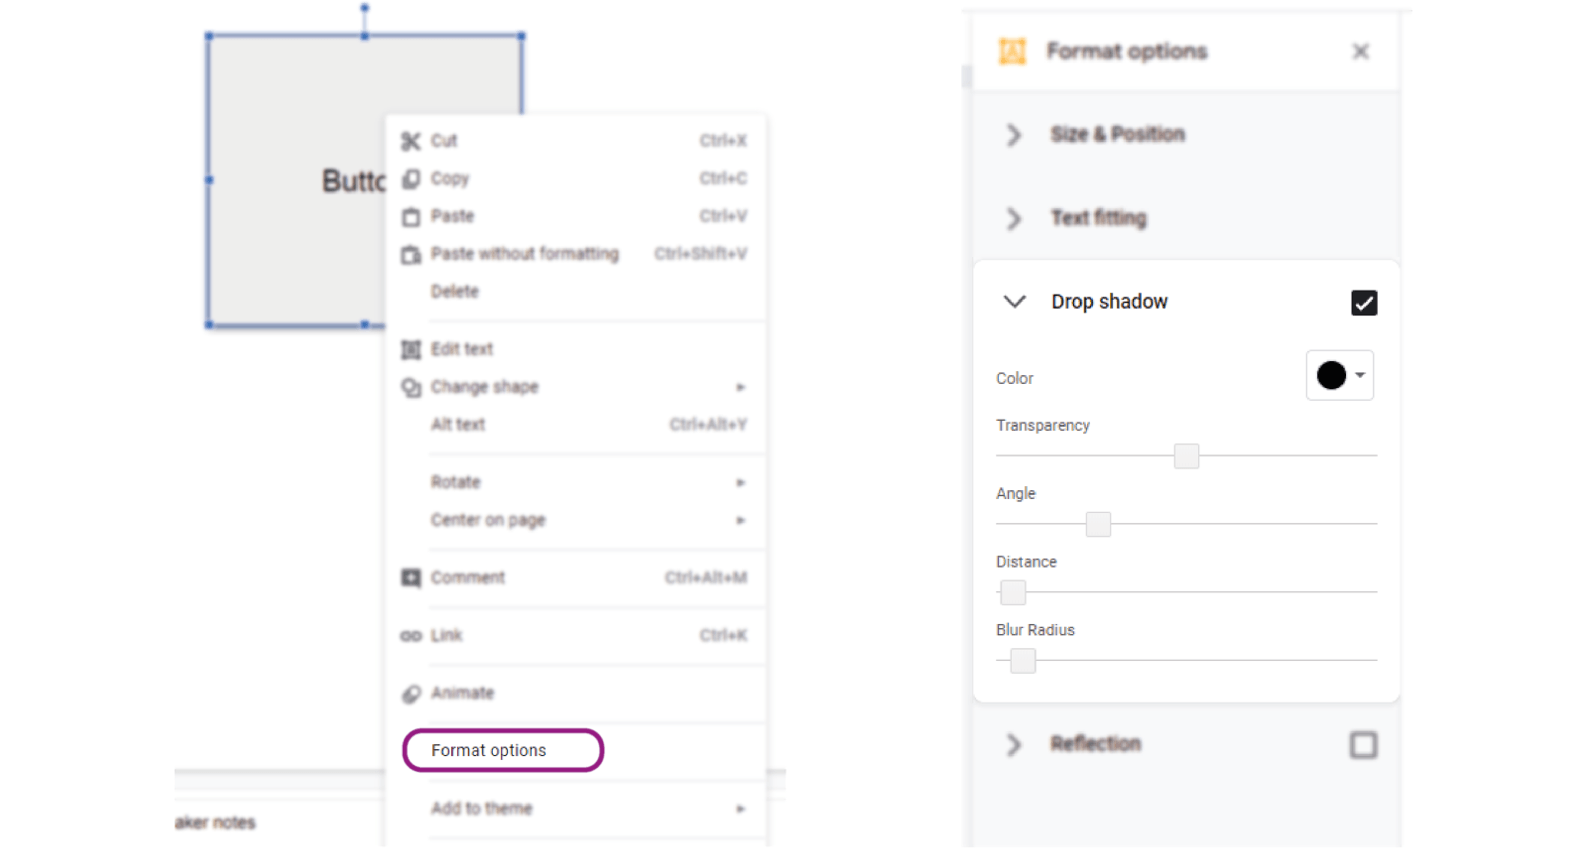
You could also make your buttons a contrasting color from the background and other text – however, avoid colors that are too bright, as this can be distracting.
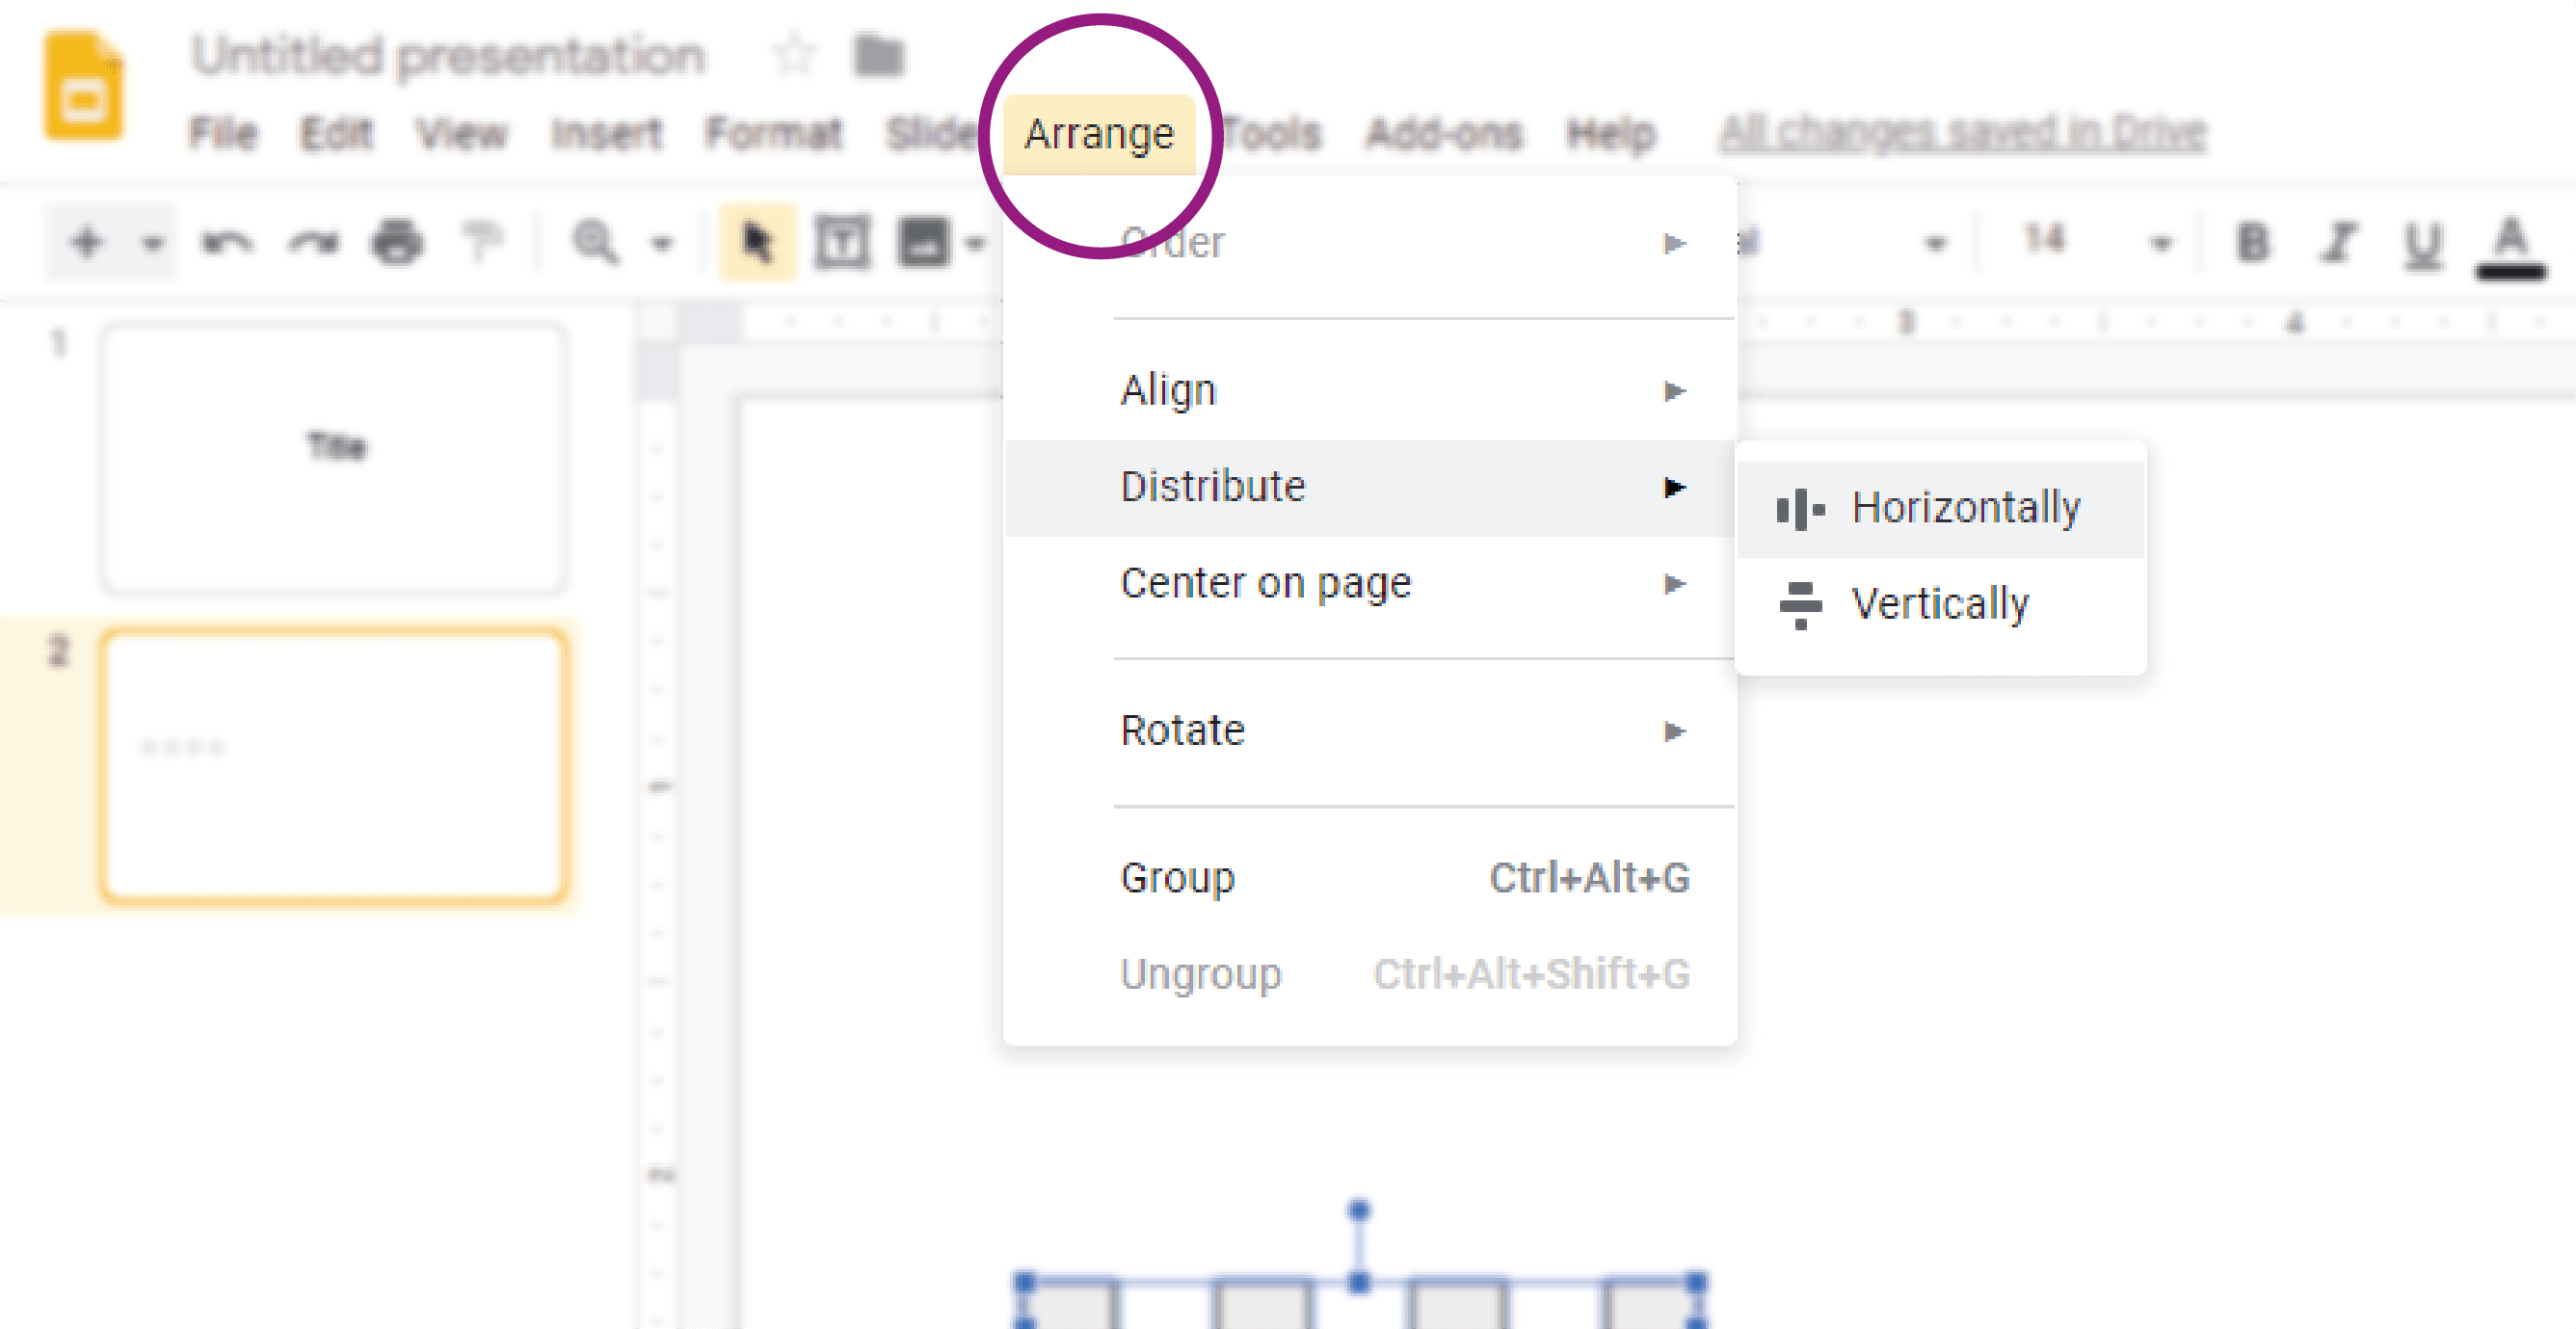
This first button you have created is the basis for your menu. When you’re happy with how it looks, replicate it so that the number of buttons corresponds to the number of sections in your presentation. You can do this by copying and pasting. Simply select the entire button – click with your mouse and drag over the button so all elements are highlighted – then copy and paste it by right clicking , selecting Copy and then Paste however many times you need. Edit the text of each button to correspond to the section of the presentation it will link to. Next, ensure that the buttons are aligned in some sort of order. You can select various buttons and then align or distribute them as you like using the alignment tools found under the Arrange tab.
Note: If you decide to use icons or imagery, it’s a good idea to make sure the meaning is clear. For example, we all know that the house symbol mean ‘go to the home page’. There’s no point using a zebra icon to return to the homepage, because people will get confused. Stick to what people find familiar, good navigation is about ease of use!
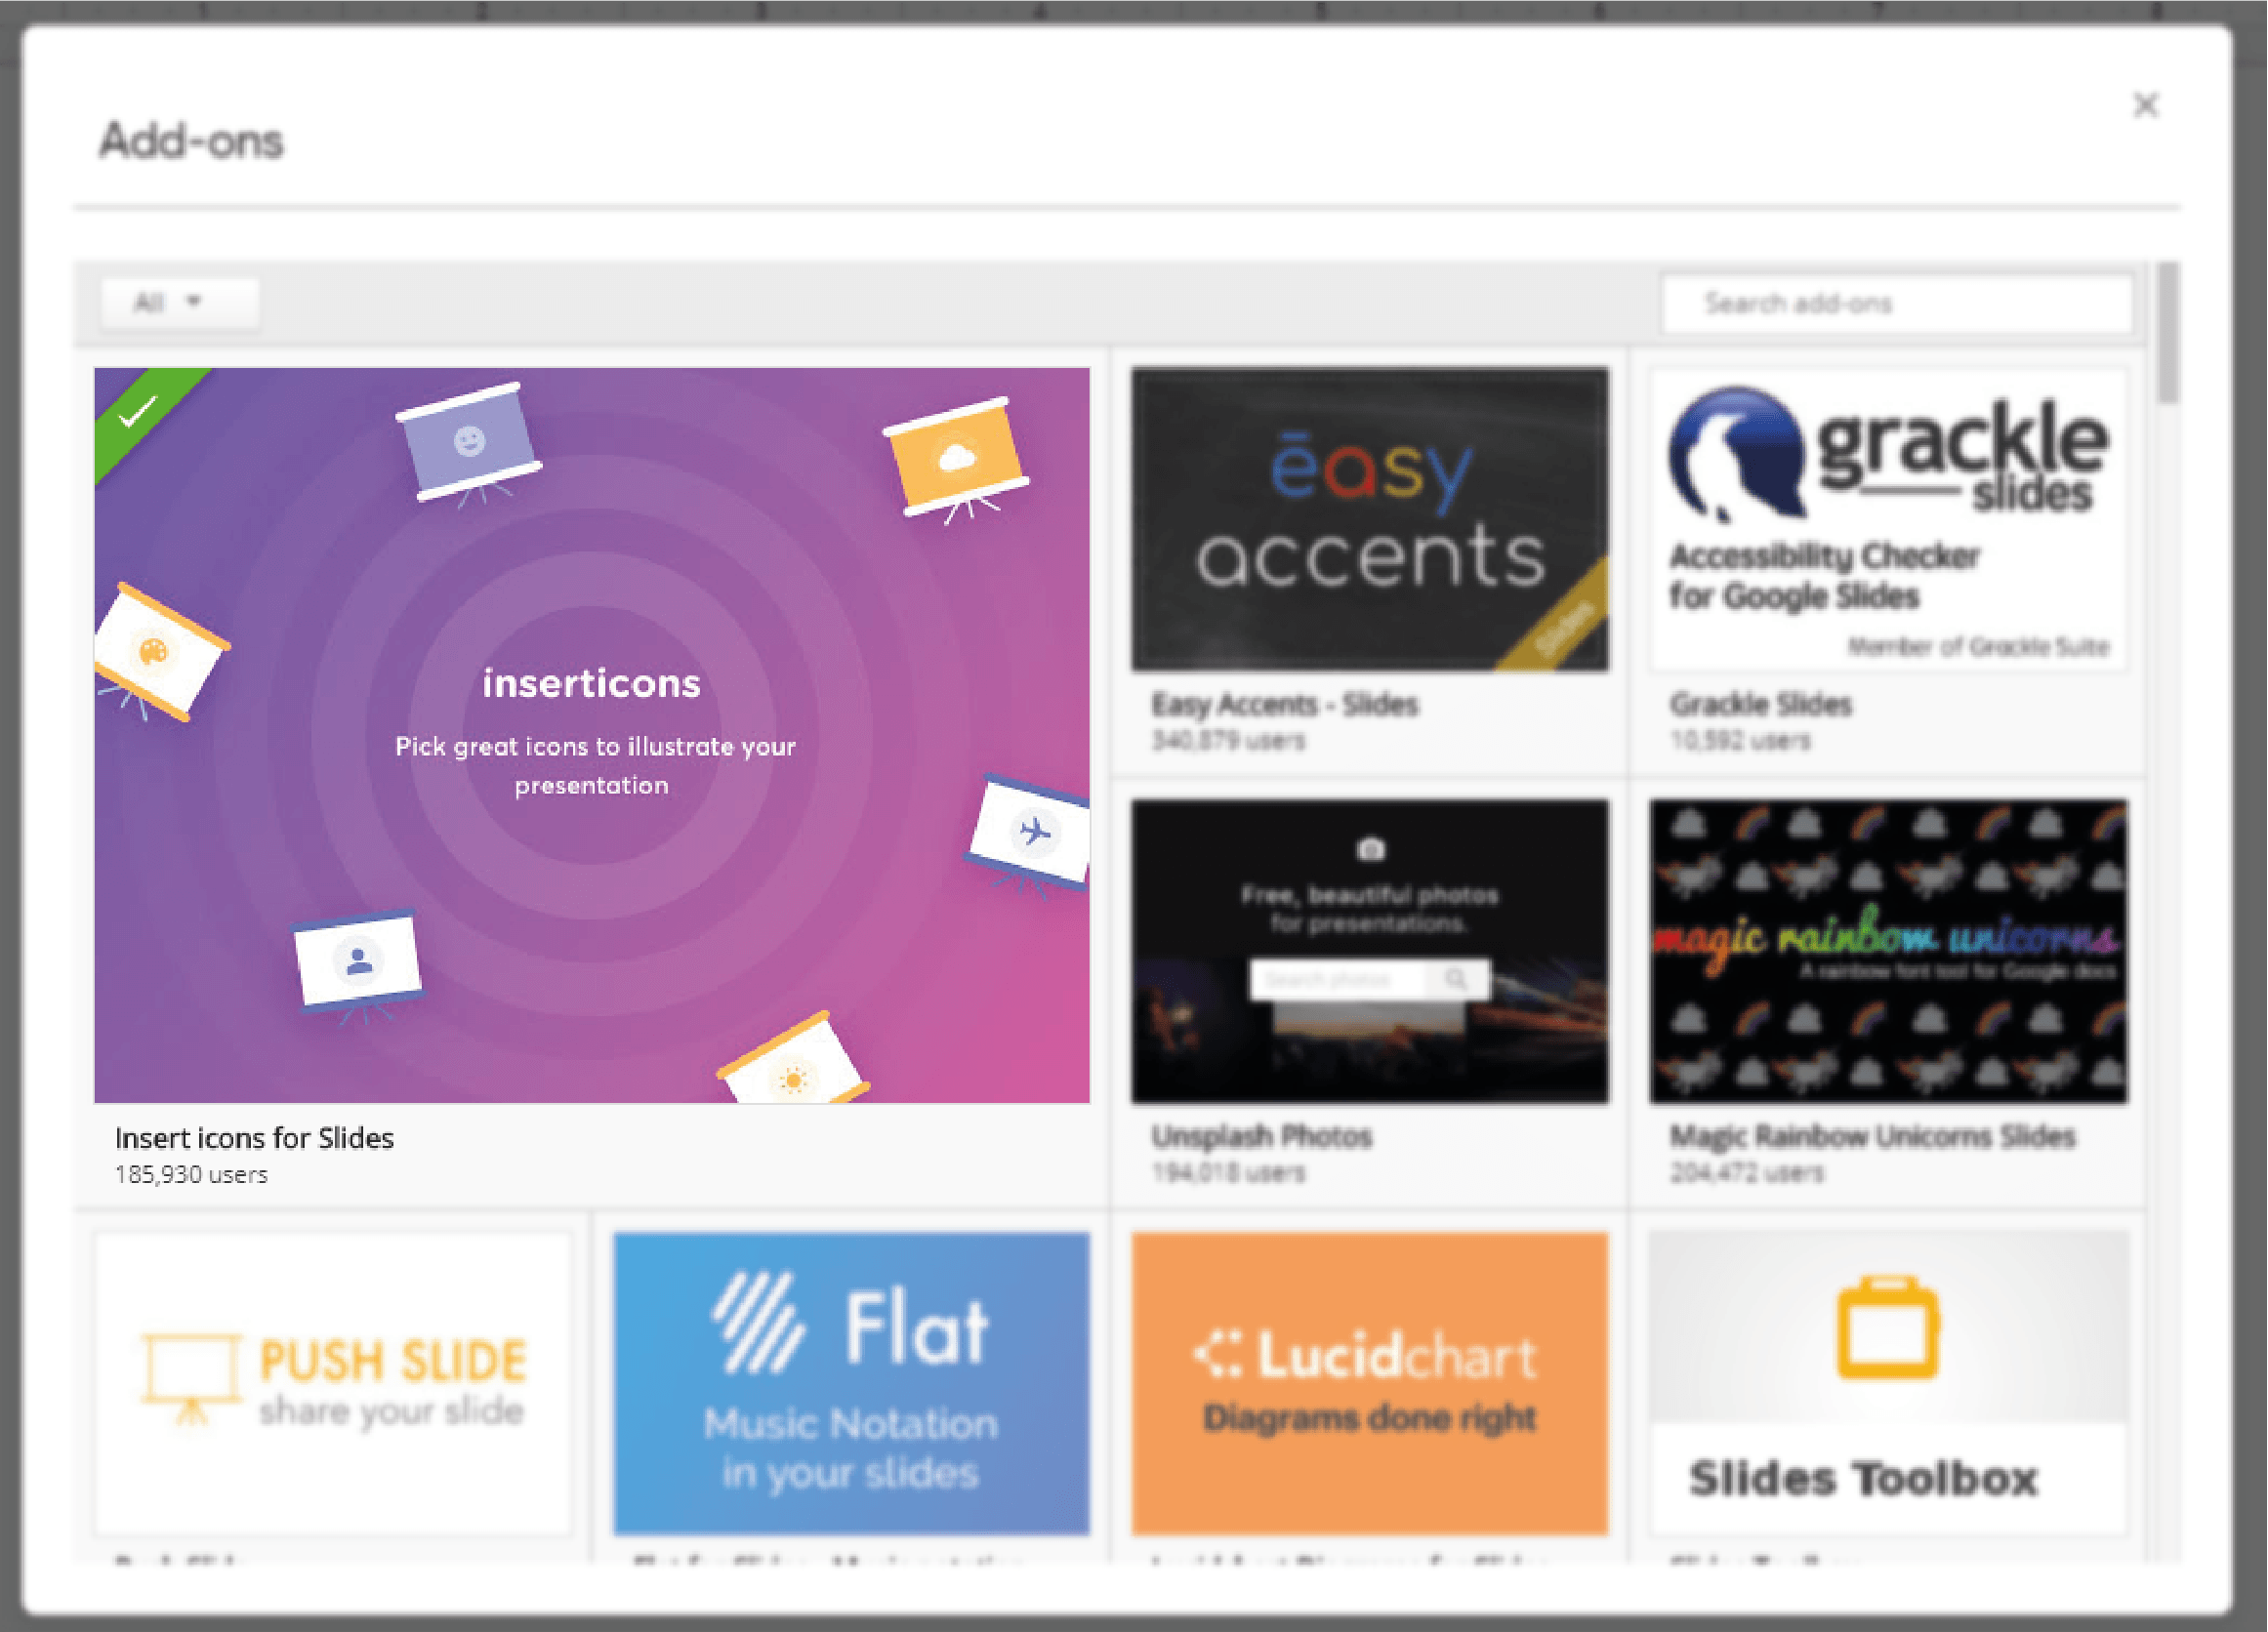
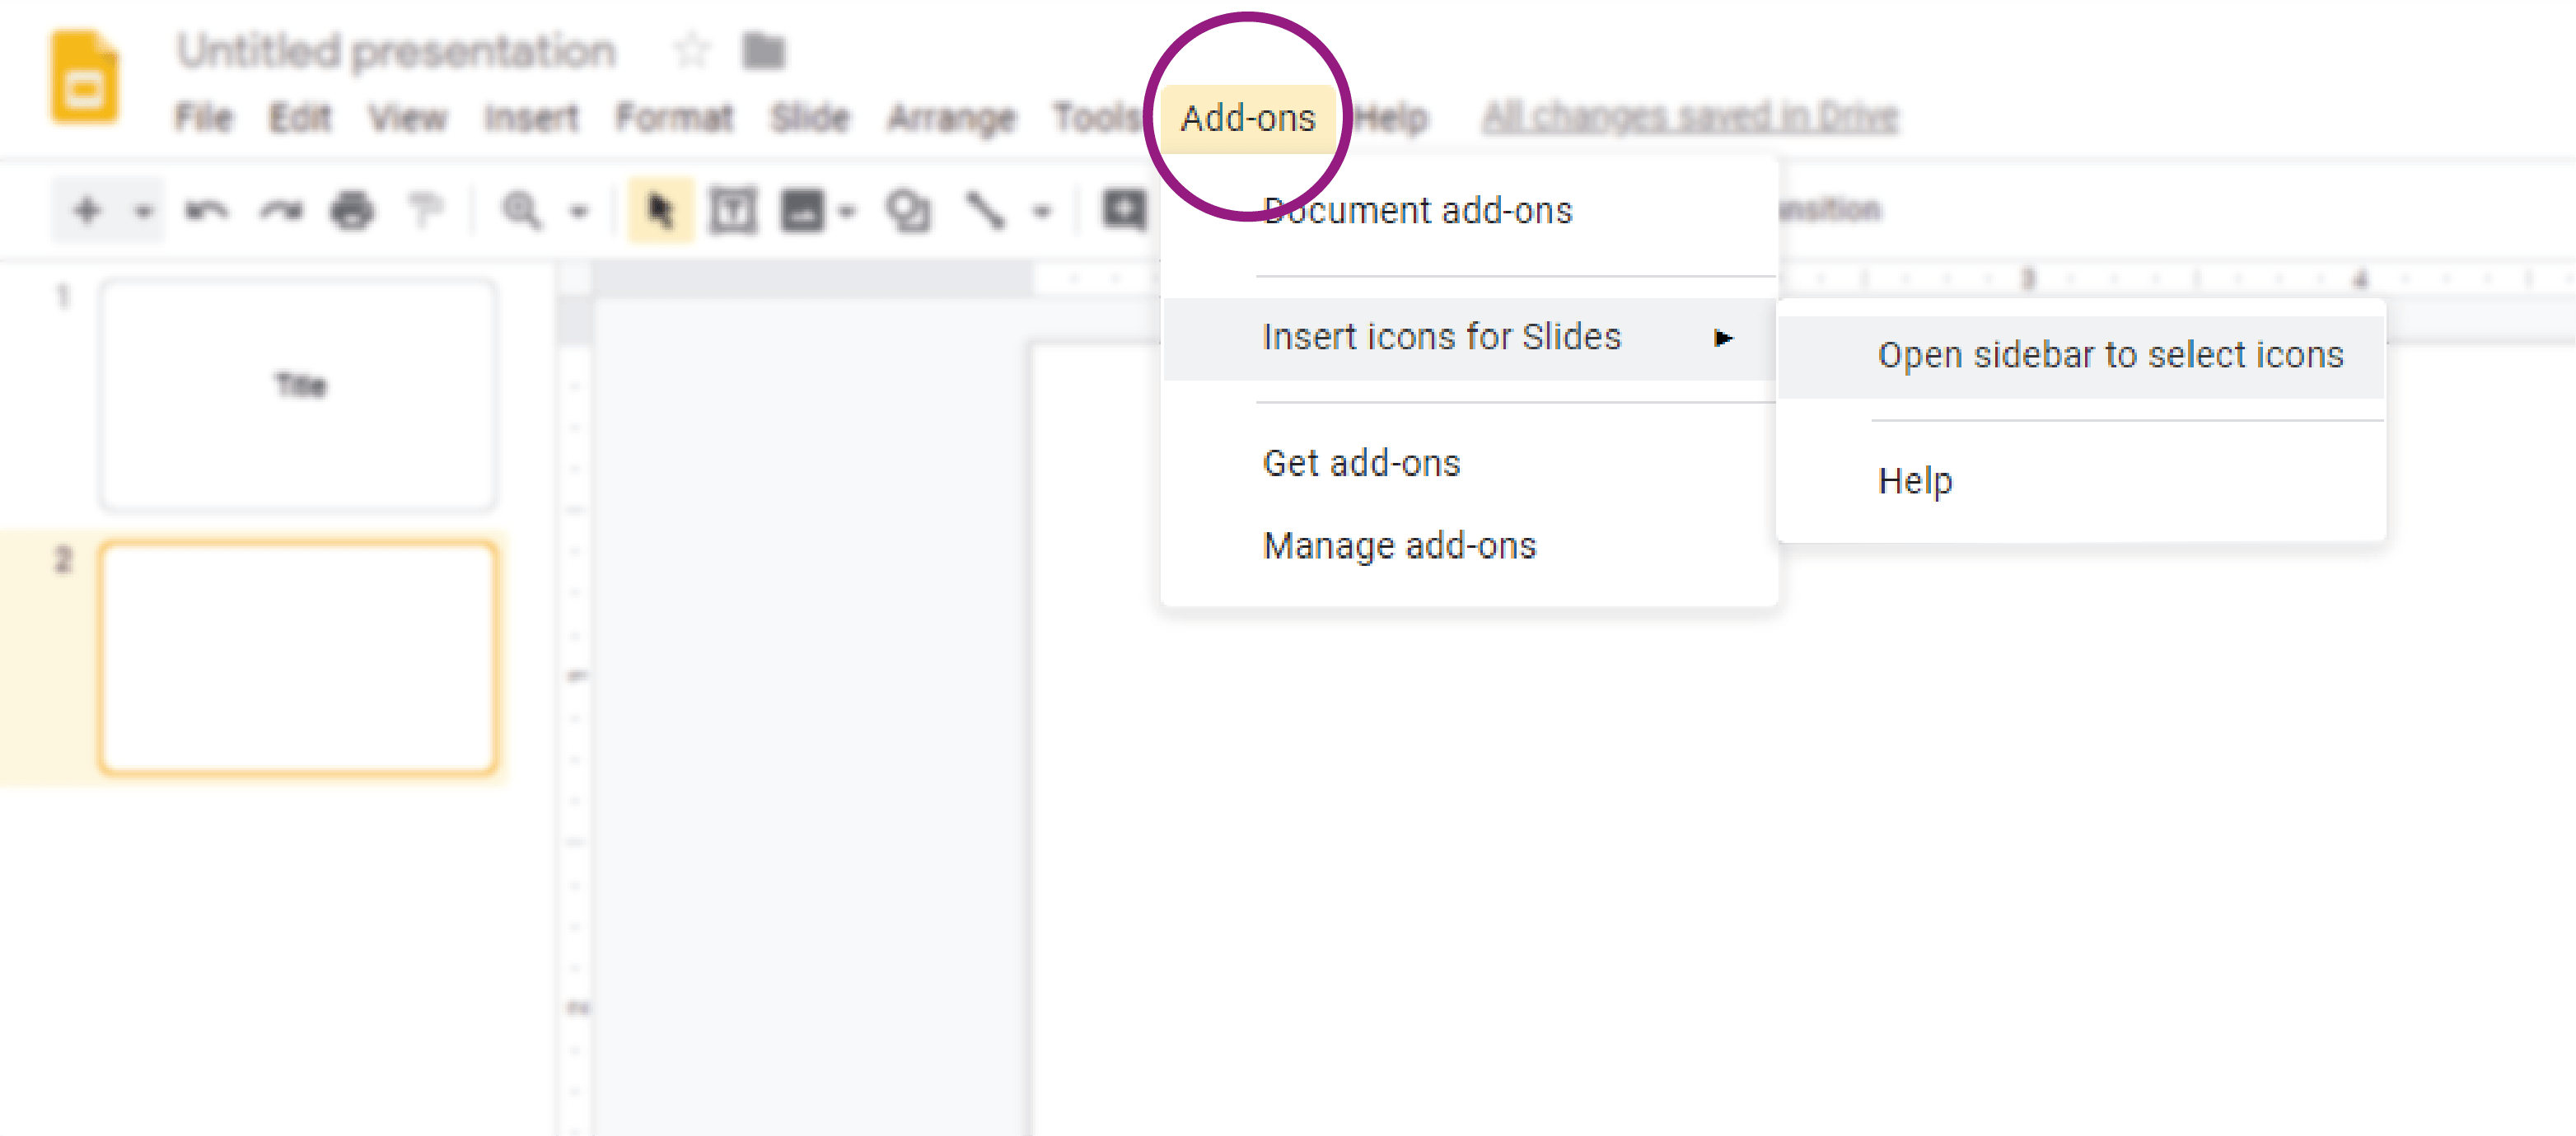
Tip: To use icons in your interactive presentation in Google Slides, click the Add – ons tab, select Get add-ons , and then select the Insert icons add-on.
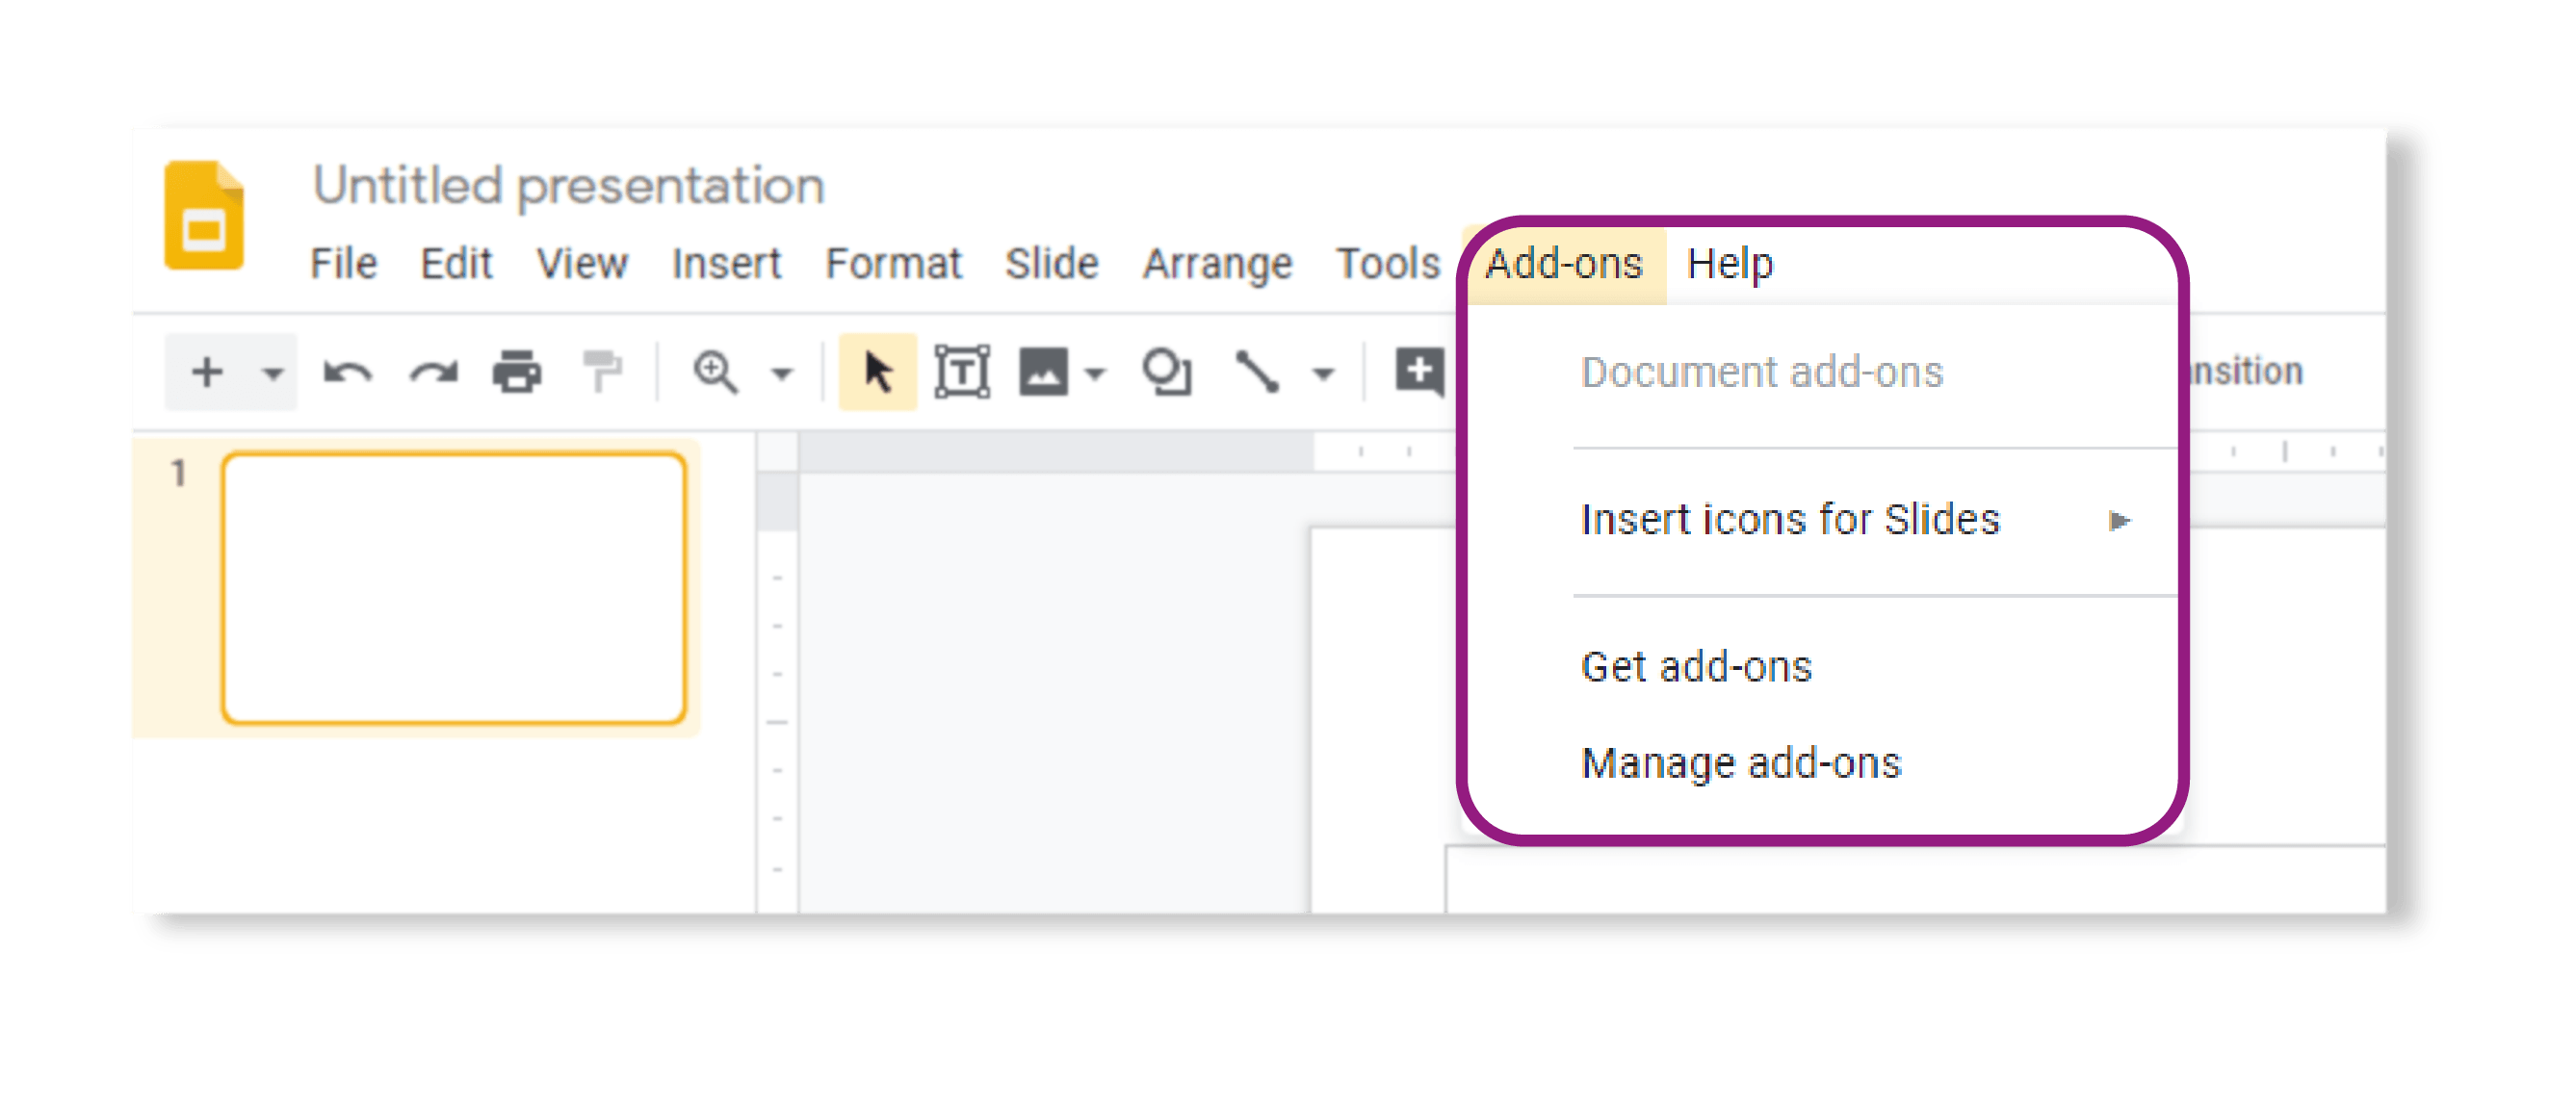
Then, under the Add – ons tab, a new option will appear which is Insert icons for Slides . Hover over this, and select Open sidebar to select icons .
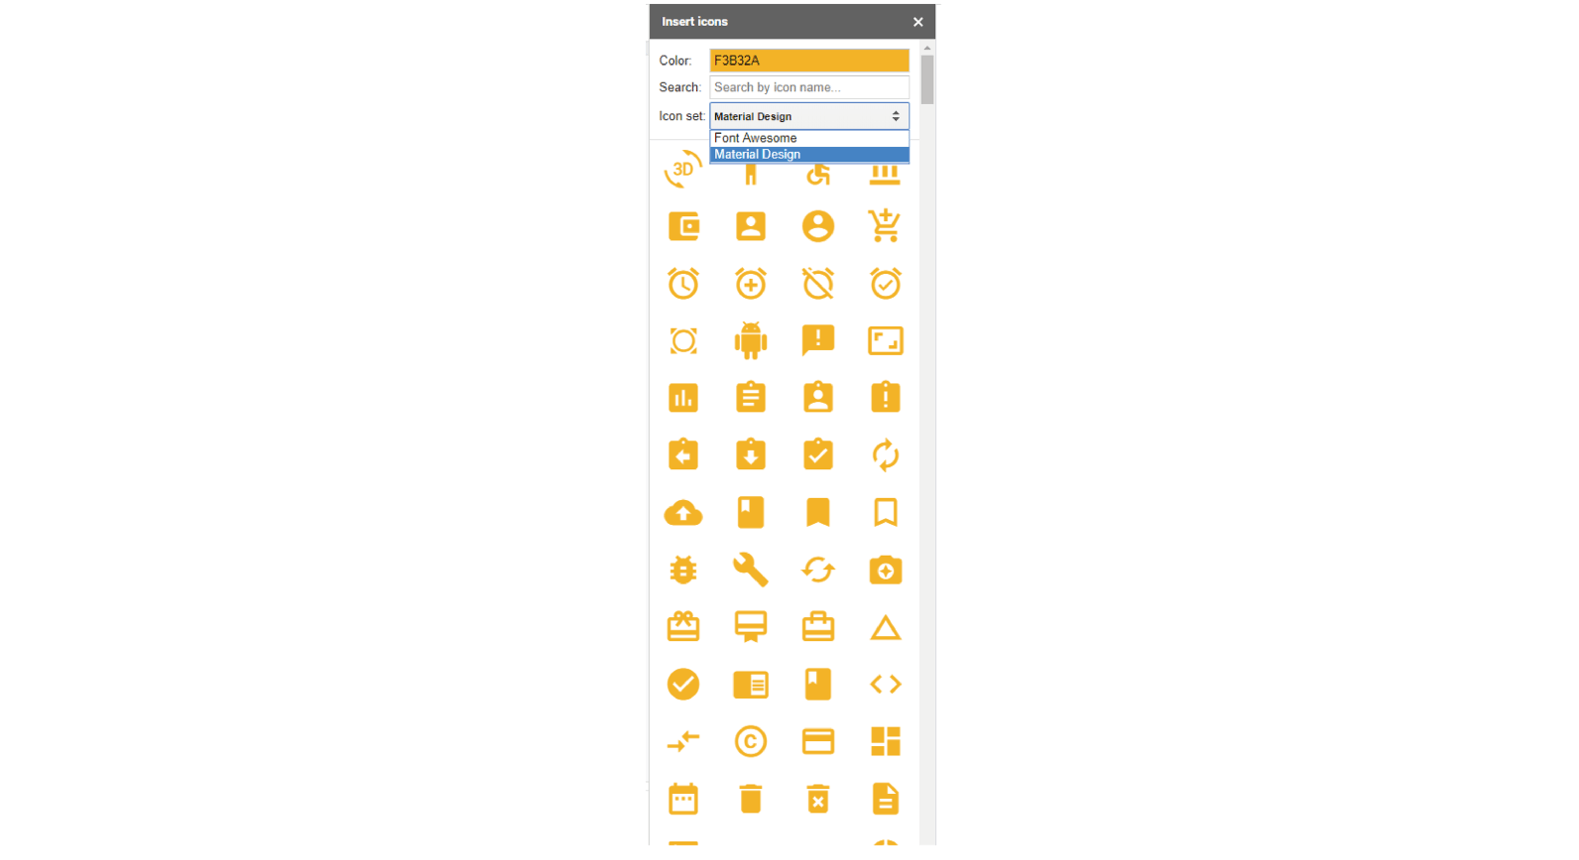
Then, once the sidebar appears, ensure that the icon set selected on the drop-down menu is ‘Material Design.’
Create section header slides for each section in your presentation. Do this by navigating to the top of the page, and clicking New slide on the top left of the tool bar. Repeat this step as many times as necessary. Next, build as many buttons as you need for the subsection using the steps outlined above. You can also simply copy and paste the buttons you’ve already created, and just edit the text.
Add the information you want to include in each section. If this is images, like in our example presentation, then insert images using the Insert tab.
If this is text, type on the slide using a text box. However, it’s best to use visuals instead of long paragraphs of text. Keep your message clear and succinct.
Repeat steps 4 and 5 for each section. Make sure each section has a header slide, with buttons if necessary. Look through your presentation up to this point – make sure all the sections are ordered correctly, and that there is a header slide at the beginning of each.
Return to your initial menu slide. Make transparent shapes to cover each ‘button’ you have created. We will turn these transparent shapes into hyperlinks that allow users to navigate through your deck. First, click the Shape button on the toolbar, and then create a shape that covers the button that you have created, but not any white space outside them. Then, select the shape and click the Fill color button on the toolbar, select Transparent from the dropdown menu.

Place these transparent shapes over the top of every button in your deck. Using transparent shapes in this way makes it much easier to edit the hyperlinks if needed, and also makes it less likely that a user will miss a clickable area!
Now we are ready to hyperlink each button! Select the first transparent box on your menu slide, right click, then select Link and choose Slides in this presentation . From here, choose the slide you want your button to navigate to when clicked.
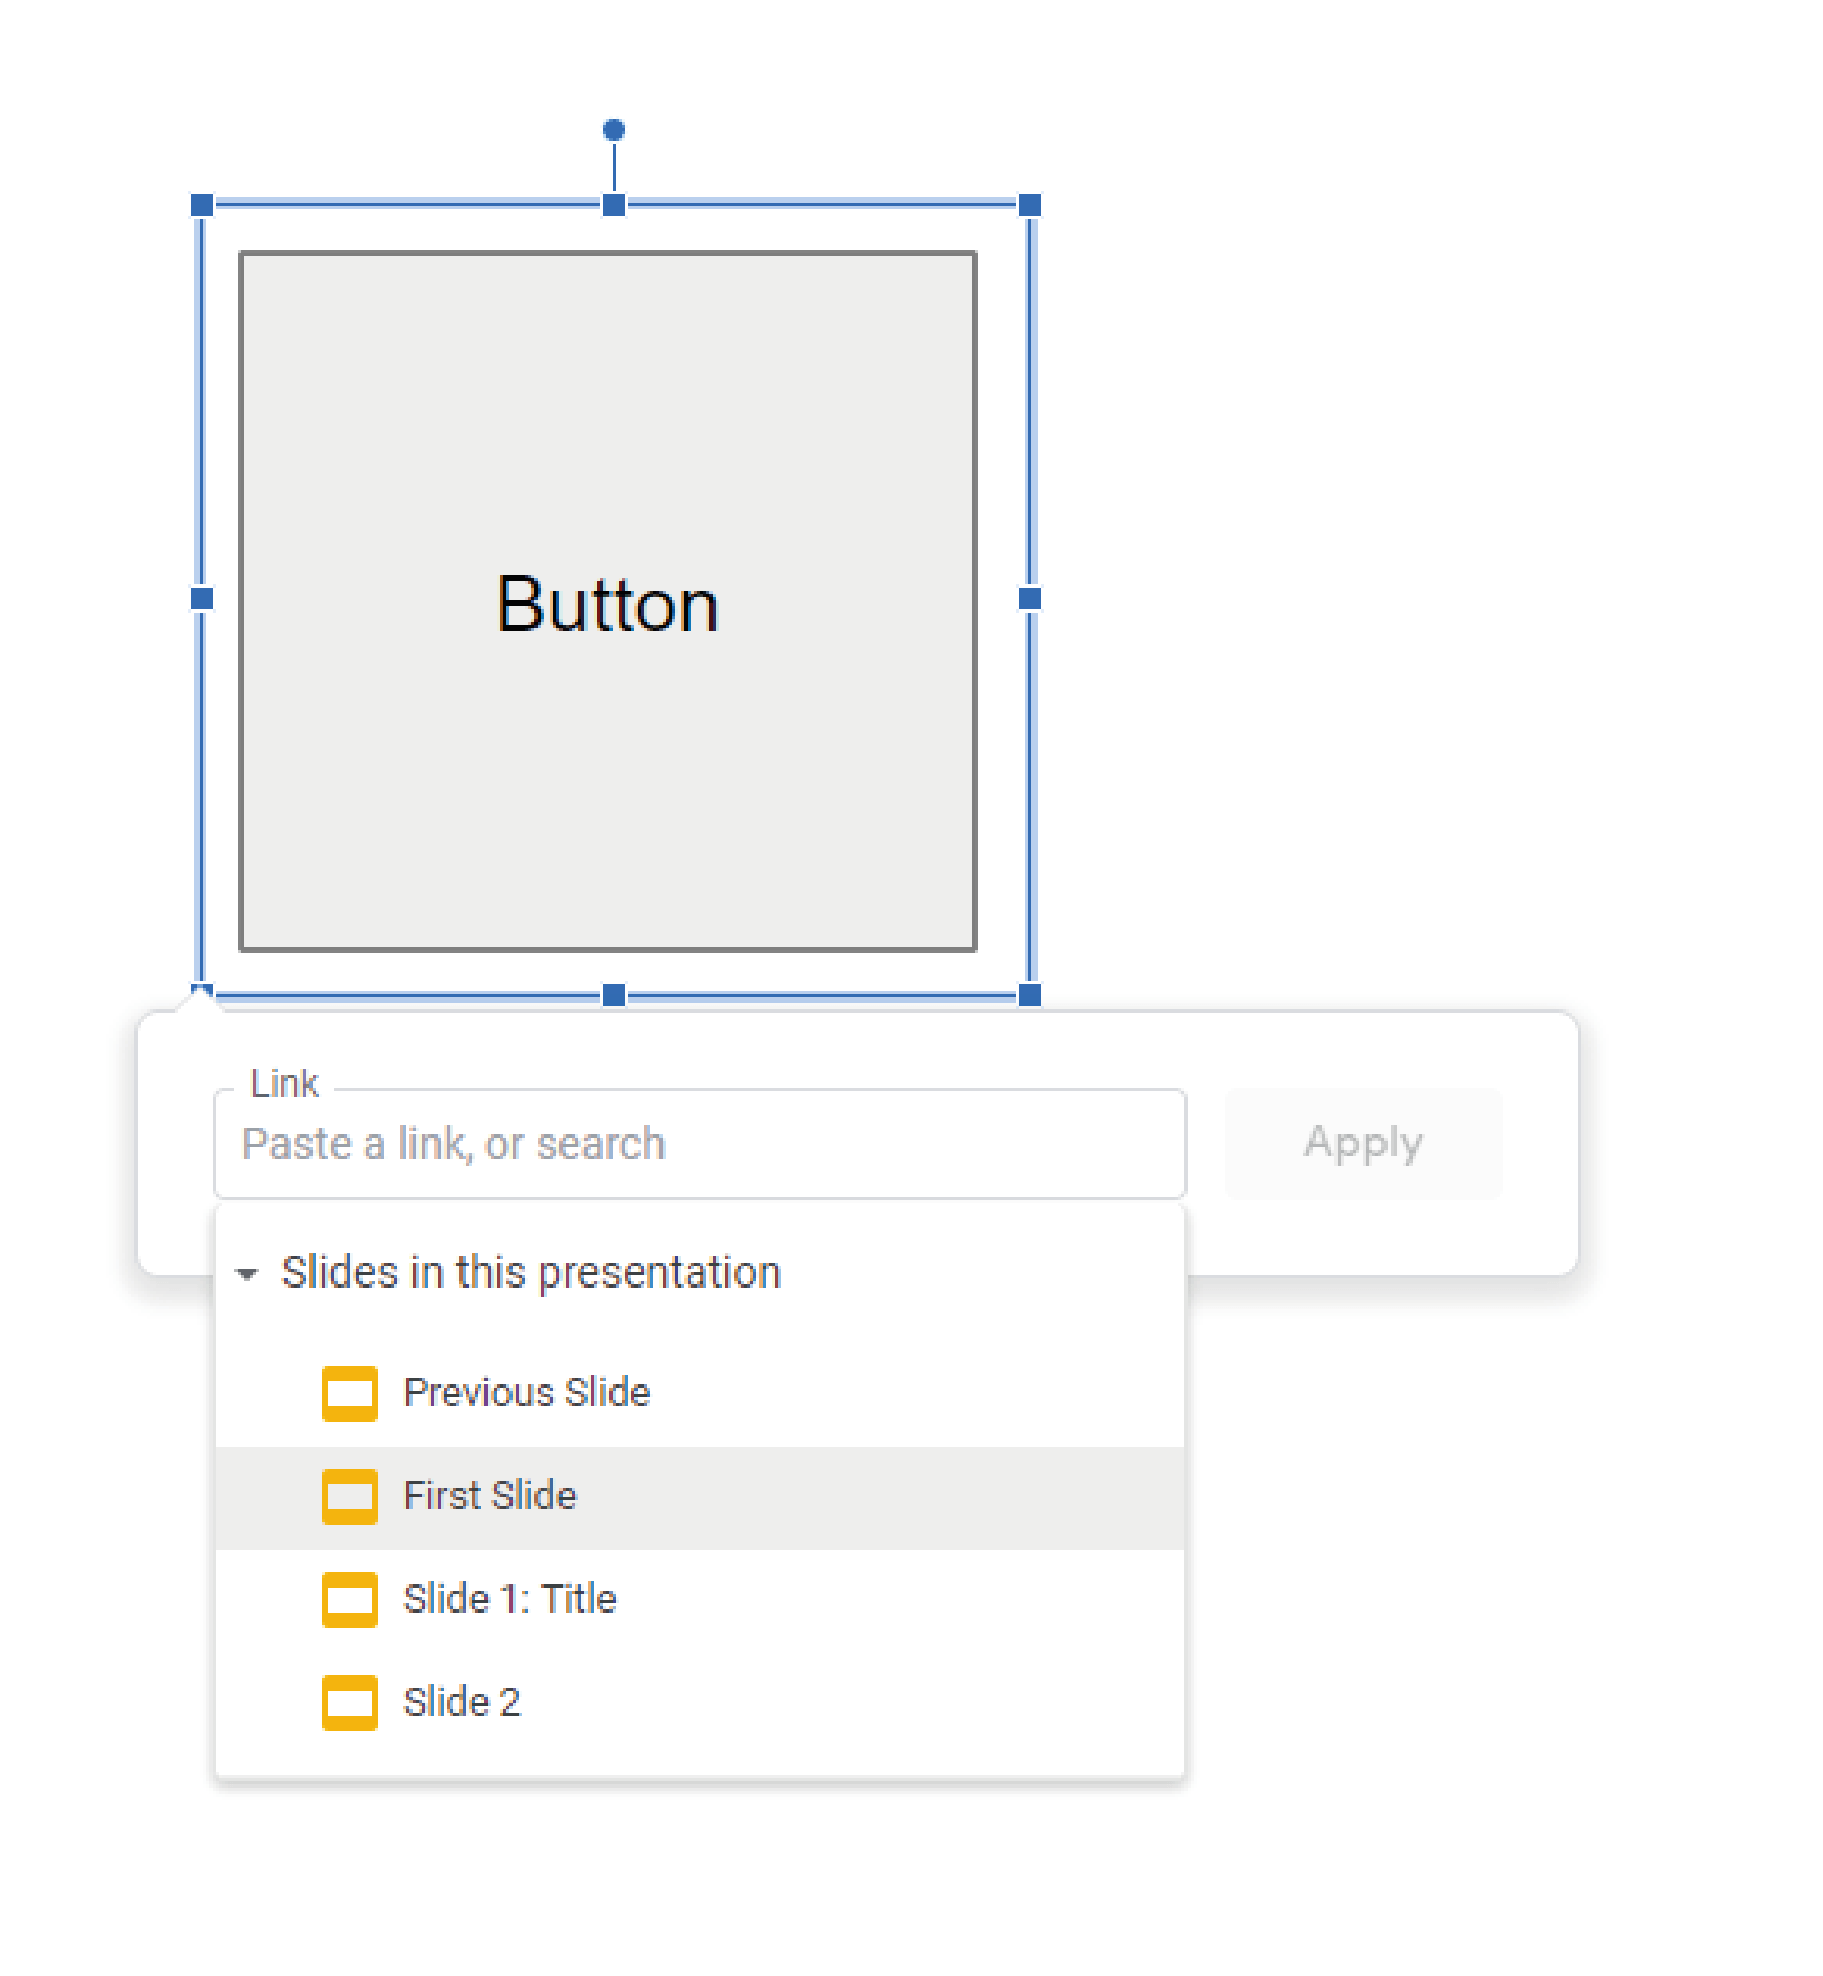
Tip: If your slide has a title, it will have the same title in the link section, making it easier to find. After you have linked these two slides the link will stay connected to the specific slide, not the slide number – so it doesn’t matter if you move things around.
Repeat this process for all buttons, so that each one links to the correct slide.
Create buttons to return to the main menu. To do this, follow the steps outlined previously and use a transparent box that links back to the main menu slide. If you have different subsections within a section, you can also create a button linking back to the section title slide from each subsection.
Interactive presentations in Google Slides: Beyond the basics
Following these steps will give you a fully interactive presentation in Google Slides. But if you want to go beyond the basics, here are some tips and tricks that will help your interactive deck be even more intuitive and user friendly.
An effective menu slide is key
The centerpiece of a good interactive presentation is an effective menu slide that is clearly navigable, has a deliberate spatial layout, and is visually appealing. For example, the buttons on this menu slide clearly indicate the separate sections in our presentation . The arrangement of your buttons helps the user understand your presentation’s structure, so make sure they are arranged logically.
Your presentation needs to be visually engaging
We at BrightCarbon are particularly passionate about this point – far too often slides look dull and drab – and we think it’s important to be the change you want to see in the presentation world! It would be impossible to cover all the ways you can make your deck visually appealing in a short blog post – the important point is to consider the overall aesthetics of each slide and the presentation as a whole. If you’re looking for some design inspiration, check out this article about making slides look great using images.

Make navigation as simple as possible
Your menu slide is the jumping-off point to the different sections of your presentation – but constantly exiting present mode to return to your menu slide can break the flow. In a normal presentation there isn’t an effective way of returning to the main slide without clicking back through all the content you’ve already shown. As you want to be able to go through your presentation in a non-linear fashion you need an easy way to return to your jumping-off point. Place a button at the end of each section that links to the original menu slide, so you don’t have to exit the presentation once you start.
Provide your audience with signposts
You want your audience to understand where they are within the presentation, providing them with signposts is an easy way to achieve this. A signpost can be a header slide at the beginning of the section or small indicator icons throughout a given section. It can also be a slide or button at the end of each that clearly includes options to either return to the main menu or go straight into the next section. Make it easy for your audience to follow the flow of your deck.
Be strategic when positioning buttons
Consider the location of buttons on the slide. If a button is at the end of a section and returns the user to the main menu, it’s probably best to put it at the bottom right, as in the West we tend to read from left to right, top to bottom. Think about where best to position buttons so the placement is consistently, and so they don’t get in the way of your main content. Take a look at the above screenshot – we’ve positioned our section buttons so they are clearly visible, but don’t dominate the slide.
Make sure you keep the best practices in mind, as they will help you make a clear roadmap that runs throughout your slides. You’re well on your way to creating a great interactive presentation in Google Slides, just one last thing to do – get started!
Related articles
Moving to google slides here’s what to consider..
- Google Slides
If your organization is considering using Google Workspace it will impact the way you create presentations. Microsoft PowerPoint will no longer be your default and you’ll need to count on Google Slides. Before you make a change like this, it can be hard to know what to expect. How might your business benefit? What are the potential downsides? How can you make the transition as smooth as possible? Let's find out!

Google Slides Themes and Layouts
- Comments: 8
In Google Slides, editing the Theme and Layouts is an easy way to ensure that your presentations have a set style that stays true to your brand. Getting to grips with the Google Slides Theme builder and Layouts can also speed up your content creation, providing a firm jumping off point for all your future presentations.

6 ways to get the most out of online collaboration with Google Slides
When preparing a presentation, it’s often the case that multiple people need to contribute content. However, when you’re not working in the same office, this can be difficult. We explore how Google Slides collaboration features can help you create brilliant presentations online.

Is there a way to send an interactive slideshow with hyperlinks to students that allows them to click outside to YouTube and click to other slides, but does NOT allow them to edit the presentation? Thanks!!
Hi Adam, There’s an easy fix for this problem. All you need to do is share the presentation as “view only” with your students. To do this, click the share button as you normally would, then click the pencil icon that is to the right of the “People” bar, and select “can view” from the drop down menu. This will still let your students use the links within the presentation as well as any external links, but won’t let them make any edits to the presentation itself. Hope this helps!
Mabey make them a commenter on the slideshow?
Yeah true that problem could be fixed and they should be able to!
When I share my presentations in present mode the presentation bar that shows up interferes with any buttons I have added. Is there a way to remove that so that only the arrow keys or buttons can be used, or is there a way to change it’s size? I makes the buttons almost useless.
Hi Kera, unfortunately there’s no way to move the presentation bar once in present mode, it’s very frustrating! The best solution is to move the buttons so that they aren’t on the bottom left of the slide. Hope this helps!
Actually there is a way to share without the presentation box there. After you click share to copy the link “choose anyone can view” paste into the task bar and change “edit” to “present” and add @rm=minimal to the end then copy and paste that link to where you are sharing.
Hi kera, this is really helpfull tutorial. I’ve a question….is possible to create a final quiz? I need a presentation with final valutation quiz….is it possible?
Hi Antonio, yes you can use the same method in this post to make a quiz. All you would need to do is create a menu slide with buttons named “Question 1” “Question 2” etc. (or “Round 1” “Round 2” if you wanted to divide questions by round), and link those buttons to slides later in the presentation that included your quiz questions. Then, include a button on your question slides that link back to the main menu slide. Of course, you would still need to keep score outside of slides, as there’s no way for slides to track correct answers to your questions. Hope this helps! 🙂
I have made a 20 slide presentation. I have also made an interactive quiz that has 4 questions with a correct and incorrect slide for each question. That makes 12 slides in the quiz. I want to know if I can put the quiz interactive into a specific slide on the 20 slide presentation?
Hi Kelly, if you want to add your quiz slides into another presentation, you should be able to copy the slides over and the hyperlinks should still link to he correct slides, maintaining all interactivity. Then just continue with your presentation once you reach the final quiz slide, instead of returning to the menu slide. If this isn’t what you’re asking, please clarify what exactly you need help with and I’m happy to help. Thanks!
Hi Ian, Thank you for this tutorial. it is great! I made an interactive quiz, published it and sent the link to someone to test. The tester said all of the buttons and links worked correctly and that he could not advance to the next slide unless he clicked on the “next” or “back” buttons. All good. BUT he COULD mouse scroll through the entire quiz and see all of the questions, correct and inocorrect prompt slides. Is there a way to publish or share without being able to scroll through with the mouse? Thank you again!
Hi Lisa, I’m so glad to hear that you found it helpful! Unfortunately, there’s no way that we are aware of to keep people from scrolling through the deck once it’s been shared. I think the best solution is to just ask the person you share the interactive presentation with to be sure and review in present mode. Thanks!
I used interactive slides to create a classroom scene. There are several slides that are accessed by clicking on hyperlinks in the first slide, and every slide has a link back to slide one.
When I try to publish it to the web, the only options include automatically playing through all the slides, which I don’t want to do. I want them only to go to the slides that they click on.
Hi Julie, unfortunately there’s no way we know of to get around this – when publishing to the web, Slides only allows you to automatically play through all the slides, as you say. If you only need to share with a few people, we would recommend simply sharing directly with them as “view only.”
this is awesome !!!!!!!!!!!!!!!!!!!!!!!!!!!! i had no idea on how to get full marks on a project i am doing…. but now my chances have increases by 50% !!! how i love this article….!!!!!! amazing
Hi Bhavya, I’m so glad to hear you found this article helpful!! Good luck on your project!
I found this very useful when producing an interactive display for our art club. However I want to call this display from another programme which deals with several clubs. This I have managed OK but how does the viewer leave the slides presentation and return to the calling programme? I need a QUIT button. I also want to ensure that it all works on tablets and desktops.
Hi Royston, I’m not sure I fully understand your question – you should be able to exit present mode simply by clicking the Escape key. An interactive presentation should work on both tablets and desktops, according to Google Slides. Please clarify and let me know if I can help any more, thanks!
I have the same question as Royston. I know users can press the esc key to exit, however that does not go along with the flow of the presentation. Also, when you press esc, it brings you to the slide show creation view. I want the show to just close on their browser with the click of a “button” on the last slide of the slide show.
On the flip side, when I send users the link to the slide show, and they click on the link, it also brings them to the creation view, so they have to click “present” to see it as intended. Is there a way for me to send a link that will open right to the first slide at full screen, already in “present” view?
I have now found a simple solution to my problem. The slide show contains several menu pages. On each of these I have a Quit button and I link this with the web address of the programme that calls the slide show. This does not send the user to the place on the calling programme which initiated the slide show but in my case this was OK.
I have since modified this so that the Quit buttons lead to the first slide in the slideshow which makes it clear that the button it presents there quits back to the presenting programme but otherwise leaves the user the option of running through the slideshow again.
Is there a way of adding an already interactive PDF to slides and it retain its functionality?
Unfortunately, once you import an interactive PDF into Slides it loses it’s functionality (as it sounds like you’ve already discovered). There’s no easy workaround here, I’m afraid.
Hi! This is really amazing. Thanks for share. I’d like to know if there is anyway to disable navigation through mouseclick, arrow keys or any other way instead of clicking the button links? Because I’m not secure that the viewers will follow the path we create if they can jump slide by slide. Thanks a lot for your attention. =)
Hi Ces, thanks for your question. Unfortunately there’s no easy way that we know of to disable navigating through the presentation but keep the mouse’s other clicking functionality. There’s a way to disable clicking the mouse but still keep keyboard functionality, but this of course doesn’t solve your problem. Sorry about that!
I made a game for students like Jeopardy with columns for each topic area and buttons that show point values fr each question. Students can select the topic and # of points, and a hyperlink will take them to the specific question. I put in back buttons on each question page so they go back to main page. Is there any way to indicate on the main page when a “button” has been opened? Can a hyperlink and animation be embedded so once that button has been clicked it has a different appearance on the main page?
Oh, I really wish that this question had been answered. I’ve been struggling with this for a long time. As far as I can tell, there is no way to do this. It’s a shame that something so easy in PowerPoint is seemingly impossible in Slides.
If I’m wrong, PLEASE correct me. I’d love to have this solved.
I have a question….so we created an interactive slide show for the students with a slide correct-great job slide and a sorry, try again slide. We were able to link each answer to the correct slide or the try again slide, but once it goes there, how do we go back to the previous slide we were at?
Also, if we are presenting our screen to during a google meet are the children able to interact with it if allow anyone with the link to be editors?
Hi Heather,
You might try adding a ‘back’ button on the bottom right of both the ‘correct’ and ‘try again’ slides, and then link these to the previous slide you were at.
As for your second question, yes that’s right – though it might be better to share the presentation with your students as ‘view only’ as if they are editors they can change the content, but if they are viewers they can’t and still have access to the interactive functionality.
Hope this helps!
I tryed it and wow when i looked it was like wow so i shred it to my teacher ms eunick in bellmere junior public school shes like oh wow!!!!!!!!!!!!!!!!!!!!!!!!!!!!!!!!!!!!!!!!!!!!!!!!!!!!!!!!!!!!!!!!!!!!!!!!!!!!!!!!!!!!!!!!!!!!!!!!!!!!
Would you be concerned about exchanging links?
Switching out links shouldn’t cause any problem – all you need to do is follow the same process for adding a new link, but instead just remove the original and add a new one. Hope this helps!
This is super helpful and I really appreciate all of the time and effort that went into it. From the knowledge shared here, I am hoping you might be able to help me with this question. I want to know if there is a way to stay in Present mode and move things around on the slide. I present google slide shows on my Dell board and it would be so much better if students could come up and manipulate icons etc. while still being in present mode, instead of having to exit out and be in edit mode. Is this even possible, or should I give up trying to figure it out? Thank you so much!
Hi Jo, unfortunately there’s not a way to make any changes from present mode. Slides doesn’t have that type of functionality available. Sorry about that!
Hey! Is there a shorter way to do this?
Hi there, unfortunately there’s no quicker way that we know of!
Is there a way to prevent users from clicking on a slide in present mode and have it advance? This way the user can only advance when clicking on a button with internal links?
Hi Frank, as far as we know there’s no way to do this. Sorry about that!
You guys are the BEST!!!!!! Usually, other websites just don’t help you but you guys helped me a lot.
So glad to hear you found it helpful!
Hey, is there a way to put it to when you click on the image it takes you to the next slide?
Hi there, yes all you would need to do in that case is link the image on the slide to the next slide you want to advance to. Hope this helps!
Is there a way to publish these slides onto sites so the audience can click around on all the links but NOT move automatically forward or backward through the deck? I want people to have to click the “go back” button, and when I click it goes through every slide. (It’s an escape room for my students).
Hi Ali, unfortunately Google Slides doesn’t have the functionality to lock slides. Sorry about that!
Hi! I just created interactive slides for my students that includes slides that go back and forth between “good job!” and “try again!” so that students can go through and self-correct. It works fine when in presentation or slideshow mode and they use a mouse to click the answers. However, I have touch screen laptops and if my students touch the screen instead of the mouse (fine motor issues), the file copies itself and goes out of the slideshow mode. What am I doing wrong or can I not use links between slides without a mouse?
Thanks in advance!
As far as I can tell, that sounds like it might be a hardware issue – is there a way for you to disable the touchscreen feature on the devices themselves? As far as I know there’s nothing that can be done from within Slides.
Sorry about that!
Join the BrightCarbon mailing list for monthly invites and resources
We’d been badly let down and got hold of BrightCarbon on a Friday afternoon – with a Monday deadline! They were reassuring, professional, easy to work with. They listened and delivered great visuals – now adopted across the board. Matt Dean byrne∙dean

- Best Mac Apps
- Unknown Caller
How to use Google Slides

If you want to create a presentation for your company or a slideshow for your classroom, Google Slides is a solid option. The application is similar to Microsoft PowerPoint but is completely free and web-based for easy access.
Get started in Google Slides
Use views in google slides, add and format slides in a presentation, include speaker notes, insert and format text on a slide, insert and format images on a slide, insert other objects on a slide, view and present a slideshow.
Here, we’ll walk you through the basics of using Google Slides as a beginner. From adding slides to inserting text and images to presenting your slideshow, here’s how to use Google Slides.
What You Need
Web browser
Google account
To create a presentation, visit Google Slides and sign in with your Google account. You can then use a template for a quick start or create a blank slideshow.
Step 1: On the main Google Slides page, you’ll see a few templates across the top. To see them all, select Template gallery . If you see a template you want to use, select it.
Otherwise, pick the Blank option to create a slideshow from scratch.
Step 2: When the slideshow opens, head to the top-left corner and give it a name.
The default for a template is the template name, and for a blank slideshow, it’s “Untitled Presentation.” Simply replace that text with your own and press Enter or Return to save it.
Step 3: As you create your presentation, Google Slides saves it automatically. At the top of the slideshow screen, you’ll see that it is saved to your Google Drive and when you made the last edit.
Step 4: You can return to the main Google Slides screen anytime by selecting the Google Slides logo on the top left, beside the name.
As you create your presentation, you can use different views depending on how you want to work.
Step 1: The main view, as shown below, puts your slide front and center without distractions.
Step 2: To open thumbnails of your slides on the left, select View > Show filmstrip . You can then use the Filmstrip to move to different slides in your presentation and take action on a slide with a right-click.
To close the Filmstrip, return to View > Show filmstrip to deselect the option.
Step 3: To see a full screen of slide thumbnails, go to View > Grid view to select the option. This gives you a larger picture of how your slides are set up and actions you can take using a right-click.
To close this view, go to View > Grid view to deselect the option.
To build a presentation, you’ll add slides. Each slide can contain text, images, videos, shapes, and other elements. To make structuring your slides a bit easier, you can use a pre-made layout. But you also have the option to use a blank slide to place items where you like.
Step 1: To add a slide, do one of the following:
- Go to the Insert tab and choose New slide near the bottom.
- Go to the Slide tab and choose New slide at the top.
- In the Filmstrip or Grid view, right-click a slide and pick New slide .
Step 2: By default, the new slide is placed after your selected slide and uses the same layout. You can change the layout for the new slide if you prefer.
Step 3: To change the layout, select the slide and do one of the following:
- Go to the Slide tab, move to Apply layout , and choose a layout in the pop-out menu.
- In the Filmstrip or Grid view, right-click a slide, move to Apply layout , and choose a layout in the pop-out menu.
When you present a slideshow that you plan to talk through, you can add notes to your slides that only you can see. This is similar to using physical index cards during a speech.
Step 1: To display the notes section on a slide, either drag up using the Three dots at the very bottom of the slide or select View > Show speaker notes .
Step 2: This expands the section below the slide. Place your cursor inside the Notes section and enter your text.
Step 3: To change the font style, size, color, or formatting, select the text in your note and use the Font buttons in the toolbar.
Step 4: To close the speaker notes area, either drag down until the notes section is out of sight or go to View > Show speaker notes to deselect the option.
You can add text to your slides using the pre-made text boxes that are included with the layout you select. Alternatively, you can add text boxes and move them where you want.
Step 1: To add text to an included text box, simply click inside the box and type. The text is automatically formatted per the text box type. For instance, if you enter text in a title box, it’s formatted in a larger font.
Step 2: To insert a text box of your own, either select Insert > Text box in the menu or choose the Text box button in the toolbar.
Step 3: Click a spot on your slide to add the text box, and then enter your text inside.
Step 4: You can move a text box by dragging it and resize one by dragging in or out from a corner or edge.
Step 5: To change the font style, size, color, or format for the text inside the box, select the text and then use the font options in the toolbar.
Slideshows are visual presentations, so along with text, you’ll likely want to include pictures or photos.
Step 1: Go to Insert and move to Image or select the arrow next to the Image button in the toolbar.
Step 2: Choose the location for your image. You can pick a picture from your computer, a web search, Google Drive, Google Photos, a URL, or your device camera.
Step 3: Once you locate and insert the image, drag to move it where you like. You can also drag a corner or edge to resize it.
Step 4: For additional formatting options such as rotation, position, shadow, reflection, and other adjustments, open the Format options sidebar.
You can do this by selecting the image and choosing Format options in the toolbar or by right-clicking the image and choosing Format options .
Along with text and images, you can include other types of visuals in your presentation. You can add videos, audio files, tables, charts, diagrams, word art, and lines.
Step 1: To see all of your options and add an element, go to the Insert tab and choose what you would like to add.
Step 2: Some items like shapes, charts, and lines display a pop-out menu for you to pick the type or style. Other elements like video and audio display a pop-up window for you to pick the location or enter a URL.
Step 3: Once you insert an object on your slide, drag to move it to the spot you want. You can also right-click the item to view additional actions like formatting, alignment, or arrangement with other slide elements.
You can view your presentation at any point in the creation process and can present it the same way to your audience.
Plus, you can take advantage of the Presenter view, which gives you controls and displays your notes. Or, simply watch the slideshow as your audience will.
Step 1: On the top right, select the arrow next to Slideshow and pick Presenter view or Start from beginning .
Step 2: In Presenter view, you’ll see your slideshow on one side of your display or second monitor, with a smaller control window floating on top.
Use the control window to move through the slides, pause the slideshow, and see your speaker notes.
Step 3: In regular slideshow view, you’ll see the presentation in full-screen mode, as mentioned.
Use the Floating toolbar on the bottom left to advance through the slides or pause the slideshow.
Step 4: In either of the above views, select the Three dots on the right side of the floating toolbar to do things like enter or exit full-screen mode, view your speaker notes, automatically play the presentation, or exit the show.
There you have it! These are the basics for how to use Google Slides if you’re new to the application. For more, look at how to use Google Sheets .
Editors’ Recommendations
- How to use Gemini AI to create presentations in Google Slides
- How to use Gemini AI to write anything in Google Docs
- What is Gemini Advanced? Here’s how to use Google’s premium AI
- How to edit a PDF in Google Drive
- How to change your Google background in Chrome
- How-To Guides

Want to add a little charm and personality to your Google Slides presentations? You should try changing the theme colors of your slideshow. This ensures that each new frame contains the same background colors and trim. Once you’ve selected a theme, you’ll then be able to customize it to add even more aesthetic power to your words and pictures.
Google Drive is an excellent cloud storage solution that can be accessed from numerous devices. Whether you do most of your Google Drive uploading or downloading from a PC, Chromebook, or mobile device, there’s going to come a time when you’ll need to delete a file (or two). Fortunately, the deletion process couldn’t be more straightforward. We’ve also put together this helpful guide to show you how to trash your Drive content a couple of different ways.
Word processing software isn’t the kind of tool that most users would consider exciting, which is why we’re glad to see companies like Google adding a little flair to its own products. We’re talking about Google Docs, a free-to-use word processor that’s part of your larger Google Account ecosystem. Basic formatting options and other familiar word processing functions are front and center on Google Docs, but the ability to add doodles, sketches, and other entertaining media to your next Docs file requires a special bit of know-how.
How-To Geek
How to use speaker notes in google slides.

Your changes have been saved
Email is sent
Email has already been sent
Please verify your email address.
You’ve reached your account maximum for followed topics.
5 Things I Never Back Up to the Cloud
Why public wi-fi is a hacker’s playground (and how to protect yourself), why you shouldn't sign in with google or facebook, quick links, view and add speaker notes in google slides, edit or remove speaker notes, display speaker notes during a presentation.
Speaker notes are helpful for talking points as you present a slideshow. In Google Slides , you can add notes to each slide, edit or remove them as needed, and of course, display them during the presentation.
You have a few convenient ways to open the Speaker Notes section below your slide as you create your presentation.
- Double-click the three dots at the bottom of the Google Slides window.
- Drag up using the three dots at the bottom to resize the Speaker Notes section as you please.
- Click View > Show Speaker Notes in the menu to select it.

Once you have the Speaker Notes area displayed below your slide, you can simply click inside the section to add your notes.

You can also use the Google Slides toolbar to format your notes. Change the font style or size, apply color, bold, or italics, or use a numbered or bulleted list.

To hide the Speaker Notes again, reverse the action you did for opening them.
- Double-click the three dots at the top of the Speaker Notes section.
- Drag down using the three dots until the section vanishes.
- Click View > Show Speaker Notes in the menu to deselect it.
To edit your speaker notes, open them and just make your changes. Your edits are saved automatically just like any other changes you make as you create your presentation.
To remove speaker notes, select all of the text and press Delete on your keyboard.
You can begin a Google Slides presentation by hitting "Present" at the top of the screen or by clicking the arrow and selecting " Presenter View " or "Present From Beginning."

To start the show with your notes in hand, choose "Presenter View." This displays your slideshow in your main browser window and places your presenter notes in a smaller external window that you can move or resize.

If you use the "Present" or "Present From Beginning" options, you can still access your notes using the Presenter Toolbar . Be sure to take your presentation out of full-screen view first. Otherwise, your notes will display in full-screen mode.
Move your cursor to the bottom left of the slideshow and you'll see this toolbar display. Open the Options Menu using the three dots on the right and select "Exit Full Screen."

Then to view your notes, open the Options Menu and select "Open Speaker Notes."

Like Presenter View, this opens your notes in a smaller window that you can place where you like.
Since the above options all place your Speaker Notes in their own window, you can click the X to close that window at any time if you no longer need your notes.
Speaker notes are not only useful when practicing your presentation, but also when showtime comes. If you're still getting used to all that Google Slides has to offer, check out our helpful beginner's guide to Google Slides for additional tips.
- Google Slides
Keyboard shortcuts for Google Slides
Use keyboard shortcuts in Google Slides to navigate, format, and edit.
Note: Some shortcuts might not work for all languages or keyboards.
To open a list of keyboard shortcuts in Google Slides, press Ctrl + / (Windows, Chrome OS) or ⌘ + / (Mac).
Tool finder (formerly search the menus), press Alt + / (Windows, Chrome OS) or Option + / (Mac).
You can also use menu access keys. Open any application menu using the keyboard, then type the underlined letter for the item you'd like to select. For example, to open the Insert menu on a Mac, press Ctrl + Option + i . To select "Image," type the underlined letter i .
| Common actions | |
|---|---|
| New slide | |
| Duplicate slide | |
| Undo | |
| Redo | |
| Copy | |
| Cut | |
| Paste | |
| Copy formatting of the selected text or shape | |
| Paste formatting of the selected text or shape | |
| Insert or edit link | |
| Open link | |
| Delete | |
| Select all | |
| Select none | holding , press then |
| Find | |
| Find and replace | |
| Find again | |
| Find previous | |
| Open... | |
| Save | |
| Show common keyboard shortcuts | |
| Tool finder (formerly Search the menus) | |
| Hide or show menus (compact mode) | |
| Turn on captions while presenting | |
| Alt text | |
| Film strip actions | |
| Move to previous slide | |
| Move to next slide | |
| Move focus to first slide | |
| Move focus to last slide | |
| Move slide up | |
| Move slide down | |
| Move slide to beginning | |
| Move slide to end | |
| Select previous slide | |
| Select next slide | |
| Select first slide | |
| Select last slide | |
| Navigation | |
| Zoom in | |
| Zoom out | |
| Zoom 100% | |
| Move to filmstrip | |
| Move to canvas | |
| Open speaker notes panel | |
| Change to HTML view of presentation | |
| Open animations panel | |
| Continue in animation preview | |
| Open Explore | |
| Go to side panel | |
| Open dictionary | |
| Open revision history panel | |
| Open cell border selection (for tables) | holding , press then |
| Play the selected video | |
| Present slides | |
| Exit the current mode | |
| Menus | |
| Context menu | |
| File menu | |
| Edit menu | |
| View menu | |
| Insert menu | |
| Format menu | |
| Tools menu | |
| Help menu | |
| Accessibility menu | |
| Input tools menu | |
| Toggle input controls | |
| Comments | |
| Insert comment | |
| Enter current comment | holding |
| Move to next comment in the presentation | holding , press then |
| Move to previous comment in the presentation | holding , press then |
| When focus is on comment, move to next comment | |
| When focus is on comment, move to previous comment | |
| When focus is on comment, reply to comment | |
| When focus is on comment, resolve comment | |
| Open comment discussion thread | |
| Use keyboard shortcuts on selected comments | |
| Reply to current comment | R |
| Move to next comment | J |
| Move to previous comment | K |
| Resolve current comment | E |
| Exit current comment | U |
| Hide comment | |
| Text | |
| Bold | |
| Italic | |
| Underline | |
| Subscript | |
| Superscript | |
| Strikethrough | |
| Clear formatting | |
| Increase font size | |
| Decrease font size | |
| Left align | |
| Right align | |
| Center align | |
| Justify | |
| Move paragraph down | |
| Move paragraph up | |
| Increase indent | |
| Decrease indent | |
| Bulleted list | |
| Numbered list | |
| Select list item | holding , press then |
| Select list items at current level | holding , press then |
| Move to next text formatting change | holding , press then |
| Move to previous text formatting change | holding , press then |
| Move to next misspelling | |
| Move to previous misspelling | |
| Move and arrange objects | |
| Duplicate | |
| Group | |
| Ungroup | |
| Send backward | |
| Bring forward | |
| Send to back | |
| Bring to front | |
| Select next shape | |
| Select previous shape | |
| Nudge up, down, left, or right | |
| Nudge one pixel at a time | |
| Rotate counterclockwise by 1° | |
| Rotate clockwise by 1° | |
| Rotate counterclockwise by 15° | |
| Rotate clockwise by 15° | |
| Resize larger horizontally | |
| Resize larger vertically | |
| Resize smaller | |
| Resize larger | |
| Resize smaller vertically | |
| Resize smaller horizontally | |
| Exit crop mode | |
| Suppress guides | Move with mouse |
| Duplicate | Move with mouse |
| Resize from center | Resize with mouse |
| Constrain to vertical or horizontal movements | Move with mouse |
| Constrain to object's aspect ratio | Resize with mouse |
| Constrain to 15° rotation increments | Rotate with mouse |
| Presenting | |
| Stop presenting | |
| Next | |
| Previous | |
| Go to specific slide (7 followed by Enter goes to slide 7) | |
| First slide | |
| Last slide | |
| Open speaker notes | |
| Open audience tools | |
| Toggle laser pointer | |
| Toggle captions (English only) | |
| Toggle full screen | |
| Show a blank black slide | or |
| Return to the presentation from a blank black slide | Press any key |
| Show a blank white slide | or |
| Return to the presentation from a blank white slide | Press any key |
| Video Player | |
| Toggle play/pause | |
| Rewind 10 seconds | |
| Fast forward 10 seconds | |
| Previous frame (while paused) | |
| Next frame (while paused) | |
| Decrease playback rate | |
| Increase playback rate | |
| Seek to specific point in the video (Shift+7 advances to 70% of duration) | |
| Toggle captions on/off | |
| Toggle full screen | |
| Toggle mute | |
| Screen reader support | |
| Verbalize selection | |
| Enable screen reader support | |
| Enable braille support | |
| Verbalize from cursor location | |
| Announce formatting at cursor location | holding , press then |
| Common actions | |
|---|---|
| New slide | |
| Duplicate slide | |
| Undo | |
| Redo | |
| Copy | |
| Cut | |
| Paste | |
| Copy formatting of the selected text or shape | |
| Paste formatting of the selected text or shape | |
| Insert or edit link | |
| Open link | |
| Delete | |
| Select all | |
| Select none | holding ⌘, press then |
| Find | |
| Find and replace | |
| Find again | |
| Find previous | |
| Open... | |
| Save | |
| Show common keyboard shortcuts | |
| Tool finder (formerly Search the menus) | Ctrl + ~ |
| Hide or show menus (compact mode) | |
| Turn on captions while presenting | |
| Alt text | |
| Film strip actions | |
| Move to previous slide | |
| Move to next slide | |
| Move focus to first slide | |
| Move focus to last slide | |
| Move slide up | |
| Move slide down | |
| Move slide to beginning | |
| Move slide to end | |
| Select previous slide | |
| Select next slide | |
| Select first slide | |
| Select last slide | |
| Navigation | |
| Zoom in | |
| Zoom out | |
| Zoom 100% | |
| Move to filmstrip | |
| Move to canvas | |
| Open speaker notes panel | |
| Change to HTML view of presentation | |
| Open animations panel | |
| Continue in animation preview | |
| Open explore tool | |
| Define selected word in explore tool | |
| Go to side panel | |
| Open revision history panel | |
| Open cell border selection (for tables) | holding , press then |
| Play the selected video | |
| Present slides | |
| Present slides from beginning | |
| Exit the current mode | |
| Menus | |
| Context menu |
|
| File menu | |
| Edit menu | |
| View menu | |
| Insert menu | |
| Slide menu | |
| Format menu | |
| Arrange menu | |
| Tools menu | |
| Help menu | |
| Input tools menu | |
| Toggle input controls | |
| Comments | |
| Insert comment | |
| Enter current comment | holding |
| Move to next comment in the presentation | holding press then |
| Move to previous comment in the presentation | holding press then |
| When focus is on comment, move to next comment | |
| When focus is on comment, move to previous comment | |
| When focus is on comment, reply to comment | |
| When focus is on comment, resolve comment | |
| Open comment discussion thread | |
| Use keyboard shortcuts on selected comments | |
| Reply to current comment | R |
| Move to next comment | J |
| Move to previous comment | K |
| Resolve current comment | E |
| Exit current comment | U |
| Hide comment | |
| Text | |
| Bold | |
| Italic | |
| Underline | |
| Subscript | |
| Superscript | |
| Strikethrough | |
| Clear formatting | |
| Increase font size | |
| Decrease font size | |
| Left align | |
| Right align | |
| Center align | |
| Justify | |
| Select paragraph above | |
| Select paragraph below | |
| Increase indent | |
| Decrease indent | |
| Bulleted list | |
| Numbered list | |
| Select list item | holding press then |
| Select list items at current level | holding press then |
| Move to next text formatting change | holding press then |
| Move to previous text formatting change | holding press then |
| Move to next misspelling | |
| Move to previous misspelling | |
| Move and arrange objects | |
| Duplicate | |
| Group | |
| Ungroup | |
| Send backward | |
| Bring forward | |
| Send to back | |
| Bring to front | |
| Select next shape | |
| Select previous shape | |
| Nudge up, down, left, or right | |
| Nudge one pixel at a time | |
| Rotate counterclockwise by 1° | |
| Rotate clockwise by 1° | |
| Rotate counterclockwise by 15° | |
| Rotate clockwise by 15° | |
| Resize larger horizontally | |
| Resize larger vertically | |
| Resize smaller | |
| Resize larger | |
| Resize smaller horizontally | |
| Exit crop mode | |
| Suppress guides | Move with mouse |
| Duplicate | Move with mouse |
| Resize from center | Resize with mouse |
| Constrain to vertical or horizontal movements | Move with mouse |
| Constrain to object's aspect ratio | Resize with mouse |
| Constrain to 15° rotation increments | Rotate with mouse |
| Presenting | |
| Stop presenting | |
| Next | |
| Previous | |
| Go to specific slide (7 followed by Enter goes to slide 7) | |
| First slide | |
| Last slide | |
| Open speaker notes | |
| Open audience tools | |
| Toggle laser pointer | |
| Toggle captions (English only) | |
| Toggle full screen | |
| Show a blank black slide | or . |
| Return to the presentation from a blank black slide | Press any key |
| Show a blank white slide | or |
| Return to the presentation from a blank white slide | Press any key |
| Video Player | |
| Toggle play/pause | |
| Rewind 10 seconds | |
| Fast forward 10 seconds | |
| Previous frame (while paused) | |
| Next frame (while paused) | |
| Decrease playback rate | |
| Increase playback rate | |
| Seek to specific point in the video (Shift+7 advances to 70% of duration | |
| Toggle captions on/off | |
| Toggle full screen | |
| Toggle mute | |
| Screen reader support | |
| Verbalize selection | |
| Enable screen reader support | |
| Enable braille support | ⌘ |
| Verbalize from cursor location | |
| Announce formatting at cursor location | holding press then |
| Common actions | |
|---|---|
| New slide | |
| Duplicate slide | |
| Undo | |
| Redo | |
| Copy | |
| Cut | |
| Paste | |
| Copy formatting of the selected text or shape | |
| Paste formatting of the selected text or shape | |
| Insert or edit link | |
| Open link | |
| Delete | |
| Select all | |
| Select none | holding , press then |
| Find | |
| Find and replace | |
| Find again | |
| Find previous | |
| Open... | |
| Save | |
| Show common keyboard shortcuts | |
| Tool finder (formerly Search the menus) | |
| Hide or show menus (compact mode) | |
| Turn on captions while presenting | |
| Alt text | |
| Film strip actions | |
| Move focus to previous slide | |
| Move focus to next slide | |
| Move focus to first slide | |
| Move focus to last slide | |
| Extend selection to previous slide | |
| Extend selection to next slide | |
| Move slide up | |
| Move slide down | |
| Move slide to beginning | |
| Move slide to end | |
| Navigation | |
| Zoom in | |
| Zoom out | |
| Zoom 100% | |
| Move to filmstrip | |
| Move to canvas | |
| Open speaker notes panel | |
| Change to HTML view of presentation | |
| Open animations panel | |
| Continue in animation preview | |
| Open explore tool | |
| Define selected word in explore tool | |
| Go to side panel | |
| Open cell border selection (for tables) | holding , press then |
| Present slides | |
| Exit the current mode | |
| Context menu |
|
| File menu | |
| Edit menu | |
| View menu | |
| Insert menu | |
| Format menu | |
| Tools menu | |
| Help menu | |
| Accessibility menu | |
| Input tools menu | |
| Toggle input controls | |
| Comments | |
| Insert comment | |
| Enter current comment | |
| Move to next comment in the presentation | holding , press then |
| Move to previous comment in the presentation | holding , press then |
| When focus is on comment, move to next comment | |
| When focus is on comment, move to previous comment | |
| When focus is on comment, reply to comment | |
| When focus is on comment, resolve comment | |
| Open comment discussion thread | |
| Use keyboard shortcuts on selected comments | |
| Reply to current comment | R |
| Move to next comment | J |
| Move to previous comment | K |
| Resolve current comment | E |
| Exit current comment | U |
| Hide comment | |
| Text | |
| Bold | |
| Italic | |
| Underline | |
| Subscript | |
| Superscript | |
| Strikethrough | |
| Clear formatting | |
| Increase font size | |
| Decrease font size | |
| Right align | |
| Center align | |
| Justify | |
| Increase indent | |
| Decrease indent | |
| Bulleted list | |
| Numbered list | |
| Select list item | holding , press then |
| Select list items at current level | holding , press then |
| Move to next text formatting change | holding , press then |
| Move to previous text formatting change | holding , press then |
| Move to next misspelling | |
| Move to previous misspelling | |
| Move and arrange objects | |
| Duplicate | |
| Group | |
| Ungroup | |
| Send backward | |
| Bring forward | |
| Send to back | |
| Bring to front | |
| Select next shape | |
| Select previous shape | |
| Nudge up, down, left, or right | |
| Nudge one pixel at a time | |
| Rotate counterclockwise by 1° | |
| Rotate clockwise by 1° | |
| Rotate counterclockwise by 15° | |
| Rotate clockwise by 15° | |
| Resize larger horizontally | |
| Resize larger vertically | |
| Resize smaller | |
| Resize larger | |
| Resize smaller vertically | |
| Resize smaller horizontally | |
| Exit crop mode | |
| Duplicate | |
| Resize from center | |
| Constrain to vertical or horizontal movements | |
| Constrain to object's aspect ratio | |
| Constrain to 15° rotation increments | |
| Add to selection | |
| Presenting | |
| Stop presenting | |
| Next | |
| Previous | |
| Go to specific slide (7 followed by Enter goes to slide 7) | |
| First slide | |
| Last slide | |
| Open speaker notes | |
| Open audience tools | |
| Toggle laser pointer | |
| Toggle captions (English only) | |
| Toggle full screen | |
| Show a blank black slide | or |
| Return to the presentation from a blank black slide | Press any key |
| Show a blank white slide | or |
| Return to the presentation from a blank white slide | Press any key |
| Video Player | |
| Toggle play/pause | |
| Rewind 10 seconds | |
| Fast forward 10 seconds | |
| Previous frame (while paused) | |
| Next frame (while paused) | |
| Decrease playback rate | |
| Increase playback rate | |
| Seek to specific point in the video (Shift+7 advances to 70% of duration) | |
| Toggle captions on/off | |
| Toggle full screen | |
| Toggle mute | |
| Screen reader support | |
| Verbalize selection | |
| Enable screen reader support | |
| Enable braille support | |
| Verbalize from cursor location | |
| Announce formatting at cursor location | holding , press then |
Related articles
Learn more about Tool finder for Docs, Sheets & Slides
Need more help?
Try these next steps:.
Using Google products, like Google Docs, at work or school? Try powerful tips, tutorials, and templates. Learn to work on Office files without installing Office, create dynamic project plans and team calendars, auto-organize your inbox, and more.
IMAGES
COMMENTS
If you click the "Slideshow" button or press Ctrl/Cmd + F5, your presentation will start directly without any speaker notes. This is the most widely used and the simplest option. Next to the "Slideshow" button, there's a drop-down arrow. Click on it to see the different presentation modes: Presenter View.
On your browser, open a presentation in Google Slides. At the top right corner, click Slideshow . At the bottom left, click Options Enable pen tool. To draw or annotate, click and drag on your slide. Optional: To change the pen color, at the bottom, click Pen tool Select a color. To erase annotations on the current slide, at the bottom, click ...
Copy the share link (in the top, right hand corner of your Google Slideshow. Paste it into the address bar. Close to the end of the URL, you'll see the word "edit". Remove the word edit and replace it with "present". Copy the new URL, and share it with your students. When students open the URL, it will automatically open in present mode.
Begin by opening your Google Slides presentation. Click on the "Present" button to enter the full-screen mode. Step 2: Activate Presenter View: Navigate to the toolbar and select the "Presenter View" option. This will open a new window, transforming your primary screen into the presentation screen and providing a separate window with the ...
To resize the Presenter view window in Google Slides, hover your cursor over any of its corners or sides and wait for the double-sided white arrow to appear. Then click and drag to alter the window to your preferred size and shape. To move the window across your screen, click and hold the very top of the window.
How to finish a presentation in Google Slides. The Present mode toolbar is only accessible when you view a presentation in Present mode. To do this, click the white Present button in the top-right corner of your screen. Once your presentation has started, hover your mouse in the bottom-left corner of the screen to bring up the Present mode toolbar.
Start the Slideshow. As a refresher, you can start your Google Slides presentation in a couple of different ways. After opening your slideshow, click View > Present from the menu, or use the Present drop-down in the upper-right corner and choose "Present From Beginning." With your slideshow ready to go, move your cursor to the bottom-left ...
You can change the mode of a presentation to: Editing; Commenting; Viewing; How to switch view mode. Important: Your access level determines the modes available to you. To know which access level you have, go to Share files from Google Drive.. Editor access: The Editing, Commenting, and Viewing modes are available. Commenter access: The Commenting and Viewing modes are available.
View a presentation. On your Android device, open a presentation in the Google Slides app. At the top, tap Present Present on this device. To change slides, swipe left or right. To exit, tap the Back arrow . Present with Chromecast or Meet. You can present slides on your television with Google Cast, or in a video call with Google Meet.
Presentation modes. There are three different options when presenting your Google Slides presentation. To see these options and select the one you wish to use, go up to your screen's upper right corner, a tab labeled "Present.". You can also press Ctrl (Cmd) and F5 to open the most accessible, simplest presentation option.
Click Displays. Click Display Settings. Click on the laptop icon, then set "Use As" to Main Display. Click on the icon of the other screen, then set Use As to Extended Display. Click Done. Display Settings on a Mac. Now you are ready to position your presenter notes on the laptop screen and the slides on the extended display (i.e. the projector ...
Sharing your Google Slides in presentation mode is a simple process that can make all the difference in how your audience experiences your presentation. By following these steps, you can share your Google Slides in presentation mode: Click on the "Share" button; Under "General access," select "Anyone with the link" Click "Copy link"
Go to File > Publish to the Web in the menu. Choose either "Link" or "Embed" per your intent. Then use the Auto-Advance Slides drop-down box to choose the timing for the slides. Here again, you can pick from every second up to every minute. To loop the slideshow, check the box for Restart the Slideshow After the Last Slide.
Email or phone. Forgot email? Not your computer? Use a private browsing window to sign in. Learn more about using Guest mode. Access Google Slides with a personal Google account or Google Workspace account (for business use).
In a different Chrome window, open Google Meet and join a video meeting. At the bottom of the meeting screen, click Present now A Tab . You can either present from the Google Meet tab, or present directly from the Slides tab. Select the tab with the Slides presentation, then click Share. In Google Meet, at the bottom right of the screen, click ...
First, open the Slides app and the presentation you want to work on. Tap on the slide you want to add notes to, then choose Edit slide . Once the slide loads into the edit view, tap on the menu in the upper-right corner, then choose Show speaker notes. You'll then see a Tap to add speaker notes subwindow appear at the bottom of the screen.
It's easier than you might think. Step 1. Start by opening a new presentation! From the Google Slides homepage, look to the top left and click the Blank button to open a new presentation. This is your blank slate from which to create an outstanding interactive presentation! Step 2.
But you also have the option to use a blank slide to place items where you like. Step 1: To add a slide, do one of the following: Go to the Insert tab and choose New slide near the bottom. Go to ...
At the bottom of the meeting screen, click Present now A Tab . Select the tab with the Slides presentation, then click Share. In Google Meet, at the bottom right of the screen, click Start slideshow . Important: You can only control a presentation in Google Meet when you're in slideshow mode. Click to the next or previous slide with the arrow ...
You have a few convenient ways to open the Speaker Notes section below your slide as you create your presentation. Double-click the three dots at the bottom of the Google Slides window. Drag up using the three dots at the bottom to resize the Speaker Notes section as you please. Click View > Show Speaker Notes in the menu to select it.
Learn how to share slides in presentation mode on Google Classroom and get answers from other educators and experts.
Bring your presentations to life in Google Slides with enhancements like videos, animations, smooth transitions, and more. Get started with templates Choose from an array of high-quality pre-designed templates with different layouts, images, colors, and fonts.
Use keyboard shortcuts in Google Slides to navigate, format, and edit. Note: Some shortcuts might not work for all languages or keyboards. To open a list of keyboard shortcuts in Google Slides, press Ctrl + / (Windows, Chrome OS) or ⌘ + / (Mac).. Tool finder (formerly search the menus), press Alt + / (Windows, Chrome OS) or Option + / (Mac).. You can also use menu access keys.