Compress PowerPoint Files
Compress PowerPoint files online for free. Reduce file size of PPT/PPTX/PPTM documents, select the PPT file and click the upload button.
NEW TOOL Free Instagram Video Resizer
Do you like this website? Share it!

Encrypted Connection
Our website uses a secure HTTPS (SSL) connection so you can securely upload your files.
Compress Unlimited Files
Compress as many files you need, there are no limitations on how many files you can compress.
Works via Web Browser
Works on any platform that has a web browser, including Windows, Mac, Linux, iOS, Android.
No Software Installation
You don't need to install any additional software on your computer, our service is 100% cloud-based.
Uploaded Files Are Deleted
All uploaded and compressed files are automatically removed from our servers after a few hours.
Quality is Preserved
We do our best to reduce file size without quality loss and without reducing visual quality.
No Watermark Added
We guarantee you that we don't add any kind of watermark on files compressed with our service.
100% Free for Anyone
You can use our online file compressor for free, please share our website with your friends.
- PRO Courses Guides New Tech Help Pro Expert Videos About wikiHow Pro Upgrade Sign In
- EDIT Edit this Article
- EXPLORE Tech Help Pro About Us Random Article Quizzes Request a New Article Community Dashboard This Or That Game Happiness Hub Popular Categories Arts and Entertainment Artwork Books Movies Computers and Electronics Computers Phone Skills Technology Hacks Health Men's Health Mental Health Women's Health Relationships Dating Love Relationship Issues Hobbies and Crafts Crafts Drawing Games Education & Communication Communication Skills Personal Development Studying Personal Care and Style Fashion Hair Care Personal Hygiene Youth Personal Care School Stuff Dating All Categories Arts and Entertainment Finance and Business Home and Garden Relationship Quizzes Cars & Other Vehicles Food and Entertaining Personal Care and Style Sports and Fitness Computers and Electronics Health Pets and Animals Travel Education & Communication Hobbies and Crafts Philosophy and Religion Work World Family Life Holidays and Traditions Relationships Youth
- Browse Articles
- Learn Something New
- Quizzes Hot
- Happiness Hub
- This Or That Game
- Train Your Brain
- Explore More
- Support wikiHow
- About wikiHow
- Log in / Sign up
- Computers and Electronics
- Presentation Software
How to Reduce Powerpoint File Size
Last Updated: March 29, 2022
This article was co-authored by wikiHow staff writer, Jack Lloyd . Jack Lloyd is a Technology Writer and Editor for wikiHow. He has over two years of experience writing and editing technology-related articles. He is technology enthusiast and an English teacher. This article has been viewed 980,195 times. Learn more...
This wikiHow teaches you how to lower a PowerPoint presentation file's size by compressing its images on a Windows or Mac computer, or by clearing the editing data on a Windows computer. There is currently no option to delete the editing data of PowerPoint presentations on a Mac.
Compressing Images on Windows

- If your PowerPoint file isn't yet open, first open it by double-clicking it.
- It doesn't matter which picture you double-click, since all of them will open the appropriate tab.

Compressing Images on Mac

Removing Edit Data on Windows

Expert Q&A
- Using JPEG files rather than other file formats will cut down on your presentation's overall size. Thanks Helpful 0 Not Helpful 0
- When formulating a presentation, using the default plain backgrounds in your slides will make your file smaller than if you upload detailed backgrounds. Thanks Helpful 0 Not Helpful 0
- If you can't get your PowerPoint file to shrink down enough to send it via email, you can upload it to a cloud service (e.g., Google Drive) and send an email with a link to the file instead. Your recipient will be able to download the file from Google Drive. Thanks Helpful 0 Not Helpful 0

- Reducing your images' quality will make a noticeable difference in your PowerPoint's overall quality. Thanks Helpful 1 Not Helpful 1
You Might Also Like

- ↑ https://support.office.com/en-us/article/Reduce-your-file-size-631d1d48-a56b-4fd4-ad66-091dd201db10?ui=en-US&rs=en-US&ad=US&fromAR=1#bmpp
- ↑ http://www.isumsoft.com/it/reduce-powerpoint-file-size-in-office-2016/
About This Article

1. Double-click an image. 2. Click Compress Pictures . 3. Remove the check mark from “Apply only to this picture.” 4. Select a lower DPI. 5. Click OK . 6. Click File . 7. Click Options . 8. Click Advanced . 9. Click Discard editing data . 10. Click OK and save the file. Did this summary help you? Yes No
- Send fan mail to authors
Is this article up to date?

Featured Articles

Trending Articles

Watch Articles

- Terms of Use
- Privacy Policy
- Do Not Sell or Share My Info
- Not Selling Info
wikiHow Tech Help Pro:
Level up your tech skills and stay ahead of the curve
- Compress PDF
- PDF Converter
- Chat with PDF
- AI PDF Summarizer
- Translate PDF
- Delete PDF Pages
- Extract PDF Pages
- PDF Annotator
- Number Pages
- Watermark PDF
- PDF to Word
- PDF to Excel
- Word to PDF
- Excel to PDF
- Protect PDF
- Flatten PDF
- PDF Scanner
- How To Compress PDF
Compress PPT Presentations Online

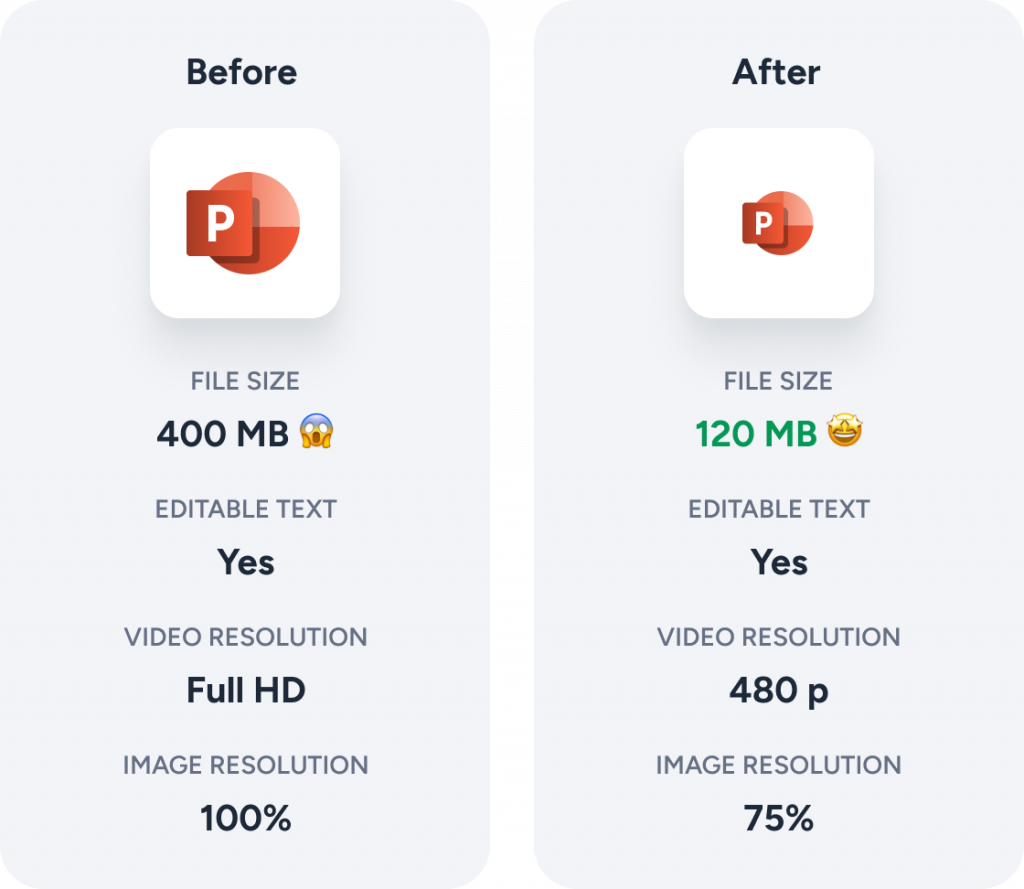
July 12, 2024 by Hung Nguyen
Learn how to reduce the size of your PPT files by more than half at no cost, using Smallpdf. No watermark, no registration, and no installation.
We’re well into the 21st century, but many email servers still have a 20–25 MB size limit for attachments. This isn’t an inconvenience when you’re sending or receiving simple documents or files. But it can be a severe impediment when you work on presentations and PPT files regularly.
Basic presentations of only a few text-based slides are rarely too large to send via email. But once you start adding charts and images to a PowerPoint presentation with more than 20 slides, the size can rapidly balloon past the email size cap.
Using the compression tools built into Windows and macOS might save you 1–2 MB. Cloud-based storage involves multiple steps for you and the recipient, and file transfer services usually require registration.
Smallpdf offers a simpler alternative that requires no registration and can reduce PowerPoint file size by more than half.
How To Compress a PPT File for Free
Upload your ppt to our compress tool ., choose “basic” once the compress panel appears., once compression is complete, select “export as” instead of “download.”, choose “powerpoint (.pptx),” and on the next screen select “convert selectable text only” and then the “convert” button., after conversion, you can download your document, share it, or save it..

Convert, compress, and download your PPT using Smallpdf
What Happens When We Compress PowerPoint Files
Smallpdf can compress PowerPoint files more effectively than zipping by first converting them to a PDF. During this process, our compressor looks for repeated patterns and data, replacing them with unique identifiers. This results in a much smaller file.
If what you wanted was a smaller PDF, you can download this once the conversion and compression are complete. But to reduce PowerPoint file size, the “Export As” option allows you to turn the PDF back into a PPT file. The layout remains unchanged, and all fields can still be edited in PowerPoint.
Once your file has been compressed and converted, you can either download it to your device, share a link to the file, or save it to your Dropbox or Google Drive account. If you have a Pro subscription, you can also save it to your Smallpdf storage.
One caveat is that compression can sometimes affect non-standard fonts, special characters, and emojis. To reduce the risk of any text in your presentation from being changed, you can embed the fonts used in your PowerPoint file.
- With your presentation open in PowerPoint, select “Preferences.”
- Select “Save” under “Output and Sharing.”
- In the panel that opens, check the “Embed fonts in the file” option.
Emojis are usually replaced by the “undefined” glyph—a rectangle with an X—during compression. If your presentation must include emoji, turn them into images first and add the image to your slides.
Other Measures to Reduce PowerPoint File Size
There are a few other steps you can take to make your PPT file smaller before compressing it.
Each high-resolution image in your presentation can add 2 MB or more to the file size. Instead of removing images essential to the presentation, try optimizing them first. This guide will take you through the steps to using our Compress tool on your images. Once you have compressed all your images, replace the high-resolution version with the optimized version.
You can also compress images using PowerPoint. Go to File and select “Compress Pictures”. This will give you a variety of options that you can experiment with to see what effect it has on the image quality and the file size.
Embedding videos in your presentation will also inflate the file size. Although Smallpdf can’t help with compressing video files, there are other online services that can. Alternatively, consider uploading the video to YouTube and then adding a link to it in the presentation.
Once you have finished compiling your PowerPoint presentation, run through all the slides again to ensure all unused slides and slide masters have been removed. You can reduce PowerPoint file size substantially by following these steps, and then you can use our Compress tool to make it even smaller.
Maintaining Quality and Formatting
Whenever you compress PowerPoint files, there is always some risk of losing quality. Text and vector graphics will remain clear with well-defined edges, but other images could end up with slightly blurred edges. Opting for Basic compression reduces this risk while still giving you a much smaller file. But always check the results before sending your file.

Our compression tool also retains the original formatting. You can still edit any text in your presentation, along with shifting, resizing, or removing individual images.
When uploading a file to our Compress tool, you’re uploading a copy. The original file is never removed from your device. So, if you are unhappy with any results, you still have the uncompressed original to work with.
Go Pro and Get More Done
Smallpdf is free to use, and you don’t need to create an account. However, you are limited to two downloads a day using any of our more than 20 tools . If you create a Smallpdf account, you unlock a 7-day free trial with unlimited downloads and access to other Pro features. You can also download our Windows app, allowing you to compress PowerPoint files, JPGs, and other file types offline. After 7 days, you can switch back to a free plan with limited downloads or subscribe to a Pro, Team, or Business plan.

Related articles

How To Translate PDF Files to Any Language for Free
Learn how to translate a full PDF online, or get a translated summary in seconds. In this guide, we’ll show you how to do both options for free.

How To Make a PDF Fillable
Learn how to create a fillable PDF from scratch or from an existing PDF. Get step-by-step guides using Word, Google Docs, Mac, and free online tools.

How To Make a PDF Editable | Smallpdf
Instantly convert PDF files to editable formats with Smallpdf, allowing you to add text, fill out PDF forms, and edit PDFs for free.
Compress PowerPoint File Online: Fast & Secure PPT Size Reduction
Reduce PowerPoint file size with our advanced PPT compressor effortlessly. Compress your presentations securely and quickly without compromising quality.
Related free tools
Delete Slides PPT
Quickly remove unwanted slides from your presentation
Remove Animations PPT
Eliminate all animations from slides with one click
Compress Images in PPT
Reduce image sizes within PowerPoint for smaller file sizes
PowerPoint presentations are vital for communication today. But as they get more complex, file sizes grow. This makes sharing and storing them a challenge. Our innovative online tool offers a solution to compress PowerPoint files efficiently and securely, all within your web browser – no software installation required.
Introducing Our Free PowerPoint Compression Tool
Our PPT compressor is a powerful, free online tool that can reduce PowerPoint file size by up to 90%. It keeps quality high and works right in your web browser, processing files locally on your device. This means it’s fast, secure, and efficient, unlike many other options.
Key Features:
- 100% Free: No hidden costs or premium versions
- Local processing: No need to upload files to external servers
- Rapid compression: Instantly begins to compress PPT files
- Secure: Your files never leave your device
- Efficient: Ability to reduce PPT file size in batches
- No file size limits: Compress even your largest presentations
- Multi-device access: Use on your computer, tablet, or smartphone
Key Takeaway: Our free online PPT compressor offers local processing on any device, ensuring fast, secure, and efficient compression of your PowerPoint files for storage and easy email sharing.
Why Choose Our PowerPoint Compressor?
When it comes to compressing PowerPoint files, our tool stands out from the crowd:
| Feature | ||
|---|---|---|
| Cost | Always free | Often require payment for full features |
| Processing Location | Your device | External servers |
| Speed | Instant start, rapid processing | Dependent on upload/download speeds |
| Security | Files stay on your device | Files uploaded to external servers |
| Efficiency | Compress multiple files at once | Often limited to single file processing |
| Compression Quality | Up to 90% size reduction | Varies |
| File Size Limit | No limit | Often restricted |
Benefits of using our online compressor tool:
- Easier File Sharing: Reduce file sizes to easily share presentations via email or messaging apps
- Save Storage Space: Compress PowerPoint files to free up space on your device or cloud storage
- Faster Upload Times: Smaller file sizes mean quicker uploads for online meetings or presentations
- Maintain Quality: Compress files without significantly compromising the quality of your presentations
- Batch Processing: Save time by compressing multiple PowerPoint files at once
Key Takeaway: Our free, local PPT compressor offers a faster, more secure, and more efficient way to reduce PowerPoint file size compared to online alternatives.
How to Reduce PowerPoint File Size Using Our Tool?

Follow these simple steps to compress PowerPoint files:
- Select Compression Level : Choose “Small Size”, “Balanced”, or “High Quality” based on your needs
- Choose Files : Drag and drop or choose the PowerPoint files you want to compress
- Start Compression : Our tool immediately begins processing
- Add More Files (Optional) : While compression is ongoing, you can add more files
- Download : Once complete, download your compressed files to your device
Pro Tip: For presentations with numerous high-resolution images, try the "Balanced" option first. It often provides the best compromise between file size and image quality.
Frequently Asked Questions
Try our free online PowerPoint compressor today and experience effortless file size reduction without compromising quality or security. Whether you need to compress PowerPoint files for easier sharing, save storage space, or speed up uploads for presentations, our tool makes it simple and efficient – all from the convenience of your web browser.

10 Ways to Compress PowerPoint Presentations to Reduce File Size

10 Strategies to Compress or Reduce the Size of Large PowerPoint Presentations
by Avantix Learning Team | Updated September 21, 2023
Applies to: Microsoft ® PowerPoint ® 2013, 2016, 2019 and 365 (Windows)
You can compress or reduce the size of large PowerPoint presentations in several ways. The most common strategy to reduce the size of a PowerPoint file is to compress pictures, video and audio. However, you can also use other methods to make files smaller including saving media and PowerPoint files in other formats and converting or removing embedded objects.
In this article, we'll look at 10 ways to compress or reduce the size of a PowerPoint presentation:
- Compress pictures
- Insert pictures instead of copying and pasting
- Use smaller image files
- Convert images to a different file type
- Save a copy of images with artistic effects
- Compress audio and video
- Link to audio or video files
- Convert Excel charts and other embedded objects
- Save a copy of large PowerPoint files
- Save a copy in PDF format
Note: Buttons and Ribbon tabs may display in a different way (with or without text) depending on your version of PowerPoint, the size of your screen and your Control Panel settings. For PowerPoint 365 users, Ribbon tabs may appear with different names. For example, the Picture Tools Format tab may appear as Picture Format.
To view file size in PowerPoint:
- Click the File tab in the Ribbon.
- Click Info. In the Properties area, file size is listed beside Size.

Once you've completed the following strategies, close and save the PowerPoint file, reopen it and check the file size again. You can also view file size in Windows 10 File Explorer or Windows Explorer in older versions of Windows.
Recommended article : How to Embed a YouTube Video in PowerPoint
Do you want to learn more about PowerPoint? Check out our virtual classroom or live classroom PowerPoint courses >
1. Compress pictures
One of the most common ways to reduce file size is to compress one or all of the pictures in your PowerPoint file. You may want to try this with one picture at a time to be sure you are satisfied with the result after compression.
To compress a picture:
- In Normal View, select a picture on image on a slide.
- Click the Picture Tools Format or Format Picture tab in the Ribbon.
- In the Adjust group, click Compress Pictures. A dialog box appears.
- Select the check box to Apply only to this picture if you want to compress only the current picture or uncheck this option if you wish to compress all pictures in the presentation.
- Select the check box to Delete cropped areas of pictures if you have cropped images and want to permanently delete the areas you have removed by cropping.
- Choose the desired document resolution.

Don't forget to check pictures in Slide Master View (click the View tab in the Ribbon and then click Slide Master) as you may want to compress or delete those images as well.
Also, be sure to check image(s) after you compress them to be sure to are satisfied with the quality of the image(s). If you create a copy of the presentation before compressing the image(s), you can revert to the original if necessary.
2. Insert pictures instead of copying and pasting
It's best to insert pictures, rather than copying and pasting (or dragging and dropping) into the PowerPoint file. When you copy and paste (or drag and drop) an image into a presentation, it can lose compression, change file type and also bring in other data that can increase file size.
To insert a picture onto a PowerPoint slide:
- In Normal View, display the slide where you want to insert a picture.
- Click the Insert tab in the Ribbon and click Pictures (2013 and later versions) or Picture (2010). You can also click the Pictures or Picture icon in a placeholder on a slide. A dialog box appears.
- Navigate to the location of the picture.
- Select the picture and click Insert or double-click the picture.
You also have the option of linking to a picture file by clicking the arrow beside Insert in the Insert Picture dialog box and then choosing Link to File. However, the picture is not actually "in" the file (which reduces file size) and if you email the document, the pictures will not be included. If you use this strategy, it's best to copy the picture to the same folder as the PowerPoint presentation and be sure to bring the entire folder with you when you deliver the presentation.
3. Use smaller image files
It's best to insert pictures in smaller sizes to reduce the size of your PowerPoint files. For example, if you are inserting pictures from a phone taken at a high resolution, this will result in larger PowerPoint decks. Create, save or send images at a lower resolution and insert the lower resolution images into your PowerPoint files.
If you're using stock images, select images at the lowest resolution (at the quality level you require). You can also open an image in an image editing program (such as Microsoft Picture Manager or Adobe Photoshop) and then save it at a lower resolution.
In PowerPoint 365, one of the biggest culprits causing inflated file size is 3D models. Although 3D models are not inserted as pictures but rather as 3D models, they are images. One 3D model we inserted took up 17 MB of space. You can't compress 3D models like other types of images so you may need to delete 3D models or use a picture instead of a 3D model if file size is an issue.
4. Convert images to a different file type
Prior to inserting an image in PowerPoint, you can open it in an image editing program (such as Microsoft Picture Manager or Adobe Photoshop) and then use Save As to save the image in another format.
The format that will result in the smallest size is usually JPEG (Joint Photographic Experts Group format) or JPG. The JPEG compression algorithm significantly reduces the file size of images.
You can also save images in PowerPoint in different formats:
- Right-click the picture. A drop-down menu appears.
- Select Save As Picture. A dialog box appears.
- Navigate to the folder where you want to save the image.
- Enter a name for the file and select a format such as JPG or PNG.
- Click Save.
- In the PowerPoint presentation, delete the original image.
- Click Insert and then click Picture(s).
- Navigate to the location with the image you saved.
- Double-click the image.
5. Save a copy of images with artistic effects
When you apply an artistic effect to an image, PowerPoint retains two copies of the image (the original and a copy with the artistic effects). This allows the user to reset the image but can significantly increase file size. Compressing pictures also doesn't normally have any effect on images where you have applied artistic effects.
If you have applied an artistic effect (such as blur) to an image, you can reduce file size using the following method:
- Right-click the image with the artistic effect. A drop-down menu appears.
- Enter a name and select a file type (usually JPG or PNG).
- In the PowerPoint presentation, delete the image with the artistic effect.
- Navigate to the location with the image you saved with the artistic effect.
6. Compress audio and video
In 2010 and later versions of PowerPoint, audio and video files are copied into presentations rather than linked to the original files. You can improve playback performance and reduce PowerPoint file size by compressing audio and video files in your presentation.
Files can be compressed at different quality levels.
In PowerPoint 2013 and 2016, you can compress to the following quality levels:
- Presentation Quality – select this option to save space but maintain overall audio and video quality.
- Internet Quality – select this option and quality will be comparable to media which is streamed over the web.
- Low Quality – select this option if space is limited, such as when you are sending presentations via e-mail.

In PowerPoint 2019 and 365, you can compress to the following quality levels:
- Full HD (1080p) – select this option to save space while maintaining overall audio and video quality.
- HD (720p) – select this option to save space and the quality will be comparable to media which is streamed over the Internet.
- Standard (480p) – select this option when space is limited, such as when you are sending presentations via e-mail.
The following compression options appear in PowerPoint 2019 or 365:

Note: Some older video file formats may not compress or export properly. Embedded subtitles and alternate audio tracks will be lost in the compression process.
To compress media in PowerPoint:
- Open the presentation that contains the audio or video files you want to compress.
- Save a copy of the presentation so you can retain a copy of the file with the original media.
- In the copy, click the File tab in the Ribbon.
- Click Info.
- In the Media Size and Performance area, click Compress Media. A dialog box appears.
- Select the desired compression option. A dialog box appears indicating that media compression is in progress. PowerPoint will indicate how much space is saved.
- When compression is complete, click Close.

7. Link to audio or video files
You also have the option of linking to audio or video files. When you insert an audio or video file, click the arrow beside Insert in the Insert dialog box and then choose Link to File. Linked audio or video is not actually "in" the presentation (which reduces file size) and if you email the presentation, the media files will not be included if you have linked to audio or video files. Linking was the default behavior in PowerPoint 2007 and earlier versions for video and larger audio files.
If you choose to link to audio or video files, t's best to copy the media files to the same folder as the PowerPoint presentation and be sure to bring the entire folder with you when you deliver the presentation.
Note: You cannot apply certain types of formatting to linked video files.
8. Convert Excel charts and other embedded objects
Embedded objects such as Excel charts or worksheets can also increase file size. If you convert embedded objects to images, it can impact the size or your presentation. You can also reduce file size by breaking links to Excel files.
If you want to convert embedded objects into pictures, you can ungroup them or cut and paste them back into PowerPoint.
To ungroup an object:
- Select the chart or embedded object.
- Click the Format tab in the Ribbon. This tab may appear as Drawing Tools Format, Drawing Format or Shape Format.
- Select Group and then Ungroup. A dialog box appears asking if you want to convert the object to a PowerPoint object.
To cut an object and paste it back into a presentation as a picture:
- Select the embedded chart or object.
- Press Ctrl + X to cut it.
- Click the Home tab in the Ribbon.
- Click the arrow below Paste to display the drop-down menu and then choose Paste Special.
- Select an image type (such as JPEG) and click OK.

If you have links to Excel files, you can reduce file size using Edit Links to Files. Check out How to Break, Update or Change Links to Excel Charts or Worksheets in PowerPoint for more information on how to break links.
9. Save a copy of large PowerPoint files
It's a good idea to save a copy of a large PowerPoint files periodically using Save As and give the file a different name (i.e. Sales Presentation and the date). If you save a copy using Save As, version history and some editing data is removed during the process and this will reduce file size. This can also help avoid corrupted files.
To save a copy of a PowerPoint presentation:
- Choose Save As. If necessary, click Options or More Options. A dialog box appears.
- Navigate to the desired location.
- Enter a new name for the presentation.
10. Save a copy in PDF format
It's also common to save a copy of a presentation as a PDF (portable document format) file to reduce the size and then share it with others. You can compress images during the process.
To save a PowerPoint presentation as a PDF (and compress images):
- Choose Save As and then click Options or More Options if necessary. A dialog box appears.
- Navigate to the desired location and enter a name for the file. You can use the same name since the extension will be different (PDF).
- Under File Type, select PDF.
- Click Tools on the bottom right of the dialog box. A drop-down menu appears.
- Select Compress Pictures. A dialog box appears.
- Click the desired compression option.
Large file size is a common problem in PowerPoint and you can use these strategies to reduce the size of your PowerPoint presentations. Compressing the size of your decks should also help to improve speed and avoid crashes.
This article was originally published on November 6, 2016 and has been updated for clarity and content.
Subscribe to get more articles like this one
Did you find this article helpful? If you would like to receive new articles, JOIN our email list.
More resources
How to Change Slide Size in PowerPoint
How to Get Slide Design Ideas Using PowerPoint Designer
How to Morph in PowerPoint to Design Engaging Presentations
How to Break, Update or Change Links to Excel Charts or Worksheets in PowerPoint
Where to Find Free Images for Your PowerPoint Presentations (10 Great Stock Photo Sites)
Related courses
Microsoft PowerPoint: Introduction
Microsoft PowerPoint: Intermediate / Advanced
Microsoft PowerPoint: Design for Non-Designers
Microsoft PowerPoint: Accessible PowerPoint Presentations
Microsoft PowerPoint: Animations Bootcamp
VIEW MORE COURSES >
To request this page in an alternate format, contact us.
Our instructor-led courses are delivered in virtual classroom format or at our downtown Toronto location at 18 King Street East, Suite 1400, Toronto, Ontario, Canada (some in-person classroom courses may also be delivered at an alternate downtown Toronto location). Contact us at [email protected] if you'd like to arrange custom instructor-led virtual classroom or onsite training on a date that's convenient for you.
Copyright 2024 Avantix ® Learning
You may also like

How to Insert or Type E with an Accent Mark in PowerPoint (È, É, Ê, Ë, è, é, ê, or ë)
You can insert or type e with an accent mark in PowerPoint using built-in tools or keyboard shortcuts (including Alt code shortcuts). The letter e can be inserted with an accent in both upper or lower case in text boxes or placeholders on slides, the slide master or layouts. The following are common accents in upper or lower case – È, É, Ê, Ë, è, é, ê, or ë.

How to Fade a Picture or Part of a Picture in PowerPoint (Using a Gradient)
You can fade a picture in PowerPoint by drawing a rectangle shape on top of the picture and then filling the rectangle with a gradient from opaque to transparent. This technique is often used to fade an image into the background of a slide. Since the rectangle is placed on top of the image and then text may be placed on top of the rectangle, you may need to reorder the objects.

How to Lock an Image, Shape or Other Object in PowerPoint
You can now lock an image, shape or other object in PowerPoint. Objects can be locked in Normal View or Slide Master View. Only PowerPoint 365 users can lock objects to prevent moving and resizing. This is helpful if you want to select and move other objects on the slide or prevent others from moving or resizing an object. You can lock items using the context menu or the Selection Pane.
Microsoft, the Microsoft logo, Microsoft Office and related Microsoft applications and logos are registered trademarks of Microsoft Corporation in Canada, US and other countries. All other trademarks are the property of the registered owners.
Avantix Learning |18 King Street East, Suite 1400, Toronto, Ontario, Canada M5C 1C4 | Contact us at [email protected]
Our Courses
Avantix Learning courses are offered online in virtual classroom format or as in-person classroom training. Our hands-on, instructor-led courses are available both as public scheduled courses or on demand as a custom training solution.
All Avantix Learning courses include a comprehensive course manual including tips, tricks and shortcuts as well as sample and exercise files.
VIEW COURSES >
Contact us at [email protected] for more information about any of our courses or to arrange custom training.
Privacy Overview
Pin it on pinterest.
- Print Friendly
- Summarize PowerPoints with AI
- Summarize Word documents with AI
- Summarize PDF with AI
- Generate PowerPoints with AI from text
- Create Presentation with AI
- Create Presentations with AI from PDF
- GPT for Presentations
- Create Presentations from Website with AI
- Chat with Document Groups
- Import files from Cloud
- Request Demo
Compress PowerPoint files
Use our PowerPoint compressor to shrink the size of your PowerPoint file.
Compress PowerPoint files with 1 click
Reduce the size of your PowerPoint files online with our FREE PowerPoint compressor. Easily compress PowerPoint files for email and more.
By using our compression tool you can reduce the size of your PowerPoint presentation by up to 90%. Try it now, it’s FREE.
Why our PowerPoint Compressor?
Our free PowerPoint compressor is super fast and has almost no limitations. Used another compression tool with success? Try our tool!
Compress PowerPoints quickly
We use the latest technology to compress your PowerPoint presentation. Want to email a presentation and it's too big? We got you covered. Simply upload your file and we will reduce the file size by up to 90%.
Secure Online PPT Compressor
SlideSpeak takes data security and privacy very seriously. That's why all PowerPoint presentations are stored fully encrypted. We never share any data with 3rd parties. You can take our word for it.
Frequently Asked Questions
Ai generate presentations and summaries..
Summarize and generate PowerPoint files with ChatGPT. Upload, chat, and gain new insights from your presentations. Use SlideSpeak AI to boost your productivity.
- Help Center
- Affiliate Program 💵
- Call us: +1 (512) 777-1759
- Compress PowerPoint
- Convert PowerPoint to PDF
- Convert PowerPoint to PSD
- Convert PowerPoint to Figma
- Convert PDF to Word
- Extract Images from PowerPoint
- Extract Images from Word
- Extract Images from PDF
- Terms of Service
- Refund Policy
Compress PPT Files
Here you can compress PowerPoint PPT, PPTX, PPTM and ODG files online and reduce their file size of up to 90% the original size. Just select the PowerPoint file (max 50MB) to compress and wait.
Best Online PowerPoint Compressor
compress all your files.
There is no limit in the number of files you can compress with our service (use it ethically!).
From Any Web Browser
This service works from any modern web browser, such as Gogole Chrome, Mozilla Firefox, etc.
Online File Compression
You do not need to install any software or addon to compress files, all is done in the cloud.
All Files Are Deleted
Both uploaded and compressed files are removed from our servers after approximately 6 hours.
Nothing to Configure
It is super easy to use our service, you just need to select the file you want to compress.
Quality is Preserved
We use the smartest settings to keep a good visual quality when compressing the file.
Without Watermark
Compressed files do not contain any watermark... yes you got it right: we don't add watermark!
Totally Free to Use
You don't have to pay a single cent (or penny?) to compress files online with our service.
Contact Details
Do you have questions about this service? That's good, you can contact us via email. If you don't receive a reply within one or two business days, please send again the message. We receive a lot of junk messages and your email may be automatically blocked by the anti-spam filter in some cases.
Here is our email address (it is an image):
Home Blog PowerPoint Tutorials How to Compress PowerPoint Presentations
How to Compress PowerPoint Presentations

Many users, when sharing PowerPoint files via email, can end up realizing that the file is too big to be sent via their email service provider because of its excessive file size. While there are many third-party apps that enable sending large files via sharing links, not only can they be less secure to use for confidential documents, but the files might take a while to download by the recipient due to the heavy file size. therefore, Compressing a PowerPoint presentation can help you avoid such issues.
Compress a PowerPoint Presentation File
There are different methods by which you can compress a PowerPoint file and elements within the file to reduce the file size and make your slide deck more manageable.
1. Compress Images in PowerPoint
The most common method to reduce the file size of a PowerPoint presentation is to compress slide images. This method is also quite useful if you’re wondering how to compress a ppt file for email since it provides the option to reduce the images down to a very low resolution of 96 PPI, which is usually sufficient to make the presentation small enough for an email attachment.
To compress one or more images in PowerPoint, select an image from the presentation, go to the Picture Format tab, and select Compress Picture from the Adjust menu.

From the dialog box that appears, you can choose various compression options. If you want only to compress the selected image, check Apply only to this picture checkbox.
The compression options available from the given dialog box can be used to reduce the size of the current or all images in the presentation file for print (220 PPI), web (150 PPI), and email (96 PPI), or you can choose the default resolution.

2. Compress Video and Audio in PowerPoint
Video and audio files can take up a lot of space and make PowerPoint presentations difficult to manage due to their large file size. If you have media files added to PowerPoint that are heavy, your presentation might also lag in SlideShow mode.
To compress video and audio files in PowerPoint, go to File > Info > Compress Media . Select a lower resolution of the media files from the drop-down menu to reduce their file size.

This will shrink the PowerPoint file size and reduce the file size for video and audio files, with information regarding how much the files were compressed.

You can play to preview the media files to ensure the quality of the converted media files is satisfactory. Suppose you aren’t satisfied with the compression quality and reduced file size.
In that case, you can also compress the media files using third-party tools, including online converters like CloudConvert and ZamZar or media file conversion apps like HandBrake, Xilisoft audio/video converter, Freemake audio/video converter, etc.

It is also important to note that if you use audio in your presentations, MP3 files typically compress the audio more than WAV files. To reduce the file size of your presentations with audio, consider inserting MP3 audio files into your presentation, over the WAV format. Check out our article how to add audio to PowerPoint presentations to learn more about the available audio formats.
3. Remove Heavy Graphics and Slide Elements
Another easy method to compress PowerPoint and shrink its size is to remove unwanted elements to reduce the file size. You can either do this directly from slides or edit the layouts of the deck via View > Slide Master .

4. Replace Media Files with Links and Embedded Content
You can also replace certain files that might be making your slides heavy. Embedding the media files directly via online sources like YouTube or by adding links to media instead of embedding files in your presentation will significantly reduce file size.

5. Convert PowerPoint File Type to Compress File Size (E.g. Export to PDF)
If you don’t need to present your slides as a PowerPoint file, Converting PowerPoint presentations to a different format, such as PDF, can compress the file size. This will also remove media files such as audio and video files that you can instead add as a clickable link for the recipient prior to conversion. This process could also shrink PowerPoint file size. Learn how to save a PowerPoint presentations to PDF .

6. Compress a PowerPoint File using a File Compression Format
To share a PowerPoint file online in a compressed format, you can convert it to a ZIP file or use a number of formats supported by your operating system or third-party apps such as RAR, 7z, GZIP, TAR, XZ, WIM, etc. The compression feature is often integrated via the right-click context menu or long tap for mobile operating systems.
Some of the most famous tools known to provide a high file compression ratio and various security features for file compression include 7-Zip, WinRAR, WinZIP, PeaZip, etc.

Compressing your PowerPoint presentation can help reduce the file size, making it easier to share via email, improve loading times, and reduce storage space. It also ensures that the recipient can quickly download and access the presentation.
The most common method is to compress the images in your presentation: – Select an image in your presentation. – Go to the Picture Format tab. – Click on Compress Pictures in the Adjust group. – Choose the desired compression options (e.g., for print, web, or email).
If the media quality is unsatisfactory, you can compress the media files separately before adding them back to your presentation using third-party tools. Tools like HandBrake, Xilisoft, and Freemake can help you achieve better compression results.
To reduce the file size by removing unnecessary elements: – Review each slide and identify heavy graphics, images, and other elements that can be removed or simplified. – Use the Slide Master view to make global changes to the slide layouts, reducing the number of heavy elements across all slides.
Yes, you can replace media files with links to online sources or embed content directly from websites like YouTube. This reduces the file size significantly by not storing large media files within the presentation.
You can convert your PowerPoint presentation to a PDF: – Go to File > Save As. – Choose PDF from the file format options. – Save the file. This will remove media files and significantly reduce the file size.
Yes, you can use file compression tools like 7-Zip, WinRAR, or WinZIP: – Right-click on the PowerPoint file. – Select Send to > Compressed (zipped) folder. – Alternatively, use third-party tools to compress the file into ZIP, RAR, or 7z formats.
The potential downsides include: – Loss of media quality due to compression. – Incompatibility issues if the recipient does not have the required software to decompress the file. – Reduced functionality if converting to a different format like PDF, as interactive elements may be lost.
To work with full compatibility: – Use common compression formats like ZIP. – Provide instructions or links to software if using less common formats like RAR or 7z. – Consider sharing a link to an online version of the presentation if possible.
Compressing PowerPoint files can have pros and cons, including loss of media quality or inability of the recipient to open the file if it’s in a compression format that requires a specific app that he/she might not have. Therefore, you should pick a mode of compression that is convenient enough for you and the recipient of the file.
Like this article? Please share
Business Presentations, Presentation Tips Filed under PowerPoint Tutorials
Related Articles

Filed under Business • August 8th, 2024
How to Create Engaging and Persuasive Proposal Presentations
Secure your business deals and build your brand’s reputation by mastering the art of proposal presentations. Tips and recommended PPT templates included.

Filed under Google Slides Tutorials • August 6th, 2024
How to Use Google Slides Strikethrough Text
Customize your presentation slides by using Google Slides strikethrough and add a factor of humor, emphasize, or track changes in a truly visual method.

Filed under Presentation Ideas • July 17th, 2024
How to Convert a Text Document into a Presentation with AI
One of the biggest challenges for presenters is to summarize content from lengthy reports, academic papers, or any other kind of written media in an informative and concise way. Rather than losing countless hours going over and over the same text, we can speed up the process thanks to the virtues of artificial intelligence. In […]
Leave a Reply
How to compress a PowerPoint file so that it loads faster and doesn't take up as much space
- You can easily compress a PowerPoint file's size, which makes it easier to share and save.
- When you compress your PowerPoint, you'll have to reduce the quality of any music, videos, or pictures you have in your slideshow.
- Once you've compressed your PowerPoint, it will load faster, but the media in it may not look as good.
- Visit Business Insider's Tech Reference library for more stories .
At some point in your slideshow-creating life, you've probably saved a PowerPoint presentation and realized that the file size is entirely too large.
Larger file sizes make PowerPoints more difficult to send and save, and they also make each slide take longer to load.
One of the easiest ways to quickly reduce a PowerPoint presentation's file size is to compress it. When you compress a PowerPoint, you'll reduce the quality and size of every media file in the presentation. This includes videos, audio clips, animations, and photos.
If you compress them down to an appropriate size, your file size will be much smaller. However, your photos, videos, and other media probably won't look or sound as sharp.
Here's how to compress your media files in PowerPoint on a Mac or PC.
Check out the products mentioned in this article:
Apple macbook pro (from $1,299.00 at apple), acer chromebook 15 (from $179.99 at walmart), how to compress a powerpoint file on a pc.
1. In the ribbon or menu bar at the top of the screen, click "File." Make sure that "Info" is selected in the left sidebar.
2. Click "Compress Media." Depending on whether your version of PowerPoint was made before or after 2016, this button will either be next to the label "Multimedia" or "Media Size and Performance."
3. Choose one of the three options for media quality from the dropdown menu. These will differ based on which version you have as well, but they boil down to:
- Select the highest quality option if you want to maintain high quality media for in-person presentations.
- Select the middle option for quality akin to media found on the internet.
- Select the lowest quality option if your file needs to be as compressed as much as possible — for example, if you need to send it via email.
How to compress a PowerPoint file on a Mac
In the Mac version of PowerPoint, you can only reduce the file size of images, not videos or music.
To do this:
1. Open your PowerPoint slideshow and click "File" in the menu bar at the top of the screen. If you only want to compress specific images, select them before clicking "File."
2. In the dropdown menu, click "Compress Pictures..."
3. You'll be shown a "Compression Table," which lists all the different ways you can compress the file. You'll have three main options:
- "Printing" will keep your pictures at the highest quality possible.
- "Viewing on screen" will reduce the quality of your pictures by about 30 percent.
- "Sending in an e-mail message" will compress them by another 30 percent or so.
You can also pick the fourth and last option, which will keep each picture's current resolution, but try to reduce the file size in other areas.
4. Select whether you'd like to delete parts of your pictures that have been cropped out — doing so will help reduce the file size.
5. Choose whether you'd like to compress every picture in the slideshow, or just the ones that you selected beforehand. Once you've decided, click "OK."
Related coverage from Tech Reference :
How to add a border to slides in powerpoint, and give your slideshow a sleek design, how to embed a youtube video into your microsoft powerpoint presentations using a mac or pc, how to convert google slides to a powerpoint presentation in 4 easy steps, how to convert a powerpoint to google slides in 2 different ways, how to copy or duplicate a powerpoint slide and put it anywhere in your slideshow.
Insider Inc. receives a commission when you buy through our links.
Watch: The coolest gadgets we saw at CES 2018
- Main content
How to Reduce the File Size of Your PowerPoint Presentation

Your changes have been saved
Email is sent
Email has already been sent
Please verify your email address.
You’ve reached your account maximum for followed topics.
Make Your Excel Spreadsheets Smarter With Dropdown Lists
These photography rules leveled up my smartphone photos, why i prefer shooting street photography on my smartphone over a dslr.
A PowerPoint Presentation is a great way to get an idea across. Whether you're pitching a product or teaching kids, you'll find slideshows helpful.
However, if your presentation is long, or you have many visuals, you might find that your PowerPoint file has become too large. That makes it difficult to attach it as an attachment. And it could even take too long to download for your clients.
To solve this problem, here are seven tips to reduce your presentation file size.
1. Use Insert Picture—Don't Drag and Drop

When you want to add a photograph from your hard drive to your presentation, the easiest and most common way is to copy it off File Explorer and paste it onto PowerPoint. Alternatively, you can also drag and drop it from your folder to your slideshow.
However, doing this potentially increases your presentation's file size. That's because when you copy-paste or drag-and-drop a file directly into PowerPoint, it converts your image to either a BMP or PNG file type.
Although these file types allow you to retain transparent backgrounds, like the ones you find in icons, they also increase your photo's file size. But if you use the Insert Picture function, PowerPoint will add your image without changing its file type, thus avoiding larger file sizes.
2. Crop Photos With an Image Editor

There are times when you don't have to use the entire image you just added. You may want to remove a section to make it more impactful. But if you do that, don't crop it using PowerPoint's built-in cropping tool.
When you crop an image inside PowerPoint, the app will simply hide the part of the image you cut out. Although this is helpful if you want to undo the crop you made in the future, if you're final with the cut you made, this just adds to your presentation's file size.
Instead of cropping images in PowerPoint, you can use dedicated image editors. You can use Microsoft's built-in Paint app for simple crops, or you can use free online tools, like Canva. Once you've cropped your photo to your liking, you can then use the Insert Picture tool to add it to your presentation.
Related: How to Use the Canva App: A Beginner's Guide
Remember to save your file as JPG or JPEG, not PNG or BMP. JPG files provide the most compression on your images while retaining reasonable quality. This way, you get to save a few more kilobytes per photo. This adds up to a lot of space when you have many pictures.
3. Edit Images Outside PowerPoint

Building upon the previous point, you should edit your photos using an image editor instead of PowerPoint. While the app does provide relatively advanced photo editing tools, it's still not as powerful as dedicated photo editing software.
You can use Microsoft's built-in basic photo editing function to edit your image. Alternatively, there are several easy-to-use photo editing software to give you advanced edits while remaining simple to use.
You should do this because PowerPoint retains all your photo's information. For example, if you convert an image from colored to black and white, the app will still keep all the color information of your file, thus making it larger. But if you convert it using an image editor, all color information is lost once you save the file, thus making it smaller.
4. Compress Your Pictures

Even if you've done all the above, there is still a way to reduce your presentation's file size further. You can do that by optimizing all your slideshow images for the screen size you expect to show your presentation.
This is because PowerPoint tends to keep your images at the maximum allowable quality. After all, the app is preparing your slideshow for all types of display sizes. It's even considering that you're going to print it. That's why it keeps your photos at the best possible quality.
And while this is a good thing, it does add a lot of size to your presentation. That's why you need to optimize your file for your intended audience.
To do that, click on any image in your slideshow. Then, in the menu ribbon, select Picture Format . Press the Compress Pictures button, and a Compress Pictures window will pop up. Under Compression options: remove the tick mark for Apply only to this picture to compress all images.
Under Resolution: , pick the appropriate points per inch (PPI) for your application. If your presentation is for personal consumption—i.e., for viewing on smartphones, tablets, and computer monitors only—then a 96 PPI resolution is enough.
But if you plan to display it on a medium-sized projector or a screen larger than 50 inches, then you should choose 150 PPI. If you're planning to print your presentation as a handout, then go for 220 PPI. Finally, if you're going to use a large-format projector or LED screen board, go for 330 PPI.
5. Link Videos

Videos are the most significant items in your presentation that will bloat its file size. A typical 1-minute full HD video has an approximate 124MB file size. So instead of embedding your videos into your PowerPoint file, you can link them instead.
Upload your videos on a video hosting website like YouTube, then just link it into your slideshow. Once you've uploaded the video, don't forget to copy its web address to add it to your presentation.
To add it to your slideshow, go to Insert on the menu ribbon, click on Video , and in the dropdown menu, choose Online Videos… . A new window will pop up and in the Enter the address for the online video bar, paste your video link.
Once your selected video has loaded, you'll see a preview of it on the main screen. If you're satisfied that it's the correct video, click on Insert . You will now find your video embedded into your slideshow.
You have to note, though, that your viewer or audience must have an active internet connection for them to see your embedded video. Otherwise, they won't be able to see it.
6. Use the Latest Formats

If you're using the latest version of Microsoft Office, it's best to use the latest file formats. The old file format called PPT, designed for Microsoft Office 2003 and older, uses up more space than the newer PPTX file format.
While older versions of PowerPoint may not be able to open your file, the smaller file size means your presentation would fit in your email as an attachment. Furthermore, those who don't have the latest version of PowerPoint can instead use Microsoft Office Online, or even Google Slides, to view your presentation.

As a last resort, you can compress your presentation's file to reduce its size. You can use several free tools to do just that . They're also widely popular, so your recipient won't have much trouble decompressing your file.
Save on Space
If your PowerPoint presentation is too large to attach to your email, you can reduce its size by following the above steps. They're simple, quick, and easy to do. And if in case you find your presentation's file size bigger than your allocated limits, you still have a couple more solutions.
The first one is to upload it onto the cloud and just share the file's link with your recipient. The second is to cut your presentation into two and then send them in two separate emails. Be sure to add a slide to your first file indicating there's a part two!
But no matter what you choose, reducing your file's size should be the last thing on your mind. Focus on your content and make it your best presentation ever first. All the other things you need to do will soon fall into place once you've finalized your output.
- Productivity
- Microsoft PowerPoint
- Presentations

Compress your media files
You can improve playback performance and save disk space by compressing your media files.
(This feature is available in PowerPoint for Windows, but not on PowerPoint for Mac or PowerPoint for the web.)
Open the presentation that contains the audio or video files.
On the File tab, select Info , and then in the Multimedia section, select Compress Media *.
* Embedded subtitles and alternate audio tracks are lost in this compression process.

To specify the quality of the video, which in turn, determines the size of the video, select one of the following:
Full HD (1080p) Save space while maintaining overall audio and video quality.
HD (720p) Quality will be comparable to media which is streamed over the Internet.
Standard (480p) Use when space is limited, such as when you are sending presentations via e-mail.

Figure: Media compression in progress
On the File tab, select Info , and then in the Media Size and Performance section, select Compress Media *.

Presentation Quality Save space while maintaining overall audio and video quality.
Internet Quality Quality will be comparable to media which is streamed over the Internet.
Low Quality Use when space is limited, such as when you are sending presentations via e-mail.

Important: Certain older video file formats may not compress or export properly in Office on a Windows RT PC. Instead, use modern media formats such as H.264 and Advanced Audio Coding (AAC), which PowerPoint 2013 RT supports. Want to know what version of Office you’re using?
Check the following article to know more about Tips for improving audio and video playback and compatibility .

Need more help?
Want more options.
Explore subscription benefits, browse training courses, learn how to secure your device, and more.

Microsoft 365 subscription benefits

Microsoft 365 training

Microsoft security

Accessibility center
Communities help you ask and answer questions, give feedback, and hear from experts with rich knowledge.

Ask the Microsoft Community

Microsoft Tech Community

Windows Insiders
Microsoft 365 Insiders
Online PPT Compressor
Compress powerpoint presentations instantly online., powered by aspose.com and aspose.cloud ., * by uploading your files or using our service you agree with our terms of service and privacy policy ..
| Service | Free | Free (registered users) | Premium | Business |
|---|---|---|---|---|
| File Size Limit | 5 Mb | 10 Mb | 50 Mb | Custom |
| Batch Files Max Count | 5 | 10 | 100 | Custom |
| Uses Per Day | 5 | 10 | Unlimited | Custom |
| Send Results via Email | ||||
| Instant Download Results | ||||
| Ad-Free App Experience | ||||
| Dropbox & Google Drive Integration |
Send the download link to
Press Ctrl + D to store it in your bookmarks in order not to search it again
We've already processed ??? files with total size of ??? Mbytes.

How to Compress PowerPoint Presentations
- Upload your PowerPoint file. Select and upload your PPT file.
- Wait for compression to end.
- Download or Share. Download the compressed file or share it directly via email or cloud storage.
Compress large PPT files online with our free tool. Maintain high-quality visuals and reduce file size. Ideal for email attachments and storage optimization. Supports PPT, PPTX, and ODP formats.

Features of Aspose.Slides Compressor
- High-quality PPT compression
- Supports all PowerPoint file formats
- Accessible on all devices, including mobile
- Free and easy-to-use online tool
- Batch compression of multiple PPT files
- How to perform PPT compress online? Use our PPT Compressor by Aspose.Slides. It's free and user-friendly.
- Is there a way to perform PPT compress for free? Yes. Use our online Aspose.Slides PPT Compressor for quick and free compression.
- Is the quality of the presentation preserved during compression? Yes, our PPT Compressor ensures maximum quality retention.
- Can I use the PPT Compressor on my mobile device? Yes, our tool is accessible via any web browser, including on mobile devices.
Fast and Efficient
Universal Accessibility
Trusted Quality
Oops an error has occurred., error has been reported successfully..
You have successfully reported the error, You will get the notification email when error is fixed. Click this link to visit the forums.
� Aspose Pty Ltd 2001-2022. All Rights Reserved.
Blog > Compress PowerPoint to reduce the file size
Compress PowerPoint to reduce the file size
02.12.20 • #powerpointtips.
Sometimes, the file size of your PowerPoint presentation can get very big. In some cases, that can be annoying, e.g. when trying to send the slides via email, but not being able to do so because the file is too large. Usually, pictures and videos are the reason why presentations become too big. The good news are that you can easily compress pictures and embedded media files by following the steps listed below.
Compress images
Compress videos and audios.
- Convert PPT into a PDF file
- Get rid of 3D-models
Compress PPT as ZIP- file
PowerPoint offers the option to compress all images at once or choose single pictures to reduce their file size. Keep in mind, that compressing an image will automatically reduce its quality as well. If you don't need to reduce the file size, better use the highest quality resolution as possible.
There are two ways to compress images within your PPT file which nearly work the same way:
Compress selected pictures
- Select the image you want to compress or any picture if you wish to reduce the size of all graphics
- Navigate to the Picture Tools Format tab and select Compress Pictures

- A new menu pops up. Choose your compression options and make sure to check "Delete cropped areas of pictures" and uncheck "Apply only to this picture" (if you want to compress all images)
- High fidelity: preserves quality of the original picture
- HD (330 ppi): good quality for high-definition (HD) displays
- Print (220 ppi): excellent quality on most printers and screens
- Web (150 ppi): good for web pages and projectors
- E-mail (96 ppi): minimize document size for sharing
- Use default resolution
Compress all images while saving the PPT file
- Open your presentation. Go to File in the PowerPoint menu
- Click Save as and then Browse
- In the window that opens, click on Tools (right beside Save )
- Select Compress Pictures and choose the resolution you need To save even more space, you can additionally choose Delete cropped areas of pictures to remove the parts of pictures which you cropped in PowerPoint.
- Click OK and then Save

Video and audio files can increase your PPT size a lot. It's a good idea to compress those if you want to make some space. Some PowerPoint versions make it possible to decrease the media size in PPT but if this option is missing in your program, online video compressors are the solution.
Compress videos and audios in PPT
- Go to File in the PowerPoint menu
- Open the Compress media drop down
- Choose a compression file size. Don't reduce the quality too much and check if the appearance of your media doesn't look too grainy on the actual projector you will be presenting on

Online video compressor
There are plenty of online video compressors which you can use to reduce the video size in advance. For example, the website FreeConvert makes it easy to decrease the file size without having to download anything. This way you can integrate a smaller media file into PPT.

Links instead of videos
Instead of importing a video to your PPT slides, including a link to your PowerPoint presentation can save a lot of space. If your video is somewhere on YouTube or other online video-sharing platforms, include a link and use it when you're presenting. But notice: a link can only be used, if you're connected with wifi. Watching videos online, can take time and a bad connection might give you some unwanted breaks during your presentation. In this case, saving the video on your disk and opening it separately can save time and still reduce the size of the PPT.

Convert PPT to PDF
By converting a PowerPoint file into a PDF, the size will reduce automatically. During the process, images get compressed and some media (audio, videos, 3D models..) get removed. If you want to change the PowerPoint slides at all time, this method might not be the right one for you, as PDF files can't get edited the way a PowerPoint can. Hence, converting PPT into PDF only makes sense if your presentation will work as a handout and if the PDF files options are enough for you.
- Click Export
- Hit the Create PDF/XPS button
- Choose a location in which you want to save your PDF file
- Click Publish

Get rid of 3D models
The Office 365 subscription makes it possible to add 3D models to your PowerPoint slides. Nevertheless, those media require much space since they transport a lot of information. In order to minimize the PPT file, exchanging the 3D model with a normal image will easily reduce the size of your PowerPoint file.

If you need to share your PPT with someone, a ZIP- file format might help you to reduce the size of the PowerPoint. Even though, this method can save some place temporally, it might not be enough to send it via email. Uploading it to file-sharing platforms, such as GoogleDrive, DropBox, OneDrive or other websites and sharing its link to download the PPT, can be the better option. (Using an USB for sharing the presentation without the need to decompress anything would be the best solution)

Here's how to convert a PPT into a ZIP- file format:
- Select the file you want to minimize in the File Explorer
- Right-Click the file and hit Send to
- Choose the Compressed (zipped) folder option

If you want to decompress a ZIP- file into its original PowerPoint format:
- Right-Click on your ZIP- folder
- Select Extract All... or the similar operation of your program
- Choose a File Location to extract your file to, or extract it at the place you are currently at

How can I reduce the size of a PowerPoint file?
There are several ways to reduce the file size of a PowerPoint. You can compress images, videos and audios, convert your presentation into a PDF file, get rid of 3D models or compress the PowerPoint as a ZIP-file. We explained for you how all of this works in our blog.
How do I compress a video in PowerPoint?
To compress videos in PowerPoint, go to "File" in the PowerPoint menu and then click on "Info". Then open the drop-down menu "Compress media" and select the size of the compression file. Be careful not to reduce the quality too much and check that the quality of your video on the projector you will be presenting on is not too bad.
Related articles
About the author.

Pia Lehner-Mittermaier
Pia works in Marketing as a graphic designer and writer at SlideLizard. She uses her vivid imagination and creativity to produce good content.

Get 1 Month for free!
Do you want to make your presentations more interactive.
With SlideLizard you can engage your audience with live polls, questions and feedback . Directly within your PowerPoint Presentation. Learn more
Top blog articles More posts

Multilingual Polls, Quiz Ranking & Open Text Polls: SlideLizard 2.3 Update

Embed poll results, Quizzes & Attendee notes: SlideLizard 2.0 Update

Get started with Live Polls, Q&A and slides
for your PowerPoint Presentations
The big SlideLizard presentation glossary
Face-to-face.
If you are talking to someone face-to-face you are directly facing each other.
Animated GIF
An animated GIF enables images to be played in a specific order. It is created when several individual images are saved in a GIF file.
Vertical Communication
Vertical communication means that information is passed from one person to the next according to a linear system based on their titles. This type of communication is used when a company follows a hierarchical structure or for important, sensitive information.
Manuscript Speech
For a manuscript speech, the speaker has an entire manuscript to read from. The benefit is that, as every single word is scripted, no important parts will be missed. However, speeches that are fully written down often seem unnatural and may bore the audience.
Be the first to know!
The latest SlideLizard news, articles, and resources, sent straight to your inbox.
- or follow us on -
We use cookies to personalize content and analyze traffic to our website. You can choose to accept only cookies that are necessary for the website to function or to also allow tracking cookies. For more information, please see our privacy policy .
Cookie Settings
Necessary cookies are required for the proper functioning of the website. These cookies ensure basic functionalities and security features of the website.
Analytical cookies are used to understand how visitors interact with the website. These cookies help provide information about the number of visitors, etc.
Compress Files
Supported formats: PDF, DOC, DOCX, XLSX, PPTX, TEX, HTML and others
Compression level
Merging PDFs...
Reduce PPT File Size Online for Free
Easily and quickly compress and optimize PPT files.
Please wait your files are in process
Would you like to report this error to Aspose forum, so that we can examine and resolve the issue? You will get the notification by email when the error is fixed. Report form
Your error has been posted successfully.
Your files have been processed successfully.
Send result to:
Share file:
Compress PPT file to reduce the size of documents by optimizing contents
Our PPT compressor allows you to compress several PPT files online for free. Compress PPT or any other supported file formats. No third-party software installation is required. Web-based application is fast, robust, easy-to-use and absolutely free.
Compress multi-format files
Compress your multi-format documents including DOC, PDF, DOCX, PNG,JPG, HTML, TXT and many more.
Save to desired format
Save your compressed documents with same quality but with less file size.
Free online quick compress operation
Lightning fast compress operations for your selected documents.
Compress image files
Ability to compress various popular image file formats easily.
Reorder compressed files
Arrange and reorder the compressed files as required.
How to compress PPT files
- Upload PPT files to compress them online for free.
- Specify the parameters and press the "COMPRESS" button to compress PPT.
- Download the compressed PPT to view instantly or send a link to email.
How to compress Microsoft PowerPoint and other files?
Just use our online compress . It is fast, easy to use and entirely free. It is designed to quickly compress documents and images online.
Which formats does your compress app support?
How many files can i compress at a time, what is the maximum allowed file size for compression, how can i get the compressed result, for how long are my files stored on your servers, are my files safe on your servers, why does the compression process run so long, learn about different file formats.
Indulge yourself into learning more about well-known document and image file formats.
PowerPoint Presentation
A file with PPT extension represents PowerPoint file that consists of a collection of slides for displaying as SlideShow. It specifies the Binary File Format used by Microsoft PowerPoint 97-2003. A PPT file can contain several different types of information such as text, bulleted points, images, multimedia and other embedded OLE objects. Microsoft came up with newer file format for PowerPoint, known as PPTX, from 2007 onwards that is based on Office OpenXML and is different from this binary file format.
The most popular file formats to compress
We support a variety of document, web, e-book and image file formats, including PDF, DOC, DOCX, RTF, ODT, HTML, Markdown, PNG, JPG, TIFF, BMP, MOBI, CHM, WPS, TXT and many more.
Report form
Only you and the support team will have access to your files.
Send us your feedback
Send the download link to, bookmark this app.
- 日本語
- ไทย
- عربي
- Suomalainen
- Български
- Français
- 한국어
- Український
- Català
- ქართველი
- اردو
- Ελληνικά
- Tiếng Việt
- Čeština
- فارسی
- Қазақ
- Íslenska
- Português
- Русский
- Slovák
- हिन्दी
- Español
- Slovenščina
- 简体中文
Optimize PowerPoint File Size: 5 Tips for Reducing the Size of Your Files!
It is still a common issue in offices today: employees from your company’s overseas branches send you the “latest presentation” via email. However, what arrives in your inbox is a 30-megabyte attachment that not only clogs your email but also slows down your computer when opened.
Furthermore, many companies still impose fixed maximum sizes for email attachments. As a result, there are instances where you may not receive the presentation at all. However, this scenario can be prevented with a few simple measures. Today, we’ll share 5 tips on how to optimize file sizes.
File Size Optimization: Here’s How!
Aim for a target size of approximately 5 megabytes or less for your presentations. This ensures that your PowerPoint file will reach the recipient as an email attachment. Follow these simple tips to reduce the file size of your PowerPoint files:
1. Remove Unused Slides, Pictures, and Videos
This is especially relevant for presentations that are edited by multiple people over an extended period. Often, there are numerous hidden old slides that may still contain images and videos, which can significantly impact the file size.
In such cases, delete all irrelevant slides and content from the presentation and save a new version. This can noticeably reduce the file size.
2. Compress Inserted Images
PowerPoint provides an integrated function to compress images in a presentation. To do this, open the presentation and go to “File,” then select “Save As.” Click on “Browse” in the newly opened window, then click on “Tools” at the bottom and choose “Compress Pictures.”

Select the option “Delete cropped areas of pictures” and set the target output to 150 or 96 ppi. If your recipient plans to print the presentation, leave the target output at 220 ppi. For more information on compressing images in PowerPoint, check our article on the subject.

You can find more information in our articel “ Compress Images “.
3. Discard Editing Data for Images
This option can further reduce the size of presentations. Go to the “File” tab, then select “Options. ” Under “Advanced,” check the box next to “Discard editing data” under “Image Size and Quality.” Keep in mind that after enabling this option, changes made to images cannot be undone.

4. Avoid Creating Image Effects with PowerPoint
Avoid using PowerPoint’s image tools to edit your graphics and photos. For example, the image tools offer the option to apply “Artistic Effects” to your images. However, PowerPoint creates two image files – one for the original and one for the edited image with the artistic effect.
As a result, the overall file size increases with more images attached to the presentation. Instead, use a separate image editing program for effects and other adjustments. Insert the finished edited images into your presentation.
5. Check the Master Slide
When copying a slide from one presentation to another, it’s possible to unintentionally include the master slide from the source presentation in the target presentation, thus increasing its file size. To avoid this unnecessary increase in file size, always paste copied slides into the target presentation using the right-click option “Use Destination Theme.”
After completing your presentation, it’s always a good idea to check the master slide view. There, you can verify if any unnecessary master slides have been inadvertently included through copying and delete them if necessary.
Extra Tip: Use File Size Optimization Tools
There are various tools available that allow you to reduce the size of PowerPoint and other Office files. A popular tool is for example PowerShrink . Both software options allow you to shrink file sizes without any loss of quality. If you want to try out these tools, you can download and test their free trial versions.
Conclusion: Easily and Quickly Optimize Your File Size with Our Tips!
In presentations, file sizes can quickly become too large. To ensure that you and your colleagues can edit and send the presentation without any issues, it’s important to keep the file size below 5 MB. With our tips, you can easily and quickly optimize your file size! Give it a try!
If you have any questions about optimizing file sizes or general questions about PowerPoint, feel free to contact us at [email protected] . We’re here to help!
Are you looking for professionally designed slide templates to support your key message ? Visit our shop for a wide range of slides on various (business) topics available for download. Explore our shop today! ► Go to Shop
You may also be interested in other articles:
- Compressing PowerPoint Images
- Standardizing Image Sizes
Share this post
- share
- save

Design Thinking: Problem Solving with a Difference

Why Corporate Mission Statements Are So Important

7 Tips & Learnings from the Apple Keynote
- Slidesgo School
- PowerPoint Tutorials
How to Reduce the Size of a PowerPoint Presentation

Sometimes, after creating a presentation, you come to realize that its size is bigger than what you expected and, thus, you need a way to reduce the space it takes up on your drive or storage device. In this Slidesgo School tutorial, we are going to give you some hints on how to decrease the size of a PowerPoint file .
Reducing the size of the images
Changing the resolution, lowering the amount of characters from embedded fonts, exporting the presentation as a pdf.
- Open your PowerPoint presentation.
- Select an image.
- The Format tab will appear at the top of the screen. Go to that tab and click Compress Pictures.
A dialog box will appear, where you can choose whether to:
- Apply the changes only to the selected picture or all of them.
- Delete all cropped areas (please note that if you choose this option, these areas will be deleted and you will not be able to restore the image to its original state).
- Under “Resolution”, we recommend that you select “Use default resolution”.
- Open your PowerPoint presentation, go to the File tab and click Options. Then, select the Advanced tab.
- Under “Image Size and Quality”, check “Discard editing data” and uncheck “Do not compress images in file”.
There’s an option that allows you to set the default resolution (measured in ppi). We recommend that you choose one that suits your presentation mode.
To minimize even more the size of the file, you should embed only the characters used in the presentation. This, however, will limit some editing capabilities for other users who do not have the same font already installed on their computers. To do this, go to:
- File tab > Options > Save.
Under “Preserve fidelity when sharing this presentation”, check the following boxes:
- Embed fonts in the file.
- Embed only the characters used in the presentation.
Pro Tip: If you have used fonts that you would like to keep or you think other users will need when editing this presentation, check “Embed all characters” instead of “Embed only the characters used in the presentation”.
If you want to reduce the size of the file even more, you can convert it to PDF. This will generate another file with the same contents, but lighter. It’s a good solution, especially if you need to send the file to other people.
To do this, go to:
- File tab > Save as Adobe PDF.
- If you do not have Adobe PDF installed, this option will not appear. In that case, go to the File Tab, click Save as and select “PDF” from the “Save as type” drop-down list.
For more information on how to set up the different options for exporting as a PDF, please refer to our How to Export Your Presentation as a PDF File tutorial. All the GIFs for this tutorial show our Cool Birthday Party template. If you like it and you want to use it to organize a nice party, just click on the title and you will be able to download it. Note: Regarding the instructions listed on this tutorial, we are assuming you are using the PowerPoint version included within Office 365. If you have a different version, some of the options might change. Please visit Microsoft Support for more information if that is the case.
Do you find this article useful?
Related tutorials.

How to Download Google Slides Templates
When preparing a presentation, many people start panicking because they realize how much time it will take to edit each and every slide. Creating them from scratch, filling them in, looking for pictures, moving the elements...How stressful! But there is a solution that saves you a lot of time. We're sure that you've browsed the internet for templates, or basically, pre-established designs and elements, that can be downloaded for free and can be edited to your liking. Are we right? Then, we have some good news for you!

Discover our collection of printable templates
With the advance of technology, printing has become something that is no longer a necessity. Smartphones have made the paper format less and less frequent, but there are still certain cases in which having physical resources is much more convenient. Whether it's for taking notes, handing out assignments, making worksheets or handing out business cards or invitations, it's necessary to print your customized designs.From now on, in every Slidesgo printable presentation that you download, you will find the instructions for printing on the third slide. Depending on the style, colors or format of each presentation, we will tell you if you can...

How to Add Superscript and Subscript in Google Slides
Let’s take the most famous formula: E=mc^2, Einstein’s relativity equation. It wouldn’t be the same if it was E=mc2, right? Okay, yes, some people write it like that because it’s very famous and it won’t be misunderstood. But technically… It can! This is where the sophistication of superscript or subscript enters the room! Do you know how to write them in equations, copyright brands or even footnotes in your presentations? Let’s figure out how.

How to Add Superscript and Subscript in PPT
It can be a registered brand, a footnote or a math formula that you need to properly write. “2^2+2” is not the same as “22+2”, is it? Using superscript or subscript in a proper way makes a whole difference in texts. If it’s for your mathematical or physics complex formulas or just an anecdotic footnote, let’s figure out how to write them in a powerpoint presentation!
How to Reduce the File Size of a PowerPoint Presentation

The larger the PowerPoint presentation, the bigger the file size. Here’s how to reduce it.
The best PowerPoint presentations are those that are dynamic and interesting for their intended audiences. Typically, that means that you’re using images, videos , and other visual elements to get your points across.
Unfortunately, the larger the presentation and the more elements you use, the bigger the file. If your PowerPoint presentation file is too big, here are some steps you can take to reduce the overall file size.
Compressing PowerPoint Images
The biggest problem with any PowerPoint presentation isn’t the text—it’s the images. More images mean a bigger file, but you can take some steps to reduce the problem.
Reducing image sizes in Office documents will reduce the overall file size, and the best way to do this is by compressing your images. The downside to this is a reduction in image quality. However, PowerPoint does offer several compression options, so you can decide to use better quality images, although the image compression will be reduced as a result.
To start, open your PowerPoint presentation. Select an image, then press Format > Compress Pictures in the ribbon bar.

This will bring up the Compress Pictures options box. There are five different image resolution options, including an additional Use default resolution option to leave your images intact.
Each resolution is measured in pixels per inch , where the larger the number, the better the quality (and the larger the file size). For maximum compression, select E-mail (96 ppi).
If you’d prefer to compress only a single image, leave the Apply only to this picture checkbox checked. If you want to compress all of the images in your PowerPoint presentation at once, make sure to uncheck this option.

Press OK to compress your image (or images) once you’re ready.
Once you’ve saved your PowerPoint presentation ( File > Save ), the file size should be reduced. The impact of image compression on file size will depend on the number of images in your presentation, as well as their original quality.
Compressing Video in PowerPoint
Compressing other media types, like video files, is the next step in reducing your PowerPoint file size. Video files, in particular, can massively increase your PowerPoint files if they’re embedded in your presentation.
Thankfully, PowerPoint offers a built-in method for compressing and converting video files. To do this, open your presentation in PowerPoint, then press File > Info > Compress Media . In the drop-down menu, select the quality you wish to use for your embedded video files.
You can choose between Full HD (1080p), HD (720p), and Standard (480p) video quality.

If the video files are supported, PowerPoint will automatically compress the media files, reducing their overall quality in the process. Click File > Info > Compress Media > Undo to undo the process if the quality is reduced too far.
If you’re happy with the process, save your document ( File > Save ).
Saving in the PPTX File Format
Most PowerPoint users are familiar with PPT, the PowerPoint file format. Many older PowerPoint presentations are still saved and distributed in this older format.
Unfortunately, the PPT file format is obsolete. The replacement, PPTX, uses compression to reduce the file size of PowerPoint presentations vastly. Saving your documents in the PPTX format, as well as converting existing PPT files to PPTX, can have a big impact on overall file size.
To convert your PPT file to PPTX, open the PPT file in PowerPoint. From there, click File > Info > Convert .

This will open the Save As dialog box, automatically selecting the PPTX file format. Confirm the file name for your new PPTX presentation, then press Save to confirm.

The additional benefits of compression that a PPTX file offers over the original PPT format should help to reduce the file size. However, the impact of saving your PowerPoint presentation as a PPTX file will depend on your original presentation file.
Disabling Embedded Fonts
Most PowerPoint users will use default system fonts for their presentation, but if you’re creating a themed presentation, you may decide to embed third-party fonts into your PowerPoint file. These embedded fonts might look great, but they can increase your PowerPoint file size significantly.
Unless you’re certain about including them, you should disable the embedded fonts option in PowerPoint. To do this, click File > Options to open the PowerPoint options menu.

In the PowerPoint Options menu, press the Save tab.
Under the Preserve fidelity when sharing this presentation section, click to disable the Embed fonts in the file checkbox.

Once the option is unchecked, click OK to save the setting, then press File > Save to save the document. Once saved, any embedded font files should be removed.
However, this is a setting that should only impact a small number of PowerPoint users and may only reduce your PowerPoint file size if you’re using a significant number of custom fonts.
Removing Hidden PowerPoint Data
Every PowerPoint document you create has additional information attached, including who authored it and other hidden metadata. If you’re trying to optimize your PowerPoint file size, removing this information should help to reduce the file size, although the impact should be relatively minor.
To do this, open your PowerPoint presentation, then click File > Info > Check for Issues > Inspect Document .

In the Document Inspector window, ensure that the Document Properties and Personal Information checkbox is selected, then press Inspect .

After the Document Inspector has scanned your PowerPoint presentation, click the Remove All button for the Document Properties and Personal Information option.

This will remove all personal metadata from your PowerPoint presentation, reducing the file size by a small amount.
Creating Better PowerPoint Presentations
You don’t need to compromise on quality to create high-quality PowerPoint presentations. If PowerPoint file sizes concern you, compress your media files and use the PPTX file format.
If you want to ditch PowerPoint completely, you could think about using Microsoft Sway instead.
Recommended for you

Choose Files:
Compression settings:, output files:.
To compress all output files in a ZIP file, click " " icon on the right, then click "Add to ZIP". To download one single file, simply right-click on file link and click "Save link as...".
| File Name | Original Size | Output Size | Size Compressed | Actions |
|---|
How to compress PPT files:
Set image quality first. Image quality value can be 1 (lowest image quality and highest compression) to 100 (best quality but least effective compression).
Drag multiple PowerPoint files to the "Choose Files" section. File extension name can be .ppt or .pptx. Each PowerPoint file size can be up to 40 MB.
Compress Files
The batch compression automatically starts when files are uploaded. Please be patient while files are uploading or compressing.
Output Files
The output files will be listed in the "Output Files" section. To compress all output files in a ZIP file, click " " icon on the right, then click "Add to ZIP". You can right-click on file name and click "Save link as..." to save the file. The output files will be automatically deleted on our server in two hours, so please download them to your computer or save them to online storage services such as Google Drive or Dropbox as soon as possible.
Unblock Files (if needed)
You may need to unblock the PowerPoint files if your Microsoft PowerPoint software can't open them. To unblock a file on Windows, right-click on the file and open "Properties". Under the General tab, towards the bottom you will see "Unblock" button or checkbox next to "Security: This file came from another computer and might be blocked to help protect this computer". Click on it, then click "Apply/OK".
The big change in PowerPoint 2007 was that the stable binary file format of 97-2003 (.ppt files) was replaced as the default by a new zipped XML-based Office Open XML format (.pptx files). Microsoft's explanation of the benefits of the change included: smaller file sizes, up to 75% smaller than comparable binary documents; security, through being able to identify and exclude executable macros and personal data; less chance to be corrupted than binary formats; and easier interoperability for exchanging data among Microsoft and other business applications, all while maintaining backward compatibility.
We can't find any open-source projects to compress PowerPoint presentations, therefore we wrote all the source codes from scratch by ourselves. This PowerPoint compressor compresses images in PowerPoint presentation to reduce file size.
Copyright © 2024 Compresss.com - A universal file compressor. All rights reserved. Privacy Policy Aconvert.com is a sister website of Compresss.com, it focuses on converting files instead of compressing files.
How-To Geek
How to compress images in microsoft powerpoint.

Your changes have been saved
Email is sent
Email has already been sent
Please verify your email address.
You’ve reached your account maximum for followed topics.
Microsoft Office vs. Google Docs, Sheets, Slides: Which Is Best?
Plex is shutting down its tidal integration, i finally bought a linux laptop, here's what i chose and why, quick links, compress images in powerpoint for windows, compress images in powerpoint for mac.
Compressing images in your Microsoft PowerPoint presentation can help reduce the overall file size of the presentation and save disk space on the device it’s stored on. Here’s how to compress images in Microsoft PowerPoint.
Note that this feature is only available for desktop versions of Office and not Office for the web.
Open the PowerPoint presentation that contains the images you’d like to compress and then select a photo.

Once selected, you’ll automatically be in the “Picture Format” tab. Here, click the “Compress Pictures” button in the “Adjust” group.

The “Compress Pictures” window will appear. In the “Compression Options” group, you can choose if the compression applies only to the selected picture. If you uncheck this option, PowerPoint will compress all of the images in the presentation, which overrides any changes you may have made to those images.
Related: How to Reduce the Size of a Microsoft Word Document
In the “Resolution” group, choose which resolution you would like to use. Once ready, click “OK.”

The image or images will now be compressed.
Open the PowerPoint presentation that contains the images you’d like to compress and then select a photo. Once selected, click “Compress Pictures” in the “Picture Format” tab.

The “Compress Pictures” window will appear. Select the picture quality you’d like to use, then select if you’d like to apply the compression to all images in the presentation or only the selected image. Also, if you want to delete the cropped areas of the pictures, check the box next to that option.
When ready, click “OK.”
- Microsoft Office
- Microsoft PowerPoint
IMAGES
COMMENTS
Reduce the character set of embedded fonts. To make your presentation more sharable with others who don't have the same fonts in their system, it's typical to embed the fonts you use. However, embedded fonts will increase your file size. To minimize the file increase, embed only those characters used in the presentation. Go to File > Options ...
Converting the file is as simple as pressing a button and choosing the file type. Go ahead and open your PPT file, head over to the "File" tab, and then click "Convert.". Windows File Explorer will appear. You'll notice the Save As type is set as "PowerPoint Presentation." This is the PPTX file type. Click "Save.".
100% Free for Anyone. You can use our online file compressor for free, please share our website with your friends. Compress PowerPoint files online for free, reduce file size of PPT/PPTX/PPTM documents online, compress Microsoft PowerPoint files online, free PPT compressor. No registration, no watermarks, free to use for anyone.
2. Click Reduce File Size. It's toward the bottom of the drop-down menu. 3. Click Picture Quality. Doing so will invoke a drop-down menu. 4. Click Best for sending in e-mail. This option will reduce the quality of all images in your PowerPoint file to 96 ppi, which is a generally lower resolution than most images' defaults.
Other Measures to Reduce PowerPoint File Size. There are a few other steps you can take to make your PPT file smaller before compressing it. Each high-resolution image in your presentation can add 2 MB or more to the file size. Instead of removing images essential to the presentation, try optimizing them first.
Introducing Our Free PowerPoint Compression Tool. Our PPT compressor is a powerful, free online tool that can reduce PowerPoint file size by up to 90%. It keeps quality high and works right in your web browser, processing files locally on your device. This means it's fast, secure, and efficient, unlike many other options.
Compress a PowerPoint file by reducing the size of audio and video files. Audio and video content takes up a lot of storage space in a presentation. You can reduce the size of audio and video files by following these steps: Click on the File tab in the upper-left corner. Select Info from the dropdown menu. Click Compress Media.
10. Save a copy in PDF format. It's also common to save a copy of a presentation as a PDF (portable document format) file to reduce the size and then share it with others. You can compress images during the process. To save a PowerPoint presentation as a PDF (and compress images): Click the File tab in the Ribbon.
Reduce the size of your PowerPoint files online with our FREE PowerPoint compressor. Easily compress PowerPoint files for email and more. By using our compression tool you can reduce the size of your PowerPoint presentation by up to 90%. Try it now, it's FREE. Features.
Compress PPT Files. Here you can compress PowerPoint PPT, PPTX, PPTM and ODG files. online and reduce their file size of up to 90% the original size. Just select the PowerPoint file (max 50MB) to compress and wait. Select File to Compress.
Compress a PowerPoint Presentation File. There are different methods by which you can compress a PowerPoint file and elements within the file to reduce the file size and make your slide deck more manageable. 1. Compress Images in PowerPoint. The most common method to reduce the file size of a PowerPoint presentation is to compress slide images.
To do this: 1. Open your PowerPoint slideshow and click "File" in the menu bar at the top of the screen. If you only want to compress specific images, select them before clicking "File." 2. In the ...
To solve this problem, here are seven tips to reduce your presentation file size. 1. Use Insert Picture—Don't Drag and Drop. When you want to add a photograph from your hard drive to your presentation, the easiest and most common way is to copy it off File Explorer and paste it onto PowerPoint.
Then, click on it to select it. Next, find the Insert dropdown in the Tools section. This is in the lower right corner of the Insert Video browser. On the dropdown, click Link to File. Choose Link to File to link to a video file, instead of embedding it directly inside the PPT deck.
Open the presentation that contains the audio or video files. On the File tab, select Info, and then in the Multimedia section, select Compress Media *. * Embedded subtitles and alternate audio tracks are lost in this compression process. To specify the quality of the video, which in turn, determines the size of the video, select one of the ...
How to Compress PowerPoint Presentations. Upload your PowerPoint file. Select and upload your PPT file. Wait for compression to end. Download or Share. Download the compressed file or share it directly via email or cloud storage. Compress large PPT files online with our free tool. Maintain high-quality visuals and reduce file size.
Compress all images while saving the PPT file. Open your presentation. Go to File in the PowerPoint menu. Click Save as and then Browse. In the window that opens, click on Tools (right beside Save) Select Compress Pictures and choose the resolution you need.
Free online Compressor to reduce PPT files size with one click - compress and optimize PPT file without losing quality. Compress Files. Supported formats: PDF, DOC, DOCX, XLSX, PPTX, TEX, HTML and others ... PowerPoint Presentation. A file with PPT extension represents PowerPoint file that consists of a collection of slides for displaying as ...
This can noticeably reduce the file size. 2. Compress Inserted Images. PowerPoint provides an integrated function to compress images in a presentation. To do this, open the presentation and go to "File," then select "Save As." Click on "Browse" in the newly opened window, then click on "Tools" at the bottom and choose ...
Changing the resolution. Open your PowerPoint presentation, go to the File tab and click Options. Then, select the Advanced tab. Under "Image Size and Quality", check "Discard editing data" and uncheck "Do not compress images in file". There's an option that allows you to set the default resolution (measured in ppi).
To do this, open your presentation in PowerPoint, then press File > Info > Compress Media. In the drop-down menu, select the quality you wish to use for your embedded video files. You can choose ...
File extension name can be .ppt or .pptx. Each PowerPoint file size can be up to 40 MB. Compress Files. The batch compression automatically starts when files are uploaded. Please be patient while files are uploading or compressing. Output Files. The output files will be listed in the "Output Files" section.
Compress Images in PowerPoint for Windows. Open the PowerPoint presentation that contains the images you'd like to compress and then select a photo. Once selected, you'll automatically be in the "Picture Format" tab. Here, click the "Compress Pictures" button in the "Adjust" group. The "Compress Pictures" window will appear.