- Biography Guest Post
- Privacy Policy

- Home Improvement
- Entertainment

Biography Bottle Buddies
Biography Bottle Buddies are unique and educational toys that help children learn about famous people. They are filled with facts about famous people and their accomplishments. Each Bottle Buddy also comes with a collectible figurine of the person the child is learning about. This makes learning about history and famous people more interactive and fun! With a variety of different figures and biographies to choose from, there’s something for everyone!
What are Biography Bottle Buddies?
Biography Bottle Buddies are the newest way to share your story with the world. This innovative product combines a personalized biographical bottle and a unique character to create a unique and meaningful keepsake for yourself or a loved one. Bottle Buddies are made from a durable plastic material and come in a variety of shapes and colors. The biographical bottle is personalized with a name, date of birth, and other meaningful information. The character, which has its own unique story and personality, is customizable with accessories and clothing to reflect the individual’s unique style. Bottle Buddies serve as a fun and interactive way to capture and relive memories, share stories, and preserve a part of yourself for eternity. They also make great gifts for any occasion, from birthdays to anniversaries. With Bottle Buddies, you can create a one-of-a-kind keepsake that celebrates the life of someone special.
Benefits of Biography Bottle Buddies
Biography Bottle Buddies are a unique and innovative way to store and share memories. These bottles are the perfect way to keep treasured memories alive, and with a variety of sizes and colors, it’s easy to find the perfect one to suit your needs. Not only are they attractive and stylish, they also provide numerous benefits for both individuals and families.
For starters, Biography Bottle Buddies are incredibly durable and can be passed down from generation to generation. With a personalized label and a cork stopper, these bottles can be used to capture and store memories for years to come. Additionally, these bottles can be used as a creative way to share memories with friends and family. Whether it’s a gift for a special occasion or just a fun conversation starter, these bottles can be used to share stories, photos, and other memories with those who are important in our lives.
Moreover, Biography Bottle Buddies provide an excellent way to preserve memories in a tangible form. Instead of relying on digital images and videos, these bottles provide a physical, tangible form of memory storage. In addition, these bottles can be used to store other items such as keepsakes, jewelry, and other sentimental items.
Overall, Biography Bottle Buddies are an excellent way to preserve memories and share them with friends and family. With a variety of sizes and colors, these bottles provide an attractive, durable, and creative way to store and share memories. Plus, they offer an excellent way to capture and preserve memories in a tangible form.
How to Create a Biography Bottle Buddy
Creating a Biography Bottle Buddy is a fun and rewarding activity for both children and adults alike. It is an excellent way to learn about the life of someone, while also creating a unique keepsake for them. In this article, we will discuss the steps necessary to create a Biography Bottle Buddy and how to make it truly special.
The first step is to collect information about the person you are creating the bottle for. This can include anything from their birthdate and birthplace, to their hobbies and interests. You can also add any awards or achievements the person has received, which will make the Biography Bottle even more meaningful. Once you have gathered all the necessary information, it is time to create your bottle.
When creating your Biography Bottle Buddy, you will need a few supplies. A wide-mouthed glass bottle is an ideal choice, but you can also use a jar or any other container. You will also need some paper and markers or paint to write the biography onto the bottle. You may also want to add some decorations, such as ribbons and charms.
When writing the biography, make sure it is concise yet comprehensive. It should include all the important information about the person, while also providing some context about their life and accomplishments. You can also add some quotes from the person to make the Biography Bottle even more personal.
Once you have written the biography and added any decorations, it is time to seal the bottle. This can be done with a cork, a cap, or tape. Finally, you can add a personal touch to the bottle by adding a picture of the person, or a quote from them.
Creating a Biography Bottle Buddy is an excellent way to show someone that you care. With just a few supplies and some creativity, you can create a unique and meaningful keepsake.

Ideas for Personalizing Bottle Buddies
Bottle Buddies are an increasingly popular way to celebrate a special occasion, commemorate an event, or simply show someone you care. From birthdays to graduations, Bottle Buddies make the ideal gift for any occasion. But how can you customize them to make them even more special? Read on for some great ideas for personalizing Bottle Buddies to make them truly unique.
One great way to make Bottle Buddies personal is to add an engraving. Engraving can be done with a laser or even with a traditional engraving tool. Engravings can include a name, initials, the date of the occasion, or even a special message. It’s a great way to make Bottle Buddies even more special.
Another way to personalize Bottle Buddies is to add a photo. This can be done in a variety of ways, from printing a photo directly onto the bottle to using a special bottle label. This is a great way to add a personal touch to the gift.
Finally, you can add unique accessories to Bottle Buddies. This could be anything from a decorative charm to a personalized key chain. Accessories are a great way to make Bottle Buddies even more special.
No matter how you choose to personalize Bottle Buddies, they make a great gift for any occasion. With these ideas, you’ll be sure to find the perfect way to show someone you care.
Tips for Using Bottle Buddies in the Classroom
Bottle Buddies are an innovative way to teach young children about science and nature. They are simple, easy-to-use, and fun! With Bottle Buddies, you can create a biography of any living thing – a plant, an insect, a bird, or even a small mammal! These creative tools are perfect for the classroom, allowing students to learn about the living things around them in a creative and interactive way. Here are some tips on how to make the most of Bottle Buddies in the classroom.
First, introduce students to the concept of biographies. Explain that biographies tell the story of a living thing’s life from beginning to end. Discuss with students the different types of biographies they might want to create, such as a plant, an insect, a bird, or a small mammal.
Next, provide students with the materials they need to create their biographies. This may include bottles, markers, labels, paper, glue, and any other materials they might need to create their biographies. Encourage students to be creative and to think outside the box.
Finally, invite students to share their biographies with the class. This is a great way to foster discussion and creative thinking among students. Have students present their biographies and explain their process. This is also an excellent way for teachers to assess student understanding and to provide feedback.
Using Bottle Buddies in the classroom is an exciting and engaging way to teach children about science and nature. By following these tips, teachers can ensure that their students have a fun and meaningful learning experience.
Examples of Bottle Buddies in Action
Bottle Buddies are an innovative way of adding life and personality to the standard water bottle. From a simple logo or design to a full-blown character, Bottle Buddies can add a unique twist to any water bottle. But what are some of the best examples of Bottle Buddies in action?
Athletes are increasingly turning to Bottle Buddies to help them stand out from the competition. Professional athletes such as LeBron James and Michael Jordan have utilized Bottle Buddies as part of their branding. In addition to logos, they often use Bottle Buddies to create full-blown characters that represent their brands. For example, LeBron James has an animated version of himself that adorns the side of his water bottle.
Bottle Buddies have also become a popular way for businesses to promote their brand. Companies like Coca-Cola, Pepsi, and Red Bull have used Bottle Buddies to bring their logos to life, creating characters that represent their brands. From simple cartoon versions of their logos to detailed depictions of their mascots, Bottle Buddies have helped these companies stand out from the competition.
Bottle Buddies have become a popular way for people of all ages to show their personality. From children to adults, people are using Bottle Buddies to express their individual style. Whether it’s a cartoon version of their favorite superhero or a logo of their favorite sports team, Bottle Buddies are a great way to show off your personality.
As you can see, Bottle Buddies are a great way to bring life and personality to any water bottle. From athletes to businesses to everyday people, Bottle Buddies are giving people a unique way to express themselves. So next time you’re looking to make your water bottle stand out, consider adding a Bottle Buddy.
FAQs About the Biography Bottle Buddies
1. What are Biography Bottle Buddies? Biography Bottle Buddies are miniature bottles that contain biographical information about someone of historical significance. They are designed to help teach children about famous people in a fun and engaging way.
2. How do I use Biography Bottle Buddies? Biography Bottle Buddies are designed to be used as part of a lesson plan to help teach children about famous people. The bottles can be filled with a variety of items such as pictures, quotes, and facts about the individual.
3. What age group is Biography Bottle Buddies appropriate for? Biography Bottle Buddies are recommended for children ages 4 to 12. They provide a great way for children to learn about famous people in a fun and interactive way.
Biography Bottle Buddies is a great way to encourage children to learn about the lives of famous people. Through this engaging craft, kids can develop a deeper understanding of their favorite historical figures and the impact they had on the world. By creating their own “bottle buddy” and personalizing it with facts and images, children can create a unique keepsake that they can keep forever. By learning more about the past, kids can gain a better appreciation for the present and be inspired to make a positive difference in their own lives.
Related Posts

Advocatus Peregrini Biography

Adam Kotas Biography
Abhiramhi mahendran biography, leave a reply cancel reply.
Your email address will not be published. Required fields are marked *
Save my name, email, and website in this browser for the next time I comment.

Bottle Buddies? What in the World is a Bottle Buddy?
by Paula | Jan 5, 2020 | Random Thoughts , Toys | 2 comments

Every time my kids come home with a project sheet, I immediately start to panic! What will they need to create this time? I close my eyes and chant “please let it be a poster, please let it be a poster.” That’s what I’m good at – helping them make posters! All other projects scare me. They all seem to require some sort of creative sewing skills, of which I have NONE!
So when Zach brought home his project sheet a couple of weeks ago, I did my normal “please let it be a poster” chant, but no such luck! This project was called “Bottle Buddies,” and it was due in one week! What?? What in the world is a Bottle Buddy?
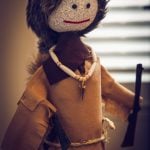
I sat down with Zach, and it said that he needed to convert a 2-liter soda bottle into his character – Daniel Boone! You want me to help him convert a 2-liter soda bottle into Daniel Boone? Oh my… This was going to be “fun”!
The directions were pretty easy… The assignment sheet said “Make a bottle buddy – use a 2-liter bottle for the body and a painted 4″ styrofoam ball (found at Hobby Lobby, Wal-mart or other craft stores) for the head. Fill the bottom with 2 inches of sand or dirt. Make the bottle look like your person.”
I was okay with everything except “make the bottle look like your person.” First of all, what did Daniel Boone look like? And second of all, I don’t sew, so how were we going to dress him??
It went on to say “To make your bottle look like your person use any material available: felt, paint, fabric, rocks, sticks, hats, construction paper, aluminum foil, etc… to create their costume and props.” Okay…well we all know that you don’t want your child to be the one who takes in a bottle covered in aluminum foil – you win the “Epic Mom Fail Award” if you do something that simple. So panic set in…
Zach and I started by talking about who Daniel Boone was, and then went to the computer to Google him for some facts and a picture! It was all gonna be okay, right? We printed out a couple of pictures of Daniel and discussed how Zach wanted to dress him up.

Tired of Paying Too Much For Home Insurance?
“Well, he is a frontiersman, so he needs to have on something made out of leather with fringy sleeves, and I want him to hold his rifle. He’s famous for his rifle too – he named it ‘tick-licker’ and he needs a coon-skin cap.” Okay…my mind was reeling. Where would I find a rifle to attach to a 2-liter bottle, and where would I find a very small coon skin cap? Let the fun begin…
For those of you who (like me) are NOT crafty with a needle and thread, these kinds of projects are unnerving! I was thinking I’d just go to my neighbor next door – a very accomplished seamstress, and beg and plead!
“Can you please sew me a leather fringy outfit that will make this 2-liter bottle look like Daniel Boone?” Once I realized how pathetic and ridiculous that sounded, I pulled myself together and decided that Zach and I could do this thing…
We headed upstairs to my art closet! Yes…I have an entire closet devoted to art supplies – poster board, paints, googly eyes, hot glue, and all kinds of fabric scraps! I keep my closet stocked for projects like this one. But I do not keep styrofoam balls, so I headed off to Hobby Lobby while Zach was at school to begin my search for Daniel Boone’s head!
I’m always happy to go to Hobby Lobby – I can roam the aisles for hours, so I was glad to have this on my list of things to do… I quickly found the styrofoam ball I needed, but then I had to find the right kind of paint. According to the Hobby Lobby worker, “the wrong kind of paint will dissolve this styrofoam!” Dissolve Daniel Boone’s head? Yikes…
She led me to the spray paint aisle, and I picked out a very nice peach color to transform the green styrofoam ball into Daniel Boone’s head. Well…when Zach spray painted the head that afternoon, he decided that the color I chose looked too orange. “He looks like a pumpkin,” Zach told me. “I need some white paint.”
So…off to Hobby Lobby we went and picked up white spray paint to try again. So please direct your comments about the color of the Bottle Buddy’s head to Zach – not me! And don’t even get me started on the fact that Daniel Boone does not have a nose. But after all…it is Zach’s project. If he chooses not to put a nose on his Bottle Buddy, there’s not much I can do about it… And believe me, I tried to convince him to add a nose to OUR (I mean HIS) Bottle Buddy project. (As a former school teacher, I sometimes find it hard to let go and let him be in charge of his projects, when I could totally do it all by myself!)
We were not able to find a coon-skin cap at the store, but my favorite “place” in the world, Amazon.com, did in fact have several coon-skin caps to choose from. So we added it to our cart and had it sent immediately.
Luckily, I’m an Amazon Prime customer, so the coon-skin cap arrived in just 2 days! We had all of our supplies (except the hat), and we were ready to begin – the glue gun was all warmed up. One of my many glue guns! I have found that you can never have too many of these when you have school-aged kids (especially if you don’t sew)…
Zach decided he wanted Daniel Boone to wear a short sleeve tan shirt, so he traced a pattern on the felt and he cut out 2 pieces. Perfect fit, so we hot glued them together. He only burned one finger and handed the glue-gun fun over to me… “I’ll hold the material, you work the glue gun. That glue is really hot!” Yep…
Daniel’s shirt was on, we wrapped some dark brown felt to the bottom of the bottle for his legs, made him a belt out of some rope, and Zach made a frontiersman necklace for Daniel from a kit I had picked up at Hobby Lobby. We were well on our way…
Then Zach looked at the printed picture again, and decided he wanted Daniel to be wearing long sleeves with fringe, so we hot glued some more felt to the short sleeves – look closely and you can see my lack of sewing skills! Zach glued on googly eyes and cut out a mouth, and this is when he decided that his Bottle Buddy didn’t need a nose. Whatever…
Now all we had to do was hope that the coon-skin cap would make it in time! While we were waiting, I learned quite a bit about Daniel Boone. I was surprised by all the little details Zach knew about him.
He was born in 1734 and was known as an American pioneer, explorer, and frontiersman. All of his adventures as a frontiersman made him one of the first folk heroes from the United States.
Boone explored lots of land, and settled the village of Boonesborough, Kentucky – one of the first American settlements west of the Appalachians.
He was an officer in the Revolutionary War, and he was captured by Shawnee warriors in 1778, but he was able to escape and warn settlers that the Shawnee were planning an attack.
To this day, Boone remains an iconic figure in American history. He was considered a legend in his own lifetime, and an account of his adventures was published by John Filson in 1784. He became famous across the United States and Europe.
After he died, Daniel Boone became the subject of many tall tales and fictional stories. In American culture, he is remembered as one of the earliest frontiersman. Zach knew so many interesting facts about him, but he really loved the story of his rifle named Tick Licker. “Tick Licker” was a gift from his gunsmith older brother and it is said that he boasted of his marksmanship saying he could shoot a tick off an animal without hurting the beast.
Enough about Daniel Boone. Back to me and Zach… We survived a project that wasn’t a poster! Zach was very proud of his finished Bottle Buddy. I was too! I was so happy that his teacher allowed me to come up to the classroom to take pictures of the other Bottle Buddies. I was eager to see how Daniel Boone compared to them…
I was so pleased with Zach’s buddy. They were all great, but of course I was most impressed with Zach’s. Maybe because I had invested lots of time too – burning my fingers, and trying not to cringe when he told me Daniel Boone did not need a nose.
And it wasn’t until after this project that we read that Daniel Boone wore a black felt hat – not a coon skin cap. Oh well…I’m sure we all agree that the coon skin cap looks better!
If you get a project sheet like this one, check out Pinterest . They had several pictures of Bottle Buddies too! But be careful….there are some over-achievers on Pinterest! I suggest keeping it simple and have some fun. Just be careful with the glue gun. It’s not called a Hot Glue Gun for nothing! Until next time…
If you’re like me, and you never have the right craft supplies, you’re going to need one of these arts and crafts supply centers like the one below! It comes with so many crafting treasures. The kit includes pom-poms, google eyes, stickers, pipe cleaners, and much more! And…even better than all the treasures, it stores them neatly in these little plastic drawers. When you run out of something, you can easily order more supplies to fill the drawers again and again! As my kids have gotten older, the supplies have changed quite a bit, but they always will know where to find what they need for their school posters and projects! And don’t forget your hot glue gun…
If you need help with photos of your school projects or if it’s time for updated pictures of your family, you can find me and my camera over at Paula Mason Photography . I’d be happy to help you with any photography projects!
Until next time…
Share this:
- Click to share on Twitter (Opens in new window)
- Click to share on Facebook (Opens in new window)
- Click to share on Pinterest (Opens in new window)
- Click to share on LinkedIn (Opens in new window)
- Click to share on X (Opens in new window)

What kind of paint did you use for painting the face. I just don’t want to ruin the head….

Wish I could remember the name – – I had a long conversation with an employee at Hobby Lobby. They know a lot about paint. Apparently, some of the paints will melt the styrofoam!
Trackbacks/Pingbacks
- My First Fairy Garden...All You Need is a Few Supplies and Your Imagination - […] right? Wrong! But I was determined. After all, I was very successful with my son’s Bottle Buddy from last…
On My Kindle...
On My Nightstand...
In My Shopping Cart...
Biography Bottles With Makey Makey

Introduction: Biography Bottles With Makey Makey

This project demonstrates the way our students use the Makey Makey combined with Scratch to create an interactive "Wax Museum". Students conduct research on the historical figure of their choice and program a Scratch project to share what they learned. They next make use of the recycling bin to create models of their person which are then connected to the Scratch Project with a Makey Makey. This project is a joint endeavor with bquentin3
Makey Makey Classic , Makey Makey Inventor Booster Kit , brass fasteners, alligator clips, 3X5 inch piece of display board (cardboard, chipboard, poster board, card stock), plastic bottle, general art supplies (yarn, crayons, glue, markers, chenille sticks, scissors, construction paper, fabric scraps).
Step 1: Create a Scratch Project

Create a Scratch project sharing the facts you have learned about your historical figure. From the "Events" block palette use the "when green flag clicked" to introduce yourself (Hi! I'm Ada Lovelace!). Use the "when space key pressed" block to trigger your facts. Each fact should be on a different key press (up arrow, down arrow, etc.). Use the "say __ for X seconds" to share your facts.
You can draw your own portrait of your person for your sprite or upload a picture (make sure it isn't copyright protected!). After the base project is completed, you can add relevant backgrounds, add music or voice overs to your facts, or any other elaboration you chose. Don't forget to cite your research and image sources!
Educator Tip:
We assign this in stages. Students must complete their research and turn in notes before beginning their Scratch project. They must have programmed the basic sharing of facts before they can elaborate the project or start raiding the maker material bins. You can explain it like a video game - you must "master" different levels to get more "powers".
Step 2: Create the Biography Bottle

Design and build a model of your historical figure using reused or scrap materials. Start with a sturdy base (a bottle, or other cylindrical container, make a good choice) and add a head. You can draw this on paper or get fancy with yarn or cotton ball hair, googly eyes, chenille stick limbs, or other extras. Dress your person appropriately for their time period/ work. The clothes can be drawn on construction paper, or assembled from fabric scraps, felt, or anything else you have available.
Before starting this activity review expectations for material use and conservation. I assign a manager for each material and tool they have out to facilitate clean up (glue manager, marker manager, cardboard manager, etc.)
Step 3: Make the Conductive Plate

Punch holes along the long edge a 3x5 piece of display board (cardboard, chipboard, card stock, etc.). Make sure the holes do not touch. You will need a hole for each key press you programmed. Insert a brass fastener into each hole and separate the prongs until they are flush with the display board. One set of legs will extend past the edge of the conductive plate. These are the buttons for your "Wax Museum" display.
Create a label for your plate and attach your Biography Bottle.
Unless you have kid-safe cardboard tools (MakeDo is one brand that produces these), you will need to punch all the holes in the conductive plates with an X-acto or similar tool.
Step 4: Connect the Makey Makey

Now you are ready to connect the Makey Makey! Connect alligator clips to the legs of the brass fasteners that protrude from the conductive plate. It is a good idea to mark which button you want to trigger each key press. Connect the other end of each alligator clip to the matching input on the Makey Makey. Make sure you have a clip attached to the ground. Connect the Makey Makey to the computer. Run your Scratch program. Hold the ground clip (making sure you are touching the metal part) and lightly touch each button.
If this is your students' first experience with the Makey Makey, it is a good idea to teach a mini lesson about its components, setting up, and packing it away.
Recommendations

Water Contest

Puzzles and Games Contest

Text Contest

In order to continue enjoying our site, we ask that you confirm your identity as a human. Thank you very much for your cooperation.

Monday, April 16, 2012
- Biography Bottle Buddy Pics

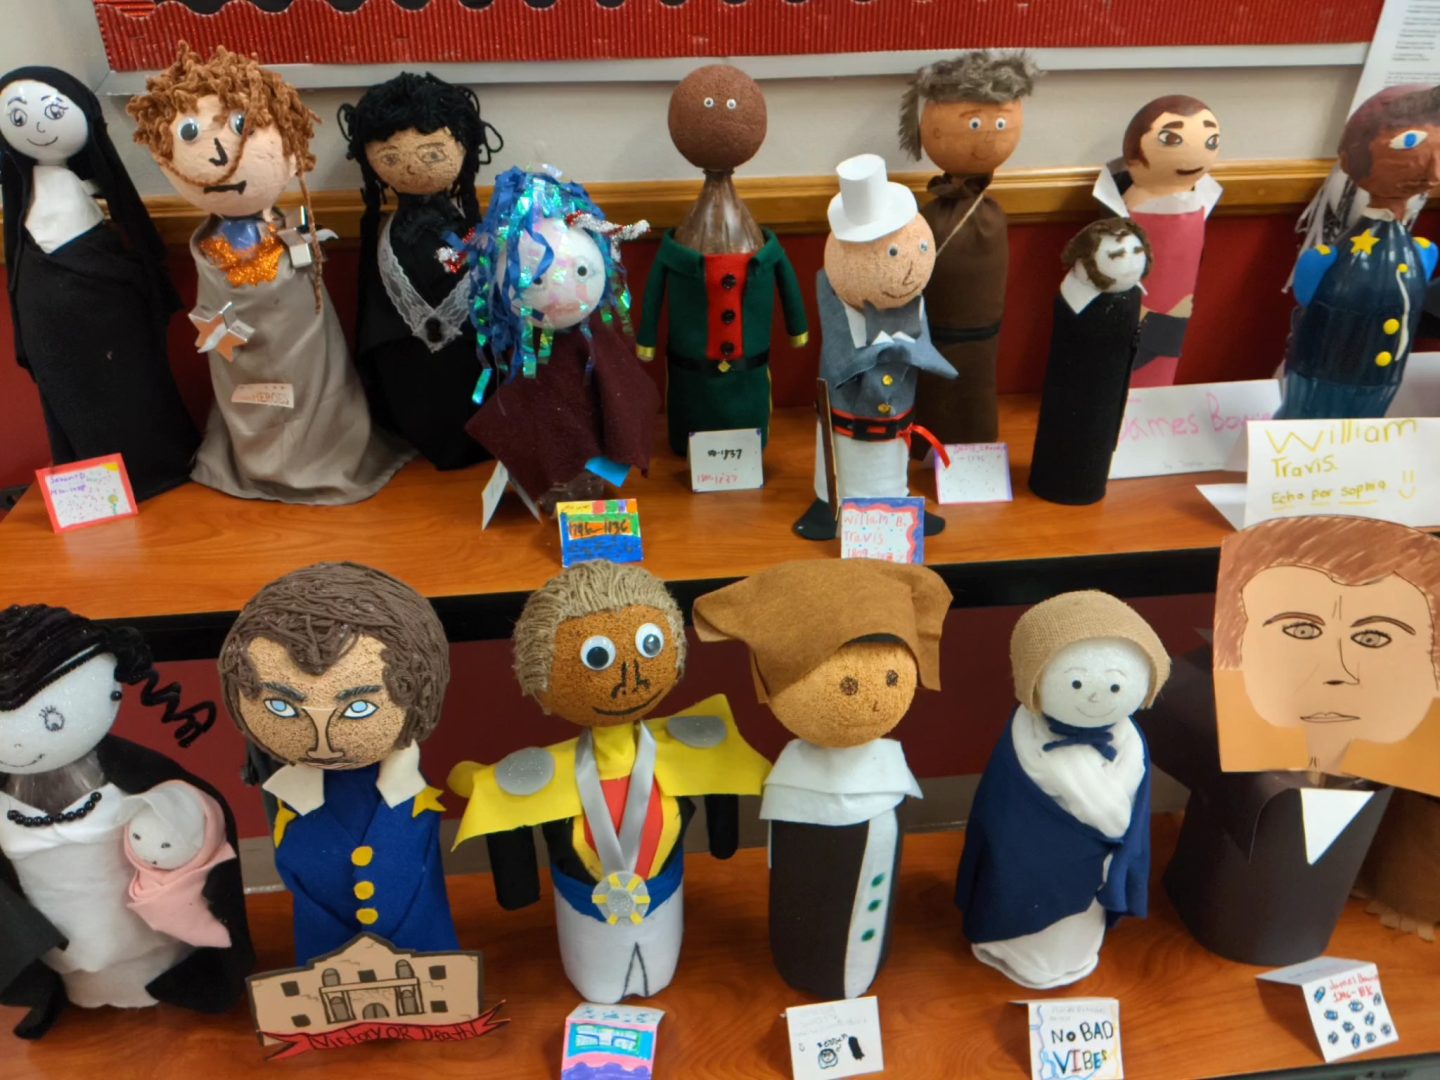
| Marie Curie, Helen Keller, Rosie the Riveter, and Harriet Tubman |
| Marie Curie has a battery pack so that the radium actually glows! Super creativity! |
| Sitting Bull and Geronimo also came to visit our classroom. |
| We were in the presence of Paul Revere, Ponce De Leon, JFK, Abe Lincoln, and Ben Franklin |
4 comments:
These are awesome! My 4th graders usually research inventors and then dress up as their inventor when they present. Unfortunately, my colleague already had our kids do this in her class, so I was looking for something different. Thank you so much for sharing this idea....it couldn't have come at a more perfect time.
So cute! How was the Abraham Lincoln costume made? Do you have a template?
your blog is very interesting, I will visit again in the next article rahasia besar cara memikat wanita idaman anda
This content is really great. Thanks for sharing.. কাজী নজরুল ইসলাম

Grab My Rambling Button

Also Read My Ramblings at

Blog Archive
- ► July (1)
- ► February (1)
- ► April (2)
- ► August (3)
- ► June (3)
- ► May (4)
- Guest Blog: A Hurried Rambling from a Happy Rambler
- Math Fact Tower Collapse and Dirty Socks: Rambling...
- Spring Time Flu and a Wonderful Blog Surprise
- Here Linky Linky! Here Linky Linky!: A "Positive a...
- "Sometimes You're the Windshield, Sometimes You're...
- ► March (8)
- ► February (3)
- ► December (1)
- ► November (2)
Blog's I Read; You Might Like Them Also...
Educational links.
- Colonial Williamburg's Student Site
- Practice of the States
- Spelling Practice
- Fun Multiplication Games
My favorite Anti-Laundry Procrastination Links
- Life's Journey Scrapbooking
- Pinterest: Where hours can be wasted, but ideas are a'plenty!

Thanks for stopping by! Come back soon!
2 Liter Soda or Pop Bottle People Project

Yep. This dude has a 2 Liter bottle body.
Have your kids had to do the “Make a person out of a 2 liter bottle and a styrofoam ball project?” What a PAIN!!
DS had to do that recently and his guy to create was Nikita Kruschev . Geeze!
Here’s how you do it: 1. Put sand in empty 2 liter bottle, for stability. 2. Buy medium styrofoam ball and cut a hole in it so that it can fit on the cap of the 2 liter bottle. 3. Decorate.
Here’s what we did: Covered the head with a white paper bag because just sytrofoam was ugly and we didn’t have any paper mache, which I thought would work well. Then, we rubber banded the bag into place. His outfit is made with some leftover polar fleece I had when I made DS#1 an Ash (from Pokemon) vest. We had an idea of what he should look like from this photo . Looking at the photo, I just cut out some material and folded it into the correct shapes for his clothes. Then I used a very hot glue gun (too hot for DS to use) to seal the pieces together. Nikita turned out great! You can even put things in his pockets. His tie and white shirt are polar fleece too. His little Russian hat is so cute. We used poly-fil for his hair and eyebrows…which we took outside and spray painted with black. We used the Cricut Expression to cut out the little stars and circle. DS added a face (of course), which is not shown here.

The back of Nikita.

Nikita to the Right.

Nikita to the Left.

Yes, I did feel the need to make Nikita Pop Art. Can you say, “geek”?
Similar Posts
Superjoy loves superfriends monthly give-a-way special edition day two.
Woo hoo…Day TWO!! Today’s Give-A-Way is for 2 of my Favorite things: Zip Dry Paper Glue AND the Jumbo Zig 2 Way Glue Pen. I use those things ALL the time! To enter just leave a comment! I’ll use Random.org to draw a winner on May 21. Good luck! I used Zip Dry most recently…

Cricut for the New User 3 of 5
This post is from 2011 and is more of a history of Cricut post now. Hello my Cricuting friends! I’ve got a video all ready for you! BTW, YouTube allows me to make videos that are longer than 15 minutes, but I’m having trouble uploading them so we’re going to stick to under 10 right…

Labeling Cuttlebug Embossing Folders
I like to know exactly which embossing folders I have, so I label them and keep a list. Sometimes I would be looking at cards people created and I would fall in love with the embossing folder they used, but they wouldn’t know the name of it. I would go crazy trying to figure out…

Spongebob Crabby Patty Valentine Treat Bag
Spongebob AND edible Crabby Patties!! SCORE! When I bought the Spongebob cartridge, I wasn’t even a fan. I’m still not a fan of the show (my kids are) but I LOVE this cartridge. I love how cute his is, I love Gary (the snail), I love how fun this whole cart is. How can you…

Ultimate Valentine’s Day Round-Up
Love is in the air! Valentine’s Day is around the corner and the Social Fabric Community has put together the Ultimate Valentine’s Day Round-Up to help you prepare for the season of love. From tutorials to crafts to delicious recipes, we have something for everyone. We dare you not to fall in love with these…

Owl Treat Box with Silhouette Cameo and SEI
Hooo’s super cute? This adorable owl made using SEI’s Pembroke paper! If you like using die cut machines in your creating you’re going to love using paper by SEI. It cuts perfectly. I like that each pack is coordinated so I don’t have to be a color genius to figure out if this goes with…
wow. I hope my son neeeeeeeeeeever has to do anything like this! LOL You did a great job and the instructions are really clear! Love it!
Unfortunately my son has to make James Cook, the famous explorer, out of a 2 liter bottle! Thank you for your detailed information, as I am not very creative! I hope mine comes out half as good as yours!
My son was just given this project for Black History Month. We’re currently working on a Scott Joplin doll! He’s not perfect (or done yet), but I think he’ll be pretty cute. 🙂
And I wanna’ learn to do the pop art too!!!! (Yeah, I can say “geek”! LOL)
OMG!! Thanks for the tips my son has to do one on JFK and its due in two days (he forgot to tell me about it) so thanks for the great tips
Comments are closed.
Biography Bottle Buddy Project

- PDF Frequently assigned in Easel
What educators are saying
Description, questions & answers, kara's class.
- We're hiring
- Help & FAQ
- Privacy policy
- Student privacy
- Terms of service
- Tell us what you think
How to Make People Figures From Plastic Pop Bottles
Things you'll need.
2-liter soda bottle
Small package of craft sand
4-inch Styrofoam ball
1 sheet paper
Ballpoint pen
Butter knife
Hot glue gun
Flesh-colored cotton sock
Permanent markers, assorted colors
Felt , several colors

Get crafty and upcycle empty soda bottles to make little people. You can use any shape or size of bottle to make one of these whimsical dolls for play or display. This tutorial is for a large soda-pop-bottle person, but the technique is the same for smaller bottles. Use these bottle people for decoration, school projects or a kid's craft project.
Advertisement
2-Liter Bottle Person
Remove the plastic label from the soda bottle. Wash and dry the bottle and lid. Allow the bottle to dry completely.
Video of the Day
Insert a funnel into the bottle and fill the bottom of the bottle with craft sand -- just enough to stabilize the bottle so when it is a doll, it won't tip over. Screw the lid back onto the bottle.
Create a face pattern: Using the Styrofoam ball to brace your pen, trace a 4-inch circle onto a piece of paper. Draw two eyes and a mouth onto the circle. Cut the eyes and mouth out of the circle to create a stencil pattern. Set the pattern aside.
Press the Styrofoam ball onto the soda bottle over the cap and neck section of the bottle. Guesstimate the center of the ball -- it doesn't need to be exact. Remove the ball. There should be a hole the size of the bottle cap and neck pressed into the surface. If necessary, use a butter knife to remove excess Styrofoam from the hole. Dab hot glue into the recess, and quickly place the ball back onto the cap. Let the glue dry.
Slide a flesh-colored sock over the Styrofoam ball. Lay the face-pattern stencil against the ball and pin it in place with a sewing pin. Trace the facial features onto the sock with a permanent marker. Remove the pattern.
Add details to the face with permanent markers. Color in the eyes and lips; if desired, draw rosy cheeks or any other distingushing features for the figure you're creating.
Fasten a twist tie underneath the head (Styrofoam ball). The tie should pull the sock tight and create a neck-like area.
Place a thin line of hot glue underneath the end of the sock and press it onto the bottle.
Hot-glue doll hair to the top of the doll's head.
Mentally divide the bottle into two sections. The bottom section should be longer than the top. Now wrap a wide rectangular piece of felt around the bottle for pants or skirt, and trim it to fit. Hot-glue it in place.
Wrap a narrow rectangular piece of felt around the bottle for a shirt or other top. Make sure to fit the felt over the twist tie to conceal it. Trim it to fit the bottle. Hot-glue it in place. If desired, roll a strip of felt to make a collar for the shirt and hot-glue that in place.
Cut two rectangular strips of felt the same color as the shirt felt for arms. Make sure that the strips are long enough to sit just below the collar and just over the top of the pants. Roll the fabric and hot-glue it to the sides of the bottle.
Add clothing details to your doll's felt clothing with permanent markers.
Add a cone-shaped Styrofoam piece to create a witch's or gnome's hat.
Add buttons for decoration.
Layer tulle over flesh-colored felt to make a ballerina tutu.
- Free Kids Crafts: Recycled Bottle People
- Joys LIfe: 2 Liter Soda or Pop Bottle People Project
- Susan Kramer: Page 4 Techniques for Making Cloth and Fabric Doll Bodies

Ash in The Wild
Where Every Journey Begins with a Spark of Discovery
How To Make Bottle Buddy Clothes: A Step-By-Step Guide
Introduction
If you’re looking for a fun and creative way to repurpose old plastic bottles, why not try making bottle buddy clothes? These adorable outfits are not only eco-friendly but also make great toys for children. In this tutorial, we’ll guide you through the process of creating your very own bottle buddy clothes in just a few simple steps. So, gather your materials and let’s get started!
Materials Needed
Before we begin, make sure you have the following materials ready:
- Empty plastic bottles (various sizes)
- Fabric of your choice
- Needle and thread (or sewing machine)
- Buttons, ribbons, and other decorative items
Step 1: Selecting the Right Bottles
Start by choosing the plastic bottles you want to use for your bottle buddy clothes. These can be from water bottles, soda bottles, or any other plastic containers you have at home. Make sure to clean and dry them thoroughly before proceeding.
Step 2: Cutting the Bottles
Using your scissors, carefully cut off the top and bottom parts of each bottle, leaving you with the desired height for your bottle buddy clothes. Smooth out any sharp edges with sandpaper or a nail file to ensure safety.
Step 3: Creating the Outfit Pattern
Take a piece of paper and lay it flat on a table. Place your bottle on top of the paper and trace around it to create the outline for your outfit. Add extra space for seam allowances and any desired design elements. Cut out the pattern.
Step 4: Cutting the Fabric
Place your pattern on the fabric of your choice and carefully cut around it. Repeat this step for each part of the outfit, including the front and back pieces, sleeves, and any additional accessories.
Step 5: Sewing the Outfit
Using a needle and thread or a sewing machine, begin by sewing the front and back pieces of the outfit together. Then, attach the sleeves to the main body. Don’t forget to leave openings for the armholes and neckline. Sew any additional accessories onto the outfit as desired.
Step 6: Decorating the Outfit
Now comes the fun part – decorating your bottle buddy clothes! Use buttons, ribbons, fabric paint, or any other decorative items to personalize your creation. Let your imagination run wild and create unique designs that reflect your style.
Step 7: Dressing Your Bottle Buddy
Once your outfit is complete, carefully slide it onto your bottle buddy. Adjust the fit and make any necessary alterations to ensure it sits comfortably on the bottle. You can also create multiple outfits to change your bottle buddy’s look whenever you want.
Step 8: Displaying Your Bottle Buddy
Now that your bottle buddy is all dressed up, it’s time to show it off! Place it on a shelf, desk, or any other prominent spot in your home. You can even create a mini wardrobe to store all your bottle buddy clothes and swap them out whenever you feel like changing their outfits.
Step 9: Sharing Your Creation
Don’t forget to share your bottle buddy clothes with friends and family! Take pictures and post them on social media, or even organize a bottle buddy clothes-making party. Encourage others to join in on the fun and spread the joy of repurposing plastic bottles.
By following this step-by-step guide, you can easily create adorable bottle buddy clothes from old plastic bottles. Not only will you reduce waste and contribute to a greener planet, but you’ll also have a unique and charming toy or decoration. So, gather your materials, unleash your creativity, and let’s start making bottle buddy clothes today!
IMAGES
VIDEO
COMMENTS
In this video, Rudy and I make an Abraham Lincoln Biography Bottle for his 3rd grade class Biography Fair for school. We used a large Zephryhills water bott...
Mar 6, 2019 - Explore Tracey Rickabaugh's board "biography bottles", followed by 120 people on Pinterest. See more ideas about bottle buddy, school projects, biography project.
How to Create a Biography Bottle Buddy . Creating a Biography Bottle Buddy is a fun and rewarding activity for both children and adults alike. It is an excellent way to learn about the life of someone, while also creating a unique keepsake for them. In this article, we will discuss the steps necessary to create a Biography Bottle Buddy and how ...
The directions were pretty easy… The assignment sheet said "Make a bottle buddy - use a 2-liter bottle for the body and a painted 4″ styrofoam ball (found at Hobby Lobby, Wal-mart or other craft stores) for the head. Fill the bottom with 2 inches of sand or dirt. Make the bottle look like your person."
To make her bottle buddy version of Musgraves, Underwood used a Styrofoam ball and Model Magic clay for the head, pink Play-Doh for the lips, long brown strands of yarn for the hair and dressed it ...
The directions below are one way to make your bottle buddy. Feel free to follow them, or create your own. We will send home daily pictures as we make our group project. Find one empty, dry water bottle. (12 to 24 oz. or a 2 liter soda bottle) Weigh the water bottle down by putting something heavy in it. (small rocks, beans or gravel)
Step 2: Create the Biography Bottle. Design and build a model of your historical figure using reused or scrap materials. Start with a sturdy base (a bottle, or other cylindrical container, make a good choice) and add a head. You can draw this on paper or get fancy with yarn or cotton ball hair, googly eyes, chenille stick limbs, or other extras.
The directions below are one way to make your bottle buddy. Feel free to follow them, or create your own. Pictures and ideas from last year's Bottle Buddies are posted online. Find one empty, dry water bottle. (12 to 24 oz. or a 2 liter soda bottle) Weigh the bottle down with something heavy. (small rocks, beans or gravel)
This is a slide show for the bottle biography project made by Avy in his 2nd Grade. In case, you wish to know how to build this please leave us a comment and...
Biography Bottle Buddy Project Directions: When making your Biography Bottle Buddy BE CREATIVE!!! Look for ways to recycle and reuse items around your house. The directions below are ONE WAY to make your bottle buddy. Feel free to follow them, or create your own. 1. Find one empty, dry water bottle. (2 litter soda bottle) 2.
Feb 24, 2017 - Explore Nan Nethery's board "Bottle Buddies", followed by 233 people on Pinterest. See more ideas about bottle buddy, school projects, biography projects.
First, find an empty bottle and weigh it down. Then, scrap out a hole the size of the top of the bottle and put the sphere on. Next, decorate the head and make clothes for it. Finally, decorate your bottle to look like your famous person. Remember to make at least 2 items that represent your person. Have fun!
In this video you will learn how to make a bottle person.
The Head: The head of the bottle buddy is attached to the cap of the bottle, so that it can be screwed onto the body. The most common material to use is a Styrofoam ball. This can be painted in ...
NyQuil has been taken, and it is almost time to stretch out on the couch and watch the Rockies play. However, I wanted to show you some of the AMAZING pictures of the bottle buddies my students created this year. I posted previously about the biography presentation and bottle buddies . I also have the directions and rubric FREE on ...
Nov 22, 2015 - Explore Becky Wilsmann's board "Biography Bottles" on Pinterest. See more ideas about bottle buddy, school projects, biography projects.
Geeze! 1. Put sand in empty 2 liter bottle, for stability. 2. Buy medium styrofoam ball and cut a hole in it so that it can fit on the cap of the 2 liter bottle. 3. Decorate. Covered the head with a white paper bag because just sytrofoam was ugly and we didn't have any paper mache, which I thought would work well.
Description. Here is a direction sheet for an AWESOME social studies project! My kiddos absolutely love this project. Each student researches a famous African American in history. Part of their report is to create a bottle buddy of that person. I provide some materials, but this portion of the project is completed at home.
Description. Students ABSOLUTELY LOVE this project! Want to motivate your students to read a new genre AND practice their speaking skills? This project requires students to read a "just-right" biography, compose a speech highlighting what s/he has learned, and pull it all together with the MOST ADORABLE renditions of their chosen subject.
Step 4. Press the Styrofoam ball onto the soda bottle over the cap and neck section of the bottle. Guesstimate the center of the ball -- it doesn't need to be exact. Remove the ball. There should be a hole the size of the bottle cap and neck pressed into the surface. If necessary, use a butter knife to remove excess Styrofoam from the hole.
Engage your students in biographical research and writing with our Bottle Biography Project. Print and distribute this multi-faceted project for students to research an individual, outline a biographical composition, write the composition, and create a bottle model of the individual (using 2-liter bottles). This resource includes a rubric for easy grading. This resource addresses the ...
Step 3: Creating the Outfit Pattern. Take a piece of paper and lay it flat on a table. Place your bottle on top of the paper and trace around it to create the outline for your outfit. Add extra space for seam allowances and any desired design elements. Cut out the pattern.
Feb 28, 2018 - Explore Tamie Kuhn's board "Bottle Buddy" on Pinterest. See more ideas about bottle buddy, school projects, biography project.