
How to Add & Fix Slides Numbers in PowerPoint? [An EASY Guide!]
By: Author Shrot Katewa
![How to Add & Fix Slides Numbers in PowerPoint? [An EASY Guide!]](https://artofpresentations.com/wp-content/uploads/2021/12/Featured-Image-Slide-Numbers-in-PowerPoint.webp "presentation number slides")
Isn’t it annoying when you add a new slide within a sequence of slides in your PowerPoint presentation, and all your slide numbers go for a toss! If you are in this boat, then you’ve come to the right place!
Adding slide numbers can be confusing even after you’ve been using PowerPoint for quite some time. However, with the proper process of adding slides numbers in PowerPoint, you won’t go wrong. But, the question really is, what is the correct way to add slides numbers in PowerPoint?
To add slide numbers in PowerPoint, click on the “Insert” tab and click on the “Slide Number” option from the ribbon. Then, enable the “Slide Number” checkmark. Finally, click on the “Apply to All” option to apply slide numbers to all slides in your presentation.
This article will walk you through the complete details of adding slide numbers in PowerPoint in a step-by-step manner with visual references so that you can easily understand the process! You’ll also learn to add slide numbers in the “1 of X slides” format.
Furthermore, I’ll also show you how to exclude slide numbers from specific slides. In the end, I’ll help you troubleshoot some of the most common issues that you may be facing with slide numbers in PowerPoint. That, and much more!
So, let’s get started!
1. Adding Slide Numbers the Wrong Way! [Don’t Do This!]
First, let’s talk about what you shouldn’t do!
The easiest (and most common incorrect way) to add a slide number is by manually adding a text box on each slide, manually inputting the slide number, and placing it at the bottom of the slide. However, this is the wrong way to add slide numbers to your PowerPoint presentation.
If you add slide numbers this way, you have to add the slide number to each slide individually. Moreover, if you decide to place a new slide in the middle of your presentation, it messes up the sequence numbers for all the slides you just inserted slide numbers. Don’t do this!
The following part of this article discusses the different ways you can add slide numbers to your PowerPoint presentation efficiently.
2. How to Add Slides Numbers in PowerPoint? [Correct Way]
There are multiple ways to add slide numbers in PowerPoint. However, I’ll share the most straightforward method in this article with you.
A quick heads up – if you prefer watching the tutorial rather than reading about it, then check out my video below with the step-by-step instructions. However, if you prefer to read the instructions, continue with the article below.
Adding a Slide Number in PowerPoint Using the “Insert” Tab
Although you will see people talk about using the “Slide Master” to add slide numbers to your presentation, using slide layouts in PowerPoint can be confusing!
The easiest method is to use the “Insert” tab to add slide numbers to your slide. You can use this method even if you are a beginner!
So, what do you need to do? Let’s take a look –
Step-1: Insert a Blank Slide Layout
The first step of the process is to insert a blank slide in your presentation. This step is only optional. It is not necessary to do this every time. Don’t do this step, especially if you use a presentation template. But, for the sake of explanation and practice, this will be a helpful step.
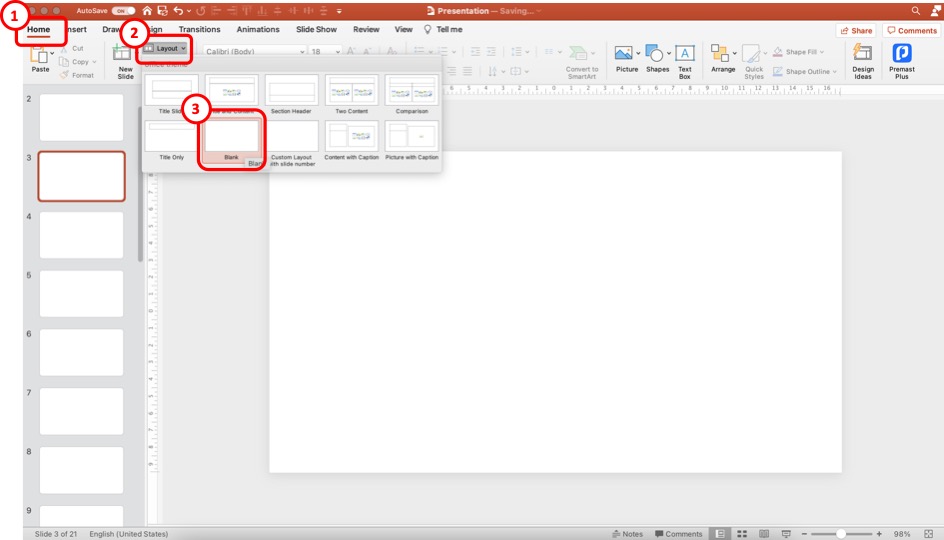
Click on the “Home” tab to add a blank slide layout. Then, click on “ Layout “, and from the options, click on the “ Blank ” slide option.
This will convert the slide layout of your current slide to a blank layout. You can also add a slide to your presentation and then convert it to a blank slide layout using the steps I just mentioned.
Step-2: Click on the “Slide Number” option
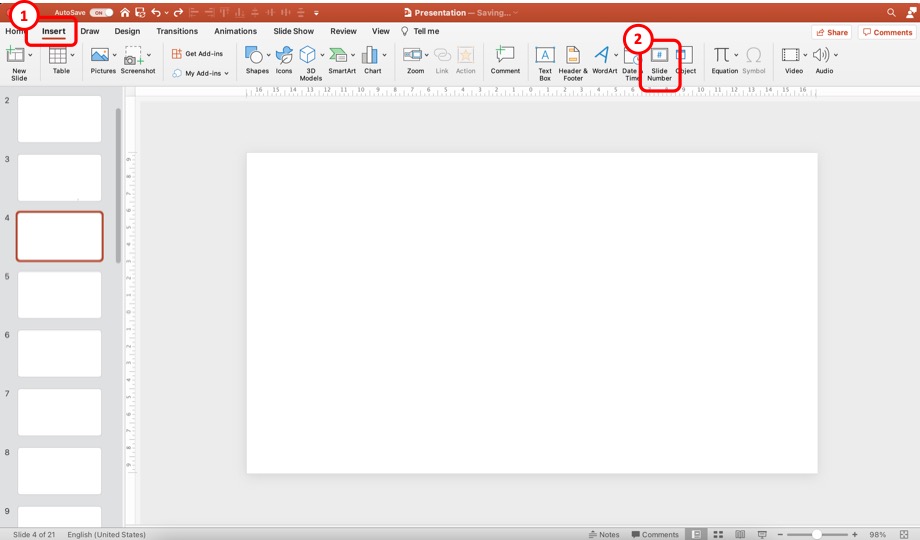
Now, click on the “ Insert ” tab. Then, from the options, click on the “ Slide Number “. This will open a new pop-up window with more options.
Step-3: Add the Slide Numbers to the Slides
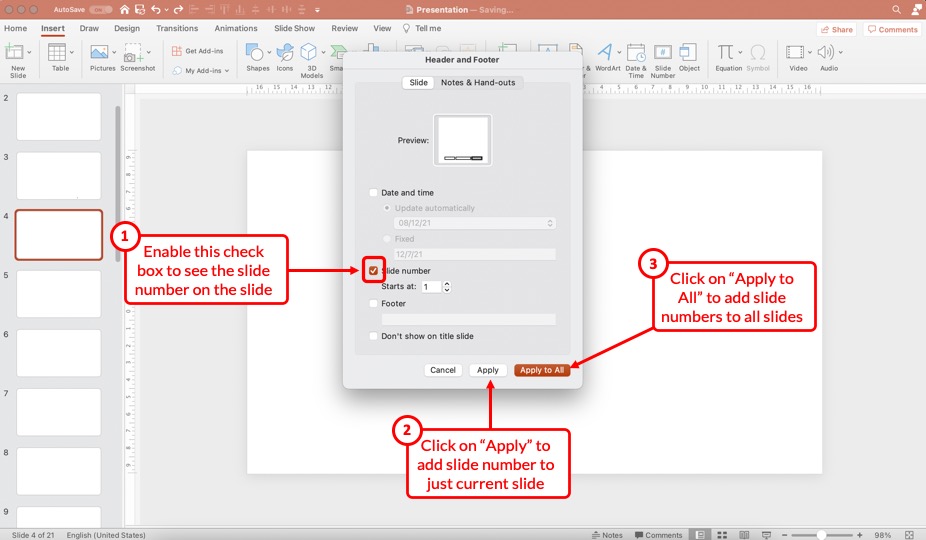
First, make sure that you enable the “Slide Number” option in the next step. Next, make sure that add a checkmark to the check box. You can choose to start the number at “ 1 “.
Then, click on the “ Apply ” option to add the slide number to just the current slide. However, if you wish to add slide numbers to all the slides, click on the “ Apply to All ” option.
Don’t worry. We’ll look at how to disable slide numbers for specific slides slightly later in the article.
Step-4: Duplicate the Slide with the Slide Number
This is, again, an optional step.
Once you have the slide number added by clicking on “Apply” in the previous step, you need to copy and paste the slide in PowerPoint .
Make sure that you format the slide number on this slide before you start duplicating this slide. (check the rest of the article to know how to format the slide number)
However, duplicating the slide with a slide number is only helpful when starting with a new presentation. If you already have a bunch of different slides that have been designed especially using a presentation template, this step 4 won’t work.
If you are in that situation, select the “Apply to All” option in step 3. Then, check the section below to format the slide number in PowerPoint.
3. How to Remove Slide Number from Specific Slides
If you don’t want specific slides to show the slide number, you can easily toggle it off.
To remove slide numbers from specific slides in PowerPoint, first, select the slide. Then, click on the “Insert” tab, and click on the “Slide Number” button. Next, “Uncheck” the slide number option in the pop-up that appears, and click on “Apply” to remove the slide numbers from the selected slides.
I’m hopeful that the process mentioned above is self-explanatory. Nevertheless, here’s a step-by-step process to disable slide numbers for specific slides in your PowerPoint presentation.
Step 1 – Select the Slides to Remove the Slide Number
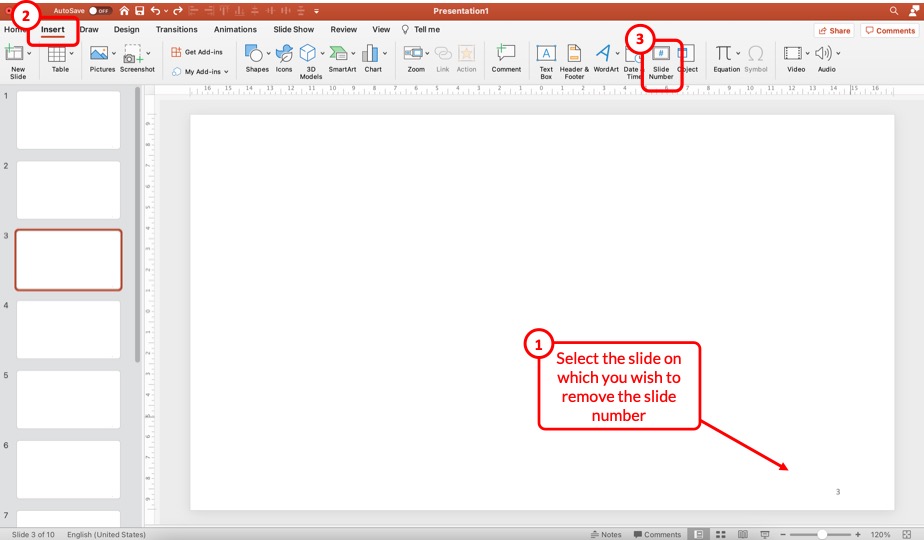
First, select the specific slides on which you wish to remove the slide numbers. You can use the “Ctrl” on your keyboard (or Cmd key for Mac) and click on the slides on the left part of the screen to select multiple slides at once.
Then, click on the “ Insert ” ribbon, and click on the “ Slide Number ” option from the ribbon. This will open a pop-up.
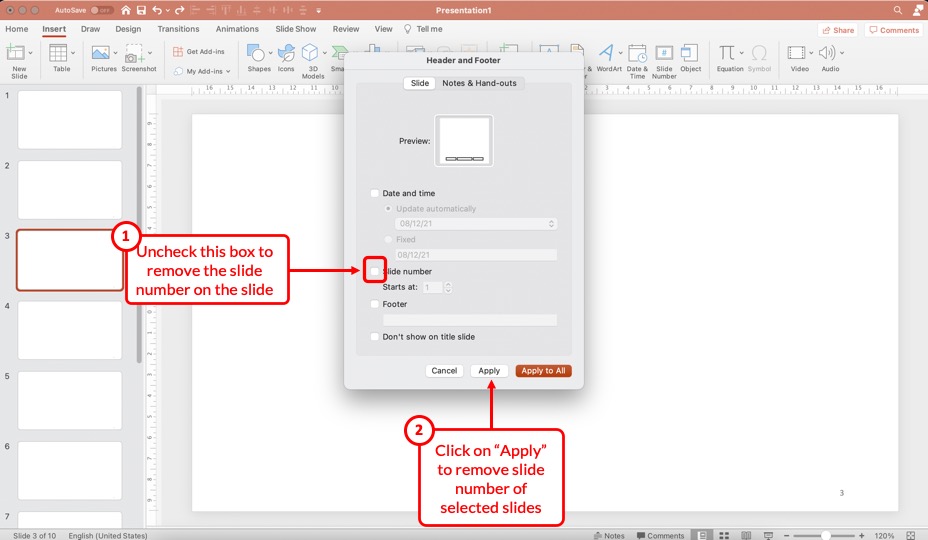
Step 2 – Uncheck the Slide Number Option

From the pop-up window that appears, uncheck the box for the “ Slide Number ” option and click on “ Apply “. This will remove the slide number just on the selected slides.
4. How to Remove Slide Number from Title Slide in PowerPoint?
One common problem that you may encounter once you add the slide numbers to all your slides is that the title slide of your presentation also now shows a slide number!
Most of us usually don’t want the slide number visible on the title slide. So, how do you remove the slide number from the title slide of your PowerPoint presentation?
Well, there are three different methods you can use. Let’s take a look at them one by one.
Method 1 – Manually Removing the Slide Number
The easiest way is to remove the slide number from the title slide manually. Simply select the slide number on the title slide and hit the “Delete” key on your keyboard, and the slide number will be deleted.
This method works well for the title slide only since the title slide will always remain as the first slide in the presentation and won’t change its position in the sequence.
If you use this method on other slides, chances are you may want to move the slides around and may want the slide numbers back on the slide later. And, that may just complicate things for you. Instead, just follow the steps mentioned in the previous section to delete slide numbers on other slides.
However, sometimes, PowerPoint just doesn’t allow you to select the slide number field on the slide! In such a scenario, you can’t just delete the slide number.
This is where the other two methods come in handy!
Method 2 – Uncheck the Slide Number Option on the Title Slide
This method works just the same way as per the steps described in the previous section (section 3 above) of the article that describes the process to remove slide numbers from specific slides.
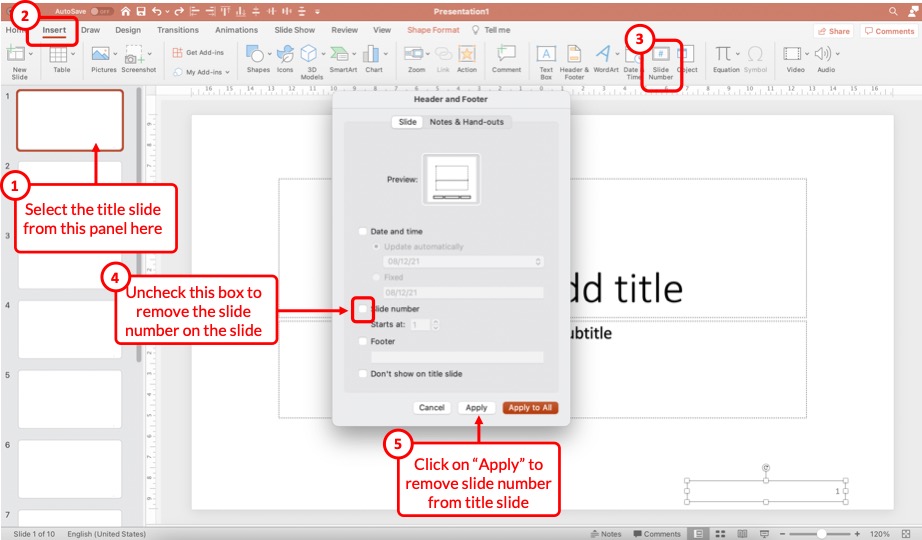
All you need to do is select the title slide by clicking on it. Then, click on the “ Insert ” tab. Next, click on the “ Slide Number ” option. From the pop-up that appears, uncheck the box for “Slide Number”, and click on “ Apply “.
Just as before, this will remove the slide number from the selected slide.
Method 3 – Use the “Don’t Show on Title Slide” Option

You can also use the “Don’t show on title slide” option when adding the slide numbers to your presentation in order to avoid the slide number on the title slide!
To do so, repeat the steps of adding the slide number to your presentation. Then, enable the checkmark on the “Don’t show on title slide” option to remove the slide number from the title slide.
5. How to Remove Slide Numbers on All Slides in PowerPoint?
Removing slide numbers from all slides is just as easy as adding slide numbers to your slides!
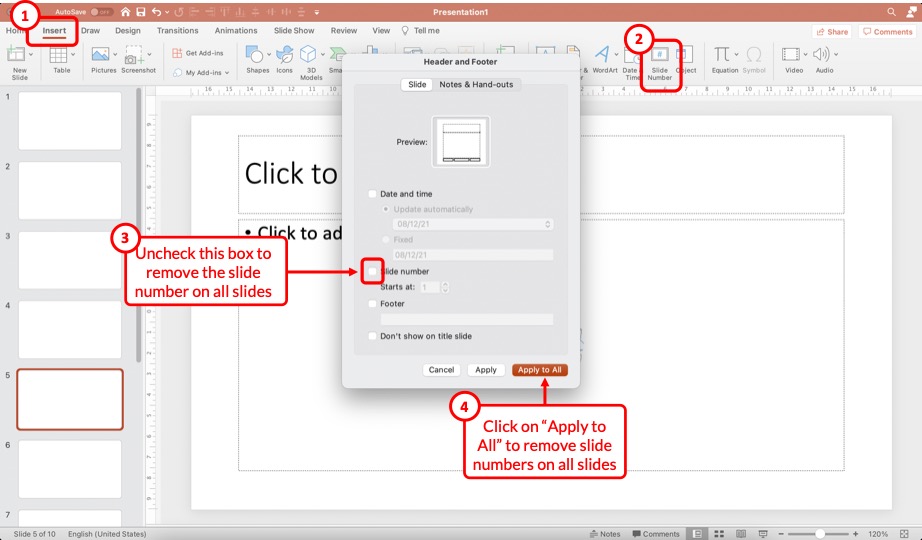
To remove slide numbers from your PowerPoint presentation, click on the “Insert” tab. Then, click on the “Slide Number” option. From the pop-up that appears, uncheck the box for “Slide numbers”, and click on the “Apply to All” option.
Check the steps on the image shared above in case you need any further clarification.
Once all the steps are complete, you will notice that the slide number disappears from all slides!
6. How to Make Slide Numbers “1 of X Slides” in PowerPoint?
If you have a really long presentation that contains more than 50 slides, then you may want to use the “1 of X Slides” format! [Where “X” is the total number of slides that your presentation contains]
Doing so allows the audience to estimate the number of slides remaining in the presentation. So, how do you do that?
Let me share with you a ninja tip in this section! Here’s a step-by-step explanation of what you need to do!
Step 1 – Insert a Text Box on the Slide
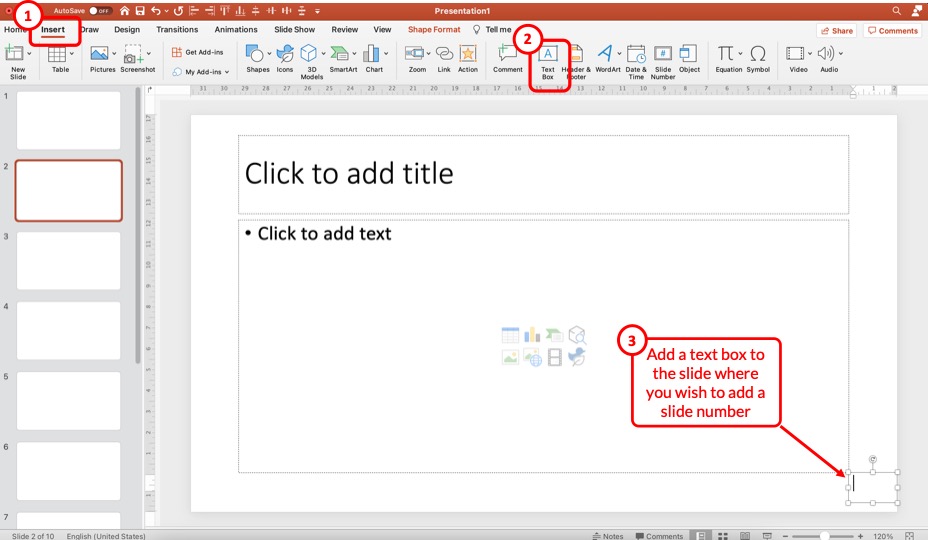
The first step is to insert a text box on the slide. To do that, click on the “ Insert ” tab. Then, click on the “ Text Box ” option from the ribbon. Next, just drag the cursor on the bottom right corner of your slide (or wherever you wish to have the slide number).
Step 2 – Insert the Slide Number
The next step is to insert the slide number. But, don’t add the slide number manually.
Instead, first, click inside the text box to make it active. Then, click on the “ Insert ” tab and click on the “ Slide Number ” option from the ribbon.
This will automatically insert the slide number inside the text box.
Step 3 – Add Text After the Slide Number
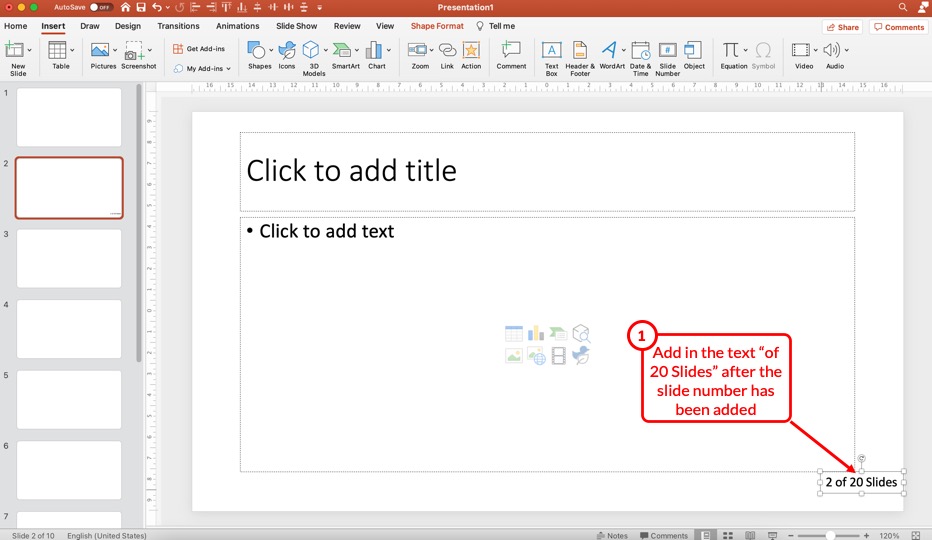
Now, simply add the text that you wish to appear after the slide number. In this case, I’ve added “of 20 Slides” after the slide number (as shown in the image above).
Step 4 – Copy and Paste the Text Box
Now, all you need to do is simply copy and paste this text box on all the slides!
Once you copy and paste the text box on other slides, you will notice that the slide number within the text box will change with the changing slide. However, “of 20 Slides” will remain constant!
Thus, it is advised to add such a slide number format to all slides once you’ve completed creating the presentation as it will provide you with a clear understanding of the exact number of slides in your presentation.
Don’t worry! Even if you move the slides around and change the sequence, the slide numbers will still change with the specific slide!
7. How to Format Slide Numbers in PowerPoint?
Formatting slides numbers is quite easy if you know what to do!
PowerPoint allows you to change the font color, font size, and even the font that is used for the slide numbers. Formatting a slide number works just like formatting text in PowerPoint .
There are two key processes to know when formatting a slide number in PowerPoint! Let’s take a look at both of them –
7.1 How to Format Slide Numbers for a Specific Slide Layout?
Formatting slide numbers of a specific slide layout will affect only those slides that use a particular type of slide layout. Here’s what you need to do –
Step 1 – Add Slide Numbers to the Slides
The first step is to add the slides numbers to your slide. Obviously, in order to edit the slide numbers and see the effect, the slide numbers need to be present on the slide.
So, if you haven’t added the slide numbers already, follow the steps mentioned earlier in the article and add the slide numbers first.
Step 2 – Check the Slide Layout
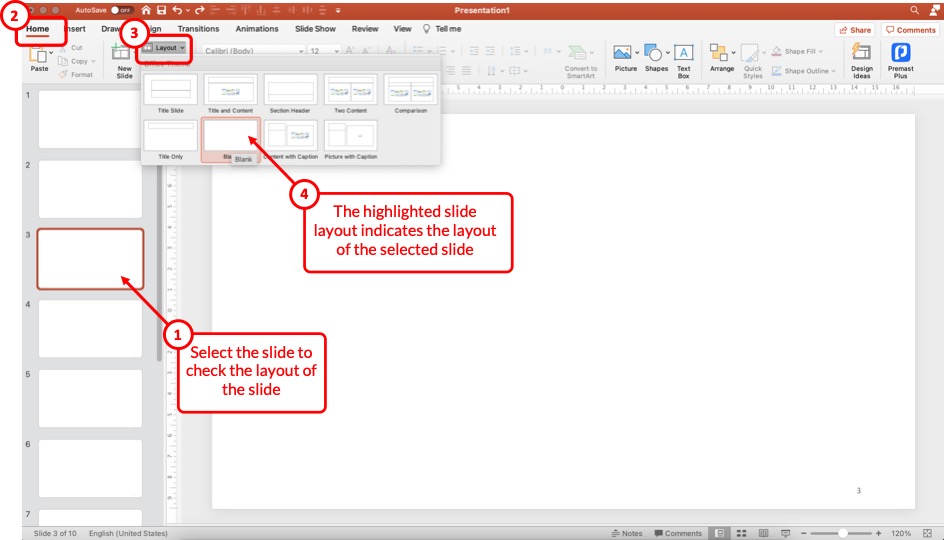
The next step that we need to take is to check the slide layout that is currently in use for the specific slide on which we intend to format the slide number.
To check the slide layout, first, select the slide. Then, click on the “ Home ” tab and click on the “ Slide Layout ” option from the ribbon.
The highlighted slide layout will indicate the layout the current slide uses.
Step 3 – Open the Slide Master View
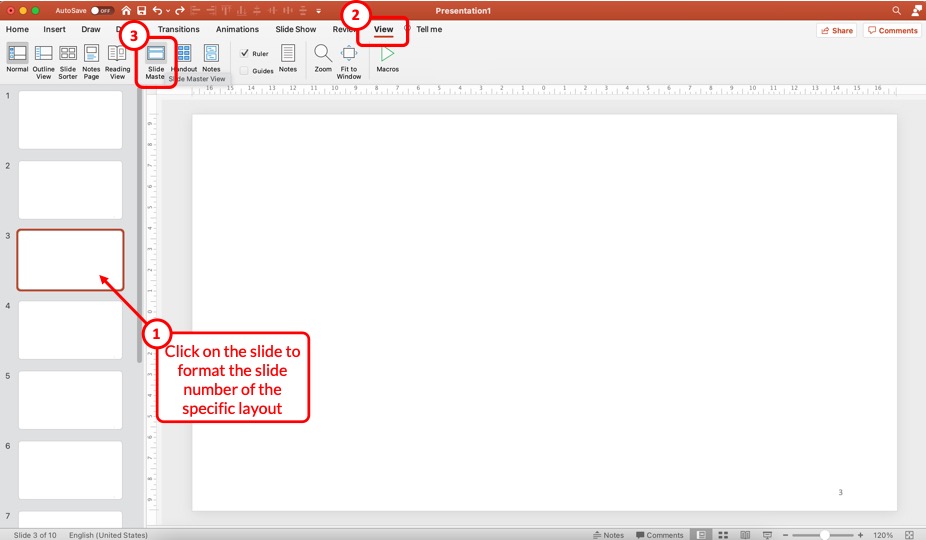
In the next step, we need to open the Slide Master View in PowerPoint .
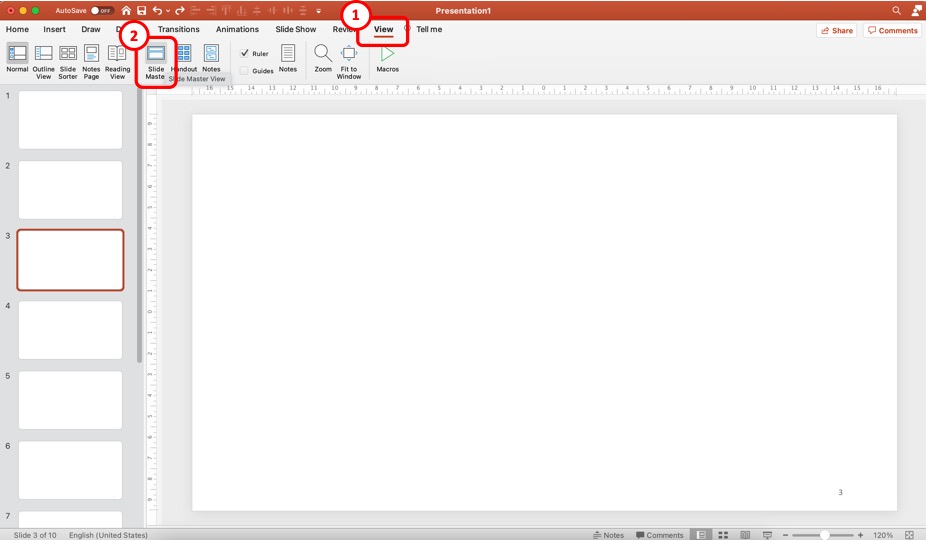
To do that, first, click on the slide for which you wish to change the slide number format. Then, click on the “ View ” tab, and click on the “ Slide Master ” option from the ribbon.
This will open the slide master view in PowerPoint.
Slide 4 – Format the Slide Number for the Specific Slide Layout
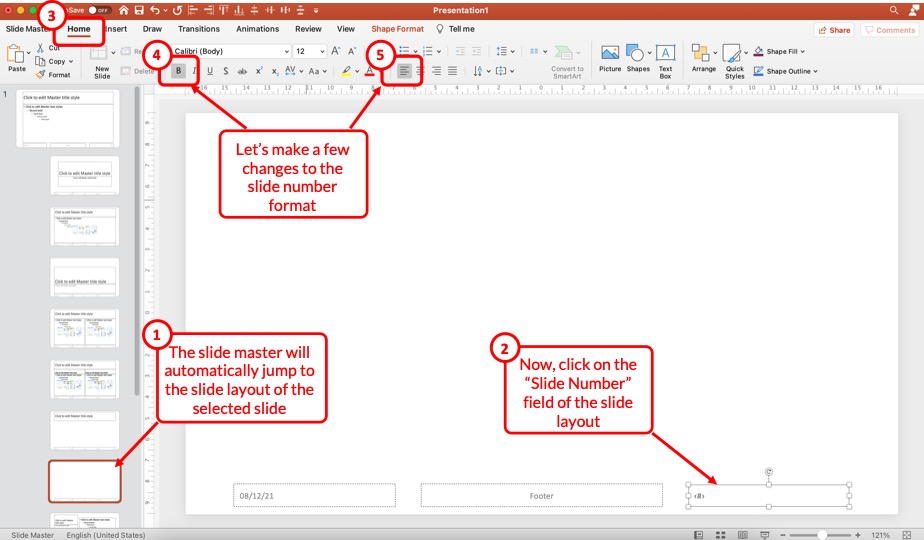
Now, first, make sure that you have the correct layout selected. By default, PowerPoint will open the slide layout of the slide that was selected before opening the slide master view.
Then, to make changes to the format of the slide number, select the slide number field present on the slide. Click on the “ Home ” tab, and make the changes as per your preference.
You can change the font, text alignment, text styles, font size, and much more! For the sake of this example, let’s change the alignment to left, and add a “Bold” style.
Slide 5 – Exit the Slide Master
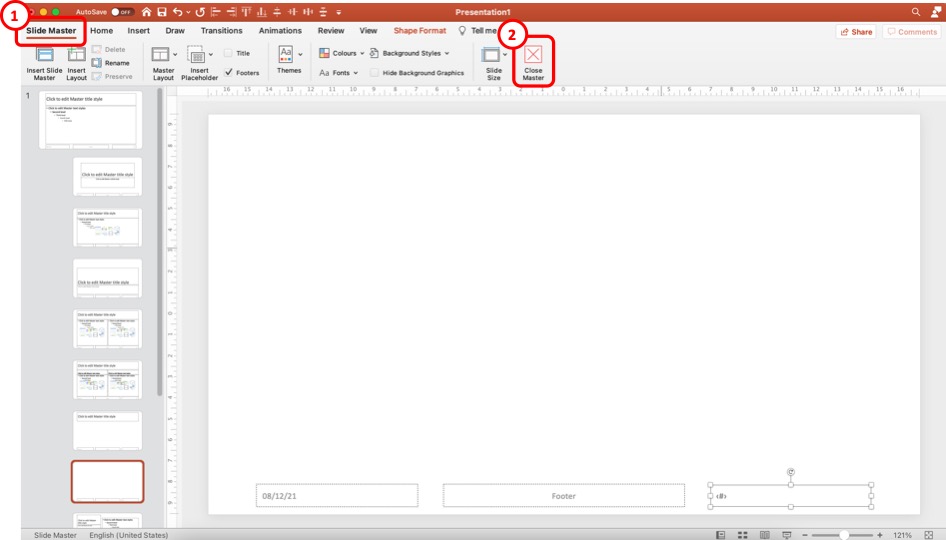
Once you’ve made the desired formatting changes, click on the “ Slide Master ” tab once again, and click on the “ Close Master ” option to exit the slide master.
Once you exit the slide master and open the normal view, you will notice that the formatting of the slide number on the current slide layout is different from other slides.
7.2 How to Format Slide Numbers on All Slides in PowerPoint?
If you wish to change the format of the slide number on all slides instead of specific slide layouts, you can do so just as easily. And, no! You don’t need to individually change the format of slide numbers on each slide!
Here’s what you need to do to change the slide numbers on all slides in PowerPoint –
Step 1 – Open the Slide Master View
First, you need to open the slide master view in PowerPoint. Just as before, click on the “ View ” tab. Then, click on the “ Slide Master ” option from the ribbon.
Step 2 – Format the Slide Number Field on the “Master Slide”
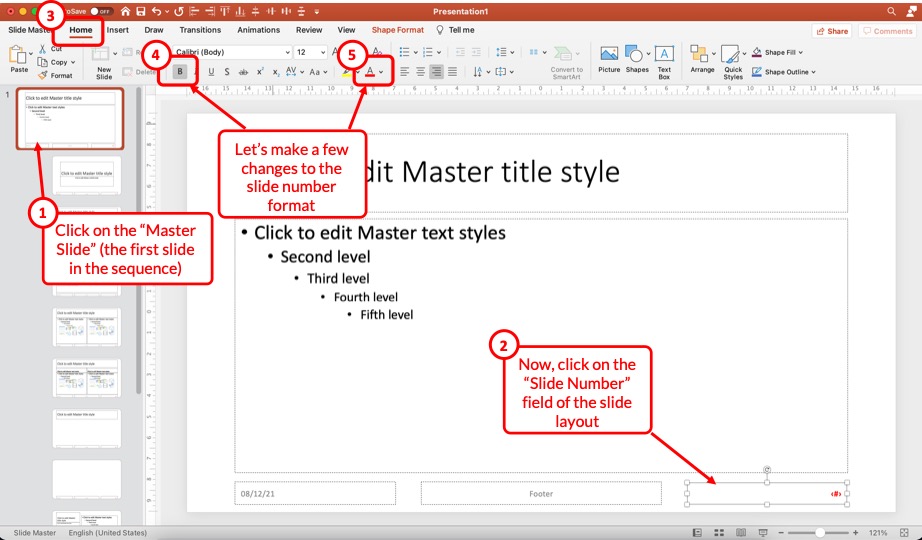
Once you open the slide master view, click on the “ Master Slide ” i.e. the first slide in the sequence (which is also larger in size than the other slides).
Next, make sure you select the slide number field on the bottom right of the slide. Then, click on the “ Home ” tab. Here you can make all the formatting changes that you need.
For the sake of this example, I’ll click on the “ Bold ” option and change the font color to red.
You can see the change taking place on the selected slide number field on the master slide.
Step 3 – Exit the Slide Master
The last step is to exit the slide master.
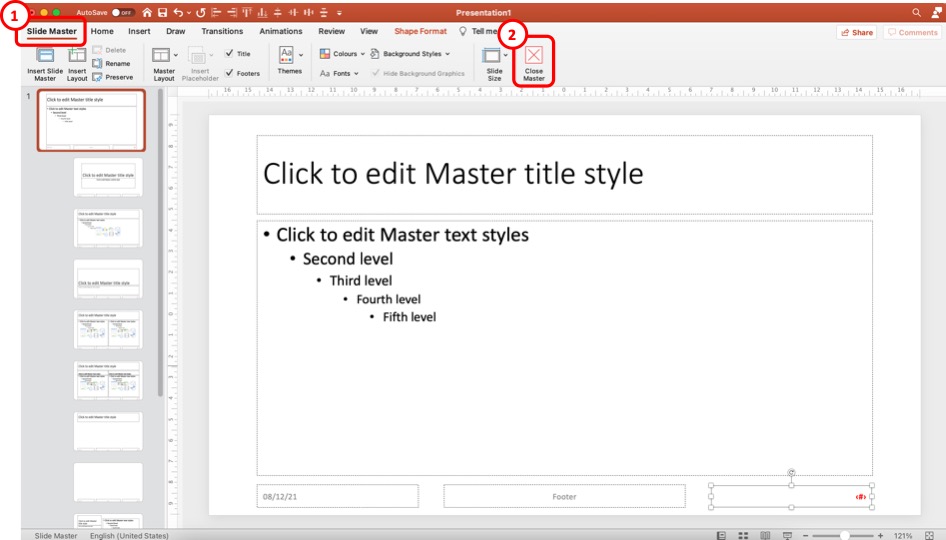
Once you have made all the changes to the slide number formatting, click on the “ Slide Master “. Then, click on the “ Close Master ” options.
When you return to the normal view, you will notice that the formatting changes have been applied to all the slide numbers in your presentation.
Using the method described above, you can make changes to font color, font size, type of font, text alignment, and other formatting changes that you can normally make to text in PowerPoint!
8. How to Change the Position of Slide Numbers in PowerPoint?
To change the position of the slide numbers in your PowerPoint presentation, at first, select the text box of the slide number. After that click and hold the text box and drag it to your preferred position anywhere on the slide.
Once you’ve dragged it to where you want the slide numbers to be let go of the mouse button and the position of the slide number will change accordingly.
In order to change the position of slide number on all the slides, make sure that you use the method described in the previous section of the article (section 7.2)
9. Troubleshooting Slides Numbers in PowerPoint
While adding slide numbers to your PowerPoint presentation you may encounter some difficulties as some users of PowerPoint has.
There may be problems like the slide numbers not, showing the slide number may not be showing as “#”, you may have difficulty removing the slide number, or maybe you want the slide number to start from 0.
All these issues and possible reasons why you are encountering them are described in the following section.
9a. Slide Numbers Not Showing in PowerPoint
Sometimes you may find it difficult to add slide numbers to your PowerPoint presentation. Some of the reasons why you’re having this problem and possible ways to get around them are described below.
1. There may be a shape inserted over your slide number: Sometimes, there may be a shape or an image placed over the location where you inserted your slide number.
To solve this issue, click on the area where the slide number should be, and if there is a shape over it, “Right-click” on the shape and select the “Send to Back” option.
2. Make sure you have used the right layout: Some layouts don’t include the “ Slide Number ” placeholder in the slide. In that case, you won’t be able to see the slide number in slides using that layout.
To get around this issue, either insert a slide number placeholder in that layout or use a different layout that has a page number placeholder.
9b. Slide Number Showing as “#”
If the slide number is not showing as “#” in your PowerPoint presentation, then the presentation may be using multiple layouts.
To resolve this issue either use a different layout or manually insert a “ Footer ” in your PowerPoint presentation. After that that you should be able to see the “#” sign in the slide number placeholder.
9c. Can’t Remove Slide Number in PowerPoint?
You can’t remove slide numbers from your PowerPoint presentation by simply deleting them. This would only remove the slide number from the single slide where you deleted the slide number.
To remove slide number from all the slides in your PowerPoint, follow the instructions of excluding a slide from being number described earlier in this presentation, but instead of selecting the “ Apply ” button, select the “ Apply all ” button.
9d. Make Slide Number Start at 0
To make the slide number start from zero, follow the instructions given below.
Step-1: Select the “Customize Slide Size” option
The first step of the process is to select the “ Customize Slide Size ” option. To do that simply go to the “ Design ” tab from the ribbon of your presentation, click on the “ Slide Size ” button located in the “ Customize ” section of the “ Design ” tab.
After that, a dropdown menu will appear on your screen. From the dropdown menu, click on the “ Customize Slide Size ” option.
Step-2: Type in 0 in the “Number starts from” box
Finally, type in ‘0’ in the “ Number starts from ” box which is the last box in the “ Slide Size ” pop-up window, and then hit the “ Ok ” button. This will make the slide numbering start from zero.
Credit to drobotdean (on Freepik) for the featured image of this article (further edited)
Critical PowerPoint Shortcuts – Claim Your FREE Training Module and Get Your Time Back!
How to add slide numbers in PowerPoint (Step-by-Step)
- PowerPoint Tutorials
- Shortcuts & Hacks
- January 11, 2024
Adding slide numbers in PowerPoint should be an easy and straightforward task, but it is not. The way that PowerPoint manages your slide numbers is confusing.
While confusing and frustrating, the last thing you want to do – and I have done this before myself – is manually add the page numbers to the slides yourself.
Manually adding slide numbers is a classic 101 timewaster that you will instantly regret for two reasons.
The first reason is, manually doing anything in PowerPoint that PowerPoint can automatically do for you (even if it requires a little research), is never an effective use of your time. If you want to have a life outside of the office slaving away in PowerPoint, you will want to push as many of these types of tasks as possible back on to PowerPoint.
The second reason is, after you manually add your slide numbers in PowerPoint, you will have to manually update them again as you add or remove slides from your presentation. If you thought it was tedious to manually add the slide numbers in the first place, believe me when I say that it is ten times as tedious to have to manually update them again, and triple-check that all your slides are numbered correctly.
Follow along with me below and see the advanced trouble shooting video at the bottom of the page if you are still having issues.
NOTE: When printing your slides as handouts, be aware that it is your slide number (NOT the page number) that displays for each page of the speaker notes you print. To learn how to add speaker notes to PowerPoint (and some of the tricks to working with them), read my guide here .
Table of Contents
[watch] how to add slide numbers in powerpoint.
You are currently viewing a placeholder content from Youtube . To access the actual content, click the button below. Please note that doing so will share data with third-party providers.
Adding slide numbers in PowerPoint is one of those things that should be simple and easy (like it is in Microsoft Word) …but it’s not.
And just so we are on the same page, in this article you can use the term slide number and page number interchangeably. They are the same thing in this case.
While a lot of people can “properly” add them to the PowerPoint Slide Master , they still can’t get them to properly show up in the Normal View . And if you work in the professional services industry, this is something you’ll want to get right! The last thing you want to do is torpedo the overall quality of your presentation simply because you can’t get your slides properly numbered.
Take your PPT skills to the next level
Setting up your slide numbers in the slide master view.
When you are adding slide numbers to PowerPoint, or troubleshooting your slide numbers, the first place to check is your Slide Master.
That is because the Slide Number field is driven and controlled by your Slide Master.
Continue reading to see how this is done. If your Slide Numbers are already set up properly on your Slide Master, you move to the next section.
1. Navigate to your Slide Master
In all versions of Microsoft PowerPoint, the slide numbers (or page numbers) for your presentation are driven from the Slide Master View. As such, this is one of the best places to check first if you are having trouble adding slide numbers in PowerPoint, or if your slide numbers are not properly displaying.

To navigate to the Slide Master view in PowerPoint, simply:
- Navigate to the View tab in your Ribbon
- Select the Slide Master command
If you frequently need to use your Slide Master, you can use the Shift + Normal icon shortcut to jump to the slide master.
2. Navigate to your Parent Slide (the big slide)

In the Slide Master view, navigate to the Parent slide on the top left. This will be the first and largest the slide listed on the left side of your screen.
3. Open the Master Layout dialog box to find the Slide Number field

To open the Master Layout dialog box in PowerPoint, simply:
- Navigate to the Slide Master tab in your Ribbon
- Click Master Layout to open the dialog box
The Master Layout dialog box is where you set the Title, Text, Date, Slide number, and Footer for your PowerPoint presentation. To expand your knowledge and learn how to create a template in PowerPoint, read our guide here .
NOTE: PowerPoint is a contextual program, in that it only displays tabs for the views you are in, or the objects you have selected. If you do not see the Slide Master tab in the ribbon, that means that you have not properly navigated to your Slide Master yet. See step #1 above.
4. Select the Slide Number field
In the Master Layout dialog box, make sure you have a check mark next to Slide number . Selecting this option adds the slide number object to the Parent Slide, that you can then use to automatically add and update all the slides numbers in your presentation (instead of manually adding them yourself).
You can additionally add the Title, Text, Date and/or Footer objects if you don’t already have them on your Parent Slide. These are the fields you will want to set up and properly format if you are building a PowerPoint template for your team or company.
After you select which elements you want to appear on your slides, click OK .

5. Place and format your Slide Number
With the slide number added to your Master Slide , you can now format and/or place it wherever you want. In this case, I’ve placed mine in the upper right-hand corner of my slide.
Where you place it on your Parent Slide determines where the numbers show up (by default) on all of your Child Slides. In the below picture, you can see I placed my slide number in the upper right hand corner of my slide.

NOTE: By default, your slide numbers populate to all the Child Slides (the little slides in the Slide Master view) in your presentation. If they do not, you will need to cycle through the Child Slide layouts and delete the old page numbers individually, and then click the Footers icon in the Ribbon to add them back (another area where slide numbers in PowerPoint can be a pain).
To learn how to set up and format the Parent Slide and Child Slides for your PowerPoint template , read my guide here .
6. Close out of the Slide Master view

Before you exit out of the Slide Master view, I recommend double-checking that your slide numbers are properly set up both on the Parent Slide, and all the individual Child Slides. If you accidentally missed one, now is the time to catch it.
Once you are sure the slide numbers are all where they are supposed to be, you can click out of the Slide Master View:
- Click the Slide Master tab
- Select Close Master View
Applying your slide numbers in the Normal View
Once you’ve set up and formatted the Slide Number field in the Slide Master view, you are ready to move on and add them to your presentation.
As an analyst or associate who is in charge of the deck, it is important to keep in mind that just because the Slide Number field is properly set up in the Slide Master, DOES NOT mean they will automatically show up in your presentation.
Continue reading to see the next steps to make sure your slide numbers properly display in PowerPoint.
1. Open the Slide Number dialog box

Now that you have setup (or double-checked) that your slide numbers are set up properly in the Slide Master view, now we can add them here in the Normal View of PowerPoint (woo-hoo). Let’s start by opening the Header and Footer dialog box as follows:
- Navigate to the Insert tab
- Select the Slide Number command
You can alternatively use the Alt + Shift + D keyboard shortcut to open the Header and Footer dialog box. If you want to learn additional PowerPoint shortcuts like this that will save you time, read my shortcut guide here .
Regardless of how you get to the Header and Footer dialog box, this is the best and proper place to add, remove, and/or manage your presentations:
- Date and time
- Slide numbers
The goal again is to get PowerPoint to do the heavy lifting for you here. Even if this dialog box is new and a little confusing to you, it is worth getting this right as it will save you a ton of time in the future.
2. Apply your Slide Numbers

NOTE: The option to “Don’t show on title slide” can easily catch you off guard. That’s because the title slide in PowerPoint is NOT what you probably think it is. For more information, on what the title slide actually is in PowerPoint, read my guide here .
Within the Header and Footer dialog box, make sure there is a checkmark next to the Slide number .
With it selected, you get a preview of where your slide numbers will appear in the upper right-hand corner of the dialog box. After that, select either:
- Apply , applies your slide number to the individual slide you are working on.
- Apply to All , applies slide numbers to all of the slides within your presentation (assuming that each of the Child Slide layouts has your slid number on it).
Assuming you want to add slide numbers to all your slides in PowerPoint, click Apply to All . Clicking Apply to All, PowerPoint automatically adds the slide numbers to all your slides, based on the formatting and positioning you set up on the slide master.
As you can see in the picture below, the slide numbers now display (just as I set them up on the Slide Master).

Troubleshooting slide numbers that won't show up
If you followed along with me above and you still can’t get your slide numbers to properly display in PowerPoint, I have you covered.
In the following video, I highlight a few extra steps you can take to make sure your page numbers show up in PowerPoint.
If you still can’t figure out what is happening with your slide numbers, leave a comment or send me a note and I will do my best to help you out.
Final thoughts
You did the right thing by looking up how to add slide numbers in PowerPoint. The worst possible thing you can do is get so fed up with the PowerPoint page numbering system, that you manually add them yourself.
Another good point to remember is that you can use the Header and Footer dialog box to quickly remove all the slide numbers from your presentation. Simply unselect the Slide number option and click Apply to All and PowerPoint will automatically remove them all from your presentation.
While we all wish that adding page numbers in PowerPoint was as easy as it is in Word, that’s why you are paid the big PowerPoint bucks.
If you enjoyed this slide number tutorial and want to take your PowerPoint skills to the next level, check out our online training courses and other PowerPoint tutorials here .
🔒 Unlock the PowerPoint Shortcuts Trusted by Industry Leaders KKR, American Express, HSBC, and More!
Join over 114,880 professionals from diverse fields including consulting, investment banking, advertising, marketing, sales, and business development who have supercharged their PowerPoint game with our proven methods.
✅ Customize compelling presentations effortlessly.
✅ Master time-saving techniques for faster deck creation.
✅ Boost your career prospects with top-notch PowerPoint skills.
Get FREE access to the Critical PowerPoint Shortcuts module of our premium training course by entering your name and email below.
DISCLAIMER: PC Users Only!
We respect your privacy and will keep your info safe and confidential.
Related Articles
- What is a broken link chart in PowerPoint (and how to fix it)?
- Bar chart trick: Right aligning categories (PPT, Word, and Excel)
- PowerPoint settings: program level vs. presentation level
- What is a linked Excel chart in PowerPoint?
- Set Up Slide Show: Customize how your PPT presentations run
About The Author

This Post Has 9 Comments

Thanks for your guidance but it doesn’t completely work. I have one Master and two layouts. It will only add the page number to one of the layouts. No matter how many times I try to insert the slide number and apply to all, when ever I add a new slide, it only puts the slide number on one layout but not the other! Very frustrating because I followed all of your steps perfectly.

Thank you thank you thank you. Have been desperately trying to populate a submaster with slide numbers for a day now. The trick of RE-clicking on Title and Footers boxes up in the Maser Slide menu, while selecting my submaster slide, finally did the trick !

So happy to be able to help, Fran! Those little slide numbers can be tricky, despite appearances. Cheers!

Great vid. thanks.
Thanks for commenting, and happy this was a help to you! Cheers!

Thanks for the super-concise speed training on this – I was starting to pull my hair out! Again Microsoft prove they are the most clumsy legacy software developers on the planet!!
Hi Mathias! Glad to have been able to help. Yes, this is still a trickier issue than it should be, but luckily, there is a solution! Cheers

WOW! What an amazing and fast video. I will definitley bookmark this site!!
So happy to hear that, Anna! Thank you and let us know if there’s any other nagging problem we can solve for you. Cheers
Comments are closed.
Popular Tutorials
- How to Strikethrough Text (l̶i̶k̶e̶ ̶t̶h̶i̶s̶) in Word, Excel & PowerPoint
- How to Make Animated Fireworks in PowerPoint (Step-by-Step)
- Strikethrough Shortcut (l̶i̶k̶e̶ ̶t̶h̶i̶s̶) for Word, Excel & PowerPoint
- How to Create a Flash Card Memory Game in PowerPoint (Like Jeopardy)
- Keyboard Shortcuts Not Working: Solved
PowerPoint Tutorial Categories
- Strategies & Opinions
- Presentation Design
- Pictures, Icons, Videos, Etc.
- New Features
- Miscellaneous
- Charts & Data Viz
We help busy professionals save hours and gain peace of mind, with corporate workshops, self-paced courses and tutorials for PowerPoint and Word.
Work With Us
- Corporate Training
- Presentation & Template Design
- Courses & Downloads
- PowerPoint Articles
- Word Articles
- Productivity Resources
Find a Tutorial
- Free Training
- For Businesses
We help busy office workers save hours and gain peace of mind, with tips, training and tutorials for Microsoft PowerPoint and Word.
Master Critical PowerPoint Shortcuts – Secure Your FREE Training Module and Save Valuable Time!
⌛ Master time-saving expert techniques.
🔥 Create powerful presentations.
🚀 Propel your career to new heights.
We value your privacy – we keep your info safe.
Discover PowerPoint Hacks Loved by Industry Giants - KKR, AmEx, HSBC!
Over 114,880 professionals in finance, marketing and sales have revolutionized their PPT skills with our proven methods.
Gain FREE access to a full module of our premium PowerPoint training program – Get started today!
We hate spam too and promise to keep your information safe.
You are currently viewing a placeholder content from Facebook . To access the actual content, click the button below. Please note that doing so will share data with third-party providers.

How to Add Slide Numbers in PowerPoint Presentations (Step-by-Step)

Add Slide Numbers in PowerPoint using Slide Layouts
by Avantix Learning Team | Updated April 5, 2021
Applies to: Microsoft ® PowerPoint ® 2013, 2016, 2019, 2021 and 365 (Windows)
You can insert slide numbers on some or all of your PowerPoint slides using slide layouts. If your slide layouts contain slide number placeholders, you can then apply those layouts to your slides and insert slide numbers in the placeholders. If the placeholders have been deleted, slide numbers will not display.
It's best not to type slide numbers in text boxes on slides in Normal View. If slide numbers are entered manually in text boxes on your slides, you won't be able to edit or format them easily and they will not renumber if the slides are rearranged.
In order to insert slide numbers on a slide, you will need to do two things:
- In Normal View, apply layouts that include a slide number placeholder to slides.
- In Slide Master View, click the Insert tab in the Ribbon, click Header & Footer in the Text group, check Slide number and click Apply to apply to the current layout or Apply to All to apply to all layouts. Most slide numbers tend to appear in the footer position at the bottom of a slide.
Recommended article: How to Change Slide Size or Dimensions in PowerPoint
Do you want to learn more about PowerPoint? Check out our virtual classroom or in-person PowerPoint courses >
Applying slide layouts
In PowerPoint, every slide is based on a slide layout (which is part of a set of layouts with a slide master or parent). Slide layouts are created and edited in Slide Master view.
To view the slide master and the layouts for the current presentation:
- Click the View tab in the Ribbon and click Slide Master in the Master Views group.
- In the thumbnails on the left, the first thumbnail is the slide master and below it are the associated slide layouts.
- Click a layout such as Title and Content. Placeholders should appear in the slide layout on the right. These placeholders usually include footer, date and slide number. If you haven't inserted headers or footers, the placeholders are empty.
On the left side of the screen in Slide Master View, the slide master and its associated layouts appear in the thumbnails area:

To apply a slide layout to a slide in Normal View:
- If necessary, click the Normal button on the bottom right of the screen.
- Select or display a slide.
- Click the Home tab in the Ribbon.
- In the Slides group, click the Layouts drop-down menu and click a layout to apply it to the current slide. Common layouts include Title Slide, Title and Content and Title Only.
In Normal View, Layouts appear in the Layouts drop-down menu:

If the layout does not seem to apply correctly, click Reset in the Slides group. If text boxes (not placeholders) have been added to the slide, you may need to delete them.
Ensuring the slide number placeholder appears on the slide master
By default, slide layouts include placeholders such as a title placeholder, body placeholder, footer placeholder, date placeholder and slide number placeholder. If the slide number placeholder has been removed from a layout in Slide Master view, the slide numbers have no place to go.
Slide layouts are part of a set which includes a slide master or parent and multiple layouts. Initially, slide layouts follow the slide master so if the slide number placeholder has been deleted on the slide master, this affects its layouts as well.
If the slide number placeholder has been deleted on the slide master (or parent), to add it to the slide master:
- Click the slide master (or parent) on the top left in the thumbnails (this normally appears with a number 1 beside it and is the first and largest thumbnail on the left).
- If the slide number placeholder does not appear in the slide on the right, click the Slide Master tab in the Ribbon and click Master Layout in the Master Layout group. A dialog box appears.
- In the Master Layout dialog box, check slide number and any other check boxes to display the desired placeholders.
Below is a slide master with title, body, date, footer and number placeholders:

Ensuring the slide number placeholder appears on layouts
To ensure that the slide number placeholder appears on a layout or layouts:
- In the thumbnails on the left, click a layout such as Title and Content. Placeholders should appear in the slide layout on the right. These placeholders usually include footer, date and slide number. If you haven't inserted headers or footers, the placeholders are empty in Normal View.
- If the footer, date and slide number placeholders are not on the slide layout, click the Slide Master tab in the Ribbon and click the Footers check box in the Slide Master group. You may need to check and uncheck the Footer check box multiple times until the placeholders appear.
- Repeat for other layouts.
Note the Footers check box below (which is enabled only if you have selected a slide layout in the thumbnails on the left):

Below is a slide layout with title, body, date, footer and number placeholders:

Inserting slide numbers into the slide number placeholder
As long as a slide number placeholder appears on a layout or layouts, you can insert slide numbers using the Header & Footer command:
- In Slide Master View, click a layout on the left in the thumbnails.
- Click the Insert tab in the Ribbon and click Header & Footer in the Text group. A dialog box appears.
- If necessary, click the Slide tab in the dialog box.
- Click the check box for Slide number (a checkmark appears). You can also check Footer and Date if required. You may also want to check Don't show on title slide.
- Click Apply to apply to the current layout or Apply to All to insert slide numbers on every layout where a slide number placeholder appears.
Below is the Header & Footer dialog box:

In Slide Master View, the slide number placeholder does not display the slide numbers. You'll need to return to Normal View to view the slide numbers. To return to Normal View, click the Normal button on the bottom right or click the View tab in the Ribbon and click Normal in the Presentation Views group.
Formatting slide number placeholders
You can format the slide number placeholder on the slide master or on individual layouts.
To format a slide number placeholder:
- Click the View tab in the Ribbon.
- Click Slide Master in the Master Views group.
- Click the slide master or the layout with the slide number placeholder you wish to format (in the thumbnails on the left).
- Click the edge of the slide number placeholder in the slide area on the right.
- Select a different font size, font color and other formats from the Home tab in the Ribbon.
- Repeat for other layouts if necessary.
You can also move a placeholder by clicking its edge and pressing the arrow keys on your keyboard or by dragging the edge of the placeholder. The number placeholder can appear in different locations on different layouts.
Changing the starting slide number
PowerPoint automatically numbers slides starting at 1 (whether they are displayed or not on your slides).
To change the starting slide number in Normal View:
- Click the Design tab in the Ribbon.
- Click Slide Size and then Custom Slide Size or click Page Setup (depending on your PowerPoint version).
- Enter a new starting number.
The Slide Size dialog box appears as follows:

Removing all slide numbers
If you decide that you want to remove all slide numbers in your presentation, you don't need to delete the placeholders in Slide Master view. Simply turn off slide numbers in the Header & Footer dialog box.
To turn off slide numbers for all slides:
- In Normal View or Slide Master View, click the Insert tab in the Ribbon.
- Click Header & Footer in the Text group.
- In the dialog box, uncheck Slide Number (and Date and Footer if necessary).
- Click Apply to All. The slide numbers will be removed but the placeholders will remain in Slide Master view so it will be simple to insert slide numbers again.
For many PowerPoint users, slide numbering is an ongoing problem so it's important to learn how to work with placeholders in Slide Master view to ensure that numbering can be added or removed easily.
Slide numbers still not working? Check out the article Troubleshoot Slide Numbers in PowerPoint Decks .
This article was originally published on September 20, 2018 and has been updated for clarity and content.
Subscribe to get more articles like this one
Did you find this article helpful? If you would like to receive new articles, JOIN our email list.
More resources
How to Print PowerPoint Presentations with Notes
How to Animate Text, Images and Other Objects in PowerPoint
How to Remove a Background from a Picture in PowerPoint (2 Ways)
How to Compress Images in PowerPoint to Reduce File Size (10 Strategies)
Change the Background of PowerPoint Slides to a Color, Gradient or Picture
Related courses
Microsoft PowerPoint: Intermediate / Advanced
Microsoft PowerPoint: Design for Non-Designers
Microsoft PowerPoint: Animations Bootcamp
Microsoft Excel: Intermediate / Advanced
VIEW MORE COURSES >
Our instructor-led courses are delivered in virtual classroom format or at our downtown Toronto location at 18 King Street East, Suite 1400, Toronto, Ontario, Canada (some in-person classroom courses may also be delivered at an alternate downtown Toronto location). Contact us at [email protected] if you'd like to arrange custom instructor-led virtual classroom or onsite training on a date that's convenient for you.
Copyright 2024 Avantix ® Learning
You may also like

How to Insert or Type E with an Accent Mark in PowerPoint (È, É, Ê, Ë, è, é, ê, or ë)
You can insert or type e with an accent mark in PowerPoint using built-in tools or keyboard shortcuts (including Alt code shortcuts). The letter e can be inserted with an accent in both upper or lower case in text boxes or placeholders on slides, the slide master or layouts. The following are common accents in upper or lower case – È, É, Ê, Ë, è, é, ê, or ë.

How to Fade a Picture or Part of a Picture in PowerPoint (Using a Gradient)
You can fade a picture in PowerPoint by drawing a rectangle shape on top of the picture and then filling the rectangle with a gradient from opaque to transparent. This technique is often used to fade an image into the background of a slide. Since the rectangle is placed on top of the image and then text may be placed on top of the rectangle, you may need to reorder the objects.

How to Lock an Image, Shape or Other Object in PowerPoint
You can now lock an image, shape or other object in PowerPoint. Objects can be locked in Normal View or Slide Master View. Only PowerPoint 365 users can lock objects to prevent moving and resizing. This is helpful if you want to select and move other objects on the slide or prevent others from moving or resizing an object. You can lock items using the context menu or the Selection Pane.
Microsoft, the Microsoft logo, Microsoft Office and related Microsoft applications and logos are registered trademarks of Microsoft Corporation in Canada, US and other countries. All other trademarks are the property of the registered owners.
Avantix Learning |18 King Street East, Suite 1400, Toronto, Ontario, Canada M5C 1C4 | Contact us at [email protected]
Our Courses
Avantix Learning courses are offered online in virtual classroom format or as in-person classroom training. Our hands-on, instructor-led courses are available both as public scheduled courses or on demand as a custom training solution.
All Avantix Learning courses include a comprehensive course manual including tips, tricks and shortcuts as well as sample and exercise files.
VIEW COURSES >
Contact us at [email protected] for more information about any of our courses or to arrange custom training.
Privacy Overview
Pin it on pinterest.
- Print Friendly
- I Tried Both: Apple Watch 9 vs Fitbit Charge 6
- Best Places to Print Photos Online
How to Add Page Numbers in PowerPoint
Keep track of your progress using slide numbers
:max_bytes(150000):strip_icc():format(webp)/KarenMarcus-b36dca4c46e7441c8a50744f9a5c0260.jpg "presentation number slides")
- University of Colorado at Denver
- Colorado State University
What to Know
- PC: Open PowerPoint in Normal view and go to the first slide > Insert > Slide Number .
- Then, in the Header and Footer dialog, select the Slide tab. Next, select Slide number .
- Mac: In Normal view, go to Insert > Slide Numbe r. Select Slide Number and enter the starting number.
This article explains how to add page numbers to a PowerPoint presentation on a PC and a Mac. Instructions apply to PowerPoint 2019, 2016, 2013, 2010; PowerPoint for Microsoft 365, PowerPoint for Microsoft 365 for Mac, and PowerPoint 2016 for Mac.
How to Add Slide Numbers in PowerPoint on a PC
Just as you would add page numbers to a Word document to help readers keep track of their place, add page numbers in PowerPoint to help you and your audience keep track of where you are in the presentation .
Open your PowerPoint presentation in Normal view.
Navigate to the first slide in your presentation.
Go to Insert and, in the Text group, select Slide Number .
In the Header and Footer dialog box, select the Slide tab.
In the Include on slide area, place a check next to Slide number . In the Preview area, you’ll see a representation of where the slide number will appear on your slide.
- If you want the slide number to appear only on the current slide, select Apply .
Navigate to each slide you want slide numbers to appear on and perform these steps again. For example, if you want slides 1, 3, and 5 to have slide numbers, repeat the process three times.
- If you want the slide number to appear on all slides, select Apply to All .
- If you want to apply slide numbers to all but the first slide, place a check next to Don’t show on title slide and select Apply to All .
- If you want to add slide numbers to your notes pages, select the Notes and Handouts tab, place a check next to Page number , and select Apply to All .
If you want the slide numbering to start with a number other than 1, go to Design and, in the Customize group, select Slide Size > Custom Slide Size . Under Number slides from , select the beginning number you want.
In PowerPoint 2010, go to Design and, in the Page Setup group, select Page Setup . Then, under Number slides from , select the beginning number you want.
You're done!
How to Add Slide Numbers in PowerPoint on a Mac
To add slide numbers on a Mac:
Go to Insert and select Slide Number .
In the Header and Footer dialog box, place a check next to Slide Number and enter the number you want the numbering to begin with. The Preview area shows how the slide number will appear on your slide.
If you don’t want numbering to appear on the first slide, place a check next to Don’t show on title slide .
Select Apply to apply only to the current slide or select Apply to All to apply to all slides.
Get the Latest Tech News Delivered Every Day
- How to Create a PowerPoint Footnote
- How to Add Page Numbers in Word
- Remove Slide Numbers From PowerPoint Slides
- How to Merge PowerPoints
- Slide Layouts in PowerPoint
- How to Print PowerPoint Slides
- How to Select More Than One Slide in PowerPoint
- How to Add Page Numbers in Google Docs
- Adding Sounds, Music or Narration to PowerPoint Slide Shows
- Loop a PowerPoint Slide Show
- How to Add Music to PowerPoint
- How to Hide and Unhide a Slide in PowerPoint
- How to Do a Voiceover on PowerPoint
- Using Design Themes in PowerPoint
- How to Add Audio to PowerPoint
- How to Add Animation to PowerPoint
- Slidesgo School
- Google Slides Tutorials
How to Add Slide Numbers in Google Slides

Slide numbers are a good visual indicator that tell you and your audience at what point of your presentation you currently are. In this new Slidesgo School tutorial, you’ll learn how to add slide numbers in Google Slides. Ready to begin?
Enabling Slide Numbers
Editing slide numbers.
- Open your presentation in Google Slides.
- Click Insert → Slide numbers.
- A new window will open, where you can enable or disable slide numbering. Click “On” to enable slide numbering. Check “Skip title slides” if you don’t want numbers to appear on title slides.

- There are two ways to apply the changes:
- Apply : If you click this button, the changes will be applied to all the slides.
- Apply to selected : If you click this button, the changes will be applied only to the selected slides. As a reminder, to select multiple slides, hold Shift or Ctrl while you click them.
- Once you click one of these two buttons, the numbers will appear on the slides.
- Run Google Slides and open the presentation in which the slide numbers are enabled.
- Google Slides allows you to edit each slide number individually, just like any other text box. However, if you want to edit all the numbers at the same time, click Slide → Edit master.
- Select the slide master (the first one, which acts as the parent slide) and click the box that contains a “#” character, located at the bottom-right corner. This is the slide number box.
- Adjust the font, the style, the fill, the position and any other parameters. When you’re done, exit the slide master editor by clicking the “X” button. The changes will be applied to all the slides (if you don’t exit the editor this way, the changes might not be saved).
Do you find this article useful?
Related tutorials.

New feature available: edit our templates with Canva
Whenever you need to create, Slidesgo is there. We’re continually enhancing your presentation design process with templates that are primed to impress for any occasion. And in order to let your ideas flow best, comfort is key. How could Slidesgo help you with this? By making you feel right at home with our resources, no matter your preferred platform.You spoke, and we listened. Now, your favorite slides can be accessed on a new platform: Canva! This new format adds to our existing options (PowerPoint and Google Slides), expanding your ways to utilize our first-rate presentation content. We’ve started with a selection of Canva-ready...

How to print PowerPoint notes
Crafting an impactful PowerPoint slideshow and delivering a captivating presentation are distinct skills. The first focuses on designing appealing visuals to convey a clear message, while the second involves employing effective presentation techniques to ensure the audience grasps the idea. The content of this article will help you with the latter part of this process, guiding future presenters on how to print PowerPoint with speaker notes to enhance your presentations success and effectiveness.

Discover Our Online Presentation Software for Free
We have great news for you today! If you’ve been a Slidesgo fan for years (or months, or weeks, or days, or mere hours, we welcome everyone!), you’ll probably know for now that our templates are available mostly in two formats: for use in Google Slides and PowerPoint.Google Slides is a free tool, since you only need a Google account in order to use it. PowerPoint, on the other hand, is part of the Microsoft Office suite, so it’s not a free program, but that didn’t stop it from being one of the most popular options in the world!What if we...

Webinar: Presentation Audit
With more than 15,000 templates released on Slidesgo and a user base composed of millions of people, we estimate that the total number of presentations created adds up to… um, a lot! Our team of professional designers work very hard to provide you with editable slides so that the only thing you need to do is, well, customize the elements to your liking. Starting from any given template, the results may vary a lot depending on the person who edited the contents.Have you ever wondered “Is my presentation good enough?” and wished that an expert on presentations looked at your template...
How to Add Slide Numbers to a PowerPoint Presentation
Never add or fix manually again
Here are two common problems related to slide numbers in PowerPoint and how to fix them.
Scenario A: You’ve finished building a PowerPoint deck for the Big Meeting tomorrow, and you get an email from your boss asking you to add one more slide to the beginning of the deck. You create the slide but then notice that all the subsequent slide numbers are off by one.

Since you manually added slide numbers to every slide using text boxes, now you have to go through the entire presentation, slide by slide, and update the slide number on each slide individually. What a pain.
Scenario B: You were savvy enough to use PowerPoint’s built-in slide number functionality, but despite having checked Slide Numbers in the Header and Footer dialog box, the slide numbers don’t appear anywhere on your slides. What’s happening?
How to Add Slide Numbers to PowerPoint
Here are the steps to follow to add slide numbers to PowerPoint the right way so they appear where you want them to, and you never have to renumber slides again.
- Open the Slide Master . Select the View tab, and then select the Slide Master icon.

- Select the Parent Slide . The Parent Slide will be at the very top of the list of slides on the left, and it will be the biggest slide on the list. You may have to scroll to the top of the list.

- Select the Master Layout icon to open a dialog box.

- Check the box next to Slide Number .

- On the Slide Master tab in the ribbon, click on the red X icon to Close Master View .

- Select Slide Number .
Note : Even though you selected Slide Number in Step 5 above, you’ve only indicated that you want the option to add slide numbers to your deck. That’s why the dialog box in Step 5 says “Placeholders.” In this step you have to tell PowerPoint to actually insert slide numbers. Then you can specify where you want the slide numbers to appear and how you want them to look.
- Select the Insert tab, and then click on the Slide Number icon to open the dialog box with Header and Footer options.

- Check the box next to Slide Number . Make sure there’s a checkmark in the box next to Slide Number.

- Check the box next to “Don’t show on title page.” Best practices say that your title slide should not have a slide number on it. Check the box highlighted below to hide the slide number on the title slide.

- Select Apply or Apply to All , and you’re done!
Note : Remember, suppressing the slide number on the title slide will only work correctly if you’ve chosen the Title Slide layout for that slide. You can double-check this by right-clicking on your title slide, choosing Layout and confirming that the title slide layout is selected.

- Format and reposition slide numbers. If you would like to change the appearance and/or position of slide numbers, go to the Slide Master to do that. Follow steps 1 and 2 above to navigate to the Parent Slide. Find the slide number placeholder. It will look like this: (#). Select that text and format it however you wish. You can also select the bounding box around the placeholder and move the slide number placeholder element wherever on the slide you like.

Similarly, if you want the slide number to appear in different positions depending on which slide layout you’ve applied, you can adjust the position of the slide number placeholder on individual layouts within the Slide Master.
To do this, navigate to the Slide Master , choose the slide layout you want to modify in the list on the left, and reposition or reformat the slide number placeholder for that specific layout.
Adding Slide Numbers to PowerPoint
By now, you have realised that the Slide Master is useful for so much more than just adding slide numbers to your PowerPoint presentation. Just as adding and positioning slide numbers on the slide master affects all slides in the deck, you can use different layouts in the Slide Master to apply different elements and formatting to slides throughout the presentation.
If you change one element in a layout master slide, that change will cascade throughout all the dependent slides. Learn more about master slide layouts and become a Slide Master master!

Maggie Marystone is a freelance technology writer, human rights worker, and storyteller based in Chicago. Read Maggie's Full Bio
Read More Posts:

How to Number Slides in PowerPoint

Do you ever find yourself losing track of where you are in a long PowerPoint presentation? It can be frustrating, but luckily there are ways to number your slides in PowerPoint to help you stay on track and keep your audience engaged. In this article, we will cover everything you need to know about numbering slides in PowerPoint, from why it is important to the different methods you can use to customize your page numbers.
Table of Contents
Why Numbering Slides in PowerPoint Matters
Numbering your slides is important because it helps you keep track of where you are in your presentation. It also helps your audience follow along and makes it easier to reference specific slides. Additionally, numbering your slides can give your presentation a more professional look and feel. By adding page numbers, you can signal to your audience that you have meticulously planned and crafted your presentation.
Another benefit of numbering your slides is that it can help you identify any missing or duplicate slides. When you have a large presentation with many slides, it can be easy to accidentally skip a slide or include a duplicate. By numbering your slides, you can quickly identify any gaps or duplicates in your presentation and make necessary adjustments.
Furthermore, numbering your slides can be especially helpful when collaborating with others on a presentation. If you are working with a team, numbering your slides can ensure that everyone is on the same page and can easily reference specific slides during discussions or revisions. It can also make it easier to divide up the work and assign specific slides to team members.
Different Ways to Number Slides in PowerPoint
There are several methods you can use to number your slides in PowerPoint, including adding page numbers, formatting your slide master, and using automation. Let’s explore each of these methods in more detail.
Adding Page Numbers to PowerPoint Presentations
Adding page numbers to PowerPoint presentations is a quick and simple way to help keep track of your slides. To add page numbers, go to the Insert tab, click on Header & Footer, and then check the box for Slide Number. From here, you can choose where you want the page numbers to appear and the font and size of your choice.
Customizing the Look of Page Numbers in PowerPoint
Customizing the look of your page numbers is a great way to make your presentation stand out. You can change the font, size, color, and position of your page numbers to match the look and feel of your presentation. Click on the Format button in the Header & Footer dialog box to customize your page numbers.
Using the Slide Master to Number Slides in PowerPoint
The Slide Master is a powerful tool in PowerPoint that allows you to customize your entire presentation’s design. By formatting the Slide Master, you can add page numbers to your presentation in a consistent and professional way. You can also customize the look of your page numbers and apply them to all slides in your presentation.
How to Start Page Numbers from a Specific Slide in PowerPoint
If you want to start your page numbers from a specific slide in your presentation, go to the Insert tab, click on Header & Footer, and then select the slide number box. Click on the “Start at” option, and then enter the number of the slide you want to start your page numbering from.
Removing Page Numbers from Certain Slides in PowerPoint
Removing page numbers from certain slides in your presentation is possible, but it requires a manual process. To remove page numbers from a slide, go to the slide in question, click on the slide number, and then press the Delete key on your keyboard.
Automating Page Numbers in PowerPoint
If you have a large presentation with many slides, manually adding and formatting page numbers can be time-consuming. Fortunately, PowerPoint offers an automation feature that can do this for you. To use this feature, go to the Insert tab, click on Header & Footer, and then check the box for Slide Number. From here, click on the “Apply to All” button to automatically add page numbers to all slides in your presentation. You can also customize the look of your page numbers using the Format button.
Troubleshooting Common Issues with Numbering Slides in PowerPoint
While adding page numbers to your PowerPoint presentation is usually straightforward, there are some common issues you may encounter. These include page numbers not showing up, the wrong page numbers appearing on slides, and page numbers not aligning properly. Check your slide master and make sure you have inserted the page numbers properly to fix these issues.
Another common issue with numbering slides in PowerPoint is when the page numbers appear in the wrong location on the slide. This can be frustrating, especially if you have a lot of slides in your presentation. To fix this issue, you can adjust the placement of the page numbers by going to the slide master and moving the text box that contains the page number to the desired location.
If you have tried all of the above troubleshooting steps and are still experiencing issues with numbering your slides, it may be helpful to reach out to PowerPoint support for further assistance. They can provide additional guidance and help you resolve any issues you may be experiencing.
Tips for Consistent and Professional Slide Numbering in PowerPoint
To achieve consistent and professional slide numbering in PowerPoint, here are some tips to keep in mind:
- Choose a font and size that matches the overall design of your presentation.
- Make sure your page numbers are placed in a consistent location on each slide.
- Use the Slide Master to format your page numbers.
- Proofread your page numbers before presenting to avoid mistakes or formatting errors.
Another important tip to keep in mind when numbering your slides in PowerPoint is to consider the order of your presentation. It’s important to number your slides in a logical and sequential order that makes sense to your audience. This can help them follow along with your presentation and stay engaged. Additionally, if you plan on sharing your presentation with others, numbering your slides can make it easier for them to reference specific slides or sections of your presentation.
Best Practices for Using Slide Numbers Effectively in PowerPoint Presentations
When using slide numbers in your PowerPoint presentations, keep in mind that they are meant to be a helpful reference tool for you and your audience. Avoid overcrowding your slides with too much information, and make sure that your slide numbering is consistent throughout your presentation. Finally, make sure your slide numbers are large enough to be seen by everyone in your audience, but not so large that they distract from your message.
Another important consideration when using slide numbers is to decide where to place them on your slides. Some presenters prefer to place them in the footer, while others prefer to place them in the top corner of the slide. Whichever location you choose, make sure it is consistent throughout your presentation. Additionally, consider using a different color or font for your slide numbers to make them stand out and be easily recognizable.
Advanced Techniques for Numbering Slides with Complex Layouts in PowerPoint
If you have a complex slide layout, such as one with multiple columns or images, you may need to use advanced techniques to properly number your slides. This could involve using automation or creating custom templates. Consider seeking help from a PowerPoint expert if you find yourself struggling to properly number your slides.
Another technique for numbering slides with complex layouts is to use the “Slide Master” feature in PowerPoint. This allows you to create a consistent numbering system across all slides in your presentation, even if they have different layouts. To access the Slide Master, go to the “View” tab and click on “Slide Master.” From there, you can add a numbering placeholder and customize its appearance. This technique can save you time and ensure that your presentation looks polished and professional.
Saving Time with Automation: How to Automatically Number Slides in PowerPoint
If you have a large PowerPoint presentation, it can be time-consuming to manually number each slide. Thankfully, Microsoft PowerPoint has a built-in tool that allows you to automatically number your slides. To do this, go to the Insert tab, click on Header & Footer, and then check the box for “Slide number.” From here, select the “Apply to All” button to apply the page numbers to all slides in your presentation.
This feature not only saves time, but it also ensures that your presentation is organized and easy to follow. Additionally, if you need to make changes to the order of your slides, the automatic numbering will update accordingly. This can be especially helpful if you are presenting to a large audience and need to refer back to specific slides. Overall, taking advantage of automation tools in PowerPoint can greatly improve your productivity and the quality of your presentations.
Comparing Different Methods of Slide Numbering in PowerPoint
Each of the methods we have discussed has its strengths and weaknesses, depending on the nature of your presentation. For example, adding page numbers can be quick and easy but may not provide the level of customization you need for a complex presentation. Using the Slide Master is a powerful way to format your entire presentation’s design, but can be time-consuming. Consider weighing the pros and cons of each method and choosing the one that best fits your presentation’s needs.
Another method of slide numbering in PowerPoint is to use the Header and Footer feature. This allows you to add not only slide numbers, but also other information such as the date, time, and your company logo. This method is useful if you want to add a professional touch to your presentation and make it look more polished. However, it can also be time-consuming to set up and customize.
If you want to make your slide numbers stand out, you can also use animations and transitions. For example, you can make the slide number appear in a unique way when the slide is first displayed, or you can make it move across the screen as you transition to the next slide. This method can be visually appealing and engaging for your audience, but it should be used sparingly and only when it enhances the overall message of your presentation.
Examples of Creative and Unique Slide Numbering Ideas
Adding creative and unique slide numbering can help make your presentation stand out and engage your audience. Some ideas might include using non-traditional numbering systems or incorporating images or icons into your page numbers. Always keep in mind the overall look and feel of your presentation and make sure your page numbers fit the aesthetic you’re going for.
Now that you know how to number slides in PowerPoint, you can create more professional and organized presentations that will keep your audience engaged and informed.
By humans, for humans - Best rated articles:
Excel report templates: build better reports faster, top 9 power bi dashboard examples, excel waterfall charts: how to create one that doesn't suck, beyond ai - discover our handpicked bi resources.
Explore Zebra BI's expert-selected resources combining technology and insight for practical, in-depth BI strategies.

We’ve been experimenting with AI-generated content, and sometimes it gets carried away. Give us a feedback and help us learn and improve! 🤍
Note: This is an experimental AI-generated article. Your help is welcome. Share your feedback with us and help us improve.

Slide Numbers on PowerPoint Slides: Here’s How You Add Page Numbers to Your PPT!
Inserting numbers on your PowerPoint slides helps to order and structure your presentation. This is especially true for longer presentations.
Setting Slide Numbers PowerPoint is actually pretty simple – we’ll show you how!
Inserting PowerPoint Slide Numbers – Why they’re Useful
So why might you need slide numbers? On a basic level, they keep your presentation well structured , and give your audience a thread to follow through your ideas .
Slide numbers are also helpful for queries which arise later – you can jump directly to the relevant slide.
Inserting PowerPoint slide numbers
- In the Insert tab, click the Header & Footer option.

- In the window that opens up, use the cursor to check the Slide number box.

- Now you have several options:
a. If you just want to assign a page number to the current slide, click Apply .
b. If you want to insert PowerPoint page numbers on all your slides, click Apply to all .
c. If you want to omit the page number on the title slide, check the Don’t show on title slide box.
- Page numbers will now appear on the slides you’ve chosen. If you don’t like way they’re automatically aligned, due to your chosen layout and design, you can change this. We’ll show you how below.
Deactivating PowerPoint Page Numbers
To remove slide numbers, open the Header & Footer option again and simply uncheck Slide number . You can apply this to all your slides or just the current slide.
Repositioning Slide Numbers PowerPoint
If you don’t like where the page number appears automatically, you can change it as follows:
- In the View tab, select the Slide Master option.

- In the thumbnails that appear, click on Slide Master .
- Now click on the placeholder for the page number. Hold it down until the crossed arrow icon appears. Then drag the placeholder to where you’d like your numbering to appear

- Save by selecting Close Master View .
Starting Your Slide Numbers PowerPoint from a Particular Number
You might find it makes sense to start slide numbers from a number other than 1. This can be done as follows:
- In the Design tab, select Slide size and then Custom slide size .

- A window will open: click the up or down arrows for the Number slides from option until you reach the starting point you want.

- Confirm with OK .
Bonus Tip: Inserting Additional Information
It’s not just page numbers that PowerPoint allows you to add; other useful information like the author of the presentation, your company name/logo, the date or the topic can also be inserted. This reinforces structure and continuity in your presentations.
It also adds another layer of professionalism – especially important when delivering business presentations.
Adding the date/time to your PowerPoint slides:
- In the View tab, select Normal in the Presentation Views section.

- Select the first slide in the thumbnail view on the left.
- Switch to the Insert tab and select Header & Footer .
- Click on the Slide tab here and activate Date and time by checking the box.

- You can now choose for the date to be updated whenever you open the presentation, or to remain fixed. For the former, select Update automatically . Next, choose the format for the date and time you want. For a fixed date, click the Fixed option and enter the date in the field below.
Tip: Handing out printed notes and want to include the date and time on those as well? Select the setting for date and time in the Notes and Handouts tab. Confirm with Apply . If you want the information to appear on every page of your notes, just click Apply to all .

To add information such as author or subject, simply follow the steps below:
- Go to the Slide tab, then activate the Footer checkbox.
- Type the information you want to appear in the field under Footer

Deleting Additional Information
To remove this additional information from your presentation:
- Open the Insert tab and select Header & Footer .
- In the dialog box that opens, click Slide .
- To delete all additional information your slides, uncheck the Footer box and confirm with Apply to all . To delete it just from the current slide, confirm with Apply .
Inserting a Copyright Notice
It can be sensible to add a copyright notice, especially in presentations for large companies and brands. To do this:
- Click on Header & footer in the Insert tab.
- Select the Slide tab and check the Footer box.
- In the blank field under Footer , type in your copyright notice: © symbol, name of copyright holder, year of first publication, plus the statement “All rights reserved”.
- Select Apply to All so that this copyright notice appears on all slides.
Inserting Logos in PowerPoint
As well as a copyright notice and basic information, you might find it useful to insert your company logo. This detailed article covers where and how to place the logo.
Conclusion Slide Numbers PowerPoint: Add Structure and Order to Your Presentations
Numbering your PowerPoint slides just makes basic sense; it adds structure to your presentations, makes them easier for your audience to follow, and allows you to refer back quickly to a particular slide. Additional information can also be useful, adding the finishing touch to your presentation. We’ve shown you above just how easy it is to add numbers and useful information to your PowerPoint slides, even if you’re a PowerPoint beginner – why not give it a try?
Still have questions about Slide Numbers PowerPoint or about PowerPoint in general? Then please feel free to email us on [email protected] . We’re always happy to help!
If you’d prefer us to create a presentation including page numbers and additional information for you or your company, just get in touch – we’re here for you.
These articles might also be of interest to you:
- Insert Your Logo in PowerPoint
- Insert Notes in PowerPoint
- PowerPoint Presenter View
Share this post
- share
- save

Design Thinking: Problem Solving with a Difference

Why Corporate Mission Statements Are So Important

7 Tips & Learnings from the Apple Keynote
Free All-in-One Office Suite with PDF Editor
Edit Word, Excel, and PPT for FREE.
Read, edit, and convert PDFs with the powerful PDF toolkit.
Microsoft-like interface, easy to use.
Windows • MacOS • Linux • iOS • Android

- Articles of PPT
How to Add Slide Numbers in PowerPoint A Comprehensive Guide
Creating engaging and organized PowerPoint presentations is crucial for effective communication. One essential element is slide numbers, which provide a clear path through your content. In this guide, we'll walk you through the process, ensuring a seamless experience for both you and your audience.
Part 1: What Are Slide Numbers

Slide numbers are a way to reference and navigate through a presentation. They typically appear in the footer or header of each slide, but can also be placed in different locations on the slide. Slide numbers can be used for a variety of purposes, including:
Helping the presenter stay on track and organized
Allowing the audience to follow along and take notes
Making it easy to reference specific slides during the presentation or later on
Giving the presentation a more professional look and feel
Number Format:
Slide numbers can be formatted in a variety of ways, including:
Arabic numerals: 1, 2, 3
Roman numerals: I, II, III
Alphabetic characters: A, B, C
Custom formats: For example, you could use slide numbers to represent different sections of your presentation, such as "Section 1.1," "Section 1.2," and so on.
Slide numbers are an important part of any presentation. They make it easier for the presenter and audience to follow along and reference specific slides.
Part 2: A step-by-step guide on adding Slide Numbers in PowerPoint
Creating a seamless and informative presentation involves incorporating slide numbers for easy navigation. Follow these steps to effortlessly add slide numbers to your PowerPoint presentation:
To add slide numbers in PowerPoint:
Step 1: Open your PowerPoint presentation.

Step 2: Click the Insert tab.

Step 3: In the Text group, click Slide Number.

Step 4: In the Header and Footer dialog box, click the Slide tab.

Step 5: Select the Slide number check box.
Step 6: If you don't want a number to appear on the title slide, also select the Don't show on title slide box.
Step 7: Click Apply to All.

Your slide numbers will now appear on each slide in the bottom-right corner.
To customize the slide numbers:
Step 1: Click the Slide Number button in the Header and Footer dialog box.
Step 2: In the Slide Number dialog box, you can change the font, size, color, and alignment of the slide numbers.

Step 3: You can also choose to display the slide number with or without the total number of slides in the presentation.
Step 4: Click OK when you're finished.
To update slide numbers after adding or removing slides, click the Slide Number button in the Header and Footer dialog box and select Update Slide Number.
To add slide numbers to specific slides, select the slide(s) you want to add slide numbers to and then click the Slide Number button in the Header and Footer dialog box.
If you're using a template, note that the slide numbers may already be formatted for you. However, you can still customize them as needed.
Part 3: How to Removing Slide Numbers in PowerPoint
When it comes to removing slide numbers in PowerPoint, you have two options: you can either temporarily hide them or permanently remove them. Follow these steps with accompanying images for both methods:
Temporarily Hiding Slide Numbers
Step 1: Open your PowerPoint presentation and go to the slide containing the numbers you want to hide.
Step 2: Click on the slide to select it.
Step 3: Navigate to the "Insert" tab in the ribbon at the top.
Step 4: Select "Header & Footer" from the drop-down menu.

Step 5: In the Header and Footer dialog box, uncheck the box next to "Slide number."

Step 6: Click "Apply" to hide the slide numbers on the selected slide.
This method allows you to quickly hide slide numbers for a clean and focused presentation. However, remember that if you need to bring them back, you'll have to revisit the Header and Footer settings.
Permanently Removing Slide Numbers
Step 2: Navigate to the slide sorter view by clicking on the icon at the bottom-right corner of the PowerPoint window.

Step 3: Select the slides from which you want to permanently remove slide numbers.
Step 4: Right-click on the selected slides and choose "Delete Slide."

Step 5: Confirm the deletion if prompted.
This option provides a clean slate for specific slides, ensuring an uncluttered look. Just be cautious, as this action is irreversible. Always consider if it aligns with your overall presentation strategy.
Part 4: Solving Common Problems with Slide Numbering in PowerPoint
Slide numbers can sometimes be a bit finicky. Here are solutions to some of the most common issues you might encounter:
Slide Numbers Not Appearing: If your slide numbers aren't showing up, it could be due to a few reasons. First, make sure they're enabled in the Header and Footer settings. Check if they're set to appear on the title slide as well. Additionally, ensure that there's no overlapping text or graphics obscuring the numbers.
Slide Numbers Not Updating: Sometimes, after making significant changes, slide numbers may not update automatically. To fix this, click on the "Insert" tab, go to "Header & Footer," and then tick the box that says "Slide Number." After that, click "Apply to All" to update all slides.
Slide Numbers Appearing on Specific Slides Only: This issue might arise if certain slides have unique master layouts. To rectify this, select the affected slides, go to the "View" tab, and choose "Slide Master." From there, ensure that the slide numbers are set to appear uniformly across all slides.
Part 5. Versatile Powerpoint Tool - WPS Office

WPS Office is a modernized powerful office tool suite that offers a variety of features, including a word processor, spreadsheet, presentation software, and PDF editor. It is available for free download and use, and it is compatible with a wide range of devices, including Windows, Mac, Android, and iOS.
WPS Office is a great alternative to Microsoft Office, and it offers a number of advantages, including:
Free to use: WPS Office is free to download and use for personal and commercial purposes.
Powerful PDF toolkit: WPS Office includes a built-in PDF editor that allows you to create, edit, and convert PDF files.
Rich template store: WPS Office offers a rich template store with a wide range of templates for presentations, documents, and spreadsheets.
Rich functions: WPS Office offers a wide range of features and functions, including support for macros, formulas, and charts.
Light weight: WPS Office is a lightweight application that does not require a lot of system resources.
Support online documents: WPS Office supports online documents, which allows you to access and edit your documents from anywhere with an internet connection.
Safe and stable: WPS Office is a safe and stable application that is regularly updated with new features and security patches.
I have been using WPS Office for several months now, and I have been very impressed with its features and functionality. I find WPS Office to be a very user-friendly application, and it is easy to learn how to use.
WPS Office has all of the features that I need to create and edit presentations, documents, and spreadsheets. I especially appreciate the built-in PDF editor, which allows me to edit PDF files without having to purchase a separate application.
Use Word, Excel, and PPT for FREE, No Ads.
Edit PDF files with the powerful PDF toolkit.
Microsoft-like interface. Easy to learn. 100% Compatibility.
Boost your productivity with WPS's abundant free Word, Excel, PPT, and CV templates.
Can I add slide numbers to only some slides?
Yes, you can indeed add slide numbers to specific slides in PowerPoint. Simply follow these steps:
Step 1: Select the slides to which you want to add slide numbers.
Step 2: Go to the "Insert" tab in the PowerPoint ribbon.

Step 3: Click on "Slide Number" in the "Text" group.
Step 4: Check the box that says "Slide Number".
Step 5: Optionally, you can choose to apply to "All" slides or "Selected" slides.
This flexibility allows you to customize slide numbering to suit your specific presentation needs.
How do I change the format of slide numbers?
To change the format of slide numbers in PowerPoint, follow these steps:
Step 1: Go to the "Insert" tab in the PowerPoint ribbon.
Step 2: Click on "Slide Number" in the "Text" group.

Step 3: In the "Header and Footer" dialog box, click the "Slide Number" checkbox if it's not already checked.
Step 4: Click the "Format" button.
This comprehensive guide has walked you through the importance of adding slide numbers in PowerPoint presentations, aiding in navigation and organization for both presenters and audiences. The step-by-step tutorial covers everything from initial setup to customizing slide numbers, ensuring a seamless process. The guide also addresses common problems related to slide numbering, providing practical solutions. A standout feature is the introduction of WPS Office , a powerful and modern office tool with advantages like free access to essential software, a robust PDF toolkit, and a rich template store. Lightweight and secure, WPS Office offers a versatile alternative for optimized presentations.
- 1. How to Create a Master Slide in PowerPoint (Step-By-Step Guide)
- 2. How to Extract Numbers from Cells With Letters and Numbers in Excel (3 Easy Steps)
- 3. How to Unhide a Slide in PowerPoint Comprehensive Guide
- 4. How to Use a Master Slide in PowerPoint (Step-By-Step Guide)
- 5. How To Change Slide Size In Keynote: A Comprehensive Guide
- 6. A Comprehensive Guide to Slide Carnival[2024]

15 years of office industry experience, tech lover and copywriter. Follow me for product reviews, comparisons, and recommendations for new apps and software.
- PRO Courses Guides New Tech Help Pro Expert Videos About wikiHow Pro Upgrade Sign In
- EDIT Edit this Article
- EXPLORE Tech Help Pro About Us Random Article Quizzes Request a New Article Community Dashboard This Or That Game Popular Categories Arts and Entertainment Artwork Books Movies Computers and Electronics Computers Phone Skills Technology Hacks Health Men's Health Mental Health Women's Health Relationships Dating Love Relationship Issues Hobbies and Crafts Crafts Drawing Games Education & Communication Communication Skills Personal Development Studying Personal Care and Style Fashion Hair Care Personal Hygiene Youth Personal Care School Stuff Dating All Categories Arts and Entertainment Finance and Business Home and Garden Relationship Quizzes Cars & Other Vehicles Food and Entertaining Personal Care and Style Sports and Fitness Computers and Electronics Health Pets and Animals Travel Education & Communication Hobbies and Crafts Philosophy and Religion Work World Family Life Holidays and Traditions Relationships Youth
- Browse Articles
- Learn Something New
- Quizzes Hot
- This Or That Game
- Train Your Brain
- Explore More
- Support wikiHow
- About wikiHow
- Log in / Sign up
- Computers and Electronics
- Presentation Software
- PowerPoint Presentations
How to Choose the Right Number of Slides for a Powerpoint Presentation
Last Updated: July 12, 2023 References
Choosing the Right Number of Slides Based on Design Choices
Using time to determine the right number of slides, moving beyond formulaic answers to finding the right number of slides.
This article was co-authored by wikiHow Staff . Our trained team of editors and researchers validate articles for accuracy and comprehensiveness. wikiHow's Content Management Team carefully monitors the work from our editorial staff to ensure that each article is backed by trusted research and meets our high quality standards. There are 10 references cited in this article, which can be found at the bottom of the page. This article has been viewed 221,659 times. Learn more...

- Keep the presentation about you, not the slideshow. [2] X Research source The slides are there to support what you have to say. They should be just one part of your presentation, not the whole thing.

- Go through your entire presentation and ask yourself if you really need a given slide. If the answer is no, or if you find you can deliver the info verbally instead, eliminate it.

- If your presentation ended well before the time limit you’ve been given, try to extend the amount of time you spend on each slide, or add extra slides to expand on the info introduced in the presentation.
- Solicit advice from family and friends during your practice presentation. If they feel there are too many or too few slides, or if they feel certain sections of the presentation felt rushed or slow, adjust your presentation to correct these deficiencies.

- One well-known formulation for PowerPoint presentations is the 10/20/30 rule. This rule dictates that you should use about ten slides for a twenty minute presentation, and each slide should utilize thirty point font. In other words, each slide should be about two minutes in length. [8] X Research source Perhaps the 10/20/30 rule works for you. If it does not, don’t feel as if you’re using the wrong number of slides.
- Others argue that an average slide should be onscreen for no more than two minutes, and can be onscreen for as little as 15 seconds. [9] X Research source

- If, on the other hand, you’re in a more intimate environment and can control the lighting, you might be inclined to utilize a greater number of slides. As always, however, don’t feel obligated to use many slides just because you can.
Community Q&A
- If your slide has embedded video, or you aren’t using one slide for each point of your presentation, you can spend longer on each slide. [11] X Research source Thanks Helpful 0 Not Helpful 0
- Treat each slide on its own merits. If one slide needs to be onscreen for two minutes, so be it. If it needs to be onscreen for ten seconds, that’s fine too. Thanks Helpful 0 Not Helpful 0
- If you have a slide with no pictures but several bullet points, each of which you intend to talk about for fifteen to twenty seconds, you might spend well over a minute on that slide. Thanks Helpful 0 Not Helpful 0

- When you take all of these factors (detail, technicality, audience size and awareness, etc.) into consideration, you can see that the only short answer to "how many slides should I use" is: "it depends." Thanks Helpful 3 Not Helpful 0
You Might Also Like

- ↑ http://www.virtualsalt.com/powerpoint.htm
- ↑ http://www.bloomberg.com/news/articles/2006-06-01/how-to-powerpoint-like-a-pro
- ↑ http://www.shutterstock.com/blog/7-design-tips-for-effective-beautiful-powerpoint-presentations
- ↑ http://www.mrmediatraining.com/2011/03/10/the-five-most-common-powerpoint-mistakes/
- ↑ http://www.free-power-point-templates.com/articles/how-many-slides-for-a-30-minute-presentation/
- ↑ https://owl.english.purdue.edu/media/ppt/20071016041310_686.ppt
About This Article

1. Break complex slides into several simple slides. 2. Include audio and video support only as needed. 3. Time your presentation. 4. Match the number of slides to the subject matter. 5. Tailor to your audience. Did this summary help you? Yes No
- Send fan mail to authors
Reader Success Stories
Jun 29, 2017
Is this article up to date?

M. Fernandez
Dec 19, 2017

Featured Articles

Trending Articles

Watch Articles

- Terms of Use
- Privacy Policy
- Do Not Sell or Share My Info
- Not Selling Info
wikiHow Tech Help Pro:
Level up your tech skills and stay ahead of the curve
Maximum Number of Slides in PowerPoint: What You Need to Know
- Recent Posts

- How to Color Code Folders in Outlook 365: A Step-by-Step Guide - May 23, 2024
- Tech Tips: How to Quickly Locate Folders for Emails in Outlook - May 23, 2024
- How to Easily Delete Templates in Outlook - May 23, 2024
As someone who has created countless PowerPoint presentations, I know firsthand the importance of keeping your audience engaged with concise and visually appealing slides. One question that often comes up when creating presentations is: what is the maximum number of slides that PowerPoint can handle?

After conducting some research, I found that the answer is not as straightforward as one might think. According to Microsoft, PowerPoint does not have a specific limit on the number of slides that can be included in a presentation. However, there are practical limitations to consider, such as the amount of memory on your computer and the size of the presentation file.
It’s important to keep in mind that the number of slides in a presentation should not be the sole focus. The content and information presented on each slide is equally important. It’s essential to strike a balance between the amount of information provided on each slide and the number of slides in the presentation. In this article, I will explore the practical limitations of PowerPoint and provide tips on creating effective presentations with an appropriate number of slides and engaging content.
JUMP TO TOPIC
Designing Effective Slides
Incorporating visuals and graphics, mastering the art of storytelling, applying the 10/20/30 rule, rehearsal techniques, utilizing stories and anecdotes, effective question and answer sessions, concluding your presentation, crafting your presentation.

When it comes to creating a PowerPoint presentation, the number of slides you use is just one of many factors to consider. To create a truly effective presentation, you need to think about the design, visuals, and storytelling elements. In this section, I will cover some tips and tricks to help you craft a presentation that engages your audience and delivers your message effectively.
The design of your slides is crucial to the success of your presentation. You want to create a consistent look and feel throughout your presentation, so your audience can focus on your message instead of being distracted by inconsistent design elements. One way to achieve this is by using a theme or template that matches your brand or message. You can also use color schemes, font styles, and layouts to create a cohesive look.
Another important aspect of slide design is the use of white space. Too much information on a slide can overwhelm your audience and make it difficult for them to focus on the key points. By using white space effectively, you can create a clean and uncluttered look that draws attention to your message.
Visuals and graphics can be powerful tools to help convey your message and engage your audience. When choosing images and graphics, make sure they align with your message and are of high quality. Low-quality images can detract from the professional look of your presentation.
In addition to images, you can also use charts, graphs, and other visual aids to help illustrate your points. These can be especially useful when presenting data or statistics.
Finally, storytelling is a key element of any effective presentation. By telling a story that relates to your message, you can engage your audience on an emotional level and make your message more memorable. To do this, you can use anecdotes, metaphors, and other storytelling techniques to help bring your message to life.
Overall, crafting an effective PowerPoint presentation takes time and effort. By considering the design, visuals, and storytelling elements, you can create a presentation that engages your audience and delivers your message effectively. Remember, the number of slides you use is just one piece of the puzzle.
Timing and Practice
When it comes to creating a PowerPoint presentation, one of the most important factors to consider is timing. You don’t want your presentation to be too short or too long. The 10/20/30 rule is a popular guideline that suggests that a presentation should have 10 slides, last 20 minutes, and have no font smaller than 30 points.
While this rule may not work for every presentation, it is a good starting point. It forces you to focus on the most important information and avoid overwhelming your audience with too much detail. However, it’s important to remember that the rule is just a guideline, and you should adjust it to fit your specific needs.
Once you have created your PowerPoint presentation, it’s important to practice your delivery. Rehearsing your presentation will help you become more comfortable with the material and ensure that you stay within your allotted time frame.
One technique that can be helpful is to time yourself as you practice. This will give you an idea of how long your presentation will take and allow you to adjust the timing as needed. As a general rule, you should aim for about 1-2 minutes per slide, depending on the complexity of the information.
Another helpful technique is to practice in front of a mirror or a small group of friends or colleagues. This will help you become more comfortable with speaking in front of an audience and allow you to receive feedback on your delivery and content.
In conclusion, timing and practice are essential components of creating a successful PowerPoint presentation. By applying the 10/20/30 rule and using rehearsal techniques, you can ensure that your presentation is engaging, informative, and delivered within the allotted time frame.
Engaging Your Audience
As a presenter, one of the most important things you can do is engage your audience. Engaged audiences are more likely to remember your message and take action on it. There are a few techniques you can use to keep your audience engaged throughout your presentation.
One of the most effective ways to engage your audience is by telling stories and anecdotes. Stories are a powerful tool for capturing your audience’s attention and keeping them engaged. They can help illustrate your message and make it more relatable to your audience. When telling a story, make sure it is relevant to your message and keep it short and to the point.
Another way to keep your audience engaged is by having an effective question and answer session. This gives your audience the opportunity to ask questions and provide feedback. It also allows you to clarify any points that may have been unclear. When conducting a question and answer session, make sure to repeat the question so everyone can hear it and keep your answers concise and to the point.
To ensure that your audience is engaged, you need to have high energy and be engaging yourself. This means you need to be confident and knowledgeable about your subject matter. You should also be clear and concise in your delivery, using natural dialogue and avoiding jargon or technical terms that may be unfamiliar to your audience.
In conclusion, engaging your audience is key to a successful presentation. By utilizing stories and anecdotes and having an effective question and answer session, you can keep your audience engaged and ensure that your message is remembered. Remember to have high energy and be engaging yourself to keep your audience focused and interested.
As I wrap up my PowerPoint presentation, I want to make sure that my audience leaves with a clear understanding of my message. A strong closing can help reinforce the main points and motivate them to take action. Here are some tips for concluding your presentation:
Restate the main message: In the closing slide, I like to restate the main message of my presentation. This helps to reinforce the message and ensures that the audience leaves with a clear understanding of what I was trying to convey.
Call to action: A call to action is a powerful way to motivate your audience to take action. Whether it’s signing up for a newsletter, making a purchase, or joining a cause, a call to action can help you achieve your goals.
Closing slide: The closing slide is an excellent opportunity to summarize the key points of your presentation. I like to use bullet points or a table to summarize the main ideas, making it easy for the audience to remember the key takeaways.
Question and answer session: A question and answer session can help to engage your audience and address any concerns or questions they may have. I like to encourage my audience to ask questions and provide feedback, as this can help me improve my presentation for future audiences.
In conclusion, ending a PowerPoint presentation is just as important as the opening and body of the presentation. By following these tips, you can ensure that your audience leaves with a clear understanding of your message and is motivated to take action.
Related posts:
- Unfortunately, PowerPoint Cannot Read: Troubleshooting Tips
- How to Highlight Important Slides in PowerPoint: A Step-by-Step Guide
- How to Easily Display Document Properties in PowerPoint
- Access Excel, PowerPoint, Word and More for Less Than 1 Euro: A Tech-Savvy Guide
- Mastering Bullet Points in PowerPoint: A Step-by-Step Guide
- Adding a Slide to an Existing PowerPoint Presentation: A Step-by-Step Guide
- PowerPoint This Picture Can’t Be Displayed: Troubleshooting Tips for Techies
- How to Add Copilot to PowerPoint: Step-by-Step Guide
- .POTX File Extension: Understanding the Type of PowerPoint File Created When Saving a Presentation
- Create a Timeline in PowerPoint 2010: Step-by-Step Guide
- Add a Slide to an Existing PowerPoint Presentation: A Step-by-Step Guide
- Troubleshooting: Why Can’t I Indent in PowerPoint?
Leave a Comment Cancel reply
Save my name, email, and website in this browser for the next time I comment.

Show the slide number and total number of slides on every slide
PowerPoint can automatically add numbers to your slides, but it can't automatically show a count (such as "slide 2 of 12"). You have to do that manually. This article describes how.
On the View tab, in the Master Views group, click Slide Master , and then click the slide master thumbnail.

On the Insert tab, in the Text group, click Text Box , and then drag to draw the text box on the slide master where you want the slide number to appear all slides.
With the cursor still in the text box, on the Insert tab, in the Text group, click Slide Number .
In the text box, place your cursor before the <#> , and then type Slide .
If you don’t know the total number of slides in your presentation, and you want an easy way to find out, do the following:
On the View tab, in the Presentation Views group, click Normal .

Note: Because this procedure adds slide numbers to the slide master, the slide numbers can't be deleted from or edited in individual slides and they won't appear in the Header and Footer dialog box.
Vote for this feature
If you want PowerPoint to be able to include the total number of slides, please send us your feedback to help us prioritize new features in future updates. See How do I give feedback on Microsoft Office? for more information.

Need more help?
Want more options.
Explore subscription benefits, browse training courses, learn how to secure your device, and more.

Microsoft 365 subscription benefits

Microsoft 365 training

Microsoft security

Accessibility center
Communities help you ask and answer questions, give feedback, and hear from experts with rich knowledge.

Ask the Microsoft Community

Microsoft Tech Community

Windows Insiders
Microsoft 365 Insiders
Was this information helpful?
Thank you for your feedback.
Home Blog PowerPoint Tutorials PowerPoint Slide Size: What is the Best Size for a Presentation
PowerPoint Slide Size: What is the Best Size for a Presentation

Whether you’re a business professional, educator, or public speaker, understanding what are the optimal slide dimensions can enhance the impact of your presentation. This guide will walk you through everything you need to know about the size of your PowerPoint presentation, from the basics to advanced tips.
What is the PowerPoint Slide Size?
PowerPoint slide size refers to the dimensions of the slides within your PowerPoint presentation. These dimensions determine how your content is displayed in a monitor or projector, and can significantly affect the overall look and feel of your presentation.
The most common slide sizes in PowerPoint are 16:9 (widescreen) and 4:3 (standard).
Choosing the right slide size is essential as it impacts how your content is perceived and ensures compatibility with various display devices. Once you define the optimal slide size for your next presentation, you can change the slide dimensions in PowerPoint following the steps described in our article.

It is important to understand the differences between Aspect Ratio and Pixel Dimensions.
The specific pixel dimensions for a standard 16:9 slide are 1920 pixels in width by 1080 pixels in height.
Understanding Aspect Ratio vs. Pixel Dimensions
Aspect ratio vs. pixel dimensions: what’s the difference.
When defining the optimal slide size for your presentation, it’s important to understand the difference between aspect ratio and pixel dimensions, as these terms often cause confusion but are critical for creating well-designed presentations.
Aspect Ratio
The aspect ratio refers to the proportional relationship between the width and height of your slide. It’s expressed as two numbers separated by a colon, such as 4:3 or 16:9. The aspect ratio defines the shape of your slide and how it will appear on different screens.
Pixel Dimensions:
Pixel dimensions, on the other hand, specify the total number of pixels in the width and height of your slide. This measurement determines the resolution and quality of your images and text in your PowerPoint slide size. For example:
- 1920 x 1080 pixels: This is a common dimension for a 16:9 aspect ratio, known as Full HD. It provides high clarity and detail, making it suitable for large screens and high-resolution displays.
- 1024 x 768 pixels: This dimension matches a 4:3 aspect ratio and is often used for smaller screens or lower resolution displays. It’s less detailed than 1920 x 1080 but can be effective for standard printouts or older projectors.
Why both slide size definitions matter? Understanding both aspect ratio and pixel dimensions is important because they impact how your PowerPoint slide size is viewed across different devices and formats. Here’s why:
- Consistency Across Devices: Ensuring your aspect ratio is compatible with the display device prevents issues like black bars on the sides (letterboxing) or content being cut off (cropping).
- Clarity and Detail: Choosing appropriate pixel dimensions ensures that your images and text appear sharp and clear, avoiding pixelation or blurriness.
- Professional Appearance: Matching the right aspect ratio and pixel dimensions helps maintain a polished and professional look, whether you’re presenting on a large screen, sharing a PDF handout (as we will see later), or displaying your slides online.
The Impact of Slide Size on Different Industries
Different industries have unique needs when it comes to presentation slide sizes. For instance:
- Business: Corporate presentations often require widescreen formats (16:9 slide size) to showcase detailed charts and data on modern projectors and screens. However, in some environments there are still projectors using the traditional 4:3 aspect ratio format for slide sizes.
- Education: Lectures and workshops benefit from both 16:9 and 4:3 formats, depending on the teaching aids and screen setups used.
- Design: Creative professionals need to create visually appealing slides that may require custom dimensions to stand out and effectively communicate their ideas.
Best Practices for Choosing a Proper Slide Size for your Presentation
When selecting an optimal PowerPoint slide size, consider the following:
- Audience and Venue: Tailor your slide size to the screen size and setup of your presentation venue. Widescreen (16:9) is typically best for large screens, while standard (4:3) works well for print distributions.
- Presentation Type: Webinars and online presentations held via Zoom or Teams , for example, often benefit from widescreen formats, while in-person meetings might require flexibility.
- Aesthetics vs. Functionality: Balance visual appeal with readability and content integrity.
When creating PDF handouts from your PowerPoint presentation, it’s also important to choose a convenient slide size that ensures readability and clarity in print.
The 4:3 aspect ratio is generally preferred for printed handouts as it aligns well with standard paper sizes such as A4 or Letter. This format ensures that your content fits neatly onto the page without excessive margins or cropping.
Additionally, using 4:3 for print ensures that text and graphics are appropriately scaled, maintaining the legibility and professional appearance of your handouts. This consideration is essential for creating effective printed materials that complement your live presentations.
Overcoming Challenges with Slide Size
Adapting content for different slide sizes.
Resizing images and adjusting layouts can be challenging. Here are some tips:
- Resizing Images: Ensure that images maintain their aspect ratio to avoid distortion.
- Text Adjustments: Modify font sizes and text boxes to fit the new slide dimensions without compromising readability.
- Consistency: Keep a consistent layout throughout your presentation to maintain a professional look.
Dealing with Mixed Slide Sizes in a Presentation
Sometimes, you may need to integrate slides with different dimensions. Here’s how:
- Transition Techniques: Use smooth transitions to blend slides of varying sizes seamlessly.
- Tools and Add-Ins: You can use PowerPoint add-ins that help manage and standardize slide sizes across your presentation.
Advanced Tips for Custom Slide Sizes
When it is time to innovate, the PowerPoint slide size can also play an important role. If you are considering to create a presentation for digital signage, or non traditional devices, choosing a custom PowerPoint slide size can help to achieve this. Here are some ideas and ways you can innovate by choosing a different slide size:
- Unique Dimensions: Create custom slide sizes for branding or special events.
- Custom Branding: Use non-standard slide sizes to align with your brand identity and marketing materials.
- Innovative Uses: Experiment with different dimensions to create unique visual experiences.
For example, to create high-quality digital signage content, you’d need to set the PowerPoint slides to a 1920×1080 resolution in vertical (portrait) or horizontal (landscape) mode, which are the typical digital sign screen sizes.
Understanding what is the optimal slide size and how to configure it is essential for creating effective and engaging presentations. By optimizing your slides, and overcoming common challenges, you can ensure your visual aids are impactful and professional. Keep experimenting with different sizes and formats to find what works best for your needs. Remember, the key to a successful presentation lies in the details—choosing the right slide size is one of them.

Like this article? Please share
Presentation Tips Filed under PowerPoint Tutorials
Related Articles

Filed under Google Slides Tutorials • May 17th, 2024
How to Import Google Slides Themes
Importing Google Slides Themes is an easy task that can bring life into your presentations. Learn how to reuse old slides to create new cool themes here.

Filed under PowerPoint Tutorials • May 17th, 2024
How to Edit Background Graphics in PowerPoint
You don’t have to stick with template designs that don’t appeal to your intended message. Learn how to edit background graphics in PowerPoint to become a master user.

How to Make Google Slides Vertical
Power up your presentation skills by learning how to make google slides go vertical. Step-by-step instructions with examples.
Leave a Reply
How-To Geek
6 ways to create more interactive powerpoint presentations.
Engage your audience with cool, actionable features.
Quick Links
- Add a QR code
- Embed Microsoft Forms (Education or Business Only)
- Embed a Live Web Page
- Add Links and Menus
- Add Clickable Images to Give More Info
- Add a Countdown Timer
We've all been to a presentation where the speaker bores you to death with a mundane PowerPoint presentation. Actually, the speaker could have kept you much more engaged by adding some interactive features to their slideshow. Let's look into some of these options.
1. Add a QR code
Adding a QR code can be particularly useful if you want to direct your audience to an online form, website, or video.
Some websites have in-built ways to create a QR code. For example, on Microsoft Forms , when you click "Collect Responses," you'll see the QR code option via the icon highlighted in the screenshot below. You can either right-click the QR code to copy and paste it into your presentation, or click "Download" to add it to your device gallery to insert the QR code as a picture.
In fact, you can easily add a QR code to take your viewer to any website. On Microsoft Edge, right-click anywhere on a web page where there isn't already a link, and left-click "Create QR Code For This Page."
You can also create QR codes in other browsers, such as Chrome.
You can then copy or download the QR code to use wherever you like in your presentation.
2. Embed Microsoft Forms (Education or Business Only)
If you plan to send your PPT presentation to others—for example, if you're a trainer sending step-by-step instruction presentation, a teacher sending an independent learning task to your students, or a campaigner for your local councilor sending a persuasive PPT to constituents—you might want to embed a quiz, questionnaire, pole, or feedback survey in your presentation.
In PowerPoint, open the "Insert" tab on the ribbon, and in the Forms group, click "Forms". If you cannot see this option, you can add new buttons to the ribbon .
As at April 2024, this feature is only available for those using their work or school account. We're using a Microsoft 365 Personal account in the screenshot below, which is why the Forms icon is grayed out.
Then, a sidebar will appear on the right-hand side of your screen, where you can either choose a form you have already created or opt to craft a new form.
Now, you can share your PPT presentation with others , who can click the fields and submit their responses when they view the presentation.
3. Embed a Live Web Page
You could always screenshot a web page and paste that into your PPT, but that's not a very interactive addition to your presentation. Instead, you can embed a live web page into your PPT so that people with access to your presentation can interact actively with its contents.
To do this, we will need to add an add-in to our PPT account .
Add-ins are not always reliable or secure. Before installing an add-in to your Microsoft account, check that the author is a reputable company, and type the add-in's name into a search engine to read reviews and other users' experiences.
To embed a web page, add the Web Viewer add-in ( this is an add-in created by Microsoft ).
Go to the relevant slide and open the Web Viewer add-in. Then, copy and paste the secure URL into the field box, and remove https:// from the start of the address. In our example, we will add a selector wheel to our slide. Click "Preview" to see a sample of the web page's appearance in your presentation.
This is how ours will look.
When you or someone with access to your presentation views the slideshow, this web page will be live and interactive.
4. Add Links and Menus
As well as moving from one slide to the next through a keyboard action or mouse click, you can create links within your presentation to direct the audience to specific locations.
To create a link, right-click the outline of the clickable object, and click "Link."
In the Insert Hyperlink dialog box, click "Place In This Document," choose the landing destination, and click "OK."
What's more, to make it clear that an object is clickable, you can use action buttons. Open the "Insert" tab on the ribbon, click "Shape," and then choose an appropriate action button. Usefully, PPT will automatically prompt you to add a link to these shapes.
You might also want a menu that displays on every slide. Once you have created the menu, add the links using the method outlined above. Then, select all the items, press Ctrl+C (copy), and then use Ctrl+V to paste them in your other slides.
5. Add Clickable Images to Give More Info
Through PowerPoint's animations, you can give your viewer the power to choose what they see and when they see it. This works nicely whether you're planning to send your presentation to others to run through independently or whether you're presenting in front of a group and want your audience to decide which action they want to take.
Start by creating the objects that will be clickable (trigger) and the items that will appear (pop-up).
Then, select all the pop-ups together. When you click "Animations" on the ribbon and choose an appropriate animation for the effect you want to achieve, this will be applied to all objects you have selected.
The next step is to rename the triggers in your presentation. To do this, open the "Home" tab, and in the Editing group, click "Select", and then "Selection Pane."
With the Selection Pane open, select each trigger on your slide individually, and rename them in the Selection Pane, so that they can be easily linked to in the next step.
Finally, go back to the first pop-up. Open the "Animations" tab, and in the Advanced Animation group, click the "Trigger" drop-down arrow. Then, you can set the item to appear when a trigger is clicked in your presentation.
If you want your item to disappear when the trigger is clicked again, select the pop-up, click "Add Animation" in the Advanced Animation group, choose an Exit animation, and follow the same step to link that animation to the trigger button.
6. Add a Countdown Timer
A great way to get your audience to engage with your PPT presentation is to keep them on edge by adding a countdown timer. Whether you're leading a presentation and want to let your audience stop to discuss a topic, or running an online quiz with time-limit questions, having a countdown timer means your audience will keep their eye on your slide throughout.
To do this, you need to animate text boxes or shapes containing your countdown numbers. Choose and format a shape and type the highest number that your countdown clock will need. In our case, we're creating a 10-second timer.
Now, with your shape selected, open the "Animations" tab on the ribbon and click the animation drop-down arrow. Then, in the Exit menu, click "Disappear."
Open the Animation Pane, and click the drop-down arrow next to the animation you've just added. From there, choose "Timing."
Make sure "On Click" is selected in the Start menu, and change the Delay option to "1 second," before clicking "OK."
Then, with this shape still selected, press Ctrl+C (copy), and then Ctrl+V (paste). In the second box, type 9 . With the Animation Pane still open and this second shape selected, click the drop-down arrow and choose "Timing" again. Change the Start option to "After Previous," and make sure the Delay option is 1 second. Then, click "OK."
We can now use this second shape as our template, as when we copy and paste it again, the animations will also duplicate. With this second shape selected, press Ctrl+C and Ctrl+V, type 8 into the box, and continue to do the same until you get to 0 .
Next, remove the animations from the "0" box, as you don't want this to disappear. To do this, click the shape, and in the Animation Pane drop-down, click "Remove."
You now need to layer them in order. Right-click the box containing number 1, and click "Bring To Front." You will now see that box on the top. Do the same with the other numbers in ascending order.
Finally, you need to align the objects together. Click anywhere on your slide and press Ctrl+A. Then, in the Home tab on the ribbon, click "Arrange." First click "Align Center," and then bring the menu up again, so that you can click "Align Middle."
Press Ctrl+A again to select your timer, and you can then move your timer or copy and paste it elsewhere.
Press F5 to see the presentation in action, and when you get to the slide containing the timer, click anywhere on the slide to see your countdown timer in action!
Now that your PPT presentation is more interactive, make sure you've avoided these eight common presentational mistakes before you present your slides.

5 Better Alternatives To Google Slides
I f you're looking to create a compelling presentation to showcase a new idea or persuade others, Google Slides may be the first option that comes to mind. But with few built-in templates, basic themes, and a limited graphics collection, you'll likely have a hard time making your presentation stand out against others.
If you want to make your presentation truly stand out, there are several alternatives to Google Slides that offer extra perks and features to give your presentations an edge. While Google focuses on integrating Slides with its other work-based apps like Sheets and Docs, other presentation apps focus more on design elements, transitions, and themes to help you convey your brand or personal image throughout your presentation.
We've tested these Google Slide alternatives to give you an idea of other available options to deliver impactful presentations. If you're looking for a way to make boring information more fun and engaging, here are the best presentation apps to replace Google Slides.
Read more: Major Graphics Card Brands Ranked Worst To Best
Microsoft PowerPoint
There's a reason so many businesses around the globe use Microsoft PowerPoint. Building its reputation as the go-to option for delivering high-quality presentations, the software generated $100 million in annual sales only three years after its initial release in 1990.
Microsoft PowerPoint may be Google Slides' largest competitor, but there are plenty of unique features that can add an extra flourish to your slides. PowerPoint excels in its impressive library of custom animations and slide transitions, which are fairly limited in Google Slides. Another unique feature is its AI-powered Designer tool. This provides professional design schemes that mirror the words used in your slides. For instance, if your title slide is named "Basketball Team 2024," Designer will automatically suggest pictures and slide layouts associated with basketball.
As PowerPoint has been in development longer than Google Slides, it naturally offers more nuanced features if you're looking for something specific. For example, you can save individual slides as an image file (using .png or .jpeg formats) or as a separate presentation file. There's also a large library of free PowerPoint templates designed to speed up your workflow. Moreover, PowerPoint integrates seamlessly with Microsoft Teams with its PowerPoint Live function, allowing you to easily share your presentation with your co-workers.
Prezi offers an innovative approach to showing presentations with its unique canvas feature. Unlike traditional presentation software, Prezi lets you zoom and pan around a flexible canvas. The canvas may feel distant to something of a presentation program, but there is still some linear order provided thanks to the Timeline view.
Finding ways to visualize data is one of the biggest challenges when dealing with presentation software. Prezi resolves this struggle with the help of its Story Blocks: a series of infographics available in multiple designs to visually represent data. You can easily edit infographics and even add animations to individual shapes. This can help add a story to your presentation and help you emphasize key points.
To further enhance your presentation visually, Prezi offers several topic path settings, which let you change how Prezi transitions from one topic to another. These options include subtopics, which are super helpful for breaking large chunks of information down. If you're looking for a unique, modern approach to presenting information, Prezi is a top pick.
If you're looking to create a professional presentation to convince potential clients about your business idea, Slidebean is a popular choice among professionals with plenty of customization options. One of the issues with Google Slides is its fairly limited template library, which is filled mostly with basic designs. Slidebean offers a better alternative with a broad selection of innovative templates split into categories for convenience.
The app's user interface is easy to navigate so that you can create slides in less time. Each slide has a dedicated Design and Outline tab. You can use the Outline tab to quickly edit the information on each slide without being distracted by all the visual elements. Another productivity-enhancing feature is the ability to generate a presentation theme from your website. Simply enter your URL, and Slidebean will automatically apply the theming to your presentation.
Slidebean is another presentation app to take advantage of AI. Using the Auto-Design feature, you can generate recommended slide layouts based on your existing content. It also features AI text suggestions designed to suit different industries. Overall, Slidebean offers a quicker, more efficient method for creating stunning presentations compared to Google Slides.
Canva is a well-known app among graphic designers, but it's also capable of making stunning presentations. The app also has mobile editions, so you can easily create and edit presentations on your Android phone , iOS device, or tablet. As long as you have an internet connection, you can modify your designs wherever you are.
To get started, head to Canva's online presentation maker . Canva offers a vast range of templates categorized by topic, which easily surpasses the simple templates in Google Slides . While some of the templates are only available to Canva Pro members, there is an ample amount of free templates to help you get started. You'll also find a large selection of stock photos, shapes, and illustrations to create beautiful customized slides.
Because Canva is built for graphic designers, you can access several features to give your presentation consistent theming. These include color palettes, font sets, and even a brand kit that allows you to add your company's fonts (available to Pro members only). One time-saving feature is Canva's Uploads tab, which lets you access recently uploaded media files. This offers a convenient way to copy content between different presentations.
Visme is a powerful visual design tool able to create videos, infographics, and presentations. One of the perks of using Visme is the company's free educational content, which offers advice on how to create impactful content to boost your brand. After signing up, the company also asks whether you're using Visme for your business, education purposes, or personal use to offer personalized tips.
In terms of charts and graphs, Visme offers some of the most impressive features we've seen from a presentation app, so you can effortlessly convey important statistics. From the Data tab, you can access dozens of graph styles to visually represent your data. Then, simply double-click a chart inside your presentation to edit the values instantly in a simple table format.
Another area that Visme excels in is collaboration. You can either generate a link to publish your presentation on the web or share your presentation privately with others. For each team member, you can choose who can view, edit, and comment slides for a seamless workflow. There's also a Slack integration that lets you receive messages whenever changes are made to your presentation. Visme is free for all users, with limited features available in its premium plans.
Read the original article on SlashGear .

IMAGES
VIDEO
COMMENTS
Add slide numbers or notes page numbers. On the View tab, in the Presentation Views group, click Normal. On the left of your screen, in the pane that contains the slide thumbnails, click the first slide thumbnail in your presentation. On the Insert tab, in the Text group, click Header & Footer. If you want to add slide numbers, click the Slide ...
To add slide numbers to your PowerPoint slides, click the "Slide Number" checkbox in the "Slides" tab. Press the "Apply to All" button to add slide numbers to all of your slides. Once applied, your slide numbers will appear on each of your slides in the bottom-right corner. If you've split your PowerPoint presentation into sections, you'll need ...
Step-2: Click on the "Slide Number" option. Now, click on the " Insert " tab. Then, from the options, click on the " Slide Number ". This will open a new pop-up window with more options. Step-3: Add the Slide Numbers to the Slides. First, make sure that you enable the "Slide Number" option in the next step.
In PowerPoint you can add or remove automatic slide numbers, hide numbering on the title slide, and move slide numbers. You can also add the date and time to slides. If you'd like to suggest improvements to the slide numbering feature, you can do that by clicking Help > Feedback > I have a suggestion. Select a heading below to open it and see ...
1. Open the Slide Number dialog box. Now that you have setup (or double-checked) that your slide numbers are set up properly in the Slide Master view, now we can add them here in the Normal View of PowerPoint (woo-hoo). Let's start by opening the Header and Footer dialog box as follows: Navigate to the Insert tab.
Things You Should Know. To add slide numbers to your presentation, click the "Insert" tab, select "Header & Footer," check the box next to "Slide number," and click "Apply All." The position, font, size, and color of your slide numbers is determined by your slide master.
In Slide Master View, click a layout on the left in the thumbnails. Click the Insert tab in the Ribbon and click Header & Footer in the Text group. A dialog box appears. If necessary, click the Slide tab in the dialog box. Click the check box for Slide number (a checkmark appears).
Adding Slide Numbers. Open your presentation in PowerPoint. Go to the Insert tab. Insert tab. In the Text group, click Header & Footer. A new window will open. Header & Footer button. Header & Footer buttonCheck "Slide number" to enable it. You'll see a little box highlighted in black on the preview.
Follow these steps: 1) Go to Insert, then, select Slide numbers. 2) On the dialog box, click the On button. 3) Click Apply. Once successful, slide numbers will be shown on the bottom-left corner of each slide. Tip: To apply on selected slides, first select the slides you want to apply for slide numbers. Next, select Apply to selected.
What to Know. PC: Open PowerPoint in Normal view and go to the first slide > Insert > Slide Number. Then, in the Header and Footer dialog, select the Slide tab. Next, select Slide number. Mac: In Normal view, go to Insert > Slide Numbe r. Select Slide Number and enter the starting number. This article explains how to add page numbers to a ...
Editing Slide Numbers. Enabling Slide Numbers. Open your presentation in Google Slides. Click Insert → Slide numbers. Slide numbers option from Insert menu. A new window will open, where you can enable or disable slide numbering. Click "On" to enable slide numbering. Check "Skip title slides" if you don't want numbers to appear on ...
On the Insert tab, in the Text group, click Header & Footer. In the Header and Footer dialog box, click the Slide tab. Do one of the following: To number the slide that you currently have selected, select the Slide number check box, and then click Apply. Repeat this step for each individual slide that you want to number. To number all slides ...
Select the Master Layout icon to open a dialog box. Check the box next to Slide Number. On the Slide Master tab in the ribbon, click on the red X icon to Close Master View . Select Slide Number . Note: Even though you selected Slide Number in Step 5 above, you've only indicated that you want the option to add slide numbers to your deck.
To use this feature, go to the Insert tab, click on Header & Footer, and then check the box for Slide Number. From here, click on the "Apply to All" button to automatically add page numbers to all slides in your presentation. You can also customize the look of your page numbers using the Format button.
Learn how to insert slide numbers in PowerPoint 2021 for Microsoft 365. Learn more at https://kaceli.com. Learn more and master PowerPoint: PowerPoint 202...
I show you how to add slide numbers in powerpoint and how to add page numbers in powerpoint in this video. For more videos like how to add powerpoint slide n...
Learn how to add slide numbers in powerpoint with this guide from wikiHow: https://www.wikihow.com/Add-Slide-Numbers-in-PowerPointFollow our social media cha...
In the Insert tab, click the Header & Footer option. In the window that opens up, use the cursor to check the Slide number box. a. If you just want to assign a page number to the current slide, click Apply. b. If you want to insert PowerPoint page numbers on all your slides, click Apply to all. c. If you want to omit the page number on the ...
Follow these steps to effortlessly add slide numbers to your PowerPoint presentation: To add slide numbers in PowerPoint: Step 1: Open your PowerPoint presentation. Open PowerPoint. Step 2: Click the Insert tab. the Insert tab. Step 3: In the Text group, click Slide Number. click Slide Number. Step 4: In the Header and Footer dialog box, click ...
Visit Google Slides, sign in, and open your presentation. To add numbers to all slides, select Insert > Slide Numbers from the menu. When the Slide Numbers box appears, mark the option for "On" and click "Apply." To number all slides except title slides, check the box for that option before you hit "Apply." Title slides are those that use the ...
2. Think about the speed at which you speak. If you speak quite quickly, you will be able to get through a great number of slides. If, on the other hand, you speak more slowly, you'll probably require a smaller number of slides. Use your rate of speech to determine how many slides your presentation can accommodate. 3.
Remember, the number of slides you use is just one piece of the puzzle. Timing and Practice Applying the 10/20/30 Rule. When it comes to creating a PowerPoint presentation, one of the most important factors to consider is timing. You don't want your presentation to be too short or too long.
Download your presentation as a PowerPoint template or use it online as a Google Slides theme. 100% free, no registration or download limits. Content PowerPoint
Place your cursor after the <#>, and then type of x, where x equals the total number of slides in your presentation (for example, <#>of 10if you have 10 total slides in your presentation). Numbering slides this way doesn't automatically calculate the total number of slides in your presentation, so you'll need to enter the total manually, in place of the x.
PowerPoint slide size refers to the dimensions of the slides within your PowerPoint presentation. These dimensions determine how your content is displayed in a monitor or projector, and can significantly affect the overall look and feel of your presentation. The most common slide sizes in PowerPoint are 16:9 (widescreen) and 4:3 (standard).
1 Make a provocative statement. "I want to discuss with you this afternoonwhy you're going to fail to have a great career." One surefire way to get your audience's attention is to make a provocative statement that creates interest and a keen desire to know more about what you have to say. The presentation above, for example, does just that by ...
Click anywhere on your slide and press Ctrl+A. Then, in the Home tab on the ribbon, click "Arrange." First click "Align Center," and then bring the menu up again, so that you can click "Align Middle." Press Ctrl+A again to select your timer, and you can then move your timer or copy and paste it elsewhere.
Presentation Type and Abstract Number: Trial-in-Progress (TiP) TPS1131, Poster 103b Date: Sunday, June 2, 2024 Time: 9:00 a.m. — 12:00 p.m. CDT Category: Session Type and Title: Poster Session - Breast Cancer—Metastatic. Abstracts are now available via the official ASCO Annual Congress website here.
Johnson & Johnson advances leadership in oncology innovation with more than 75 clinical study and real-world presentations at ASCO and EHA. 05/23/2024. Download (opens in new window) PDF. Multimedia Files: View all news. Questions? Please contact us: 1-800-950-5089 [email protected].
It also features AI text suggestions designed to suit different industries. Overall, Slidebean offers a quicker, more efficient method for creating stunning presentations compared to Google Slides ...