How to Remove Page Numbers From a PowerPoint: A Step-by-Step Guide
Removing page numbers from a PowerPoint presentation is a simple process that can be completed in just a few steps. To accomplish this, you will need to access the ‘Insert’ tab, go to the ‘Header & Footer’ section, and uncheck the ‘Slide Number’ option. After saving your changes, the page numbers will no longer be visible on your slides.
After completing the action, your PowerPoint presentation will have a cleaner and more streamlined appearance. This can be particularly useful if you want to create a more professional-looking presentation or if the page numbers are not necessary for your audience to follow along.

Introduction
PowerPoint presentations are essential tools for conveying information in a visually appealing manner. Whether you’re a student, educator, or professional, knowing how to customize your presentation to fit your needs is crucial. One customization option you might need is removing page numbers from your slides. Page numbers are automatically added by PowerPoint to help keep track of the sequence of slides.
However, there are instances when you might want to remove them – maybe you’re printing handouts and the page numbers aren’t needed, or you want a cleaner look for a professional presentation. Understanding how to remove page numbers is valuable for anyone who uses PowerPoint regularly. It’s a simple task, but if you’re new to PowerPoint or haven’t done it before, it can be a little confusing. No worries, though! We’re here to walk you through it step by step.
Step by Step Tutorial on Removing Page Numbers
This section will guide you through the steps needed to remove page numbers from your PowerPoint presentation.
Step 1: Open the ‘Insert’ Tab
Go to the ‘Insert’ tab on the PowerPoint ribbon.
This tab is located at the top of the PowerPoint window and contains various tools for adding to your slides, including the ‘Header & Footer’ button where you can control page numbers.
Step 2: Click on ‘Header & Footer’
Find and click the ‘Header & Footer’ button in the ‘Text’ group.
This will open a new dialog box where you can edit the header and footer settings for your presentation, including the slide numbers.
Step 3: Uncheck ‘Slide Number’
In the ‘Header and Footer’ dialog box, uncheck the box next to ‘Slide Number’.
By doing this, you instruct PowerPoint not to display any numbers on your slides.
Step 4: Apply to All or Selected Slides
Click on ‘Apply to All’ to remove numbers from all slides or ‘Apply’ to remove from the selected slides.
If you only want to remove page numbers from certain slides, make sure to select those slides before clicking ‘Apply’.
| Benefit | Explanation |
|---|---|
| Cleaner Slide Appearance | A presentation without page numbers can look cleaner and more professional. |
| More Space for Content | Removing page numbers frees up space, allowing for larger images or additional content. |
| Flexibility in Printing | Without page numbers, you can rearrange printed handouts without worrying about the order. |
| Drawback | Explanation |
|---|---|
| Less Navigation Guidance | Page numbers can help the audience keep track of the presentation, so removing them can lead to confusion. |
| Potential for Disorganization | If the slides get shuffled, a lack of page numbers can make it hard to sort them back into order. |
| Inconsistency with Handouts | If you provide handouts with page numbers but the presentation itself doesn’t have them, it can cause inconsistency. |
Additional Information
When working with PowerPoint, there are a few additional tips you should keep in mind when dealing with page numbers. First, if you’re collaborating with a team, ensure everyone is on the same page about removing slide numbers to avoid confusion. Also, consider your presentation’s format; if you’re sharing it digitally, page numbers might not be as important.
However, for physical handouts, they can be crucial for keeping your audience aligned. Always remember to save your presentation after making changes to avoid losing your work. Lastly, if you’re dealing with a pre-existing template with hard-coded numbers, you may need to adjust the slide master rather than just unchecking the ‘Slide Number’ box. This will require a few more clicks but is still a straightforward process.
- Open the ‘Insert’ tab.
- Click on ‘Header & Footer’.
- Uncheck ‘Slide Number’.
- Click ‘Apply to All’ or ‘Apply’.
Frequently Asked Questions
What if the slide numbers don’t disappear after unchecking the box.
Make sure you have clicked ‘Apply to All’ and also check if the slide numbers are manually added text boxes, in which case you’ll need to delete them individually.
Can I remove page numbers from just one specific slide?
Yes, simply select the slide you want to alter before opening the ‘Header & Footer’ dialog box, then click ‘Apply’ instead of ‘Apply to All’.
Will removing page numbers affect my presentation’s layout?
It might create a small amount of extra space where the number used to be, but it should not significantly alter your slide’s layout.
Can I remove page numbers from the slide master?
Yes, editing the slide master will change the layout of all slides based on that master, including removing page numbers.
Is there a shortcut to remove page numbers?
There isn’t a dedicated shortcut, but accessing the ‘Header & Footer’ box can be done quickly by using the ribbon in PowerPoint.
Removing page numbers from a PowerPoint presentation is a simple yet effective way to create a more polished and professional-looking presentation. Whether you’re a seasoned PowerPoint user or new to the software, following the steps outlined in this article will ensure you can accomplish this task with ease. Remember that while removing slide numbers can enhance the visual appeal, they serve a practical purpose in guiding your audience through your presentation.
Always consider the context in which your presentation will be used before deciding to remove them. If you’re ready to elevate your PowerPoint skills further, exploring more advanced features such as customizing slide masters or working with animations can further enhance your presentations.

Matthew Burleigh has been writing tech tutorials since 2008. His writing has appeared on dozens of different websites and been read over 50 million times.
After receiving his Bachelor’s and Master’s degrees in Computer Science he spent several years working in IT management for small businesses. However, he now works full time writing content online and creating websites.
His main writing topics include iPhones, Microsoft Office, Google Apps, Android, and Photoshop, but he has also written about many other tech topics as well.
Read his full bio here.
Share this:
Join our free newsletter.
Featured guides and deals
You may opt out at any time. Read our Privacy Policy
Related posts:
- How to Add Page Numbers in Powerpoint 2010
- How to Save Powerpoint as PDF with Notes
- How to Set Time for Slides in Powerpoint
- The Footer is Stuck on the Page in PowerPoint: How to Fix It
- Can I Convert My Powerpoint to Google Slides?
- How to Remove a Hidden Footer From Microsoft PowerPoint: A Step-by-Step Guide
- How to Unhide a Slide in Powerpoint 2013
- How to Drag Slides From One PowerPoint to Another: A Step-by-Step Guide
- How to Add the Filename to the Header in Excel 2013
- How to Delete a Slide in Powerpoint 2010
- How to Make a Powerpoint Slide Vertical in Powerpoint 2013
- How to Loop a Slideshow on Powerpoint 2013
- How to Insert Slide Number PowerPoint: The Ultimate 2024 Guide
- How to Change the Font on All Slides in Google Slides
- How to Hide a Slide in Powerpoint 2010
- How to Delete Multiple Slides in Google Slides
- How to Add a Footer to All Sheets in Excel: A Step-by-Step Guide
- How to Insert a Google Slides Page Number
- How to Make a Header Row in Google Sheets
- How to Rotate a Slide in PowerPoint: A Step-by-Step Guide
Byte Bite Bit
How to Remove Page Numbers in PowerPoint: Step-by-Step Guide for All Versions
Removing page numbers from a PowerPoint presentation might seem like a tiny detail, but it can significantly impact the overall look and feel of your slides. I’ve been in situations where unnecessary slide numbers just cluttered the design or distracted from the content. To remove these distractions, you simply need to access the “Insert” tab, navigate to “Text,” and select “Slide Number.” From there, uncheck the option, and you’re good to go!

Not all slides need to follow the same rule. For instance, you might want page numbers on most slides but avoid them on the title slide or specific sections. It’s straightforward. Highlight the slide in question, head over to “Header & Footer,” and uncheck “Slide Number.” Trust me; it’s a quick fix that works wonders.
In my presentations, I’ve found that keeping the structure clean makes a huge difference. Whether for a business meeting, a school project, or a personal slideshow, eliminating unnecessary page numbers can streamline your presentation and make it more professional. Plus, it’s one less thing for your audience to focus on, allowing them to concentrate fully on your message.
- 1.1 Understanding Slide Masters
- 1.2 Navigating the View Tab
- 1.3 Utilizing the Slide Size Functionality
- 1.4 Applying Consistent Formatting Across Slides
- 2.1 Inserting Text Boxes and Fields
- 2.2 Working with Headers, Footers, and Page Numbers
- 2.3 Exploring the Insert Tab Options
- 3.1 Adding Slide Numbers
- 3.2 Removing Slide Numbers from Presentations
- 3.3 Customizing Navigation and Starting Points
- 4.1 Creating a Custom Presentation for Small Businesses
- 4.2 Leveraging PowerPoint for Different Platforms
- 4.3 Addressing Frequently Asked Questions
Setting Up Your PowerPoint Presentation
To set up a PowerPoint presentation effectively, it’s essential to familiarize yourself with a few powerful tools and techniques. Using slide masters, navigating the view tab, leveraging slide size options, and ensuring consistent formatting leads to a sleek, professional presentation.
Understanding Slide Masters
Slide Masters in PowerPoint are like the backstage of a theater performance. They control the overall look and feel of all your slides. By setting fonts, colors, and layout once in the Master Slide, you ensure uniformity across every slide.
To access Slide Masters, go to the View Tab and select Slide Master . Here, you can modify the Master Slide or individual layouts. For example, applying a specific font or theme color will reflect on all dependent slides. This feature is also useful for adding common elements such as logos or headers that must appear on each slide. It’s a great way to maintain a consistent and professional appearance throughout your presentation.
Navigating the View Tab
The View Tab is your control center for managing the different views and details of your presentation. Within this tab, options like Normal , Slide Sorter , Notes Page , and more help you tailor your presentation workflow.
In Normal View , you can work on individual slides and see thumbnails on the side. Slide Sorter View allows you to see and arrange all slides at once. This is especially handy for reorganizing slides. For those who use speaker notes, the Notes Page View lets you write and view notes side-by-side with the slides. It’s all about finding what works best for your specific presentation needs.
Utilizing the Slide Size Functionality
Different presentation settings may require different aspect ratios or custom slide sizes. PowerPoint provides flexible slide size options to fit distinct needs.
To adjust the slide size, go to the Design Tab and click on Slide Size . You can choose between standard (4:3) and widescreen (16:9) formats, or opt for a Custom Slide Size . Choosing the right size ensures your presentation looks great on various devices and screens. For instance, using a widescreen format is perfect for modern projectors and screens. Custom sizes help if you have specific dimensions to adhere to.
Applying Consistent Formatting Across Slides
Consistency is key in creating a professional PowerPoint presentation. Applying uniform formatting ensures every slide looks polished and cohesive.
Using Slide Masters is one method, but applying consistent formatting can also involve manual adjustments. Within the Home Tab , use the Slide Layout dropdown to apply pre-set layouts. The Format Painter tool is particularly useful for copying formatting from one slide to another. When applying new designs or themes, remember to hit Apply to All to maintain uniformity. Ensuring consistent use of fonts, colors, and layout across all slides prevents distracting the audience with inconsistency.
In PowerPoint for the Web , while some functionalities are limited, you can still achieve a reasonable consistency. Utilize the available themes and templates while making minor adjustments as needed for a cohesive look.
Adding and Customizing Slide Elements
When customizing slides in PowerPoint, adding and tailoring elements like text boxes, headers, footers, and other options from the Insert tab can transform your presentation.
Inserting Text Boxes and Fields
Adding text boxes allows for flexibility in customizing where and how text appears on each slide. I often find this particularly useful for emphasizing key points. To insert a text box, go to the Insert tab and select Text Box . Click on the desired spot on your slide to draw the text box.
You can also insert fields like date, slide number, or footer text directly within text boxes. This comes in handy for adding dynamic elements to your slides.
Working with Headers, Footers, and Page Numbers
Headers and footers help maintain consistency across multiple slides. I typically add these through the Insert tab. Click on Header & Footer to open the dialog box. Here, you can decide whether to apply changes to a single slide or all slides.
- To remove page numbers : Uncheck the Slide number option.
- To add/edit headers or footers : Click the Header or Footer boxes and type your desired text.
Another nifty feature is the ability to suppress page numbers on the title slide, keeping it clean and focused.
Exploring the Insert Tab Options
The Insert tab is a treasure trove of options for customizing slides. Not only can you add text and headers, but you can also insert images, shapes, and charts. Want to add a bit of pizzazz? Explore the Icons and 3D Models options to make your slides visually appealing.
| Option | Description | Usage |
| Add images | Enhances visual engagement | |
| Add geometric elements | Graphs, flowcharts | |
| Insert data charts | Represent data visually |
Whether it’s incorporating multimedia or simply adjusting text formatting, the Insert tab provides a quick, straightforward way to elevate your presentation quality.
Managing Slide Numbers and Navigation
This section covers how to add, remove, and customize slide numbers in PowerPoint. We’ll also explore how to personalize the navigation and set starting points for numbering.
Adding Slide Numbers
Adding slide numbers in PowerPoint provides a reference point for presenters and audience members alike. To start, open your presentation and go to the Insert tab. Next, in the Text group, select Slide Number . A dialog box appears allowing you to add slide numbers.
To include slide numbers on all slides, click Apply to All . If you prefer to add numbers to specific slides, select the target slides before clicking Apply . This grants flexibility in how slides are numbered throughout the presentation.
Removing Slide Numbers from Presentations
Removing slide numbers is just as straightforward. First, open the presentation and navigate to the Insert tab. In the Text group, select Slide Number . Uncheck the box next to Slide Number in the dialog box that appears.
If you want to remove numbers from all slides, click Apply to All . To remove them from select slides, highlight those slides first and then click Apply . This method keeps the remaining slides numbered while removing numbering from the specified slides, essential for custom navigation needs.
Customizing Navigation and Starting Points
Customizing navigation involves deciding where numbering begins and how it links with the presentation’s flow. If the first slide should not be numbered, such as a title slide, you can select Hide on title slide in the Slide Number dialog.
To start numbering from a specific slide, deselect slides you don’t want to number and start from the desired slide. This controls the audience’s navigation experience and ensures clarity. For presentations with multiple sections, clearly marking the starting slide number for each section can help keep the audience on track.
Pro Tip: Use the Header and Footer tool to customize footers while managing slide numbers!
Controlling navigation through slide numbering is vital for delivering a smooth and professional presentation. Proper setup ensures that both you and your audience can follow along effortlessly.
Advanced PowerPoint Techniques and Tips
Exploring advanced techniques in PowerPoint can allow users to create more impactful presentations, especially for small businesses, and effectively utilize the tool across different platforms. This section addresses some critical aspects.
Creating a Custom Presentation for Small Businesses
Creating custom presentations tailored for small businesses revolves around personalization and strategic messaging. It’s crucial to incorporate your business’s unique branding elements. Use consistent color schemes, fonts, and logos.
When I design presentations, I often add interactive elements, such as hyperlinks to different parts of the presentation or external sources. Animations and transitions should be subtle—nothing too flashy that distracts from the message. Additionally, rehearse timings to keep the presentation flow smooth. Remember, simplicity paired with a strong, clear message wins.
Leveraging PowerPoint for Different Platforms
PowerPoint is not limited to desktop use; it’s highly versatile across platforms. Microsoft PowerPoint 2019 works seamlessly on both Windows and Mac. Additionally, the mobile versions for Android and iOS enable users to create and edit presentations on the go.
Leveraging cloud storage, such as OneDrive, allows easy syncing and sharing across devices. I find the collaboration feature incredibly useful. Multiple users can work on a presentation simultaneously. For online presentations, PowerPoint’s export to PDF and video format features are helpful. It ensures accessibility across different devices and platforms without the native software.
Addressing Frequently Asked Questions
How do I insert multimedia in my presentation?
It’s straightforward. Go to Insert , choose the type of media (Images, Video, Audio), and place it in your slide.
Can I use Photoshop files in PowerPoint?
Yes, you can insert Photoshop files by exporting them as PNGs or JPEGs and importing them into your slides.
What are some tips for presenting?
Always test your presentation with the equipment you’ll use. Engage with your audience through eye contact and clear articulation . Prepare for questions, and keep backup copies of your presentation.
| Branding Elements | All | Consistency in Design |
| Interactive Elements | All | Hyperlinks, Animations |
| Media Insertion | PC, Mac | Photos, Videos |
Related posts:
- How to Add Music to PowerPoint: A Step-by-Step Guide for Seamless Presentations
- How to Insert GIF into PowerPoint: A Step-by-Step Guide
- How to Create an Org Chart in PowerPoint: Step-by-Step Guide for Beginners
- How to Use Slide Master in PowerPoint: Streamline Your Presentation Design
- How to Indent Bullet Points in PowerPoint: A Step-by-Step Guide
- How to Add a Row to a Table in PowerPoint: Step-by-Step Guide
- How to Embed a File in PowerPoint: A Step-by-Step Guide
- How to Send a PowerPoint Through Email That Is Too Big: Effective Solutions
- Can You Work on PowerPoint at the Same Time: Tips for Seamless Collaboration
- How to Change Layout in PowerPoint: Step-by-Step Guide for Beginners
- Where is the Insert Outline Dialog in PowerPoint: A Quick User Guide
- How to Enable Editing in PowerPoint: A Step-by-Step Guide
Leave a Comment Cancel reply
Save my name, email, and website in this browser for the next time I comment.
TechRepublic
Account information.

Share with Your Friends
How to remove slide numbers from specific slides in Microsoft PowerPoint
Your email has been sent

Occasionally, you see a Microsoft PowerPoint presentation with numbered slides. It’s the same as numbering pages in a Microsoft Word document. Similar to Word, there might be slides that you don’t want to number, such as the title slide. PowerPoint’s slide-numbering feature is easy to implement, but it is seriously limited.
In this tutorial, I’ll show you how to add slide numbers to a presentation. Then, I’ll show you how to remove numbers from specific slides and a trick that lets you restart slide numbering at the second slide, but that’s the only time it works.
SEE: Windows, Linux, and Mac commands everyone needs to know (free PDF) (TechRepublic)
I’m using Microsoft 365 on a Windows 10 64-bit system, but you can use older versions of PowerPoint. PowerPoint for the web supports slide numbers. If you’re working with a slide show other than the default, add slide numbering to the master show slides. The process is the same.
How to add slide numbers in PowerPoint
Adding slide numbers to a presentation is simple. Similar to Word, you’ll add a field that displays the current slide number. Because it’s a field, it updates when you move, delete and add slides. Let’s start by adding slide numbers to all the slides in a simple presentation:
- After adding a slide, click the Insert tab.
- Click Header & Footer in the Text group to add the numbers to the footer.
- In the resulting dialog, click the Slide tab if necessary.
- Check the Slide Number option ( Figure A ).
- Click Apply to All. Notice that there’s also an Apply button. Click Apply to insert the page number only on the selected slide(s).

As you can see in Figure B , the slide number is in the bottom-right corner.
Enabling slide numbering for one or all slides is easy. Now, let’s turn it off for a specific page.
How to disable slide numbering in PowerPoint
Once you’ve enabled numbering for all slides, you might want to disable it for a page or two. For instance, this presentation has a title page — most do. As a rule, title slides don’t display a number, so let’s turn numbering off for the title slide as follows:
- Click the Insert tab and then click Header & Footer in the Text group.
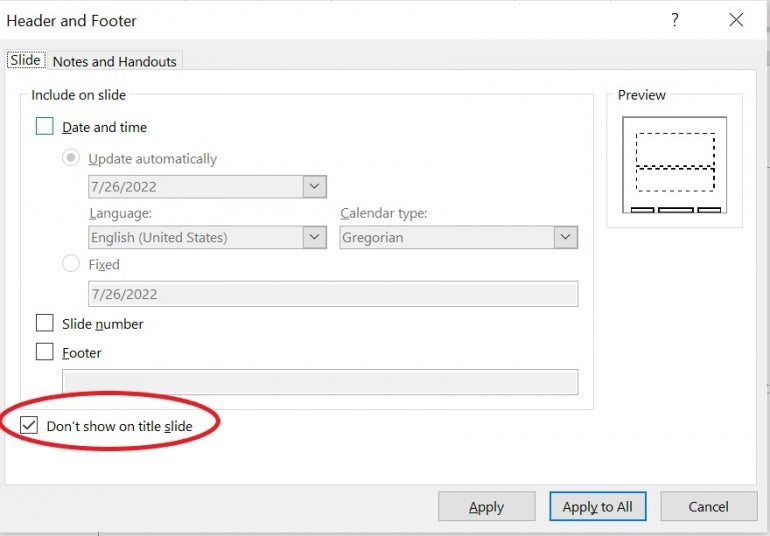
- In the resulting dialog, check the Don’t Show On Title Slide option ( Figure C ).
- If the title page is currently selected, click Apply. If you select another slide, click Apply All.
That was easy, but what if you want to disable numbering for a slide other than the title slide? Again, the solution is simple:
- Select the slide in question. In this case, we’ll use slide 2.
- Click Insert and then click Header & Footer in the Text group.
- In the resulting dialog, uncheck the Slide Number option.
- Click Apply to disable numbering for only the selected slide, the second slide.
This simple presentation has four slides. The first two have no slide numbers, and slides 3 and 4 do. You might want to consider restarting the page numbering at slide 3. Instead of displaying 3, you might want it to display 1. To the best of my knowledge, you can’t restart slide numbering. However, I do have a quick trick that will work only when you’ve turned numbering off for the first slide.
You can reset the starting slide number, and PowerPoint will apply it to the entire presentation. If you start with 4 slides and disable numbering for the first slide, you can reset that starting number to 0. Consequently, slide 1 is 0, slide 2 is 1 and so on. To reset the starting number to 0, do the following:
- Click the Design tab.
- In the Customize group, click Slide Size.
- From the dropdown, choose Custom Slide Size.
- In the resulting dialog, change the Number Slides From setting from 1 to 0 ( Figure D ).

At this point, slide 3 displays 2 and slide 4 displays 3. The only way to fix this is to enable numbering for slide 2 as follows:
- Select slide 2 — the real slide 2.
- Click the Insert tab.
- Choose Header & Footer in the Text group.
- In the resulting dialog, check Slide Number.
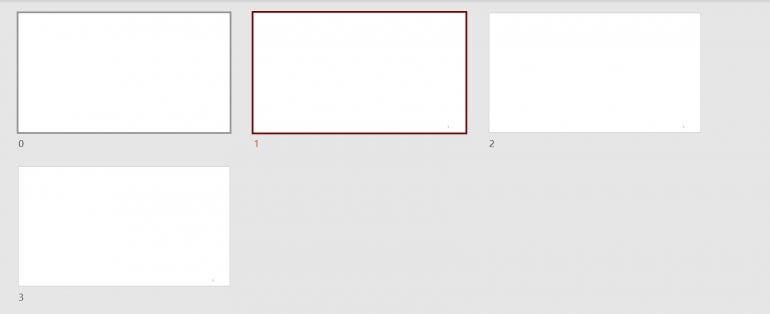
Figure E shows the slides and numbering. The title slide displays no number. The second slide displays 1. Slide 3 displays 2 and slide 4 displays 3. The only time this works is when the first slide doesn’t display a number and you reset the starting number to 0.
You can reset the starting slide number to a larger number. You’ll do so when combining different presentations. For instance, you might run the first show with slides 1 through 10 and then run a second, from slides 11 to 25.
There are third-party products available that allow you to implement more complex slide numbering schemes in PowerPoint.
Subscribe to the Developer Insider Newsletter
From the hottest programming languages to commentary on the Linux OS, get the developer and open source news and tips you need to know. Delivered Tuesdays and Thursdays
- Windows 11 cheat sheet: Everything you need to know
- Windows PowerToys: A cheat sheet
- Google Workspace vs. Microsoft 365: A side-by-side analysis w/checklist
- Best software for businesses and end users

Create a TechRepublic Account
Get the web's best business technology news, tutorials, reviews, trends, and analysis—in your inbox. Let's start with the basics.
* - indicates required fields
Sign in to TechRepublic
Lost your password? Request a new password
Reset Password
Please enter your email adress. You will receive an email message with instructions on how to reset your password.
Check your email for a password reset link. If you didn't receive an email don't forgot to check your spam folder, otherwise contact support .
Welcome. Tell us a little bit about you.
This will help us provide you with customized content.
Want to receive more TechRepublic news?
You're all set.
Thanks for signing up! Keep an eye out for a confirmation email from our team. To ensure any newsletters you subscribed to hit your inbox, make sure to add [email protected] to your contacts list.
How to Add or Remove Slide Numbers in PowerPoint

Your changes have been saved
Email is sent
Email has already been sent
Please verify your email address.
You’ve reached your account maximum for followed topics.
If you use Microsoft products like Word and Excel, there's also a good chance that you use PowerPoint for presentations. Depending on the purpose, such presentations can either be short or long.
Whereas one-page slides do not need numbering, you cannot say the same for longer and larger presentations which usually run into tens or hundreds of pages. In such cases, it makes perfect sense to number the slides for easy reference.
So, we'll show you how to add, format, and remove slide numbers from your PowerPoint presentation.
Adding Slide Numbers in PowerPoint
Adding slide numbers in PowerPoint is easy and straightforward. Here's how to go about it:
- Launch PowerPoint on your desktop.
- Open the PowerPoint presentation you want to number.
- Click on the Insert tab in the ribbon area.
- Then click on Header and Footer .

- To add a page number to the current slide only, click on Apply .
- To add slide numbers to all the pages, click Apply to All instead. There's also the provision to add the current date and time .
- If your first page also doubles as your title page, you definitely don't want a slide number there. To prevent that, simply check the Don't show on title slide box.
If you want to be a little adventurous, you can also add the Zoom effect .
Repositioning Slide Numbers in PowerPoint
If, for some reason, you don't like the placement of the slide number, you can easily reposition it to your liking. You can do this two ways—for specific or all slides.
Repositioning Slide Numbers for a Specific Slide
To reposition the slide number for a particular slide in PowerPoint:

- Now drag the Slide Number box to any location of your choice. This can be the header, footer, or even side panels; it's up to you.
Repositioning Slide Numbers for All Slides
To reposition the slide numbers for all slides in PowerPoint:
- Click on the Slide Number box.
- Go to the ribbon and click on the View tab.

- Now, drag the Slide Number box to your desired location.
- When done, click on Close Master View .
Formatting Slide Numbers
You can change the font type, size, and color of your slide numbers in PowerPoint. You can even use special characters like Roman, Chinese, or Hebrew numerals and more. To do so:

- From the popup toolbar options, select your font and size. You can also bolden, underline, or italicize the slide number to your taste.
Removing Slide Numbers in PowerPoint
Removing slide numbers in PowerPoint is also easy and straightforward. You can equally do it in two ways for short and long presentations.
Removing Slide Numbers from a Specific Slide
To remove the slide number from a particular slide:
- Open the PowerPoint presentation.

- Press the Delete key on your keyboard.
Removing Slide Numbers from All Slides
If you want to remove slide numbers from all pages:
- Open the PowerPoint presentation in question.

- On the Header and Footer dialog box, uncheck the Slide number box.
- Now click on Apply to All .
You can add, format, and remove PowerPoint slide numbers across all platforms, including online and mobile. It's essentially the same process.
Keep Track of Your PowerPoint Slides.
If your PowerPoint presentation runs into dozens or hundreds of slides, you'll be better off numbering it. This way, you can easily reference a particular page. It also makes it easier for your viewers to keep track of your slides as they read or study. It helps them track their progress and not get lost along the way.
Adding, formatting, and removing slide numbers is another simple way of optimizing your PowerPoint presentations for maximum impact.
- Productivity
How to Remove Slide Numbers in Powerpoint 2019: Easy Steps
Removing slide numbers in PowerPoint 2019 may seem like a daunting task, but it’s actually quite simple! All you need to do is access the “Insert” tab, select “Slide Number,” uncheck the box that says “Slide number,” and then apply the changes to all slides. And just like that, your slides will be number-free!
Step by Step Tutorial: Removing Slide Numbers in PowerPoint 2019
Before we dive into the steps, let’s understand what we’re about to do. We’re going to take away those pesky little numbers at the corner of your slides that can sometimes distract your audience. Ready? Let’s go!
Step 1: Open the “Insert” Tab
Open the “Insert” tab on the ribbon at the top of PowerPoint.
The “Insert” tab is where you can add various elements to your slides, like text boxes, pictures, or symbols. For our purpose, it’s also where we’ll start the process of removing slide numbers.
Step 2: Click on “Slide Number”
Click on the “Slide Number” option in the “Text” group.
The “Text” group on the “Insert” tab is where you can add or edit text-related items in your PowerPoint presentation, like headers, footers, and you guessed it – slide numbers.
Step 3: Uncheck “Slide number”
In the “Header and Footer” dialog box, uncheck the box next to “Slide number.”
A dialog box will pop up when you click “Slide Number.” This is where you can control various options for headers and footers on your slides. To remove the slide numbers, simply uncheck the corresponding box.
Step 4: Apply to All
Click “Apply to All” to remove numbers from all slides.
After unchecking the “Slide number” box, don’t just close the dialog box. Make sure to click “Apply to All” to ensure that slide numbers are removed from every slide in your presentation, not just the one you’re currently working on.
After you complete these actions, you will see that the numbers that used to appear on the bottom right corner of your slides disappear. Your slides will look cleaner and more professional, allowing your audience to focus on the content of your presentation, not the slide numbers.
Tips: Making the Most of Your PowerPoint 2019 Presentation
- Always preview your presentation after making changes to ensure everything looks as intended.
- If you want to remove slide numbers from only a few slides, simply select those slides before performing the steps.
- Remember that removing slide numbers does not affect your ability to navigate the slides during a presentation.
- Consider if your presentation really needs slide numbers–sometimes they can be helpful for reference during Q&A sessions.
- Keep in mind that any changes you make to slide numbers will not affect any other footer elements like date or footer text.
Frequently Asked Questions
How do i add slide numbers back if i change my mind.
To add slide numbers back, simply follow the steps in reverse: click on “Slide Number” and then check the “Slide number” box.
Can I remove slide numbers from just the title slide?
Yes, in the “Header and Footer” dialog box, you will find an option to “Don’t show on title slide.” Check this box to remove numbers from the title slide only.
Will removing slide numbers affect the total number of slides?
No, removing slide numbers does not affect the total number of slides in your presentation. It only removes the visible numbers on the slides.
Can I customize the format of the slide numbers?
Yes, you can customize the format before you remove them by selecting the slide numbers and using the “Format” options.
What if the “Slide Number” option is greyed out?
If the “Slide Number” option is greyed out, it could be because you’re in a view that doesn’t support editing. Try switching to “Normal” view.
- Open the “Insert” Tab
- Click on “Slide Number”
- Uncheck “Slide number”
- Apply to All
There you have it, a step-by-step guide on how to remove slide numbers in PowerPoint 2019. Whether you’re fine-tuning your presentation for a big meeting or just tidying up some slides for a class project, getting rid of those numbers can make your slides look cleaner and more professional. With this knowledge, you can now tailor your presentations to suit your audience and content without unnecessary distractions.
Remember, PowerPoint is a powerful tool that offers a lot of customization options. It’s always worth exploring these options to make your presentations stand out. Keep practicing, keep experimenting, and before long, you’ll be a PowerPoint pro!
If you’re looking to learn more about PowerPoint 2019 or need further assistance with other features, plenty of resources are available online. Don’t be afraid to search for tutorials or ask for help. After all, the best way to learn is by doing, and the more you use PowerPoint, the more skilled you’ll become.
So, go ahead and give your presentations that extra polish by removing those slide numbers. Who knows, it might just be the small detail that makes a big impression!

Matt Jacobs has been working as an IT consultant for small businesses since receiving his Master’s degree in 2003. While he still does some consulting work, his primary focus now is on creating technology support content for SupportYourTech.com.
His work can be found on many websites and focuses on topics such as Microsoft Office, Apple devices, Android devices, Photoshop, and more.
Share this:
- Click to share on Twitter (Opens in new window)
- Click to share on Facebook (Opens in new window)
Related Posts
- How to Remove Page Number from First Page of Google Docs and Google Sheets
- How to Add a Footer in Powerpoint 2016: A Step-by-Step Guide
- How to Rotate a Powerpoint Slide Presentation
- How to Add Page Numbers in Powerpoint 2010: A Step-by-Step Guide
- How to Download a Google Slides Presentation as a Powerpoint File
- How to Insert a Google Slides Page Number: Step-by-Step Guide
- How to Add a Hyperlink on Google Slides
- How to Do a Powerpoint Google Slides Presentation Conversion
- How to Make Google Slides Vertical (5 Quick Steps)
- How to Delete a Slide in Powerpoint 2010: Step-by-Step Guide
- How to Add a New Slide in Google Slides: A Step-by-Step Guide
- How to Put the Worksheet Name in Excel’s Footer: A Step-by-Step Guide
- How to Hide a Slide in Powerpoint 2010: A Step-by-Step Guide
- How to Make a Powerpoint Slide Vertical in Powerpoint 2013: A Step-by-Step Guide
- How to Delete Multiple Slides in Google Slides: A Step-by-Step Guide
- How to End Powerpoint on Last Slide in Powerpoint 2010: A Step-by-Step Guide
- How to Change Slide Size in Powerpoint 2016
- How to Convert Powerpoint to Google Slides: A Tech Solution
- How to Hide Background Graphics in Powerpoint 2013: A Step-by-Step Guide
- Can You Save a Powerpoint as a Video in Powerpoint 2013? Find Out Here!
Get Our Free Newsletter
How-to guides and tech deals
You may opt out at any time. Read our Privacy Policy
How to Remove Slide Numbers in PowerPoint Slide

In my previous article about adding a slide number to PowerPoint slides , I mentioned that each number can only be edited individually — meaning that if you want to remove all of them, you have to clean it manually.
Here’s how to remove slide numbers easily!
3. Select Slide Number .
However, if you only click the “Apply” button on the #4 step, it only a slide number on the current slide. It may be useful on the slide you want it to clean from a slide number.
About The Author
Related posts, how to format subscript or superscript text in powerpoint, how to edit footer in powerpoint mac os, how to turn powerpoint into notes, how to use powerpoint’s designer feature to take the pain out of presentations.
How to Remove Page Numbers From a PowerPoint
Page numbers can be inserted and displayed on all Microsoft Office 2010 documents, including PowerPoint 2010. In PowerPoint 2010, page numbers are called "slide numbers." To remove slide numbers from an entire PowerPoint 2010 presentation or from a single slide, you must use the Slide Number tool. This is the same tool the presentation creator used to insert the original slide numbers.
- Open the presentation that you want to edit in PowerPoint 2010.
- Click the "Insert" tab at the top of the PowerPoint window.
- Click "Slide Number" in the Text group at the top of the window to display the Header and Footer window.
- Remove the check mark from the Slide Number option, in the Include On Slide section.
- Click "Apply to All" to remove the page numbers from all slides or "Apply" to remove the page numbers from just the selected slide.
- Press "Ctrl-S" on the keyboard to save the presentation.
- Microsoft: Add Slide Numbers, Page Numbers, or the Date and Time
Advertisement
Article continues below this ad
More For You
How to write fractions on powerpoint, how to get rid of white border in acrobat, changing a twitter password on an iphone, how to block your number on skype, how to remove the background from word 2007.
- GCF LearnFree: PowerPoint 2010
Kirk Bennet started writing for websites and online publications in 2005. He covers topics in nutrition, health, gardening, home improvement and information technology.
How to Remove Page Numbers in PowerPoint

In a PowerPoint presentation, page numbers can be a useful tool for the presenter and audience to keep track of the content and navigate through the slides. However, there may be times when you decide that page numbers are not necessary or you prefer a cleaner and more focused look for your slides. In this article, we will guide you through the process of removing page numbers in PowerPoint and provide some tips for managing page numbers in different versions of the software.
Understanding the Basics of Page Numbers in PowerPoint
Page numbers in PowerPoint serve a similar purpose as they do in written documents - they provide a way to identify and locate specific slides within a presentation. This can be particularly helpful in longer presentations or when referencing specific slides during a discussion or Q&A session.
By default, PowerPoint displays page numbers in the footer area of each slide. The page number appears as a simple numeric value, starting from the first slide and continuing sequentially throughout the presentation. However, it is worth noting that the placement and format of page numbers can vary depending on the PowerPoint version and design template you use.
The Role of Page Numbers in Presentations
Page numbers can aid in the organization and flow of a presentation. They allow both the presenter and audience to easily locate and refer to specific slides, enhancing the overall navigation experience. Moreover, page numbers can provide a sense of structure to the content, especially in lengthier presentations where it might be challenging to keep track of the order of slides.
Where to Find Page Numbers in PowerPoint
To locate the page numbers in your PowerPoint presentation, you need to access the Header & Footer settings. Depending on the version of PowerPoint you are using, this option can be found in different locations within the software. Here are the steps to follow for PowerPoint 2010 and later versions:
- Open your PowerPoint presentation.
- Click on the Insert tab in the PowerPoint ribbon.
- In the Text group, click on the Header & Footer button.
- A Header and Footer dialog box will appear.
- In the Slide tab, check the box next to Slide number .
- Choose the desired options for the appearance and placement of the page numbers.
- Click Apply to All to add the page numbers to all slides in your presentation.
- Click Close to exit the Header and Footer dialog box.
Once you have followed these steps, the page numbers will be displayed on each slide in your PowerPoint presentation. You can customize the appearance of the page numbers by adjusting the font, size, color, and alignment options in the Header and Footer dialog box.
It's important to note that page numbers can also be added to specific slide layouts or master slides in PowerPoint. This allows you to have different page number formats or placements for different sections of your presentation, providing even more flexibility in organizing and navigating your slides.
Step-by-Step Guide to Removing Page Numbers
Accessing the insert tab.
To remove page numbers, open your PowerPoint presentation and navigate to the Insert tab located in the PowerPoint ribbon at the top of the window.
Navigating to Slide Number Option
Within the Insert tab, locate the Header & Footer group. Click on the Slide Number option to access the Header & Footer dialog box.
When you access the Header & Footer dialog box, you will notice that it provides you with a range of options to customize the footer content of your slides. In addition to removing page numbers, you can also choose to include or exclude the date, footer text, and even the slide title. This level of customization allows you to tailor the appearance of your slides to suit your specific presentation needs.
Unchecking the Page Number Box
Once the Header & Footer dialog box appears, you will find various options for customizing the footer content. To remove the page numbers, simply uncheck the Slide number box. You can also uncheck any other footer elements you wish to remove, such as date or footer text.
After making the desired changes, click on the Apply to All or Apply button to remove the page numbers from all slides in your PowerPoint presentation.
Troubleshooting Common Issues
While removing page numbers in PowerPoint is generally a straightforward process, you may encounter some common issues that can hinder your ability to remove or customize page numbers. Here are a few troubleshooting tips to help you address these problems:
Page Numbers Not Disappearing
If you have followed the steps outlined above and the page numbers are still visible on your slides, try selecting the problematic slides individually and repeat the process of unchecking the Slide number box in the Header & Footer dialog box. Additionally, ensure that you have clicked on either the Apply to All or Apply button to save the changes to all slides.
Difficulty Locating the Slide Number Option
In some versions of PowerPoint, the location of the Slide number option may vary or be grouped under a different menu. If you are having trouble finding this option, refer to PowerPoint's help documentation or the software's official website for specific instructions tailored to your PowerPoint version.
Another common reason for page numbers not disappearing could be due to the presence of a master slide template that includes the page numbers by default. In such cases, you may need to access the Slide Master view to remove or modify the page numbers at a higher level, affecting all slides based on that master template.
Unexpected Formatting Changes
Occasionally, when removing page numbers, you may notice unexpected formatting changes on your slides, such as text shifting or alignment issues. This can happen if the page number element was serving as a placeholder for other content. To mitigate this, double-check your slide layout and adjust any content that may have been affected by the removal of page numbers.
Tips for Managing Page Numbers in Different PowerPoint Versions
When it comes to PowerPoint presentations, managing page numbers can be crucial for organizing your content effectively. Whether you are using PowerPoint 2010 or newer versions like PowerPoint 2013, 2016, or 2019, understanding how to handle page numbers is essential for a polished and professional presentation.
Handling Page Numbers in PowerPoint 2010
In PowerPoint 2010, the Slide number option can be found under the Insert tab, within the Text group. Adding page numbers to your slides can help your audience keep track of where they are in your presentation. Moreover, you can customize the appearance and placement of page numbers to suit your design preferences. For instance, you can choose to have the page numbers displayed at the top or bottom of the slides, or even opt for a specific format for numbering, such as Roman numerals or letters.
Furthermore, in PowerPoint 2010, you can also use the Header & Footer dialog box not only to add or remove page numbers but also to include additional information like date and time, slide titles, and footnotes. This feature can be particularly useful when you need to provide context or references within your presentation without cluttering the slides with excessive text.
Managing Page Numbers in PowerPoint 2013 and Later
In PowerPoint 2013 and subsequent versions, such as PowerPoint 2016 and PowerPoint 2019, the process of managing page numbers remains consistent with PowerPoint 2010. By locating the Slide number option under the Insert tab, within the Text group, users can easily add or remove page numbers as needed. This continuity in functionality across different versions of PowerPoint ensures a seamless experience for users transitioning between software iterations.
The Impact of Removing Page Numbers on Presentation Flow
When it comes to creating a PowerPoint presentation, one important decision to make is whether or not to include page numbers. While some may argue that page numbers provide a sense of organization and structure, others believe that they can be distracting and take away from the overall flow of the presentation. So, what are the pros and cons of removing page numbers?
Pros of Removing Page Numbers
One of the main advantages of removing page numbers is the potential to create a more visually appealing and streamlined presentation. Without the distraction of numbers at the bottom of each slide, the audience can focus solely on the content being presented. This can help maintain their attention and ensure that they are fully engaged throughout the entire presentation.
Another benefit of removing page numbers is the flexibility it allows in terms of slide order. When page numbers are present, there is often an expectation of a linear progression from one slide to the next. However, by removing page numbers, presenters have the freedom to navigate through their slides in a non-linear fashion, allowing for a more dynamic and interactive experience.
Cons of Removing Page Numbers
While there are certainly advantages to removing page numbers, it's important to consider the potential drawbacks as well. One potential disadvantage is the loss of a clear reference point for the audience. Without page numbers, it may be more difficult for viewers to keep track of where they are in the presentation, especially if they need to refer back to a specific slide later on.
Additionally, removing page numbers may not be suitable for all types of presentations. In some cases, such as academic or research-based presentations, page numbers can provide a valuable point of reference for citing sources or discussing specific findings. Therefore, it's important to carefully consider the context and purpose of your presentation before making a decision.
Alternatives to Using Page Numbers in PowerPoint
If you do decide to remove page numbers from your PowerPoint presentation, there are alternative methods you can use to facilitate navigation and referencing of slides. Here are a few options:
- Use slide titles: Ensure that each slide has a clear and descriptive title that reflects its content. This allows the audience to easily identify and locate specific slides during and after the presentation.
- Provide slide thumbnails: Some presentation software, including PowerPoint, allows you to generate a thumbnail view of all slides in your presentation. This view gives a visual overview of the entire presentation and enables quick navigation to individual slides.
- Add hyperlinks: If your presentation is interactive or includes non-linear navigation, you can add hyperlinks between slides. This allows you to guide the audience through specific sections or topics without relying on sequential page numbers.
By utilizing these alternative methods, you can effectively remove page numbers in PowerPoint while still ensuring that your audience can easily navigate and reference specific slides. Remember, the goal is to create a seamless and engaging experience for your audience, so choose the method that best suits your presentation's needs.
In conclusion, the decision to remove page numbers from your PowerPoint presentation is ultimately a personal one. Consider the pros and cons, as well as the alternative navigation methods available, to determine what will work best for your specific context and goals. By taking the time to carefully plan and customize your presentation, you can create a visually appealing and engaging experience that captivates your audience from start to finish.
Upgrade Your Presentation Experience with Bricks
While mastering PowerPoint is a valuable skill, imagine taking your presentations to the next level with Bricks. Say goodbye to the hassle of manual updates and hello to real-time data integration. With Bricks, you can effortlessly connect your spreadsheets to your slides, ensuring that your audience always sees the most current information. Embrace the power of AI to enhance your content creation and collaborate effectively with your team. Ready to transform your presentation workflow and make a lasting impression? Get started for free with Bricks and experience the future of presentations today.

Get the spreadsheet powered by AI
You shouldn't have to be a spreadsheet expert to get your work done. Bricks makes it easy to create docs, reports, presentations, charts, and visuals backed by your data.

Share this post:
Other posts you might like, how to set default font in powerpoint, how to create a decision tree in powerpoint, how to add hanging indent in powerpoint, how to remove transitions in powerpoint, how to curve text in powerpoint, how to make a slide deck in powerpoint, create visuals, powered by your spreadsheet data.
Never start from a blank page again. Describe what you want to create and Bricks will build it for you in seconds.

How to Remove Page Number in PowerPoint When Printing?
Trish Dixon
Are you trying to print your PowerPoint presentation but want to remove the page numbers that automatically appear? Luckily, it’s easy to get rid of page numbers in PowerPoint so they don’t show up when you print your slides. In this article, we will show you exactly how to remove page numbers in PowerPoint in a few simple steps.
Why Remove Page Numbers in PowerPoint?
There are a few reasons you may want to remove page numbers from your PowerPoint slides when printing:
- You want a cleaner, more polished look for your printed presentation
- The automatic page numbers are distracting or unnecessary for your particular slides
- You plan to print the slides in a different order than they appear in the presentation
- You want to print handouts without page numbers
No matter the reason, PowerPoint makes it simple to hide page numbers so they don’t appear on your printed slides. Let’s walk through the steps.
Step-by-Step: How to Get Rid of Page Numbers in PowerPoint
Follow these easy steps to remove page numbers from your PowerPoint presentation for printing:
Step 1: Go to the View Tab
First, navigate to the View tab in the top PowerPoint ribbon.
Step 2: Open the Slide Master View
In the View tab, find and click the Slide Master button . This will open the Slide Master view, which allows you to make changes that apply to all slides.
Step 3: Scroll to the Top Slide Layout
In the left-hand pane of the Slide Master view, scroll all the way to the top . Click the first, larger slide layout, usually named something like “Title Slide Layout” or “First Slide Layout”. Selecting this ensures your changes will apply to all slides.
Step 4: Remove the Page Number
With the top layout slide selected, find the page number placeholder on the slide. It will look something like <#> or Slide Number. Click on this to select it .
Then, simply press the Delete key on your keyboard . This will remove the page number placeholder from the slide layout.
Step 5: Close Slide Master View
You’re done! With the page number deleted, just click the “Close Master View” button on the Slide Master tab of the ribbon.
Now when you go to print your presentation, the slides should no longer have any page numbers . If you want to double check, you can go to Print Preview to see how the final printed slides will look.
Removing Page Numbers from Notes & Handouts
What if you want to print Notes pages or Handouts from PowerPoint without page numbers? The process is very similar:
For Notes Pages
- Go to the View tab and click the Notes Master button
- In the Notes Master view, click on the page number placeholder and hit Delete
- Close the Notes Master view
For Handouts
- Go to the View tab and click the Handout Master button
- In Handout Master view, click the page number placeholder and Delete it
- Close the Handout Master view
Now your Notes and Handouts will also print without page numbers . If you want some slides to have page numbers but not others, you can apply the above steps only to specific slide layouts rather than the top layout.
Changing PowerPoint Page Number Settings
In addition to removing page numbers entirely, PowerPoint also allows you to change the page number style and formatting . Here’s how:
- In the Slide Master or Notes/Handout Master , click to select the page number placeholder
- Use the options on the Format tab of the ribbon to change the style and appearance of the page numbers
- Change the font face, size, color, etc.
- Use bold, italic, or underline formatting
- Align the page number left, center, or right
- When finished, click Close Master View
This allows you to customize the look of your page numbers without getting rid of them completely.
Page Numbers Not Printing Correctly?
If you’ve followed the above steps but are still seeing page numbers when you print, there are a few troubleshooting tips to try:
- Make sure you deleted the page number from the top slide layout in Slide Master view. Changes made to individual slide layouts below it will be overridden.
- Double check that you’re in Normal view (not Slide Master, Handout Master, or Notes Page view) before printing.
- Try a different print layout – in the Print window, change the “Full Page Slides” dropdown to a different option like Outline or Handouts and see if page numbers appear there.
- Confirm the correct printer settings . Click the Printer Properties link and make sure the settings are correct for your printer model.
If none of those work, you can also try saving the PowerPoint slides as a PDF , then printing the PDF file instead. The PDF version should maintain the formatting and omit the slide numbers.
Benefits of Removing Page Numbers in PowerPoint
So why go through the trouble of removing page numbers? A clean, streamlined printed presentation looks more professional and polished. It allows your audience to focus on the content of the slides rather than the slide numbers.
Removing page numbers is also helpful if you need to print slides in a different order than they appear in the presentation. This gives you more flexibility to print customized handouts.
Plus, if your presentation is image-heavy , omitting the page numbers prevents them from cluttering up or detracting from the visuals. The same goes for printing speaker notes – you likely don’t need page numbers there.
When to Include Page Numbers
Of course, there are times when having page numbers on your printed PowerPoint slides is useful or necessary :
- If your presentation is very long or has many sections, page numbers help keep printed copies organized
- When your audience needs to reference specific slides, page numbers make it easy to direct them to the right spot
- Handouts with lines for taking notes are enhanced by page numbers so people can match their notes to the correct slides
- For legal or official presentations , numbered pages create a clear record
In those cases, it’s best to keep the automatic PowerPoint page numbering or customize it to fit your needs using the formatting steps outlined earlier.
In summary, to remove page numbers in PowerPoint when printing:
- Open the Slide Master, Handout Master, or Notes Master (depending what you’re printing)
- Select the top-level slide layout
- Click on the page number placeholder and press Delete
- Close the Master view
For more control, you can also change the formatting of PowerPoint page numbers from the Format tab in Slide Master view. If you’re still seeing page numbers after deleting them, try troubleshooting by checking your print settings and layouts.
By removing or customizing page numbers, you can print clean, professional PowerPoint presentations tailored to your exact needs. Omitting page numbers reduces clutter and distraction, while keeping them helps organize long presentations. Use these tips to prepare the perfect printed slides every time!
Frequently Asked Questions
How do i remove page numbers from all slides in powerpoint.
To remove page numbers from all slides: 1) Go to the View tab and click on Slide Master. 2) Select the top slide layout. 3) Find and click on the page number placeholder. 4) Press the Delete key. 5) Close the Slide Master view.
Can I remove page numbers from handouts in PowerPoint?
Yes, you can remove page numbers from handouts. Go to the View tab, click on Handout Master, delete the page number placeholder, and close the Handout Master view.
Why are page numbers still showing when I print my PowerPoint slides?
If page numbers are still showing, ensure you deleted them from the top slide layout in Slide Master view, check that you’re in Normal view before printing, try different print layouts, and verify your printer settings.
How can I change the formatting of page numbers in PowerPoint?
To change page number formatting: 1) Open Slide Master view. 2) Select the page number placeholder. 3) Use the Format tab options to change font, size, color, alignment, etc. 4) Close Slide Master view when finished.
Is it possible to remove page numbers from only some slides in PowerPoint?
Yes, you can remove page numbers from specific slides. In Slide Master view, delete the page number placeholder from individual slide layouts rather than the top layout. This allows you to keep page numbers on some slides while removing them from others.
What should I do if I can’t find the page number placeholder in PowerPoint?
If you can’t find the page number placeholder, make sure you’re in Slide Master view. Look for a small box with ‘<#>‘ or ‘Slide Number’ text. If it’s not visible, it may have been previously deleted. You can add it back by going to the Slide Master tab and clicking ‘Insert Slide Number’.
- Recent Posts

- How to Embed Power BI in PowerPoint: A Step-by-Step Guide – October 14, 2024
- 10 Easy Ways to Fix “Cannot Play Media” Error in PowerPoint – October 13, 2024
- How to Change the Background in PowerPoint: Expert Guide – October 12, 2024
Leave a Reply Cancel reply
Your email address will not be published. Required fields are marked *
Save my name, email, and website in this browser for the next time I comment.
Latest Posts
How to embed power bi in powerpoint: a step-by-step guide.
Learn how to embed Power BI in PowerPoint with this detailed guide. Integrate live data updates and interactive visuals for engaging presentations.
10 Easy Ways to Fix “Cannot Play Media” Error in PowerPoint
Fix the “cannot play media” error in PowerPoint with easy steps, including checking formats, installing codecs, and embedding media for flawless presentations.
How to Change the Background in PowerPoint: Expert Guide
Learn how to easily change the background in PowerPoint with our step-by-step guide. Customize your slides using colors, images, gradients, patterns, and more.
How-To Geek
How to add and remove slide numbers in google slides.

Your changes have been saved
Email is sent
Email has already been sent
Please verify your email address.
You’ve reached your account maximum for followed topics.
Quick Links
Add slide numbers in google slides, remove slide numbers in google slides.
Slide numbers in a presentation are helpful for referring to a particular slide, using a table of contents , or simply making the show more professional. We'll show you how to add and remove slide numbers in Google Slides.
You have flexibility when adding slide numbers in Google Slides. You can number all slides, only certain ones, or all but title slides. If you change your mind later, removing those slide numbers takes only a couple of clicks.
Related: How to Add Slide Numbers in PowerPoint
Visit Google Slides , sign in, and open your presentation. To add numbers to all slides, select Insert > Slide Numbers from the menu.

When the Slide Numbers box appears, mark the option for "On" and click "Apply."

To number all slides except title slides, check the box for that option before you hit "Apply." Title slides are those that use the Title Slide layout.

To add numbers only to certain slides, select the slides first.
- To select a range of adjacent slides, click the first slide, hold Shift, and click the last slide in the range.
- To select a range of nonadjacent slides, click the first slide, hold Ctrl (Windows) or Command (Mac), and click each additional slide.

Once you select the slides, then go to Insert > Slide Numbers. Mark the option for "On" and then click "Apply to Selected."

You can also use this option if you want to add slide numbers to various slides one at a time. Just select the slide to make it the active one and add the slide number to it.

While you have flexibility and options for adding slide numbers in Google Slides, it's a bit limited when you want to remove them.
Head back to Insert > Slide Numbers, mark the option for Off, and click "Apply." This removes numbers from all slides regardless of if you have certain ones selected or not.

If you want to remove slide numbers from individual slides, go to a slide, click the number which is contained in a text box, and delete the number.
Related: How to Remove Slide Numbers from PowerPoint Slides
You'll then see "Slide Number" inside the text box instead of the actual number. But you'll only see this while editing, not when you present your slideshow. During your presentation, the box appears blank with no text or number.

If you prefer, you can also delete the text box for the slide number altogether.
For additional ways to improve your Google Slides presentations, look at how to add videos with customized playback or how to insert photos and GIFs in your slideshow .
- Google Slides

Remove page numbers
Go to Insert > Page Number , and then choose Remove Page Numbers .
If the Remove Page Numbers button isn't available or if some page numbers are still there, double-click in the header or footer, select the page number, and press Delete. This may happen with documents with multiple sections or Different odd and even pages.
To close the header or footer, select Close Header and Footer , or double-click anywhere outside the header and footer area.
Caution: If you have headers or footers set up, using this option might remove them entirely. Instead, open the header or footer, select the page number, and then press Delete. You might need to temporarily move or resize any objects that are on top of the page number so you can select it.
On the Insert tab, select the Page Number icon, and then click Remove Page Numbers .
If the Remove Page Numbers button isn't available, double-click in the header or footer, select the page number, and press Delete.
If you’re not in Editing View , go to Edit Document > Edit in Word for the web .
Go to Insert > Page Numbers .
Choose Remove Page Numbers .
For more info on page numbers, see Page numbering in Word .

Need more help?
Want more options.
Explore subscription benefits, browse training courses, learn how to secure your device, and more.

Microsoft 365 subscription benefits

Microsoft 365 training

Microsoft security

Accessibility center
Communities help you ask and answer questions, give feedback, and hear from experts with rich knowledge.

Ask the Microsoft Community

Microsoft Tech Community

Windows Insiders
Microsoft 365 Insiders
Was this information helpful?
Thank you for your feedback.
IMAGES
VIDEO
COMMENTS
Remove Slide Number from One or All Slides. First, open the PowerPoint presentation that contains the slide numbers you want to remove. The slide number appears in the top-left corner of its respective slide. Next, head over to the "Text" group of the "Insert" tab and select "Slide Number." Once selected, the "Header and Footer ...
Step 4: Apply to All or Selected Slides. Click on 'Apply to All' to remove numbers from all slides or 'Apply' to remove from the selected slides. If you only want to remove page numbers from certain slides, make sure to select those slides before clicking 'Apply'.
In PowerPoint you can add or remove automatic slide numbers, hide numbering on the title slide, and move slide numbers. You can also add the date and time to slides. If you'd like to suggest improvements to the slide numbering feature, you can do that by clicking Help > Feedback > I have a suggestion. Select a heading below to open it and see ...
First, open the presentation and navigate to the Insert tab. In the Text group, select Slide Number. Uncheck the box next to Slide Number in the dialog box that appears. If you want to remove numbers from all slides, click Apply to All. To remove them from select slides, highlight those slides first and then click Apply.
Select the slide in question. In this case, we'll use slide 2. Click Insert and then click Header & Footer in the Text group. In the resulting dialog, uncheck the Slide Number option. Click ...
Step 4: Review and Save. How to Remove Slide Numbers Using Slide Master. Step 1: Open Slide Master View. Step 2: Deselect Slide Numbers. Step 3: Apply Changes to All Slides. Step 4: Save Your Presentation. How to Prevent Slide Numbers from Appearing on the Title Slide. Step 1: Open the Slide Numbering Dialog Box.
Open the PowerPoint presentation in question. Click on the Insert tab in the ribbon area. Click on Header and Footer. On the Header and Footer dialog box, uncheck the Slide number box. Now click on Apply to All. You can add, format, and remove PowerPoint slide numbers across all platforms, including online and mobile.
Step 3: Uncheck "Slide number". In the "Header and Footer" dialog box, uncheck the box next to "Slide number.". A dialog box will pop up when you click "Slide Number.". This is where you can control various options for headers and footers on your slides. To remove the slide numbers, simply uncheck the corresponding box.
Launch the PowerPoint file that you want to remove its slide numbers. 2. Go to the Insert menu. 3. Select Slide Number. 4. Uncheck Slide number, then Apply to All. 5. The slide numbers are gone now.
Add slide numbers or notes page numbers. On the View tab, in the Presentation Views group, click Normal. On the left of your screen, in the pane that contains the slide thumbnails, click the first slide thumbnail in your presentation. On the Insert tab, in the Text group, click Header & Footer. If you want to add slide numbers, click the Slide ...
Click the "Insert" tab at the top of the PowerPoint window. Click "Slide Number" in the Text group at the top of the window to display the Header and Footer window. Remove the check mark from the ...
-Today, we will show you how to add or remove page number in Powerpoint 2019. Enjoy this short and easy tutorial. Open the Microsoft Office PowerPoint. Go to...
To remove the page numbers, simply uncheck the Slide number box. You can also uncheck any other footer elements you wish to remove, such as date or footer text. After making the desired changes, click on the Apply to All or Apply button to remove the page numbers from all slides in your PowerPoint presentation. Troubleshooting Common Issues
How to Remove Slide Numbers from PowerPoint Slides.Please Subscribe to our channel:https://www.youtube.com/channel/UCKevbriFTbpu-nd4NBafPEg/featuredYou can d...
You can change the number of slides per page, page orientation, slide size. You can add or remove page numbers, headers and footers, date and time, and you can insert a picture or add a background. To see the handout options, select the View tab, and then select Handout Master in the Master Views group. Select a heading below to open it and see ...
Step-by-Step: How to Get Rid of Page Numbers in PowerPoint. Step 1: Go to the View Tab. Step 2: Open the Slide Master View. Step 3: Scroll to the Top Slide Layout. Step 4: Remove the Page Number. Step 5: Close Slide Master View. Removing Page Numbers from Notes & Handouts. For Notes Pages.
Replied on March 23, 2015. Report abuse. In reply to Kobi Aflalo's post on March 23, 2015. You can get the same effect as a -1 page number by creating your first slide in a separate presentation, then using an action button to link to the first slide 0 of your main presentation. Here's a link that tells you how to do the linking: Create a Link ...
To add slide numbers, open a PowerPoint presentation with several slides added and then click the "Insert" tab. From here, you'll need to select the "Header & Footer" button in the "Text" section. This will bring up the "Header and Footer" options box. To add slide numbers to your PowerPoint slides, click the "Slide Number" checkbox in the ...
This video shows how to remove slide numbers from the title slide in PowerPoint and renumber slide two as slide 1 this will be very helpful to Insert number...
Answer. Hi Shalice_408 In PowerPoint, go to File - Options On the left, choose Advanced and on the right, go to the Print section Clear the option 'Print slide numbers on handouts' and click OK Or In PowerPoint, on the View Ribbon, choose Handout Master, see if you can remove those numbers form there . . .
Select any slide. Select Insert > Header & Footer. In the Header and Footer dialog box, click the Notes and Handouts tab, clear the boxes for the options you want to remove from the header or footer. Select Apply to All. On the View tab of the ribbon, select Notes Page to see the effect of your changes. These changes don't affect the headers ...
Visit Google Slides, sign in, and open your presentation. To add numbers to all slides, select Insert > Slide Numbers from the menu. When the Slide Numbers box appears, mark the option for "On" and click "Apply." To number all slides except title slides, check the box for that option before you hit "Apply." Title slides are those that use the ...
On the Insert tab, select the Page Number icon, and then click Remove Page Numbers. If the Remove Page Numbers button isn't available, double-click in the header or footer, select the page number, and press Delete. To close the header or footer, select Close Header and Footer, or double-click anywhere outside the header and footer area.