Lean Six Sigma Training Certification
- Facebook Instagram Twitter LinkedIn YouTube
- (877) 497-4462

Causal Loop Diagram in Systems Thinking. Everything to Know
March 29th, 2024
The challenges facing organizations are a result of interrelated factors. Handling these numerous issues requires a detailed understanding of the systemic structures and feedback loops that drive behaviors and outcomes.
This is where the power of causal loop diagram comes.
Key Highlights
- Causal loop diagrams are a powerful systems thinking tool for visually mapping complex systems’ variables.
- Enabling the identification of reinforcing and balancing feedback loops that drive system behaviors and outcomes.
- These provide a holistic problem perspective by revealing the underlying systemic structures and root causes .
- Constructing causal loop diagram is a qualitative approach to modeling dynamic systems.
- The motive is to understand leverage points for interventions.
Understanding Causal Loop Diagram
A powerful tool in the Systems Thinking arsenal, providing a lens through which we can altogether examine complex problems and understand the dynamics that might otherwise remain obscured.
Definition and Purpose of Causal Loop Diagram
A causal loop diagram (CLD) is a visual mapping tool used to represent the cause-and-effect relationships among various elements.
It illustrates how variables influence one another through a series of cause-and-effect linkages, forming feedback loops that can either reinforce or balance changes in the system.
Concept Mapping Tool
A causal loop diagram serves as a strong concept mapping tool, enabling us to break free from linear thinking and capture the nature of real-world systems.
By depicting variables as nodes and their causal connections as arrows, these diagrams provide a structured yet flexible framework for organizing and visualizing our mental models of how different factors interrelate.
Map Interdependent Variables with Causal Loop Diagram
One of the key strengths of causal loop diagram lies in their ability to map the inter-dependencies among variables. It’s rare for factors to operate in isolation; instead, they are often intricately linked through intricate cause-and-effect chains.
Causal loop diagram illuminate these interdependencies, allowing us to trace the ripple effects of changes across the entire system and anticipate potential unintended consequences.
Identify Feedback Loops
Perhaps the most valuable aspect of causal loop diagram is their capacity to identify feedback loops – the circular cause-and-effect relationships that govern system behavior.
These loops can be either reinforcing (amplifying change) or balancing (counteracting change), and their interactions often give rise to the complex, nonlinear dynamics we observe in real-world systems.
By explicitly mapping these feedback loops , causal loop diagram enable us to understand the underlying drivers of system behavior and pinpoint leverage points for intervention.
For instance, reinforcing loops are often responsible for exponential growth or decline, while balancing loops can create oscillations or goal-seeking behavior.
Understand System Behavior
Ultimately, the purpose of constructing causal loop diagram is to develop a deeper understanding of system behavior.
By visually representing the web of causal relationships and feedback loops, these diagrams shed light on the structural forces that shape outcomes and uncover the root causes of persistent problems or recurring patterns .
Causal loop diagrams empower us to anticipate unintended consequences, identify high-leverage points for change, and develop robust strategies that account for the dynamic complexities of the systems we operate within.
Components of Causal Loop Diagram
While the concept of causal loop diagrams is relatively straightforward, their true power lies in their ability to capture and communicate the intricate dynamics of complex systems.
To harness this power effectively, it’s essential to understand the fundamental components that make up these diagrams.
As a seasoned practitioner, I’ve found that mastering these building blocks is key to constructing meaningful and insightful causal loop diagram that can drive real change within organizations.
Nodes/Variables
The most basic element of a causal loop diagram is the node, which represents a variable or factor within the system under consideration.
These variables can encompass a wide range of concepts, from tangible metrics like sales figures, production rates, or customer satisfaction scores, to more abstract notions such as organizational culture, employee morale , or market competitiveness.
Identifying the relevant variables is a crucial first step in constructing a causal loop diagram, as it lays the foundation for mapping the interconnections and feedback loops that govern the system’s behavior.
Causal Links/Arrows
Once the variables have been defined, the next step is to establish the causal relationships between them. These relationships are represented by arrows, which indicate how changes in one variable influence or affect another variable.
The direction of the arrow signifies the direction of causality, allowing us to trace the flow of influence through the system.
Capturing these time delays is often essential for accurately representing the system’s dynamics.
Polarity (Positive, Negative)
In addition to direction, causal links in a causal loop diagram are also characterized by polarity, which indicates the nature of the relationship between the variables.
A positive polarity (+) implies that the two variables change in the same direction – an increase in one variable leads to an increase in the other, and a decrease in one variable leads to a decrease in the other.
Conversely, a negative polarity (-) signifies that the variables change in opposite directions, where an increase in one variable leads to a decrease in the other, and vice versa.
Accurately assigning polarities is crucial, as it determines the reinforcing or balancing nature of the feedback loops within the system.
Loop Labeling
The true power of causal loop diagram lies in its ability to identify and analyze feedback loops – the circular chains of cause-and-effect relationships that drive the system’s behavior.
Once these loops have been traced through the interconnected variables and causal links, it’s essential to label them as either reinforcing or balancing.
Reinforcing loops, denoted by the letter “R,” represent self-amplifying or exponential growth/decline patterns.
In these loops, a change in one variable propagates through the loop, leading to further changes in the same direction, amplifying the initial change over time.
On the other hand, balancing loops, labeled with the letter “B,” counteract change and promote stability or equilibrium within the system. In these loops, a change in one variable triggers a series of effects that ultimately lead to an opposing change, thereby balancing or limiting the initial change.
By explicitly labeling these loops, causal loop diagram provides invaluable insights into the underlying forces that shape the system’s behavior, enabling us to identify leverage points for intervention and develop effective strategies for achieving desired outcomes.
When to Use Causal Loop Diagram
It’s important to recognize that these diagrams are not a one-size-fits-all solution – their true value lies in their ability to provide insights into specific types of problems and scenarios.
Understanding when to employ causal loop diagram is crucial to leveraging their full potential and driving meaningful change within organizations .
Complex Systems Modeling
One of the primary applications of causal loop diagram is in the modeling and analysis of complex systems.
These systems are characterized by a high degree of interconnectedness among factors, where variables are intricately linked through intricate cause-and-effect chains, forming feedback loops that can amplify or counteract changes.
Interconnected Factors
It’s rare for variables to operate in isolation. Instead, they are often deeply intertwined, with changes in one factor rippling through the system and influencing a multitude of other factors in ways that are not always immediately apparent.
Causal loop diagrams are particularly valuable in these situations, as they enable us to map these interconnections and trace the cascading effects of changes across the entire system.
Nonlinear Relationships
Complex systems often exhibit nonlinear relationships, where the effects of changes are disproportionate to their causes. These nonlinearities can lead to counterintuitive behaviors, such as tipping points, where small changes can trigger sudden, dramatic shifts in the system’s state.
Causal loop diagram provide a powerful tool for visualizing and understanding these nonlinear dynamics, allowing us to anticipate and prepare for potential tipping points or regime shifts.
Time Delays
Another hallmark of complex systems is the presence of time delays, where the effects of changes in one variable may take time to propagate through the system and manifest in other variables.
These delays can create oscillations, overshoots, or other dynamic behaviors that can be difficult to anticipate or manage without a comprehensive understanding of the underlying systemic structures.
Causal loop diagram allow us to explicitly capture and represent these time delays, enabling more accurate modeling and better-informed decision-making.
Unintended Consequences
In complex systems, interventions or policy changes can often lead to unintended consequences due to the intricate web of causal relationships and feedback loops.
Causal loop diagrams are invaluable in these situations, as they provide a holistic view of the system, allowing us to anticipate potential unintended consequences and mitigate their impact proactively.
Problem-Solving Applications
Beyond their utility in modeling complex systems, causal loop diagrams have proven to be powerful tools in a wide range of problem-solving applications across various industries and domains.
Process Improvement
Causal loop diagrams can be used to identify bottlenecks, inefficiencies, and root causes of quality issues or performance problems .
By mapping the interrelationships between various process variables, such as cycle times , resource allocation, and quality metrics, these diagrams can reveal leverage points for targeted interventions and help organizations develop more robust, streamlined processes.
Policy Analysis
Causal loop diagrams are particularly valuable in policy analysis, where they can be used to evaluate the potential impacts of proposed policies or regulations on complex socio-economic systems.
By modeling the causal relationships between policy levers, stakeholder behaviors, and system outcomes, these diagrams can help policymakers anticipate unintended consequences, identify potential trade-offs, and design more effective, well-informed policies.
Risk Assessment
In the context of risk assessment and management, causal loop diagram can be used to map the interconnected factors contributing to various risks, such as operational risks , financial risks, or environmental risks.
By visualizing the feedback loops and interdependencies among these factors, organizations can develop a more comprehensive understanding of risk drivers and devise more robust mitigation strategies.
Strategic Planning
Causal loop diagrams are powerful tools for strategic planning, as they enable organizations to explore the systemic implications of different strategic choices or initiatives.
Causal Loop Diagram Examples
While the theoretical underpinnings and methodologies behind causal loop diagrams are essential, their true power lies in their practical application across a wide range of domains and contexts.
Through these examples, I aim to not only demonstrate the practical utility of these diagrams but also to inspire you to explore their potential in your problem-solving endeavors.
Business Examples
New product launch.
Introducing a new product to the market is a complex endeavor that involves a multitude of interconnected factors, from market demand and competitive pressures to production capacity and supply chain logistics.
Causal loop diagram can be invaluable in mapping these interdependencies and anticipating potential challenges or unintended consequences.
For instance, a diagram may reveal how increased marketing efforts can drive initial sales, but if production capacity is not scaled up accordingly, it could lead to backorders and customer dissatisfaction, ultimately dampening future demand.
By identifying these feedback loops, organizations can develop more robust launch strategies that account for these systemic dynamics and proactively address potential bottlenecks or risks.
Supply Chain Management
In today’s globalized economy, supply chains are intricate networks of interconnected entities, each with its own set of variables and constraints.
Causal loop diagram can help organizations gain a holistic understanding of these complex systems, illuminating the ripple effects of disruptions , inventory fluctuations, or changes in demand patterns.
By mapping the causal relationships between variables such as supplier lead times, transportation logistics, inventory levels, and customer demand, these diagrams can reveal reinforcing loops that can amplify shortages or excesses, as well as balancing loops that can help restore equilibrium.
Project Risk Analysis
Large-scale projects, whether in construction, software development, or organizational change initiatives, are inherently complex endeavors fraught with potential risks and uncertainties.
Causal loop diagram can be a powerful tool for identifying, assessing, and mitigating these risks by modeling the interplay between various project variables, such as resource allocation, scope creep, stakeholder expectations, and quality control measures.
Project managers can develop more proactive risk management strategies and identify high-leverage intervention points to keep projects on track and within budget.
Social Examples
Public health policies.
Public health challenges, such as disease outbreaks, epidemics, or chronic health issues, are often deeply rooted in complex socio-economic and environmental factors.
Causal loop diagram can provide policymakers and public health officials with a comprehensive understanding of these intricate systems, enabling them to design more effective interventions and anticipate potential unintended consequences.
For example, a diagram examining the dynamics of obesity rates may reveal reinforcing loops involving factors such as sedentary lifestyles, access to unhealthy food options, and limited physical activity opportunities in certain communities.
Urban Development
Cities are complex, dynamic systems characterized by intricate relationships between various economic, social, and environmental factors.
Causal loop diagram can provide urban planners and policymakers with a powerful tool for understanding and managing the systemic challenges associated with urban growth, infrastructure development, and sustainability initiatives.
For instance, a diagram may highlight how increased investment in public transportation can not only alleviate traffic congestion but also foster economic development and improve access to job opportunities, creating a virtuous cycle of positive change.
Education Reform
Educational systems are complex, multi-layered entities influenced by a myriad of interrelated factors, ranging from funding and resource allocation to curriculum design, teacher training, and student demographics.
Causal loop diagram can provide educational policymakers, administrators, and stakeholders with a holistic perspective on these interconnections, enabling them to develop more comprehensive and effective reform strategies.
Armed with these insights, policymakers can design targeted interventions that address the root causes of systemic challenges, rather than relying on piecemeal or isolated efforts that may fail to account for the broader system dynamics.
Combined with Other Systems Tools
While causal loop diagram is a powerful tool in its own right, its true potential is unlocked when integrated into a broader system thinking approach that leverages a range of complementary methodologies and techniques.
Systems Thinking Approach
Causal loop diagrams are often just the starting point in a comprehensive systems thinking journey.
Qualitative and Quantitative
While causal loop diagrams offer a qualitative understanding of the causal relationships and feedback loops within a system, combining them with quantitative techniques can yield even deeper insights.
For instance, once the causal structure has been mapped, organizations can develop simulation models that incorporate numerical data and mathematical equations to quantify the strengths of the relationships and predict system behavior under different scenarios.
Computer Modeling
Computer-based modeling and simulation tools, such as system dynamics software , can take the insights gleaned from causal loop diagram to the next level.
By translating the diagrams into computational models, organizations can simulate the dynamic behavior of the system over time, test the impact of various interventions, and explore alternative futures.
Scenario Analysis
By integrating causal loop diagram with computer modeling and simulation, organizations can engage in robust scenario analysis, exploring how different policies, strategies, or external factors might influence the system’s behavior. This capability is particularly valuable in strategic planning, risk management, and policy evaluation, enabling decision-makers to make more informed choices based on a comprehensive understanding of potential outcomes and trade-offs.
Simulation Software
To facilitate this integration of qualitative and quantitative approaches, a range of specialized simulation software tools have been developed, offering powerful features and capabilities for systems thinking and analysis .
Vensim, iThink
Two of the most widely used software platforms in this domain are Vensim and iThink .
These tools provide user-friendly interfaces for constructing causal loop diagram, translating them into stock-and-flow models, and conducting simulations and scenario analyses.
Test Interventions
One of the key benefits of using simulation software is the ability to test the impact of various interventions or policy changes on the system’s behavior.
By modifying parameters, introducing new variables, or adjusting causal relationships within the model, organizations can simulate the ripple effects of these interventions and assess their potential outcomes before implementing them in the real world.
Benefits and Limitations of Causal Loop Diagram
As with any tool or methodology, it is important to understand both the strengths and limitations of causal loop diagram and systems thinking approaches.
While these techniques offer numerous benefits and have proven their value in a wide range of applications, they also come with inherent limitations that must be acknowledged and addressed.
Holistic Perspective
One of the primary advantages of causal loop diagrams is their ability to provide a holistic perspective on complex systems.
By mapping the interconnected variables and feedback loops, these diagrams help organizations move beyond siloed thinking and gain a comprehensive understanding of the systemic forces at play.
This holistic view is essential for developing effective solutions that account for the interdependencies and potential unintended consequences within the system.
Uncover Root Causes
Causal loop diagrams are powerful tools for uncovering the root causes of persistent problems or recurring patterns within systems.
By tracing the causal relationships and feedback loops, these diagrams reveal the underlying drivers of system behavior, enabling organizations to address the fundamental issues rather than merely treating symptoms.
Enable System Redesign
Armed with a deep understanding of the system’s dynamics, causal loop diagram empower organizations to explore opportunities for system redesign.
By identifying high-leverage points and potential interventions, these diagrams facilitate the development of targeted strategies that can reshape the system’s behavior and drive desired outcomes more effectively.
Limitations
Despite their numerous benefits, causal loop diagram, and systems thinking approaches also have inherent limitations that must be recognized and addressed.
Qualitative Only
Causal loop diagrams, in their purest form, are qualitative representations of system structure and dynamics. While they provide valuable insights into the causal relationships and feedback loops, they do not quantify the strengths or magnitudes of these connections.
To gain a more precise understanding of system behavior, causal loop diagram must be complemented with quantitative techniques, such as computer modeling and simulation .
Subjective Interpretations
The construction of causal loop diagram is inherently subjective, as it relies on the knowledge, assumptions, and mental models of the individuals involved in the process.
Different stakeholders may have varying perspectives on the variables, causal relationships, and feedback loops within the system, leading to potential biases or disagreements in the resulting diagrams.
Oversimplified Representation
While causal loop diagrams strive to capture the complexity of systems, they ultimately represent a simplified abstraction of reality.
In the process of modeling, certain details or nuances may be overlooked or omitted, potentially leading to an incomplete or inaccurate representation of the system’s dynamics. It is essential to recognize that these diagrams are not perfect replicas of the real world but rather tools for gaining insights and informing decision-making.
Parting Notes
Throughout my decades of experience as a practitioner, the causal loop diagram have empowered organizations to navigate the complexities of their operating environments, understanding the complex web of interconnected factors, and driving sustainable change.
Causal loop diagrams represent a fundamental shift in mindset – a departure from the linear, compartmentalized thinking that has long dominated problem-solving approaches, and an embrace of a more holistic, systems-oriented perspective.
Whether you are a business leader, a policymaker, an educator, or a concerned citizen, these tools offer a path toward a deeper understanding of the world around us, and the opportunity to shape a future that is more sustainable , more equitable, and more resilient.
Let us boldly venture into this new frontier, armed with the knowledge and insights we have gained, and together, let us redefine the boundaries of what is possible.
SixSigma.us offers both Live Virtual classes as well as Online Self-Paced training. Most option includes access to the same great Master Black Belt instructors that teach our World Class in-person sessions. Sign-up today!
Virtual Classroom Training Programs Self-Paced Online Training Programs
SixSigma.us Accreditation & Affiliations

Monthly Management Tips
- Be the first one to receive the latest updates and information from 6Sigma
- Get curated resources from industry-experts
- Gain an edge with complete guides and other exclusive materials
- Become a part of one of the largest Six Sigma community
- Unlock your path to become a Six Sigma professional
" * " indicates required fields
Hey! You are using an outdated browser. Please upgrade your browser to improve your experience.
Causal Loop Construction: The Basics
S ystems thinking has been described as a language for talking about the complex, interdependent issues managers face every day. Within that framework, causal loop diagrams can be thought of as sentences that are constructed by identifying the key variables in a system (the “nouns”) and indicating the causal relationships between them via links (the “verbs”). By linking together several loops, you can create a concise story about a particular problem or issue.
A causal loop diagram consists of four basic elements: the variables, the links between them, the signs on the links (which show how the variables are interconnected), and the sign of the loop (which shows what type of behavior the system will produce). By representing a problem or issue from a causal perspective, you can become more aware of the structural forces that produce puzzling behavior.
By linking together several loops, you can create a concise story about a particular problem or issue.
Take the example of an HR team that has been responsible for integrating a Total Quality approach in an organization. In the beginning, there was much enthusiasm around the program, and demand for training was high. There were also some well-publicized successes in several local line teams. But over time, the TQM programs seemed to produce diminishing results, and interest in TQM activities slacked. What happened?
1. Create Variable Names
The first step in creating a causal “story” is to identify the nouns—or variables—that are important to the issue. Remember, a variable is something that can vary over time. In the TQM example, “TQM Activities” and demand for TQM Training” are important elements of the story. Upon further conversation, the team also agreed that the “Perceived Threat” of the new program was an important element, as was the “Resistance by Middle Managers” and their willingness to change.
2. Draw the Links
Once you have identified the variables, the next step is to fill in the “verbs,” by linking the variables together and determining how one variable affects the other. In the language of systems thinking, links are labeled with either an “s” or an “o.”

If variable B moves in the same direction as variable A, the link from variable A to B would be labeled with an “s”(or “+”). In the TQM story, the team noticed that in the beginning, TQM activities generated demand for TQM training—as activities went up, training went up (indicated by an “s” link). Similarly, as training increased, it generated even more TQM activities—another “s” link.

However, as TQM activities increased, the perceived threat of these activities also increased (another “s” link), which led to resistance by middle managers (another “s” link).

If variable B changes in a direction opposite of A (i.e., as A increases, B decreases), the link from A to B should be labeled with an “o” (or “-“). For example, the HR team noticed that, as the resistance by middle managers increased, the number of TQM activities decreased, which would be indicated by an “o.”
At this point, the causal “story” consists of two causal loops that are linked through the common variable “TQM Activities.”

3. Label the Loop
Once you have completed all of the links in the loop, you want to determine what type of behavior it will produce. In systems thinking, there are two basic types of causal loops: reinforcing and balancing. In a reinforcing loop, change in one direction is compounded by more change. For example, money in a savings account generates interest, which increases the balance in the savings account and earns more interest.

Balancing loops, in contrast, counter change in one direction with change in the opposite direction. Balancing processes attempt to bring things to a desired state and keep them there, much as a thermostat regulates the temperature in a house. For example, when we are hungry, our body sends a signal to our brain that it’s time to eat, which appeases the hunger.

To determine if a loop is reinforcing or balancing, one quick method is to count the number of “o’s.” If there are an even number of “o’s” (or none are present), the loop is reinforcing. If there are an odd number of “o’s,” it is a balancing loop. You should always double-check this method by walking through the loop to make sure the links are labeled correctly. In the TQM story, the “TQM Training” loop (which has two “s” links) is a reinforcing loop (labeled with an “R”), while the “Resistance by Middle Managers” loop (which has one “o” link) describes a balancing process that seeks to “balance” the growth in TQM activities (labeled with a “B”).

TIP: Another way to double-check the expected type of loop is to draw the behavior of the system over time. A reinforcing loop shows exponential growth (or decay); a balancing loop tends to produce oscillation or movement toward equilibrium.

4. Talk Through the Loop
Once you have completed the causal loop diagram, it is wise to walk through the loops and “tell the story,” to be sure the loops capture the behavior being described. In the TQM example, the loops tell the following story: “Initial TQM activities led to an increase in TQM training, which led to more TQM activities throughout the company. However, as the number of activities increased, the perceived threat also increased, which led to increased resistance by middle managers, and a decrease in overall TQM activities.”
Storytelling
By using causal loop diagrams to create stories about complex issues, we can make our understanding of the interrelationships within a system’s structure more explicit. The resulting diagrams also provide a visual representation that can be used to communicate that understanding with others. With practice, we can become more adept at telling systems stories that help us recognize the multiple, interdependent effects of our actions.
Colleen P. Lannon is co-founder of Pegasus Communications, Inc.
Related Articles
The supply/demand see-saw: a generic structure.
Using a systems thinking approach can expand our understanding of a particular problem or issue by helping us…
The Sustainability Challenge: Ecological and Economic Development
Imagine picking up a newspaper and reading that the country’s largest petroleum company has petitioned the government to…
Managing in the Knowledge Era
The world economy is in the midst of a profound change—one that is creating huge shifts in the…
Learning Organizations: The Promise and the Possibilities
This year’s annual Systems Thinking in Action Conference explored both the promise and the reality of the learning…
Sign up to stay in the loop
- First Name *
- Last Name *
- Password * Enter Password Confirm Password
Receive updates of new articles and save your favorites.
Problem-Solving Flowchart: A Visual Method to Find Perfect Solutions
Lucid Content
Reading time: about 7 min
“People ask me questions Lost in confusion Well, I tell them there's no problem Only solutions” —John Lennon, “Watching the Wheels”
Despite John Lennon’s lyrics, nobody is free from problems, and that’s especially true in business. Chances are that you encounter some kind of problem at work nearly every day, and maybe you’ve had to “put out a fire” before lunchtime once or twice in your career.
But perhaps what Lennon’s saying is that, no matter what comes our way, we can find solutions. How do you approach problems? Do you have a process in place to ensure that you and your co-workers come to the right solution?
In this article, we will give you some tips on how to find solutions visually through a problem-solving flowchart and other methods.
What is visual problem-solving?
If you are a literal thinker, you may think that visual problem-solving is something that your ophthalmologist does when your vision is blurry. For the rest of us, visual problem-solving involves executing the following steps in a visual way:
- Define the problem.
- Brainstorm solutions.
- Pick a solution.
- Implement solutions.
- Review the results.
How to make your problem-solving process more visual
Words pack a lot of power and are very important to how we communicate on a daily basis. Using words alone, you can brainstorm, organize data, identify problems, and come up with possible solutions. The way you write your ideas may make sense to you, but it may not be as easy for other team members to follow.
When you use flowcharts, diagrams, mind maps, and other visuals, the information is easier to digest. Your eyes dart around the page quickly gathering information, more fully engaging your brain to find patterns and make sense of the data.
Identify the problem with mind maps
So you know there is a problem that needs to be solved. Do you know what that problem is? Is there only one problem? Is the problem sum total of a bunch of smaller problems?
You need to ask these kinds of questions to be sure that you are working on the root of the issue. You don’t want to spend too much time and energy solving the wrong problem.
To help you identify the problem, use a mind map. Mind maps can help you visually brainstorm and collect ideas without a strict organization or structure. A mind map more closely aligns with the way a lot of our brains work—participants can bounce from one thought to the next defining the relationships as they go.

Mind mapping to solve a problem includes, but is not limited to, these relatively easy steps:
- In the center of the page, add your main idea or concept (in this case, the problem).
- Branch out from the center with possible root causes of the issue. Connect each cause to the central idea.
- Branch out from each of the subtopics with examples or additional details about the possible cause. As you add more information, make sure you are keeping the most important ideas closer to the main idea in the center.
- Use different colors, diagrams, and shapes to organize the different levels of thought.
Alternatively, you could use mind maps to brainstorm solutions once you discover the root cause. Search through Lucidchart’s mind maps template library or add the mind map shape library to quickly start your own mind map.
Create a problem-solving flowchart
A mind map is generally a good tool for non-linear thinkers. However, if you are a linear thinker—a person who thinks in terms of step-by-step progression making a flowchart may work better for your problem-solving strategy. A flowchart is a graphical representation of a workflow or process with various shapes connected by arrows representing each step.
Whether you are trying to solve a simple or complex problem, the steps you take to solve that problem with a flowchart are easy and straightforward. Using boxes and other shapes to represent steps, you connect the shapes with arrows that will take you down different paths until you find the logical solution at the end.

Flowcharts or decision trees are best used to solve problems or answer questions that are likely to come up multiple times. For example, Yoder Lumber , a family-owned hardwood manufacturer, built decision trees in Lucidchart to demonstrate what employees should do in the case of an injury.
To start your problem-solving flowchart, follow these steps:
- Draw a starting shape to state your problem.
- Draw a decision shape where you can ask questions that will give you yes-or-no answers.
- Based on the yes-or-no answers, draw arrows connecting the possible paths you can take to work through the steps and individual processes.
- Continue following paths and asking questions until you reach a logical solution to the stated problem.
- Try the solution. If it works, you’re done. If it doesn’t work, review the flowchart to analyze what may have gone wrong and rework the flowchart until you find the solution that works.
If your problem involves a process or workflow , you can also use flowcharts to visualize the current state of your process to find the bottleneck or problem that’s costing your company time and money.

Lucidchart has a large library of flowchart templates to help you analyze, design, and document problem-solving processes or any other type of procedure you can think of.
Draw a cause-and-effect diagram
A cause-and-effect diagram is used to analyze the relationship between an event or problem and the reason it happened. There is not always just one underlying cause of a problem, so this visual method can help you think through different potential causes and pinpoint the actual cause of a stated problem.
Cause-and-effect diagrams, created by Kaoru Ishikawa, are also known as Ishikawa diagrams, fishbone diagrams , or herringbone diagrams (because they resemble a fishbone when completed). By organizing causes and effects into smaller categories, these diagrams can be used to examine why things went wrong or might go wrong.

To perform a cause-and-effect analysis, follow these steps.
1. Start with a problem statement.
The problem statement is usually placed in a box or another shape at the far right of your page. Draw a horizontal line, called a “spine” or “backbone,” along the center of the page pointing to your problem statement.
2. Add the categories that represent possible causes.
For example, the category “Materials” may contain causes such as “poor quality,” “too expensive,” and “low inventory.” Draw angled lines (or “bones”) that branch out from the spine to these categories.
3. Add causes to each category.
Draw as many branches as you need to brainstorm the causes that belong in each category.
Like all visuals and diagrams, a cause-and-effect diagram can be as simple or as complex as you need it to be to help you analyze operations and other factors to identify causes related to undesired effects.
Collaborate with Lucidchart
You may have superior problem-solving skills, but that does not mean that you have to solve problems alone. The visual strategies above can help you engage the rest of your team. The more involved the team is in the creation of your visual problem-solving narrative, the more willing they will be to take ownership of the process and the more invested they will be in its outcome.
In Lucidchart, you can simply share the documents with the team members you want to be involved in the problem-solving process. It doesn’t matter where these people are located because Lucidchart documents can be accessed at any time from anywhere in the world.
Whatever method you decide to use to solve problems, work with Lucidchart to create the documents you need. Sign up for a free account today and start diagramming in minutes.
About Lucidchart
Lucidchart, a cloud-based intelligent diagramming application, is a core component of Lucid Software's Visual Collaboration Suite. This intuitive, cloud-based solution empowers teams to collaborate in real-time to build flowcharts, mockups, UML diagrams, customer journey maps, and more. Lucidchart propels teams forward to build the future faster. Lucid is proud to serve top businesses around the world, including customers such as Google, GE, and NBC Universal, and 99% of the Fortune 500. Lucid partners with industry leaders, including Google, Atlassian, and Microsoft. Since its founding, Lucid has received numerous awards for its products, business, and workplace culture. For more information, visit lucidchart.com.
Related articles

Sometimes you're faced with challenges that traditional problem solving can't fix. Creative problem solving encourages you to find new, creative ways of thinking that can help you overcome the issue at hand more quickly.

Dialogue mapping is a facilitation technique used to visualize critical thinking as a group. Learn how you and your team can start dialogue mapping today to solve problems and bridge gaps in knowledge and understanding (plus get a free template!).
Bring your bright ideas to life.
or continue with
Home » Diagram » Comprehensive Guide to Causal Loop Diagrams
Comprehensive Guide to Causal Loop Diagrams
- Posted on September 21, 2023
- / Under Diagram
- / With 0 Comments
Introduction

Purpose of Causal Loop Diagrams
Causal Loop Diagrams serve several important purposes:
- Understanding Complex Systems: They help in gaining a deeper understanding of complex systems by identifying the cause-and-effect relationships between variables.
- Policy Analysis: CLDs can be used to analyze the potential impacts of policy changes or interventions within a system.
- Decision Making: They aid in informed decision-making by providing insights into the consequences of different actions.
- Communication: CLDs facilitate communication among stakeholders by visually representing the interdependencies in a system.
- Problem Solving: They assist in identifying root causes of problems and exploring potential solutions.
Key Concepts and Elements of Causal Loop Diagrams
1. variables.
Variables are the key elements in a CLD. They represent quantities or attributes within the system that can change over time. Variables are usually depicted as ovals or rectangles with labels.
Arrows represent causal relationships between variables. There are two types of causal links:
- Positive (+): A positive link indicates that when the causal variable increases, all else being equal, the effect variable also increases. Conversely, a decrease in the causal variable leads to a decrease in the effect variable.
- Negative (-): A negative link signifies that an increase in the causal variable leads to a decrease in the effect variable, and vice versa. It represents an inverse relationship.
3. Loop Labels
Loop labels are words or phrases used to describe feedback loops within the CLD. Feedback loops can be either:
- Reinforcing (R): A reinforcing loop is a cycle in which an initial change in a variable propagates through the loop and reinforces the deviation in the same direction. It often leads to exponential growth or decline.
- Balancing (B): A balancing loop is a cycle in which an initial change in a variable propagates through the loop and opposes the initial deviation, striving to reach a goal or maintain stability.

Learn by Examples Using Visual Paradigm Online
Visual Paradigm Online offers a user-friendly platform for creating CLDs with pre-made templates. Let’s explore an example using a positive reinforcing loop.
Example: Positive Reinforcing Loop
Scenario: We want to illustrate how an increase in bank balance leads to increased earned interest, creating a positive reinforcing loop.
- Access Visual Paradigm Online: Go to Visual Paradigm Online ( https://online.visual-paradigm.com/ ).
- Create a New Diagram: Choose “Causal Loop Diagram” as the diagram type and create a new diagram.
- Add Variables: Add two variables – “Bank Balance” and “Earned Interest” – to your diagram. Label them accordingly.
- One from “Bank Balance” to “Earned Interest” with a “+” symbol to represent the positive causal link.
- Another from “Earned Interest” to “Bank Balance” with a “+” symbol to indicate that earned interest contributes to the bank balance.
- Add a Loop Label: Insert a loop label and designate it as “R” to signify the positive reinforcing loop.
- Visualize the Loop: Connect the arrows to form a loop, and use connectors to create a clear and organized diagram.
- Narrative: Write a brief narrative explaining the relationship between bank balance and earned interest, emphasizing the positive reinforcing nature of the loop.
- Save and Share: Save your CLD and share it with others for analysis and discussion.
This example illustrates how Visual Paradigm Online can be used to create CLDs for various scenarios, helping you understand complex systems and their feedback dynamics.
Causal Loop Diagrams are valuable tools for modeling and analyzing the causal relationships within complex systems. By understanding the purpose, key concepts, and elements of CLDs, and practicing with examples using tools like Visual Paradigm Online, you can enhance your ability to visualize and address complex problems in diverse fields, from business to environmental science.

- What’s New
- Infographics
- Terms of Service
- Privacy Policy
- Security Overview
- Report Abuse
Causal Loop Diagrams: A key tool for Systems Thinking & Practice

Causal Loop Diagrams (CLDs) are a useful tool in the kitbag of any systems practiotioner. They are used to make our mental models explicit so they can be shared, challenged and understood. CLDs enable us to capture the parts, connections and feedback in a system. They can be used to build consensus, agree definitions, identify leverage points and explore consequences of potential interventions. They enable us to share our ideas and communicate our understanding of a system to others clearly and powerfully.
The workshop will introduce the concept of a CLD and explore how the diagrams can be developed and used both individually and in teams. There will be the opportunity to practice developing causal loop diagrams from documents and from observed systems. Participants are encouraged to bring a problem/idea they would like to explore with this approach.
Kerry Turner is passionate about understanding and improving systems. She acquired her skills in systems thinking during her career as a management consultant. She has applied it to a wide range of business problems for organisations around the world. For the last decade she has applied systems thinking to every aspect of her life including horsemanship, swimming, relationships, home economics and health. She has also worked with small organisations who share her values.
SCiO Membership
Becoming a member of SCiO offers a way to engage in developing new approaches to managing organisations and helps to support the group’s activity. Membership is £30 a year.
Join / Renew
Notifications
To subscribe to our newsletter please fill out all fields.
What is Causal Loop Diagram? (With Examples)
Causal loops diagrams (also known as system thinking diagrams) are used to display the behavior of cause and effect from a system’s standpoint. Fishbone diagrams may elicit the categories of causes that impact a problem. Causal loops show the interrelation causes and their effects. When finished you have a diagram of the positive and negative reinforcements which describe the system of behavior. The neat thing about causal loops is it is depersonalizing. People can point at the arrows in the loop that are reinforcing the problem instead of pointing at people. It becomes a model of system behaviors that create the outcome of the system.
A causal loop diagram (CLD) is a causal diagram that aids in visualizing how different variables in a system are interrelated. The diagram consists of a set of nodes and edges. Nodes represent the variables and edges are the links that represent a connection or a relation between the two variables. A link marked positive indicates a positive relationship and a link marked negative indicates a negative relation. A positive causal link means the two nodes change in the same direction, i.e. if the node in which the link starts decreases, the other node also decreases. Similarly, if the node in which the link starts increases, the other node increases as well. A negative causal link means the two nodes change in opposite directions, i.e. if the node in which the link starts increases, the other node decreases, and vice versa.

Edit this Diagram
Cause Loop Diagram Example – Growth and Investment
A Growth and Underinvestment structure is simply an elaborated Limits to Growth structure where the growth inhibitor is part of another Balancing Loop with an external standard and some delay. The nasty thing about this structure is that the two balancing loops form a single reinforcing loop that inhibits growth.

- The growing action which initiates this structure influences an increase in growth. The resultant growth then simply influences more of the same growing action, producing the reinforcing growth characteristic.
- As was indicated in the Balancing Loop areas of concern, noting growth forever. Growth sooner or latter produces some effect which tends to limit the growth. As growth moves in the desired direction, it also influences an increase in some growth inhibitor . This growth inhibitor subsequently impedes growth .
- This system can be enabled to grow more if the growth inhibitor is reduced. As the growth inhibitor interacts with a defined standard it develops a perceived need for action to develop some sort of inhibitor avoidance. This inhibitor avoidance will, after some delay, reduce the growth inhibitor. The annoying part of this structure is the delay associated with the inhibitor avoidance interaction with the growth inhibitor.
- What happens is that the growth inhibitor works in a shorter time frame reducing growth. The reduced growth adds less to the growth inhibitor thus eliminating the perceived need. As such the system is limited in its growth because the perceived need for action is undermined by the systems own actions. By the time it is realized that inhibitor avoidance action needs to be taken the need to dissolves itself and growth levels off at a level much lower than what could have been achieved.
Cause Loop Diagram Example – Pizza House
A new home delivery-focused pizzeria opens up in the neighborhood. At first, the demand is low, but the pizza’s quality is excellent, as well as the delivery times. After a while, the pizzeria gets noticed and is featured in a local online food blog. As a result, the demand for pizza rises sharply. But the pizzeria owners are reluctant to purchase more delivery capacity (pizza delivery vehicles and personnel) along with higher pizza production capacity (additional pizza ovens). That results in higher delivery times and a larger percentage of undercooked pizzas, in turn lowering the number of returning customers. As a result, the pressure for additional investment in both delivery and production capacity is eliminated. The pizzeria owners are happy that they held off on the additional investment.

©2024 by Visual Paradigm. All rights reserved.
- Terms of Service
- Privacy Policy
- Security Overview
- Your Project
What is the OODA Loop?
The OODA Loop is a Model that summarizes Problem-Solving Processes in 4 simple Steps .
- It is commonly used in Professional Problem-Solving situations.
Its name is an acronym for the 4 Steps it Proposes :
Four Steps of the OODA Loop
1. Observe : Analyze the Problem and Collect as much data as Possible.
- How often this Problem takes place, When, Under which Circumstances, etc.
2. Orient : Study the Data and find different ways to tackle the Problem .
- Problems can always be addressed in more than one way.
3. Decide : Establish How the Problem will be Addressed .
- And what Strategy will be employed.
4. Act : Implement the Necessary Actions to Solve the Problem.
- Establishing Schedules, Goals and Metrics.
This cycle should be Repeated Indefinitely until the Problem is completely Solved .
Let’s see the first example:
OODA Loop example
This Problem-solving Approach is widely used in Industry .
In the Manufacturing line there are many Problems whose Solution is not always obvious.
- Small defects that alter the final product.
- Omitted operations.
- Raw materials with defects.
The most common mistake is to Settle for the first explanation found.
- And keep going.
Usually this results in the Problem not being Solved Correctly because the data has not been analyzed deeply enough.
Process engineers follow the OODA Loop constantly (whether they know it or not) by analyzing the Data, finding the Root cause of problems, and Implementing the best possible Solutions.
* If you are interested in the Root Cause approach, we suggest you to visit:
- Root Cause Analysis .
There, we explain different Problem-Solving Methods that focus specially on Root Causes.
We know that this method seems pretty obvious.
- In fact, it is some of the most obvious Methods we have explained so far.
Therefore, How can it be of any help?
How can you take advantage of the OODA Loop?
How to Use the OODA Loop
It is an Easy Guideline to Remember .
- Remembering the acronym OODA and what it means is very simple .
It contains the Essence of all Problem-Solving Processes .
- A Careful Analysis , Reflect on the Alternatives , Act and Repeat the cycle.
It can be Taught to people Unfamiliar with Problem-Solving methods .
- Technicians or Specialized workers can easily use and Remember it.
It is not as Obvious as it seems .
- This model Reminds us that we have to Stop , Think , Analyze and Act .
The best way to understand the OODA Loop and how you can use it is by sharing some examples with you:
OODA Loop examples
We have chosen 3 different situations in which the OODA Loop can be of great Help .
- And we explain How to use it.
Let’s begin:
Negotiating - OODA Loop example
A good Negotiation is not one in which both parties discuss positions, but one in which both parties Reconcile Common Interests .
And the best way to seek Common Interests is to Analyze the needs of the other party .
The next time you are in a Negotiation, we suggest you this:
- Observe the Issues that the Other Party highlights or mentions the Most.
- Orient the conversation towards those Issues.
- Decide how the two of you can get something good out of these Issues.
- Act : Propose Agreements on those Matters, which you consider fair for both parties.
Then, you should Repeat this cycle, until the two of you come to an Agreement .
Starting a New Project - OODA Loop example
In New Projects , the OODA Loop can be of Great Help.
It helps you define your Products and approach your Customers in the most effective way.
If you Start a New Project or Develop a New Product:
- Observe what People Consume, How Often, Their Preferences , etc.
- Orient your Product or Project to fulfill the needs of your potential Customers.
- Decide the appropriate Price , Marketing Campaign, etc.
- Act : Launch a Beta Product.
Once you have information about your Beta Product, Repeat the Cycle until your Product is Perfect .
Improving a Skill - OODA Loop example
The OODA Loop can be used in your day to day .
- As it is a very versatile method, you can use it in your personal life.
You can use it for improving your Skills , for example.
- Observe what it takes to Master a Skill that you would like to improve.
- Orient your analysis to include your Actual Capabilities .
- Decide what Learning method and Approaches would be the best.
- Act : Start Practicing and Create a Schedule with your Progress.
You should repeat this cycle, Checking your Personal Progress and trying New Approaches .
Summarizing
The OODA Loop is a Model that summarizes the Problem-Solving Process in 4 simple Steps.
- Observe : Analyze the Problem and Collect as much data as Possible.
- Orient : Study the Data and find different ways to tackle the Problem.
- Decide : Establish How the Problem will be Addressed.
- Act : Implement the Necessary Actions to Solve the Problem.
How to take advantage of the OODA Loop:
- It is an Easy Guideline to Remember.
- It contains the Essence of a Problem-Solving Process.
- It can be Taught to people Unfamiliar with Problem-Solving methods.
- It is not as Obvious as it seems.
- Economies of Scale
- Business Plan for Beginners
- Business Plan Basics
- How to write a Business Plan
- Cash Flow Calculation
- Raising Funds for a Business
- 4 C’s of Credit
- Business Plan Templates
- Customer Insight
- Customer Experience
- Customer Pain Points
- 4C Marketing Model
- RATER Model
- Augmented Product
- Product Mix
- Unique Selling Proposition
- DAGMAR Model
- Marketing Storytelling
- Content Marketing
- Psychographics
- Barnum Effect
- Market Segmentation
- Market Research & Big Data
- Marketing to Generation Z
- 4P Marketing Mix
- 7P Marketing Mix
- Sales Funnel
- Loyalty Ladder
- RACE Planning
- Push and Pull Marketing
- Marketing Strategy
- Marketing Templates
- Starting your own business
- From Startup to a Business
- Entrepreneur FAQs
- Start your Business Idea
- Entrepreneur Golden Rules
- Innovate or Imitate?
- Design Thinking
- SCAMPER Model
- AAR Process
- Work From Home
- Growth strategies for Startups
- VMOST Analysis
- 3P Framework
- SOAR Analysis
- TELOS Analysis
- 5 C’s of Entrepreneurship
- Crowdfunding
- BATNA & ZOPA Negotiation
- Entrepreneur with no Money
- Entrepreneurship Templates
- Strategy vs Tactics
- Mission and Vision
- Business Values
- Value Chain
- Scenario Planning
- Porter 6 Forces
- Bowman’s Strategy Clock
- GE-McKinsey Matrix
- Delta Model
- PEST Analysis
- PESTEL Analysis
- SWOT Analysis
- VRIO Framework
- Strategy Canvas
- Competitive Advantages
- Porter’s Four Corners
- 5 Ps of Strategy
- Porter’s Generic Strategies
- Porter’s Diamond Model
- Wardley Map
- Core Competencies
- Resource Based View
- Bridges Transition Model
- CAGE Distance Framework
- McKinsey’s 3 Horizons
- Vertical Integration
- Horizontal Integration
- Blue Ocean Strategy
- Red Ocean Strategy
- Porter 5 Forces
- Ansoff Matrix
- McKinsey 7S Framework
- CATWOE Analysis
- Strategy Pyramid
- Bain’s RAPID Framework
- Balanced Scorecard
- Resources and Capabilities
- Strategy of Apple
- Strategy of Amazon
- Strategy of Starbucks
- Strategy Templates
- Communicate Effectively
- COIN Conversation Model
- SCARF Model
- SBI Feedback Model
- CEDAR Feedback Model
- How to behave at a meeting
- Gibbs’ Reflective Cycle
- Bloom’s Taxonomy
- 5E Learning Model
- 9-Box Performance Grid
- SEEDS Bias Model
- Halo Effect
- Pygmalion Rosenthal Effect
- Dunning-Kruger Effect
- How to be an Entrepreneur
- How to be a Leader
- Mintzberg Managerial Roles
- Cog’s Ladder
- The Peter Principle
- How to Negotiate
- Teamwork Skills and Profiles
- Gantt Chart
- RACI Matrix
- Eisenhower Matrix
- MoSCoW Method
- FMEA Process
- Problem Solving
- Ishikawa Fishbone diagram
- 5 Whys Method
- 8 Disciplines Method
- ADDIE Model
- ORAPAPA Method
- Cynefin Framework
- Just In Time
- SMART Goals
- KISS Principle
- Birkinshaw’s 4 Dimensions
- Parkinson’s Law
- OGSM Framework
- OKR Methodology
- APQP Framework
- Theory of Constraints
- Success through Organization
- ADKAR Model
- Lewin’s Change Model
- Kotter’s 8-Step Model
- The Greiner Curve
- GAP Analysis
- Planning Templates
- Mean, Median and Mode
- Define your Data
- Pareto Principle 80/20 Rule
- Decision Matrix
- Decision Tree
- TARA Framework
- Root Cause Analysis
- Simplex Process
- Forecasting Methods
- Product Life Cycle
- How to use Google Trends
- Correlation vs Causation
© 2024 - Consuunt .
We're not around right now. But you can send us an email and we'll get back to you, asap.
Log in with your credentials
Forgot your details.

Causal Loop Diagrams – a powerful systems thinking problem solving tool
Today @Vinaya and I approached a challenge using the Causal Loop diagram technique. We tried it for the first time and it was refreshing and fun. If you already know what Causal Loop Diagrams are, its great; if not suggest you have a look Causal Loop Diagram – Wikipedia and causal loop diagrams little known analytical tool .
I would say I liked this modelling technique for the following main reasons:
All variables / nodes are considered more or less equal
You are putting everything on the table and what matters more is the linking. This is especially fulfilling when you discover a loop around a variable that seemed insignificant initially and most likely could be the place for intervention.
Modelling variable inter-dependencies / cause and effect relationships
This is a simple and intuitive way to model inter-dependencies and the positive or negative influence of the variables on each other, especially in areas where you have to build some kind of a mental model that is subjective and oriented around behavior of stakeholders involved.
Closed Feedback Loop & result oriented thinking
Trying to close the loop helps to focus the discussion and bring out more practical and actionable model – than just blabbering or wishful thinking. Once a loop has been identified, it channels the discussion to finding from the variables involved, which are more suitable for intervention. Not all variables will be suitable for intervention, but seeing them all together with their inter relationships helps to figure out which one would be the most optimum.
Identifying a system’s major variables, their cause and effect relationships and their behavior as a system is key to a deeper understanding of what causes the problems and the influencing variables that could offer an opportunity to solve them. Causal Loop Diagrams allow to do just that in a very structured, simple and intuitive way. A useful technique indeed.
Leave a Comment Cancel Reply
Your email address will not be published. Required fields are marked *
Notify me of follow-up comments by email.
Notify me of new posts by email.
We use essential cookies to make Venngage work. By clicking “Accept All Cookies”, you agree to the storing of cookies on your device to enhance site navigation, analyze site usage, and assist in our marketing efforts.
Manage Cookies
Cookies and similar technologies collect certain information about how you’re using our website. Some of them are essential, and without them you wouldn’t be able to use Venngage. But others are optional, and you get to choose whether we use them or not.
Strictly Necessary Cookies
These cookies are always on, as they’re essential for making Venngage work, and making it safe. Without these cookies, services you’ve asked for can’t be provided.
Show cookie providers
- Google Login
Functionality Cookies
These cookies help us provide enhanced functionality and personalisation, and remember your settings. They may be set by us or by third party providers.
Performance Cookies
These cookies help us analyze how many people are using Venngage, where they come from and how they're using it. If you opt out of these cookies, we can’t get feedback to make Venngage better for you and all our users.
- Google Analytics
Targeting Cookies
These cookies are set by our advertising partners to track your activity and show you relevant Venngage ads on other sites as you browse the internet.
- Google Tag Manager
- Infographics
- Daily Infographics
- Popular Templates
- Accessibility
- Graphic Design
- Graphs and Charts
- Data Visualization
- Human Resources
- Beginner Guides
Blog Business What is a Problem-Solving Flowchart & How to Make One
What is a Problem-Solving Flowchart & How to Make One
Written by: Danesh Ramuthi Aug 10, 2023

Problem-Solving Flowcharts, contrary to what many believe aren’t just aesthetic wonders — they’re almost like magical blueprints for troubleshooting those pesky problems that many of us face.
Flowcharts take business challenges and turn them into a navigable pathway. In this post, I will guide you on key aspects of problem-solving flowcharts such as what it is, the advantages of problem-solving flowcharts, how to create one and more.
Besides, you’ll also discover how to create problem-solving flowcharts with the help of Venngage’s Flowchart Maker.
And for those of you thinking, “I’m no designer, how can I create one?” worry not! I’ve got you covered. Just hop on Venggage’s Flowchart Templates and you’ll be charting your way to problem-solving glory in no time.
Click to jump ahead:
What are problem-solving flowcharts?
When to use problem-solving flowcharts, what are the advantages of flowcharts in problem-solving, what are the 7 steps of problem-solving flowcharts.
- 5 different types of problem-solving flowcharts
Best practices for designing effective problem-solving flowcharts
How to make a flowchart using venngage , problem-solving flowcharts faqs.
- Final Thoughts
Problem-Solving Flowcharts is a graphical representation used to break down problem or process into smaller, manageable parts, identify the root causes and outline a step-by-step solution.
It helps in visually organizing information and showing the relationships between various parts of the problem.
This type of flowcharts consists of different symbols and arrows, each representing different components or steps in the problem-solving process.
By following the flow of the chart, individuals or teams can methodically approach problem, analyze different aspects of it and come to a well-informed solution.

Problem-Solving Flowcharts is a versatile tool that can be used in various scenarios. Here’s when to consider utilizing one:
- Complex Problems: When faced with a multifaceted issue that involves multiple steps or variables, flowcharts can help break down the complexity into digestible parts.
- Team Collaboration: If you’re working with a team and need a common understanding of problem and its potential solutions then a flowchart provides a visual that everyone can refer to.
- Analyzing Processes: In a situation where you need to understand a particular process, whether it’s within a project or a part of regular operations then mapping it out in a flowchart can offer clarity.
- Decision Making: When various paths or decisions might be taken, a flowchart can outline the potential outcomes of each aiding in making an informed choice.
- Training and Onboarding: Flowcharts can be used in training materials to help new employees understand complex processes or procedures which makes the learning curve smoother.
- Identifying Root Causes: If you’re looking to identify the underlying causes of problem then a flowchart can facilitate a systematic approach to reaching the root of the issue.
Related: How to Use Fishbone Diagrams to Solve Complex Problems
Problem-solving flowcharts can offer several benefits to the users who are looking to solve a particular problem. Few advantages of flowcharts in problem solving are:
Visual Clarity
When you’re dealing with multifaceted problems or processes, words alone can make the situation seem even more tangled. Flowcharts distill these complexities into easily understandable visual elements.
By mapping out each phase or component of problem, flowcharts offer a bird’s eye view enabling individuals to grasp the bigger picture and the finer details simultaneously.
Sequential Representation
Flowcharts excel in laying out the sequence of events or actions. By indicating a clear starting point and illustrating each subsequent step, they guide users through a process or solution path methodically.
This linear representation ensures that no step is overlooked and each is executed in the right order.
Collaboration
Problem-solving often requires team effort and flowcharts are instrumental in fostering collaborative environments.
When a team is discussing potential solutions or trying to understand problem’s intricacies, a flowchart serves as a collective reference point.
It aids in synchronizing everyone’s understanding, minimizing miscommunications and promoting constructive discussions.
Read more about: Flowcharts Symbols and Meaning

1. Define the Problem
Before anything else, it’s essential to articulate the problem or task you want to solve clearly and accurately. By understanding exactly what needs to be addressed you can ensure that subsequent steps align with the core issue.
2. Identify the Inputs and Outputs
Determine what inputs (such as data, information or resources) will be required to solve the problem and what the desired outputs or outcomes are. Identifying these factors will guide you in structuring the steps needed to reach the end goal and ensure that all necessary resources are at hand.
3. Identify the Main Steps
Break down the problem-solving process into its main steps or subtasks. This involves pinpointing the essential actions or stages necessary to reach the solution. Create a roadmap that helps in understanding how to approach the problem methodically.
4. Use Decision Symbols
In problem-solving, decisions often lead to different paths or outcomes. Using standard symbols to represent these decision points in the flowcharts allows for a clear understanding of these critical junctures. It helps visually present various scenarios and their consequences.
5. Add Descriptions and Details
A well-designed flowcharts is concise but clear in its labeling. Using arrows and short, descriptive phrases to explain what happens at each step or decision point ensures that the flowcharts communicates the process without unnecessary complexity.
6. Revise and Refine
Creating a flowcharts is not always a one-and-done process. It may require revisions to improve its clarity, accuracy or comprehensiveness. Necessary refinement ensures that the flowcharts precisely reflects the problem-solving process and is free from errors or ambiguities.
7. Use Flowchart Tool
While it’s possible to draw a flowcharts manually, using a flowcharts tool like Venngage’s Flowchart Maker and Venngage’s Flowchart Templates can make the process more efficient and flexible. These tools come with pre-designed templates and intuitive interfaces that make it easy to create, modify and share flowcharts.

5 different types of problem-solving flowcharts
Let’s have a look at 5 most common types of flowcharts that individuals and organizations often use.
1. Process Flowchart s
A process flowcharts is a visual representation of the sequence of steps and decisions involved in executing a particular process or procedure.
It serves as a blueprint that showcases how different stages or functions are interconnected in a systematic flow and it highlights the direction of the process from its beginning to its end.

Process flowcharts are instrumental in training and onboarding, sales process , process optimization, documentation, recruitment and in any scenario where clear communication of a process is crucial.

2. Flowcharts Infographic
A flowcharts infographic is a great way to showcase the process or a series of steps using a combination of graphics, icons, symbols and concise text. It aims to communicate complex information in a clear and easy-to-understand manner, making it a popular tool for conveying information, data and instructions in a visually engaging way.

For example, you can use this flowchart to illustrate a health insurance process that visually explains the steps involved from finding a provider to paying for your healthcare provider.

3. Circular Flowcharts
A circular flowcharts is used to illustrate the flow of information, goods, services or money within a closed system or process. It gets its name from its circular shape, which emphasizes the continuous and cyclical nature of the flow.

Circular flowcharts are widely used in various fields such as economics, business, engineering and process management to help visualize and understand complex systems.
In a circular flowcharts , elements are represented using various shapes and connected with arrows to indicate the direction of flow. The circular arrangement indicates that the process is ongoing and repeats itself over time.

4. Swimlane flowcharts
Swimlane flowcharts , also known as cross-functional flowcharts are a specific type of flowchart that organizes the process flow into lanes or “swimlanes.”
Each lane represents a different participant or functional area involved in the process and the flowchart shows how activities or information move between these participants.

Swimlane flowcharts are particularly useful for illustrating complex processes that involve multiple stakeholders or departments.
In a swimlane flowcharts, the process is divided horizontally into lanes and each lane is labeled with the name of the department, person or role responsible for that part of the process. Vertically, the flowchart displays the sequence of steps or actions taken in the process.

5. Decision Flowchart s
Decision flowcharts, also known as decision trees or flow diagrams are graphical representations that illustrate the process of making decisions or solving problems.
They are widely used in various fields such as computer science, business mapping , engineering and problem-solving scenarios.

Decision flowcharts help break down complex decision-making processes into simple, sequential steps, making it easier to understand and follow.
A decision tree is a specialized flowchart used to visually represent the process of decision-making.
Businesses and other individuals can employ a decision tree analysis as a tool to aid in evaluating different options and the possible consequences associated with each choice.
Decision trees Infographics can be used to create a more nuanced type of flowchart that is more informative and visually appealing by combining a decision flowchart and the flowchart infographic.
Decision flowcharts are valuable tools for visualizing decision-making processes, analyzing complex problems and communicating them effectively to others.

Designing effective problem-solving flowcharts involves careful consideration of various factors to ensure clarity, accuracy and usability. Here are some best practices to create efficient and useful problem-solving flowcharts:
- Understand the problem first & clearly define it
- Keep it simple
- Use standard & recognizable symbols
- Ensure that the flowchart follows a logical and sequential order
- Clearly label each decision point, action and outcome
- Verify the flowchart’s accuracy by testing it
- Clearly state the decision criteria that lead to different branches
- Provide context when the flowchart is part of a larger process or system
- Review and revise the flowchart
Creating problem-solving flowchart on Venngage is incredibly simple. All you have to do is:
- Start by Signing Up and Creating an Account with Venngage
- Choose a flowchart template that best suits your needs from our library.
- Start editing your flowchart by choosing the desired shapes, labels and colors.
- You can also enhance your flowchart by incorporating icons, illustrations or backgrounds all of which are readily available in our library.
- Once done, you will have 2 options to choose from, either sharing it online for free or downloading your flowchart to your desktop by subscribing to the Premium or Business Plan.
Is flowchart the representation of problem solutions?
Flowcharts are not the representation of problem solutions per se; rather, they are a visual representation of processes, decision-making steps and actions taken to arrive at a solution to problem.
What are the 3 basic structures of flowcharts?
3 Basic Structures of Flowcharts are:
- Sequence: Simplify Complexity
- Selection (Decision): Embrace Choices
- Repetition (Loop): Emphasize Iteration
What are the elements of a good flowchart?
A good flowchart should exhibit clarity and simplicity, using consistent symbols and labels to depict a logical sequence of steps. It should be readable, with appropriate white space to avoid clutter while eliminating ambiguity through well-defined decision criteria and paths.
Can flowcharts be used for both simple and complex problem-solving?
Yes, flowcharts can be used for both simple and complex problem-solving scenarios. Flowcharts are versatile visual tools that can effectively represent various processes, decision-making steps and problem-solving approaches regardless of their complexity.
In both cases, flowcharts offer a systematic and visual means of organizing information, identifying potential problems and facilitating collaboration among team members.
Can problem-solving flowcharts be used in any industry or domain?
Problem-solving flowcharts can be used in virtually any industry or domain. The versatility and effectiveness of flowcharts make them applicable to a wide range of fields such as Business and Management, Software Development and IT, Healthcare, Education, Finance, Marketing & Sales and a lot more other industries.
Final thoughts
Problem-solving flowcharts are a valuable and versatile tool that empowers individuals and teams to tackle complex problems with clarity and efficiency.
By visually representing the step-by-step process of identifying, analyzing and resolving issues, flowcharts serve as navigational guides simplifying intricate challenges into digestible parts.
With the aid of modern tools like Venngage’s Flowchart Maker and Venngage’s Flowchart Templates , designing impactful flowcharts becomes accessible to all while revolutionizing the way problems are approached and solved.
Discover popular designs

Infographic maker

Brochure maker

White paper online

Newsletter creator

Flyer maker

Timeline maker

Letterhead maker

Mind map maker

Ebook maker

Causal Loop Diagram Template
Visualize systems relationships and improve problem-solving with the causal loop diagram template.
Trusted by 65M+ users and leading companies
About the Causal Loop Diagram Template
The causal loop diagram template is a robust resource designed to visualize complex interrelationships within systems. By providing an organized framework, this template enables the in-depth exploration of interactions, promoting a comprehensive understanding of systems and helping in effective problem-solving.
What's a causal loop diagram template?
A causal loop diagram (CLD) template is a tool that showcases the system's feedback loops and cause-and-effect relationships. Instead of viewing issues in isolation, this diagram gives a holistic view of the interactions between various system components. The template provides a structured framework, enabling teams to chart out these interconnections in an organized and easy-to-understand manner.
How to use the causal loop diagram template in Miro
Miro has intuitive features, making the creation of a CLD seamless:
Shapes library : Select the feature in the toolbar. Here, you can choose different shapes representing many elements within your system.
Arrows and connections : Use arrows to depict the direction of influence between elements. Positive and negative feedback loops can be indicated using '+' and '-' signs.
Customization : Change colors, sizes, and labels to differentiate and categorize the elements as needed.
Drag and drop : Simply drag your chosen elements onto the Miro board and position them to create your causal loop diagram.
Why should you use a causal loop diagram template?
Holistic viewpoint : The template helps understand the bigger picture by visualizing a system's complex web of relationships.
Effective problem-solving : By recognizing the underlying patterns and structures, teams can address root causes instead of superficial symptoms.
Enhanced communication : A well-structured CLD fosters clarity in discussions, promoting shared understanding amongst team members.
Strategic planning : The template helps identify use points, helping in effective decision-making and strategic interventions.
Do you need more advanced diagramming capabilities? Check Miro's diagram maker features.
What is the difference between a positive and a negative feedback loop?
A positive feedback loop amplifies changes, driving the system further from its original state. A negative feedback loop stabilizes the system, pushing it back towards a desired equilibrium.
Can I collaborate in real time with my team on the CLD?
Yes, Miro's workspace supports real-time collaboration, allowing team members to edit, comment, and discuss the diagram.
How can I share my causal loop diagram with stakeholders?
Miro offers easy sharing options. You can invite stakeholders to view or edit the board directly or export the diagram as an image or PDF to share externally.
Is there a limit to the complexity of the system I can map?
While Miro offers a vast canvas, ensuring your CLD remains readable and understandable is essential. If a system is exceedingly complex, consider breaking it down into smaller sub-systems for clarity.
Get started with this template right now.

Onion Diagram Template
Works best for:.
Diagramming, Mapping and Diagramming
The Onion Diagram Template is a distinct tool designed to visually represent layers of a specific concept, system, or process, akin to the layers of an onion. Each concentric layer of the diagram provides insights into a different aspect or phase of the topic at hand, moving from the core foundational element outwards to more peripheral components. One of the prime benefits of this template is its ability to offer hierarchical clarity. Users can immediately discern the importance, sequence, or interrelation of different elements within a system, facilitating enhanced comprehension and efficient decision-making.

Swimlane Diagram Template
Flowcharts, Diagrams, Workflows
A swimlane diagram shows you which stakeholders are responsible for each area of your critical processes. You can use it to understand current processes or plan new ones.

Algorithm Flowchart Template
Diagramming, Flowcharts
The Algorithm Flowchart Template is a useful tool for simplifying the process of creating and understanding complex algorithms. Its pre-structured format makes it easy to lay out each operation and decision point in a clear and easily understandable visual format. This is particularly helpful for explaining intricate processes to team members who may not be as technically proficient in the subject matter. With each step clearly defined within its designated shape, the flowchart promotes clarity and makes it easy to identify the logical flow at a glance. This clarity is the template's most significant advantage, reducing cognitive load and enabling a more inclusive and straightforward approach to discussing and refining algorithmic solutions.

Cisco Network Diagram Template
Software Development, Diagrams
Cisco offers data center and access networking solutions built for scale with industry-leading automation, programmability, and real-time visibility. The Cisco Data Network Diagram uses Cisco elements to show the network design of Cisco Data Networks visually.

Pedigree Diagram Template
Diagrams, Education
Use our Pedigree Diagram Template to show how traits and diseases are passed from one generation to the next. Whether you’re a doctor, farmer, or just someone interested in genetics, a Pedigree Diagram can help you identify hereditary traits.

CI/CD Pipeline Diagram Template
Diagramming, Development
The CI/CD template is a well-designed roadmap for software deployment that enables a smooth and automated flow from development to production. This strategic layout includes critical elements such as source code management, automation servers, container orchestration, staging environments, and the final deployment to production. One of the key benefits of using such a template is that it builds a robust deployment pipeline, which significantly reduces manual intervention and human error. By visualizing each step and integrating automation throughout, teams can achieve faster deployment cycles, ensuring that new features, updates, and fixes are delivered to users promptly and reliably. This enhanced pace does not compromise quality, as the template inherently supports continuous testing and quality assurance, ensuring that each update is quick but also secure and stable before it is delivered to the end user.

How it works
For Business
Join Mind Tools
Article • 12 min read
Systems Diagrams
Understanding how factors affect one another.
By the Mind Tools Content Team

Systems diagrams are powerful tools that help you to understand how complex systems work.
They're particularly helpful for showing you how a change in one factor may impact elsewhere. They're excellent tools for flushing out the long-term impacts of a change. Importantly, a good systems diagram will show how changing a factor may feed back to affect itself!
Drawing a systems diagram is a good way of starting to build a computer model. The technique helps you to map out the structure of the system to be modeled. It shows the factors and relationships that are important, and helps you to start quantifying the linkages between factors.
How Do Systems Diagrams Work?
To explore how systems diagrams work, let's look at seven key aspects of them:
1. Relationships Between Factors
At the heart of the use of systems diagrams is the idea of {{stub}}linking factors to show a relationship between them.
For example a company may link the factors of product quality and customer satisfaction. It believes that as the quality of its goods changes, so will customers' happiness. We show this as an arrow linking the two factors:
Figure 1: A Simple Same-Way Relationship Between Two Factors

The S shows that the factors move in the Same way – as quality improves, so will the happiness of customers. The arrow shows the direction of the relationship: raising customer happiness does not raise the quality of the goods!
These relationships can also work the other way. The company may link price with the customers' perceptions of the "good value" of its goods. This is shown below.
Figure 2: An Opposite Relationships Between Two Factors

The O shows that the relationship works in the opposite way: in this case, as you raise the price, customers' perceptions of good value reduce.
2. Feedback Loops
Feedback is an important concept in the use of systems diagrams. In very many cases, changing one factor will impact on another factor, which will then affect the first.
Feedback will either reduce the impact of the change, or amplify it.
3. Balancing Loops
Where feedback reduces the impact of a change, we call this a "balancing loop." The example below shows an example of a balancing loop, where an under-resourced service company is trying to raise quality.
Figure 3: An Example Balancing Loop

In this situation, improving the quality of service leads to improved customer satisfaction, which leads to an increase in demand for the company's service. In trying to meet this demand, the company has less time to devote to individual customers, which reduces its ability to improve quality further.
Note the small circular arrow in the middle of the loop. This shows which way round the loop is running. In complex diagrams with many loops, this arrow will be labeled and will identify loops.
The graph below shows how quality of service might vary with time in the example above.
Figure 4: Graph Showing How Quality Changes Over Time in the Balancing Loop in Figure 3

4. Reinforcing Loops
Where feedback increases the impact of a change, we call this a "reinforcing loop." The example below shows an example of a theater trying to improve its profitability by investing more in productions.
Figure 5: Reinforcing Loop Showing the Effect of Increasing Investment in a Theater

As more investment is put into a production, the theater is able to put on more-lavish plays with more-famous actors. Better plays should bring better reviews, and therefore higher ticket sales. This should lead to higher profitability, and therefore more money available to invest in future productions.
A graph showing how ticket sales might vary against time is shown below.
Figure 6: Graph Showing the Effect on Sales of the Reinforcing Loop in Figure 5

Note that this assumes that investment is increasing as time goes on. It also ignores some important facts: firstly that there is only a certain number of seats in the theater, and secondly that external factors such as competition and market saturation will eventually limit growth. On a systems diagram showing the way that the theater operates, these factors would be shown as balancing loops impacting on this reinforcing loop.
5. External Factors
The systems diagrams that we've looked at so far completely ignore the impact of these external factors on them.
In our balancing loop example above we assumed that demand was raised only as customers became more satisfied. In reality, demand is just as likely to be affected by the state of the economy. This is shown in the modified diagram below.
Figure 7: Diagram Showing the Effect of an External Factor on a System

We show an external factor as a labeled relationship arrow pointing to the appropriate part of the systems diagram.
In our reinforcing loop example above we related sales of theater seats to investment in productions. What we weren't able to build into the model was the fact that there's a limited number of seats in the theater.
Inevitably this will cap the growth of ticket sales, as the theater will seriously upset customers if it sells more tickets than it has seats available!
We build this into our model with the idea of a gap. There's a gap between the number of seats available (an external factor we haven't yet built into our model), and the number of seats used (tickets sold).
As the theater sells more tickets, the size of this gap reduces. At a particular point it can't sell any more tickets. Increases in investment beyond this point may not yield any more profit.
We show this by modifying our diagram to both show both the external factor of the limit of the number of seats, and to show the gap:
Figure 8: Systems Diagram Showing the Effect of a Gap on a System

When all seats are sold, i.e. when seats available - seats bought = 0, then profit will not rise any higher unless other factors are brought into the system.
Note that it's very important to get the gap definition correct for your model.
The impact of delay is the final area we need to consider in our systems diagrams.
Ideally when we make a change to a system it should adjust immediately to its new state. In reality, there's almost always a delay before other factors adjust. This delay may occur in a mechanical system simply as a result of inertia and friction. In a human system it will occur as people take time to communicate, get used to new ideas, and implement change.
We can show this delay in a simple model using antelopes and cheetahs. As the number of antelopes rises, more food is available for the cheetahs. More cheetahs will therefore survive, and will be able to breed.
One part of the delay within this system is given by the length of time it takes for a cheetah to be born and grow to maturity. The other part occurs as starving cheetahs take time to die.
Feedback occurs as cheetahs kill antelopes. The higher the number of cheetahs, the greater will be their impact on the antelope population.
The figure below shows this.
Figure 9: Diagram Showing Delay in a System

Note the double slash on the line showing the relationship between the antelope and cheetah populations. This shows that some form of delay is slowing the change of the related factor.
If there was no delay within the system, we might expect to see a graph showing the number of cheetahs over time like the one below.
Figure 10: Graph Showing the Adjustment in Cheetah Population in the Example in Figure 9 If There Was No Delay

Here adjustment would be immediate. Any change in the antelope population would be instantly matched by an increase in the cheetah population. These additional cheetahs would eat the additional antelopes, and then die immediately.
The delay in the system causes it to behave in a different way:
- Firstly, the cheetah population will take time to increase.
- Next, the large population of cheetahs will continue to breed as food starts to become scarce.
- This number of cheetahs will cause a big reduction in the number of antelopes.
- This will then lead to a crash in cheetah population as animals starve.
- The antelope population will then recover as there will be fewer cheetahs to restrict their numbers.
If nothing else has any impact on this system, then cheetah numbers may oscillate as shown below:
Figure 11: Graph Showing the Effect on Cheetah Populations When Delay Is Considered in Figure 9

This occurs as the cheetah population continually over-adjusts, first in growth, and then in decline. In this system, the longer it takes for a cheetah to breed and starve – i.e. the greater the delay – the greater will be the variations in cheetah populations.
Improving the Systems Model
The models we've looked at so far have been simple – they've ignored many possible impacts on each system. For example, in our model of antelopes and cheetahs, we've ignored the impact of disease, drought, human activity, etc.
We improve the model by building in as many of these external factors as we can think of. We can then simplify it by eliminating those factors that have a negligible impact.
External factors might be:
- Natural – weather, natural resources, disease, environmental change, etc.
- Technological – new technologies, changes in technology, etc.
- Human – psychological, emotional, ambitions, expectations, etc.
- Political – ideology, corruption, effectiveness, interest, etc.
- Social – values, social inertia, traditions, philosophies, etc.
- Financial – state of the economy, capital available, etc.
Ultimately, you may end up with a model made up of a number of reinforcing loops, balancing loops, and external factors. The example below shows a more sophisticated diagram of the antelopes and cheetahs system.
Figure 12: The Completed Systems Model Showing the Way in Which Antelope and Cheetah Populations Vary

Systems Diagrams as the Basis of Computer Models
Once you've established the relationships between factors on your diagram, you can look to see if you can put numbers to the relationships. In the example above you may find that if drought halves the amount of grass available to antelopes, then the antelope population reduces by one third.
You can build this relationship into a computer model. A useful way of starting this with simple and moderately complex models is to build the model on a spreadsheet.
You can use this model to make predictions by changing factors within it. This would allow you to assess the likely impact on your system of external changes, and investigate the effect of changes you might make within the system.
This article draws on the work of Peter Senge of the MIT Sloan School of Management, and his concepts of "systems thinking" and the "learning organization." To learn more, read Senge's highly influential 1990 book, "The Fifth Discipline." [1]
Systems diagrams allow you to model the way in which complex systems work. They help you to think through the way in which the factors within a system interact and feed back upon themselves.
Using a systems diagram, you can analyze:
- How factors are related, and how one factor will change when another changes.
- How factors may feed back in either balancing loops or reinforcing loops.
- How external factors impact on the system.
- How gaps operate.
- How delay affects the system.
- All the complexities of a system.
[1] Senge, P. (1990). 'The Fifth Discipline: The Art and Practice of the Learning Organization,' New York: Doubleday.
You've accessed 1 of your 2 free resources.
Get unlimited access
Discover more content
Cog's ladder.
Understanding and Accelerating Group Formation
Appreciative Inquiry
Solving Problems by Looking at What's Going Right
Add comment
Comments (0)
Be the first to comment!

Get 30% off your first year of Mind Tools
Great teams begin with empowered leaders. Our tools and resources offer the support to let you flourish into leadership. Join today!
Sign-up to our newsletter
Subscribing to the Mind Tools newsletter will keep you up-to-date with our latest updates and newest resources.
Subscribe now
Business Skills
Personal Development
Leadership and Management
Member Extras
Most Popular
Latest Updates

Tips for Dealing with Customers Effectively

Pain Points Podcast - Procrastination
Mind Tools Store
About Mind Tools Content
Discover something new today
Pain points podcast - starting a new job.
How to Hit the Ground Running!
Ten Dos and Don'ts of Career Conversations
How to talk to team members about their career aspirations.
How Emotionally Intelligent Are You?
Boosting Your People Skills
Self-Assessment
What's Your Leadership Style?
Learn About the Strengths and Weaknesses of the Way You Like to Lead
Recommended for you
Adapting your communication style.
Inquire, Observe and Use Active Listening to Find the Right Fit
Business Operations and Process Management
Strategy Tools
Customer Service
Business Ethics and Values
Handling Information and Data
Project Management
Knowledge Management
Self-Development and Goal Setting
Time Management
Presentation Skills
Learning Skills
Career Skills
Communication Skills
Negotiation, Persuasion and Influence
Working With Others
Difficult Conversations
Creativity Tools
Self-Management
Work-Life Balance
Stress Management and Wellbeing
Coaching and Mentoring
Change Management
Team Management
Managing Conflict
Delegation and Empowerment
Performance Management
Leadership Skills
Developing Your Team
Talent Management
Problem Solving
Decision Making
Member Podcast
How to create a problem-solving flow chart
Problem-solving is one of those topics that we’ve often discussed on this site (check out our Problem Solving guide ). We think it’s one of THE vital skills of business. Why? Because you’ll come across problems every day, and you need to arm yourself with the right tools to solve them.
A problem-solving flowchart is one of those tools. It’ll help you take a problem statement, break the problem down into likely causes helping you get to the bottom of what’s gone wrong.
In this post, we’ll cover
- What is a Problem Solving Flow Chart
- How to create a Problem Solving flow chart
- Example 1 of Problem Solving flow chart
- Example 2 of Problem Solving Flow chart
- What flow chart shapes to use
- When should you use a flow chart
- 7 tips on creating your Problem Solving chart
Key Benefits & Likely issues with the tool
Let’s get started!
What is a Problem Solving Flowchart
A Problem Solving flow chart is a diagram that uses shapes, arrows, and text to show a moving sequence of actions and/or activities that help solve a problem.
How to create a Problem Solving flowchart
- Describe your problem.
- Pose Yes/No Questions that can help identify the cause of the problem
- Question each stage of the process until it is fully examined
- Repeat steps 2 & 3 until you have identified a solution
- Try the solution; if it is successful in addressing the root cause, then you’ve fixed your problem. If not, repeat the process until you have a solution that works.
A problem-solving flowchart attempts to identify a root cause/solution to the trigger that is causing the problem allowing you to change the process and prevent the problem from occurring.
Let’s now demonstrate the effectiveness of a problem solving flowchart by showing some examples.
Example 1 Problem solving flow chart
In our first example, we’re going to start with something simple to show you the principle of the tool.
We have been given a cup of tea and we don’t like it!
Let’s use a problem-solving flow chart to find out what’s gone wrong.
We’ve used Excel to capture this flow chart using flowchart shapes (insert –> shapes), you can, of course, use other applications to do this, you don’t’ have to have specialized flow chart software to do this. ( there’s a great flowchart in Excel video here ). Or you can simply use a pen and paper.
Use a rectangle and add your problem statement.
Remember to keep your problem statement unambiguous and straightforward. Here we’ve used “I don’t like my cup of tea.”
Now that we’ve got our problem statement, we’re going to start asking questions.
We’re going to examine the variables that go into a cup of tea in an attempt to find out what’s gone wrong.
** TIP** – Work through your process – rather than start from scratch, if you have a documented process, work through that examining each step to ascertain if there are issues. If not, you might find it useful to research and sketch out the process before starting with your flowchart.
We have a process for the cup of tea, which is:
1/ Boil Water
2/ Place Breakfast Tea teabag in the cup
3/ Add Water
4/ Leave to sit for 2 mins
4/ Remove teabag
5/ Add milk
6/ Add sugar
So our problem solving flow chart needs to examine each of those steps to determine where the failure has occurred.
We’ll add a question shape (diamond), connect out problem statement to it using an arrow to check if we boiled the kettle. Our Diagram will now look like:
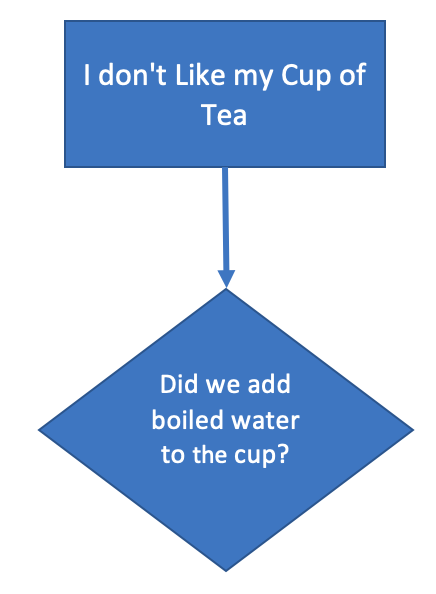
As a question, we want two possible routes – Yes and No.
Our process asks us to boil the kettle if we did, and the answer is Yes, then we can go to the next process step.
If the answer is No, then we have a problem. Our tea will be cold.
Here we can do one of two things. We can terminate the flow chart, or we can add an activity to rectify the problem (this might be to remake the drink or to perhaps heat the drink up in the microwave).
Our flow chart now looks like this:
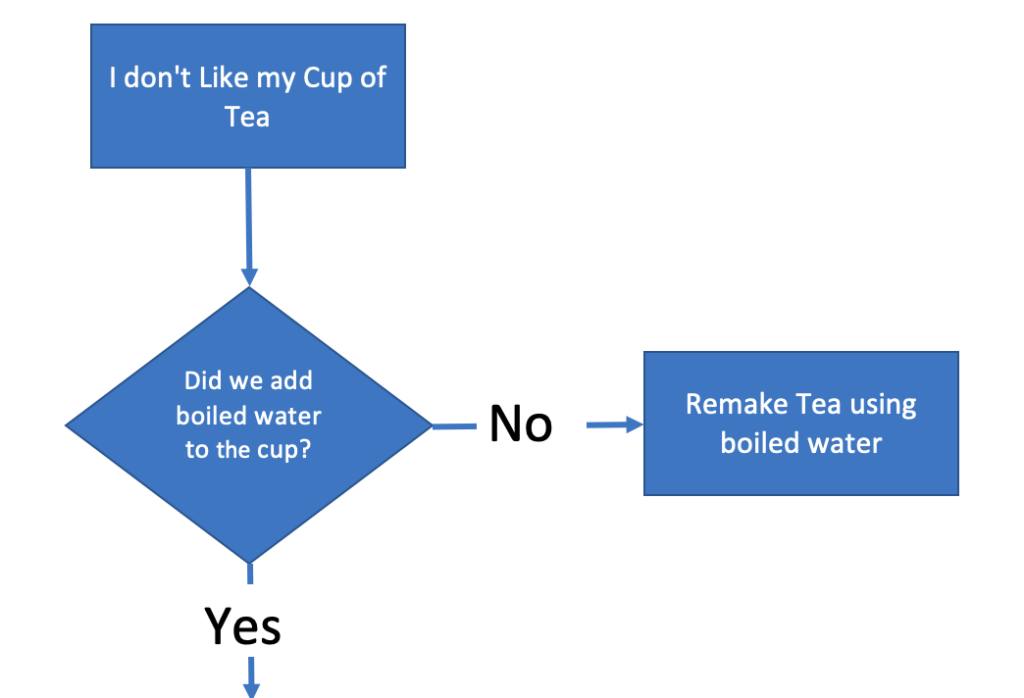
Step 2 in our Tea making process was to add a Breakfast-tea tea bag.
So, once again, we’ll ask a question about that step.
“Did we add an English Breakfast teabag.”
As before, we’ll use a question shape, using Yes or No answers. If we performed the process step correctly, we’d move on. If we didn’t, we’ll either end the problem solving (we’ve found the root cause), or we’ll add a corrective action.
Now we’ll repeat this process until we’ve reviewed the whole process.
Our finished flowchart looks like this.
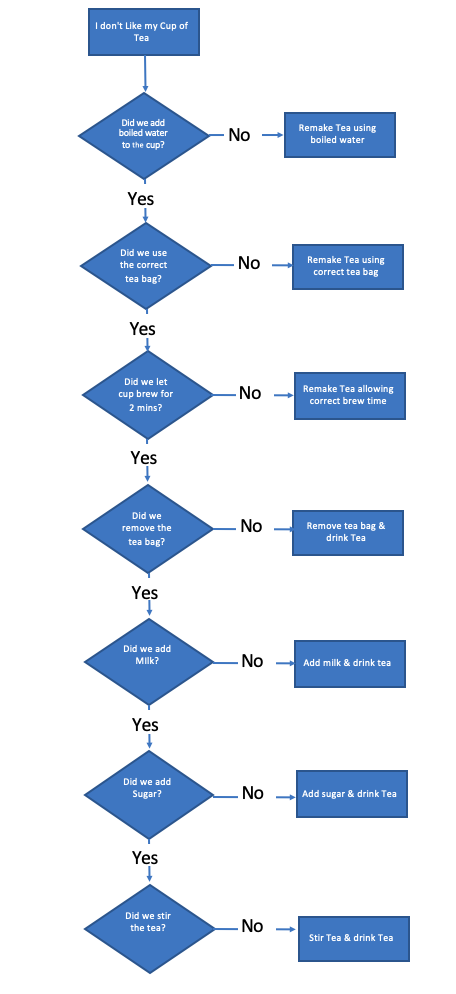
However, we’re not finished.
What happens if we follow the flow chart, and we find we didn’t use boiled water. We remake the tea using boiled water, and we still don’t like it?
We need to ask some further questions.
We need to update our flow chart to validate that we solved the problem and what to do if we didn’t.
So for each step of the process, our problem solving flowchart now looks like this.
Here’s our completed flow chart.
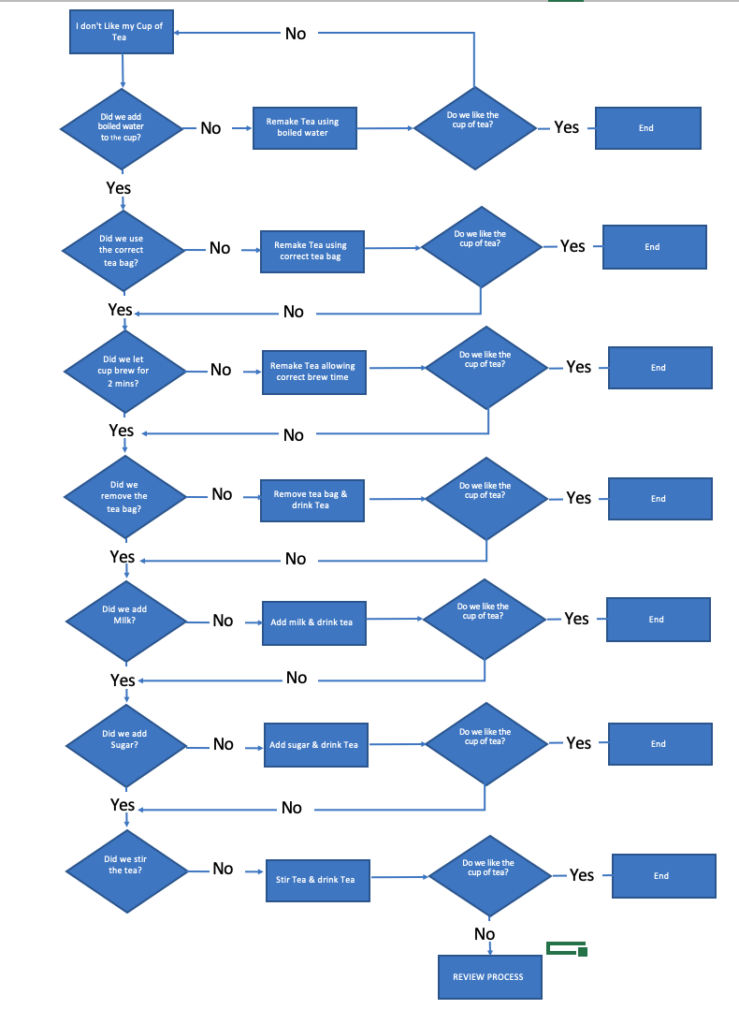
As you can see, we’ve identified the problem, and we’ve described a corrective action.
But there’s a problem here. With this flowchart, you can still follow it, validating the process, and still end up with a cup of tea that’s unsatisfactory.
Why is that?
Well, it’s perfectly possible that we started out with a process that’s incorrect. What happens if the process called for using an incorrect tea bag from the start?
So we’ll simplify things by adding a block at the end that if you’re still not happy at the end of reviewing the steps, a full review of the process will be undertaken. This is a simple answer to this problem, and I would expect that you would expand this section in more detail if you were creating a flowchart yourself.
So what does a more complex process look like, how about we look at a business problem?
Example 2 Problem Solving flow chart
OK, so example 1 may have been a bit simple, and you are maybe looking for something in a business context.
So in Example 2, let’s look at a scenario that’s a little more complex.
Let’s assume that your organization has received a non-conforming part. You have been assigned to work with the Vendor to:
- Find out what went wrong
- Prevent recurrence
We’re going to use a problem solving flow chart to help us do that.
As with the first example, we’re going to state the problem.
“The part is non conforming.”
Using the production process from the Vendor, we’ll work through the stages to see if we can spot what’s gone wrong.
The diagram below shows an analysis of the first two steps of the production process using a problem-solving flow chart.
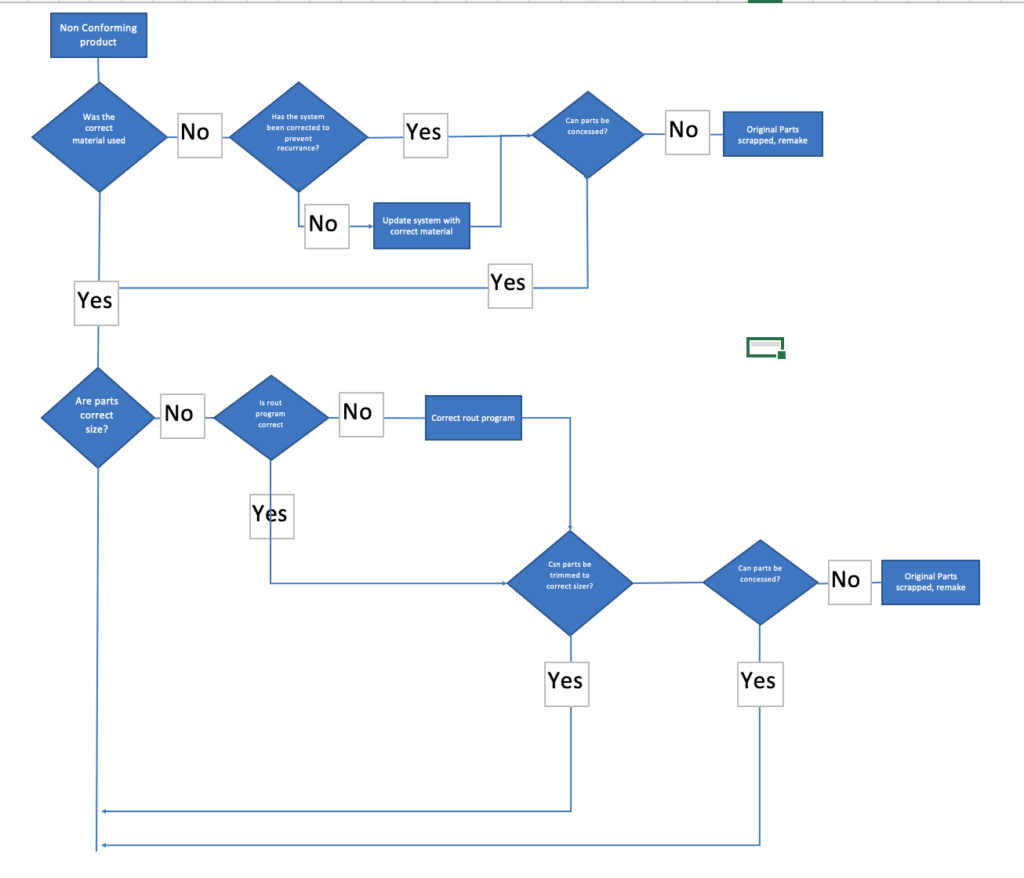
The first thing you’ll notice is that on one process step, there may be many questions to ascertain the potential issue.
Some of these may be complex and require careful thought.
There may be multiple variables (systems, processes, tools, inputs, etc.) that may require attention.
You will need to analyze each process step, in full, to be sure you have caught all the possible causes of the fault.
Which Flow chart shapes should you use.
A problem solving flow chart usually utilizes only a small number of shapes. We show these in the table below.
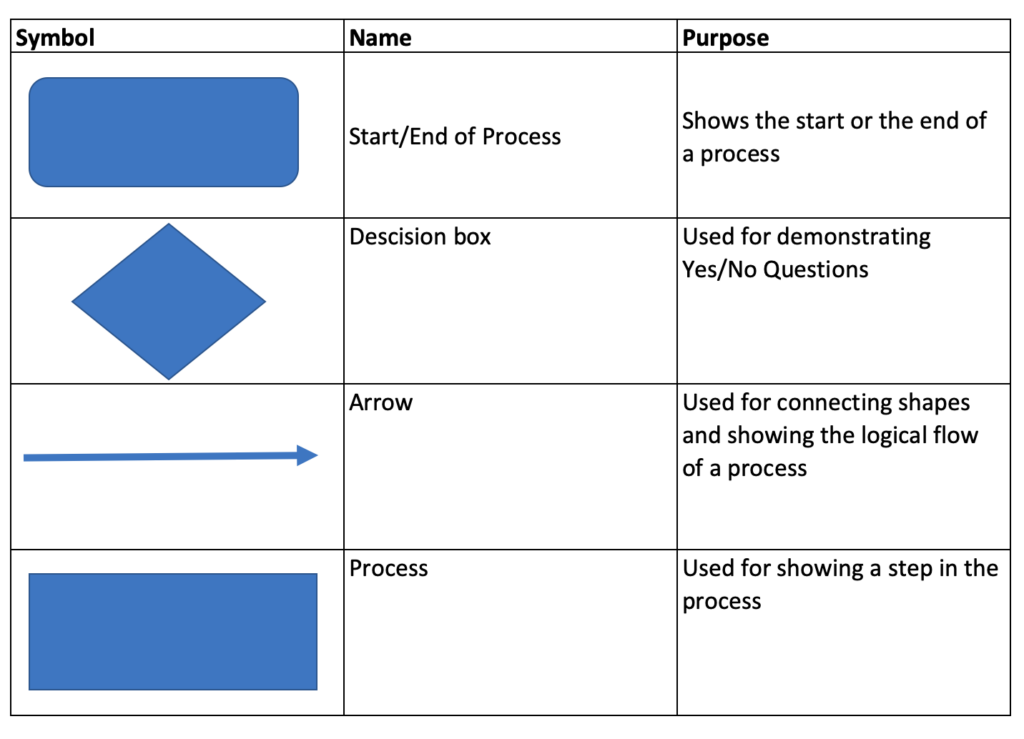
When should you use a Problem Solving flow chart
There are many many problem tools available.
A flow chart lends itself to be used when:
- You are looking for a tool that is simple to use
- You are looking to use a tool that does not require complex software
- You want to validate a process.
- You want something that facilitates collaboration
- You want something that you can use to communicate with others
7 Tips on creating great problem solving flow charts
1/ Use standard shapes!
2/ Make it easy to follow!
3/ Keep things on one page
4/ Don’t overload your boxes with text
5/ Go into enough detail. Don’t try and simplify activities as it might hide problems from being seen.
6/ Collaborate. Where you can utilize a team to help document the problem and the activities do so. The more knowledge of the process, the better chance you’ll have of locating the issue.
7/ Use a consistent direction to flow your process, moving things around the page can confuse people who might look at it.
A flow chart can provide you with a great advantage when looking to solve problems. Some of the key benefits include
- A visual aide that’s easy to understand
- Simple to use, does not require hours and hours of training
- A tool that facilitates collaboration
- Effective for aiding communication
- Provides an effective method of analysing a process
However, as with everything, there are some issues to look out for
- Flowchart fails to capture all process steps and therefore root cause analysis is hit and miss
- Lack of knowledge of the process by the individual compiling the flowchart results in inaccurate problem solving
- Inconsistent flow of process makes maps confusing
- Complex processes may be better suited to other tools (fishbone etc)
- Inconsistent formatting and/or use of shapes result in flowchart that is difficult to utilise.
There are a great many tools out there for problem-solving, and flow charts can be used either as a stand-alone tool or conjunction with one of these other tools.
Flowcharts can make for a great problem-solving tool.
They’re simple to use, effective, and facilitate collaboration.
We hope you’ve found our article useful, in particular the example walkthroughs.
If you’re looking to use the tool, we’d love some feedback from you and hearing how you’ve got on. Why not fire us a message on twitter or use the comments section below.
This article is part of our Problem Solving Guide.
Our Content
- Calculators
- Career Skills
- Communications
- Human Resources
- Strategy and Leadership
- Supply Chain Management
35 problem-solving techniques and methods for solving complex problems

Design your next session with SessionLab
Join the 150,000+ facilitators using SessionLab.
Recommended Articles
A step-by-step guide to planning a workshop, how to create an unforgettable training session in 8 simple steps, 47 useful online tools for workshop planning and meeting facilitation.
All teams and organizations encounter challenges as they grow. There are problems that might occur for teams when it comes to miscommunication or resolving business-critical issues . You may face challenges around growth , design , user engagement, and even team culture and happiness. In short, problem-solving techniques should be part of every team’s skillset.
Problem-solving methods are primarily designed to help a group or team through a process of first identifying problems and challenges , ideating possible solutions , and then evaluating the most suitable .
Finding effective solutions to complex problems isn’t easy, but by using the right process and techniques, you can help your team be more efficient in the process.
So how do you develop strategies that are engaging, and empower your team to solve problems effectively?
In this blog post, we share a series of problem-solving tools you can use in your next workshop or team meeting. You’ll also find some tips for facilitating the process and how to enable others to solve complex problems.
Let’s get started!
How do you identify problems?
How do you identify the right solution.
- Tips for more effective problem-solving
Complete problem-solving methods
- Problem-solving techniques to identify and analyze problems
- Problem-solving techniques for developing solutions
Problem-solving warm-up activities
Closing activities for a problem-solving process.
Before you can move towards finding the right solution for a given problem, you first need to identify and define the problem you wish to solve.
Here, you want to clearly articulate what the problem is and allow your group to do the same. Remember that everyone in a group is likely to have differing perspectives and alignment is necessary in order to help the group move forward.
Identifying a problem accurately also requires that all members of a group are able to contribute their views in an open and safe manner. It can be scary for people to stand up and contribute, especially if the problems or challenges are emotive or personal in nature. Be sure to try and create a psychologically safe space for these kinds of discussions.
Remember that problem analysis and further discussion are also important. Not taking the time to fully analyze and discuss a challenge can result in the development of solutions that are not fit for purpose or do not address the underlying issue.
Successfully identifying and then analyzing a problem means facilitating a group through activities designed to help them clearly and honestly articulate their thoughts and produce usable insight.
With this data, you might then produce a problem statement that clearly describes the problem you wish to be addressed and also state the goal of any process you undertake to tackle this issue.
Finding solutions is the end goal of any process. Complex organizational challenges can only be solved with an appropriate solution but discovering them requires using the right problem-solving tool.
After you’ve explored a problem and discussed ideas, you need to help a team discuss and choose the right solution. Consensus tools and methods such as those below help a group explore possible solutions before then voting for the best. They’re a great way to tap into the collective intelligence of the group for great results!
Remember that the process is often iterative. Great problem solvers often roadtest a viable solution in a measured way to see what works too. While you might not get the right solution on your first try, the methods below help teams land on the most likely to succeed solution while also holding space for improvement.
Every effective problem solving process begins with an agenda . A well-structured workshop is one of the best methods for successfully guiding a group from exploring a problem to implementing a solution.
In SessionLab, it’s easy to go from an idea to a complete agenda . Start by dragging and dropping your core problem solving activities into place . Add timings, breaks and necessary materials before sharing your agenda with your colleagues.
The resulting agenda will be your guide to an effective and productive problem solving session that will also help you stay organized on the day!
Tips for more effective problem solving
Problem-solving activities are only one part of the puzzle. While a great method can help unlock your team’s ability to solve problems, without a thoughtful approach and strong facilitation the solutions may not be fit for purpose.
Let’s take a look at some problem-solving tips you can apply to any process to help it be a success!
Clearly define the problem
Jumping straight to solutions can be tempting, though without first clearly articulating a problem, the solution might not be the right one. Many of the problem-solving activities below include sections where the problem is explored and clearly defined before moving on.
This is a vital part of the problem-solving process and taking the time to fully define an issue can save time and effort later. A clear definition helps identify irrelevant information and it also ensures that your team sets off on the right track.
Don’t jump to conclusions
It’s easy for groups to exhibit cognitive bias or have preconceived ideas about both problems and potential solutions. Be sure to back up any problem statements or potential solutions with facts, research, and adequate forethought.
The best techniques ask participants to be methodical and challenge preconceived notions. Make sure you give the group enough time and space to collect relevant information and consider the problem in a new way. By approaching the process with a clear, rational mindset, you’ll often find that better solutions are more forthcoming.
Try different approaches
Problems come in all shapes and sizes and so too should the methods you use to solve them. If you find that one approach isn’t yielding results and your team isn’t finding different solutions, try mixing it up. You’ll be surprised at how using a new creative activity can unblock your team and generate great solutions.
Don’t take it personally
Depending on the nature of your team or organizational problems, it’s easy for conversations to get heated. While it’s good for participants to be engaged in the discussions, ensure that emotions don’t run too high and that blame isn’t thrown around while finding solutions.
You’re all in it together, and even if your team or area is seeing problems, that isn’t necessarily a disparagement of you personally. Using facilitation skills to manage group dynamics is one effective method of helping conversations be more constructive.
Get the right people in the room
Your problem-solving method is often only as effective as the group using it. Getting the right people on the job and managing the number of people present is important too!
If the group is too small, you may not get enough different perspectives to effectively solve a problem. If the group is too large, you can go round and round during the ideation stages.
Creating the right group makeup is also important in ensuring you have the necessary expertise and skillset to both identify and follow up on potential solutions. Carefully consider who to include at each stage to help ensure your problem-solving method is followed and positioned for success.
Document everything
The best solutions can take refinement, iteration, and reflection to come out. Get into a habit of documenting your process in order to keep all the learnings from the session and to allow ideas to mature and develop. Many of the methods below involve the creation of documents or shared resources. Be sure to keep and share these so everyone can benefit from the work done!
Bring a facilitator
Facilitation is all about making group processes easier. With a subject as potentially emotive and important as problem-solving, having an impartial third party in the form of a facilitator can make all the difference in finding great solutions and keeping the process moving. Consider bringing a facilitator to your problem-solving session to get better results and generate meaningful solutions!
Develop your problem-solving skills
It takes time and practice to be an effective problem solver. While some roles or participants might more naturally gravitate towards problem-solving, it can take development and planning to help everyone create better solutions.
You might develop a training program, run a problem-solving workshop or simply ask your team to practice using the techniques below. Check out our post on problem-solving skills to see how you and your group can develop the right mental process and be more resilient to issues too!
Design a great agenda
Workshops are a great format for solving problems. With the right approach, you can focus a group and help them find the solutions to their own problems. But designing a process can be time-consuming and finding the right activities can be difficult.
Check out our workshop planning guide to level-up your agenda design and start running more effective workshops. Need inspiration? Check out templates designed by expert facilitators to help you kickstart your process!
In this section, we’ll look at in-depth problem-solving methods that provide a complete end-to-end process for developing effective solutions. These will help guide your team from the discovery and definition of a problem through to delivering the right solution.
If you’re looking for an all-encompassing method or problem-solving model, these processes are a great place to start. They’ll ask your team to challenge preconceived ideas and adopt a mindset for solving problems more effectively.
- Six Thinking Hats
- Lightning Decision Jam
- Problem Definition Process
- Discovery & Action Dialogue
Design Sprint 2.0
- Open Space Technology
1. Six Thinking Hats
Individual approaches to solving a problem can be very different based on what team or role an individual holds. It can be easy for existing biases or perspectives to find their way into the mix, or for internal politics to direct a conversation.
Six Thinking Hats is a classic method for identifying the problems that need to be solved and enables your team to consider them from different angles, whether that is by focusing on facts and data, creative solutions, or by considering why a particular solution might not work.
Like all problem-solving frameworks, Six Thinking Hats is effective at helping teams remove roadblocks from a conversation or discussion and come to terms with all the aspects necessary to solve complex problems.
2. Lightning Decision Jam
Featured courtesy of Jonathan Courtney of AJ&Smart Berlin, Lightning Decision Jam is one of those strategies that should be in every facilitation toolbox. Exploring problems and finding solutions is often creative in nature, though as with any creative process, there is the potential to lose focus and get lost.
Unstructured discussions might get you there in the end, but it’s much more effective to use a method that creates a clear process and team focus.
In Lightning Decision Jam, participants are invited to begin by writing challenges, concerns, or mistakes on post-its without discussing them before then being invited by the moderator to present them to the group.
From there, the team vote on which problems to solve and are guided through steps that will allow them to reframe those problems, create solutions and then decide what to execute on.
By deciding the problems that need to be solved as a team before moving on, this group process is great for ensuring the whole team is aligned and can take ownership over the next stages.
Lightning Decision Jam (LDJ) #action #decision making #problem solving #issue analysis #innovation #design #remote-friendly The problem with anything that requires creative thinking is that it’s easy to get lost—lose focus and fall into the trap of having useless, open-ended, unstructured discussions. Here’s the most effective solution I’ve found: Replace all open, unstructured discussion with a clear process. What to use this exercise for: Anything which requires a group of people to make decisions, solve problems or discuss challenges. It’s always good to frame an LDJ session with a broad topic, here are some examples: The conversion flow of our checkout Our internal design process How we organise events Keeping up with our competition Improving sales flow
3. Problem Definition Process
While problems can be complex, the problem-solving methods you use to identify and solve those problems can often be simple in design.
By taking the time to truly identify and define a problem before asking the group to reframe the challenge as an opportunity, this method is a great way to enable change.
Begin by identifying a focus question and exploring the ways in which it manifests before splitting into five teams who will each consider the problem using a different method: escape, reversal, exaggeration, distortion or wishful. Teams develop a problem objective and create ideas in line with their method before then feeding them back to the group.
This method is great for enabling in-depth discussions while also creating space for finding creative solutions too!
Problem Definition #problem solving #idea generation #creativity #online #remote-friendly A problem solving technique to define a problem, challenge or opportunity and to generate ideas.
4. The 5 Whys
Sometimes, a group needs to go further with their strategies and analyze the root cause at the heart of organizational issues. An RCA or root cause analysis is the process of identifying what is at the heart of business problems or recurring challenges.
The 5 Whys is a simple and effective method of helping a group go find the root cause of any problem or challenge and conduct analysis that will deliver results.
By beginning with the creation of a problem statement and going through five stages to refine it, The 5 Whys provides everything you need to truly discover the cause of an issue.
The 5 Whys #hyperisland #innovation This simple and powerful method is useful for getting to the core of a problem or challenge. As the title suggests, the group defines a problems, then asks the question “why” five times, often using the resulting explanation as a starting point for creative problem solving.
5. World Cafe
World Cafe is a simple but powerful facilitation technique to help bigger groups to focus their energy and attention on solving complex problems.
World Cafe enables this approach by creating a relaxed atmosphere where participants are able to self-organize and explore topics relevant and important to them which are themed around a central problem-solving purpose. Create the right atmosphere by modeling your space after a cafe and after guiding the group through the method, let them take the lead!
Making problem-solving a part of your organization’s culture in the long term can be a difficult undertaking. More approachable formats like World Cafe can be especially effective in bringing people unfamiliar with workshops into the fold.
World Cafe #hyperisland #innovation #issue analysis World Café is a simple yet powerful method, originated by Juanita Brown, for enabling meaningful conversations driven completely by participants and the topics that are relevant and important to them. Facilitators create a cafe-style space and provide simple guidelines. Participants then self-organize and explore a set of relevant topics or questions for conversation.
6. Discovery & Action Dialogue (DAD)
One of the best approaches is to create a safe space for a group to share and discover practices and behaviors that can help them find their own solutions.
With DAD, you can help a group choose which problems they wish to solve and which approaches they will take to do so. It’s great at helping remove resistance to change and can help get buy-in at every level too!
This process of enabling frontline ownership is great in ensuring follow-through and is one of the methods you will want in your toolbox as a facilitator.
Discovery & Action Dialogue (DAD) #idea generation #liberating structures #action #issue analysis #remote-friendly DADs make it easy for a group or community to discover practices and behaviors that enable some individuals (without access to special resources and facing the same constraints) to find better solutions than their peers to common problems. These are called positive deviant (PD) behaviors and practices. DADs make it possible for people in the group, unit, or community to discover by themselves these PD practices. DADs also create favorable conditions for stimulating participants’ creativity in spaces where they can feel safe to invent new and more effective practices. Resistance to change evaporates as participants are unleashed to choose freely which practices they will adopt or try and which problems they will tackle. DADs make it possible to achieve frontline ownership of solutions.
7. Design Sprint 2.0
Want to see how a team can solve big problems and move forward with prototyping and testing solutions in a few days? The Design Sprint 2.0 template from Jake Knapp, author of Sprint, is a complete agenda for a with proven results.
Developing the right agenda can involve difficult but necessary planning. Ensuring all the correct steps are followed can also be stressful or time-consuming depending on your level of experience.
Use this complete 4-day workshop template if you are finding there is no obvious solution to your challenge and want to focus your team around a specific problem that might require a shortcut to launching a minimum viable product or waiting for the organization-wide implementation of a solution.
8. Open space technology
Open space technology- developed by Harrison Owen – creates a space where large groups are invited to take ownership of their problem solving and lead individual sessions. Open space technology is a great format when you have a great deal of expertise and insight in the room and want to allow for different takes and approaches on a particular theme or problem you need to be solved.
Start by bringing your participants together to align around a central theme and focus their efforts. Explain the ground rules to help guide the problem-solving process and then invite members to identify any issue connecting to the central theme that they are interested in and are prepared to take responsibility for.
Once participants have decided on their approach to the core theme, they write their issue on a piece of paper, announce it to the group, pick a session time and place, and post the paper on the wall. As the wall fills up with sessions, the group is then invited to join the sessions that interest them the most and which they can contribute to, then you’re ready to begin!
Everyone joins the problem-solving group they’ve signed up to, record the discussion and if appropriate, findings can then be shared with the rest of the group afterward.
Open Space Technology #action plan #idea generation #problem solving #issue analysis #large group #online #remote-friendly Open Space is a methodology for large groups to create their agenda discerning important topics for discussion, suitable for conferences, community gatherings and whole system facilitation
Techniques to identify and analyze problems
Using a problem-solving method to help a team identify and analyze a problem can be a quick and effective addition to any workshop or meeting.
While further actions are always necessary, you can generate momentum and alignment easily, and these activities are a great place to get started.
We’ve put together this list of techniques to help you and your team with problem identification, analysis, and discussion that sets the foundation for developing effective solutions.
Let’s take a look!
- The Creativity Dice
- Fishbone Analysis
- Problem Tree
- SWOT Analysis
- Agreement-Certainty Matrix
- The Journalistic Six
- LEGO Challenge
- What, So What, Now What?
- Journalists
Individual and group perspectives are incredibly important, but what happens if people are set in their minds and need a change of perspective in order to approach a problem more effectively?
Flip It is a method we love because it is both simple to understand and run, and allows groups to understand how their perspectives and biases are formed.
Participants in Flip It are first invited to consider concerns, issues, or problems from a perspective of fear and write them on a flip chart. Then, the group is asked to consider those same issues from a perspective of hope and flip their understanding.
No problem and solution is free from existing bias and by changing perspectives with Flip It, you can then develop a problem solving model quickly and effectively.
Flip It! #gamestorming #problem solving #action Often, a change in a problem or situation comes simply from a change in our perspectives. Flip It! is a quick game designed to show players that perspectives are made, not born.
10. The Creativity Dice
One of the most useful problem solving skills you can teach your team is of approaching challenges with creativity, flexibility, and openness. Games like The Creativity Dice allow teams to overcome the potential hurdle of too much linear thinking and approach the process with a sense of fun and speed.
In The Creativity Dice, participants are organized around a topic and roll a dice to determine what they will work on for a period of 3 minutes at a time. They might roll a 3 and work on investigating factual information on the chosen topic. They might roll a 1 and work on identifying the specific goals, standards, or criteria for the session.
Encouraging rapid work and iteration while asking participants to be flexible are great skills to cultivate. Having a stage for idea incubation in this game is also important. Moments of pause can help ensure the ideas that are put forward are the most suitable.
The Creativity Dice #creativity #problem solving #thiagi #issue analysis Too much linear thinking is hazardous to creative problem solving. To be creative, you should approach the problem (or the opportunity) from different points of view. You should leave a thought hanging in mid-air and move to another. This skipping around prevents premature closure and lets your brain incubate one line of thought while you consciously pursue another.
11. Fishbone Analysis
Organizational or team challenges are rarely simple, and it’s important to remember that one problem can be an indication of something that goes deeper and may require further consideration to be solved.
Fishbone Analysis helps groups to dig deeper and understand the origins of a problem. It’s a great example of a root cause analysis method that is simple for everyone on a team to get their head around.
Participants in this activity are asked to annotate a diagram of a fish, first adding the problem or issue to be worked on at the head of a fish before then brainstorming the root causes of the problem and adding them as bones on the fish.
Using abstractions such as a diagram of a fish can really help a team break out of their regular thinking and develop a creative approach.
Fishbone Analysis #problem solving ##root cause analysis #decision making #online facilitation A process to help identify and understand the origins of problems, issues or observations.
12. Problem Tree
Encouraging visual thinking can be an essential part of many strategies. By simply reframing and clarifying problems, a group can move towards developing a problem solving model that works for them.
In Problem Tree, groups are asked to first brainstorm a list of problems – these can be design problems, team problems or larger business problems – and then organize them into a hierarchy. The hierarchy could be from most important to least important or abstract to practical, though the key thing with problem solving games that involve this aspect is that your group has some way of managing and sorting all the issues that are raised.
Once you have a list of problems that need to be solved and have organized them accordingly, you’re then well-positioned for the next problem solving steps.
Problem tree #define intentions #create #design #issue analysis A problem tree is a tool to clarify the hierarchy of problems addressed by the team within a design project; it represents high level problems or related sublevel problems.
13. SWOT Analysis
Chances are you’ve heard of the SWOT Analysis before. This problem-solving method focuses on identifying strengths, weaknesses, opportunities, and threats is a tried and tested method for both individuals and teams.
Start by creating a desired end state or outcome and bare this in mind – any process solving model is made more effective by knowing what you are moving towards. Create a quadrant made up of the four categories of a SWOT analysis and ask participants to generate ideas based on each of those quadrants.
Once you have those ideas assembled in their quadrants, cluster them together based on their affinity with other ideas. These clusters are then used to facilitate group conversations and move things forward.
SWOT analysis #gamestorming #problem solving #action #meeting facilitation The SWOT Analysis is a long-standing technique of looking at what we have, with respect to the desired end state, as well as what we could improve on. It gives us an opportunity to gauge approaching opportunities and dangers, and assess the seriousness of the conditions that affect our future. When we understand those conditions, we can influence what comes next.
14. Agreement-Certainty Matrix
Not every problem-solving approach is right for every challenge, and deciding on the right method for the challenge at hand is a key part of being an effective team.
The Agreement Certainty matrix helps teams align on the nature of the challenges facing them. By sorting problems from simple to chaotic, your team can understand what methods are suitable for each problem and what they can do to ensure effective results.
If you are already using Liberating Structures techniques as part of your problem-solving strategy, the Agreement-Certainty Matrix can be an invaluable addition to your process. We’ve found it particularly if you are having issues with recurring problems in your organization and want to go deeper in understanding the root cause.
Agreement-Certainty Matrix #issue analysis #liberating structures #problem solving You can help individuals or groups avoid the frequent mistake of trying to solve a problem with methods that are not adapted to the nature of their challenge. The combination of two questions makes it possible to easily sort challenges into four categories: simple, complicated, complex , and chaotic . A problem is simple when it can be solved reliably with practices that are easy to duplicate. It is complicated when experts are required to devise a sophisticated solution that will yield the desired results predictably. A problem is complex when there are several valid ways to proceed but outcomes are not predictable in detail. Chaotic is when the context is too turbulent to identify a path forward. A loose analogy may be used to describe these differences: simple is like following a recipe, complicated like sending a rocket to the moon, complex like raising a child, and chaotic is like the game “Pin the Tail on the Donkey.” The Liberating Structures Matching Matrix in Chapter 5 can be used as the first step to clarify the nature of a challenge and avoid the mismatches between problems and solutions that are frequently at the root of chronic, recurring problems.
Organizing and charting a team’s progress can be important in ensuring its success. SQUID (Sequential Question and Insight Diagram) is a great model that allows a team to effectively switch between giving questions and answers and develop the skills they need to stay on track throughout the process.
Begin with two different colored sticky notes – one for questions and one for answers – and with your central topic (the head of the squid) on the board. Ask the group to first come up with a series of questions connected to their best guess of how to approach the topic. Ask the group to come up with answers to those questions, fix them to the board and connect them with a line. After some discussion, go back to question mode by responding to the generated answers or other points on the board.
It’s rewarding to see a diagram grow throughout the exercise, and a completed SQUID can provide a visual resource for future effort and as an example for other teams.
SQUID #gamestorming #project planning #issue analysis #problem solving When exploring an information space, it’s important for a group to know where they are at any given time. By using SQUID, a group charts out the territory as they go and can navigate accordingly. SQUID stands for Sequential Question and Insight Diagram.
16. Speed Boat
To continue with our nautical theme, Speed Boat is a short and sweet activity that can help a team quickly identify what employees, clients or service users might have a problem with and analyze what might be standing in the way of achieving a solution.
Methods that allow for a group to make observations, have insights and obtain those eureka moments quickly are invaluable when trying to solve complex problems.
In Speed Boat, the approach is to first consider what anchors and challenges might be holding an organization (or boat) back. Bonus points if you are able to identify any sharks in the water and develop ideas that can also deal with competitors!
Speed Boat #gamestorming #problem solving #action Speedboat is a short and sweet way to identify what your employees or clients don’t like about your product/service or what’s standing in the way of a desired goal.
17. The Journalistic Six
Some of the most effective ways of solving problems is by encouraging teams to be more inclusive and diverse in their thinking.
Based on the six key questions journalism students are taught to answer in articles and news stories, The Journalistic Six helps create teams to see the whole picture. By using who, what, when, where, why, and how to facilitate the conversation and encourage creative thinking, your team can make sure that the problem identification and problem analysis stages of the are covered exhaustively and thoughtfully. Reporter’s notebook and dictaphone optional.
The Journalistic Six – Who What When Where Why How #idea generation #issue analysis #problem solving #online #creative thinking #remote-friendly A questioning method for generating, explaining, investigating ideas.
18. LEGO Challenge
Now for an activity that is a little out of the (toy) box. LEGO Serious Play is a facilitation methodology that can be used to improve creative thinking and problem-solving skills.
The LEGO Challenge includes giving each member of the team an assignment that is hidden from the rest of the group while they create a structure without speaking.
What the LEGO challenge brings to the table is a fun working example of working with stakeholders who might not be on the same page to solve problems. Also, it’s LEGO! Who doesn’t love LEGO!
LEGO Challenge #hyperisland #team A team-building activity in which groups must work together to build a structure out of LEGO, but each individual has a secret “assignment” which makes the collaborative process more challenging. It emphasizes group communication, leadership dynamics, conflict, cooperation, patience and problem solving strategy.
19. What, So What, Now What?
If not carefully managed, the problem identification and problem analysis stages of the problem-solving process can actually create more problems and misunderstandings.
The What, So What, Now What? problem-solving activity is designed to help collect insights and move forward while also eliminating the possibility of disagreement when it comes to identifying, clarifying, and analyzing organizational or work problems.
Facilitation is all about bringing groups together so that might work on a shared goal and the best problem-solving strategies ensure that teams are aligned in purpose, if not initially in opinion or insight.
Throughout the three steps of this game, you give everyone on a team to reflect on a problem by asking what happened, why it is important, and what actions should then be taken.
This can be a great activity for bringing our individual perceptions about a problem or challenge and contextualizing it in a larger group setting. This is one of the most important problem-solving skills you can bring to your organization.
W³ – What, So What, Now What? #issue analysis #innovation #liberating structures You can help groups reflect on a shared experience in a way that builds understanding and spurs coordinated action while avoiding unproductive conflict. It is possible for every voice to be heard while simultaneously sifting for insights and shaping new direction. Progressing in stages makes this practical—from collecting facts about What Happened to making sense of these facts with So What and finally to what actions logically follow with Now What . The shared progression eliminates most of the misunderstandings that otherwise fuel disagreements about what to do. Voila!
20. Journalists
Problem analysis can be one of the most important and decisive stages of all problem-solving tools. Sometimes, a team can become bogged down in the details and are unable to move forward.
Journalists is an activity that can avoid a group from getting stuck in the problem identification or problem analysis stages of the process.
In Journalists, the group is invited to draft the front page of a fictional newspaper and figure out what stories deserve to be on the cover and what headlines those stories will have. By reframing how your problems and challenges are approached, you can help a team move productively through the process and be better prepared for the steps to follow.
Journalists #vision #big picture #issue analysis #remote-friendly This is an exercise to use when the group gets stuck in details and struggles to see the big picture. Also good for defining a vision.
Problem-solving techniques for developing solutions
The success of any problem-solving process can be measured by the solutions it produces. After you’ve defined the issue, explored existing ideas, and ideated, it’s time to narrow down to the correct solution.
Use these problem-solving techniques when you want to help your team find consensus, compare possible solutions, and move towards taking action on a particular problem.
- Improved Solutions
- Four-Step Sketch
- 15% Solutions
- How-Now-Wow matrix
- Impact Effort Matrix
21. Mindspin
Brainstorming is part of the bread and butter of the problem-solving process and all problem-solving strategies benefit from getting ideas out and challenging a team to generate solutions quickly.
With Mindspin, participants are encouraged not only to generate ideas but to do so under time constraints and by slamming down cards and passing them on. By doing multiple rounds, your team can begin with a free generation of possible solutions before moving on to developing those solutions and encouraging further ideation.
This is one of our favorite problem-solving activities and can be great for keeping the energy up throughout the workshop. Remember the importance of helping people become engaged in the process – energizing problem-solving techniques like Mindspin can help ensure your team stays engaged and happy, even when the problems they’re coming together to solve are complex.
MindSpin #teampedia #idea generation #problem solving #action A fast and loud method to enhance brainstorming within a team. Since this activity has more than round ideas that are repetitive can be ruled out leaving more creative and innovative answers to the challenge.
22. Improved Solutions
After a team has successfully identified a problem and come up with a few solutions, it can be tempting to call the work of the problem-solving process complete. That said, the first solution is not necessarily the best, and by including a further review and reflection activity into your problem-solving model, you can ensure your group reaches the best possible result.
One of a number of problem-solving games from Thiagi Group, Improved Solutions helps you go the extra mile and develop suggested solutions with close consideration and peer review. By supporting the discussion of several problems at once and by shifting team roles throughout, this problem-solving technique is a dynamic way of finding the best solution.
Improved Solutions #creativity #thiagi #problem solving #action #team You can improve any solution by objectively reviewing its strengths and weaknesses and making suitable adjustments. In this creativity framegame, you improve the solutions to several problems. To maintain objective detachment, you deal with a different problem during each of six rounds and assume different roles (problem owner, consultant, basher, booster, enhancer, and evaluator) during each round. At the conclusion of the activity, each player ends up with two solutions to her problem.
23. Four Step Sketch
Creative thinking and visual ideation does not need to be confined to the opening stages of your problem-solving strategies. Exercises that include sketching and prototyping on paper can be effective at the solution finding and development stage of the process, and can be great for keeping a team engaged.
By going from simple notes to a crazy 8s round that involves rapidly sketching 8 variations on their ideas before then producing a final solution sketch, the group is able to iterate quickly and visually. Problem-solving techniques like Four-Step Sketch are great if you have a group of different thinkers and want to change things up from a more textual or discussion-based approach.
Four-Step Sketch #design sprint #innovation #idea generation #remote-friendly The four-step sketch is an exercise that helps people to create well-formed concepts through a structured process that includes: Review key information Start design work on paper, Consider multiple variations , Create a detailed solution . This exercise is preceded by a set of other activities allowing the group to clarify the challenge they want to solve. See how the Four Step Sketch exercise fits into a Design Sprint
24. 15% Solutions
Some problems are simpler than others and with the right problem-solving activities, you can empower people to take immediate actions that can help create organizational change.
Part of the liberating structures toolkit, 15% solutions is a problem-solving technique that focuses on finding and implementing solutions quickly. A process of iterating and making small changes quickly can help generate momentum and an appetite for solving complex problems.
Problem-solving strategies can live and die on whether people are onboard. Getting some quick wins is a great way of getting people behind the process.
It can be extremely empowering for a team to realize that problem-solving techniques can be deployed quickly and easily and delineate between things they can positively impact and those things they cannot change.
15% Solutions #action #liberating structures #remote-friendly You can reveal the actions, however small, that everyone can do immediately. At a minimum, these will create momentum, and that may make a BIG difference. 15% Solutions show that there is no reason to wait around, feel powerless, or fearful. They help people pick it up a level. They get individuals and the group to focus on what is within their discretion instead of what they cannot change. With a very simple question, you can flip the conversation to what can be done and find solutions to big problems that are often distributed widely in places not known in advance. Shifting a few grains of sand may trigger a landslide and change the whole landscape.
25. How-Now-Wow Matrix
The problem-solving process is often creative, as complex problems usually require a change of thinking and creative response in order to find the best solutions. While it’s common for the first stages to encourage creative thinking, groups can often gravitate to familiar solutions when it comes to the end of the process.
When selecting solutions, you don’t want to lose your creative energy! The How-Now-Wow Matrix from Gamestorming is a great problem-solving activity that enables a group to stay creative and think out of the box when it comes to selecting the right solution for a given problem.
Problem-solving techniques that encourage creative thinking and the ideation and selection of new solutions can be the most effective in organisational change. Give the How-Now-Wow Matrix a go, and not just for how pleasant it is to say out loud.
How-Now-Wow Matrix #gamestorming #idea generation #remote-friendly When people want to develop new ideas, they most often think out of the box in the brainstorming or divergent phase. However, when it comes to convergence, people often end up picking ideas that are most familiar to them. This is called a ‘creative paradox’ or a ‘creadox’. The How-Now-Wow matrix is an idea selection tool that breaks the creadox by forcing people to weigh each idea on 2 parameters.
26. Impact and Effort Matrix
All problem-solving techniques hope to not only find solutions to a given problem or challenge but to find the best solution. When it comes to finding a solution, groups are invited to put on their decision-making hats and really think about how a proposed idea would work in practice.
The Impact and Effort Matrix is one of the problem-solving techniques that fall into this camp, empowering participants to first generate ideas and then categorize them into a 2×2 matrix based on impact and effort.
Activities that invite critical thinking while remaining simple are invaluable. Use the Impact and Effort Matrix to move from ideation and towards evaluating potential solutions before then committing to them.
Impact and Effort Matrix #gamestorming #decision making #action #remote-friendly In this decision-making exercise, possible actions are mapped based on two factors: effort required to implement and potential impact. Categorizing ideas along these lines is a useful technique in decision making, as it obliges contributors to balance and evaluate suggested actions before committing to them.
27. Dotmocracy
If you’ve followed each of the problem-solving steps with your group successfully, you should move towards the end of your process with heaps of possible solutions developed with a specific problem in mind. But how do you help a group go from ideation to putting a solution into action?
Dotmocracy – or Dot Voting -is a tried and tested method of helping a team in the problem-solving process make decisions and put actions in place with a degree of oversight and consensus.
One of the problem-solving techniques that should be in every facilitator’s toolbox, Dot Voting is fast and effective and can help identify the most popular and best solutions and help bring a group to a decision effectively.
Dotmocracy #action #decision making #group prioritization #hyperisland #remote-friendly Dotmocracy is a simple method for group prioritization or decision-making. It is not an activity on its own, but a method to use in processes where prioritization or decision-making is the aim. The method supports a group to quickly see which options are most popular or relevant. The options or ideas are written on post-its and stuck up on a wall for the whole group to see. Each person votes for the options they think are the strongest, and that information is used to inform a decision.
All facilitators know that warm-ups and icebreakers are useful for any workshop or group process. Problem-solving workshops are no different.
Use these problem-solving techniques to warm up a group and prepare them for the rest of the process. Activating your group by tapping into some of the top problem-solving skills can be one of the best ways to see great outcomes from your session.
- Check-in/Check-out
- Doodling Together
- Show and Tell
- Constellations
- Draw a Tree
28. Check-in / Check-out
Solid processes are planned from beginning to end, and the best facilitators know that setting the tone and establishing a safe, open environment can be integral to a successful problem-solving process.
Check-in / Check-out is a great way to begin and/or bookend a problem-solving workshop. Checking in to a session emphasizes that everyone will be seen, heard, and expected to contribute.
If you are running a series of meetings, setting a consistent pattern of checking in and checking out can really help your team get into a groove. We recommend this opening-closing activity for small to medium-sized groups though it can work with large groups if they’re disciplined!
Check-in / Check-out #team #opening #closing #hyperisland #remote-friendly Either checking-in or checking-out is a simple way for a team to open or close a process, symbolically and in a collaborative way. Checking-in/out invites each member in a group to be present, seen and heard, and to express a reflection or a feeling. Checking-in emphasizes presence, focus and group commitment; checking-out emphasizes reflection and symbolic closure.
29. Doodling Together
Thinking creatively and not being afraid to make suggestions are important problem-solving skills for any group or team, and warming up by encouraging these behaviors is a great way to start.
Doodling Together is one of our favorite creative ice breaker games – it’s quick, effective, and fun and can make all following problem-solving steps easier by encouraging a group to collaborate visually. By passing cards and adding additional items as they go, the workshop group gets into a groove of co-creation and idea development that is crucial to finding solutions to problems.
Doodling Together #collaboration #creativity #teamwork #fun #team #visual methods #energiser #icebreaker #remote-friendly Create wild, weird and often funny postcards together & establish a group’s creative confidence.
30. Show and Tell
You might remember some version of Show and Tell from being a kid in school and it’s a great problem-solving activity to kick off a session.
Asking participants to prepare a little something before a workshop by bringing an object for show and tell can help them warm up before the session has even begun! Games that include a physical object can also help encourage early engagement before moving onto more big-picture thinking.
By asking your participants to tell stories about why they chose to bring a particular item to the group, you can help teams see things from new perspectives and see both differences and similarities in the way they approach a topic. Great groundwork for approaching a problem-solving process as a team!
Show and Tell #gamestorming #action #opening #meeting facilitation Show and Tell taps into the power of metaphors to reveal players’ underlying assumptions and associations around a topic The aim of the game is to get a deeper understanding of stakeholders’ perspectives on anything—a new project, an organizational restructuring, a shift in the company’s vision or team dynamic.
31. Constellations
Who doesn’t love stars? Constellations is a great warm-up activity for any workshop as it gets people up off their feet, energized, and ready to engage in new ways with established topics. It’s also great for showing existing beliefs, biases, and patterns that can come into play as part of your session.
Using warm-up games that help build trust and connection while also allowing for non-verbal responses can be great for easing people into the problem-solving process and encouraging engagement from everyone in the group. Constellations is great in large spaces that allow for movement and is definitely a practical exercise to allow the group to see patterns that are otherwise invisible.
Constellations #trust #connection #opening #coaching #patterns #system Individuals express their response to a statement or idea by standing closer or further from a central object. Used with teams to reveal system, hidden patterns, perspectives.
32. Draw a Tree
Problem-solving games that help raise group awareness through a central, unifying metaphor can be effective ways to warm-up a group in any problem-solving model.
Draw a Tree is a simple warm-up activity you can use in any group and which can provide a quick jolt of energy. Start by asking your participants to draw a tree in just 45 seconds – they can choose whether it will be abstract or realistic.
Once the timer is up, ask the group how many people included the roots of the tree and use this as a means to discuss how we can ignore important parts of any system simply because they are not visible.
All problem-solving strategies are made more effective by thinking of problems critically and by exposing things that may not normally come to light. Warm-up games like Draw a Tree are great in that they quickly demonstrate some key problem-solving skills in an accessible and effective way.
Draw a Tree #thiagi #opening #perspectives #remote-friendly With this game you can raise awarness about being more mindful, and aware of the environment we live in.
Each step of the problem-solving workshop benefits from an intelligent deployment of activities, games, and techniques. Bringing your session to an effective close helps ensure that solutions are followed through on and that you also celebrate what has been achieved.
Here are some problem-solving activities you can use to effectively close a workshop or meeting and ensure the great work you’ve done can continue afterward.
- One Breath Feedback
- Who What When Matrix
- Response Cards
How do I conclude a problem-solving process?
All good things must come to an end. With the bulk of the work done, it can be tempting to conclude your workshop swiftly and without a moment to debrief and align. This can be problematic in that it doesn’t allow your team to fully process the results or reflect on the process.
At the end of an effective session, your team will have gone through a process that, while productive, can be exhausting. It’s important to give your group a moment to take a breath, ensure that they are clear on future actions, and provide short feedback before leaving the space.
The primary purpose of any problem-solving method is to generate solutions and then implement them. Be sure to take the opportunity to ensure everyone is aligned and ready to effectively implement the solutions you produced in the workshop.
Remember that every process can be improved and by giving a short moment to collect feedback in the session, you can further refine your problem-solving methods and see further success in the future too.
33. One Breath Feedback
Maintaining attention and focus during the closing stages of a problem-solving workshop can be tricky and so being concise when giving feedback can be important. It’s easy to incur “death by feedback” should some team members go on for too long sharing their perspectives in a quick feedback round.
One Breath Feedback is a great closing activity for workshops. You give everyone an opportunity to provide feedback on what they’ve done but only in the space of a single breath. This keeps feedback short and to the point and means that everyone is encouraged to provide the most important piece of feedback to them.
One breath feedback #closing #feedback #action This is a feedback round in just one breath that excels in maintaining attention: each participants is able to speak during just one breath … for most people that’s around 20 to 25 seconds … unless of course you’ve been a deep sea diver in which case you’ll be able to do it for longer.
34. Who What When Matrix
Matrices feature as part of many effective problem-solving strategies and with good reason. They are easily recognizable, simple to use, and generate results.
The Who What When Matrix is a great tool to use when closing your problem-solving session by attributing a who, what and when to the actions and solutions you have decided upon. The resulting matrix is a simple, easy-to-follow way of ensuring your team can move forward.
Great solutions can’t be enacted without action and ownership. Your problem-solving process should include a stage for allocating tasks to individuals or teams and creating a realistic timeframe for those solutions to be implemented or checked out. Use this method to keep the solution implementation process clear and simple for all involved.
Who/What/When Matrix #gamestorming #action #project planning With Who/What/When matrix, you can connect people with clear actions they have defined and have committed to.
35. Response cards
Group discussion can comprise the bulk of most problem-solving activities and by the end of the process, you might find that your team is talked out!
Providing a means for your team to give feedback with short written notes can ensure everyone is head and can contribute without the need to stand up and talk. Depending on the needs of the group, giving an alternative can help ensure everyone can contribute to your problem-solving model in the way that makes the most sense for them.
Response Cards is a great way to close a workshop if you are looking for a gentle warm-down and want to get some swift discussion around some of the feedback that is raised.
Response Cards #debriefing #closing #structured sharing #questions and answers #thiagi #action It can be hard to involve everyone during a closing of a session. Some might stay in the background or get unheard because of louder participants. However, with the use of Response Cards, everyone will be involved in providing feedback or clarify questions at the end of a session.
Save time and effort discovering the right solutions
A structured problem solving process is a surefire way of solving tough problems, discovering creative solutions and driving organizational change. But how can you design for successful outcomes?
With SessionLab, it’s easy to design engaging workshops that deliver results. Drag, drop and reorder blocks to build your agenda. When you make changes or update your agenda, your session timing adjusts automatically , saving you time on manual adjustments.
Collaborating with stakeholders or clients? Share your agenda with a single click and collaborate in real-time. No more sending documents back and forth over email.
Explore how to use SessionLab to design effective problem solving workshops or watch this five minute video to see the planner in action!

Over to you
The problem-solving process can often be as complicated and multifaceted as the problems they are set-up to solve. With the right problem-solving techniques and a mix of creative exercises designed to guide discussion and generate purposeful ideas, we hope we’ve given you the tools to find the best solutions as simply and easily as possible.
Is there a problem-solving technique that you are missing here? Do you have a favorite activity or method you use when facilitating? Let us know in the comments below, we’d love to hear from you!

thank you very much for these excellent techniques

Certainly wonderful article, very detailed. Shared!

Your list of techniques for problem solving can be helpfully extended by adding TRIZ to the list of techniques. TRIZ has 40 problem solving techniques derived from methods inventros and patent holders used to get new patents. About 10-12 are general approaches. many organization sponsor classes in TRIZ that are used to solve business problems or general organiztational problems. You can take a look at TRIZ and dwonload a free internet booklet to see if you feel it shound be included per your selection process.
Leave a Comment Cancel reply
Your email address will not be published. Required fields are marked *

Going from a mere idea to a workshop that delivers results for your clients can feel like a daunting task. In this piece, we will shine a light on all the work behind the scenes and help you learn how to plan a workshop from start to finish. On a good day, facilitation can feel like effortless magic, but that is mostly the result of backstage work, foresight, and a lot of careful planning. Read on to learn a step-by-step approach to breaking the process of planning a workshop into small, manageable chunks. The flow starts with the first meeting with a client to define the purposes of a workshop.…

How does learning work? A clever 9-year-old once told me: “I know I am learning something new when I am surprised.” The science of adult learning tells us that, in order to learn new skills (which, unsurprisingly, is harder for adults to do than kids) grown-ups need to first get into a specific headspace. In a business, this approach is often employed in a training session where employees learn new skills or work on professional development. But how do you ensure your training is effective? In this guide, we'll explore how to create an effective training session plan and run engaging training sessions. As team leader, project manager, or consultant,…

Effective online tools are a necessity for smooth and engaging virtual workshops and meetings. But how do you choose the right ones? Do you sometimes feel that the good old pen and paper or MS Office toolkit and email leaves you struggling to stay on top of managing and delivering your workshop? Fortunately, there are plenty of online tools to make your life easier when you need to facilitate a meeting and lead workshops. In this post, we’ll share our favorite online tools you can use to make your job as a facilitator easier. In fact, there are plenty of free online workshop tools and meeting facilitation software you can…
Design your next workshop with SessionLab
Join the 150,000 facilitators using SessionLab
Sign up for free
- Skip to main navigation
- Skip to main content
- Skip to footer
- Work at NPC
- Our approach to pay
- Our trustees
- How we work
- How we are funded
- Hire our space
- Small charities
- Funders and philanthropists
- Impact investors
- Organisations we’ve worked with
- Our expertise
- Corporate Social Impact
- Effective philanthropy
- Impact investing
- Impact measurement, evaluation and data
- Strategy and leadership
Systems change
- Theory of change
- Trusteeship and governance
- User involvement
- Initiatives we’re working on
- Cost of living crisis
- Everyone’s environment
- Levelling Up
- Open philanthropy
- Starting to measure your impact
- Young people’s mental health
- Resource hub
- Newsletter signup
- Search Search Submit

Triple Loop Learning
Home » Resource hub » Systems Practice Toolkit » Triple Loop Learning
The triple loop learning model supports learning and reflection within teams and individuals. It highlights three modes of learning, as shown in the graphic below. Understanding these modes helps teams to reflect in different ways: from the day-to-day activities to the wider context in which they take place.
- Loop 1 helps problem-solving and course-correction, asking: ‘Are we doing things right?’.
- Loop 2 questions the assumptions a set of activities are based on, and asks: ‘Are we doing the right things?’ ( 1 ).
- Loop 3 questions the questions, and asks: ‘How do we decide what’s right’?
It digs into the underlying assumptions and values that shape the activities’ approach, inviting ‘ continual reflection on the learning process, the contexts within which learning occurs, and the assumptions and values motivating the learning’ . ( 2 )

Learning and systems change
Learning is a core systems practice. Tools 1 and 2 showed how working with complex problems requires testing, reflecting, and adapting, none of which is possible without embedding learning cultures and practices.
To support systemic change, learning needs to be embedded across that system. People from different parts of the system learning together can generate insights, ideas and solutions that lead to a richer understanding of complex issues and more innovative approaches to problem-solving.
Many different inputs, spaces and processes are needed for this, from centring lived experience and shared data to embedding feedback loops and decentralising decision-making.
The Learning section of our toolkit includes two tools: Triple Loop Learning, which supports team learning, and the Reflexive Practice Model, which supports individual learning.
Reflection isn’t new – “plan, do, review” has been with us forever and is arguably one of the most important human traits of all. The triple loop learning model sheds light on the different levels that we operate on in the 'review' element. It is a model that can help [actors] in any field have greater self-awareness and tap into deeper levels of questioning.
Alex Atkinson
A framework for learning
As shown in the diagram below, this framework actually has four loops – three learning loops and one ‘defensive reasoning’ loop. This first loop is not a learning loop as it is a loop of self-justification that blocks learning. The framework shows what is happening in each loop: its primary concern, the questions it poses, and the learning approach it enables.

Guidance for use
There are different versions of the Triple Loop Learning framework. This is a natural part of collective learning, as different people test and iterate concepts over time. Our version particularly draws on the work of systems practice consultant and academic, Joan O’Donnell , which itself draws on the original Double Loop Learning Framework created by Argyris and Schön. ( 3 )
The following rules of thumb can help guide your use of this framework:
- It’s non-judgmental: Everyone will find themselves in each of these loops at different times. While we might aspire to be strategic and enquiring at all times, sometimes we are in ‘reactive’ and even ‘defensive’ modes. This framework does not say that Single Loop Learning– the reactive mode– is intrinsically bad: course correction is a necessary part of day-to-day learning and improvement. The important thing is not to just stay in this loop and avoid the broader questions and enquiries in Loops 2 and 3. The aim should be to achieve balance between Loops 1, 2 and 3.
- It’s non-linear: Learning is never linear. Although there is a logic of moving from the micro-level daily details of Loop 1 out to the bigger picture questions of Loops 2 and 3, in reality we may do some Loop 2 reflections within Loop 1 conversations, or ask some Loop 3 questions within a Loop 2 strategy assessment. The purpose of this framework is to increase our consciousness of these different learning modes and so create spaces for them.
- Its use can be spontaneous or structured: The framework can be used in either a spontaneous or structured way. Sometimes you might bring the tool into a project review meeting to consider learning at different levels, or you might use it to intentionally structure and plan learning conversations, creating explicit spaces for the different loops at different points in your process.
- It can be used by individuals or teams: As well as the team uses described above, the framework can also be used as a personal reflection tool. You might print out the framework and think about when you might have found yourself in each of the loops. You might ask yourself some of the questions in Loops 2 and 3 to consider your own approaches to, or assumptions about, a situation.
Triple Loop Learning and System Change
Reflection allows us to consciously direct change. It helps us to understand the existing dynamics of change in a situation and our own role in and relationship to them. By doing this, we are more able to intentionally influence them. Triple loop learning encourages learners to reflect at different levels, and so be able to influence change within them.
The graphic below summarises the kind of change that each learning loop can facilitate.
- Loop 1: Reviewing actions to identify errors and improvements can lead to changing actions.
- Loop 2: Challenging assumptions about current actions and the course set can lead to changing approaches to situations.
- Loop 3: Challenging assumptions about the approach and the context in which the activities exist can change perspectives and opens the possibility of changing wider norms and structures.

Below we provide further detail on using the framework, along with examples of questions to ask, situations in which you might use these approaches, and potential changes that might happen as a result of using these tools.
Learning Loops Example
Loop: defensive.
Mode: Self-justifying: How do I / we protect my / our own interests?
Description: Although this is a loop, it is one that blocks learning. It avoids feedback and what it perceives as criticism. It believes that if it can convince others that its actions are correct then its position / status will be secure. This mode is often one born of insecurity and fear– the belief that accepting feedback and correction will undermine position, status or advantage.
Questions: How do I / we cover up flaws and ensure ‘business as usual’ continues? How can we present a positive picture at all times?
Example: A team in a youth charity seeking to reduce youth violence has not met the projected engagement targets for a funded project. Participant data is adjusted to meet the targets. Unaware of these issues, the funder accepts the project reports, and similarly presents the positive programme achievements to its stakeholders and funding is renewed. Although this may bring benefit in the short-term, this is unlikely to hold, and opportunities for learning about how engagement can be more effective will be inhibited.
Loop: Single
Mode: Reactive: Am I / are we doing it right?
Description: Single loop learning focuses on correcting actions and behaviours without questioning the fundamental assumptions or beliefs that underpin those actions. The emphasis is on problem-solving and achieving desired outcomes more efficiently through improvements in working practices and operations.
Questions: How do we correct errors or improve processes and practices to meet existing goals? What is contributing to achieving our goals and what is hindering them?
Example: The programme team use data to analyse how many young people they have reached, compared to their targets. They look at what engagement methods have been successful and haven’t, then decide to concentrate their resources on the more successful engagement approaches. In doing so, they are able to improve their engagement data. However, this reactive learning, which focuses mainly on the numbers, may miss opportunities to understand why unsuccessful approaches haven’t worked or to develop new approaches.
Possible changes: Higher numbers of young people are engaged.
Loop: Double
Mode: Reflective: Am I / are we doing the right things?
Description: Double-loop learning encourages learners to not only correct actions but also question the underlying assumptions that guide those actions. Rather than correcting course, it doesn’t assume the course previously set is itself correct. This compels teams to look harder at whether their actions offer the best chance of achieving their goals, and opens the possibility of exploring alternative approaches.
Questions: What assumptions are we making about how to achieve our goals? Are they correct? Do we need to try different approaches? What might they be?
Example: Here, the programme team question whether the activities they are offering are the right ones – they had previously assumed young people would want to come, but perhaps the problem is the activity itself. Perhaps young people aren’t interested. They consider their broader violence prevention goals and they engage young people in exploring what activities they might be more interested in attending, which could deliver the same overall outcomes. They may they do this as part of a strategy review process, for example.
Possible changes: Change in strategy and approach leading to possible innovations in youth engagement. Change in mentality and understanding about the drivers of violence affecting young people.
Loop: Triple
Mode: Subjective: How do we know what’s right?
Description: The third loop goes beyond actions to examine the context– the norms, structures, patterns– in which the actions occur. It questions the relationship between the actions taken and the wider context, how these contribute to each other and how patterns of behaviour are created. Loop 3 moves from a subject-object view of the team/ individual as the protagonist acting upon a situation/ group of people, to one acting with it. This engages those groups/ people in the process, shifting power relationships and democratising learning. In Loop 3 we are zooming out from our normal mental frameworks to question the situation and our agency, role and motives within it. This is deepening our reflective capacity.
Questions: Are our goals the right ones? Why have we set those goals? Are there other views on this problem/ situation or other goals that could be set? What are the wider norms and structures that are creating this problem? Are there ways in which we are contributing to it ourselves (perhaps unwittingly)? What role do we play in this system / situation? Are there different roles we should be playing? What do others think?
Example: In this loop, the programme team decide to establish ongoing reflection sessions. In these sessions, members are invited to reflect on what their experiences are telling them about youth violence in the local area and why it isn’t improving. This may lead them to question the basis for the actions and the approach they take. They bring in external perspectives, and again seek the perspectives of the young people themselves, to help develop a fuller picture of the issue. They consider what role they are playing and how they might use their role in a different way– considering how their activities might contribute more towards breaking cycles of violence.
- Circular organizing and triple loop learning: Romme and Van Witteloostuijn, Journal of Organizational Change Management , 1999.
- Beyond Agency and Structure: Triple-Loop Learning: Yuthas, K., Dillard J., Rogers R., Journal of Business Ethics , 2004.
- Argyris, C., & Schon, D. (1978). Organizational learning: A theory of action perspective
Blank Triple Loop Learning templates to download
- NPC Tool 7 Triple Loop Learning Table Blank
Systems Practice Toolkit
Related items.

The long journey home: designing better supported housing systems
By Seth Reynolds .
On 18 January 2024.
In this blog, Seth Reynolds, Principal: Systems Change at NPC, sets out the need for a systemic approach to tackling our supported housing crisis.

Closing the gap
By Seth Reynolds , and Naomi Chapman .
On 10 January 2024.
Building better child poverty prevention systems.

On 31 July 2018.
- Privacy Overview
- Strictly Necessary Cookies
This website uses cookies so that we can provide you with the best user experience possible. Cookie information is stored in your browser and performs functions such as recognising you when you return to our website and helping our team to understand which sections of the website you find most interesting and useful.
Strictly Necessary Cookie should be enabled at all times so that we can save your preferences for cookie settings.
If you disable this cookie, we will not be able to save your preferences. This means that every time you visit this website you will need to enable or disable cookies again.
Causal Loop Diagram (CLD)
Introduction to causal loop diagramming, the high-level cld for the world3 model, how to create clds for non-trivial problems, turning a cld into a system dynamics model, the limitations of causal loop diagrams.
A causal loop diagram (CLD) explains the behavior of a system by showing a collection of connected nodes and the feedback loops created by the connections. One or more of the nodes represent the symptoms of the problem. The rest of the nodes are the causal chains causing the problem.
The simplest possible CLD contains two nodes. Below is an example from video 3 in The Dueling Loops Video Series. The R signifies this is a reinforcing loop. The graph shows the loop's general behavior by showing the symptom of interest, population growth.

The insight is that problem symptoms are caused by certain key feedback loops. It follows that to solve a complex system problem you must first model its key feedback loops.
Now take a look at the same causal loop diagram transferred to a system dynamics simulation model .
All you need to draw CLDs is pencil and paper or a whiteboard. Below is an actual sketch of a CLD from my notebook on October 20, 2004. On the next notebook page this became The Race to the Bottom loop in the first version of the Dueling Loops model. (A solid arrow is a direct relationship. A dashed arrow is an inverse relationship.)

Let's walk the reinforcing loop, denoted by an “R.” As fallaciousness of arguments goes up, so does false attacks and false promises . As these increase, so does supporters due to falsehood . That in turn causes an increase in political power due to falsehood . Since the strategy of mass deception worked so well, that in turn increases the next round of fallaciousness of arguments and the loop starts all over again. Loop growth creates a social force. This loop increases the force of mass deception in the political powerplace. Note this force does not arise from individual nodes. It comes from the feedback loop. That is the key insight offered by causal loop diagramming. The tool allows you to find where the fundamental forces causing a problem are coming from.
Here's how causal loop diagramming works. A CLD consists of nodes, arrows, and feedback loops. The nodes on the one above are truth ratings, detected deception, false attacks, false promises , and so on. A node has a name and a value and represents something in the real world. What matters is not the exact value, but the value relative to what it was earlier or in relation to other nodes.
There are two types of arrows for showing how one node influences another. A solid arrow is a direct relationship , where the value of node A varies directly with the value of node B. A dashed arrow indicates an inverse relationship , where as the value of A goes up the value of B goes down, or vice versa.
There are two types of feedback loops: reinforcing and balancing. In a reinforcing feedback loop (designated R) a change in a node goes around the loop to cause a change in that same node in the same direction, which causes the loop to grow or decline. In a balancing feedback loop (designated B) the change is in the opposite direction, which causes the loop to balance its behavior as it seeks a goal of some kind.

Instead of Rs or Bs for loops, (+) and (-) are used. The lower left loop has a "(+)" in it. That's a positive or reinforcing loop. The book emphasized this loop, named Industrial Growth , was the key feedback loop pushing the human system beyond the limits of growth, and thus toward eventual collapse unless the sustainability problem was proactively solved.
Let's examine how this loop works. An increase in investment causes growth in industrial capital . Growth in that causes growth in industrial output. As output grows, more money is directed toward investment , and the loop starts over again. In this manner the Industrial Growth loop rapidly grows to huge amounts.
The environmental sustainability problem arises from the way growth in industrial output causes more pollution (as well as decreasing nonrenewable and renewable resources, not shown). The effect of pollution has a long delay, so there is no reason to solve the problem now in the minds of many people. It is only enlightened minds, those educated by insights from models like this, that can see the future before it happens and decide to commit to solving the problem proactively.
Wouldn't it be nice if a majority of the world's population could grasp the truth of this model and decide to aggressively solve the sustainability problem?
That is currently impossible due to high systemic change resistance .
Here's a simple process for doing this. First you structure your work by accumulating this information first, before you start drawing a CLD:
1. Model name , like The Vicious Cycle of Car Congestion in Cities .
2. The key output variables you want the model to explain, like Road Capacity and Congestion, and further description as necessary. Here capacity is in percent. 90% would be very congested. At 100% cars would be packed so closely together (touching) average speed would be zero. Congestion means low average car speed.
3. Problem symptoms. This describes the present behavior of the key output variables and describes the problem to solve. For example, Congestion remains subbornly high, even though plenty of Road Capacity has been built.
4. Dynamic hypothesis . Describe why the behavior of interest occurs in terms of feedback loops. Here the dynamic hypothesis is that when investment causes Road Capacity to increase, Congestion falls. But this attracts more cars. In a few years, Congestion and low average car speed are right back where they were before. This causes demand for more roads to reduce Congestion. A vicious cycle has occurred.
5. A list of the factors that probably must be in the model , given your knowledge of the problem. These might be Number of Cars and Investment in Road Capacity.
6. A list of factors that might be necessary , such as Public Pressure for More Road Capacity, City Area, Population, and so on.
Now you have a well-structured problem. How to create a CLD is now much easier, since the above steps essentially define your CLD Requirements . Try the steps below as you draw on paper, in a modeling tool such as Vensim (recommended, try their free Vensim PLE ), or in a diagramming tool such as Visio or Kumu .
The steps below for how to turn your requirements into a CLD are about the same as the steps for building a system dynamics model. The main differences are in addition to logical testing, you can use simulation testing, and each node has an equation.
1. Add the model name at the top.
2. Add the key output variables .
3. If there are causal relationships between any of these variables, add the arrows .
4. Now the hard part of synthesis begins. Tell yourself or those working with you a story of how the model works. What causes what? In particular, root cause analysis tells use to ask "Why does this occur?" Use your answers and the story to start adding nodes and connecting them to the nodes already on the model. Your list of factors should be useful here. Each node must have a carefully chosen name that clearly describes what it represents. Don't be afraid of long names.
5. As you add or change arrows, always identify the arrow as a direct or inverse relationship. In a direct relationship , a change in node A causes a change in node B in the same direction. In an indirect relationship , a change in node A causes a change in node B in the opposite direction. I personally prefer solid lines for direct and dashed lines for indirect. Others use + for direct and - for indirect. Include a delay mark on an arrow as necessary.
6. If you are thinking ahead to a systems dynamics model, it helps to identify the stocks as early as possible, since they are usually the backbone of the model. Indicate stocks with rectangles. Add the main stocks to the model as early as you can. Things that exist when a model is not running are stocks, such as Population and Number of Cars.
7. Continue and strive to get your first feedback loop created as soon as possible. Now walk the loop all the way around. Tell a story of how each node influences the next node. Verify the loop makes sense. Determine if it's a reinforcing or balancing loop. Give the loop a carefully chosen name, one that describes the main effect of the loop. Add the loop name and a symbol for reinforcing or balancing (R or B). Arrange the arrows to give the loop a rounded, smooth shape.
8. Iterate with steps 4 through 7 until done. Strive for a well-organized model that's easy to read.
Now suppose we built the CLD for The Vicious Cycle of Car Congestion in Cities using the above process. The result might look like this:

We've made some changes from the variable names we wrote down earlier, in order to arrive at a diagram that made sense. Road Capacity is a city's road system, so it's a stock. Number of Cars could also be a stock, but to keep things simple it's not. The key to the model is the two loops.
Starting at Congestion Percent, as congestion goes up, people put pressure on their local government for more road capacity. Plus the government puts pressure on themselves to keep their citizens happy. This pressure increase Road Investment, which after a delay increases Road Capacity.
Now the model gets interesting. The increase in capacity causes two things. One is it causes congestion to go DOWN. This inverse relationship is shown by the dashed arrow, and creates the balancing loop of More Road Capacity. The second result is that as capacity goes up, Number of Cars also goes up. More people who were not commuting via car before now switch to cars. This causes congestion to go UP and creates the More Cars reinforcing loop. The result is Pressure for More Road Capacity also goes up, and the More Road Capacity loop starts all over again. The two loops form the Fixes that Fail pattern.
Next, if we converted the CLD into a system dynamics model using Vensim, we might get one that looks like this:

We had to add nodes to turn the CLD into a system dynamics model. There were 5 nodes in the CLD but 18 in the system dynamics model, which contains much more detail.
The three turquoise nodes are lookup tables. These are used to calculate the effect of one variable on another, using a curve. The model is running, so you can see the sliders for the eight constants. These can be adjusted to change the graphs in real time. Calibrating the model to an actual city would require measured data for the contants and graphs of actual behavior for the lookup tables.
Because of the delay the behavior is cyclic. The vicious cycle is never escaped, causing Road Capacity to continually overshoot and come back down. This causes a ripple effect on the other variables.
The dynamic hypothesis of a vicious cycle was confirmed. The insight is that the conventional solution of build more roads to reduce congestion doesn't work. Some other solution strategy must be used instead. One way to begin to find these solutions would be to expand the model using root cause analysis. Why do people choose cars instead of other forms of transport? We can ask inspect-the-system questions like: Why in some countries do people vastly prefer motorcycles and mopeds to cars? See the graph below. ( source , page 25)

Issue 1. Inspection - Note that inspection of the CLD cannot reveal if cyclic behavior would occur or not. The delay might cause only slow adjustment to addition of more Road Capacity. Or it might cause cyclic behavior. Nor could inspection of the CLD tell how long the cycles might be. Here they are about 35 years apart. How does that relate to a delay of only 10 years? You cannot tell from the CLD. You could also look at the CLD and ask: An increase in Road Capacity causes congestion to go UP if you travel one arrrow, but it causes congestion to go DOWN if you travel the other arrow. Why don't these cancel each other out and cause no change in congestion? The CLD offers no clue to this puzzle, while the system dynamics model explains this easily. It's because of the 4 factors used to calculate Number of Cars, in addition to Road Capacity.
The structural cause of the overshoot cycles is identical to many other cases of overshoot. Overshoot cycles are common. For example, Jared Diamond, in Collapse How Societies Choose to Fail or Succeed , 2005, page 546, reported that:
"Ancient Greece went through cycles of environmental problems and re-covery, at intervals of about 400 years. In each cycle, human population built up, forests were cut down, hillsides were terraced to reduce erosion, and dams were built to minimize siltation in the valley bottoms. Eventually in each cycle, the terraces and dams became overwhelmed, and the region had to be abandoned or suffered a drastic decrease in population and in societal complexity, until the landscape had recovered sufficiently to permit a further population buildup."
Issue 2. Hidden flaws - As you create a CLD it helps tremendously to think ahead to the system dynamics model it will or could become. This avoids the error of a CLD that intuitively makes sense to the average person, but to a modeler (and by comparison to the real world) has flaws. It's impossible or impractical for some reason. For example, Food causes Population to grow but no Population Limit is included. Nothing can grow forever, so it's an impossible model. If it's a trivial model, limits can be omitted.
Issue 3. Missing key concept - Or a key concept could be missing. For example, if more Congestion causes Road Capacity to increase, how does that actually occur? There's a missing node(s). It should be something like more Congestion causes Public Pressure for More Road Capacity causes Road Investment causes Road Capacity to increase. It's okay to omit concepts that don't matter much, like contants and intermediate variables. It's very hard to tell if a key concept is missing in a CLD, because a CLD lacks equations and the ability to simulate the behavior of the model, in order to test to see if the model's behavior agrees with the real world.
Issues 1, 2, and 3 above illustrate some of the limitations of CLDs compared to system dynamics modeling. There are many more. In general, CLDs should not be relied on for deep correct insights to how difficult problems behave. At most they can generate some possibly correct insights. The more difficult and complex the problem, the less likely these insights are to be complete and correct. This issue is examined in a 2001 paper on Maps and models in system dynamics: a response to Coyle . It's main point is:
"Our purpose in this paper is to review the roles of qualitative maps [CLDs] and simulation models in system dynamics, and to argue that simulation — following established system dynamics methodology — can add value beyond mapping [CLDs] alone in most cases. This argument rests upon two points that have been demonstrated repeatedly in the laboratory and in real life: first, that one cannot reliably draw inferences from complex causal maps without simulation and, second, that system dynamics is well suited for addressing issues associated with soft variables and incomplete data."
Hard and soft variables refer to the constants and lookup tables in a model, as well as variables calculated by the model, such as the way people's lifespans change. Hard variables are things that are easily measured and for which data is available. " Soft variables , in contrast, are those for which numerical metrics and data are not available, including factors such as goals, perceptions, and expectations." (Quote from John Sterman's Business Dynamics: Systems Thinking and Modeling for a Complex World , 2000, page 853.)
If a CLD represents a high-level view of a system dynamics model, then it doesn't have to be fully correct, since it's an architecture model. It shows the main pieces of the model and their relationships. Large system dynamics models require high-level models for their structure to be understood, such as the high-level CLD for the World3 model shown above.
is simulation modeling. The type of simulation modeling that seems to fit the sustainability problem and our problem solving process the best is system dynamics .

“All events in life are the results, the outcomes, of previous events. Life itself is a collage of ecological cycles, all intertwining, mingling, ever-evolving chains of cause-and-effect relationships. Likewise, every problem we analyze is the product of a definable cause-and-effect system.
“It stands to reason, then, that identifying that system's components—the major factors—and how they interact to produce the problem is essential to effective problem solving.
The chapter then lists “ The Five Steps of Causal Flow Diagramming:
Step 1. Identify the major factors Step 2. Identify cause-and-effect relationships Step 3. Characterize the relationships as direct or indirect Step 4. Diagram the relationships Step 5. Analyze the behavior of the relationships as an integrated system.”

Start your reading here:
Mastering the Science of Striking at the Root

Analysis is the breaking down of a problem into smaller easier to solve problems. Exactly how this is done determines the strength of your analysis.
You will see powerful techniques used in this analysis that are missing from what mainstream environmentalism has tried. This explains why a different outcome can be expected.
The key techniques are proper subproblem decomposition and root cause analysis .
The analysis was performed over a seven year period from 2003 to 2010. The results are summarized in the Summary of Analysis Results , the top of which is shown below:

Click on the table for the full table and a high level discussion of analysis results.

This is the solution causal chain present in all problems. Popular approaches to solving the sustainability problem see only what's obvious: the black arrows. This leads to using superficial solutions to push on low leverage points to resolve intermediate causes .
Popular solutions are superficial because they fail to see into the fundamental layer, where the complete causal chain runs to root causes . It's an easy trap to fall into because it intuitively seems that popular solutions like renewable energy and strong regulations should solve the sustainability problem. But they can't, because they don't resolve the root causes.
In the analytical approach, root cause analysis penetrates the fundamental layer to find the well hidden red arrow. Further analysis finds the blue arrow. Fundamental solution elements are then developed to create the green arrow which solves the problem. For more see Causal Chain in the glossary.
First the analysis divided the sustainability problem into four subproblems. Then each subproblem was individually analyzed. For an overview see The Four Subproblems of the Sustainability Problem .

This is no different from what the ancient Romans did. Its a strategy of divide and conquer. Subproblems like these are several orders of magnitude easier to solve because you are no longer trying (in vain) to solve them simultaneously without realizing it. This strategy has changed millions of other problems from insolvable to solvable, so it should work here too.
For example, multiplying 222 times 222 in your head is for most of us impossible. But doing it on paper, decomposing the problem into nine cases of 2 times 2 and then adding up the results, changes the problem from insolvable to solvable.

Change resistance is the tendency for a system to resist change even when a surprisingly large amount of force is applied.
Overcoming change resistance is the crux of the problem, because if the system is resisting change then none of the other subproblems are solvable. Therefore this subproblem must be solved first. Until it is solved, effort to solve the other three subproblems is largely wasted effort.
The root cause of successful change resistance appears to be effective deception in the political powerplace. Too many voters and politicians are being deceived into thinking sustainability is a low priority and need not be solved now.
The high leverage point for resolving the root cause is to raise general ability to detect political deception. We need to inoculate people against deceptive false memes because once people are infected by falsehoods, its very hard to change their minds to see the truth.

Life form improper coupling occurs when two social life forms are not working together in harmony.
In the sustainability problem, large for-profit corporations are not cooperating smoothly with people. Instead, too many corporations are dominating political decision making to their own advantage, as shown by their strenuous opposition to solving the environmental sustainability problem.
The root cause appears to be mutually exclusive goals. The goal of the corporate life form is maximization of profits, while the goal of the human life form is optimization of quality of life, for those living and their descendents. These two goals cannot be both achieved in the same system. One side will win and the other side will lose. Guess which side is losing?
The high leverage point for resolving the root cause follows easily. If the root cause is corporations have the wrong goal, then the high leverage point is to reengineer the modern corporation to have the right goal.

Solution model drift occurs when a problem evolves and its solution model doesnt keep up. The model drifts away from whats needed to keep the problem solved.
The worlds solution model for solving important problems like sustainability, recurring wars, recurring recessions, excessive economic inequality, and institutional poverty has drifted so far its unable to solve the problem.
The root cause appears to be low quality of governmental political decisions. Various steps in the decision making process are not working properly, resulting in inability to proactively solve many difficult problems.
This indicates low decision making process maturity. The high leverage point for resolving the root cause is to raise the maturity of the political decision making process.

In the environmental proper coupling subproblem the worlds economic system is improperly coupled to the environment. Environmental impact from economic system growth has exceeded the capacity of the environment to recycle that impact.
This subproblem is what the world sees as the problem to solve. The analysis shows that to be a false assumption, however. The change resistance subproblem must be solved first.
The root cause appears to be high transaction costs for managing common property (like the air we breath). This means that presently there is no way to manage common property efficiently enough to do it sustainably.
The high leverage point for resolving the root cause is to allow new types of social agents (such as new types of corporations) to appear, in order to radically lower transaction costs.
There must be a reason popular solutions are not working.
Given the principle that all causal problems arise from their root causes, the reason popular solutions are not working (after over 40 years of millions of people trying) is popular solutions do not resolve root causes.
This is Thwink.orgs most fundamental insight.

Using the results of the analysis as input, 12 solutions elements were developed. Each resolves a specific root cause and thus solves one of the four subproblems, as shown below:

Click on the table for a high level discussion of the solution elements and to learn how you can hit the bullseye.
The solutions you are about to see differ radically from popular solutions, because each resolves a specific root cause for a single subproblem. The right subproblems were found earlier in the analysis step, which decomposed the one big Gordian Knot of a problem into The Four Subproblems of the Sustainability Problem .

Everything changes with a root cause resolution approach. You are no longer firing away at a target you cant see. Once the analysis builds a model of the problem and finds the root causes and their high leverage points, solutions are developed to push on the leverage points.
Because each solution is aimed at resolving a specific known root cause, you can't miss. You hit the bullseye every time. It's like shooting at a target ten feet away. The bullseye is the root cause. That's why Root Cause Analysis is so fantastically powerful.

Nine Sample Solution Elements
1. Freedom from Falsehood
2. The Truth Test
3. Politician Truth Ratings
4. Politician Corruption Ratings
5. No Servant Secrets
6. Corporation 2.0 Suffix
7. Servant Responsibility Ratings
8. Sustainability Index
9. Quality of Life Index
The high leverage point for overcoming change resistance is to raise general ability to detect political deception. We have to somehow make people truth literate so they cant be fooled so easily by deceptive politicians.
This will not be easy. Overcoming change resistance is the crux of the problem and must be solved first, so it takes nine solution elements to solve this subproblem. The first is the key to it all.

In this subproblem the analysis found that two social life forms, large for-profit corporations and people, have conflicting goals. The high leverage point is correctness of goals for artificial life forms. Since the one causing the problem right now is Corporatis profitis , this means we have to reengineer the modern corporation to have the right goal.
Corporations were never designed in a comprehensive manner to serve the people. They evolved. What we have today can be called Corporation 1.0. It serves itself. What we need instead is Corporation 2.0. This life form is designed to serve people rather than itself. Its new role will be that of a trusted servant whose goal is providing the goods and services needed to optimize quality of life for people in a sustainable manner.
Solution element: Corporation 2.0
Whats drifted too far is the decision making model that governments use to decide what to do. Its incapable of solving the sustainability problem.

The high leverage point is to greatly improve the maturity of the political decision making process. Like Corporation 1.0, the process was never designed. It evolved. Its thus not quite what we want.
The solution works like this: Imagine what it would be like if politicians were rated on the quality of their decisions. They would start competing to see who could improve quality of life and the common good the most. That would lead to the most pleasant Race to the Top the world has ever seen.
Solution element: Politician Decision Ratings
Presently the worlds economic system is improperly coupled to the environment. The high leverage point is allow new types of social agents to appear to radically reduce the cost of managing the sustainability problem.
This can be done with non-profit stewardship corporations. Each steward would have the goal of sustainably managing some portion of the sustainability problem. Like the way corporations charge prices for their goods and services, stewards would charge fees for ecosystem service use. The income goes to solving the problem.
Corporations gave us the Industrial Revolution. That revolution is incomplete until stewards give us the Sustainability Revolution.
Solution element: Common Property Rights

Cutting Through Complexity: The Engineers Guide to Solving Difficult Social Problems with Root Cause Analysis
This presents our research results, including SIP, analysis of the environmental sustainability problem, and twelve sample solution elements.

The Dueling Loops of the Political Powerplace: Why Progressives Are Stymied and How They Can Find Their Way Again
This analyzes the worlds standard political system and explains why its operating for the benefit of special interests instead of the common good. Several sample solutions are presented to help get you thwinking.
Change Resistance as the Crux (journal paper)
Solving Problems with Root Cause Analysis (journal paper)
Democratic Backsliding (working paper)
Striking at the Root with Common Property Rights
Preventing the Death of Democracy
The Trump Phenomenon
The Powell Memo
What Is an Analytical Approach?
Root Cause Analysis: How It Works at Thwink.org
Bridging the Sustainability Gap with Common Property Rights
It's best to start with the first one and watch them all in sequence.
1. Overview of the Dueling Loops , 11 min
Part 1. Basic Concepts of Systems Thinking and the Problem
2. Discovery of the Sustainability Problem by LTG Project , 6 min 3. The Basic Concept of Feedback Loops, with Pop Growth , 9 min 4. How Simulation Models Work, with Pop Growth , 10 min 5. The Importance of Structural Thinking, 3 types , 8 min
Part 2. Deriving the Dueling Loops Shape from Past System Behavior
6. What Jared Diamonds Collapse Book Attempted to Do , 6 min 7. Extracting the Competitive Spiral from Collapse , 8 min 8. The Two Fundamental Loops of All Political Systems , 5 min 9. The Four Loop Model of Why Some Societies Collapsed , 7 min 10. The Basic Dueling Loops Shape , 15 min
Part 3. How the Basic Dueling Loops Simulation Model Works
11. The Race to the Bottom Simulation Model , 6 min 12. The Five Main Types of Political Deception , 18 min
The Democracy in Crisis Film Series
Introduction to the WorldChange Model , 27 min
Adding Change Resistance to IGMs , 29 min
Part 1. Introduction to Common Property Rights , 15 min
Part 2. The 7 Components of Common Property Rights , 23 min
Truth or Deception , 10 min
The Progressive Paradox Film , 123 min
Introduction to Analytical Activism , 48 min

Abstraction
Agent Based Modeling
Analytical Activism
Analytical Approach
Analytical Method
Best Practice
Broken Political System Problem
Causal Chain
Causal Loop Diagram
Change Resistance
Classic Activism
Competition
Competitive Advantage
Competitive Exclusion Principle
Complex Social System
Cooperation
Cycle of Acceptance
DISMALL Problems
Dueling Loops
Economic Sustainability
Emergent Behavior
Environmental Sustainability
Environmentalism 2.0
Event Oriented Thinking
Feedback Loop
Fundamental Attribution Error
Fundamental Solution
Intermediate Cause
Intuitive Process Trap
Law of Root Causes
Laws of Root Cause Analysis
Leverage Point
Malthusian Trap
MECE Issue Trees
Model Based Analysis
Model Crisis
Model Drift
Model Revolution
More of the Truth
New Dominant Life Form
Normal Science
Paradigm Change
Principle of Cumulative Adv.
Process Driven Problem Solving
Proper Coupling
Root Cause Analysis
Scientific Method
Social Agent
Social Force Diagrams
Social Sustainability
Superficial Solution
Sustainability
System Dynamics
System Improvement Process
Systems Thinking
Three Pillars of Sustainability

The glossary is the foundation for the entire website. It defines the conceptual framework required to "move toward higher levels" of thinking.

Meet the Thwinkers
How You Can Help
What Does Thwink Have to Offer?
Democratic Backsliding (active)
Politician Truth Ratings (inactive)
Atlanta Analytical Activists (inactive)
The Forum (inactive)
The World of Simulation

About Thwink.org
One way to get started is The Common Property Rights Project .
This can be done by switching to Root Cause Analysis , which will lead to Environmentalism 2.0 .
Kaizen is about changing the way things are. If you assume that things are all right the way they are, you can’t do kaizen. So change something! —Taiichi Ohno
Inspect and Adapt
Inspect & adapt: overview.

The Inspect and Adapt (I&A) is a significant event held at the end of each PI, where the current state of the Solution is demonstrated and evaluated. Teams then reflect and identify improvement backlog items via a structured problem-solving workshop.
The Agile Manifesto emphasizes the importance of continuous improvement through the following principle: “At regular intervals, the team reflects on how to become more effective, then tunes and adjusts its behavior accordingly.”
In addition, SAFe includes ‘relentless improvement’ as one of the four SAFe Core Values as well as a dimension of the Continuous Learning Culture core competency. While opportunities to improve can and should occur continuously throughout the PI (e.g., Iteration Retrospectives ), applying some structure, cadence, and synchronization helps ensure that there is also time set aside to identify improvements across multiple teams and Agile Release Trains .
All ART stakeholders participate along with the Agile Teams in the I&A event. The result is a set of improvement backlog items that go into the ART Backlog for the next PI Planning event. In this way, every ART improves every PI. A similar I&A event is held by Solution Trains .
The I&A event consists of three parts:
PI System Demo
- Quantitative and qualitative measurement
- Retrospective and problem-solving workshop
Participants in the I&A should be, wherever possible, all the people involved in building the solution. For an ART, this includes:
- The Agile teams
- Release Train Engineer (RTE)
- System and Solution Architects
- Product Management , Business Owners , and other stakeholders
Additionally, Solution Train stakeholders may also attend this event.
The PI System Demo is the first part of the I&A, and it’s a little different from the regular system demos after every iteration. This demo shows all the Features the ART has developed during the PI. Typically the audience is broader; for example, Customers or Portfolio representatives are more likely to attend this demo. Therefore, the PI system demo tends to be a little more formal, and extra preparation and setup are usually required. But like any other system demo, it should be timeboxed to an hour or less, with the level of abstraction high enough to keep stakeholders actively engaged and providing feedback.
Before or as part of the PI system demo, Business Owners collaborate with each Agile Team to score the actual business value achieved for each of their Team PI Objectives , as illustrated in Figure 1.
The achievement score is calculated by separately totaling the business value for the plan and actual columns. The uncommitted objectives are not included in the total plan. However, they are part of the total actual. Then divide the actual total by the planned total to calculate the achievement score illustrated in Figure 1.
Quantitative and Qualitative Measurement
In the second part of the I&A event, teams collectively review any quantitative and qualitative metrics they have agreed to collect, then discuss the data and trends. In preparation for this, the RTE and the Solution Train Engineer are often responsible for gathering the information, analyzing it to identify potential issues, and facilitating the presentation of the findings to the ART.
Each team’s planned vs. actual business value is rolled up to create the ART predictability measure, as shown in Figure 2.
Reliable trains should operate in the 80–100 percent range; this allows the business and its external stakeholders to plan effectively. (Note: Uncommitted objectives are excluded from the planned commitment. However, they are included in the actual business value achievement, as can also be seen in Figure 1.)
Retrospective
The teams then run a brief (30 minutes or less) retrospective to identify a few significant issues they would like to address during the problem-solving workshop . There is no one way to do this; several different Agile retrospective formats can be used [3].
Based on the retrospective and the nature of the problems identified, the facilitator helps the group decide which issues they want to tackle. Each team may work on a problem, or, more typically, new groups are formed from individuals across different teams who wish to work on the same issue. This self-selection helps provide cross-functional and differing views of the problem and brings together those impacted and those best motivated to address the issue.
Key ART stakeholders—including Business Owners, customers, and management—join the retrospective and problem-solving workshop teams. The Business Owners can often unblock the impediments outside the team’s control.
Problem-Solving Workshop
The ART holds a structured, root-cause problem-solving workshop to address systemic problems. Root cause analysis provides a set of problem-solving tools used to identify the actual causes of a problem rather than just fixing the symptoms. The RTE typically facilitates the session in a timebox of two hours or less.
Figure 3 illustrates the steps in the problem-solving workshop.
The following sections describe each step of the process.
Agree on the Problem(s) to Solve
American inventor Charles Kettering is credited with saying that “a problem well stated is a problem half solved.” At this point, the teams have self-selected the problem they want to address. But do they agree on the details of the problem, or is it more likely that they have differing perspectives? To this end, the teams should spend a few minutes clearly stating the problem, highlighting the ‘what,’ ‘where,’ ‘when,’ and ‘impact’ as concisely as possible. Figure 4 illustrates a well-written problem statement.
Perform Root Cause Analysis
Effective problem-solving tools include the fishbone diagram and the ‘5 Whys.’ Also known as an Ishikawa Diagram , a fishbone diagram is a visual tool to explore the causes of specific events or sources of variation in a process. Figure 5 illustrates the fishbone diagram with a summary of the previous problem statement written at the head of the ‘fish.’
For our problem-solving workshop, the main bones often start with the default categories of people, processes, tools, program, and environment. However, these categories should be adapted as appropriate.
Team members then brainstorm causes that they think contribute to solving the problem and group them into these categories. Once a potential cause is identified, its root cause is explored with the 5 Whys technique. By asking ‘why’ five times, the cause of the previous cause is uncovered and added to the diagram. The process stops once a suitable root cause has been identified, and the same process is then applied to the next cause.
Identify the Biggest Root Cause
Pareto Analysis, also known as the 80/20 rule, is used to narrow down the number of actions that produce the most significant overall effect. It uses the principle that 20 percent of the causes are responsible for 80 percent of the problem. It’s beneficial when many possible courses of action compete for attention, which is almost always the case with complex, systemic issues.
Once all the possible causes-of-causes are identified, team members then cumulatively vote on the item they think is the most significant factor contributing to the original problem. They can do this by dot voting. For example, each person gets five votes to choose one or more causes they think are most problematic. The team then summarizes the votes in a Pareto chart, such as the example in Figure 6, which illustrates their collective consensus on the most significant root cause.
Restate the New Problem
The next step is to pick the cause with the most votes and restate it clearly as a problem. Restating it should take only a few minutes, as the teams clearly understand the root cause.
Brainstorm Solutions
At this point, the restated problem will start to imply some potential solutions. The team brainstorms as many possible corrective actions as possible within a fixed timebox (about 15–30 minutes). The rules of brainstorming apply here:
- Generate as many ideas as possible
- Do not allow criticism or debate
- Let the imagination soar
- Explore and combine ideas
Create Improvement Backlog Items
The team then cumulatively votes on up to three most viable solutions. These potential solutions are written as improvement stories and features, planned in the following PI Planning event. During that event, the RTE helps ensure that the relevant work needed to deliver the identified improvements is planned. This approach closes the loop, thus ensuring that action will be taken and that people and resources are dedicated as necessary to improve the current state.
Following this practice, problem-solving becomes routine and systematic, and team members and ART stakeholders can ensure that the train is solidly on its journey of relentless improvement.
Inspect and Adapt for Solution Trains
The above describes a rigorous approach to problem-solving in the context of a single ART. If the ART is part of a Solution Train, the I&A event will often include key stakeholders from the Solution Train. In larger value streams, however, an additional Solution Train I&A event may be required, following the same format.
Due to the number of people in a Solution Train, attendees at the large solution I&A event cannot include everyone, so stakeholders are selected that are best suited to address the problems. This subset of people consists of the Solution Train’s primary stakeholders and representatives from the various ARTs and Suppliers .
Last update: 22 January 2023
Privacy Overview
- Shop Card Decks
- Video Libary
Engineering , Leadership , User experience , User experience , Product management
Problem-Solving Workshop
A collaborative learning environment designed to help participants develop skills to identify and solve problems. product glossary problem-solving workshop also called: problem-solving session and problem-solving exercise see also: how might we , hypothesis statement , premortem , problem statement , six thinking hats , swot analysis , affinity diagram , circles method , design thinking , jobs-to-be-done framework (jtbd) relevant metrics: attendance and engagement, pre- and post-workshop assessments, goal achievement, participant satisfaction, knowledge retention, application of skills, networking and collaboration, and commitment to continuous improvement in this article what is a problem-solving workshop.
A Problem-Solving Workshop is a collaborative event in which a group of people come together to identify and solve a problem. It is a structured process that involves brainstorming, analyzing, and developing solutions to a problem. A problem-solving workshop is a rapid session that helps you:
- Unlocking the Core of the Issue . A problem-solving workshop serves as an accelerated session designed to delve into the underlying cause of a dilemma, enabling participants to better comprehend its complexities.
- Generate ideas . With a deeper understanding of the problem at hand, participants rapidly brainstorm potential solutions. They then carefully assess these ideas, ensuring their feasibility and effectiveness in addressing the issue.
- Evaluating ideas . Participants scrutinize their proposed ideas, determining their robustness and ability to withstand potential challenges to ensure that only the most viable and reliable solutions are considered for implementation, enhancing the likelihood of successfully resolving the problem.
- Make a plan to test or implement . Equipped with a well-rounded perspective and carefully evaluated solutions, the workshop empowers attendees to devise a strategic plan for testing or implementing their chosen resolution, ultimately guiding them toward the ideal solution to their problem.
The workshop typically begins with a discussion of the problem and its context. Participants then brainstorm potential solutions and evaluate them based on their feasibility and potential impact. After the brainstorming session, the group works together to develop a plan of action to address the problem. This plan may include changes to existing processes, new procedures, or other solutions.
The Problem-Solving Workshop is an effective way to identify and solve problems in the context of Product Management and User Experience. It allows for a collaborative approach to problem-solving, which can lead to more creative and effective solutions. It also allows for a structured approach to problem-solving, which can help ensure that the problem is addressed in a timely and efficient manner.
Where did Problem-Solving Workshops come from?
The idea of coming together to solve problems can be traced back to ancient human societies that held gatherings to discuss issues and find solutions. In modern times, problem-solving workshops have been shaped by developments in various fields like psychology, education, management, design, and innovation.
Some significant influences on problem-solving workshops include:
- Brainstorming . Alex Osborn, an advertising executive, introduced brainstorming in the 1940s as a group creativity technique to generate ideas and solve problems. This method encouraged people to share their ideas freely, no matter how wild, and suspend judgment during the idea-generation process. Brainstorming has since been incorporated into many problem-solving workshops.
- Quality circles . In the 1960s, Japanese companies introduced quality circles, which are small groups of employees who meet regularly to discuss and solve work-related problems. These circles aimed to improve the quality of products and processes by involving employees in problem-solving and decision-making. The concept of quality circles has inspired many problem-solving workshops in various industries.
- Design thinking . The design thinking methodology, pioneered by companies like IDEO and Stanford University’s d.school, has played a crucial role in shaping modern problem-solving workshops. Design thinking is a human-centered approach to problem-solving that encourages empathy, experimentation, and collaboration. It involves a series of steps, such as empathizing, defining, ideating, prototyping, and testing, which can be adapted to various problem-solving workshop formats.
- Lean and Agile methodologies . Lean and Agile methodologies, which originated in the manufacturing and software development sectors, respectively, have also influenced problem-solving workshops. These approaches emphasize collaboration, continuous improvement, and rapid iteration to achieve better results.
- Facilitation techniques . The growth of professional facilitation has also impacted problem-solving workshops. Skilled facilitators use various tools and techniques to guide groups through problem-solving processes, ensuring that the workshop’s objectives are met and that participants stay engaged and focused.
Why should I conduct a problem-solving workshop?
Conducting a problem-solving exercise can be beneficial in several ways. It can help individuals or teams to:
- Identify the root cause of a problem . By engaging in a structured problem-solving exercise, participants can gain a deeper understanding of the issue and identify the underlying causes.
- Generate new ideas and solutions . By brainstorming and evaluating various solutions, individuals or teams can develop creative and effective solutions that they may not have thought of otherwise.
- Encourage collaboration and teamwork . Collaborative problem-solving exercises can foster a sense of teamwork and create a shared sense of ownership and responsibility for the problem and the solution.
- Improve decision-making . By evaluating various options and considering different perspectives, participants can make informed and effective decisions that take into account a wide range of factors.
- Enhance learning and development . Problem-solving exercises can provide opportunities for individuals or teams to learn new skills, practice critical thinking, and develop problem-solving abilities that can be applied to future challenges.
How to run a problem-solving workshop
Step 1: assemble a well-rounded team.
Gather individuals with diverse backgrounds, skill sets, and perspectives who are relevant to the problem at hand. This may include team members, cross-functional collaborators, subject matter experts, or stakeholders. A diverse group will enhance the ideation process and facilitate a more comprehensive understanding of the issue.
Consider the following factors:
- Diversity . Assemble a team with a mix of expertise, backgrounds, perspectives, and roles relevant to the problem. Diversity encourages creative thinking and helps avoid groupthink or blind spots.
- Relevant stakeholders . Ensure that key stakeholders, including decision-makers, subject matter experts, and those directly affected by the problem, are included in the workshop. Their insights and buy-in are crucial for the success of the proposed solutions.
- Size of the group . Aim for a group size that allows for effective collaboration and communication. Ideally, the group should be large enough to generate a variety of ideas but small enough to facilitate productive discussions. Typically, a group of 6-10 participants is considered optimal for a problem-solving workshop.
- Team dynamics . Select participants who are open-minded, willing to collaborate, and capable of engaging in constructive discussions. The right balance of personalities is essential for fostering a positive atmosphere and effective teamwork.
- Establish clear roles . Assign roles and responsibilities to participants, such as a facilitator to guide the workshop, a timekeeper to monitor progress, and a note-taker to document key points and decisions. Clearly defined roles help ensure the smooth flow of the workshop.
- Preparation . Communicate the workshop’s purpose, goals, and expectations to participants beforehand. Encourage them to familiarize themselves with the problem and come prepared with any relevant data or insights. This will enable a more focused and productive discussion during the workshop.
Step 2: Establish the Objective and Scope
Clearly define the purpose and goals of the workshop. Ensure that all participants understand the problem to be addressed, its context, and any constraints or limitations. Set a time limit for the workshop to maintain focus and efficiency.
Consider the following:
- Preparation and research . A facilitator should be well-prepared with a thorough understanding of the problem, its context, and the workshop’s objectives. This may involve conducting research, reviewing relevant materials, and consulting with key stakeholders or subject matter experts beforehand.
- Active listening . Practice active listening during the workshop to ensure participants feel heard and understood. Encourage questions and clarifications to address any misunderstandings or ambiguities regarding the problem, scope, or objectives.
- Flexibility and adaptability . Be prepared to adjust the workshop’s objectives or scope if new information or insights emerge during the discussion. Maintain an open-minded approach and adapt to the needs of the group while ensuring that the workshop remains focused and productive.
- Time management . Monitor the workshop’s progress and allocate time appropriately for each stage. If necessary, intervene to refocus the discussion, maintain momentum, or transition to the next step in the problem-solving process.
Each of the following workshop exercises can contribute to the success of establishing a clear objective and scope by helping participants gain a deeper understanding of the problem, its context, and the needs of those affected, leading to a clearer definition of the objective and scope:
- Six Thinking Hats . This exercise, developed by Edward de Bono, encourages participants to approach the problem from six different perspectives, represented by metaphorical “hats.” These perspectives are: facts and information (white hat), emotions and feelings (red hat), cautious and critical thinking (black hat), optimistic and positive thinking (yellow hat), creative and alternative thinking (green hat), and process and organization (blue hat). This technique can help the group establish a more comprehensive understanding of the problem, its context, and potential constraints, leading to a clearer definition of the objective and scope.
- Stakeholder Mapping . In this exercise, participants identify and analyze the key stakeholders involved in or affected by the problem. This helps the group understand the different perspectives, priorities, and needs of these stakeholders, providing valuable context for the problem-solving process. By considering stakeholder needs and concerns, the workshop can better define the objective and scope while ensuring that potential solutions address relevant issues.
- Empathy Mapping . This exercise helps participants gain insight into the needs, motivations, and challenges of the individuals affected by the problem, such as customers, users, or team members. By creating an empathy map, the group can better understand the problem from the perspective of those who are directly impacted. This understanding can help the group establish a clearer and more focused objective and scope for the workshop, ensuring that potential solutions address the most critical concerns of the affected individuals.
Step 3: Identify the Right Problem and Root Cause
Begin the workshop by collectively discussing the problem to gain a deeper understanding of its nuances. Use techniques like the 5 Whys or Fishbone Diagram to identify the root cause of the problem, ensuring that the team’s efforts are directed towards solving the underlying issue rather than merely addressing symptoms.
Approach this step with a well-defined strategy that guides participants through the process of understanding the problem and its underlying factors. The facilitator plays a pivotal role in creating an environment that encourages open and honest dialogue, allowing participants to share their insights and collectively work towards identifying the root cause.
Strike a balance between allowing sufficient time for discussions and ensuring that the workshop maintains momentum and stays on track. The facilitator may need to intervene occasionally to refocus the conversation or steer the group towards the desired outcome.
Be prepared to adapt to the evolving dynamics of the workshop. They must be flexible and responsive to new insights or challenges that emerge during the discussions. If necessary, the facilitator may need to adjust the workshop’s objectives, scope, or methodology to ensure that the group remains focused on addressing the problem’s root cause.
Consider using one of these workshop exercises to identify the right problem:
- Five Whys . This technique involves asking “Why?” repeatedly to dig deeper into the problem and uncover the root cause. By using this approach in the workshop, participants can move beyond surface-level symptoms to identify the true source of the issue. The facilitator can guide the group through the Five Whys exercise, ensuring that the discussion stays focused and productive.
- Fishbone Diagram . Also known as the Ishikawa or cause-and-effect diagram, this tool visually represents the relationship between a problem and its potential causes. Participants brainstorm and categorize potential causes into distinct branches, which can help the group identify the root cause. The facilitator can lead the group through the Fishbone Diagram exercise, encouraging them to consider various aspects of the problem and promoting a comprehensive understanding.
- Round Robin . This brainstorming technique involves giving each participant a chance to contribute an idea or perspective on the problem in a structured and organized manner. This ensures equal participation and helps to gather diverse insights. Using the Round Robin method, the facilitator can facilitate discussions on the problem’s root cause by encouraging participants to share their thoughts and perspectives without interruption.
- Force Field Analysis . This exercise helps participants identify the driving and restraining forces that influence a problem. By analyzing these forces, the group can gain a deeper understanding of the underlying factors contributing to the issue. The facilitator can guide participants through the Force Field Analysis, helping them to identify and assess the various forces at play and facilitating discussions on how these forces might relate to the root cause of the problem.
Step 4: Generate Ideas to Solve the Problem
Encourage participants to brainstorm solutions, emphasizing the importance of open-mindedness and creativity. Utilize techniques like mind mapping, round-robin, or the six thinking hats to foster an environment conducive to idea generation. Ensure that all participants have an opportunity to share their thoughts, and discourage judgment or criticism during this stage.
Make sure that all participants feel comfortable sharing their ideas, no matter how unconventional they may seem. This requires the facilitator to create a non-judgmental and supportive atmosphere that promotes inclusivity and equal participation.
One critical aspect for the facilitator is the use of various brainstorming techniques and ideation exercises that can stimulate creative thinking and encourage diverse perspectives. By employing a mix of individual and group activities, the facilitator can cater to different thinking styles and preferences, ensuring that everyone contributes to the ideation process.
These workshop exercises are great for generating ideas to solve the problem you identified:
- Mind Mapping . This technique helps to visually organize information around a central concept, allowing participants to generate ideas in a structured manner. It encourages them to think about the problem from different perspectives and make connections between seemingly unrelated ideas, which can lead to creative solutions.
- Crazy Eights . In this exercise, participants are given eight minutes to sketch out eight different ideas on a piece of paper. The time constraint forces them to think quickly and encourages them to generate a wide variety of ideas. By sharing and discussing their sketches afterward, the group can build upon each other’s ideas and develop more innovative solutions.
- Reverse Brainstorming . This technique prompts participants to think about the problem from an opposite perspective, by asking them to come up with ways to make the situation worse. By challenging conventional thinking, reverse brainstorming helps uncover new insights and approaches that may not have been considered otherwise.
- How Might We . This exercise frames the problem as an open-ended question, starting with the phrase “How might we…?”. This positive and optimistic framing encourages participants to think creatively and generate ideas without constraints. The open-ended nature of the question also promotes collaboration, as participants can build on each other’s ideas to find innovative solutions.
- Forced Analogy . In this exercise, participants are asked to draw analogies between the problem at hand and unrelated objects or scenarios. This encourages them to think about the problem from a new perspective and come up with creative ideas that they may not have considered otherwise. The forced analogy technique can reveal hidden connections and inspire innovative solutions.
- SCAMPER . This is an acronym for Substitute, Combine, Adapt, Modify, Put to another use, Eliminate, and Reverse. Participants are prompted to think about the problem and generate ideas using each of these seven approaches. The SCAMPER technique encourages participants to look at the problem from different angles and find unique solutions.
Step 5: Evaluate and Refine Ideas
Once a range of potential solutions has been generated, evaluate their robustness and viability. Encourage participants to consider potential challenges, drawbacks, and risks associated with each idea. Use a decision matrix, SWOT analysis, or other evaluation tools to help compare and prioritize the proposed solutions.
Seek to create an environment where participants feel comfortable sharing their opinions and ideas while also being open to constructive feedback. The facilitator must balance encouragement and critical thinking, promoting an atmosphere where ideas are assessed objectively, and their merits and drawbacks are examined thoroughly.
Be aware of any biases, power imbalances, or dominant personalities that may influence the evaluation process. By skillfully navigating these dynamics, the facilitator can ensure that all voices are heard and that the evaluation process remains objective and fair.
These workshop exercises are great for evaluating and refining ideas.
- SWOT Analysis . This exercise requires participants to analyze the strengths, weaknesses, opportunities, and threats associated with each proposed solution. By conducting a SWOT Analysis, the group can thoroughly evaluate the viability and potential impact of each idea, identifying potential challenges and opportunities.
- Pros and Cons . In this exercise, participants list the advantages and disadvantages of each proposed solution. This method encourages participants to think critically about the potential outcomes of each idea, enabling the group to make a more informed decision.
- Poster Session . In this exercise, each proposed solution is presented on a poster, and participants are given time to review and provide feedback on each idea. The Poster Session promotes thoughtful consideration of each solution and allows for open discussion and collaborative evaluation.
- Plus/Delta . This exercise involves participants identifying the positive and negative aspects of an idea or solution. It can help to refine ideas by focusing on the strengths and weaknesses of each one.
- Affinity Mapping . This exercise involves grouping similar ideas together and can help to identify common themes and patterns. It can help to refine ideas by clarifying the relationships between different solutions.
- Assumptions Collection . This exercise involves identifying assumptions that have been made about the problem or solution and testing them to see if they are valid. It can help to refine ideas by identifying any flawed assumptions and correcting them.
- Force Field Analysis . This exercise involves identifying the forces that are supporting and opposing a proposed solution. It can help to refine ideas by addressing the barriers and challenges that need to be overcome for the solution to be successful.
By incorporating these workshop exercises, participants can thoroughly evaluate the proposed ideas to ensure they are robust and viable. These
Step 6: Select the Best Solution
As a group, decide on the most promising solution(s) based on the evaluation process. Discuss the reasoning behind the selection and ensure that all participants are on board with the decision.
To promote objectivity, encourage the use of predefined criteria or frameworks for evaluating the proposed solutions. By providing a structured approach to decision-making, participants will be better equipped to weigh the pros and cons of each idea, ultimately leading to a more informed choice.
This will also help you maintain a neutral stance throughout the selection process, allowing the group to discuss and debate the merits of each solution without bias. As a facilitator, your goal is to ensure that the group focuses on the problem at hand and avoids getting sidetracked by personal preferences or interpersonal conflicts.
If you see that the group is struggling to reach a consensus, you might need to guide them toward a decision. By summarizing the key points of the discussion and highlighting the most promising solutions, the facilitator can help the group make a well-informed decision that best addresses the problem.
The following workshop exercises are great for facilitating the selection process:
- Dot Voting . This method helps participants prioritize solutions by giving them a limited number of dots or stickers that they can distribute among the proposed ideas. The solutions with the most votes are considered the most promising and can be further discussed or refined.
- Fist to Five . This technique allows the group to quickly gauge the level of support for each solution. Participants indicate their level of agreement by raising a certain number of fingers (1 to 5), with five fingers signifying strong support. The solutions with the highest average scores are deemed the most favorable.
- Stack Ranking . In this exercise, participants rank the proposed solutions in order of preference, assigning a unique position to each idea. The facilitator then tallies the rankings and determines the overall order of preference for the group. This helps identify the top solutions based on collective input.
- Trade-off Sliders . This method encourages participants to consider the pros and cons of each solution by using sliders to represent various criteria, such as cost, time, or quality. Participants adjust the sliders to visually represent the trade-offs they are willing to make, and the facilitator synthesizes the results to identify the most viable solutions.
- SWOT Analysis . By evaluating each solution’s strengths, weaknesses, opportunities, and threats, participants can gain a comprehensive understanding of the potential outcomes and risks associated with each idea. This structured analysis helps the group make a more informed decision about which solution is best suited to address the problem.
- Decision Matrix . The facilitator creates a matrix with the proposed solutions as rows and the evaluation criteria as columns. Participants then score each solution based on how well it meets the criteria. The solution with the highest total score is considered the best option. This method promotes objective decision-making and allows for a clear comparison of the proposed solutions.
- Priority Mapping . This technique involves visually mapping ideas based on their importance and urgency. By using Priority Mapping, the group can quickly identify the most critical and time-sensitive ideas, ensuring that the most pressing solutions are prioritized for implementation.
Step 7: Develop a Plan for Implementation or Testing
With the chosen solution(s) in hand, create a detailed plan outlining the steps required for implementation or testing. Assign responsibilities, establish deadlines, and set milestones to ensure accountability and progress. Consider creating a pilot project or running tests to validate the effectiveness of the solution before a full-scale implementation.
Seek to guide the group in setting realistic timelines and defining clear roles and responsibilities. This involves promoting open communication, ensuring that everyone’s input is valued, and addressing any concerns that may emerge.
You might also consider to spend time establishing key metrics for monitoring success and setting up checkpoints to evaluate the success of the implementation, enabling the team to learn from their experiences and iterate on the solution as necessary.
The following workshop exercises work great for exploring an creating an implementation plan.
- Project timeline . A project timeline is an effective way to help the team map out the key milestones, tasks, and deadlines involved in implementing the chosen solution. It allows the team to visualize the project’s overall progress and identify potential issues that may arise during the implementation process.
- Future-Back Planning . Future-Back Planning is a technique that helps the team envision what success will look like in the future and work backward to identify the necessary steps to achieve that success. This approach can help the team develop a clear vision and strategy for implementing the solution.
- RACI Matrix . A RACI Matrix is a tool that can be used to clarify roles and responsibilities during the implementation process. It helps ensure that each team member understands their role in the project and can help prevent confusion or misunderstandings.
- Dependency Map . A Dependency Map is a visual tool that helps the team identify the interdependencies between different tasks or components of the project. This can help the team develop a more realistic and feasible plan for implementing the solution.
- Sailboat . The Sailboat exercise can be used to help the team identify potential obstacles or challenges that may arise during the implementation process. It involves visualizing the solution as a sailboat and identifying the factors that may help or hinder its progress towards the desired destination. This exercise can help the team proactively address any potential roadblocks and develop a plan to overcome them.
Step 8: Follow Up and Iterate
After the workshop, monitor the progress of the solution’s implementation or testing. Gather feedback, evaluate results, and make any necessary adjustments or refinements. Encourage open communication among participants, and consider scheduling follow-up meetings to review progress and address any emerging challenges.
The solution that was chosen may need to be adjusted or refined based on feedback or unexpected challenges that arise. As a facilitator, you should encourage team members to share their thoughts and ideas and foster an environment where experimentation and iteration are encouraged.
Find ways celebrate successes and acknowledge the efforts of the team throughout the process. This can help maintain morale and motivation for continued improvement and innovation.
Typical pitfalls when running a Problem-Solving Workshop
- Finding the Right Facilitator . Finding a facilitator who is knowledgeable and experienced in problem-solving techniques can be a challenge. It is important to find someone who can effectively lead the workshop and ensure that all participants are engaged and productive.
- Establishing Clear Goals . Establishing clear goals for the workshop is essential for its success. Without a clear understanding of the objectives, it can be difficult to ensure that the workshop is productive and successful.
- Creating an Engaging Environment . Creating an engaging environment for the workshop is key to its success. Participants need to feel comfortable and be able to focus on the task at hand.
- Managing Time . Time management is essential for a successful workshop. It is important to ensure that the workshop is structured in a way that allows for productive discussion and problem-solving.
- Ensuring Participation . Ensuring that all participants are actively engaged in the workshop is essential. It is important to create an environment where everyone feels comfortable to contribute and share their ideas.
Google is known for its commitment to fostering a culture of innovation and continuous improvement. The company regularly conducts workshops, hackathons, and brainstorming sessions to encourage creative problem-solving among employees. Google’s “20% time” policy, which allowed employees to dedicate 20% of their time to side projects, has led to the development of successful products like Gmail and Google Maps.
IDEO, a global design consultancy, is renowned for its human-centered, collaborative approach to problem-solving called “design thinking.” The company conducts workshops, both internally and for clients, to tackle complex challenges and create innovative solutions. This approach has helped IDEO to develop breakthrough products, such as the Apple mouse and the Palm V PDA.
Procter & Gamble (P&G)
P&G is a consumer goods company that has leveraged problem-solving workshops and open innovation programs to drive growth. They have held workshops and innovation sessions, such as the “Clay Street Project,” where cross-functional teams come together to tackle complex challenges and create new products. The company’s innovation initiatives have resulted in successful products like Swiffer, Febreze, and Mr. Clean Magic Eraser.
LEGO, the toy company known for its iconic plastic bricks, has used problem-solving workshops to foster innovation and drive business growth. The company has employed design thinking workshops to explore new product ideas and refine existing ones. LEGO’s commitment to problem-solving and innovation has led to the creation of successful product lines such as LEGO Mindstorms, LEGO Architecture, and LEGO Ideas.
- What is the purpose of the workshop?
- What are the objectives of the workshop?
- Who will be attending the workshop?
- What topics will be covered in the workshop?
- What methods will be used to facilitate problem-solving?
- What is the expected outcome of the workshop?
- How will the success of the workshop be measured?
- What is the timeline for the workshop?
- What is the budget for the workshop?
You might also be interested in reading up on:
- How Might We
- Hypothesis Statement
- Problem Statement
- Six Thinking Hats
- SWOT Analysis
- Affinity Diagram
- CIRCLES Method
- Design Thinking
- Jobs-To-Be-Done Framework (JTBD)
- Tim Brown @tceb62
- Tom Kelley @TomKelley74
- Jeanne Liedtka @jeanneliedtka
- Tendayi Viki @tendayiviki
- Dave Gray @davegray
- Lateral Thinking : Creativity Step by Step by Edward de Bono (1970)
- Thinkertoys : A Handbook of CreativeThinking Techniques by Michael Michalko (1991)
- Problem Solving and Decision Making : A Guide for Managers by Barry K. Baines (2000)
- The 5 Elements of Effective Thinking by Edward B. Burger and Michael Starbird (2012)
- Six Thinking Hats by Edward de Bono (1985)
- Innovation Games : Creating Breakthrough Products Through Collaborative Play by Luke Hohmann (2006)
- Gamestorming by Dave Gray (2010)
Want to learn more?
Receive a hand picked list of the best reads on building products that matter every week. Curated by Anders Toxboe. Published every Tuesday.
No spam! Unsubscribe with a single click at any time.
Community events Product Loop
Product Loop provides an opportunity for Product professionals and their peers to exchange ideas and experiences about Product Design, Development and Management, Business Modelling, Metrics, User Experience and all the other things that get us excited.
- Become a mentee
- Become a mentor
- Product Management glossary
- User Experience glossary
- Product playbooks
- Product & UX video library
- Privacy Policy
- Terms and Conditions
- Code of Ethics
Made with in Copenhagen, Denmark
Want to learn more about about good product development, then browse our product playbooks .
IMAGES
VIDEO
COMMENTS
Causal loop diagrams are a powerful systems thinking tool for visually mapping complex systems' variables. Enabling the identification of reinforcing and balancing feedback loops that drive system behaviors and outcomes. These provide a holistic problem perspective by revealing the underlying systemic structures and root causes .
A reinforcing loop shows exponential growth (or decay); a balancing loop tends to produce oscillation or movement toward equilibrium. 4. Talk Through the Loop. Once you have completed the causal loop diagram, it is wise to walk through the loops and "tell the story," to be sure the loops capture the behavior being described.
To perform a cause-and-effect analysis, follow these steps. 1. Start with a problem statement. The problem statement is usually placed in a box or another shape at the far right of your page. Draw a horizontal line, called a "spine" or "backbone," along the center of the page pointing to your problem statement. 2.
Problem Solving: They assist in identifying root causes of problems and exploring potential solutions. Key Concepts and Elements of Causal Loop Diagrams 1. Variables. Variables are the key elements in a CLD. They represent quantities or attributes within the system that can change over time.
08 July 2019. Causal Loop Diagrams (CLDs) are a useful tool in the kitbag of any systems practiotioner. They are used to make our mental models explicit so they can be shared, challenged and understood. CLDs enable us to capture the parts, connections and feedback in a system. They can be used to build consensus, agree definitions, identify ...
Cause Loop Diagram Example - Pizza House. Causal loops diagrams (also known as system thinking diagrams) are used to display the behavior of cause and effect from a system's standpoint. Fishbone diagrams may elicit the categories of causes that impact a problem. Causal loops show the interrelation causes and their effects.
The OODA Loop is a Model that summarizes the Problem-Solving Process in 4 simple Steps. Its name is an acronym for the 4 Steps it Proposes: Observe: Analyze the Problem and Collect as much data as Possible. Orient: Study the Data and find different ways to tackle the Problem.
Identifying a system's major variables, their cause and effect relationships and their behavior as a system is key to a deeper understanding of what causes the problems and the influencing variables that could offer an opportunity to solve them. Causal Loop Diagrams allow to do just that in a very structured, simple and intuitive way.
Problem-Solving Flowcharts is a graphical representation used to break down problem or process into smaller, manageable parts, identify the root causes and outline a step-by-step solution. It helps in visually organizing information and showing the relationships between various parts of the problem. This type of flowcharts consists of different ...
System Thinking is a common concept for understanding ho w causal relationships. and feedbacks work in an everyday problem. Understanding a cause and an effect. enables us to analyse, sort out and ...
The causal loop diagram template is a robust resource designed to visualize complex interrelationships within systems. By providing an organized framework, this template enables the in-depth exploration of interactions, promoting a comprehensive understanding of systems and helping in effective problem-solving.
Learn how to use Systems Diagrams - a useful problem-solving technique for finding out how complex systems work. ... We show an external factor as a labeled relationship arrow pointing to the appropriate part of the systems diagram. 6. Gaps. In our reinforcing loop example above we related sales of theater seats to investment in productions ...
4/ Leave to sit for 2 mins. 4/ Remove teabag. 5/ Add milk. 6/ Add sugar. 7/ Stir. So our problem solving flow chart needs to examine each of those steps to determine where the failure has occurred. We'll add a question shape (diamond), connect out problem statement to it using an arrow to check if we boiled the kettle.
Causal loop diagrams (CLDs) are a powerful consultant's tool for dealing with complex problems. Such problems are characterized by both content complexity and process complexity (Rittel & Webber, 1973; Vermaak, 2009). Content complexity refers to problems being multidimensional and ambiguous, with many interrelated aspects and feedback ...
6. Discovery & Action Dialogue (DAD) One of the best approaches is to create a safe space for a group to share and discover practices and behaviors that can help them find their own solutions. With DAD, you can help a group choose which problems they wish to solve and which approaches they will take to do so.
1. Define the problem. Diagnose the situation so that your focus is on the problem, not just its symptoms. Helpful problem-solving techniques include using flowcharts to identify the expected steps of a process and cause-and-effect diagrams to define and analyze root causes.. The sections below help explain key problem-solving steps.
Identify the people, information (data), and things needed to resolve the problem. Step. Description. Step 3: Select an Alternative. After you have evaluated each alternative, select the alternative that comes closest to solving the problem with the most advantages and fewest disadvantages.
In this blog post, I'll touch on these five tools, from the House of Lean: Ishikawa Diagramming. Causal Loop Diagramming. A3 Problem Solving. Hoshin Kanri. Value Stream Mapping. The tools that I ...
Loop 1 helps problem-solving and course-correction, asking: 'Are we doing things right?'. Loop 2 questions the assumptions a set of activities are based on, ... As shown in the diagram below, this framework actually has four loops - three learning loops and one 'defensive reasoning' loop. This first loop is not a learning loop as it ...
A causal loop diagram (CLD) explains the behavior of a system by showing a collection of connected nodes and the feedback loops created by the connections. One or more of the nodes represent the symptoms of the problem. The rest of the nodes are the causal chains causing the problem.. The simplest possible CLD contains two nodes. Below is an example from video 3 in The Dueling Loops Video Series.
The eight disciplines (8D) model is a problem solving approach typically employed by quality engineers or other professionals, and is most commonly used by the automotive industry but has also been successfully applied in healthcare, retail, finance, government, and manufacturing. The purpose of the 8D methodology is to identify, correct, and ...
The Inspect and Adapt (I&A) is a significant event held at the end of each PI, where the current state of the Solution is demonstrated and evaluated. Teams then reflect and identify improvement backlog items via a structured problem-solving workshop. The Agile Manifesto emphasizes the importance of continuous improvement through the following ...
The Problem-Solving Workshop is an effective way to identify and solve problems in the context of Product Management and User Experience. It allows for a collaborative approach to problem-solving, which can lead to more creative and effective solutions. It also allows for a structured approach to problem-solving, which can help ensure that the ...