- Ablebits blog
- Excel formulas

Excel Data Validation: custom formulas and rules

The tutorial shows how to make custom Data Validation rules in Excel. You will find a few examples of E xcel data validation formulas to allow only numbers or text values in specific cells, or only text beginning with specific characters, permit unique data preventing duplicates, and more.
In yesterday's tutorial we started to look at Excel Data Validation - what its purpose is, how it works, and how to use built-in rules to validate data in your worksheets. Today, we are going to take a step further and talk about the nitty-gritty aspects of custom data validation in Excel as well as experiment with a handful of different validation formulas.
How to create custom data validation with formula
Microsoft Excel has several built-in data validation rules for numbers, dates and text, but they cover only the most basic scenarios. If you want to validate cells with your own criteria, create a custom validation rule based on a formula. Here's how:
- Select one or more cells to validate.
- Open the Data Validation dialog box. For this, click the Data Validation button on the Data tab, in the Data Tools group or press the key sequence Alt > D > L (each key is to be pressed separately).
- On the Settings tab of the Data Validation dialog window, select Custom in the Allow box, and enter your data validation formula in the Formula box.

Optionally, you can add a custom input message and Error alert that will show up when the user selects the validated cell or enters invalid data, respectively.
Below you will find a few examples of custom validation rules for different data types.
Note. All Excel data validation rules, built-in and custom, verify only new data that is typed in a cell after creating the rule. Copied data is not validated, nor is the data input in the cell before making the rule. To pin down existing entries that do not meet your data validation criteria, use the Circle Invalid Data feature as shown in How to find invalid data in Excel .
Excel data validation to allow numbers only
Surprisingly, none of the inbuilt Excel data validation rules cater for a very typical situation when you need to restrict users to entering only numbers in specific cells. But this can be easily done with a custom data validation formula based on the ISNUMBER function, like this one:
=ISNUMBER(C2)

Note. The ISNUMBER function allows any numeric values in validated cells, including integers, decimals, fractions as well as dates and times, which are also numbers in terms of Excel.
Excel data validation to allow text only
If you are looking for the opposite - to allow only text entries in given range of cells, then build a custom rule with the ISTEXT function, for example:
=ISTEXT(D2)

Allow text beginning with specific character(s)
If all values in a certain range should begin with a particular character or substring, then do Excel data validation based on the COUNTIF function with a wildcard character:
For example, to ensure that all order id's in column A begin with the "AA-", "aa-", "Aa-", or "aA-" prefix (case-insensitive), define a custom rule with this data validation formula:

Validation formula with the OR logic (multiple criteria)
In case there are 2 or more valid prefixes, add up several COUNTIF functions, so that your Excel data validation rule works with the OR logic:

Case-sensitive validation formula
If the character case matters, then use EXACT in combination with the LEFT function to create a case-sensitive validation formula for entries beginning with specific text:
For instance, to allow only those order ids that begin with "AA-" (neither "aa-" nor "Aa-" is allowed), use this formula:
=EXACT(LEFT(A2,3),"AA-")

Allow entries containing certain text
To allow entries that contain specific text anywhere in a cell (in the beginning, middle, or end), use the ISNUMBER function in combination with either FIND or SEARCH depending on whether you want case-sensitive or case-insensitive match:
- Case-sensitive validation: ISNUMBER(FIND( text , cell ))
On our sample data set, to permit only entries containing the text "AA" in cells A2:A6, use one of these formulas:
Case-insensitive:
=ISNUMBER(SEARCH("AA", A2))
Case-sensitive:
=ISNUMBER(FIND("AA", A2))
The formulas work with the following logic:

Data validation to allow only unique entries and disallow duplicates
In situations when a certain column or a range of cell should not contain any duplicates, configure a custom data validation rule to allow only unique entries. For this, we are going to use the classic COUNTIF formula to identify duplicates :
For example, to make sure that only unique order ids are input in cells A2 to A6, create a custom rule with this data validation formula:
=COUNTIF($A$2:$A$6, A2)<=1
When a unique value is entered, the formula returns TRUE and the validation succeeds. If the same value already exists in the specified range (count greater than 1), COUNTIF returns FALSE and the input fails validation.

Note. This data validation formulas is case-insensitive , it does not distinguish uppercase and lowercase text.
Validation formulas for dates and times
Inbuilt date validation provides quite a lot of predefined criteria to restrict users to entering only dates between the two dates you specify, greater than, less than, or equal to a given date.
If you want more control over data validation in your worksheets, you can replicate the inbuilt functionality with a custom rule or write your own formula that goes beyond the built-in capabilities of Excel data validation.
Allow dates between two dates
To limit the entry to a date within a specified range, you can use either the predefined Date rule with the "between" criteria or make a custom validation rule with this generic formula:
- cell is the topmost cell in the validated range, and
- start and end dates are valid dates supplied via the DATE function or references to cells containing the dates.
For example, to allow only dates in the month of July of the year 2017, use the following formula:
=AND(C2>=DATE(2017,7,1),C2<=DATE(2017,7,31))
Or, enter the start date and end date in some cells ( F1 and F2 in this example), and reference those cells in your formula:
=AND(C2>=$F$1, C2<=$F$2)

Allow weekdays or weekends only
To restrict a user to entering only weekdays or weekends, configure a custom validation rule based on the WEEKDAY function.
With the return_type argument set to 2, WEEKDAY returns an integer ranging from 1 (Monday) to 7 (Sunday). So, for weekdays (Mon to Fri) the result of the formula should be less than 6, and for weekends (Sat and Sun) greater than 5.
Allow only workdays :
Allow only weekends :
For example, to allow entering only workdays in cells C2:C6, use this formula:

Validate dates based on today's date
In many situations, you may want to use today's date as the start date of the allowed date range. To get the current date, use the TODAY function , and then add the desired number of days to it to compute the end date.
For example, to limit the data entry to 6 days from now (7 days including today), we are going to use the built-in Date rule with the formula-based criteria:
- Select Date in the Allow
- Select between in the Data
- In the Start date box, enter =TODAY()
- In the End date box, enter =TODAY() + 6

Validate times based on current time
To validate data based on the current time, use the predefined Time rule with your own data validation formula:
- In the Allow box, select Time .
- In the Data box, pick either less than to allow only times before the current time, or greater than to allow times after the current time.
- To validate dates and times based on the current date and time: =NOW()
- To validate times based on the current time: =TIME( HOUR(NOW()), MINUTE(NOW()), SECOND(NOW()))

Custom Excel data validation rule not working
If your formula-based data validation rule does not work as expected, there are 3 main points to check:
- Data validation formula is correct
- Validation formula does not refer to an empty cell
- Appropriate cell references are used
Check the correctness of your Excel data validation formula
For starters, copy your validation formula into some cell to make sure it does not return an error such as #N/A, #VALUE or #DIV/0!.
If you are creating a custom rule , the formula should return the logical values of TRUE and FALSE or the values of 1 and 0 equating to them, respectively.
Excel data validation formula should not refer to an empty cell
In many situations, if you select the Ignore blank box when defining the rule (usually selected by default) and one or more cells referenced in your formula is blank, any value will be allowed in the validated cell.

Absolute and relative cell references in data validation formulas
When setting up a formula-based Excel validation rule, please keep in mind that all cell references in your formula are relative to the upper left cell in the selected range.
If you are creating a rule for more than one cell and your validation criteria are dependent on specific cells , be sure to use absolute cell references (with the $ sign like $A$1), otherwise your rule will work correctly only for the first cell. To better illustrate the point, please consider the following example.

The problem is this seemingly correct formula won't work for cells D3 to D5 because relative references change based on a relative position of rows and columns. Thus, for cell D3 the formula will change to =A3/B3 , and for D4 it will become =A4/B4 , doing data validation all wrong!
To fix the formula, just type "$" before the column and row references to lock them: =$A$2/$B$2 . Or, press F4 to toggle between different reference types.

This is how to use data validation in Excel with your own formulas. T gain more understanding, feel free to download our sample workbook below and examine the rule settings. I thank you for reading and hope to see you on our blog next week!
Practice workbook for download
You may also be interested in.
- How to make a cascading drop-down list
- Crating a dynamic dependent dropdown in Excel 365 an easy way
- Making dependent dropdown for multiple rows
- How to make multi-select drop down list in Excel
- How to change, copy and delete Excel drop down list
- How to create data entry form in Excel
Table of contents
286 comments
Hi Alexander, I do not think it address my curiosity. When constructing drop down list using data validation, the “normal” approach is to create list on the same sheet or another within workbook. Like Europe, Asia, Afrika anthen only these are visible and selectable. What I am curious about is, I have ever changing csv with options. I can use Power query to create table Anywhere in the workbook and go the “normal” way. BUT I do not like it very much, is there possibility not to create this “helper” table and use just Power query connection as source list? If yes how. Thank you Jindra
Hi! This can't be done with normal Excel methods. But you can experiment with VBA.
I need some help on the below case, Col A have some TAG no (repeat), Col B Material No (may or may not available in system thus valid or invalid in Col C ), I need a formula in Col D if against same TAG in Col A, Col C one of the line is In-valid then all row of the TAG in Formula (Col D) show In-Valid.
TAG Material Logic Formula 204-FOCC-101 7057581 InValid InValid 204-FOCC-101 7057581 InValid InValid 201-MCRS-201 7057583 Valid InValid 201-MCRS-201 7057583 InValid InValid 201-MCRS-101 7057583 Valid Valid 201-MCRS-101 7057583 Valid Valid
Hi! Use the IF function to get the value of a condition. To check 3 conditions for 3 columns, use the SUMPRODUCT function . On the basis of the information given above, the formula could be as follows:
=IF(SUMPRODUCT(($A$1:$A$6=A1) * ($B$1:$B$6=B1) * ($C$1:$C$6="InValid"))>0, "InValid", "Valid")
Hi Alexander, Thanks for quick reply, I apply the formula suggested by you but not meet my requirement.
I need if any of the row against same TAG ID(Col A) Logic value is In-Valid, all the row should show as In-Valid in formula.
TAG ID COMPONENT Logic Formula 204-FOCC-101 7057581 In-Valid In-Valid 204-FOCC-101 7057581 In-Valid In-Valid 201-MCRS-201 7058233 Valid Valid 201-MCRS-201 7057583 Valid Valid 201-MCRS-101 7061604 Valid Valid 201-MCRS-101 7057583 In-Valid In-Valid 20EA-01 7061606 Valid Valid 20EA-01 7061609 In-Valid In-Valid 20EA-01 7058236 In-Valid In-Valid 20EA-01 7061607 Valid Valid 20EA-01 7062075 Valid Valid 20EA-01 7061608 Valid Valid 20EA-01 7061605 Valid Valid
Hi! You are using different data, but the proposed formula returns exactly the same data that you specified in column D. Clarify which results do not meet your requirements.
Is there a way to use Power query result (table or list) in Data validation without creating table. If yes please advise.
Hi! I'm really sorry, looks like this is not possible with the standard Excel options.
I would like to add a drop-down list along with allowing user to type in the cell. I was able to achieve this, however additionally I want to keep a constraint that user can only type decimal values in the cell and not alpha numeric. I can I add both this constraints in the same cell 1) Either user can select from drop-down values 2) Or he can type only decimal values in it.
Any quick help would be appreciated.
Hi! You cannot use two data validation in the same cell. You can use a drop-down list and you can use VBA code for the second validation.
I want to use the data validation tool to display the full name (e.g.,COM (Commissioning)) in the dropdown but displays the acronym in worksheet (e.g. COM). Would the custom function in data validation allow me to achieve this using 2 reference lists i.e. in full and acronym)?
Hello Lara! To use two columns in a drop-down list and insert values from the second column, you can use a Combo Box (ActiveX Control). On Developer tab , in Controls group, click Insert, and select Combo Box under ActiveX Controls.
I am trying to come up with a formula to only allow a 9 digit number, or a 9 digit number with an R or G at the end. We have certin profile numbers we use at my place of work and want to make sure no one mistypes anything. For example, the entries could be 123451234 or 123121234G or 123121234R with no spaces, dashes, etc.
Hello! We have a special tutorial that can help to solve your problem. You can find the examples and detailed instructions here: Excel Data Validation using regular expressions . Try using this formula to data validation:
=OR(RegExpMatch(A1,"^\d{9}[RG]"), RegExpMatch(A1,"^\d{9}"))
I hope that the advice I have given you will help you solve your problem.
Post a comment
How to Create Data Validation Rules in Excel for Accuracy and Integrity
As an expert developer well-versed in data quality best practices, data validation is an Excel feature I highly recommend using. Defining rules for valid entries is a critical component when building spreadsheets handling important data. In this comprehensive guide, I’ll share my insight on how to create different types of data validation rules in Excel with step-by-step instructions and real-world examples.
Why Data Validation Matters for Data Integrity
Let‘s start by examining a few examples where businesses experienced major issues due to lack of data validation:
- A hospital lost thousands of patient records when an intern accidentally deleted entries in an uncapped Excel column. This halted operations for days.
- An engineering firm had to recall 20,000 products when an inverted min and max range validation let faulty sensor data into field testing samples.
- A bank faces ongoing accounting struggles after a merged cell typo allowed invalid numeric formats that stymied financial reporting automation.
Based on my experience building data pipelines across various industries, these kinds of data accuracy failures prove extremely expensive and dangerous for organizations. Excel‘s validation rules serve as the last line of defense before problems spread further downstream.
Preventing Errors in Practice
On the flip side, implementing thoughtful validation rules matched to common entry errors provides tremendous value:
- The hospital now mandates strict intake form validation to prevent faulty patient data from even reaching core record-keeping. Accuracy improved by 75% in the first year through input restrictions.
- Automated inventory management code at the engineering firm strictly checks for sensor outliers known to correlate with defects. Early intervention improved quality control.
- Global financial auditing standards now explicitly call for restricted cell formats on certain sensitive calculations after high-profile accounting irregularities impacted public perception of banking integrity.
Data validation may seem trivial on the surface but plays an enormously important role in information quality. Now let’s explore the various validation options Excel provides to support better data work.
Excel Data Validation Methods
Excel offers several core validation techniques to restrict data entry:
1. Content Restriction
Limit what a user can actually enter into cells, like:
- Allowing only whole numbers or decimals
- Selecting values from a dropdown list
- Constraining text length
- Entering properly formatted dates
This forces users to provide data in expected formats, avoiding free-entry human errors.
2. Value Range Checking
Make sure numbers fall within an expected minimum and maximum, such as:
- Percentages between 0-100%
- Grades in the range 0-4.3
- Ages over 18 but under 200
Outliers often indicate faulty data so restricting ranges is wise.
3. Custom Formula Rules
For advanced needs, custom formulas validate based on any logic, like:
- Email addresses containing one ‘@‘ sign
- Dates avoiding weekends or holidays
- Gender values following male/female options
- Cross-field criteria checking multiple cells
This flexibility allows validating complex real-world requirements.
Now let’s walk through concrete examples…
Hands-on Examples
Based on common data scenarios I’ve encountered, here are some step-by-step examples for applying core validation techniques in Excel.
Preventing Invalid Entries in Databases
For validating imported datasets, like from forms, surveys or instrumentation, restricting cell types is crucial.
Consider this示例 database recording values from an experimental survey:
| Person | Age | Gender | Comments |
|---|---|---|---|
| John | 20 | Male | No issues |
| Leah | e | F | Needed prompting |
With no validation, clearly faulty data slips in for Gender and Age. The “e” and blank entries would wreak havoc in any analysis.
By applying data validation lists and whole number ranges, we add strict controls:
1. Set allowed Gender values
- Cell Range: B2:B1000
- Criteria: List
- Source: Male, Female, Other
- Ignore blank UNCHECKED
2. Set allowed Age range
- Cell Range: C2:C1000
- Criteria: Whole Number
Now Gender forces selection from expected options and Age prevents unexpected numerical formats derailing later formulas that might sum ages.
The improved dataset now follows standards:
| Person | Age | Gender | Comments |
|---|---|---|---|
| John | 20 | Male | No issues |
| Leah | 23 | Female | Needed prompting |
Data validation added critical quality gates enforcing data accuracy according to specified formats and ranges. What previously looked like a database is now a validated and integrity-checked database ready for robust analysis.
Building Validation into Intake Forms
Beyond validating ad-hoc data imports, directly embedding rules into intake forms to prevent bad data on entry follows best practices.
For example, HR onboarding checklists help collect employee details:
| Full Name | Date of Birth | Offered Salary | … |
|---|---|---|---|
| Sara Dunham | 7/18/1962 | $58000 | … |
By validating directly in the template, we guide users while eliminating omitted or improperly formatted entries.
1. Full name text length check
- Cell Range: A2:A500
- Criteria: Text length
- Between 5 and 30 characters
2. DOB enforced date check
- Cell Range: B2:B500
- Criteria: Date
- Between 1/1/1900 and 1/1/2025
3. Salary enforced decimal check
- Cell Range: C2:C500
- Criteria: Decimal
- Between 25000 and 150000
Embedded validation saves work by improving consistency on the front end. Reviewing 100 records with occasional errors takes much longer versus getting 99% correct submissions enabled by robust template rules inherited by all new entries.
Calculation Model Integrity Checks
To prevent common errors when building complex calculated models, validating inputs protects against formula confusion down the line.
Take this cash flow projection using daily revenue and cost figures:
| Day | Revenue | Costs | Net |
|---|---|---|---|
| 1 | $5000 | $2000 | =B3-C3 |
| 2 | $4000 | =B4-C4 |
Allowing blank days or costs clearly will undercount totals later. Yet also over-restricting data entry to expect full continuity loses flexibility.
With thoughtful validation, we maintain integrity while allowing real-world unknowns:
1. Validation omitting blank revenues
- Cell Range: B3:B365
- Criteria: Decimal Number
2. Optional cost entry
- Cell Range: C3:C365
- Ignore blank CHECKED
Now our projection accurately sums all records with revenue while allowing cost variability:
| Day | Revenue | Costs | Net |
|---|---|---|---|
| 1 | $5000 | $2000 | $3000 |
| 2 | $4000 | $4000 |
The right requirements keep the model calculating while preventing revenue gaps undercounting overall cash flows.
Safeguarding Data Integrity in Financial Systems
Publicly filed financial figures require rigorous validation to avoid misstatements shaking market confidence and impacting careers.
Let’s examine controls around numeric formatting using 10-Q earnings summary data:
| Quarter | Division | Revenue | Expenses |
|---|---|---|---|
| Q1 2021 | Hardware | $1.23M | $200k |
| Q2 2021 | Software | $500K | $300K |
But allowing inconsistent formats like blanket millions and specific dollar counts risks unintended presentation confusion.
Through standardized number validation:
1. Unify currency formats
- Cell Range: C3:E10
- Between 0 and 1000 million
- 2 Decimal Places
- Use 1000 separator commas
Now cleanly standardized numeric presentation reduces financial reporting errors:
| Quarter | Division | Revenue | Expenses |
|---|---|---|---|
| Q1 2021 | Hardware | $1.23M | $0.20M |
| Q2 2021 | Software | $0.50M | $0.30M |
Data validation avoided public relations headaches over basic Excel mishaps. For mission-critical financial data powering major decisions, restricting cells appropriately is a must.
Expert-Level Validation Rule Tips
Through my years applying validation across many industries, I’ve compiled some key learnings for leveraging Excel’s capabilities at scale:
Use Helper Cells to Simplify Maintenance
Building validation rules with hard-coded cell anchors and ranges quickly becomes difficult to maintain. Instead, reference named helper cells containing your configured ranges.
For example:
Now updating validation date ranges only requires adjusting helper cells, not hunting down hard-coded dates across rules.
Format Clear Input Messages and Error Alerts
Unclear validation messaging confuses users. Format messages clearly:
1. Friendly Input Message Please enter your birthdate in MM/DD/YYYY format between 01/01/1900 and 01/01/2025
2. Descriptive Error Alert Sorry, the date you entered does not fall within the expected range. Please re-enter your birthdate as MM/DD/YYYY between 01/01/1900 and 01/01/2025.
Well-formatted messages improve data accuracy by explaining expected formats to users on entry, not just reacting after invalid data triggers non-specific Excel default alerts.
Improve Formula Performance With Callouts
Complex custom validation formulas with nested IFs, VLOOKUPs and more slow down large sheets. Structure logic to isolate intense processing then validate against intermediates.
Checking length only happens once via helper cell, not repeatedly for every validation rule.
Cross-Reference Other Sheets
To coordinate validations spanning multiple sheets using unique lists, leverage INDIRECT.
For example, validating regional sales manager selections from a master lookup list:
This allows updating the manager list in one place instead of each sales worksheet.
Learn From Other Databases
While Excel provides sufficient validation capabilities, for larger datasets I recommend migrating to dedicated databases like SQL Server with more granular controls. Often the skills transfer directly:
| Excel | SQL | Purpose | | ————- | ————- | | List Validation | CHECK Constraint | Restricting values | | Number/Date Validation | INT, DATE data types | Enforcing data types | | Helper Cell References | Foreign Keys | Managing valid value lists |
The principles of data validation remain but tooling improves. Power users can validate Excel stopgaps before formalizing business logic in robust databases.
Common Pitfalls To Avoid
While data validation provides tremendous value, it can also frustrate users and negatively impact workflows if applied carelessly based on a few problematic patterns I’ve encountered:
Problem : Too many restrictions paralyze data entry Solution : Prioritize only the most critical use cases
Problem : Rules configured differently across worksheets confuse users Solution : Centralize rules to remain consistent
Problem : Failing to document when making changes breaks assumptions Solution : Leave comments explaining edits to validation logic
Problem : Allowing invalid interim data obscures long term insights Solution : Enforce quality rigorously, not just fixing later
Overall, validate thoughtfully, not arbitrarily. As with any technical solution, the tool is only effective when addressing genuine underlying needs.
Excel Data Validation Keeps Getting Better
As one of Excel’s most powerful features for managing data quality, Microsoft continues advancing validation capabilities:
- Reverse lookup support allows cascading dropdowns
- WARNING alerts soft-prompt users before rejecting data
- Enhanced date filtering improves restrictive abilities
- External list linking centralizes changes
- Security trimming prevents user rule tampering
Combined with stronger change tracking, protection and documented best practices, Excel’s validation toolset caters to demanding data environments.
Highly Recommended for Serious Data Work
Applying reasonable validation rules suits any spreadsheet managing information critical to decisions or outcomes. Preventing faulty data improves analysis and safeguards processes dependent on workbook data flows. Start simple with a few core validations, then expand iteratively while avoiding common over-engineering pitfalls.
As an expert developer and analyst, validating early and consistently remains essential advice I stand behind. Let me know in the comments if you have any other data quality best practices to share!

Dr. Alex Mitchell is a dedicated coding instructor with a deep passion for teaching and a wealth of experience in computer science education. As a university professor, Dr. Mitchell has played a pivotal role in shaping the coding skills of countless students, helping them navigate the intricate world of programming languages and software development.
Beyond the classroom, Dr. Mitchell is an active contributor to the freeCodeCamp community, where he regularly shares his expertise through tutorials, code examples, and practical insights. His teaching repertoire includes a wide range of languages and frameworks, such as Python, JavaScript, Next.js, and React, which he presents in an accessible and engaging manner.
Dr. Mitchell’s approach to teaching blends academic rigor with real-world applications, ensuring that his students not only understand the theory but also how to apply it effectively. His commitment to education and his ability to simplify complex topics have made him a respected figure in both the university and online learning communities.
Similar Posts

How to Build an Accordion Menu in React from Scratch – No External Libraries Required
Accordion menus are an essential component in many web applications. They provide an intuitive way to…

The Best Angular and AngularJS Tutorials: A Full-Stack Developer‘s Guide
As a full-stack developer with over 5 years of experience building complex web apps, I‘ve had…

I spent 3 months applying to jobs after a coding bootcamp. Here’s what I learned as a now senior full-stack developer.
After graduating from a 12-week intensive coding bootcamp in mid-2016, I hit the ground running with…

How to Check if an Object is Empty in JavaScript: An In-Depth Guide
Checking if a JavaScript object is empty is a common task developers face regularly. With JavaScript‘s…

How TypeScript Helps You Write Better Code
TypeScript has become increasingly popular among web developers in recent years. According to the latest State…

BSD: The Powerful, Secure Unix-Based Operating System
Berkeley Software Distribution (BSD) is a family of open source Unix-like operating systems derived from early…
Excel Data Validation Guide

Data validation can help control what a user can enter into a cell. You can use data validation to make sure a value is a number, a date, or to present a dropdown menu with predefined choices to a user. This guide provides an overview of the data validation feature, with many examples.
Quick Links
- Validation Formulas
- Dependent Dropdown Lists
Introduction
Data validation is a feature in Excel used to control what a user can enter into a cell. For example, you could use data validation to make sure a value is a number between 1 and 6, make sure a date occurs in the next 30 days, or make sure a text entry is less than 25 characters.
Data validation can simply display a message to a user telling them what is allowed as shown below:

Data validation can also stop invalid user input. For example, if a product code fails validation, you can display a message like this:
")
In addition, data validation can be used to present the user with a predefined choice in a dropdown menu:

This can be a convenient way to give a user exactly the values that meet requirements.
Data validation controls
Data validation is implemented via rules defined in Excel's user interface on the Data tab of the ribbon.

Important limitation
It is important to understand that data validation can be easily defeated. If a user copies data from a cell without validation to a cell with data validation, the validation is destroyed (or replaced). Data validation is a good way to let users know what is allowed or expected, but it is not a foolproof way to guarantee input.
Defining data validation rules
Data validation is defined in a window with 3 tabs: Settings, Input Message, and Error Alert:

The settings tab is where you enter validation criteria. There are a number of built-in validation rules with various options, or you can select Custom, and use your own formula to validate input as seen below:

The Input Message tab defines a message to display when a cell with validation rules is selected. This Input Message is completely optional. If no input message is set, no message appears when a user selects a cell with data validation applied. The input message has no effect on what the user can enter — it simply displays a message to let the user know what is allowed or expected.

The Error Alert Tab controls how validation is enforced. For example, when style is set to "Stop", invalid data triggers a window with a message, and the input is not allowed.

The user sees a message like this:

When style is set to Information or Warning, a different icon is displayed with a custom message, but the user can ignore the message and enter values that don't pass validation. The table below summarizes behavior for each error alert option.
| Alert Style | Behavior |
|---|---|
| Stop | Stops users from entering invalid data in a cell. Users can retry, but must enter a value that passes data validation. The Stop alert window has two options: Retry and Cancel. |
| Warning | Warns users that data is invalid. The warning does nothing to stop invalid data. The Warning alert window has three options: Yes (to accept invalid data), No (to edit invalid data) and Cancel (to remove the invalid data). |
| Information | Informs users that data is invalid. This message does nothing to stop invalid data. The Information alert window has 2 options: OK to accept invalid data, and Cancel to remove it. |
Data validation options
When a data validation rule is created, there are eight options available to validate user input:
Any Value - no validation is performed. Note: if data validation was previously applied with a set Input Message, the message will still display when the cell is selected, even when Any Value is selected.
Whole Number - only whole numbers are allowed. Once the whole number option is selected, other options become available to further limit input. For example, you can require a whole number between 1 and 10.
Decimal - works like the whole number option, but allows decimal values. For example, with the Decimal option configured to allow values between 0 and 3, values like .5, 2.5, and 3.1 are all allowed.
List - only values from a predefined list are allowed. The values are presented to the user as a dropdown menu control. Allowed values can be hardcoded directly into the Settings tab, or specified as a range on the worksheet.
Date - only dates are allowed. For example, you can require a date between January 1, 2018 and December 31 2021, or a date after June 1, 2018.
Time - only times are allowed. For example, you can require a time between 9:00 AM and 5:00 PM, or only allow times after 12:00 PM.
Text length - validates input based on number of characters or digits. For example, you could require code that contains 5 digits.
Custom - validates user input using a custom formula. In other words, you can write your own formula to validate input. Custom formulas greatly extend the options for data validation. For example, you could use a formula to ensure a value is uppercase, a value contains "xyz", or a date is a weekday in the next 45 days.
The settings tab also includes two checkboxes:
Ignore blank - tells Excel to not validate cells that contain no value. In practice, this setting seems to affect only the command "circle invalid data". When enabled, blank cells are not circled even if they fail validation.
Apply these changes to other cells with the same settings - this setting will update validation applied to other cells when it matches the (original) validation of the cell(s) being edited.
Note: You can also manually select all cells with data validation applied using Go To + Special, as explained below.
Simple drop down menu
You can provide a dropdown menu of options by hardcoding values into the settings box, or selecting a range on the worksheet. For example, to restrict entries to the actions "BUY", "HOLD", or "SELL" you can enter these values separated with commas as seen below:

When applied to a cell in the worksheet, the dropdown menu works like this:

Another way to supply values to a dropdown menu is to use a worksheet reference. For example, with sizes (i.e. small, medium, etc.) in the range F3:F6, you can supply this range directly inside the data validation settings window:

Note the range is entered as an absolute address to prevent it from changing as the data validation is applied to other cells.
Tip: Click the small arrow icon at the far right of the source field to make a selection directly on the worksheet so you don't have to enter the range manually.
You can also use named ranges to specify values. For example, with the named range called "sizes" for F3:F7, you can enter the name directly in the window, starting with an equal sign:

Named ranges are automatically absolute, so they won't change as the data validation is applied to different cells. If named ranges are new to you, this page has a good overview and a number of related tips .
Tip - if you use an Excel Table for dropdown values, Excel will expand or contract the table automatically when dropdown values are added or removed. In other words, Excel will automatically keep the dropdown in sync with values in the table as values are changed, added, or removed. If you're new to Excel Tables, you can see a demo in this video on Table shortcuts.
Data validation with a custom formula
Data validation formulas must be logical formulas that return TRUE when input is valid and FALSE when input is invalid. For example, to allow any number as input in cell A1, you could use the ISNUMBER function in a formula like this:
If a user enters a value like 10 in A1, ISNUMBER returns TRUE and data validation succeeds. If they enter a value like "apple" in A1, ISNUMBER returns FALSE and data validation fails.
To enable data validation with a formula, selected "Custom" in the settings tab, then enter a formula in the formula bar beginning with an equal sign (=) as usual.
Troubleshooting formulas
Excel ignores data validation formulas that return errors. If a formula isn't working, and you can't figure out why, set up dummy formulas to make sure the formula is performing as you expect. Dummy formulas are simply data validation formulas entered directly on the worksheet so that you can see what they return easily. The screen below shows an example:

Once you get the dummy formula working like you want, simply copy and paste it into the data validation formula area.
If this dummy formula idea is confusing to you, watch this video , which shows how to use dummy formulas to perfect conditional formatting formulas. The concept is exactly the same.
Data validation formula examples
The possibilities for data validation custom formulas are virtually unlimited. Here are a few examples to give you some inspiration:
To allow only 5 character values that begin with "z" you could use:
This formula returns TRUE only when a code is 5 digits long and starts with "z". The two circled values return FALSE with this formula.
To allow only a date within 30 days of today:
To allow only unique values:
To allow only an email address
Data validation to circle invalid entries
Once data validation is applied, you can ask Excel to circle previously entered invalid values. On the Data tab of the ribbon, click Data Validation and select "Circle Invalid Data":

For example, the screen below shows values circled that fail validation with this custom formula:

Find cells with data validation
To find cells with data validation applied, you can use the Go To > Special dialog. Type the keyboard shortcut Control + G, then click the Special button. When the Dialog appears, select "Data Validation":

Copy data validation from one cell to another
To copy validation from one cell to other cells. Copy the cell(s) normally that contain the data validation you want, then use Paste Special + Validation. Once the dialog appears, type "n" to select validation, or click validation with the mouse.

Note: you can use the keyboard shortcut Control + Alt + V to invoke Paste Special without the mouse.
Clear all data validation
To clear all data validation from a range of cells, make the selection, then click the Data Validation button on the Data tab of the ribbon. Then click the "Clear All" button:

To clear all data validation from a worksheet, select the entire worksheet, then, follow the same steps above.

Hi - I'm Dave Bruns, and I run Exceljet with my wife, Lisa. Our goal is to help you work faster in Excel. We create short videos, and clear examples of formulas, functions, pivot tables, conditional formatting, and charts.
Related Information
- Test conditional formatting with dummy formulas
Get Training
Quick, clean, and to the point training.
Learn Excel with high quality video training. Our videos are quick, clean, and to the point, so you can learn Excel in less time, and easily review key topics when needed. Each video comes with its own practice worksheet.

Help us improve Exceljet
Your email address is private and not shared.
How to Use Data Validation in Excel: Full Tutorial (2024)
Sometimes we have to share our Microsoft Excel files with multiple users to fill in data.
The problem with sharing Excel files is that other people might input the wrong data. Which in turn screws up filtering, lookups, and other types of features and functions.
To prevent this, use data validation!
And I’ll walk you through how to do that here, step-by-step, in this table😊
If you want to tag along, download the practice workbook here .
Table of Contents
What is data validation in Excel?
How to add data validation, types of data validation rules, how to remove data validation.
Excel data validation helps to check input based on validation criteria. 🤔
That means data validation can be used:
- To check if a value is a number, a date, a time, a text with a specified length or
- To show a dropdown menu to the user with set options.
As a result, it can help users enter only valid data into a cell.🤗
You can also show a custom message to the user before entering data into a cell.
You can also display a warning message if the users enter invalid data.
This will simplify data entry and minimize input and typing errors. 😊
Before using Excel’s data validation feature on our table, we shall become familiar with it.👍
- To start, you have to select one or more cells in the Excel file for data validation.
- Then, go to the data tab.
- Click the data validation button, in the Data Tools Group, to open the data validation settings window.
This is how the data validation window will appear.
- The first tab in the data validation window is the settings tab.
You can create rules for data validation in this tab.
For example, we can specify that the date in the first column must be a future date.
In the following part, we will go through all of the data validation rules in depth🤗.
- Go to the input message tab to create an input message.
Put a tick mark for the “Show input message when cell is selected”.
Input messages can be a guide to user input data in the correct format and reduce entering invalid data.
Add a title for the input message.
Enter a custom message for the input message.
When you select a cell with data validation, you will see an input message similar to this.
- Finally, go to the error alert tab to create an error message for invalid data.
When a user enters an invalid entry or invalid value, you can show an error alert.
Put a tick mark next to the “show error alert after invalid data is entered” in the error alert tab.
You can select 3 different styles for the error message when a user inputs invalid data.
Next, give a title to your error alert.
Then, enter a custom error message.
This error message will show up if a student enters a date that has passed.
Let’s apply data validation rules to our Excel data table .
Dates and time validation rules
Date data validation rule.
Students can make an appointment date only for a future date.
Let’s learn how to avoid entering an invalid date in the date column.
- Select “date” from the allow box in the settings tab.
By selecting “date”, restrict data entry types to date in the validation cell.
- Select a condition under the data drop down list and specify data validation criteria in the start date box.
Students can now only enter future appointment dates in the first column of the Excel table.
Time data validation rule
Next, we want to make sure that students enter appointment times between 8 a.m. and 5 p.m.
- Select “Time” as the data validation criteria from the allow box.
By selecting “Time”, all other entries other than time will become invalid entries in data validation cells.
- Select a condition under the data drop down list in the data validation dialog box.
Then enter the data validation rule for the time column.
How to change data validation settings for many cells easily?
No need to copy data validation one by one.
You can check the below box to apply the changed data validation settings to all cells with the same settings.
Number validation rules
Whole number data validation rule.
We want to make sure that no more than three students attend the appointment.
In other words, we need to create an error message as invalid data if the data entry is not a whole number or is more than 3.
Let’s learn how to apply the whole number validation rule.
- Select the “Whole number” as the data validation criteria from the settings tab.
- Select a condition under data in the data validation dialog box.
I select “between” and give 1 & 3 as the minimum and maximum values.
Students can enter only 1, 2, or 3 in column C.
Decimal data validation rule
We would like to get the group results when they are scheduling the appointment.
The results should be between 0% to 100% (i.e., the results should be between 0 to 1).
Let’s learn how to do data validation in excel for decimal values.
- Select “Decimal” as the data validation criteria from the settings tab.
- Select a condition from the list under data and apply validation criteria.
Text validation rule
Do you think we can have data validation in Excel only for numeric values?🤔
No. We can apply for data validation in excel for text length as well.
When the user inputs a text that has a different length to the given data validation that data entry can be recognized as invalid data.
In this table, the group name should be less than 15 letters.
Let’s look at how we can validate the group name.
- Select the “Text length” as the data validation criteria from the settings tab.
- Select a condition for the data validation from the data box.
Drop-down lists
In the last column, students must enter either “Batch 1” or “Batch 2”.
We can give those 2 options in a cell dropdown box.
If the user selects “Batch 1”, it will show in that cell.
Let’s learn how to create a drop down list.
- Select the “List” as the data validation criteria.
- Enter the items for the drop down list in the source box or give a specified range for the drop down list in the source box.
To give a cell reference, click the upside arrow in the source box.
Is it difficult to update drop down list, if the number of options for drop down list are changing every time?😕
Don’t worry.
Give the cell reference of the source box to a Table in Excel .
The table automatically updates your list.😍
With the drop down list, users can easily select the batch.
Since drop down list is a very common data validation feature, it is good to learn this in a very detailed manner.
I highly recommend checking out my drop-down tutorial here to learn all about it!
Now users can enter only valid entries into our Excel table.
Now you know how to apply data validation in excel.👏
Do you want to know how to remove data validation?
It is very simple!🙂
- Select the cells that contain data validation you need to remove.
- Go to the data tab
- Click on the data validation icon.
- Click “Clear All”.
That’s it – Now what?
Now, you can easily add data validation to your cells, making it almost impossible for other users to mess up data input 😊
Pretty great, right?
But messed up data is only a problem if there’s something relying on that data.
Functions like IF, SUMIF, and VLOOKUP rely on data being neat and orderly. And those functions are the backbone of most important spreadsheets.
If you don’t master them yet, click here to learn IF, SUMIF, and VLOOKUP in my free 30-minute online course.
Other resources
If you want to use more advanced date and time functions as validation conditions, read our article about Excel’s Date and Time Functions .
After applying data validation, it is quite simple to narrow down your data to find what is relevant with Excel Filters. Read our How to Filter in Excel article to find out more information about the Excel filter tool.
And not just that! When you have complete data, you can easily rearrange it using Pivot Tables .
The Ultimate Guide to Data Validation and Drop-down Lists in Excel

Data validation and drop-down lists are essential features in Excel that help ensure the accuracy, integrity, and efficiency of data entry and analysis. In this ultimate guide , we will explore the concept of data validation, its importance, and the various types of data validation in Excel. We will also delve into the creation of drop-down lists and how they can be enhanced with data validation settings. We will cover advanced techniques for data validation and address common troubleshooting issues related to data validation. By the end of this guide, you will have a comprehensive understanding of data validation and drop-down lists in Excel, empowering you to effectively manage and validate your data with confidence and precision.
What is Data Validation?
Data validation in Excel is a feature that allows users to ensure that the data entered in a cell meets specific criteria. By incorporating data validation, you can effectively prevent errors and maintain the accuracy of the data. It provides the ability to control the allowed data types, set input messages , and display error alerts when necessary.
A practical application of data validation is the creation of drop-down lists , which limits cell entries to predefined options. This feature promotes consistency in the entered data.
A useful tip for data validation is to utilize custom formulas to establish complex validation rules. These formulas enable you to perform data checks based on specific conditions and formulas, granting you greater flexibility and control over the validation process.
Why is Data Validation Important?
Data validation is crucial in Excel for ensuring data accuracy, consistency, and reliability. It helps prevent errors and inconsistencies in data entry, ensuring that the data meets specific criteria and adheres to established rules. By implementing data validation, you can enhance data quality, minimize mistakes, and save time in data analysis and reporting. It helps maintain data integrity and improves data validation issues, such as clearing invalid entries or handling errors effectively.
True story: A company experienced a major mishap when an employee accidentally entered incorrect data into an important financial spreadsheet, resulting in significant financial losses. This incident highlighted the importance of data validation in preventing such errors and ensuring the accuracy of critical data. The company implemented robust data validation procedures and training to prevent similar incidents in the future, emphasizing its significance in maintaining data integrity.
Why is Data Validation Important? Data validation is important because it safeguards data accuracy, consistency, and reliability. It plays a crucial role in preventing errors or inconsistencies during data entry, ensuring that the data meets specific criteria and follows established rules. With data validation, you can enhance the quality of your data, minimize mistakes, and save time in analyzing and reporting data. It also helps maintain data integrity and resolves data validation issues, such as clearing invalid entries and effectively handling errors. The significance of data validation was underscored by a real-life incident at a company, where incorrect data entry led to significant financial losses. Consequently, the company implemented stringent data validation procedures and training to avoid similar incidents in the future, highlighting the importance of maintaining data integrity through data validation.
Types of Data Validation in Excel

Photo Credits: Exceladept.Com by Joseph Perez
Discover the various types of data validation in Excel that can elevate your spreadsheet game to the next level. From input messages to error alerts, cell range validation, and even custom formulas, each sub-section offers invaluable tools to ensure the accuracy and efficiency of your data. Get ready to unlock the power of data validation and create error-free spreadsheets that will impress your colleagues and streamline your work process. Let’s dive in and explore the world of data validation in Excel!
Input Messages
Input messages in Excel data validation serve as valuable tools for providing instructions and guidance to users as they input data into a cell. These input messages can be personalized to effectively communicate specific requirements or restrictions associated with the data entered. By customizing these messages, they can either appear when a user selects a cell or hovers over it, thus ensuring that users receive clear instructions on how to accurately input data. This feature is particularly advantageous when dealing with intricate spreadsheets or collaborating with multiple users on the same document. It plays a crucial role in preventing data entry errors and guaranteeing consistent and precise data input.
Error Alerts
Error alerts are essential in data validation as they contribute significantly to maintaining the accuracy and integrity of data in Excel . Here are some important points to know about error alerts:
- Prompt for data correction: Error alerts display personalized messages when users enter invalid data, guiding them to correct their entries and preserve data integrity.
- Alert types: Excel offers various types of error alerts, including Stop , Warning , and Information . Users can select the appropriate alert type depending on the error’s severity.
- Customization options: Error alerts can be customized by specifying the error message, title, and style to provide clear instructions and enhance the user experience.
- Preventing data discrepancies: By enabling error alerts, users receive alerts when they input data that violates predefined rules, helping to prevent data discrepancies and inaccuracies.
Fun fact: Excel ‘s error alerts can save valuable time and effort by detecting and prompting for data correction, ensuring data accuracy to support improved decision-making.
Cell Range Validation
- Cell range validation is a crucial aspect of data validation in Excel . It allows users to set specific criteria for the values entered in a selected range of cells.
- Here are the steps to implement cell range validation :
- Select the range of cells where you want to apply cell range validation .
- Go to the “Data” tab and click on “Data Validation”.
- In the “Settings” tab, choose “Whole Number”, “Decimal”, “List” or other options based on your validation requirements.
- Set the validation criteria, such as minimum or maximum values, using the available options.
- Specify input messages and error alerts to guide users entering data in the validated range.
- Click “OK” to apply the cell range validation to the selected range of cells.
- By following these steps, you can ensure that the data entered in the specified cell range meets the defined criteria, enhancing the accuracy and reliability of your Excel spreadsheets.
Custom Formulas
When working with data validation in Excel , custom formulas provide advanced control over the validation process. By using custom formulas, you can create specific rules that data needs to follow before being accepted. These custom formulas, which can consist of logical operators , functions , and references to other cells, add flexibility to data validation. For example, you can incorporate custom formulas to ensure that a number entered in a cell is greater than a certain value or that a text entry meets specific criteria . They are a powerful tool in ensuring the accuracy and consistency of your data entries.
Pro-tip: When creating custom formulas for data validation, make sure to thoroughly test them to ensure they correctly validate your data.
Creating Drop-down Lists in Excel

Photo Credits: Exceladept.Com by Lawrence Wright
Ready to level up your Excel game? In this section, we’ll explore the art of creating drop-down lists in Excel. From basic designs to dynamic and dependent options, we’ll cover it all. Discover how data validation settings can enhance your drop-down lists and learn how to adjust options to fit your needs. Get ready to streamline your data entry with this ultimate guide to creating drop-down lists in Excel.
Creating a Basic Drop-down List
Creating a basic drop-down list in Excel is a straightforward process that can significantly improve data entry and organization. To create a basic drop-down list, you can follow these steps:
Start by selecting the cell or range where you want the drop-down list to appear.
Next, navigate to the “Data” tab in the Excel ribbon.
Click on the “Data Validation” button.
A Data Validation dialog box will open. From the “Allow” drop-down menu, choose “List” .
In the “Source” field, enter the desired values for the drop-down list, separating each value with a comma.
Once you have entered the values, click “OK” to close the dialog box.
Now, the selected cell or range will display a drop-down arrow. By clicking on the arrow, you can view the list of values.
By adhering to these steps, you can effortlessly create a basic drop-down list in Excel to streamline your data entry and selection processes.
Adding Dynamic Drop-down Lists
When you want to incorporate dynamic drop-down lists in Excel, it allows for flexibility and automated updating of options based on changing data. To accomplish this, here is a step-by-step guide:
- Select the cell where you want to add the dynamic drop-down list .
Go to the Data tab and click on Data Validation.
- In the Settings tab, choose List as the Validation Criteria .
- Enter the range of cells that contain the options for the drop-down list in the Source field.
- Click OK to apply the drop-down list to the selected cell.
- To make the drop-down list dynamic , utilize a defined range or table as the source of data instead of static cell references.
- Whenever the source data changes, the drop-down list will automatically update to show the new options .
Creating Dependent Drop-down Lists
- To create dependent drop-down lists in Excel , follow these steps :
- Start by creating a list of data for the first drop-down list.
- Next, select the cell where you want the first drop-down list to appear.
- Go to the Data tab and click on Data Validation .
- In the Settings tab, choose List as the validation criteria.
- Then, in the Source box, select the range of cells that contain the data for the first drop-down list .
- Create a new list of data for the second drop-down list . Make sure it is organized in a way that corresponds to the first list .
- Select the cell where the second drop-down list will appear .
- Repeat steps 3-5, but this time, in the Source box, enter the formula “ =INDIRECT ( cell reference of the cell with the first drop-down list)”.
By following these instructions, you can efficiently create dependent drop-down lists in Excel for data entry and analysis .
Enhancing Drop-down Lists with Data Validation Settings
By incorporating data validation settings, you can enhance drop-down lists in Excel and add more functionality and control to the data entry process. Follow the step-by-step guide below for improving drop-down lists:
- Create a drop-down list in Excel using the Data Validation feature, allowing you to customize the options available.
- Specify the range from which the drop-down list will draw its values. You can do this by either directly entering the values or selecting a range of cells.
- Add data validation settings to the drop-down list, giving you the ability to allow or disallow empty values, restrict input to specific values, or set input limits.
- Personalize error alerts to display helpful messages or prompts when users enter invalid data.
- Utilize conditional formatting to highlight or format certain cells based on the selected value from the drop-down list.
- Thoroughly test the drop-down list and data validation settings to ensure that they function correctly as intended.
Adjusting Drop-down List Options
When adjusting drop-down list options in Excel , it is crucial to ensure that the list reflects the desired choices. To do this, follow these steps:
1. Begin by selecting the cell or range where you have applied the drop-down list.
2. Navigate to the Data tab in the Ribbon and click on Data Validation.
3. Once in the Data Validation dialog box, access the Settings tab.
4. Under the “Allow” dropdown menu, choose “List” .
5. In the “Source” field, modify the list values by adding or removing options, keeping them separated by commas.
6. Finally, click on OK to save the changes you have made.
By following these straightforward steps, you can easily adjust the drop-down list options in Excel according to your specific requirements.
Advanced Techniques for Data Validation

Photo Credits: Exceladept.Com by Thomas Jones
Discover the secrets to taking your data validation skills in Excel to the next level! In this section, we’ll dive into advanced techniques that will revolutionize how you handle data validation. From leveraging data from different worksheets or workbooks to using named ranges, we’ll explore the power of harnessing external data sources. We’ll uncover methods for applying data validation to multiple cells and limiting input to specific numeric formats. Get ready to supercharge your Excel game!
Using Data from Another Worksheet or Workbook
Using data from another worksheet or workbook in Excel can greatly enhance the efficiency and accuracy of your data validation process. By incorporating the technique of using data from another worksheet , you can avoid duplicating data and ensure that any changes made in the source worksheet or workbook automatically reflect in the data validation.
| Step | Description |
|---|---|
| 1 | Open the where you want to apply validation. |
| 2 | Go to the Data tab and click on . |
| 3 | In the dialog box, select the dropdown and choose the type of validation you want to apply. |
| 4 | In the Source field, enter the reference to the or using the appropriate syntax. For example, ‘=Sheet2!A1:A10’ or ‘[WorkbookName]Sheet2!A1:A10’. |
| 5 | Click OK to apply the data validation using the data from or . |
Story: A financial analyst, Sarah , was working on a complex Excel model that required data from multiple worksheets. Instead of manually copying and pasting data into her main worksheet, she discovered the power of utilizing data from another worksheet . This technique saved her a significant amount of time and ensured that any updates made in the source worksheet were instantly reflected in her calculations. Thanks to this method, Sarah was able to streamline her workflow and deliver accurate financial reports to her clients on time.
Using Named Ranges in Data Validation
Data validation in Excel includes the use of named ranges , which allows for more efficient and organized validation processes. By using named ranges in data validation, users can simplify the process of assigning validation rules to multiple cells. It enables the user to specify the validation criteria for each named range , making it easier to manage and update the rules as needed. Additionally, using named ranges increases flexibility as users can easily apply the same validation rules to different parts of the worksheet without having to manually update each individual cell. This saves time and reduces the chances of error. Moreover, incorporating named ranges in data validation improves the readability and understandability of the spreadsheet. Instead of having complex formulas in each validation rule, the use of named ranges provides a clear label for the validation criteria, enhancing the overall usability of the worksheet. Furthermore, named ranges streamline maintenance tasks. If changes need to be made to the validation criteria, updating the named range automatically applies the modifications to all cells associated with that particular range. This simplifies the maintenance process and ensures consistency throughout the worksheet.
Applying Data Validation to Multiple Cells
When working with Excel, applying data validation to multiple cells is essential to ensure the accuracy and integrity of your data. Here are the steps to apply data validation to multiple cells :
Select the range of cells where you want to apply data validation .
Go to the “Data” tab and click on “Data Validation.”
In the Data Validation dialog box, set the criteria and validation settings for the cells.
Click on “OK” to apply the data validation to the selected range of cells.
By following these steps, you can efficiently apply data validation to multiple cells in Excel, allowing you to maintain consistency and prevent errors in your data entries.
Limiting Input to Whole Numbers or Decimal Numbers
- To restrict input to whole numbers or decimal numbers in Excel , you can utilize the data validation feature. Here is how you can do it:
- Select the specific cell or range of cells where you wish to implement the data validation.
- Head to the Data tab and click on Data Validation.
- In the Settings tab, select “ Whole Number ” or “ Decimal ” from the Allow dropdown menu, based on your requirements.
- If necessary, set additional criteria like minimum and maximum values.
- Click OK to apply the data validation.
By diligently following these steps, you can ensure that only whole numbers or decimal numbers are inputted in the designated cells or range. This process plays a crucial role in maintaining the accuracy and consistency of data in your Excel spreadsheets.
Troubleshooting Data Validation Issues

Photo Credits: Exceladept.Com by Willie Miller
Having trouble with data validation in Excel? Don’t worry, we’ve got you covered! In this section, we’ll delve into troubleshooting common data validation issues. From clearing data validation rules to handling errors and error alerts, we’ll equip you with the knowledge to overcome any hurdles. Get ready to master the art of dealing with invalid data entries and unlock the full potential of data validation and drop-down lists in Excel. Let’s dive in and find solutions that will streamline your data entry process.
Clearing Data Validation Rules
Clearing data validation rules in Excel is a straightforward process that can help you manage your data effectively. Here are the steps to clear data validation rules:
Select the cell or range of cells where you want to clear the data validation rules.
In the Data Validation dialog box, click on the “Clear All” button.
Click on OK to confirm deleting the data validation rules.
By following these steps, you can easily remove data validation rules from your selected cells or ranges. This allows you to modify and update your data without any restrictions.
In the early days of Excel, there was no built-in feature for clearing data validation rules. Users had to manually delete and adjust the validation settings, which was time-consuming and prone to errors. With advancements in technology and user feedback, Microsoft added the “Clear All” button, simplifying the process and improving the user experience. This enhancement has made working with data validation in Excel more efficient and convenient for users around the world.
Dealing with Invalid Data Entries
Dealing with invalid data entries in Excel is of utmost importance for maintaining precise and dependable data. To effectively manage these invalid entries, it is crucial to follow the steps outlined below:
- Apply data validation rules to restrict the type of data that can be entered in a cell, thus avoiding any invalid entries .
- Enhance user experience by using error alerts to promptly notify users about their invalid data entries. These alerts should include helpful messages and instructions.
- If necessary, you can clear data validation rules from a cell to eliminate any restrictions associated with it.
- For easy identification, make use of conditional formatting to visually highlight any invalid data .
- Implement advanced data cleansing techniques to correct or remove any invalid data from the dataset, ensuring that the data remains accurate and reliable .
By adhering to these steps, you can be confident that your Excel data will remain accurate, reliable, and devoid of any invalid entries.
Handling Errors and Error Alerts
When working with data validation in Excel, handling errors and error alerts is a crucial aspect to guarantee data accuracy. Here are the necessary steps to effectively handle errors and error alerts:
- Identify the type of error: It is essential to determine if the error is a data input error or a formula error.
- Read error message: It is important to understand the error message displayed by Excel in order to identify the issue.
- Correct errors: Make the necessary changes to fix the errors, such as correcting data entries or adjusting formulas.
- Apply error alert settings: Set up error alerts to promptly notify users when incorrect data is entered.
- Customize error messages: Tailor error messages to provide specific instructions or explanations to users.
- Test data entry: Validate data entries to ensure error alerts are triggered when appropriate.
- Update error handling: Continuously review and update error handling processes to enhance data accuracy.
Summary of the Benefits of Data Validation and Drop-down Lists in Excel
– By incorporating data validation and drop-down lists in Excel, you can experience enhanced data accuracy. This means that only valid and accurate data will be entered, minimizing the risk of errors and inconsistencies in your spreadsheets.
– Furthermore, the use of these features can lead to improved efficiency . With drop-down lists, users can choose from a pre-defined list of options, saving time and reducing the chances of making typos or entering incorrect information.
– The process of data entry can also be streamlined with data validation and drop-down lists. These features provide clear prompts and instructions, guiding users regarding the acceptable format and range of values for each cell.
– Additionally, data analysis can be enhanced through the enforcement of data validation rules . By ensuring consistency and validity in your data, you can conduct more accurate and reliable analysis.
– Lastly, data maintenance is simplified when utilizing data validation. Instead of manually updating each cell, you can make changes in a centralized location, resulting in easy update and maintenance of your spreadsheets.
Frequently Asked Questions
1. how do i create a drop-down list in excel.
To create a drop-down list in Excel, follow these steps:
- Select a cell where you want the drop-down list.
- Go to the Data tab and choose Data Validation.
- In the Data Validation dialog box, select the source range for the drop-down list.
2. Can I limit entries and reduce typing mistakes using drop-down lists?
Yes, drop-down lists help organize data and limit the amount of entries people can make to each cell. They significantly reduce input errors and typing mistakes.
3. How can I adjust the appearance of the drop-down list in Excel?
You can adjust the font size and zoom level magnification to make the items in the list appear bigger. This helps create a smooth-looking document and enhances the user experience.
4. Can I add additional items to an existing drop-down list in Excel?
Yes, you can add additional items to the drop-down list by modifying the source range in the Data Validation dialog box. This allows you to expand the options available to users.
5. How do I protect the source data for my drop-down list in Excel?
The worksheet containing the source data can be hidden or password protected to prevent accidental edits or removals. This ensures the integrity of the drop-down list and the order of information.
6. Is it possible to allow user input that is not in the drop-down list?
Yes, you can allow users to enter another item that is not in the drop-down list. In the Data Validation dialog box, uncheck the “Show error alert after invalid data is entered” option to enable this flexibility.
11 Awesome Examples of Data Validation
This is a guest post by Alan Murray from Computergaga .
Data Validation is a very useful Excel tool. It often goes unnoticed as Excel users are eager to learn the highs of PivotTables, charts and formulas.
It controls what can be input into a cell, to ensure its accuracy and consistency. A very important job when working with data.
In this blog post we will explore 11 useful examples of what Data validation can do.
To apply these Data Validation rules;
- First select the range of cells you want to apply the validation to.
- Click the Data tab and then the Data Validation button on the Ribbon.
- In the Settings tab, select the validation rule criteria.
Allow Uppercase Entries Only
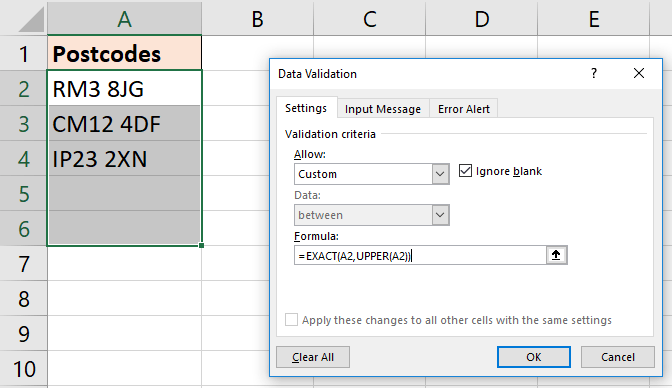
You may need to ensure that data is entered in uppercase, such as this example of UK postcodes being entered.
The cells need to accept the entry of both text and numbers, but the text must be uppercase.
For this we can use a formula with the UPPER and the EXACT functions.
The UPPER function probably speaks for itself. It converts text into uppercase.
The EXACT function is used to compare the cell entry with the uppercase version to see if they are the same. If they are, then the entry is valid.
For this example, the validation was applied to range A2:A6. Select Custom from the Allow list and enter the following formula into the Formula box.
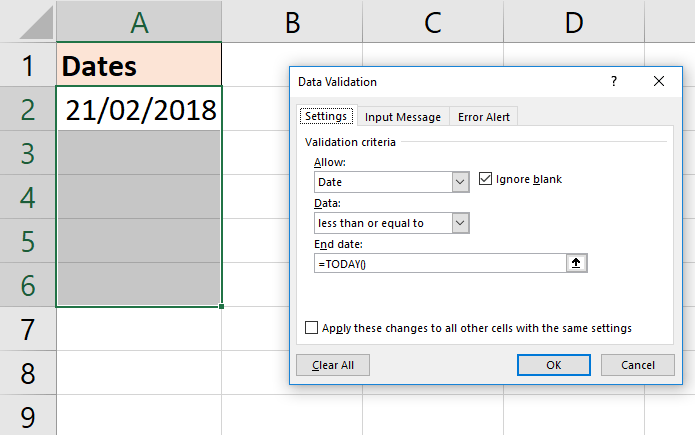
Prevent Future Dates
Entering dates is very common on a spreadsheet. Unfortunately users entering the wrong date is also commonplace.
By using validation rules, we can limit the mistake a user may make.
In this example, we prevent the entry of a future date. Maybe users are recording a transaction that has occurred. Therefore, it must be a date in the past or todays date.
Select Date from the Allow list and then Less than or equal to from Data.
In the End Date box, type the formula below.
The TODAY function returns the current date from the computer. Incredibly useful. Check out more great Excel date functions (https://www.howtoexcel.org/category/functions/date-and-time/).
Creating Drop Down Lists
Creating drop down lists is the reason most people become familiar with the Data Validation feature. Creating lists is a simple and effective way of controlling data entry.
Select List from the Allow list. You can then either type the list items directly into the Source box separated by a comma, or refer to a range of cells that contain the list items.
When you need a simple list such as Open and Closed, or Yes and No, then typing the entries in makes sense.
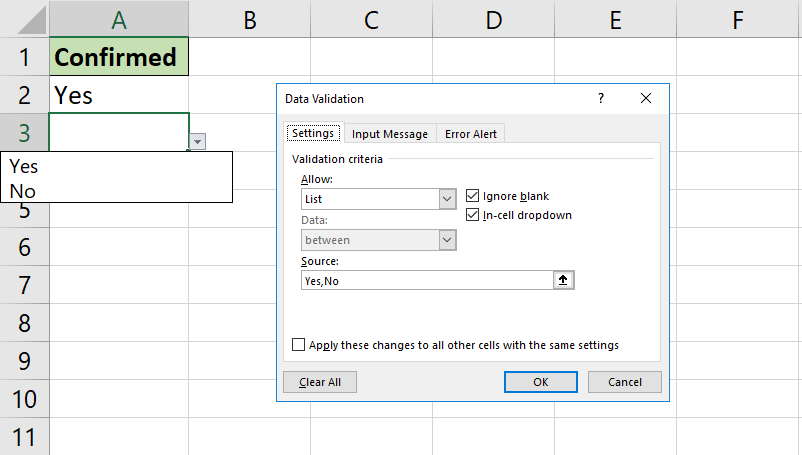
When you need a more dynamic list for items that change over time such as lists of products, places and people, then referring to a range makes sense.
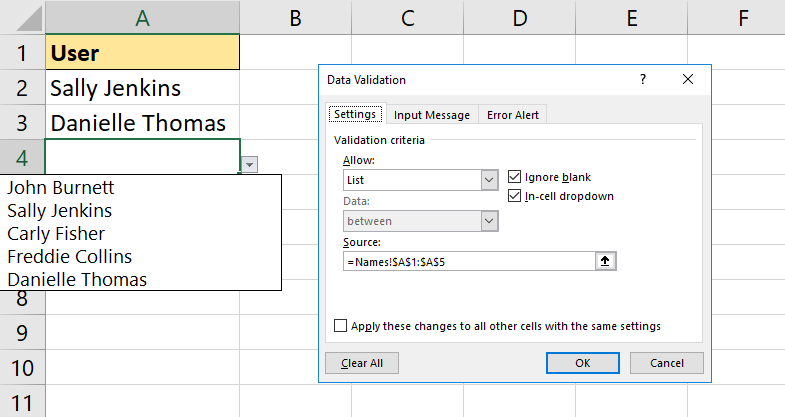
For this list, click in the Source box and then go and select the cells that contain the items.
In this example, the items were in range A1:A5 of a sheet called Names.
Dependent Drop Down Lists
Let’s take our drop down lists further and create dependent lists. For these lists, the item selected in one list will affect what options appear in the next list.
In the example below, we have a list of cities in cell F2. The selection from this list affects what names appear in the next list in cell G2.
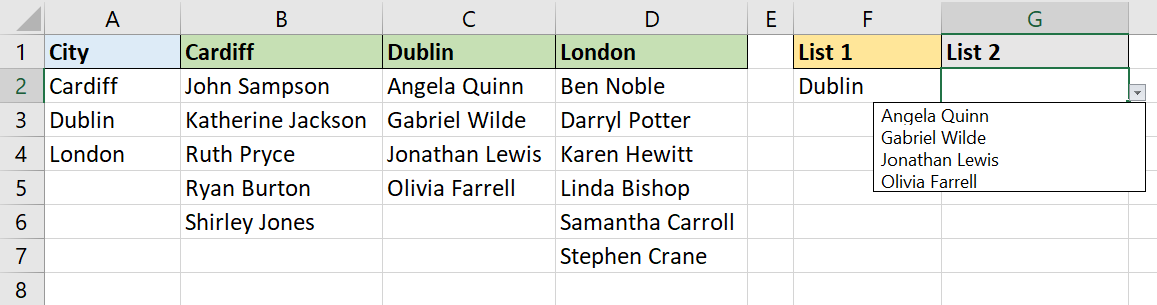
To achieve this, we first must name each list. For example, range A2:A4 is named city, range B2:B6 is named cardiff and so on.
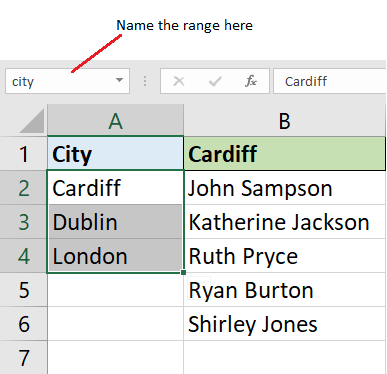
Follow these steps to create a named range.
- Select the range to name e.g. A2:A4.
- Click in the Name Box to the left of the Formula bar.
- Type the name you would like to apply and press Enter.
The list in cell F2 is created just like in the previous example. In the Source box you can type =city to reference the named range.
For the dependent list in cell G2, the selection in cell F2 needs to be converted into a reference to the named ranges. This is done using the INDIRECT function (Learn more awesome examples of the INDIRECT function).
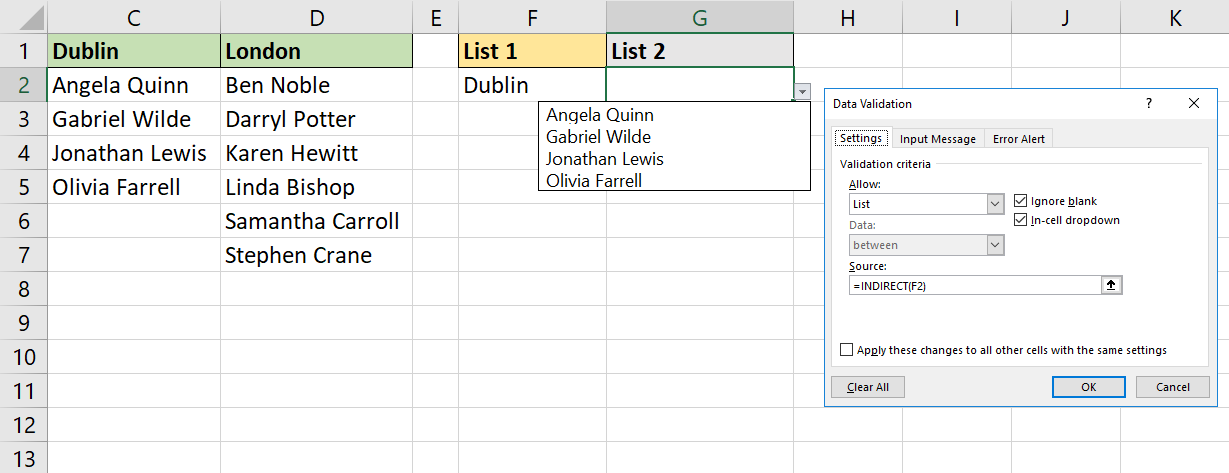
A common issue when creating dependent lists is the use of illegitimate characters in named ranges. You cannot begin named ranges with a number, or use spaces and some other symbols.
So, if items in your list use spaces, or start with numbers it presents an obstacle. Learn how you can overcome this issue in the video below.
Prevent Duplicate Values
Duplicate values are a very common problem in Excel. There are many techniques for identifying and removing duplicates, but it would be better if you could prevent them in the first place.
By using the COUNTIF function in a custom formula we can.
The formula below counts the occurrences of the inputted value in the range A2:A8. If the answer is 0 then the value is unique and allowed.
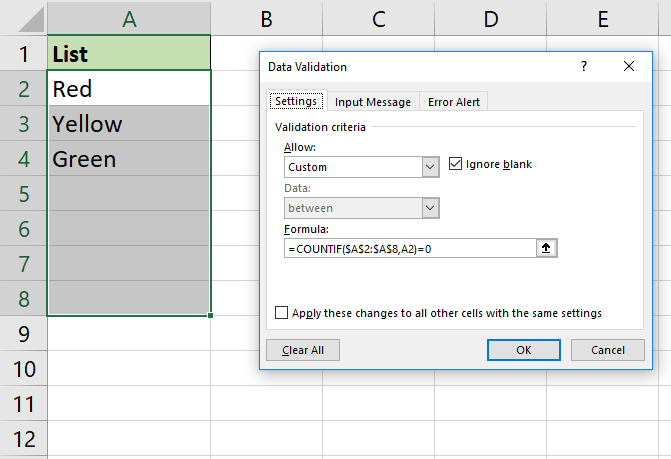
Allow only Numeric or Text Entries
The ISNUMBER function can be used to create a validation rule that only allows the entry of numeric values in a cell.
Select Custom from the Allow list and use the formula below. In this example, cell A2 is the upper left cell of the selected range of cells.
This will allow any numeric values only including dates and times.
To allow text values only we could use the ISTEXT function in the same way.
Validate an Entry Based on Another Cell
You can create Data Validation rules that are based on the value from another cell by writing a custom formula.
For example, maybe you only want a drop down list to appear if another cell is not empty.
The following IF function will test if cell A2 is not empty, and if so show the list from the location named range.
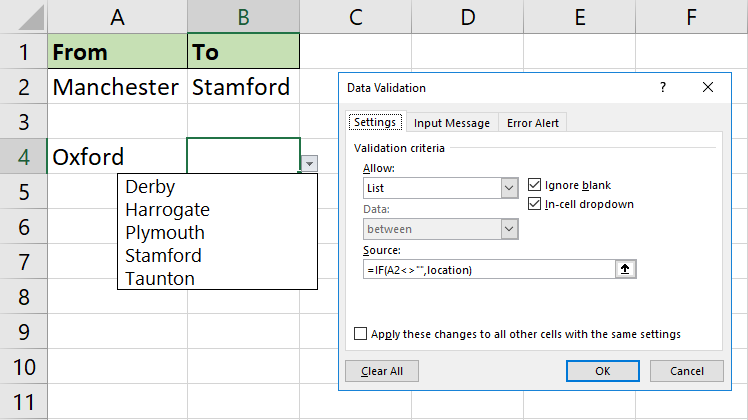
Allow the Entry of Weekdays Only
When entering dates, you may need to restrict a user to the entry of specific days of the week. We can achieve this with the WEEKDAY function.
For this example, we shall restrict entry of dates that are Monday to Friday only. The formula below can be used for this.

The WEEKDAY function returns a number that represents the day of the week. In the WEEKDAY function, the 2 specifies that a week starts on Monday as 1 through to the Sunday as 7.
In this validation rule, the returned value must be less than or equal to 5. This excludes Saturdays and Sundays.
Restrict the Text Length
Entries may need to be of a specific text length, or no more than a certain number of characters. Creating a validation rule can help us ensure this.
In this example, I want to confine the text length to exactly 9 characters.
Select Text length from the Allow list, equal to from the Data list and then type 9 for the length.
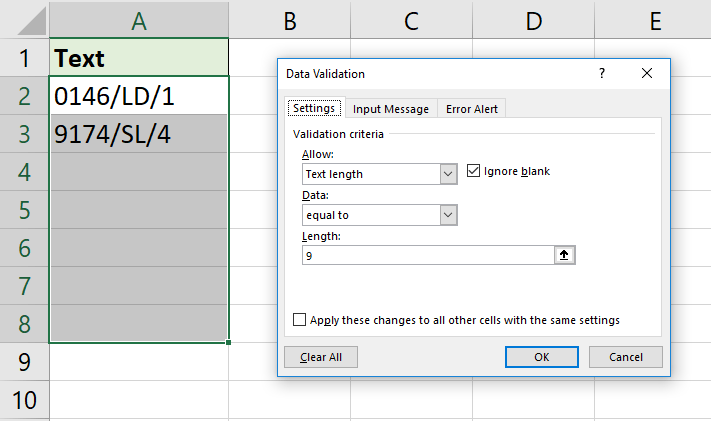
Entries Contain Specific Text
Using Formulas in validation rules enables us to test and validate for almost anything.
In this last example, we ensure entries contain specific text.
The FIND function is used to search for a specific string of text (“ENG” in this example) and return its position within the cell. If FIND does not locate the text, an error is returned.
The ISNUMBER function is used to check if the FIND function was successful (if it returned a number). If it did, then ISNUMBER returns True, otherwise it returns False. This completes our validation test.
Here is the formula to use.
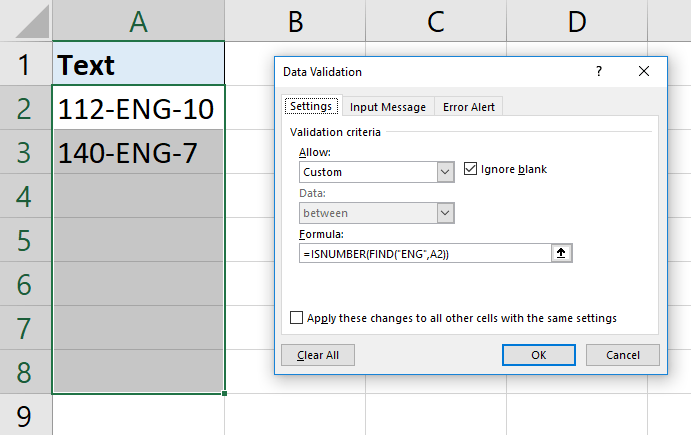
Note: The FIND function is case sensitive. The SEARCH function can be used instead if you do not need to match the case of the text.
Create Meaningful Error Messages
We have looked at 10 Data Validation examples in this article. However, if a data entry mistake is made the same validation is shown, regardless of the validation criteria.

The great news is that you can create your own error messages to effectively communicate what may have gone wrong to the user.
Click the Error Alert tab of the Data validation window.
Select a Style from the list of Stop, Warning, or Information.
- Stop will prevent invalid data from being entered.
- Warning displays the error, but with the choice to allow the entry or prevent it.
- Information display the error, but does not prevent the data entry at all.
Type a Title and Error Message for the error alert.
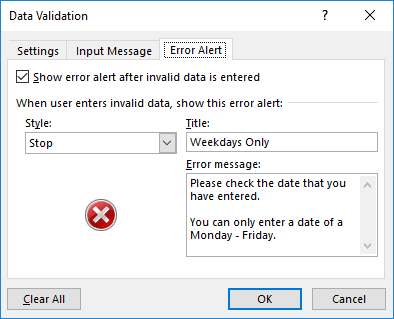
Let’s take the example of allowing only the entry of weekdays into a cell. You could create an error message like this.
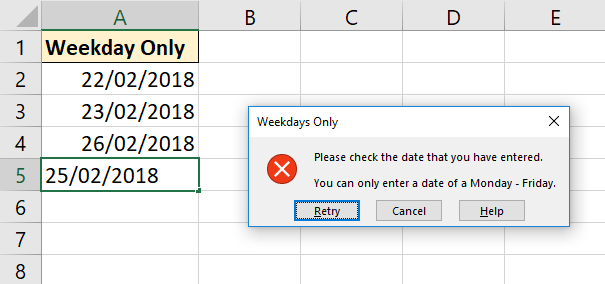
I believe Data Validation is an undervalued tool of Excel. Without clean data our PivotTables, charts and formulas will not function correctly.
This feature provides a method of limiting mistakes and collecting clean data on entry.
Data Validation cannot help though when receiving data from other databases, workbooks and websites.
If this is something that you do, I heavily encourage you to check out the Power Query feature of Excel . A powerful tool for establishing connections and automating the process of cleaning and transforming data from external sources.
About the Author

Alan is the founder of Computergaga and has a large YouTube following where he shares Excel tips and tutorials. He lives in the UK with his wife and 2 children. His passions for Excel and data keep him busy, but when he has free time he enjoys running and hiking.

Alan Murray
Subscribe for awesome Microsoft Excel videos 😃

- Pivot Table Tips and Tricks You Need to Know
- Everything You Need to Know About Excel Tables
- The Complete Guide to Power Query
- Introduction To Power Query M Code
- The Complete List of Keyboard Shortcuts in Microsoft Excel
- The Complete List of VBA Keyboard Shortcuts in Microsoft Excel

Related Posts

37 Awesome Excel Mouse Tips & Tricks You Should Know
Apr 15, 2019
While the keyboard is generally quicker, you shouldn’t completely ignore the mouse. There are also some great time saving mouse shortcuts as well. In this post we’ll take a look at some of the best Excel mouse time saving tips and tricks.

25 Amazing Power Query Tips and Tricks
Jun 11, 2018
Power query is amazing tool that allows you to import and transform data with ease and helps to create repeatable and robust procedures with your data. Here are some tips and tricks to help you get the most out Power Query.

Amazing Excel Tips and Tricks
May 12, 2018
A compilation of the best Excel tips and tricks ranging from beginner to pro that will save you time and make you more productive.
54 Comments

Nice Compilation Alan………..Thanks for sharing.

Wonderful Job Sir,

How do I enter Data Validation so that a new row iterates to the next row reference? For example so that a Data Validation setting in Cell C38 that references Cell C39 on line 39? For some cells its works and for others it doesn’t increment in the Data Validation Settings/Source field.

How do we disallow entry in dropdown cell and only allow the selection of list item in excel?

I don’t believe this is possible. Potentially with some VBA. But even if they type, it will get validated.

“How do we disallow entry in dropdown cell…?” On the Error Alert tab in the Data Validation window, select the “Stop” Style and add a message that explains what the user must do instead.
Oh, and choose List in the Validation criteria > Allow field.

Data validation is such a cool feature so im always intrin seeing the different ways people can use them.
Absolutely. And so often overlooked to learn sexier tools like PivotTables and charts. But without good data, its over.

Thank you so much for the information = Very Helpful!
How can you set up a Data Validation that will allow specific text but will not allow you to enter a space before or after that text? i.e. they can only enter EXE, PRO, SPEC in the cell – but not EXE , SPEC , PRO.
Thank you for your help! It is greatly appreciated!!!
You can use the list option for this. Either enter those words separated by a comma, or refer to a range of cells where they are written. If you don’t want the list you can uncheck the in-cell dropdown box.

Use this formula in custom option of data validation =ISERR(FIND(” “,E4))

use TRIM() in the validation formula:
=TRIM(cellref)=cellref
Thank you! But I don’t like to use drop down list because they show up so small. I do put the specific words that can be entered… But I’d someone accidently puts a space behind the letters then my formulas in other areas will not pick up the cell information that has a space in it. 😭😭😭😭
Yes, just uncheck the in-cell dropdown and you will not get a list. You can use a formula such as this – A1=TRIM(A1) to prevent spaces before and after. This assumes your selection starts at A1. We then just need it to restrict it to your three words also.
Your other formulas could include the TRIM() function so that even if spaces are wrongly added, those formulas would reas them correctly.
I’m not sure I’m explaining my self correctly. Can you have multiple Data Validations on the same cells? So let’s just say… I have selected cells A1..D20 I have done a Data Validations that only LTR, STR, EXE, PRO can be entered in these cells. Which works. So how can I do a data validation with a TRIM in these same cells A1..D20 so that if they enter a Space behind these letters it will not let them?
If you make a list in Data Validation by referring to a range of cells, and not typing them into the source box. This will also prevent the trailing space scenario. I just wrote your 4 items in cells A1:A4 on a sheet. Named the range items. And then used =items in the source of a Data Validation list. Remember you can turn of the in-cell drop down. You don’t have to have the list. Just this option for your four entrants.
Thank you! THANK YOU! THANK YOU!!!! That takes care of the trailing space… . Now can I am them be entered in with ALL CAPS?
The EXACT function can be used to ensure that text matches case, but I am not sure this can be used with the list functionality. I think this may be too much for Data Validation.

Did you ever get the answer you needed to this question?

HI, I need to use a list of products codes and in a specific cell to return the product code that’s matching that code once I start entering. What can I use? Data validation with a formula..to Search and Find the product code and show it once I start typing? Or something else? I need to limit the typing(entering the codes) to a list (range) and display the code once I start typing. Thanks
Displaying a list whilst typing is not something that Data Validation does as standard. There are tutorials on the web of people using VBA or complex formulas to get an imitation going. A lot of effort for little reward and will also increase Excel’s processing. Hopefully a future version will bring this.
Thanks for the reply.
Another project I am working on, requires me to use a workbook with 3 different columns that can be filtered(with regular filter) and then get final results in the 3 rd column. This is to reduce the drop down list to a narrow one.
In the actual workbook I need to show that final result in a drop down menu. I am thinking of a searchable table with results to be displayed. Is there any way I can do that using simple functions in Excel? An example would be very helpful. Thank you!
Hi Lyl, It sounds like you would like dependent drop down lists. I have a video on setting these up here – https://youtu.be/5nb84p2wX-c

Thank you so much for the information and for sharing your knowledge!
Let’s say I have to create two drop-down menus with one specifying the Start date and another the End date – my dates are listed on my active sheet (eg. 12/31/2014, 12/31/2015 etc.) How can I make sure the End date is always greater than or equal to Start date?
Thank you!!!
Thank you so much for the information and for sharing your knowledge!!
Question: Let’s say I had to create two drop-down menus: one specifying a Start date and the other an End date, with the dates listed on my active sheet (eg. 12/31/2015, 12/31/2016 etc.) How can I make sure the End date is always greater than or equal to the End date?
Many thanks!
A cell can only contain one validation rule if you are using it for a drop down. You could lose the drop down and use the Data Validation for the greater than rule instead. Or if you want to keep the dropdown, maybe use a different technique such as Conditional Formatting. Instead of stopping the user, you could get the cell to change colour if it is greater than or equal to the start date. In Conditional Formatting, if the start date is in A2 and the end date in B2 then the formula could be =B2<A2

I HAVE A PROBLEM THAT I HAVE TWO DIFFERENT TYPES OF DATA. I WANT THAT WHEN ONE TYPE OF DATA APPEARED BY VALIDATION THEN ITS TOTAL SHOULD BE PLACED IN A CELL AND WHEN I CHANGE THE DATA OF SAME CELL BY VALIDATION BY CHOOSING 2ND TYPE OF DATA THEN ITS TOTAL SHOULD BE PLACED IN ANOTHER CELL , NOT PREVIOUS.
Hi Yashraj, a cell can only contain one format type – number or text. Maybe you don’t want validation in the cell. Either way you can control what cell the total is shown in by using formulas in those cells. Depending on your scenario a simple IF may suffice to test the validation cell and run the formula or not.
I found “Validate An Entry Based On Another Cell” particularly useful, Alan, and immediately applied it to a current project using Table names in this formula: =IF(ISNUMBER(E6),INDIRECT(“Table_Title_OBJECT_TYPE[System ID]”),INDIRECT(“Table_Title_OBJECT_TYPE[Hierarchy]”)).
This allows users to pick from a list (Hierarchy) or to enter the Hierarchy’s ID number if they know it already.
Here’s a variation using Named Ranges: =IF(G2=”HH”,HH,IF(G2=”NS”,NS,IF(G2=”Bot”,Bot)))
Thanks for the tip!
You’re welcome Philip. Thank you.

Lets say I hard code 1,0 while creating a drop down, and change the format to display the result as YES or NO. How do I apply this format to the drop down list as well, and not just the result?
The drop down list content cannot be formatted, just the result of that content by formatting the cell that the drop down is in.

Its Awesome – Very well explained – I managed to clear lot of doubts – Thank you
You’re very welcome Asoka. Happy to help.

Hello, In your “Prevent Duplicates” section, for a value to be unique, the COUNTIF formula must return 1, not zero. That’s how it works in my Excel. If I put zero, any entry is refused.
Quite right Patrick. I’ll get it changed.

is there a way I can enter only specific 2 to 3 words and dates in a cell, eg if an activity is completed then date of completion, if activity is pending than “Pending” if issue “Issue” apart from these any entry should not be possible
Sure Varaprasad. The three options would be your classic drop down list. For the date of completion, you could make this cell dependent upon completion being entered in another cell if you wanted. An example of a rule based on another cells value is shown in the tutorial.

Hi Alan, Is there a way to combine a drop down list together with another validation such as Prevent duplicate values?
No sorry, not within the Data Validation rules. You would have to look at using a macro for this validation check on top of the drop down list one.

Thanks Alan.
I have a little complex problem.
I have two tables T1 and T2, and both have common columns say “Name” and “City”. Now, how to add a data validation list to T2.Name that is filtered with T1.Name where T2.City = T1.City.
Basically I want to filter the Names drop down in the T2.Name only with the T1.Names from the same City.
Thanks in advance.
My pleasure. This sounds like a lookup formula instead of a Data Validation list. If it is filtered by T1 for one city, you wouldn’t need a list. VLOOKUP will do the job.
Good to see the reply Alan.
Certainly I need a data validation drop down list, just that it has to be filtered based on the current table’s City (common column between 2 tables) value in the lookup table.
So for T2 Name column dropdown to be filtered and show only those Names who live in that city.
To up the complexity a little bit😀 this filtered, relevant list should be ‘distinct’ Names
Oh ok. Are you using 365 because if you are, with the new UNIQUE and FILTER functions this task is easy. If not, PivotTables could be used to create the unique city lists and dependent drop downs can be created from them.

how to put the validation for Mandatory columns does anyone know..
You are probably better off doing this in VBA. Data Validation will only work when someone attempts entry to a cell. VBA could be used to check cell values (ensure they have been used) prior to submitting, saving, printing or whatever the action may be.

Hi Alan. Thanks for this nice post. I have specific query. I have used data validation input message option to add comments to some specific cell in excel. However, there is no indication that the particular cell has some message. Its only when I click on the cell, I get to see the message. In the case when we add a comment for a cell, there is a small red arrow in the cell corner which indicates that a comment is entered for the cell. Is there some similar kind of arrangement that we can do for data validation message.
Thanks –Ashutosh
Hi Ashutosh, there is not a setting for this in Data Validation. Sorry.

Hi Alan, Is there a way to create a drop down list that contains a data name and other text values? For instance, want a drop down list of Year(Today()) – 1, Year(Today()), None, Both. Thank you!
Not sure exactly what you mean Cal. But looking at your example, I would put those formula into a cell somewhere along with the text values. And select them for the DV list.

Hi can someone help with a formula in excel that ensures that cell can only be 9 characters long. And the following must show if the entry does not meet the requirements: a stop symbol and an error message that says: the text lenght must be 9 characters
Hi Elizna, this is shown in the tutorial. There is an example for “Restrict the Text Length” and then one for “Create Meaninging Error Messages”.
Get the Latest Microsoft Excel Tips

Follow us to stay up to date with the latest in Microsoft Excel!

Excel Data Validation
Learn how to use Excel Data Validation to restrict the type of values you can enter in your Excel spreadsheet.
Excel data validation is a feature that allows you to set rules for data entry in a cell or range of cells. This is useful when you want to ensure that the data entered in a cell or range is accurate, consistent, and meets certain criteria. Data validation can help you avoid input errors and improve the quality of your data.
For practical use, think about creating an Excel worksheet and sharing it with others to fill in the requested information. The requested information can, for example, include the user's name, date, and age. Data validation is commonly used to make sure the user inputs the correct data type. So the user for example cannot type a number into a cell intended for names and vice versa where the user can’t type text into a cell intended for numbers.
Example 1: Number Restrictions (Restricting Age Column)
Let us look at an example where the user must fill in their name, date of entry, age, and department. To ensure the data the user enters is valid, select the column(s) used for data entry. First, go to the ‘Data’ ribbon and click ‘Data Validation'.

The default selection is set so that any value can be entered in this column.

However, this is not the ideal representation of the values that need to be inserted for the ‘Age’ column. With this in mind, the user can change the settings to only allow whole numbers. Additionally, the user can create a specific range for the ages inserted, here we use 18 years old (as a minimum) to 45 years old (as a maximum).

Now, if the user attempts to enter non-numbers or numbers less than 18 or greater than 45, a pop-up notification will appear, alerting the user that there is an input error.
Error Scenarios
#1 typing a word in the age column.

#2 Number less than 18

#3 Number greater than 45

Example 2: Date Restrictions
Next, we can look at another example of how the user can control entered data. Take, for example, the ‘Date’ column which records an entry date. This column has dates ranging from 2018 to 2022. Let’s walk through how you can apply date criteria to ensure the dates are entered within a certain range.
First, select the dates of entry from the ‘Dates’ column and click the ‘Data Validation’ button.

Next, apply the necessary restrictions for this column. We want this column to include only dates as values and range from 01-01-2021 to 12-12-2022.

After applying these restrictions, Excel does not automatically highlight values that fall outside the set range. To pick out dates outside the range, go to ‘Data Tools’ and click ‘Circle Invalid Data’.

After clicking ‘Circle Invalid Data’, Excel will display the values within the selected column that fall outside the restrictions placed. For example, the entry dates before 01-01-2021 are circled in red to signify an error.

To remove the entry dates circled in red, the user needs to click ‘Clear Validation Circles’ listed under ‘Data Tools’.
Example 3: Input List (Department Selection)
Now let’s take a look at how we can use data validation to set up dropdown input lists that users can use to enter data in the department column. This feature is useful because it allows us to control a fixed set of inputs so that the user cannot enter anything outside of the given list.
In this particular example, we are going to set up a data validation list that only allows the user to input one of three departments: Math, Science, or History.

First, highlight the department column cells and go to data validation. Then select allow “List.” From there, you can go to the source input bar and put in all of your input options separated by commas. In this example, we would write our 3 options like this: “Math, Science, History.”

Once that is applied, you’ll see that all of the department cells now have this dropdown input feature that forces the user to only select values from the list.

Example 4: Input Prompt (Name Column Message)
Lastly, when setting up data validation restrictions, the user can enable Excel to display an input message. The input message will provide a pop-up guidance message to help the user correctly input data.
For example, the user can insert an input message to remind the user to only input their first name. To do this, hover over the 'Name' column and click the 'Data Validation' button.

First, the user can restrict the ‘Name’ column by selecting ‘Text length’. Then, the user needs to pick the desired text length that captures the user’s first name, such as a minimum of two text lengths and a maximum of 75 text lengths. With these settings, the user cannot input text that is only one character long or text that is over 75 characters long.

Next, the user can click the ‘Input Message’ tab to write out the guiding prompt for the user.

Now every time someone attempts to enter a name, a message appears to remind the user to input their full first name as shown on their ID card.

Additional Resources
If you found this article on Excel data validation helpful and you're interested in learning more ways to level up your Excel skills, check out our Excel for Business and Finance Course and more using the get started button below.
Other Articles You May Find Helpful
- Excel Filter
- Excel Sort Function
- Excel Text to Columns
- Must Know Finance Interview Questions
Introduction
Building a cash flow statement from scratch using a company income statement and balance sheet is one of the most fundamental finance exercises commonly used to test interns and full-time professionals at elite level finance firms.
Test hyperlink

Dolor enim eu tortor urna sed duis nulla. Aliquam vestibulum, nulla odio nisl vitae. In aliquet pellentesque aenean hac vestibulum turpis mi bibendum diam. Tempor integer aliquam in vitae malesuada fringilla.
Elit nisi in eleifend sed nisi. Pulvinar at orci, proin imperdiet commodo consectetur convallis risus. Sed condimentum enim dignissim adipiscing faucibus consequat, urna. Viverra purus et erat auctor aliquam. Risus, volutpat vulputate posuere purus sit congue convallis aliquet. Arcu id augue ut feugiat donec porttitor neque. Mauris, neque ultricies eu vestibulum, bibendum quam lorem id. Dolor lacus, eget nunc lectus in tellus, pharetra, porttitor.
- Test Bullet List 1
- Test Bullet List 2
- Test Bullet List 3
"Ipsum sit mattis nulla quam nulla. Gravida id gravida ac enim mauris id. Non pellentesque congue eget consectetur turpis. Sapien, dictum molestie sem tempor. Diam elit, orci, tincidunt aenean tempus."
Tristique odio senectus nam posuere ornare leo metus, ultricies. Blandit duis ultricies vulputate morbi feugiat cras placerat elit. Aliquam tellus lorem sed ac. Montes, sed mattis pellentesque suscipit accumsan. Cursus viverra aenean magna risus elementum faucibus molestie pellentesque. Arcu ultricies sed mauris vestibulum.
Morbi sed imperdiet in ipsum, adipiscing elit dui lectus. Tellus id scelerisque est ultricies ultricies. Duis est sit sed leo nisl, blandit elit sagittis. Quisque tristique consequat quam sed. Nisl at scelerisque amet nulla purus habitasse.
Nunc sed faucibus bibendum feugiat sed interdum. Ipsum egestas condimentum mi massa. In tincidunt pharetra consectetur sed duis facilisis metus. Etiam egestas in nec sed et. Quis lobortis at sit dictum eget nibh tortor commodo cursus.
Odio felis sagittis, morbi feugiat tortor vitae feugiat fusce aliquet. Nam elementum urna nisi aliquet erat dolor enim. Ornare id morbi eget ipsum. Aliquam senectus neque ut id eget consectetur dictum. Donec posuere pharetra odio consequat scelerisque et, nunc tortor. Nulla adipiscing erat a erat. Condimentum lorem posuere gravida enim posuere cursus diam.

Ready to Level Up Your Career?
Learn the practical skills used at Fortune 500 companies across the globe.
How to use Excel Table within a data validation list (4 easy ways)
Excel Tables expand automatically whenever new data is added. This feature alone makes Tables one of the most powerful tools within the Excel user’s toolkit. A Table can be used as the source data for a chart and within a named range, both of which benefit from the auto-expand feature. Data validation lists would also benefit from the auto-expand feature, but they just don’t work correctly—an oversight on Microsoft’s part (in my opinion).
In this post, we examine the issues and solutions for creating an Excel data validation list from a Table.
Example data
The problem, normal cell references over a table, problems with this approach, indirect function, warning about this method, named range of the table column, create the named range, add the named range to the data validation list, key points about this method, dynamic array spill range, create a spill range, use the spill range in the data validation list, which method to choose.
Download the example file: Join the free Insiders Program and gain access to the example file used for this post.
File name: 0076 Data Validation with Tables.zip
The examples in this post use the following data:

The Table name is myList (I know, it’s not a great name, but it will work for the examples).
The following data validation settings look like they should work. It should use the column called Animals from a Table called myList .

Instead of giving us an Excel data validation list from the Table, Excel shows an error message.

What can you use to solve this problem? I’ve got four solutions for you:
Let’s look at each of these and you can decide which is the best option for your situation.
Normally, if we use standard cell references, the data validation list is static. Each time a new item is added to the list either the data validation source will need to be updated, or the new items will need to be added within the existing list range.
However, if we create the data validation list using normal cell references, which also happen to be all the rows from a Table column, it will expand.
Look at the screenshot below. The cells $A$2:$A$7 are exactly the same cells as the reference myList[Animals] would be for a Table.

It looks like it would behave like a standard static list. But somehow Excel knows.
If we add data to the bottom of the Table, the data validation list expands when values are added to the Table. Try it for yourself.
Now, don’t get too excited. There is a big problem with this approach:
- If the data validation list is on a separate sheet to the Table, it does not expand.
- This method only works if the cells selected include the entire Table column (i.e., in our example, if you reference $A$4:$A$7 it will not expand when a new item is added as it is not the whole Table column).
Due to the issues noted above, it is probably best to avoid this method.
The INDIRECT function converts text into a Range that Excel recognizes and can use in calculations. For example, if Cell A2 contains the text “ A1 ” you can write =INDIRECT(A2) and Excel converts that to the cell reference =A1 .
We can use the INDIRECT function with the Table and column reference as text and Excel will understand this.

The formula used in the screenshot above is.
If the list only has one column, it is possible to refer to just the Table.
The range for the data validation list now expands whenever new items are added to the Table.
With this method, there is one key thing to be aware of; the Table and column names are hardcoded into the INDIRECT formula. If either of these change, the data validation list will cease to work as the formula cannot find the source data.
INDIRECT is normally considered a volatile function, which, in some circumstances, can cause slow calculations in Excel workbooks.
However, data validation lists are only recalculated when we interact with the cell. Therefore, INDIRECT does not perform a volatile function in this context.
Named ranges accept a Table column as the source, and data validation lists accept a named range. Therefore, we can take a two-step approach to achieve the desired result.
To create the named range, click Formulas > Define Name
The New Name dialog box opens.
Give the named range a name ( myDVList in the example below) and set the Refers to box to the name of the Table and column.
Click OK . The named range has been created.

As with the example above, if the Table only has one column, we can refer to just the Table without the column name.
The screenshot below shows the named range added to the data validation list box.

The data validation list now expands whenever new items are added to the Table.
In relation to this method, there are a few things to be aware of:
- This is a two-stage process, which takes a little longer to set up.
- If the Table or Column names change the named range automatically updates to reflect the changes.
While it takes longer to set up, this method is harder to break.
We are about to get technical for a moment, but don’t worry applying this method is very easy, so stick with me.
Excel 2021 and Excel 365 have a feature known as dynamic arrays. These allow a formula to return multiple results and to spill the results across multiple cells; this is known as a spill range .
If the number of rows returned by the formula changes, the rows and columns in the spill range also change.
We use the # sign (also known as the spill operator) to refer to the cells in the spill range.
Here is the key part… data validation lists accept the spill range as a valid range reference. So this means we can create a two-step process:
- Use the spill range in a data validation list
To create the spill range on a sheet, we just need to refer to the Table and column.

The formula in cell F2 is:
Since the Table column has multiple cells, those values spill down into cells F2:F7 . This can be seen by the blue box which highlights the spill range.
If the number of items in the Table changes, the spill range of the Table changes.
Just as for previous methods, if the Table only contains a single column, we could refer to just the Table name of myList, instead of the myList[Animals].
To get the spill range into the data validation list, we refer to the first cell in the range, followed by # .

In the screenshot above, we are using cell F2 and its spill range as the source for the data validation list.
If the data validation list refers to the range on another worksheet, the sheet name must also be included in the source, such as:
- If the Table or Column names change, the formulas update automatically to reflect the changes.
So, with four options to choose from, the question is which is the best?
I don’t advise using the standard cell references over a table as it won’t work across worksheets. And I avoid the INDIRECT method as it can easily break if renaming Tables or columns.
I like the named range and spill range options. While they take a few extra seconds, they are easy to set up and less likely to break if changes occur.
We cannot create an Excel data validation list directly from a Table. However, in this post, we have seen four methods that we can use to achieve the same result.
Related Posts:
- Don’t trust data validation in Excel!
- How to loop through each item in Data Validation list with VBA
- How to use Table slicers for advanced interactivity in Excel
Discover how you can automate your work with our Excel courses and tools.

Excel Academy The complete program for saving time by automating Excel.

Excel Automation Secrets Discover the 7-step framework for automating Excel.

Office Scripts: Automate Excel Everywhere Start using Office Scripts and Power Automate to automate Excel in new ways.
Leave a Comment Cancel reply

Add, change, or remove data validation
Data validation is the ability to automatically check for errors while the user fills out a form. By adding data validation to controls in your form template, you can ensure that the data that you collect is accurate and consistent, and that it conforms to any standards that are already in use by your company. For example, you can use data validation to let users know when the amount that they enter for an expense item exceeds the approved amount, or when they mistakenly enter their name in a box that is used for collecting phone numbers.
If a form contains data validation errors, and it is connected to a database or Web service, users won't be able to submit the form until they fix these errors. Users can save a local copy of the form, and then correct and submit the data later.
In this article
Ways that users are notified about validation errors, compatibility considerations, add data validation, change a data validation condition, remove data validation.
For a form that is designed to be filled out by using InfoPath, you can set a data validation message to be displayed as a ScreenTip. After viewing the ScreenTip, your users can optionally display a detailed alert that you provide. Alternatively, you can set the detailed alert to be displayed automatically. For example, if you specify an error condition that you want to occur if a user types their name into a box that is used for collecting phone numbers, you can enable a ScreenTip to display the message "Type a telephone number in this field." If you enable an alert to appear automatically, you can show a detailed message by default, such as "This field requires a telephone number in the format (555) 555-0100." If you choose to display a ScreenTip by default, your users can manually display the alert that you provide by right-clicking the field in InfoPath, and then clicking the option to show the alert.
1. The pointer changes to an I-beam when you rest it over the field, and the ScreenTip is displayed.
2. When you right-click the field, a shortcut menu appears — and when you point to Full error description , the pointer changes to an arrow.
3. When you click Full error description , the alert appears.
For a form that is filled out in a Web browser, alerts cannot be displayed automatically. However, users can display the alert by clicking in the field on the Web page that contains the ScreenTip, and then clicking the link that appears.
2. The pointer changes to a hand when you move it to the ScreenTip.
3. When you click the link, the alert appears.
Top of Page
When you design a form template in InfoPath, you can choose a specific compatibility mode to design a browser-compatible form template. When a browser-compatible form template is published to a server running InfoPath Forms Services, and then browser-enabled, forms based on the form template can be viewed in a Web browser. When you design a browser-compatible form template, some controls are unavailable in the Controls task pane because they cannot be displayed in a Web browser.
Some data validation features work differently in a Web browser than they do in InfoPath. For example, when you add data validation to a control, you create explanatory text to be displayed when a user enters invalid data into that control. You can have this explanatory text appear in a ScreenTip, and optionally allow users to display an alert that contains additional information, or you can have the alert appear automatically when a user enters invalid data. Alerts cannot be displayed automatically for forms that are viewed in a Web browser, but users can still view the ScreenTip, and optionally display an alert containing additional information.
Note: When users fill out forms by using a browser, they can quickly display a data validation alert by pressing CTRL+SHIFT+I.
List of controls that support data validation
The following table lists the Microsoft Office InfoPath 2007 controls that support data validation and whether they are available for browser-compatible form templates.
|
|
|
| Check box | Yes |
| Date picker | Yes |
| Drop-down list box | Yes |
| List box | Yes |
| Option button | Yes |
| Text box | Yes |
| Rich text box | Yes |
| Bulleted, numbered, or plain list | No |
| Combo box | No |
Click the control that you want to add data validation to.
On the Format menu, click Data Validation .
In the Data Validation dialog box, click Add .
Under If this condition is true , add a condition.
The following example shows how to create a data validation condition to ensure that data typed into a text box control matches a specific value — in this case, the word Hello.
In the first box, click Select a field or group , and then select the field or group that the control is bound to.
In the second box, click is not equal to .
In the third box, click Type text , and then type Hello .
Note: To require users to enter data into the control, in the Control Properties dialog box, select the Cannot be blank check box.
To automatically show a dialog box message when a user leaves a control blank, select the Show dialog box messages immediately when users enter invalid data check box.
Note: Because dialog box messages cannot be displayed automatically in a Web browser, a user who fills out your form by using a Web browser will see only the ScreenTip.
In the ScreenTip box, type the text that you want to display when a user points to the control or right-clicks the control.
In the Message box, type the text that you want to display in the message dialog box either immediately or when the user requests more details.
Note: The ScreenTip for a data validation error will not display for controls that also have a default ScreenTip set on the Advanced tab of the Control Properties dialog box. This behavior helps to ensure that the name of the control is accurately conveyed to users who are using screen readers.
Click the control whose data validation you want to modify.
In the Data Validation dialog box, click the condition that you want to change, click Modify , and then make the changes that you want.
Click the control whose data validation you want to remove.
In the Data Validation dialog box, click the condition that you want to remove, and then click Remove .

Need more help?
Want more options.
Explore subscription benefits, browse training courses, learn how to secure your device, and more.

Microsoft 365 subscription benefits

Microsoft 365 training

Microsoft security

Accessibility center
Communities help you ask and answer questions, give feedback, and hear from experts with rich knowledge.

Ask the Microsoft Community

Microsoft Tech Community

Windows Insiders
Microsoft 365 Insiders
Was this information helpful?
Thank you for your feedback.
- Write My Statistics Paper
- Jamovi Assignment Help
- Business Statistics Assignment Help
- RapidMiner Assignment Help
- Econometric Software Assignment Help
- Econometrics Assignment Help
- Game Theory Assignment Help
- Take My Statistics Exam
- Statistics Assignment Helper
- Statistics Research Paper Assignment Help
- Do My Statistics Assignment
- Pay Someone to Do My Statistics Assignment
- Professional Statistics Assignment Writers
- Need Help with My Statistics Assignment
- Hire Someone to Do My Statistics Assignment
- Statistics Assignment Experts
- Statistics Midterm Assignment Help
- Statistics Capstone Project Help
- Urgent Statistics Assignment Help
- Take My Statistics Quiz
- Professional Statistics Assignment Help
- Statistics Assignment Writers
- Best Statistics Assignment Help
- Affordable Statistics Assignment Help
- Final Year Statistics Project Help
- Statistics Coursework Help
- Reliable Statistics Assignment Help
- Take My Statistics Test
- Custom Statistics Assignment Help
- Doctorate Statistics Assignment Help
- Undergraduate Statistics Assignment Help
- Graduate Statistics Assignment Help
- College Statistics Assignment Help
- ANCOVA Assignment Help
- SPSS Assignment Help
- STATA Assignment Help
- SAS Assignment Help
- Excel Assignment Help
- Statistical Hypothesis Formulation Assignment Help
- LabVIEW Assignment Help
- LISREL Assignment Help
- Minitab Assignment Help
- Analytica Software Assignment Help
- Statistica Assignment Help
- Design Expert Assignment Help
- Orange Assignment Help
- KNIME Assignment Help
- WinBUGS Assignment Help
- Statistix Assignment Help
- Calculus Assignment Help
- JASP Assignment Help
- JMP Assignment Help
- Alteryx Assignment Help
- Statistical Software Assignment Help
- GRETL Assignment Help
- Apache Hadoop Assignment Help
- XLSTAT Assignment Help
- Linear Algebra Assignment Help
- Data Analysis Assignment Help
- Finance Assignment Help
- ANOVA Assignment Help
- Black Scholes Assignment Help
- Experimental Design Assignment Help
- CNN (Convolutional Neural Network) Assignment Help
- Statistical Tests and Measures Assignment Help
- Multiple Linear Regression Assignment Help
- Correlation Analysis Assignment Help
- Data Classification Assignment Help
- Decision Making Assignment Help
- 2D Geometry Assignment Help
- Distribution Theory Assignment Help
- Decision Theory Assignment Help
- Data Manipulation Assignment Help
- Binomial Distributions Assignment Help
- Linear Regression Assignment Help
- Statistical Inference Assignment Help
- Structural Equation Modeling (SEM) Assignment Help
- Numerical Methods Assignment Help
- Markov Processes Assignment Help
- Non-Parametric Tests Assignment Help
- Multivariate Statistics Assignment Help
- Data Flow Diagram Assignment Help
- Bivariate Normal Distribution Assignment Help
- Matrix Operations Assignment Help
- CFA Assignment Help
- Mathematical Methods Assignment Help
- Probability Assignment Help
- Kalman Filter Assignment Help
- Kruskal-Wallis Test Assignment Help
- Stochastic Processes Assignment Help
- Chi-Square Test Assignment Help
- Six Sigma Assignment Help
- Hypothesis Testing Assignment Help
- GAUSS Assignment Help
- GARCH Models Assignment Help
- Simple Random Sampling Assignment Help
- GEE Models Assignment Help
- Principal Component Analysis Assignment Help
- Multicollinearity Assignment Help
- Linear Discriminant Assignment Help
- Logistic Regression Assignment Help
- Survival Analysis Assignment Help
- Nonparametric Statistics Assignment Help
- Poisson Process Assignment Help
- Cluster Analysis Assignment Help
- ARIMA Models Assignment Help
- Measures of central tendency
- Time Series Analysis Assignment Help
- Factor Analysis Assignment Help
- Regression Analysis Assignment Help
- Survey Methodology Assignment Help
- Statistical Modeling Assignment Help
- Survey Design Assignment Help
- Linear Programming Assignment Help
- Confidence Interval Assignment Help
- Quantitative Methods Assignment Help
Mastering Data Validation in Excel: Your Key to Assignment Success

Submit Your Excel Assignment
Claim your offer.
Unlock a fantastic deal at www.statisticsassignmenthelp.com with our latest offer. Get an incredible 20% off on your second statistics assignment, ensuring quality help at a cheap price. Our expert team is ready to assist you, making your academic journey smoother and more affordable. Don't miss out on this opportunity to enhance your skills and save on your studies. Take advantage of our offer now and secure top-notch help for your statistics assignments.

- Data Validation Techniques with Excel for Statistics Assignments
Types of Data Validation
Step 1: select the cell or range, step 2: access the data validation dialog box, step 3: choose a validation type, step 4: configure validation criteria, step 5: input messages (optional), step 6: error alerts (optional), step 7: test the data validation, dynamic dropdown lists, cascading dropdowns, custom error messages with formulas, conditional formatting with data validation, using named ranges in data validation, common data validation pitfalls.
Excel is a versatile tool that serves as a Swiss army knife for data analysis, especially for university students working on assignments. Whether you're tracking finances, conducting scientific research, or organizing survey data, Excel plays a pivotal role. However, with great power comes great responsibility, and ensuring data integrity is paramount. This is where data validation steps in, providing you with the ability to maintain the quality and accuracy of your data. In this comprehensive guide, we will explore the ins and outs of data validation in Excel, equipping you with the knowledge to write your data validation assignment using Excel .
What is Data Validation?
Data Validation: Excel allows users to set validation rules to ensure data integrity. In simpler terms, data validation helps you control the types of data that can be entered into a cell, ensuring that the data conforms to specific criteria you define. This is particularly useful when you want to restrict data entry to a specific range, format, or set of values. Data validation prevents users from entering incorrect or inconsistent data, reducing errors and improving the overall quality of your spreadsheets.

- Whole Number and Decimal Validation: When you need to limit the input to whole numbers or decimals within a specified range, you can use these options. For instance, you can restrict a cell to only accept whole numbers between 1 and 100.
- List Validation: List validation allows you to create a dropdown list of predefined values, ensuring that users select from this list. This is handy when you have a set of choices, such as department names or product codes, to avoid typos or inconsistencies.
- Date Validation: Date validation ensures that dates entered into a cell are within a specified range or conform to a specific format. For example, you can restrict the entry of dates to those within the current year.
- Text Length Validation: Use this type to set character limits for text input. For instance, if you're collecting short descriptions, you can limit them to 200 characters or less.
- Custom Validation: Custom validation rules allow you to define your criteria using formulas. This is incredibly powerful and versatile, enabling you to create complex validation rules tailored to your specific needs.
How to Implement Data Validation in Excel
Now that we've covered the basics, let's dive into the practical aspect of implementing data validation in Excel.
Begin by selecting the cell or range where you want to apply data validation. To select a single cell, click on it. To select a range, click and drag to highlight the desired cells.
Go to the "Data" tab on the Excel ribbon, and in the "Data Tools" group, click on "Data Validation." This will open the Data Validation dialog box.
In the Data Validation dialog box, you will see various tabs corresponding to the different types of validation. Select the appropriate tab based on the type of validation you want to implement.
Once you've selected a validation type, you need to configure the validation criteria. This involves specifying the allowed values, ranges, or conditions for the selected cells.
- Whole Number and Decimal Validation: Set the minimum and maximum values for the range of acceptable numbers.
- List Validation: Enter the list of valid values, or you can reference a range of cells containing the values.
- Date Validation: Specify the date range or format for the valid dates.
- Text Length Validation: Set the minimum and maximum character limits.
- Custom Validation: Here, you'll need to enter a custom formula that evaluates to either TRUE or FALSE. If the formula evaluates to TRUE, the data is valid; if it's FALSE, the data is rejected.
You can provide input messages to guide users as they enter data. These messages can explain the validation rules or offer instructions. To add an input message, go to the "Input Message" tab in the Data Validation dialog box.
Error alerts are displayed when users enter data that violates the validation rules. You can customize error messages to inform users about the issue and how to rectify it. To configure error alerts, go to the "Error Alert" tab in the Data Validation dialog box.
After configuring the validation rules, test them by trying to enter data that violates the rules. Excel will either accept the data or display an error message, depending on whether the input meets the criteria.
Advanced Techniques in Data Validation
Now that you've mastered the basics of data validation, let's explore some advanced techniques that can help you tackle more complex assignments in Excel.
One common scenario is to have a dropdown list that changes based on a selection made in another cell. This can be achieved by using Excel's dynamic named ranges or using a combination of INDEX and MATCH functions to create dependent dropdown lists.
In assignments involving hierarchical data, such as regions and cities or product categories and subcategories, you can create cascading dropdown lists. When a user selects an option from the first dropdown, it filters the options available in the second dropdown, streamlining data entry.
While Excel provides default error messages, you can take it a step further by using custom error messages with formulas. For example, you can create a formula that checks if the entered value is within an acceptable tolerance and then displays a custom error message accordingly.
To provide visual cues to users, you can combine data validation with conditional formatting. For instance, you can highlight cells that contain invalid data with a specific colour, making it easier for users to identify and correct errors.
Named ranges not only make your formulas more readable but also enhance data validation. You can use named ranges to define lists or validation criteria, making it easier to manage and update your validation rules.
While data validation is a powerful tool, there are some common pitfalls you should be aware of:
- Overly Restrictive Validation: Avoid setting validation rules that are too strict, as they can frustrate users and limit flexibility. Balance data integrity with usability.
- Ignoring Error Alerts: Users may dismiss error alerts without fully understanding them. Ensure that error messages are clear and helpful.
- Not Updating Validation Rules: As your data or assignment requirements change, remember to update your validation rules accordingly to maintain data accuracy.
- Not Testing Thoroughly: Always test your validation rules with various scenarios to ensure they work as expected.
- Complex Custom Formulas: While custom formulas can be powerful, they can also be prone to errors. Verify and validate complex custom formulas thoroughly.
Data validation is a crucial skill for university students working on Excel assignments. It not only helps maintain data integrity but also improves the overall quality of your work. By understanding the types of validation, how to implement them, and mastering advanced techniques, you can tackle complex assignments with confidence. Avoid common pitfalls, test rigorously, and leverage data validation to excel in your academic pursuits. Excel's data validation is your key to success in maintaining clean and reliable data for your assignments.
Discover More
Our popular services.
Data Analytics Internship
About the internship, skill(s) required.
Who can apply
Only those candidates can apply who:
1. are available for full time (in-office) internship
2. can start the internship between 21st Aug'24 and 25th Sep'24
3. are available for duration of 3 months
4. have relevant skills and interests
Number of openings
About arcatron mobility private limited.
Excel Sample Data (Free Download 13 Sample Datasets)
Project Management Sample Data
A project management sample data is suitable for various types of data filtering, analyzing, and visualizing. Here are the variables that we have included in the sample data:
- Project Name
- Assigned to
- Days Required
Here is a preview of the project management dataset:

Download the Sample Workbook
Inventory Records Sample Data in Excel
Inventory management records consist of product and stock information. In our sample dataset, we have included the following fields:
- Product Name
- Opening Stock
- Purchase/Stock-in
- Number of Units Sold
- Hand-in-stock
- Cost Price Per Unit
- Cost Price Total
Here is a preview of the inventory records sample data:

Call Center Customer Satisfaction Data
Call centers deal with customer service and receive various types of feedback from customers. In our Call Center Customer Satisfaction data, we have included the following fields:
- Customer Name
- Call Timestamp
- Response Time
- Call Duration
- Call Center
Here is a preview of our sample data:

Supermarket Sales Sample Data in Excel
Supermarket sales sample data is a popular dataset for learning and practicing your Excel skills. Here is the list of variables we have included in our supermarket sales sample data:
- Retail Price
- Order Quantity
Here is a preview of the sample supermarket sales data in Excel:

Download the Practice Workbook
Employee Management Data
Employee management data contains information on all employees in an organization. In our sample employee management data in Excel, we have listed the following variables:
- Employee ID
- Designation
- Annual Salary
Here is a preview of the employee management data:

Technological Product Sample Data
Any technological product information requires various specifications. In our sample dataset, we have listed the following specifications:
- Country of Origin
- Release Date
The following image shows a preview of our sample technological product dataset:

Engineering and Manufacturing Sample Data
Engineered or manufactured products also require various specifications. Here is the list of variables we have included in our sample engineering and manufacturing sample data:
- Manufacturer
- Stock Quantity
Here is a preview of the sample dataset:

Students Marksheet Sample Data in Excel
A student mark sheet contains the student identifiers and marks in various subjects. In our sample students marksheet dataset, we have listed the following variables:
- Marks in Mathematics
- Marks in Physics
- Marks in Chemistry
Here is a preview of the sample student marksheet dataset:

2022 FIFA World Cup Performance Data
In our sample dataset, we have listed the information of each player from the World Cup-winning Argentina team. Here is the list of variables we have included:
- Player Name
- Jersey Number
- Appearances
- Goals Scored
- Assists Provided
- Dribbles per 90 Min
- Interceptions per 90 Min
- Tackles per 90 Min
- Total Duels Won per 90 Min
You can preview the sample dataset in the following image:

Tokyo Olympic Data
This sample dataset contains the team names, number of Gold, Silver, Bronze, and total medals, and ranking of teams (based on gold medal and total medal count) in the Tokyo Olympics. Here is a preview of the sample dataset:

Healthcare Insurance Sample Data in Excel
The price of healthcare insurance depends on various factors such as current age, BMI, smoking habits, etc. In our sample healthcare insurance dataset, we have listed the following variables:
- Smoking Status
- Insurance Price

Travel Destination Distance Data in Excel
While deciding on a travel destination, we need to take the distance, available travel modes, travel duration, etc. factors into consideration. In our sample travel destination dataset, we have listed the following variables:
- Source City
- Source Latitude
- Source Longitude
- Destination City
- Destination Latitude
- Destination Longitude
- Distance (in km)
- Distance (in mile)
- Travel Mode

Netflix Movies Sample Data
The movie dataset provided in this section contains the following variables:
- IMDb Rating
You can preview the dataset in the image below:

Excel Sample Data: Knowledge Hub
- GST State Code List in Excel
- Historical Data of NSE Stocks in Excel
<< Go Back to Learn Excel
What is ExcelDemy?
Tags: Learn Excel

Seemanto Saha graduated in Industrial and Production Engineering from Bangladesh University of Engineering and Technology. He has been with ExcelDemy for a year, where he wrote 40+ articles and reviewed 50+ articles. He has also worked on the ExcelDemy Forum and solved 50+ user problems. Currently, he is working as a team leader for ExcelDemy. His role is to guide his team to write reader-friendly content. His interests are Advanced Excel, Data Analysis, Charts & Dashboards, Power Query,... Read Full Bio

Thanks for the DATA SETS !

Hello Margit ,
You are most welcome.
Regards ExcelDemy

Thank you so much
Hello Usama Jamil ,

I needed Oil parameters Offshore Foundation design 2015 excel sheet access
Hello Ameer Ahmed ,
We don’t have any dataset you asked for and your question is not clear enough. Our datasets are given in the article.

Thank you so much for the data sets.
Hello Gaurav,

Where are the solutions to these problems? Would like to check against what I did
Hello Cynthia Satterwhite ,
Neither any problem nor any solution are given. These dataset are given to practice by yourself.

Wow Great Readymade Excel Sheets, Can You provide any excel sheet to maintain monthly calibration details for internal lab
Hello Karunesh Pandey ,
As calibration details varies with lab type we can provide you the criteria. You can fill out your information and edit the list.

| pH Meter | 12345 | ABC Inc. | Model X | Monthly | 3/15/2024 | 4/15/2024 | AB | – |
| Balance | 67890 | XYZ Corp. | Model Y | Monthly | 3/20/2024 | 4/20/2024 | CD | – |
| Spectrophotometer | 13579 | DEF Ltd. | Model Z | Monthly | 3/10/2024 | 4/10/2024 | EF | – |
| Pipettes (10-100µl) | 24680 | GHI Co. | Model A | Monthly | 3/25/2024 | 4/25/2024 | GH | – |
| – | – | – | – | – | – | – | – | – |

nice work thank you ! I need dataset for students, subjects, teachers and departments hope U help.

Hello Fulad
Thanks for your compliment! As you requested, you can use the following dataset, which contains data with your mentioned fields:
You can download the workbook from the following link:
DOWNLOAD WORKBOOK
I hope you have found the dataset you were looking for; good luck.
Regards Lutfor Rahman Shimanto ExcelDemy

ExcelDemy good work. It is difficult to get excel datasets for predictive analysis. please can I get a comprehensive CRM (customer online journey) or Supply chain dataset (Procurement-Logistics- inventory-sales) for retail industry.
Hello Amara ,
Here I’m attaching a sample dataset for CRM and Supply chain. You can modify this dataset based on your requirements. Dataset of CRM: CRM Dataset.xlsx Dataset of Supply Chain: Supply Chain Dataset.xlsx

I need a dataset for Customs Compliance Monthly Report excel sheet to help me populate:
General data: •Import/Export numbers. [Breakdown of EC, Sanctions, IP, FC, DG, Incoterms, duty spend] •CCAR performance. •Procedures status. Declaration Accuracy: •Export (Export Control/IP/General). •Import (General/IP).
Inward Processing: •Quarterly update. •Renewal.
Audit: •Export/Export Control. •Tariff Classification. •Preferential Origin. •Finance/Tax. •Documentation. •NISR audit (high risk).
Project status updates: •Incoterms. •Plain Language Customs Descriptions. •Service Level Agreements. •D365 (Service Centre). Regards Dems
Hello Demba ,

Download the Excel file from here : Customs Compliance Monthly Report.xlsx
Leave a reply Cancel reply
ExcelDemy is a place where you can learn Excel, and get solutions to your Excel & Excel VBA-related problems, Data Analysis with Excel, etc. We provide tips, how to guide, provide online training, and also provide Excel solutions to your business problems.
Contact | Privacy Policy | TOS
- User Reviews
- List of Services
- Service Pricing

- Create Basic Excel Pivot Tables
- Excel Formulas and Functions
- Excel Charts and SmartArt Graphics
- Advanced Excel Training
- Data Analysis Excel for Beginners

Advanced Excel Exercises with Solutions PDF
IMAGES
COMMENTS
Select the cell (s) with data validation. On the Data tab, click the Data Validation button. On the Settings tab, click the Clear All button, and then click OK. Tips: To remove data validation from all cells on the current sheet, use the Find & Select feature to select all of the validated cells.
Apply data validation to cells. Use data validation to restrict the type of data or the values that users enter into a cell, like a dropdown list. Select the cell (s) you want to create a rule for. Select Data >Data Validation. Whole Number - to restrict the cell to accept only whole numbers. Decimal - to restrict the cell to accept only ...
For this, click the Data Validation button on the Data tab, in the Data Tools group or press the key sequence Alt > D > L (each key is to be pressed separately). On the Settings tab of the Data Validation dialog window, select Custom in the Allow box, and enter your data validation formula in the Formula box. Click OK.
Guide 1 - How to Apply Data Validation in Excel. Select the cell or range where you want the validation. Go to the " Data " tab. Click on " Data Validation " and choose the validation type you need. Configure the criteria in all tabs based on your requirements and click " OK " to apply the validation.
As an expert developer well-versed in data quality best practices, data validation is an Excel feature I highly recommend using. Defining rules for valid entries is a critical component when building spreadsheets handling important data. In this comprehensive guide, I'll share my insight on how to create different types of data validation ...
Data validation is a feature in Excel used to control what a user can enter into a cell. For example, you could use data validation to make sure a value is a number between 1 and 6, make sure a date occurs in the next 30 days, or make sure a text entry is less than 25 characters. Data validation can simply display a message to a user telling ...
Data validation in Excel refers to a specific feature that controls the values that can go into a cell. It offers a range of techniques that can be used to check both existing values or create rules that will apply to ones. To find the Data Validation feature in Excel, we follow these steps: Open the Data tab.
Click the data validation button, in the Data Tools Group, to open the data validation settings window. This is how the data validation window will appear. The first tab in the data validation window is the settings tab. You can create rules for data validation in this tab. For example, we can specify that the date in the first column must be a ...
You can use data validation to restrict the type of data or the values that users enter into a cell. One of the most common data validation uses is to create...
Click on the "Data Validation" button. A Data Validation dialog box will open. From the "Allow" drop-down menu, choose "List". In the "Source" field, enter the desired values for the drop-down list, separating each value with a comma. Once you have entered the values, click "OK" to close the dialog box.
To find the cells on the worksheet that have data validation, on the Home tab, in the Editing group, click Find & Select, and then click Data Validation. After you have found the cells that have data validation, you can change, copy, or remove validation settings. When creating a drop-down list, you can use the Define Name command ( Formulas ...
Assign data validation to the cell where the user selects the company, limiting the input to the list of company names. 4. Next, use the "Index" and "Offset" functions to display the corresponding table based on the selected company. ... Create a dropdown list of company names (e.g., in cell A50) using Excel's Data Validation feature ...
The formula below can be used for this. =WEEKDAY (A2,2)<=5. The WEEKDAY function returns a number that represents the day of the week. In the WEEKDAY function, the 2 specifies that a week starts on Monday as 1 through to the Sunday as 7. In this validation rule, the returned value must be less than or equal to 5.
Example 1: Number Restrictions (Restricting Age Column) Let us look at an example where the user must fill in their name, date of entry, age, and department. To ensure the data the user enters is valid, select the column (s) used for data entry. First, go to the 'Data' ribbon and click 'Data Validation'. The default selection is set so ...
To create the named range, click Formulas > Define Name. The New Name dialog box opens. Give the named range a name ( myDVList in the example below) and set the Refers to box to the name of the Table and column. Click OK. The named range has been created. The formula used in the screenshot above is. =myList[Animals]
First, we need to store the primary drop-down choices in a table named tbl_primary: Next, we set up a new custom name dd_primary that refers to the table: Then, we set up data validation on the primary input cell to allow a list equal to dd_primary: The resulting primary input cell is shown below:
Example 1 - Create a Drop-Down List in a Single Cell from Comma Separated Values. Select cell B5. Go to Data tab. From the Data Tools group, select Data Validation and choose Data Validation. A Data Validation dialog box pops up. Select the Setting tab. Choose List from the Allow drop-down. Input the data in the Source typing box that is ...
Change a data validation condition. Click the control whose data validation you want to modify. On the Format menu, click Data Validation. In the Data Validation dialog box, click the condition that you want to change, click Modify, and then make the changes that you want. Top of Page.
Excel exercises on DATA VALIDATION. This page lists the 2 exercises about Data validation in Excel on our website: Apply validation and protection to a model of game show winner expenditure and income. Set data validation on cells to stop invalid entries - pay data. You can search our full list of Excel exercises here .
Go to the Developer tab in the Ribbon. Click on Insert in the Controls group. Choose Check Box (Form Control) from the dropdown. Draw a checkbox in the Data Validation Control column as shown below. Right-click on the checkbox and select Edit Text. Rename the checkbox (e.g., Enable Data Entry ).
This is where data validation steps in, providing you with the ability to maintain the quality and accuracy of your data. In this comprehensive guide, we will explore the ins and outs of data validation in Excel, equipping you with the knowledge to write your data validation assignment using Excel. What is Data Validation?
Using the IF function in the data validation formula we will make the conditional list in the right-side table. Steps: Select the range E3:E12. Go to the Data tab and the Data Tools group. Select the Data Validation dropdown. Choose the Data Validation option. Then, the Data Validation dialog box will appear.
Position Overview: As a Data Analyst Intern, you will work closely with our data analysis and business intelligence teams to support various data-related projects. This role offers an excellent opportunity to gain hands-on experience with data visualization tools such as Power BI or Tableau and to develop your analytical skills in a real-world setting. Key Responsibilities: 1) Assist in the ...
Go to the Data tab, select Data Tools, and choose Data Validation. The Data Validation window will open. Click the Allow box and select Whole number. In the Data box, select Between. Put 40 in Minimum and 100 in Maximum. Click OK. Enter the values manually.
This sample dataset contains the team names, number of Gold, Silver, Bronze, and total medals, and ranking of teams (based on gold medal and total medal count) in the Tokyo Olympics. Here is a preview of the sample dataset: Download the Sample Workbook. Tokyo Olympic Sample Data.xlsx.