- Password Recovery Password Refixer Bundle Windows Password Refixer Windows 7 Password Refixer Office Password Refixer Word Password Refixer Excel Password Refixer PowerPoint Password Refixer RAR Password Refixer ZIP Password Refixer PDF Password Refixer Access Password Refixer Outlook Password Refixer SQL Password Refixer WiFi Password Refixer iTunes Password Refixer
- Support Support Center FAQs & Technical Support Download Free Download Center Resources How-to Articles Blog iSumsoft IT Blog
- How to Protect PowerPoint Presentation from Editing and Modifying

Updated: January 11, 2024
If you don't want others to open and modify your PowerPoint presentation, you can lock the presentation. Here, this guide will introduce several ways to protect a presentation file from being copied, edited, and changed by unauthorized others.
- Option 1: Marking as final
- Option 2: Restrict Access
- Option 3: Encrypt with Password

Option 1: Make the presentation read-only
If you want to let people know that a presentation shouldn't be changed, you can use the Mark as Final feature. When a presentation is marked as final, typing, editing, commands, and proofing marks are disabled or turned off and the presentation becomes read-only .
Step 1: Click the File tab to go to Backstage view.
Step 2: From the Info pane, click the Protect Presentation command.
Step 3: In the drop-down menu, choose the option that best suits your needs. select Mark as Final .

Step 4: A dialog box will appear prompting you to save, click OK .

Step 5: Another dialog box will appear, click OK .
When you mark a presentation as final, PowerPoint asks you to save the file. The next time you open it, you will see a yellow MARKED AS FINAL message at the top of the file. If you click Edit Anyway , the presentation will no longer be marked as final.

Option 2: Set Restrict Access to Prevent Others from Editing
If you want to prevent people from editing it, you can use the Restrict Access option:
Step 1: Click on File tab to go to Backstage view.
Step 2: In Info tab, click Protect Document button. And then select Restrict Access option.

Option 3: Set a Password for Modify Presentation
To protect PowerPoint 2010/2013/2016 presentation, use these steps as follows:
Step 1: Click on the File tab, choose Save As option. Select one location you will save this *.pptx file.

Step 2: In the Save As dialog, click the Tools button at the bottom and then select General Options .

Step 3: Type a password in the Password to modify box and click OK . Reenter the password to modify and click OK to confirm. When you return back to the Save As dialog, click Save to save this presentation.

Then the password to modify will lock this PowerPoint 2016 presentation and prevent it from being edited or modified. Keep your password in a safe place. If you lose or forget the password, Microsoft won't help recover it and you have to remove the password with a third-party utility like PowerPoint Protection Refixer .
Related Articles

Latest Articles
- 4 Ways to Encrypt/Password Protect an Email Attachment in Outlook or Gmail
- 3 easy ways to find out what Microsoft Word version you have on Windows
- 8 ways to make a Word Document containing images smaller without losing quality
- How to Repair Excel File Corrupted by Virus
- [Solved] Word Experienced an Error Trying to Open the File Windows 10
- How to Fix "PowerPoint Found a Problem with Content in .PPTX"
Hot Articles
- How to See Saved Passwords in MS Outlook 2016
- How to Remove Red and Green Wavy Underlines in Word Document
- Fix Picture is Blurry When Inserted to Word Document Problem
- How to Activate Microsoft Office for Free
Support Team: support#isumsoft.com(Replace # with @) Sales Team: sales#isumsoft.com(Replace # with @)
- Top Products
- Windows Password Refixer
- iPhone Passcode Refixer
- RAR Password Refixer
- iOS Refixer
Copyright © 2024 iSumsoft Studio All Rights Reserved.
How to Make PowerPoint Uneditable
- Small Business
- Business Communications & Etiquette
- Presentations
- ')" data-event="social share" data-info="Pinterest" aria-label="Share on Pinterest">
- ')" data-event="social share" data-info="Reddit" aria-label="Share on Reddit">
- ')" data-event="social share" data-info="Flipboard" aria-label="Share on Flipboard">
How to Open GDB Files
How to open a pa2 file, how to make a print layout the default view layout in microsoft word.
- How to Make a Swirl in InDesign
- How to Hide Favorites on Twitter
When PowerPoint marks a document as “Final,” it becomes impossible for anyone to type anything in it or use editing commands to change it. Although you may usually want others to have the ability to update your presentations, you may wish to protect your documents occasionally. PowerPoint’s main ribbon doesn’t have a button that makes a document uneditable, but you can find one that does when you know where to look.
Launch PowerPoint and open a presentation you’d like to make uneditable.
Click “File,” then “Info” to view information about the presentation.
Click the “Protect Presentation” to view a menu containing options. Click the “Mark as Final” option. PowerPoint displays a pop-up box warning you that it will mark the presentation as “Final.”
Click “OK” to close the pop-up and type a name for the file in the “File Name” text box that appears.
Click “Save” to save the file.
- Microsoft: Protect Your Document, Workbook, or Presentation With Passwords, Permission, and Other Restrictions - PowerPoint - Office.com
- Give the saved file a new name if you do not want to overwrite the existing file.
- A “Mark as Final” icon appears in the status bar of any PowerPoint application viewing a document whose status is “Final.”
After majoring in physics, Kevin Lee began writing professionally in 1989 when, as a software developer, he also created technical articles for the Johnson Space Center. Today this urban Texas cowboy continues to crank out high-quality software as well as non-technical articles covering a multitude of diverse topics ranging from gaming to current affairs.
Related Articles
How to unlock read only powerpoint presentations, how to choose pictures in a facebook profile page, how to make powerpoint pictures transparent, how to make a .txt tab delimited, how to convert tiff to ms word, how to disable the microsoft word spell checker, how to hide & unhide the taskbar, how to abbreviate my url, how to open a pym file, most popular.
- 1 How to Unlock Read Only PowerPoint Presentations
- 2 How to Choose Pictures in a Facebook Profile Page
- 3 How to Make Powerpoint Pictures Transparent
- 4 How to Make a .Txt Tab Delimited
How-To Geek
Can i stop people from editing my powerpoint presentation.
Your options depend on your version of Office, but you can at least make editing more difficult.
Quick Links
Use the restrict access feature (business and enterprise only), make your presentation read-only or mark it as final, password protect your presentation, save your presentation as an image.
To preserve the integrity of your PowerPoint presentation, you may want to try to prevent others from editing it. Depending on the Office version you have, there are a few things you can do to block editing, or at least make it more difficult.
You can use the Restrict Access feature to protect your PPTX file from edits, but this feature is only available for Microsoft 365 for Business or Enterprise , and the feature must be enabled by your organization's administrator in the Microsoft 365 admin panel . That means if you're using any version below Microsoft 365 for Business, such as Home or Family, then you won't have this feature.
Related: How to Find Out Which Version of Microsoft Office You're Using (and Whether it's 32-bit or 64-bit)
If you are subscribed to a version that supports this feature, and if the admin of your organization has enabled it, you can locate "Restrict Access" under File > Info > Protect Presentation.
You can then set the restriction types and file access expiration dates.
Visit Microsoft's official doc site to learn more about Information Rights Management and how to use this feature.
Making your presentation read-only or marking it as final doesn't actually make your presentation un-editable. What this does is discourage others from making edits. It's also good for preventing accidental edits, as it makes you opt-in before you're able to make any changes to the content.
Related: How to Make a Microsoft PowerPoint Presentation Read-only
To make your presentation read-only, or to mark it as final, open your PPTX file and click the "File" tab.
Next, click "Info" in the left-hand pane.
Now, in the Protect Presentation group, click "Protect Presentation."
Once selected, a drop-down menu will appear. You can choose between these two options to make your presentation read-only:
- Always Open Read-Only: This asks the reader to opt-in to edit the presentation, which prevents accidental edits.
- Mark as Final: This lets the reader know that this is the final version of the presentation.
Selecting either option will prevent the reader from editing the presentation---unless they opt-in to do so by clicking the "Edit Anyway" button in the banner.
While making your presentation read-only serves a purpose, it's a weak form of protection if you want to truly keep others from editing your content.
Related: How to Unlock Read-Only PowerPoint Presentations
PowerPoint has an option that lets you encrypt your presentation and only those with the password can access it. Again, this doesn't fully protect the content within the presentation, but if only those with the password have access, the chances of the presentation being edited are certainly lower.
This password isn't stored anywhere on your local machine. Be sure to store the password somewhere safe. If you forget or lose your password, you won't be able to access the presentation again.
To password protect your presentation, open PowerPoint, click the "File" tab, click "Info" in the left-hand pane, and then click the "Protect Presentation" option.
Next, click "Encrypt with Password" from the menu that appears.
The Encrypt Document window will appear. Enter your password in the Password text box and then click "OK."
Reenter the password and then click "OK" again.
Now anyone who tries to open the presentation will need the password to access it.
This method is more secure than simply making your presentation read-only. However, you're merely preventing people from opening the PPTX file. If they have the password, then they can also edit the presentation's content. Be careful who you share the password with. If you're worried the password may have been exposed , change the password immediately.
Related: How to Check if Your Password Has Been Stolen
If you want to deliver your PPTX file to someone, but don't want them to be able to copy or edit the content (easily, at least), then you can convert the PowerPoint presentation to an image file and send it that way.
Open the PowerPoint presentation, click "File," and then click "Save As" in the left-hand pane.
Browse to the location you would like to save the file and then, in the "Save As" box, choose the image file type you would like to save the presentation as. You can choose between:
- Animated GIF Format (*.gif)
- JPEG File Interchange Format (*.jpg)
- PNG Portable Network Graphics Format (*.png)
- TIFF Tag Image File Format (*.tif)
- Scalable Vector Graphics Format (*.svg)
Related: What's the Difference Between JPG, PNG, and GIF?
Once you save the presentation as an image, you can send it out to the desired recipients.
At the end of the day, there's no solid way to 100% protect your presentation. You can kindly ask recipients not to edit the content, password-protect your presentation so only those you want to have access to it can access it, or convert your presentation to an image or PDF , but even with these measures, if someone wants to edit something, they can always find a way.
Related: How to Save Microsoft PowerPoint Presentations as PDF Files
Is Your PowerPoint Read-Only? Here’s How to Edit and Save it!
By: Author Shrot Katewa

Are you trying to open a PowerPoint presentation that sadly opens up as a read-only file? If the answer is yes, then you are not alone! This isn’t a pleasant situation for anyone, however, there are many complications and reasons behind why this happens. On a larger note, the solution to this problem is fairly simple.
To edit your PowerPoint read-only file, simply click on the “Edit Anyway” button on the horizontal yellow bar under the ribbon. You can also click on the “File” tab. Then, click on “Info”. Next, locate and click on “Protect Presentation”, and finally click on “Mark as Final”.
Interestingly, one of the reasons why your presentation shows as read-only is because of an in-built feature within PowerPoint! (We’ll get to the details of that in a bit). So, this is not something that you need to fear. We just need to be a bit more informed on how to fix it!
So, in this article, I will be sharing with you the details of why a PowerPoint file shows “Read-only”, and what can you do to save the file and make it editable. Let’s get started!
A Quick Note Before We Begin – if you want to make jaw-dropping presentations, I would recommend using one of these Presentation Designs . The best part is – it is only $16.5 a month, but you get to download and use as many presentation designs as you like! I personally use it from time-to-time, and it makes my task of making beautiful presentations really quick and easy!
Why is My PowerPoint Read-Only?
One of the most common reasons for PowerPoint to become a read-only file as when it has been done so intentionally. Why would anyone want to do this intentionally?
1. “Mark as Final” Feature is Enabled
Well, it turns out, PowerPoint actually provides a built-in feature known as “Mark as Final”. This feature turns the PowerPoint file into “Read-Only” mode . The “Mark as Final” feature of PowerPoint is designed to let the readers know that the version of the presentation that they are viewing is the final version and no changes are to be made to that version!
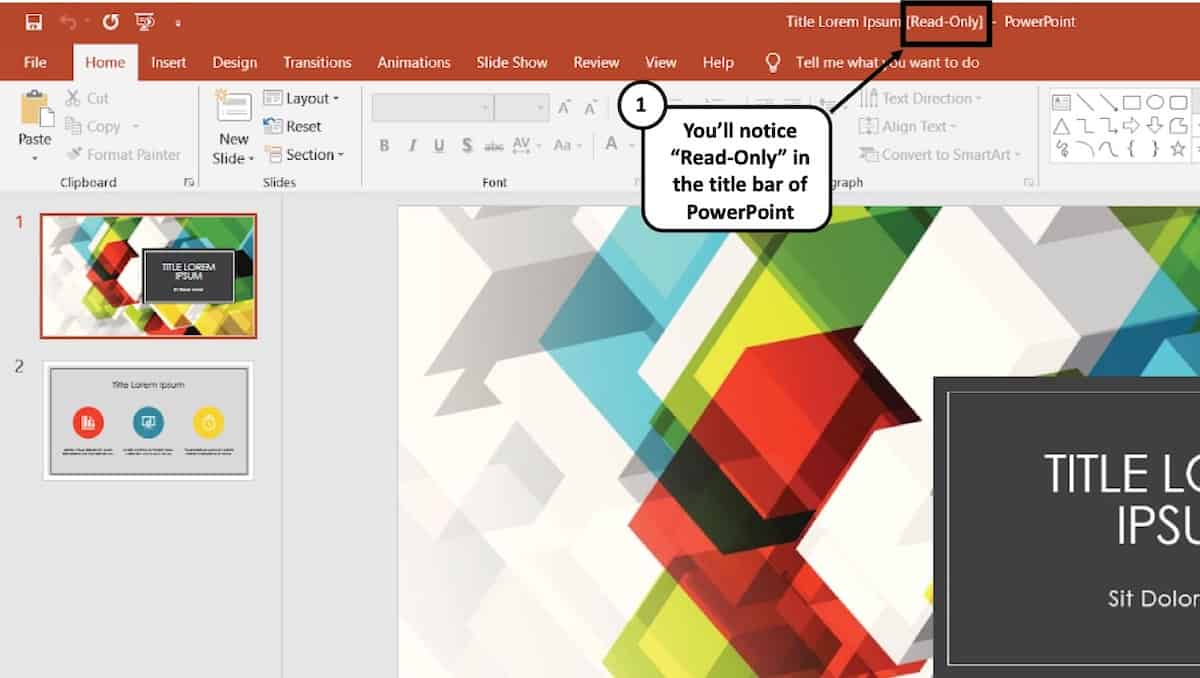
Thus, even though such a presentation can be opened by viewers, they will see a “Read-Only” prompt both at the top of the PowerPoint application where the title appears (otherwise known as the title bar), and a yellow strip just below the ribbons with a button that says “Edit Anyway”.
Obviously, there are other ways to prevent your viewers from editing your PowerPoint file which is more fool-proof. More on that later in the article.
2. PowerPoint has just Recovered from a Crash
Another common reason for PowerPoint to get into “Read-Only” mode is when your PowerPoint may have recovered from a crash . Irrespective of whether the PowerPoint application was abruptly closed intentionally or unintentionally when a presentation file was open, PowerPoint may open the file in “Read-Only” mode when restarted.
PowerPoint automatically marks the previous saved version as the final version of the file and opens it up in the read-only mode.
3. Same PPT file is Opened Twice at the Same time!
Lastly, PowerPoint may also convert a presentation into “Read-Only” mode when two presentations that have the same name are opened at the same time. Alternatively, the file may also become read-only when the same file has been opened twice by mistake.
This can happen especially when PowerPoint takes some time to respond to the user’s first request to open a presentation file leading to the user double-clicking on the same file twice. Although there are checks and balances in place to avoid this issue, nevertheless, such issues can still take place.
Furthermore, if you have perhaps saved a presentation file that has the same name in two different locations on your computer, and you open both of them together, PowerPoint can sometimes open the file that has been opened later in read-only mode.
How to Unlock Read-Only in PowerPoint?
As annoying as it may seem, it is quite easy to unlock the read-only mode from PowerPoint!
Here’s how to exit from the “Read-Only” mode in PowerPoint –
- Open the “Read-Only” PowerPoint (PPT) file.
- At the top part just below the ribbon options, you’ll see a long yellow banner.
- Hover your mouse towards the banner and click on the option “Edit Anyway”.
You will now be able to edit the PowerPoint file as you usually would.
Furthermore, make sure that you haven’t opened the same file twice by chance. If so, try to close one or both the files and re-open the presentation once again.
Why Does Read-Only Keep Coming Back in PowerPoint?
One of the key reasons why your PowerPoint file may become read-only every time you open it is because the “Mark as Final” feature has been enabled in the settings. As long as this feature has been enabled, your PowerPoint file may keep reopening as a read-only file from time to time.
Let us understand how to turn off read-only mode in PowerPoint so that you don’t have to deal with this issue.
How to Turn Off Read-Only Mode in PowerPoint?
Even though clicking on “Edit Anyway” as described above will fix the issue, however, if the presentation has been marked as final by the original author, it may continue to show the read-only mode sometimes.
In order to fix that issue, you will need to take a slightly longer route. Here’s a step-by-step process to turn off read-only mode in PowerPoint.
1. Start by opening your “read-only” PowerPoint presentation.
2. Hover to the top menu and then click on the tab named ‘File’. Then click on Info.
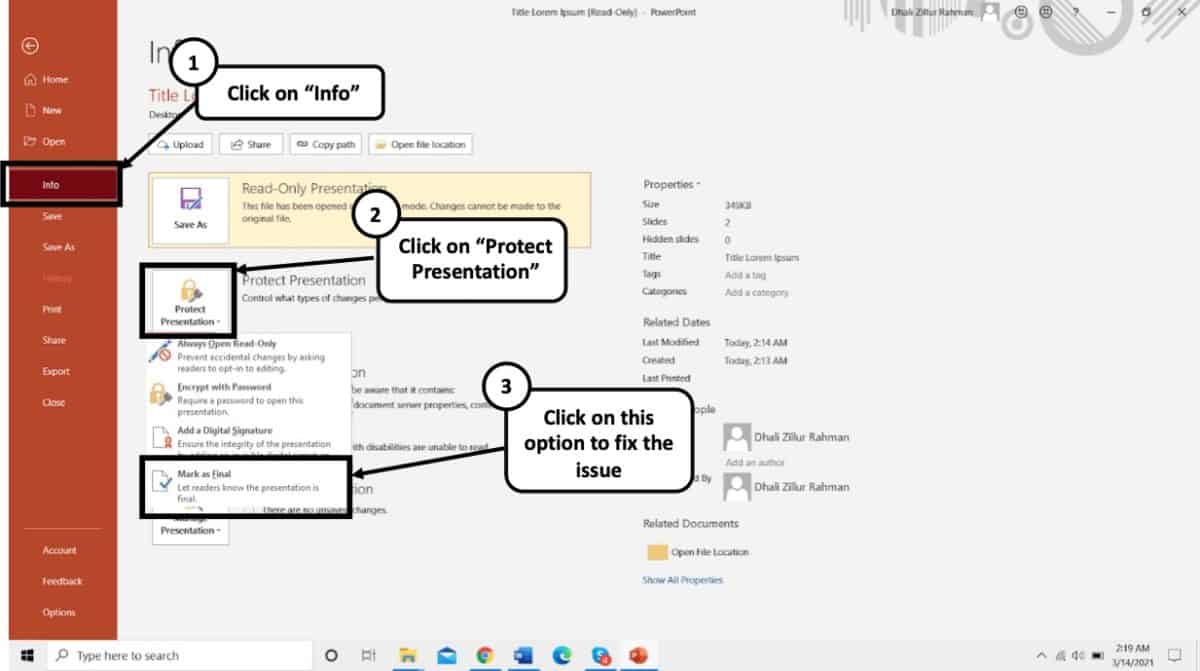
3. There will be a ‘Protect Presentation’ option in clear yellow.
4. You might come across a dialog box telling you “The presentation has been marked as final to discourage any editing.”
5. To undo this feature, simply click on Protect Presentation. A menu will appear, click on the ‘Mark as Final’ to fully unlock the desired presentation.
After doing this you will see that the Read-Only suffix from your PPT file’s name will be gone and you would be able to freely edit further.
How to Edit a Read-Only PowerPoint File?
After you have done removing the read-only feature from your PowerPoint, you can simply edit texts, add animations, images and use features with absolute free will. Just getting through the read-only barrier is the only thing that you need to know to get started with editing.
Interestingly, you can also get out of the read-only mode in PowerPoint by saving the file with a different name. This will not only allow you to get rid of the read-only mode but also allow you to save a copy of the edits that you may have made while the file was in the read-only mode.
Let’s learn how to save a read-only presentation file.
How to Save a Read-Only PowerPoint File?
Saving a PowerPoint file that is in a read-only mode is rather quite simple. Although you don’t need to enable “Edit Anyway”, doing so would be recommended. The next step is really saving a file in a different location on your computer with either the same name or under a different name.
Here’s how you can save a read-only PowerPoint presentation –
- Click on the “File” tab.
- Click on “Save As” from the option provided on the left part of your screen.
- Navigate to a folder location where you want to save the file. Feel free to change the name of the file if needed.
- Click “Save”.
- Lastly, browse to the specific folder where you saved the PowerPoint file. Open it and check to see if the “Read-Only” mode has been removed.
Why Does Every PowerPoint File Open in Read-Only Mode?
As we have learned so far, one of the key reasons for PowerPoint to open a presentation file in read-only mode is when it has been “Marked as Final” by the author of the file. By now, you’ve also learned how to get rid of this problem.
However, the “Mark as Final” feature should only restrict the specific file shared by a particular author . It typically shouldn’t make all your PowerPoint files “Read-Only”.
If this is the case for you, the problem may be slightly different. Let’s understand this a bit further.
Sometimes, t he file or the folder in which the PowerPoint presentation has been saved itself becomes read-only due to a glitch in the operating system . There are several reasons why this could happen. I won’t go into details of each of those reasons. However, it is important for us to understand how to make this file or folder editable.
Here’s what you could do to remove the read-only from a particular presentation file –
- Navigate to the folder in which the file has been saved, and locate the file.
- Right-click on the file and select “Properties” from the window the just opens up.
- A new window will open up. Click on the “General” tab. Next, clear the check-box from the “Read-Only” attribute option.
- Finally, click “OK” and save your changes.
This should solve the problem. If it still doesn’t fix the issue, you may want to check whether the folder in which the PowerPoint file has been saved has the editable rights to it and is not marked as read-only.
If the folder is also being marked as read-only, you will need to remove the “Read-Only” attributes from the folder first. Here’s an article that can help you remove the read-only attribute from a folder in Windows.
How to Prevent PowerPoint from Being Edited?
There are quite a few different ways in which you can lock a PowerPoint file or prevent it from being edited. Here are some of the options that you can choose from –
- Save a PowerPoint File as Read-Only
- Password protect your PowerPoint file.
- Convert a PowerPoint file into a PowerPoint Show File (PPSX)
- Convert a PowerPoint file into a PDF file
- Convert a PowerPoint file into a Video
Let’s look at some of these methods in detail –
Method 1 – Save a PowerPoint File as Read-Only
To get this done, simply do the opposite of turning off the read-only mode. Here’s a step-by-step process to save a PowerPoint file as Read-Only:
- Open the desired PowerPoint presentation, and click on the “ File ” tab.
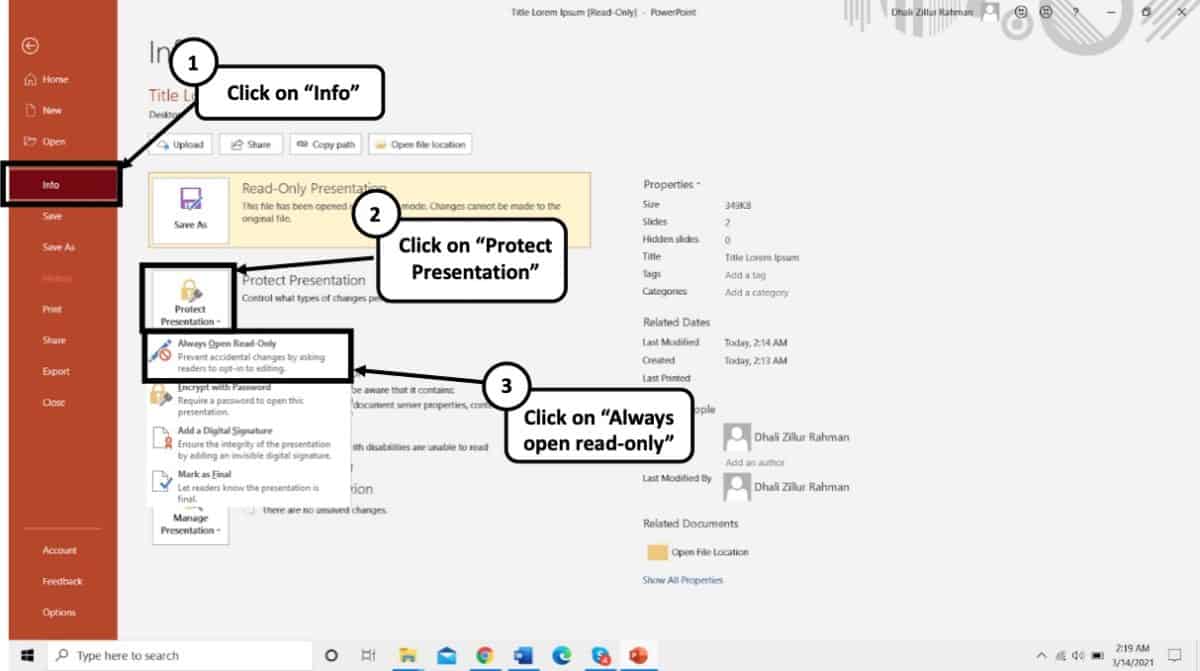
- Next, click on the “ Info ” tab from the options presented on the left part of the screen.
- Select the “ Protect Presentation ” option.
- From the dropdown, select “ Always Open Read-Only “.
- Finally, save the file by pressing Ctrl+S.
Your presentation file will now be opened as a read-only file.
Method 2 – Password Protect your PowerPoint presentation
If your colleagues or students haven’t been very familiar with your polite way of discouraging any edits on your final PowerPoint file, then the best option for you is to simply encrypt your presentation file using a password protection feature.
Here’s what you need to do to password protect your PowerPoint presentation –
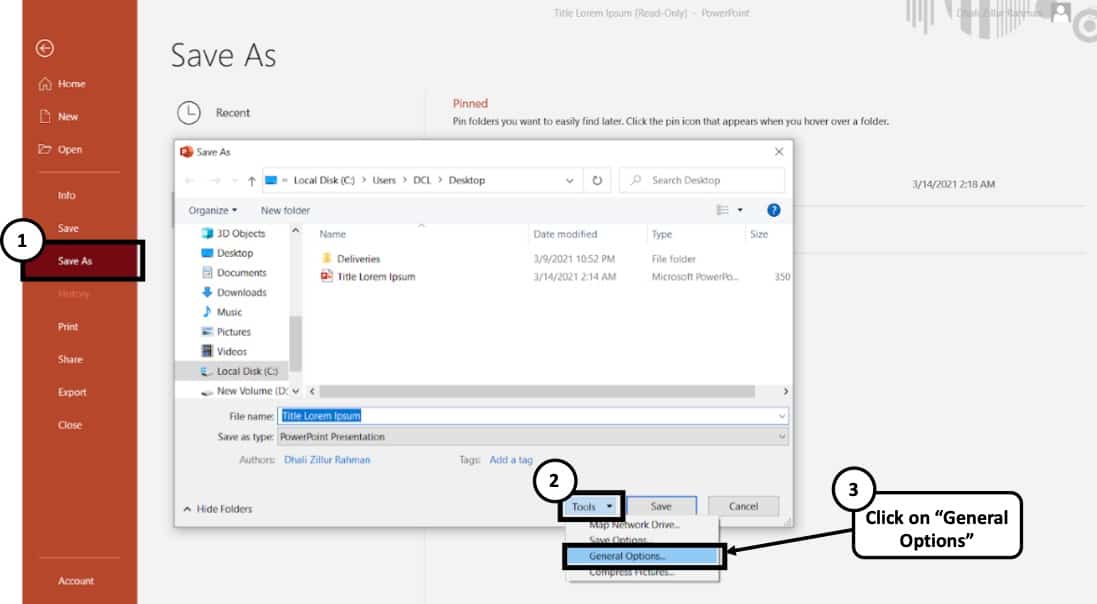
- Open your desired presentation and select the File tab and then click on “ Save As ”.
- At the bottom of the “Save As” dialogue box, a “ Tools ” option will appear.
- Click on “ General Options ”.
- The box marked as “ Password to Modify ” can be used to type in the desired password you wish to set.
- After setting up your password and re-entering it for further verification, simply click “ OK ”
Similarly, you can also enable password protection from the “ Info ” tab. To do that, click on the “ File ” tab first. Then, click the “ Info ” tab. Next, click on “ Protect Presentation “, and finally from the dropdown, click on “ Encrypt with Password “. You will then be asked to set a password. Simply re-enter the same password and click “ OK “.
While encrypting the PowerPoint file with a password, you will be presented with 2 options – either to restrict access to the PowerPoint file or to restrict modifying the presentation file. Choose the latter as this will allow your audience to at least view the presentation file without editing it.
Method 3 – Convert PowerPoint presentation as a PPSX file
Another method of preventing a PowerPoint presentation from being editing is to convert it into a PowerPoint show file or a PPSX file format. Doing so will directly open the presentation file in a PowerPoint Slide Show mode thereby restricting the editing capabilities of an individual for such a file.
Here’s how to convert a PowerPoint presentation to a PowerPoint Show file (PPSX file)
- Click on the “ File ” tab.
- Then, click on “ Save As ” from the panel on the left part of your screen.
- On the new window that pops-up, click on the “ Save As Type ” option.
- From the dropdown, scroll down and locate the “ PowerPoint Show ” file type option.
- Navigate to the desired location and rename the file if needed.
- Click on “ Save “.
Method 4 – Convert PowerPoint Presentation into a PDF File
Another alternative method is to share a PDF version of the presentation instead of the PPT file. All you need to do is convert the file to the PDF file format. To do that, you can follow the below steps –
- Then, click on “ Export ” from the panel on the left part of your screen.
- On the new window that pops-up, click on the “ Create PDF ” option.
You will now notice that there is a PDF file added to the folder in which you saved the file. Make sure that you share this PDF file instead of the PPT presentation.
Method 5 – Convert PowerPoint File into a Video
Last, but not the least, you can also convert your presentation into a video. Although the use of this method is more suited for creating videos using PowerPoint, however, you can also use this method to ensure that you are able to prevent your viewers from editing it.
Here’s how to convert a PowerPoint file into a video –
- On the new window that pops-up, click on the “ MPEG/MP4 ” option.
How to Remove Restricted Access in PowerPoint?
PowerPoint also provides you with an option to remove access restrictions that the original author may have put in place.
To remove the restricted access setting in your file, simply follow the below steps:
- Next, click on the “Info” tab.
- Then, click on “Protect Presentation” and change the permissions which have been applied.
Unselecting the previous options will remove the existing restrictions.
It is important to note that if the file is password-protected, you will need the password to change the permissions of the file. Without the original password, you won’t be able to unlock the permission protections.
More Related Topics
- Change the Style of Your Bullet Points and Stand-out from the Crowd!
- 7 EASY Tips to Always Make your Presentations Attractive! (Even if You are a Beginner)
- How to Reduce the Size of Your PowerPoint File? The Perfect Method!
- Auto Create Your PowerPoint Slides using Design Ideas Feature!
- Main Features of PowerPoint! [I bet You DIDN’T Know These]
Credit to Cookie_Studio for the featured image of this article.
How to Make a PowerPoint Not Editable? (Simple Steps to Follow)
PowerPoint presentations are a powerful and versatile tool for creating compelling and interactive presentations.
But what if you want to make sure your PowerPoint presentation is not editable? Fortunately, it is easy to do just that.
In this article, we’ll explore the simple steps you can take to make a PowerPoint not editable, as well as the benefits of setting the security settings to read only.
We’ll also cover other options to make a PowerPoint not editable, and provide troubleshooting tips if you encounter any issues.
So if you’re ready to learn how to make your PowerPoint presentation secure, read on!
Table of Contents
Short Answer
To make a PowerPoint presentation not editable, you can save it as a PDF file.
This will lock the presentation and prevent any changes from being made to it.
You can also convert the presentation to a video format, which will make it uneditable.
Additionally, you can password protect the presentation so only you have access to the editable version.
What is a PowerPoint Presentation?
A PowerPoint presentation is a collection of slides that are used to visually communicate ideas or information to an audience.
It is typically used for presentations in the business world, but can also be used for educational, creative, or personal purposes.
PowerPoint presentations are made up of a series of slides, each containing text, images, or other elements to help explain the main point of the presentation.
PowerPoint slides can be edited and customized, allowing the presenter to tailor the presentation to their audience.
Additionally, PowerPoint slides can be easily shared, making them a great medium for collaboration.
With all these features, PowerPoint presentations are a great tool for getting your message across in a clear and engaging way.
How to Save a PowerPoint Presentation as a PDF
Saving a PowerPoint presentation as a PDF is a great way to protect your work from unwanted changes.
This process is simple and easy to do, and can be done in a few steps.
First, open the PowerPoint presentation you want to save as a PDF.
Then, go to the File tab in the upper left-hand corner and select Export.
From there, select Create PDF/XPS Document and click Create.
Next, choose a filename and select the location you want to save the file to.
Lastly, click Publish to save the PowerPoint presentation as a PDF.
Once your PowerPoint presentation is saved as a PDF, you can choose to password protect the file.
This will ensure that only you have access to the file and make it uneditable.
Additionally, you can set the security settings to Read Only to prevent any changes to the file.
Doing this will guarantee that your PowerPoint presentation remains intact and uneditable.
By following these simple steps, you can easily make your PowerPoint presentation uneditable and protect your work from unwanted changes.
How to Password Protect a PDF File
When it comes to protecting your PowerPoint presentation from unwanted changes, the best option is to save it as a PDF.
Doing this will allow you to password protect the file and ensure that only you have access to the file.
To do this, simply open your presentation in PowerPoint and click on the File tab.
From there, select Save As and choose the PDF option.
Once youve saved your presentation as a PDF, you can password protect it by clicking on the Security tab in the Save As menu.
From there, you can enter a password and set the security settings to Read Only.
Benefits of Setting the Security Settings to Read Only
When setting the security settings to Read Only, the PowerPoint presentation is completely protected from any unwanted changes.
Regardless of who opens the file, they will not be able to make any modifications to it.
This will ensure that the presentation remains exactly as you intended it to be.
Furthermore, if someone else opens the presentation, they wont be able to save it with any of their own changes.
This means that you wont have to worry about someone else making unauthorized changes to your work.
Additionally, by setting the security settings to Read Only, you can rest assured that your presentation will be safe from any malicious intent.
If someone were to open the presentation in an attempt to steal or modify your work, they would be unable to do so.
This will help to protect you and your work from potential theft or copyright violations.
Finally, setting the security settings to Read Only will make your presentation easier to share.
By doing this, you can easily share your presentation with multiple people without having to worry about the file being modified.
Furthermore, you can be sure that the presentation will always be the same when it is viewed by different people.
This feature can be especially useful when sharing your presentation with potential employers or clients.
Other Options to Make a PowerPoint Not Editable
In addition to saving the PowerPoint as a PDF and setting the security settings to Read Only, there are a few other options to make a PowerPoint presentation uneditable.
One way is to use a presentation software that does not allow for editing.
There are several such programs available online, such as Prezi and SlideDog.
These programs are designed to be used as presentation tools and do not allow for any changes to be made to the original document.
Another way to make a PowerPoint uneditable is to convert the presentation to a video format.
This prevents any changes from being made, as the video is a static representation of the presentation.
There are several video formats to choose from, such as MP4, AVI, and MPEG.
Depending on the video format you choose, you may also be able to password protect the video.
Finally, you can also use a third-party service to make your PowerPoint presentation uneditable.
There are several services available, such as SlideRocket and SlideShare, that allow you to upload your presentation and set permissions to prevent editing.
You can then share the presentation with others, knowing that the document will remain secure and uneditable.
Simple Steps to Follow to Make a PowerPoint Not Editable
Making a PowerPoint not editable is an important and useful task for many people.
Whether youre a student needing to protect your hard work, a business professional wanting to ensure that your presentation is only seen in its intended form, or a creative wanting to protect your intellectual property, the steps to make a PowerPoint not editable are simple and easy to follow.
The first step to make a PowerPoint not editable is to save the presentation as a PDF.
This will ensure that the document is only viewable, not editable.
Once the presentation is saved as a PDF, you can then password protect the file to ensure that only you have access to it.
Additionally, you can set the security settings to Read Only, preventing anyone from making changes to the file.
The second step is to open the PDF document in Adobe Reader or another PDF reader.
Once youve opened the document, navigate to the Security tab.
Here, you can select the Read Only option, which will prevent any changes from being made to the file.
Additionally, you can also select the Password Protect option, which will require a password to be entered in order to view the file.
The third step is to save the document with the security settings in place.
Once the document has been saved with the security settings applied, it will remain intact and uneditable, guaranteed.
Making a PowerPoint not editable is a simple and straightforward process.
With these three easy steps, you can ensure that your presentation remains intact and uneditable.
Protect your work from unwanted changes and ensure that only you have access to the file.
Create a secure and uneditable PowerPoint presentation today!
Troubleshooting Tips
When it comes to creating an uneditable PowerPoint presentation, there are a few troubleshooting tips you should keep in mind.
First, make sure that your presentation is saved in PDF format before you start making any changes.
This will ensure that all the formatting remains intact when you make changes.
Additionally, when setting the security settings to Read Only, make sure to select the Do Not Allow Changes option.
This will ensure that the presentation remains uneditable.
Its also a good idea to password protect the file.
This will prevent anyone from accessing the file without the correct password.
You can also use a digital signature to certify that the file is coming from you.
This will prove that you are the author of the file and will guarantee that it remains uneditable.
Finally, if youre having trouble getting your presentation to stay uneditable, try using a third-party tool.
There are a number of options available, such as Adobe Acrobat or Nitro PDF Creator.
These tools will allow you to create a secure, uneditable document that cant be changed without your permission.
With these troubleshooting tips in mind, you can rest assured that your PowerPoint presentation will remain uneditable.
Protecting your work is essential, so following these steps will ensure that you can keep your presentation safe from any unwanted changes.
Final Thoughts
By following these simple steps, you can easily create an uneditable PowerPoint presentation and protect your work from unwanted changes.
Not only is this a great way to ensure your work remains intact, but it also offers the added security of password-protecting your file and setting the security settings to Read Only.
So, if you want to make sure your PowerPoint presentation remains uneditable, take the time to save it as a PDF and set the security settings accordingly.
James Wilson
James Wilson has extensive knowledge in the information technology industry.His second love, besides dealing with computers, is smart home technology. He is continually updating information to better comprehend this problem and has a deep understanding of the apartment’s support system.
Recent Posts
Is Airtable a Public Company? Unveiling the Truth
No, Airtable is not a public company. As of now, Airtable is a private company that has raised funds from various investors but has not gone through an initial public offering (IPO) to be listed on...
How to Make Money with Airtable: Top Strategies and Success Stories
To make money with Airtable, you can offer consulting services to businesses looking to optimize their workflows through the platform. You can also create and sell templates or automation scripts...
Passper Online
Unlock all file formats online
Passper for Excel
Excel password remover
Passper for Word
Word password remover
Passper for PowerPoint
Powerpoint password remover
Passper for PDF
PDF password remover
Passper for RAR
Rar password unlocker
Passper for ZIP
Zip password unlocker
- Windows Password Recovery
Top 5 Methods to Make PowerPoint Read Only
There are a lot of reasons why you would want to make a PowerPoint document read-only. But perhaps the most important one is to keep someone else from making changes on the document. PowerPoint presentations are often sensitive and just a small change can cause the whole presentation to lose meaning. Therefore, it would make sense to make the document read-only as soon as it is done to prevent accidental changes that can alter the whole concept of the presentation. You may also want to protect the content of the presentation and the easiest way to do that would be to make it harder to edit the presentation.
Whatever your reasons for making your PowerPoint presentation read-only, this article will share with you numerous ways you can do that. We will also take the time to share with you the easiest way to unlock a read-only PowerPoint presentation.
Part 1. How to Make PowerPoint Read Only
The following are just some of the ways you can make a PowerPoint presentation read only.
1. Set Presentations to Read Only
2. set password to modify presentation, 3. burn powerpoint to cd/dvd, 4. convert powerpoint to read-only video, 5. set restrict access.
One of the easiest ways to make your presentation read only is to mark it as "Final". This is a feature available in MS Office that is used to let other users know that you have completed all edits on the document. Here's how to do it;
Step 1: Open the document you want to protect and then click on "File".
Step 2: Click on "Info" and then select "Protect Presentation". Step 3: In the options on the drop-down menu, click on "Mark as Final".

Step 4: Click "OK" in the dialogue box that appears and click "OK" again to confirm.
The next time you open the document, you will see a yellow "Marked as Final" message at the top. If you want to edit the document, simply click on "Edit Anyway" to restore your editing privileges.

You can also choose to set a password to restrict modification of the document. Here's how to do that;
Step 1: Open the presentation and then click on "File > Save As".
Step 2: Click on "Tools" at the bottom of the "Save As" dialogue box and then click on "General Options".
Step 3: In the box marked "Password to Modify", type in the password you would like to use and then click "OK". Reenter the password and then click "OK".

Step 4: Click "Save" to save the PowerPoint presentation and the next time someone tries to edit the document, they will be required to enter the password.
Another really easy way to make a PowerPoint not read only is to burn the file onto CD/DVD. There are a lot of programs that can help you do that and since storage media like CD/DVD is read-only, you are assured of the safety of the data on the presentation. It is also much easier to playback the presentation when it is on CD/DVD.

In the same way, you can also convert your PowerPoint presentation into read-only video. This will not just make it impossible for others to edit the content on the presentation, but it will also make it easier to distribute the presentation.
There are a lot of tools that can help you convert the PowerPoint presentation to video, including screen recorders like Adobe Captivate and Camtasia Studio or Quick Time Movie and Windows Movie Maker.

You may also be able to prevent others from editing the presentation if you use the "Restrict Access" option. The following is how to do that;
Step 1: Open the document and then click on "File".
Step 2: Click on "Info > Protect Document" and from then choose "Restrict Access" from the dropdown menu.

This option will allow people to open and read the document but they will be unable to print, edit or copy any of the content on the presentation.
Part 2. How to Unlock a Read Only PowerPoint
What if you find yourself unable to edit a read only PowerPoint presentation? If someone has sent you an incomplete presentation that has restrictions, the best way to lift these restrictions and edit the document is to use Passper for PowerPoint . This is a password recovery tool that makes it very easy for you to unlock any presentation and lift any restrictions placed on the document. The following are some of the program's features;
Check 2,900,000 passwords /S: It has one of the fastest password recovery rates in the market because it can check up to 2,900,000 passwords per second.
4 Attack Modes Available: 4 different attack modes are used to make it easier to recover the password in the shortest time possible. The fact that it has a database of millions of frequently used passwords is just an added bonus.
Remove Edit Restrictions: It can remove any editing restrictions on the presentation within 2 seconds in a single click.
It is compatible with all versions of MS Office and 100% safe to use. None of the data on the program will be lost or damaged in any way during the recovery process.
Free Download Buy Now
Follow these simple steps to use Passper for PowerPoint to unlock a read-only presentation.
Step 1: Download and install Passper for PowerPoint on your computer and then launch the program. In the main window, click on "Remove Restrictions".

Step 2: Import the presentation into the program and then click on "Remove".

In a few seconds all editing restrictions will be lifted from the document, allowing you to edit the presentation any way you want.
How to Recover PowerPoint Presentation if You Can't Open the File
If you are unable to open the presentation because it is password protected and you don't have the password, Passper for PowerPoint can also help you easily recover the password and use it to open the presentation. Here's how to do that;
Step 1: Open Passper for PowerPoint and choose "Recover Passwords" in the main window.

Step 2: Add the protected presentation into the program and then select a recovery method to use. Click "Recover".

Step 3: The program will immediately begin the process of recovering the password. When the process is complete, the password will be displayed on the screen. You can use it to unlock the document.

Make PowerPoint read only is a simple, yet highly effective technique to help you prevent accidental edits on your presentation and also keep the content safe. But sometimes this well-meaning feature can keep you locked out of your own document. If you find yourself unable to access the PowerPoint presentation or unable to edit it, Passper for PowerPoint presents the best solution to help you recover the password or lift restrictions thanks to its faster recovery speeds, more attack methods and higher recovery rates.
Related Articles:
- Top 9 PowerPoint Password Recovery Software That Unlock Your PowerPoint
- 6 Free Ways to Lock PowerPoint from Editing
- [Updated] 4 Methods to Unlock Read-Only PowerPoint

By Ronnie Barnes to PowerPoint
Posted on Mar 17, 2023 ( Updated: Mar 17, 2023)
Ronnie Barnes, a blogger with more than 5-year experience in writing tips about password recovery for Windows and office files.
You’re using an older browser version. Update to the latest version of Google Chrome , Safari , Mozilla Firefox , or Microsoft Edge for the best site experience.
- Corporate Training
- Course Selling
- Academic Learning
- Learning Basics
- Instructional Design
- Online Training Tools
- Manufacturing
- Products iSpring Suite iSpring Learn
- Use Cases Onboarding Compliance Training Induction Training Product Training Channel Partner Training Sales Training Microlearning Mobile Learning
- Company About Us Case Studies Customers Partnership Course Development Contact Us
- Knowledge Hub Knowledge Hub Academy Webinars Articles Guides Experts on iSpring
- Language EN English Français Deutsch Español Italiano Nederlands Português Polski 中文 日本語 العربية Indonesia
- Shopping Cart
How to Protect PowerPoint Presentations – Methods that Really Work

content creator
Paulina Fox See full bio →

You have a PowerPoint presentation you need to share with others, such as an explanation of unique training materials. But how can you protect it from being copied or modified? Protecting the intellectual property in your PowerPoint slides is actually not that hard.
Method #1. Protect Your Presentation with a Watermark or a Password
If you need to safeguard your PPT presentation and distribute it using a physical device or place it on the web providing a possibility for users to download it, a good way to prevent your project from being stolen is to protect it using iSpring Suite . It’s an eLearning authoring toolkit for PowerPoint that offers a bunch of presentation protection settings.
Download iSpring Suite for free and install it on your computer. Open the presentation you want to keep safe, switch to the iSpring Suite 9 tab, and click Publish .

In the Publish Presentation window, select the My Computer tab and head over to the Protection section .

In the opened window, you can configure the security settings you need.
1. Copyright your PowerPoint slides by adding a watermark
With iSpring Suite, you can watermark your presentation with, for example, your corporate logo or copyright notice like © 2020 John Smith . It’s possible to set the watermark’s transparency and position on the slides. You can also specify a webpage that will open when your viewers click on the watermark. It could be anything from terms of use to your profile page on a social network site.

2. Set a password
This option is pretty straightforward. You create a password and no one can view your presentation without entering it first.

3. Restrict time
You can set a special time period when your audience will be able to view your presentation. For example, you can set up a 2-week interval when your slides will be available.

When you’re finished with the settings, save any changes and publish the slides. By default, the output presentation is saved on your PC. You can then transfer it to a pen drive or CD and distribute it to your learners or colleagues.
Method #2. Make Your Presentation Read-Only
This method won’t prevent your copyrighted PPT slides from being copied and shared, but it will protect them from being modified. The upside is that to lock a presentation from editing you don’t need any third-party services – you can do this right in PowerPoint by using the Mark as Final option. When a presentation is marked as final, other users can read and view it, but can’t make any alterations.
To lock the slides, click the File tab in PowerPoint and choose the Protect Presentation command in the Info pane. In the drop-down menu, select Mark as Final . That will set your presentation in read-only mode.

Method #3. Restrict Permission to Selected Individuals
You can set the restriction to your readers so they can read the presentation but won’t be able to change, print, or copy the content.
As with the previous method, you can do this right in PowerPoint. Simply go to File → Info → Protect Presentation → Restrict Access .

However, to grant people access, you need to connect to the Rights Management Service (RMS). It is integrated into Microsoft Office and is available for faculty and staff. Ask your IT department to help you to enable RMS for your account.
Note: RMS allows employees to share restricted documents only within their company or campus. It won’t be possible to share your presentation with individuals that are not your colleagues or faculty members.
We hope this article gave you insights on ways that you can protect your PowerPoint presentations. If you know of any alternative ways to safeguard the slides, please share your ideas in the comment section.
Useful Resources on PowerPoint
Are you a PowerPoint lover? If so, here are some other helpful articles for you:
- How to Share a PowerPoint Presentation Online
- How to Add Narration to a PowerPoint Presentation
- How to Add YouTube Video Into PPT Presentation
- How to Structure a PowerPoint Presentation
Table of Contents
iSpring Suite
Create online courses and assessments in record time.

Content creator
Paulina Fox
Passionate about design and tech, Paulina crafts content that helps customers delve deeper into iSpring products.

How to Remove the Background From a Picture in PowerPoint

The Best Online Learning Platforms in 2024

How to Create an Interactive PowerPoint Presentation
Subscribe to our blog
Stay tuned to get our latest eLearning tips and tricks!
By clicking “Subscribe”, you agree to our Privacy Policy . All emails include an unsubscribe link, so that you can opt-out at any time.
We use cookies to give you the best possible experience on our website and also for analytics and marketing purposes. You can enable or disable optional cookies as desired. See our Cookie Policy for more details.
Manage your cookies
Essential cookies are always on. You can turn off other cookies if you wish.
Essential cookies
Analytics cookies
Social media cookies

Make changes to a read-only presentation
If you want to reuse some of the slides in a read-only presentation, you can download a copy to your computer and make changes to the copy.
On the File tab, click Save As .
Click Download .

Pick the steps below for your browser to save and open the file.
Google Chrome displays the file name at the bottom left corner of the PowerPoint for the web task bar.
To open the downloaded file, click the down-arrow, and then click Open .

Internet Explorer
If you are prompted, click Save as .

In the Save As box, pick where you want to save your presentation.
In the File name box, give your file a name (if you haven’t already), and then click Save .

To open your downloaded file, go to the file folder where you saved it.
Under What should Firefox do with this file? , click Save file , and then click OK .

Need more help?
Want more options.
Explore subscription benefits, browse training courses, learn how to secure your device, and more.

Microsoft 365 subscription benefits

Microsoft 365 training

Microsoft security

Accessibility center
Communities help you ask and answer questions, give feedback, and hear from experts with rich knowledge.

Ask the Microsoft Community

Microsoft Tech Community

Windows Insiders
Microsoft 365 Insiders
Was this information helpful?
Thank you for your feedback.
- PRO Courses Guides New Tech Help Pro Expert Videos About wikiHow Pro Upgrade Sign In
- EDIT Edit this Article
- EXPLORE Tech Help Pro About Us Random Article Quizzes Request a New Article Community Dashboard This Or That Game Popular Categories Arts and Entertainment Artwork Books Movies Computers and Electronics Computers Phone Skills Technology Hacks Health Men's Health Mental Health Women's Health Relationships Dating Love Relationship Issues Hobbies and Crafts Crafts Drawing Games Education & Communication Communication Skills Personal Development Studying Personal Care and Style Fashion Hair Care Personal Hygiene Youth Personal Care School Stuff Dating All Categories Arts and Entertainment Finance and Business Home and Garden Relationship Quizzes Cars & Other Vehicles Food and Entertaining Personal Care and Style Sports and Fitness Computers and Electronics Health Pets and Animals Travel Education & Communication Hobbies and Crafts Philosophy and Religion Work World Family Life Holidays and Traditions Relationships Youth
- Browse Articles
- Learn Something New
- Quizzes Hot
- This Or That Game
- Train Your Brain
- Explore More
- Support wikiHow
- About wikiHow
- Log in / Sign up
- Computers and Electronics
- Presentation Software
- PowerPoint Presentations
Simple Steps to Make a PowerPoint Presentation
Last Updated: April 28, 2024 Fact Checked
Creating a New PowerPoint
Creating the title slide, adding a new slide, adding content to slides, adding transitions, testing and saving your presentation.
This article was co-authored by wikiHow staff writer, Darlene Antonelli, MA . Darlene Antonelli is a Technology Writer and Editor for wikiHow. Darlene has experience teaching college courses, writing technology-related articles, and working hands-on in the technology field. She earned an MA in Writing from Rowan University in 2012 and wrote her thesis on online communities and the personalities curated in such communities. This article has been fact-checked, ensuring the accuracy of any cited facts and confirming the authority of its sources. This article has been viewed 4,327,995 times. Learn more...
Do you want to have your data in a slide show? If you have Microsoft 365, you can use PowerPoint! PowerPoint is a program that's part of the Microsoft Office suite (which you have to pay for) and is available for both Windows and Mac computers. This wikiHow teaches you how to create your own Microsoft PowerPoint presentation on a computer.
How to Make a PowerPoint Presentation
- Open the PowerPoint app, select a template and theme, then like “Create.”
- Click the text box to add your title and subtitle to create your title slide.
- Click the “Insert” tab, then “New Slide” to add another slide.
- Choose the type of slide you want to add, then add text and pictures.
- Rearrange slides by dragging them up or down in the preview box.
Things You Should Know
- Templates make it easy to create vibrant presentations no matter your skill level.
- When adding photos, you can adjust their sizes by clicking and dragging in or out from their corners.
- You can add animated transitions between slides or to individual elements like bullet points and blocks of text.

- If you don't have a Microsoft Office 365 subscription, you can use the website instead of the desktop app. Go to https://powerpoint.office.com/ to use the website version.
- You can also use the mobile app to make presentations, though it's easier to do this on a computer, which has a larger screen, a mouse, and a keyboard.

- If you don't want to use a template, just click the Blank option in the upper-left side of the page and skip to the next part.

- Skip this step if your selected template has no themes available.

- If you're creating a PowerPoint presentation for which an elaborate title slide has been requested, ignore this step.

- You can change the font and size of text used from the Home tab that's in the orange ribbon at the top of the window.

- You can also just leave this box blank if you like.

- You can also click and drag in or out one of a text box's corners to shrink or enlarge the text box.

- On a Mac, you'll click the Home tab instead. [1] X Research source

- Clicking the white slide-shaped box above this option will result in a new text slide being inserted.

- Title Slide
- Title and Content
- Section Header
- Two Content
- Content with Caption
- Picture with Caption

- Naturally, the title slide should be the first slide in your presentation, meaning that it should be the top slide in the left-hand column.

- Skip this step and the next two steps if your selected slide uses a template that doesn't have text boxes in it.

- Text boxes in PowerPoint will automatically format the bulk of your text for you (e.g., adding bullet points) based on the context of the content itself.
- You can add notes that the Presentation will not include (but you'll still be able to see them on your screen) by clicking Notes at the bottom of the slide.

- You can change the font of the selected text by clicking the current font's name and then clicking your preferred font.
- If you want to change the size of the text, click the numbered drop-down box and then click a larger or smaller number based on whether you want to enlarge or shrink the text.
- You can also change the color, bolding, italicization, underlining, and so on from here.

- Photos in particular can be enlarged or shrunk by clicking and dragging out or in one of their corners.

- Remember to keep slides uncluttered and relatively free of distractions. It's best to keep the amount of text per slide to around 33 words or less. [2] X Research source

- Slide content will animate in the order in which you assign transitions. For example, if you animate a photo on the slide and then animate the title, the photo will appear before the title.
- Make your slideshow progress automatically by setting the speed of every transition to align with your speech as well as setting each slide to Advance . [3] X Trustworthy Source Microsoft Support Technical support and product information from Microsoft. Go to source

- If you need to exit the presentation, press Esc .

- Windows - Click File , click Save , double-click This PC , select a save location, enter a name for your presentation, and click Save .
- Mac - Click File , click Save As... , enter the presentation's name in the "Save As" field, select a save location by clicking the "Where" box and clicking a folder, and click Save .
Community Q&A
- If you save your PowerPoint presentation in .pps format instead of the default .ppt format, double-clicking your PowerPoint presentation file will prompt the presentation to open directly into the slideshow view. Thanks Helpful 5 Not Helpful 0
- If you don't have Microsoft Office, you can still use Apple's Keynote program or Google Slides to create a PowerPoint presentation. Thanks Helpful 0 Not Helpful 0

- Your PowerPoint presentation (or some features in it) may not open in significantly older versions of PowerPoint. Thanks Helpful 1 Not Helpful 2
- Great PowerPoint presentations avoid placing too much text on one slide. Thanks Helpful 0 Not Helpful 0
You Might Also Like

- ↑ https://onedrive.live.com/view.aspx?resid=DBDCE00C929AA5D8!252&ithint=file%2cpptx&app=PowerPoint&authkey=!AH4O9NxcbehqzIg
- ↑ https://www.virtualsalt.com/powerpoint.htm
- ↑ https://support.microsoft.com/en-us/office/set-the-timing-and-speed-of-a-transition-c3c3c66f-4cca-4821-b8b9-7de0f3f6ead1#:~:text=To%20make%20the%20slide%20advance,effect%20on%20the%20slide%20finishes .
About This Article

- Send fan mail to authors
Reader Success Stories
Artis Holland
Sep 22, 2016
Is this article up to date?

Oct 18, 2016
Jul 23, 2016
Margery Niyi
Sep 25, 2017
Jul 21, 2016

Featured Articles

Trending Articles

Watch Articles

- Terms of Use
- Privacy Policy
- Do Not Sell or Share My Info
- Not Selling Info
Keep up with tech in just 5 minutes a week!
IMAGES
VIDEO
COMMENTS
It's by no means un-editable. Open the presentation that you want to make read-only, then click the "File" tab. Next, in the left-hand pane, select "Info." You'll now see a "Protect Presentation" section, which lets you (to an extent) protect against any editing of your presentation. Click "Protect Presentation."
4] Select Always Open Read-Only. In order to set your presentation to Read-Only, you must click on Always Open Read-Only from the dropdown menu, and right away, the changes will take effect. Now ...
Step-1: Click on the "File" tab. The first step is to click on the " File " tab to enter the backend view of your PowerPoint presentation. Step-2: Click on the "Info" option. Now, click on the "Info" tab from the options in the left part of your screen. Step-3: Select the "Restricted Access" option.
Select "Protect Presentation" to open a drop-down menu. Click "Mark as Final." A dialogue box will then appear, letting you know the presentation will be marked as final and saved. Click "OK." Now, when you send out the presentation, it will display the "Marked as Final" message bar, alerting the recipients that the presentation is read-only.
Step 1: Click the File tab to go to Backstage view. Step 2: From the Info pane, click the Protect Presentation command. Step 3: In the drop-down menu, choose the option that best suits your needs. select Mark as Final. Step 4: A dialog box will appear prompting you to save, click OK.
In PowerPoint for the web, click the Share tab. Under Share, click Get a link. Under View only, click Create. Tip: Click Shorten to decrease the length of the URL that you share with others. Right-click the URL and click Copy. Under Share, click Send email. Enter the email address in the To box. Paste the URL in the message box, and click Share.
Open your Powerpoint presentation. Choose File at the top left. Select Info on the bar on the left. Click Protect Presentation. In the pull-down menu, you'll see four options: When selected ...
3. Click the "Protect Presentation" to view a menu containing options. Click the "Mark as Final" option. PowerPoint displays a pop-up box warning you that it will mark the presentation as ...
Select Protect Presentation, point to Restrict Access, and then select Restricted Access. In the Permission dialog box, select Restrict permission to this presentation, and then select More Options. Under Additional permissions for users, select the This presentation expires on check box, and then enter a date. Select OK twice.
To password protect your presentation, open PowerPoint, click the "File" tab, click "Info" in the left-hand pane, and then click the "Protect Presentation" option. Next, click "Encrypt with Password" from the menu that appears. The Encrypt Document window will appear. Enter your password in the Password text box and then click "OK."
Open the desired PowerPoint presentation, and click on the " File " tab. Next, click on the " Info " tab from the options presented on the left part of the screen. Select the " Protect Presentation " option. From the dropdown, select " Always Open Read-Only ". Finally, save the file by pressing Ctrl+S.
First, open the PowerPoint presentation you want to save as a PDF. Then, go to the File tab in the upper left-hand corner and select Export. From there, select Create PDF/XPS Document and click Create. Next, choose a filename and select the location you want to save the file to.
Here's how to do it; Step 1: Open the document you want to protect and then click on "File". Step 2: Click on "Info" and then select "Protect Presentation". Step 3: In the options on the drop-down menu, click on "Mark as Final". Step 4: Click "OK" in the dialogue box that appears and click "OK" again to confirm.
With this trick, you can make your PPT read-only. Nobody can modify.Timeline:0:00 Intro2:00 Tools#Abanikanta#PGtechEducation#MSPowerPoint
Step-1: Access File > Save as on the top left corner. Step-2: In the Save as interface, click Save as type button and select the JPEG or PNG option. You can also modify the file name. Step-3: Click the Save button and you will get a prompt to export every slide in the presentation or only the current slide.
Method #3. Restrict Permission to Selected Individuals. You can set the restriction to your readers so they can read the presentation but won't be able to change, print, or copy the content. As with the previous method, you can do this right in PowerPoint. Simply go to File → Info → Protect Presentation → Restrict Access .
PowerPoint for the web. If you want to reuse some of the slides in a read-only presentation, you can download a copy to your computer and make changes to the copy. On the File tab, click Save As. Click Download. Pick the steps below for your browser to save and open the file.
In this video I will show you how to Save Powerpoint Document as Read Only
Try saving a copy of your presentation as a "picture presentation". In the File | Save As dialog, choose Picture Presentation. Give the file a new name (be SURE you don't overwrite your original !) I want to vote for this one as the best solution. It does create an image-based PowerPoint slide deck.
Want to keep your original slide as is? I'll show you how to create a non-editable slide, where the original content can't be changed, moved, or deleted by y...
Open the PowerPoint app, select a template and theme, then like "Create.". Click the text box to add your title and subtitle to create your title slide. Click the "Insert" tab, then "New Slide" to add another slide. Choose the type of slide you want to add, then add text and pictures. Rearrange slides by dragging them up or down in ...
How to Make PowerPoint Presentation File Read-Only & Uneditable on Windows Hindi-UrduOn Windows How to Make PowerPoint Presentation File Read-Only & Uneditab...