

Save a slide design (theme) as a template
If you create a slide design (theme) and you want to save it as a template (.potx file), simply do the following:
Open the presentation that contains the slide design (theme) that you want to save as a template.
Select File > Save As .
Browse to C:\Users\ <your username> \Documents\Custom Office Templates.
In the Save As dialog box, in the File name box, type a name for the template.
In the Save as type list, select PowerPoint Template , and then click Save .
Use your new template
To make use of your template when you create a new presentation:
Select File > New .
Select Custom > Custom Office Templates to find your template.
Select your template, and then click Create .
Themes vs. Templates
Themes are different than templates in PowerPoint:
A theme is a slide design made up of cohesive colors, fonts, and effects such as shadows or reflections.
A template includes a theme, but also contains instructions in placeholders suggesting what to insert and what types of information the user of the template might want to include.

Need more help?
Want more options.
Explore subscription benefits, browse training courses, learn how to secure your device, and more.

Microsoft 365 subscription benefits

Microsoft 365 training

Microsoft security

Accessibility center
Communities help you ask and answer questions, give feedback, and hear from experts with rich knowledge.

Ask the Microsoft Community

Microsoft Tech Community

Windows Insiders
Microsoft 365 Insiders
Was this information helpful?
Thank you for your feedback.
- All-Access Subscriptions
- Business Licensing
- Lightroom Classic
- Photoshop Elements
- Crystal Reports
- Interview Skills
- Resume Skills
- Excel for Lawyers
- Outlook for Lawyers
- QuickBooks for Lawyers
- Word for Lawyers
- Microsoft Office Suite
- Outlook on the Web
- Microsoft Project
- Microsoft Teams
- QuickBooks Online
- QuickBooks Pro
- Video Course Options
- SUBSCRIPTIONS
- Photoshop Elements 2024
- Photoshop Elements 2023
- Photoshop Elements 2022
- Photoshop Elements 2021
- Photoshop Elements 2020
- Photoshop Elements 2019
- Photoshop Elements 2018
- Photoshop Elements 15
- Google Classroom for Teachers
- Google Docs
- Google Drive
- Google Forms
- Google Sheets
- Google Slides
- Mac OS Keyboard Shortcuts
- Excel Formulas and Functions
- Excel Keyboard Shortcuts
- Excel Tables PivotTables and Charts
- Access for Microsoft 365
- Excel for Microsoft 365
- Microsoft Office 365
- Outlook for Microsoft 365
- PowerPoint for Microsoft 365
- Publisher for Microsoft 365
- Word for Microsoft 365
- Access 2021
- Microsoft Office 2021
- Outlook 2021
- PowerPoint 2021
- Publisher 2021
- Access 2019
- Microsoft Office 2019
- Outlook 2019
- PowerPoint 2019
- Publisher 2019
- Access 2016
- Microsoft Office 2016
- OneNote 2016
- Outlook 2016
- PowerPoint 2016
- Publisher 2016
- Microsoft Office 2013
- OneNote 2013
- Outlook 2013
- PowerPoint 2013
- Microsoft Office for iPad
- QuickBooks Pro 2024
- QuickBooks Pro 2023
- QuickBooks Pro 2022
- QuickBooks Pro 2021
- QuickBooks Pro 2020
- QuickBooks Pro 2019
- QuickBooks Pro 2018
- QuickBooks Pro 2017
- QuickBooks Pro 2016
- QuickBooks Pro 2015
- QuickBooks Pro 2014
- Sage 50 Accounting
- Windows 11 and 10 Keyboard Shortcuts
- Chrome OS for Chromebooks
- Word and Excel (Mac) 2022
- Word and Excel (PC/Windows) 2021-2016 and 365
- QuickBooks Desktop (PC/Windows) 2024
- QuickBooks Desktop (PC/Windows) 2023
- QuickBooks Desktop (PC/Windows) 2022-2015
- Windows 11 and 10
- Our History
- Customer Service
- Testimonials
- Lost Password
- Register a Product
- Manage My Account
- Member Login
Try the PowerPoint Course for Free!
Save a presentation template in powerpoint – instructions, how to save a presentation template in powerpoint: video.
This video lesson, titled “ Saving a Presentation Template ,” shows you how to save a presentation template in PowerPoint. This video lesson is from our complete PowerPoint tutorial , titled “ Mastering PowerPoint Made Easy v.2019 and 365 .”
Overview of Saving a Presentation Template in PowerPoint:
You can save a presentation template in PowerPoint after customizing a presentation’s slide masters and slide layouts. After you save the customized presentation as a template, you can then easily use it to create new presentations in the future. Doing this lets you use the presentation’s customized content without having to reapply all your changes to a new presentation again.
By default, PowerPoint wants to save presentation templates into a specific folder on the specific computer you are using to make the templates easier to access and use. If you choose to do this, you’ll need to access the same device to most easily use them in the future. However, if you know into which folder you save the template, you can select it from any computer that can access that folder, if needed.
How to Save a Presentation Template in PowerPoint:
To save a presentation template in PowerPoint, first open the customized presentation to save as a template in PowerPoint. Then click the “File” tab in the Ribbon to show the presentation’s Backstage view. At the left side of the Backstage view, then either click the “Save As” command if using a locally saved presentation or click the “Save a Copy” command if using a file saved to online storage. Then click the “This PC” choice in the pane to the right.
In the far-right pane, type a template name into the “File name:” field. Then select “PowerPoint Template” or “PowerPoint Macro-Enabled Template,” as needed, from the “Save as type:” drop-down. For ease of use, you should save it to the default folder PowerPoint then selects for you. This folder is where PowerPoint stores its default templates. If you save it to this folder, then you can easily select the name of the template to use when creating new presentations in the future by choosing it from the listing of available templates that appears when you create a new presentation in PowerPoint.
Note that if you didn’t select the “This PC” choice earlier and you are using a file saved online, PowerPoint encourages you to change the folder location in a small message below the “Save as type” drop-down. You can click the “Go to recommended folder” link below this message to select the default templates folder on your PC, if needed. To save the presentation template when you are ready, click the “Save” button next to the “Save as type” drop-down.

A picture of a user saving a presentation template in the Backstage view of PowerPoint for Microsoft 365.
Instructions on how to save a presentation template in powerpoint:.
- To save a presentation template in PowerPoint , open the presentation to save as a template in PowerPoint.
- Then click the “File” tab in the Ribbon to show the presentation’s Backstage view.
- At the left side of the Backstage view, then either click the “Save As” command if using a locally saved presentation or click the “Save a Copy” command if using a file saved to online storage.
- Then click the “This PC” choice in the pane to the right.
- In the far-right pane, type a name for the new presentation template into the “File name:” field.
- Then select “PowerPoint Template” or “PowerPoint Macro-Enabled Template,” as needed, from the “Save as type:” drop-down.
- For ease of use, you should save it to the default folder that PowerPoint then selects for you. This folder is where PowerPoint stores its default templates.
- If you save it to this folder , then you can easily select the name of the template to use when creating new presentations in the future by choosing it from the listing of available templates that appears when you create a new presentation in PowerPoint.
- Note that if you didn’t select the “This PC” choice earlier and you are using a file saved online , PowerPoint encourages you to change the folder location in a small message below the “Save as type” drop-down. You can click the “Go to recommended folder” link below this message to select the default templates folder on your PC, if needed.
- To save the presentation template when you are ready , click the “Save” button next to the “Save as type” drop-down.

About Joseph Brownell

Critical PowerPoint Shortcuts – Claim Your FREE Training Module and Get Your Time Back!
How to create a PowerPoint template (step-by-step)
- PowerPoint Tutorials
- Presentation Design
- August 1, 2019
We pulled this EPIC blog post together to show you how to create a PowerPoint template. Right off the bat, creating a PowerPoint template for your company, or for your team is no small task. There are both a lot of design decisions to make, and a lot of things that need to be properly set up in PowerPoint.
If you stumbled upon this blog post by accident, you might be wondering what a PowerPoint template is, and why do you need one.
In short, a template is a set of pre-built slide layouts and defined formatting to help you quickly create brand consistent and professional PowerPoint presentations.
Below is an example of the properly built template you’ll learn how to create throughout these PowerPoint tutorials.

Time Saving Tip: You can save yourself a bunch of time by first buying a professional PowerPoint template and then tweaking it to meet your needs.
To see the 4 best places I recommend finding professional PowerPoint templates online (and why I like them), read my guide here .
If you and your team make lots of PowerPoint presentations, a properly built template can save you THOUSANDS of hours building and editing your slides (no joke).
On the flip side, if your template is broken (which many are), it can make working in PowerPoint a nightmare.
Chances are that if your current PowerPoint template is difficult to work with, you are using a broken template. This tutorial will help you fix it (fast).
[Watch] How to create a template in PowerPoint
This is the first of three parts for how to create a PowerPoint template. If you prefer to watch over my shoulder as I do this (and explain it to you), click play below.
If you are more of a reader or want to quickly jump around these different template topics, scroll beneath the video for step-by-step instructions.
Both options will help you achieve the same end results, and that is creating a template for your PowerPoint presentations.
You are currently viewing a placeholder content from Youtube . To access the actual content, click the button below. Please note that doing so will share data with third-party providers.
Part #1. Creating Your PowerPoint Template Slide Backgrounds
In the first part of this tutorial, you’ll discover how to create your own slide backgrounds and how to:
- Build the overall frame for your template
- Use and navigate the PowerPoint Slide Master (and how the Parent and Child
- Slides work together)
- Use the different paste special options
- Add a pattern background to your slide
- Crop images to fit your entire slide background
- Add a radial gradient fill to a shape with transparency
- Add new guides and move them around on your Slide Master
1. Set the colors for your template
The first step when creating a template in PowerPoint is to select a color scheme for your template (preferably one that reflects your company’s brand image).
To select a color scheme for your template, inside of PowerPoint, navigate to the Design tab, and open the Variant options .

To choose a color scheme for your PowerPoint template, simply:
- Navigate to the Design tab
- Open the More variants options
- Click on Colors to open the dropdown
- Select the color scheme you want to use
If you want to use a color scheme that isn’t listed here, you can create your own.
Selecting a new PowerPoint theme changes all the default colors you have to work with inside your presentation (allowing you to maintain consistent formatting throughout).
Your theme colors will be reflected in all of your color dropdowns as pictured below (with pre-populated variants for those colors).

2. Set the fonts for your template
To navigate to your PowerPoint Slide Master, simply:
- Navigate to the View tab
- Select the Slide Master command
The next step is to select a font pairing for your template, which you can also do in the Design tab, under Variants.
NOTE: This is one of my top PowerPoint template tips, and is one you don’t want to mess up. To see my 9 other top tricks for your PowerPoint templates, read my guide here .

- Click on Fonts
- Select the font combination you want to use

The ability to make this kind of macro level formatting is one of the major benefits of creating a PowerPoint template. You set your formatting in one place, and it updates throughout your entire presentation (amazing!).
Once you have your colors and fonts selected, you are ready to create the framework. This includes your slide backgrounds and other common design elements you will want in your presentation.
3. Navigate to the Slide Master View
In order to properly create the slide backgrounds for your template, you’ll need to create a presentation framework on the Slide Master.

To choose a new font combination for your PowerPoint template, simply:
Inside the Slide Master , you’ll see two sets of slides on the left as pictured below:
#1. The Parent Slide (the bigger slide) is where you want to make the macro-level edits that you want to see reflected on the majority of your slides. For example, this is likely where you will want to see things like your company logo or any corporate branding design element.
#2. The Child Slides (the smaller slides) are where you want to customize the individual layouts. For example, your title slides and divider slides may look quite different from the rest of your slides, which is why they’ll have their own Child Slides.

Warning : Although you can delete the Child Slide layouts within a presentation, I don’t recommend it.
As Julie Terberg and Echo Swinford point out in their book on templates, “Building PowerPoint Templates Step by Step with the Experts”, if you delete these Child Slide layouts, you are likely to encounter formatting issues and errors when copying and pasting between your templates down the road.
So unless you are 300% sure you are never going to use these layouts (and nobody on the planet is ever going to send you a slide deck with one of these layouts), I don’t recommend deleting them.
4. Customize your Parent Slide background
Now that you are on your Slide Master, you’ll want to start by formatting your Parent Slide.
That’s because the formatting that you set on your Parent Slide will affect all of the other slide backgrounds within your template.

A. Choose your PowerPoint template's background
Next, you are going to format your slide background with the various design elements you want for all your slides.
In the example below, I’ve chosen a pattern for my template that is minimalist and modern. You can download and insert any picture or pattern you want to use as your slide background image.

B. Crop to Aspect Ratio

If you are using a picture for your slide background, the fastest way to make it fit on your slide is to crop it using the Aspect Ratio Crop tool. To do that, simply:
- Select the background image you have pasted on the slide
- Navigate to the Format tab
- Open the Crop dropdown
- Open the Aspect Ratio options
- Choose your aspect ratio. In the picture above I chose 16:9 for widescreen to match my slide dimensions (another common aspect ratio is 4:3 for printed slides).
- Adjust your photo within the frame
- Hit the Crop command again or hit Esc on your keyboard
This makes resizing the image to fit your template easier without having to worry about any warping.
Picture Cropping: Want to expand your knowledge and learn more about how to crop pictures in PowerPoint? Read our cropping guide here
C. Fill out your slide background
To make the image fit your entire slide space, there are two options.
Option #1. You can simply drag the handlebars to expand the image. Just make sure you hold the Shift key while you enlarge your image, so you don’t accidentally warp it.

Option #2. You can resize your image more precisely:
- In the Shape Width box, enter 13.33 and hit Enter on your keyboard
- Drag the image in the center to fit the entire slide
NOTE: In my example in the video above, I wanted a smaller pattern. That’s why I duplicated the background image so that I have two smaller images next to each other.
And then I made sure to group the two images together so that they function as a unit.
The final example of the background shown below is the result of that. And because the image is set on the Parent Slide like this, by default it will show up as all the slides in my PowerPoint template.

After resizing your background image, you will want to send it back behind all other elements.

To send the image backward, simply:
- Select your background image
- Navigate to the Picture Tools Format tab
- Click on the Send Backward dropdown
- From the dropdown menu, select Send to Back
This sends the background behind the text as shown in the picture below. This makes all the Parent Slide content placeholders visible again on your slide.

D. Create a semi-transparent gradient layer
With the slide background set for my PowerPoint template, I’m additionally going to make the slide background less visible by adding a semi-transparent layer.
That’s because as you can see in the picture below, the text is not clear against the background image I used. This will make it hard for people to read my slides during a presentation.
In the steps below, I will use the old method (non-Office 365 subscription) for creating a transparent background in PowerPoint. If you have an Office 365 subscription and want to see the brand-new way to create a transparent image, see our guide here .
Step #1. Insert and format a rectangle

To insert and format a rectangle in PowerPoint, simply:
- From the Insert Tab, click on the Shapes gallery, and select a rectangle (mine is on my QAT).
- Draw in the rectangle so that it covers your entire background image (for this to work, your rectangle needs to be the same exact size as the image you want to make transparent).
- Remove its outline by going to the Shape Outline dropdown and selecting No Outline .
Step #2. Add a gradient fill

With the rectangle still selected, make the following adjustments:
- Select your rectangle and click Format Shape to open the Format Shape dialog box. This gives you a wide variety of formatting options you can use to format your shape backgrounds for your template.
- Select the Gradient fill.
- In the Type dropdown, select Radial .
- For the Direction , select the “from center” option (in the middle).
- In the Gradient stops bar, select the first gradient stop, and from the fill Color dropdown, select white. Under Transparency , enter 5 %. So that it almost looks 100% white in the middle.
- Next, select the second gradient bar and drag it to the right. From the fill Color dropdown, select white. For Transparency , enter 10%.
- Then, select the third gradient bar and drag it to the right. From the fill Color dropdown, select white. For Transparency , enter 10%.
- Finally, select the last gradient bar and drag it to the right. From the fill Color dropdown, select white. For Transparency , enter 60%.
Using the gradient fill options described above, your rectangle should look like mine, with some of your text bleeding through it.

Close the Format Shape pane and you’re all set with your gradient formatting.
As a final step, right-click your gradient rectangle and select Send to Back and then Send Forward so that it sits behind your placeholders but on top of your pattern background.

5. Add a slide background design element

As a next step, I’m going to add a bright bar down the right-side of my slide as a nice design element. To do that, simply:
- Navigate to the Insert tab and select the Shapes dropdown.
- Select a Rectangle and draw it on the right-hand side of your slide. Make sure to place it on the edge of your slide.
- Select No Outline
Note: Make sure you are adding this to your Parent Slide and not a Child Slide. This automatically populates the design element on all the Child Slides.
That’s the power of creating a PowerPoint template – you add a design element in one place, and it shows up throughout your presentation.

6. Add and edit your guides
In PowerPoint, guides help with formatting, positioning, and slide-to-slide consistency.
Consider guides as the anchors on your slide that help you to consistently align your objects. It’ s an optional step, but I recommend adding them to your template.

To add guides to your PowerPoint template, simply:
- Click on the View tab
- Select Guides . Notice that there are two guides: one vertical and one horizontal.
- To move a guide, place your mouse over it , and when your cursor becomes a double-headed arrow, drag the guide to where you want it on your slide.
For now, I will simply place my guides on the edges of the slide, to create a “bleed area” in case part of the presentation gets cut off in print.
We will look at adding more guides in part #2 of this series. To add a new guide, simply start dragging an existing one, and then hit the Ctrl key on your keyboard before you let go.
Depending on how you set up your guides, they tell users where they should and shouldn’t be placing content on your slides.
Part #2. Setting up your template placeholders and footers
With your slide background now set up, let’s nail down the following three placeholders on the Parent Slide :
- Title placeholder
- Content placeholder
- Date and time, Footer, and Slide Number placeholders

And even if you don’t want to use these placeholders on all of your slides, it’s still important to set and format them on your Parent Slide.
Why? Because if you don’t, you run the risk of letting default formatting slip through the cracks and ruin an otherwise perfect template.
Later in this tutorial, you’ll learn how to tweak your slide layouts away from the Parent Slide if that’s what you want to do.
1. Format the Title placeholder
There are a number of ways in which you can format your placeholders and there is no right or wrong formatting.
But before we dive into that, let’s talk about what placeholders are. Placeholders are blank spaces that are designated for certain types of content.
You set these on your Slide Master so that they are locked when people fill them in when building their PowerPoint slides using your template.
Three keys to remember about your content placeholders are:
- They can only be set and edited (for real) on your Slide Master.
- Only text typed into your placeholders will show in the Outline View of your presentation.
- Only text that has been typed into your placeholders will change fonts automatically when you change your theme’s fonts.
You can change the font size, alignment, size, position, etc. of your placeholders to meet your requirements. Below I’ll run you through the most common formatting elements.
A. Change the font size
Before you start formatting your placeholders, make sure you are on your Parent Slide. We will focus on formatting your Child Slide layouts later.

As a first step, let’s change the font size of the title placeholder:
- Select your title placeholder
- In the Font Size dialog box, enter 40 (or whatever size you want)
B. Resize and position the placeholder

Next, adjust the size and position of your title placeholder. To do that, simply select the placeholder and:
- Use the four-headed arrow cursor to move the placeholder to where you want it on your slide.
- With the placeholder still selected, drag the resizing handles (the 8 little white circles) in or out to resize the placeholder.
There is no right size and position for your title. You’ll simply want to make sure that it fits your slide.
You’ll also want to think about how much text you’re expecting people to type into the placeholder for their slides. Make sure the placeholder is big enough to fit the typical scenario.
C. Set your vertical text alignment

Next, set the vertical text alignment for your title. To do that:
- From the Home tab, select the Align Text dropdown menu
- Choose your desired vertical text alignment (I’ll choose Bottom for mine)
Unless you have a specific reason to do otherwise, I recommend that you choose Bottom for your vertical text alignment. That way your title text will always stay perfectly aligned at the bottom, from slide to slide.
This helps avoid jumping titles for any slides that have more than one line of text. On the flip side, if you plan on having short titles for all your slides (no more than one line), I recommend using the Middle text alignment instead.
Regardless of what you decide, make sure you test different title lengths to see what will work best for your PowerPoint template.
D. Align the guides to the title
Since we added our guides in the first part of this series, now we’ll set them to align with our title.
- Drag your Horizontal Guides to match the top and the bottom of your title placeholder (add more guides if necessary)
- Drag your Vertical Guides to match the left-hand and right-hand sides of the title placeholder (add more guides if necessary)
To add a new guide, simply start dragging an existing one, and then hit the Ctrl key on your keyboard before you let go.
Adjusting your guides like this will make aligning objects on your slides much easier as your Smart Guides will automatically snap them together.

Note: If your Guides are not visible, simply right-click on a blank part of your slide and select Grid & Guides, and then Guides. That will turn them on. Alternatively, you can go up to the View tab in the Ribbon and select Guides inside the Show area.
2. Format the Text placeholder
The Text placeholder on your Parent Slide is special in that it will dictate the default formatting of all the other content placeholders in your presentation (except for the Title placeholder and the Footer placeholders).

Setting the default here on the Parent Slide is important because it makes it a lot easier to make fast and consistent changes to swathes of content down the road.
Later in this template series, I will show you how to format away from this default behavior on the Child Slides. But first you want to set its default formatting.
A. Resize and position the Text placeholder

The first thing to do with your Text placeholder is change its position and/or size so that it’s exactly aligned with the Title and Footer placeholders. To do that:
- Select the Text placeholder and when the cursor becomes a four-headed arrow, drag the placeholder to the top and left side so that it is aligned with the Title placeholder.
- With the placeholder still selected, use its sizing handles to adjust its size until it is just right (factoring the amount of text that you predict you’ll type in, as well as the alignment with the other placeholders).
B. Align the guides

In this step, you need to align the horizontal and the vertical guides to that they align with the Text placeholder. To do that:
- Drag the horizontal guides to match the top and the bottom of the Text placeholder.
- Similarly, drag the vertical guides to match the left and right-hand sides of the Text placeholder.
C. Change the font size

The next step is to change the font size of the different levels of text inside the placeholder. To do that:
- Select the first level of text
- In the Font Size box, type in 20 and hit Enter
Repeat these steps for the second, third, fourth, and fifth levels of bulleted text, changing their font sizes to 18,16, 14, and 14 respectively.
D. Adjust and align the bullet points

Once you have set the font size, it is important to adjust the bullets.
- Select all the text styles in the content placeholder
- In the Paragraph group, click on the Bullets and Numbering dropdown
- Click on the square style bullets

Next, you want to adjust the indent of the bulleted lists so that it appears in all your slide layouts. To do that:
- Select the bulleted list you want to adjust
- Click, hold, and drag the desired indent marker. In our example, we’ll drag the hanging indent marker.
- Repeat this for each text level
You can adjust the bullets as per your personal preference. Based on your knowledge of how someone is going to be using this template, you might decide to add more or less space.
Note: My recommendation as per Julie Terberg and Echo Swinford’s book, “Building PowerPoint Templates Step by Step with the Experts,” is to always make sure that you format every single item you have available. That includes formatting each text list level.
You can see their book on templates here .
That way, you have everything set in case someone decides to break the rules or do their own thing. This inevitably happens with templates and you want to be prepared for it!
3. Formatting the footers of your template
The footer section of the Slide Master has three types of placeholders:
- Slide number
- Footer text
- Date and time

A. Set the font size for all your footers

The first step is to change the font size of the footer placeholders. To do that:
- Select all your footer placeholders holding the Shift key.
- In the Font Size dialog box, type 10 (of whatever your desired font size is) and hit Enter.
B. Resize and position the placeholders
The next thing to do with the footer placeholders is to change their position and/or size so that they’re aligned with the rest of the placeholders. To do that:
- Select each placeholder and when the cursor becomes a four-headed arrow, drag the placeholder to its desired location (use the guides for assistance).
- Repeat this for each placeholder.
If you want to be 100% certain that all the Footer placeholders are the same, select them one at a time and go to the Shape Format tab in the Ribbon. In the Size section, verify that the height of the placeholders is the same.
In this example, note that I am swapping the positions of the Date & Time and Footer placeholders.

Remember to also add new guides around these placeholders to help keep them in place. Here, I’m only going to add the top and bottom guides, so as to avoid confusion and overkill.

C. Format the Slide Number placeholder

Next, we’ll need to adjust the formatting of the text inside the slide number placeholder. To do that:
- Right-click the placeholder, click on Format Shape and select Text Options
- Open the Text box tab
- Type 0 for the Left margin and hit Tab or Enter on your keyboard
Note: For the slide number placeholder, you can also add symbols as I have here (such as a bar and two spaces), in order to create a visual break from the other placeholders.

D. Format the Date and Time placholder
The next thing is to format the date and time footer placeholder. You can choose any kind of format you like. Below you’ll find the steps that I took in the video tutorial at the top of this page.
First, select the placeholder and hit Ctrl+R on your keyboard to right-align the text to the right (so that it’s flush with the slide number to the right).

Then, you’ll want to choose what kind of date formatting you want. To do that, simply:
- Select the Date and time placeholder and hit Ctrl + R on your keyboard to align the text to the right.
- Go up to the Insert tab and in the Text group, select Header & Footer .
- Click on Date and time so that there is a checkmark next to it.
- Click on the Date dropdown and select the option as required. In this example, we are going to select December 30th, 2017.
- Click Apply to All to save the changes. You can see that the date and time text has changed accordingly.
E. Format the Footer text placeholder
The final default placeholder to format on the Parent Slide here is the Footer text placeholder. This placeholder is designed for a tagline, an author’s name, or cited sources. For helping citing sources in PowerPoint, read our guide here .
All you need to do here is to select the placeholder and hit Ctrl+L on your keyboard to left-align the text. This way, it is next to the logo and the text inserted will extend out towards the right.

F. (Optional) Add your logo
While all the default placeholders have now been set up and formatted correctly, there is still one element that you can add on the Parent Slide of your Slide Master; and that is a logo.
This is optional, so don’t feel obligated to add one. In fact, a common practice today is to display the logo more sparingly and only place it on certain Child Slide Layouts.

To add a logo, simply:
- Copy the logo and hit Ctrl+V to paste it on the slide. Make sure you paste it as a PNG because it won’t lose its quality over time, whereas a JPEG will.
- Resize and reposition the logo to make it fit nicely in its desired position. Alternatively, you can click on the Picture Format tab in the Ribbon and set the height to 0.35 to make it even with the other placeholders.
You can also use this same technique to add a watermark to your PowerPoint slides. To see how to add a watermark to your slides (like Draft or Confidential ), read our guide here .
Part #3. Creating Custom PowerPoint Template Slides
In the last part of this creating a PowerPoint template guide, you’ll finalize the slide layouts that you want to use in your PowerPoint presentation by formatting the Child Slides .
The Child Slides represent the blueprints for each type of slide included in your template. By default, your Child Slide layouts will inherit your Parent Slide formatting. But as you will see, you can tweak these layouts to meet your individual needs.

The key to designing good Child Slide layouts is to keep in mind how the end-user is likely going to insert content on each type of slide. You want to make it easy for everyone to quickly fill them in when using your template.
In this section you’ll learn how to:
- Remove background graphics so that they’re hidden on your Child Slide layouts,
- Make the slide background an existing picture,
- Rename your custom Child Slide,
- Add prompt text to help the template user properly fill in each layout,
1. Format the Title slide layout
The first step is to edit the Title slide layout. This layout is designed to be filled in with the title and general information about your presentation.
Typically, its looks slightly different than the rest of the layouts. It usually has less text and fewer images/objects, and it stands apart.
That being said, it still needs to match the other layouts overall and look like it’s a part of the same template.

The first thing we need to do when formatting our Title slide layout is to think about the background. Typically, a Title slide will have a slightly different background from the regular Content slides.
However, because the background has been set on the Parent Slide, this means that you will have to deviate from it. There are 2 ways to approach this – let’s go over each one.
A. Hide the background graphics on a Child Slide - Method #1
The first method for hiding anything in the background (graphics such as the logo, background patterns, design elements, etc.) is to insert a blank rectangle to cover it up.

To cover up your slide background with a white rectangle, simply:
- Go to the Insert tab on the Ribbon, click on the Shapes dropdown, select a rectangle.
- Draw in the rectangle so that it fills out the entire slide.
- Change the rectangle’s fill color to White .
- Remove the rectangle’s outline .
Next, we’ll need to make sure the placeholders are visible on the slide, in front of the newly inserted rectangle.
To do that, with the rectangle still selected, go to the Shape Format tab on the Ribbon, click on the Send Backward dropdown and select Send to Back .

Note: Keep in mind that covering up the background elements like this means that the logo (and any other image you’ve pasted onto the Parent Slide) will be hidden. If you want that element to be visible on this Child Layout, you’ll have to copy/paste it in.
B. Hide the background graphics on a Child Slide - Method #2

The “technically better” way to do this is to use the default PowerPoint feature set up to do this for you. Simply:
- Go to the Slide Master tab in the Ribbon
- Click on Hide Background Graphics to add a checkmark next to it
This hides anything from the Parent Slide that isn’t a placeholder. This includes any background images or patterns, logos, and other design elements.
You can easily make them visible again by unchecking the Hide Background Graphics checkbox.
C. Add in a new background for this layout
Now that we’ve removed the background inherited from the Parent Slide layout, we’ll need to add in background elements we want on this particular Child Slide.
While the background image can be different, we want to keep it consistent. So let’s go back up and take some elements we can reuse.
First, navigate back to the Parent Slide and select the pattern image (without the gradient). Then hit Ctrl + C on your keyboard to copy it.

Then, go back to your Title slide layout and:
- Right-click a blank area on your slide and select Format Background .
- In the Format Background tab, select Picture or texture fill .
- Select Clipboard .
This pastes whatever is currently copied on your clipboard into your slide background.
Note: Pasting an object directly into your slide background like this means that it can no longer be edited in your PowerPoint template.
If instead you paste it directly onto the slide as an image, you can always go back in and make adjustments to the image, and therefore to the background too.
It’s up to you whether you want your template’s users to be able to edit the background image or not.
So if you’re putting the image directly into the slide background, I recommended that you only do so when you are sure that this is the final background image you want to use.
D. Add in an extra design element

The next step is to add in a design element that matches the general theme and style of the template. To do that:
- Go to the Insert tab on the Ribbon, click on the Shapes dropdown and select a rectangle.
- Draw in the rectangle (it should be filled with the first accent color of your theme) so that it fills about 80% of your slide.
- Make sure the rectangle is centered and in the middle of the slide.
Next, let’s send the rectangle behind the placeholders.
To do that, right-click the rectangle, open the Send Backward dropdown and select Send to Back .

E. Adjust the placeholders

First, adjust your Title and Subtitle placeholders. To do that, simply select the two placeholders and:
- Change their Font color to white.
- Adjust their position and size on the slide, keeping in mind how much room you need to leave for the text.
Next, let’s address the Footer placeholders.
Even if you don’t want footers visible on the Title slide of your template, I don’t recommend deleting them here in the Slide Master View.
Why? Because if someone decides to use them despite your instructions, you still want them to appear correctly and match the rest of the template.
F. Format and hide your Footer placeholders
To format and hide your footer placeholders, simply:
- Format the footer placeholders the way you’d like them to appear if they were used.
- Go up to the Slide Master tab in the Ribbon and deselect the Footers checkbox.
Note: Even if your footers stay selected on this Title slide layout in the Slide Master View, they typically don’t appear on that Title slide in the Normal View.
To turn them on, you have to go to the Insert tab in the Ribbon and select Header & Footer. There, you can turn them on.
So, unless you truly want someone to NEVER be able to add a page number, date and time, and footer text to the Title layout, then I recommend leaving them on the Child Slide, to keep that option open.
If you deselect the Footers checkbox in the Slide Master View as we did above, then when someone tries to insert footers in the Normal View, they will not appear.
To learn all about how to add slide numbers in PowerPoint (and troubleshoot ones that won’t show up), read our guide here .
One more thing you might notice is that the guides are not visible on the Title slide. Since this is a Child Slide, you can’t edit the guides here.
Unfortunately, the guides you set on the Parent Slide will likely not match the content you have on the Title slide (and any Child Slide whose content deviates from it). There is no way around this in PowerPoint at this point in time.

2. Format your Title and Content layout
The next step is to edit the most commonly used PowerPoint slide in any presentation, the Title and Content layout.

This specific slide layout will look almost identical to to the Parent Slide layout that we’ve already set up at this point. This means that there isn’t much we have to do to change it.

However, in this example, we are going to add one more design element to the layout, which is a straight line. To do that simply:
- In the Insert tab on the Ribbon, click on the Shapes dropdown and select the straight line. To make sure it’s 100% straight, hold the Shift key as you draw in the line.
- Drag the straight line and place it underneath the title. It should perfectly fit in thanks to the Smart Guides . Make sure that it’s long enough to go past the text in the Title placeholder .
The reason you don’t add this line to the Parent Slide is that the layout has to be formatted to work for the majority of the layouts in your template.
That means that the Parent Slide has to be relatively bare-bones. You can always add extra elements in the Child Slides.

3. Format the other Child Slides
From here onward, you will need to format each of the Child Slides to match the content that goes in them.
You will want to follow the same procedure as in Step #2 above, keeping in mind what each Child Slide is designed for and how the content should be placed.
Some layouts will require more custom formatting and design elements. For example, for the Divider slide (the first slide in the examples below,) I have added a rectangle that matches the design elements on the Title Slide layout.

4. Optional step: Create your own Child Layouts
In addition to the default Child Slides that PowerPoint gives you, you have the option to create your own.
You can choose to create your own if you have a very specific type of slide that you’ll need to create over and over in your presentation.
If you make the slide under 10 times, it may not be worth clogging up your Slide Master area. But if you use it frequently, creating a layout template for that type of slide will save you countless hours.
Here are the kinds of slides you may want to create a custom layout for:
- Table of Contents / Agenda
- Team bios / Team headshots
- Case studies
- Thank you / Learn more
- Data dashboard
Keep in mind that the blank layout (and other blank variations) can always be used to create more one-off slides.
Creating a custom agenda slide

In this example, we’re going to add a custom Agenda Child Slide. To add this custom layout:
- Go to the Slide Master tab in the Ribbon and click Insert Layout . You’ll see that a new Child Slide gets added in with just a Title placeholder and the Footer placeholders.
- Add any additional placeholders you need (Slide Master tab > Insert Placeholder) and format them as per your requirements. In this example, I’ve added 20 text placeholders that I’ve resized and formatted.
- Adjust the prompt text in the placeholders to fit the respective content need. For example, in the image below you can write “Type in item” so that the user knows to type in the right text into each placeholder.
Note: You can change the shape of a placeholder, as well as adjust all other properties of a typical shape. That means that you can also add fill, outline, effects, etc.
This is how I was able to create the circular TOC numbers in this layout:

You can also rename the custom Child Layout by:
- Right-clicking it in the Thumbnail View on the left-hand side and selecting Rename Layout .
- Type in a helpful name and click Rename .

Note: You can perform these steps for all custom Child Slides. You can also create custom layouts for a lot of slides such as for products, case studies, contact us, etc.
However, try not to go overboard because you don’t want to have a layout area packed full of slides, which will confuse the user.
But for very frequently occurring slides, I highly recommend making a custom layout.
There are also other slides in the template such as the content slide with subtitles or a blank slide with a title. You can format them per your requirements.
5. Finalize your PowerPoint template
Although your PowerPoint template is almost finished, there are still a few critical steps I recommend taking. Take a deep breath, you are almost there.
A. Set your PowerPoint animations and transitions
The first thing is to set the animations and transitions for your slides. For all placeholders that you want to automatically animate in your template, simply select it and apply your animation.
Note: Keep in mind that animations should be used in your template VERY sparingly. That’s not only because animations can be overly distracting, but it’s also because the user of your template may not want to have animations set automatically for them.
In short, make sure you create the template in a way that makes your users’ life easier, rather than harder.

Once that’s done, let’s set the slide transitions. To do that, simply:
- Select all of the slides in your template (in the Slide Master View).
- Click into the Transitions tab in the Ribbon and select your preferred slide transition.
Next, let’s make sure we close the Slide Master View since we are done with it. From the Slide Master tab in the Ribbon, click Close Master View .

Note: There is also a Notes Master and Handout Master in PowerPoint that you can set up and format. These masters determine the look and feel of your PowerPoint handouts when you print them.
B. Stress test your template to make sure it works
It is highly recommended that you test your template before you distribute it. That way you catch any errors before your users do.
Here are some ways you can stress test your template:
- Try to use it in a variety of different ways to see if it breaks
- Type in all kinds of dummy text
- Delete things and turn them back on again
- Paste slides in from other templates to see what happens in your template
And that’s how to create a PowerPoint template that works the way it is supposed to.
You now have the foundational skills to start creating your own PowerPoint templates and building beautiful and tailor-made presentations.
If you want to learn more about building and deploying your template in professional settings, I recommend checking out my step-by-step training course, see details here .
As a quick recap of everything we covered, you learned how to:
- Navigate the Slide Master View,
- Create and insert slide backgrounds, as well as hide background graphics,
- Format each of the elements on the Parent Slide layout,
- Format each Child Layout and create your own custom Child Slide layouts,
- Add and adjust the Guides on your Parent Slide layout,
If you enjoyed this in-depth tutorial, you’ll love our PowerPoint training courses and tutorials that you can learn more about here .
Related Articles
About the author.

This Post Has 2 Comments

Such a great GREAT walkthrough! I’ve learned so much. You shared so many little golden nuggets that are pricesless!

Very happy to hear you found this useful!
Comments are closed.
Popular Tutorials
- How to Strikethrough Text (l̶i̶k̶e̶ ̶t̶h̶i̶s̶) in Word, Excel & PowerPoint
- How to Make Animated Fireworks in PowerPoint (Step-by-Step)
- Strikethrough Shortcut (l̶i̶k̶e̶ ̶t̶h̶i̶s̶) for Word, Excel & PowerPoint
- How to Create a Flash Card Memory Game in PowerPoint (Like Jeopardy)
- Keyboard Shortcuts Not Working: Solved
PowerPoint Tutorial Categories
- Strategies & Opinions
- Shortcuts & Hacks
- Pictures, Icons, Videos, Etc.
- New Features
- Miscellaneous
- Charts & Data Viz
We help busy professionals save hours and gain peace of mind, with corporate workshops, self-paced courses and tutorials for PowerPoint and Word.
Work With Us
- Corporate Training
- Presentation & Template Design
- Courses & Downloads
- PowerPoint Articles
- Word Articles
- Productivity Resources
Find a Tutorial
- Free Training
- For Businesses
We help busy office workers save hours and gain peace of mind, with tips, training and tutorials for Microsoft PowerPoint and Word.
Master Critical PowerPoint Shortcuts – Secure Your FREE Training Module and Save Valuable Time!
⌛ Master time-saving expert techniques.
🔥 Create powerful presentations.
🚀 Propel your career to new heights.
We value your privacy – we keep your info safe.
Discover PowerPoint Hacks Loved by Industry Giants - KKR, AmEx, HSBC!
Over 114,880 professionals in finance, marketing and sales have revolutionized their PPT skills with our proven methods.
Gain FREE access to a full module of our premium PowerPoint training program – Get started today!
We hate spam too and promise to keep your information safe.
You are currently viewing a placeholder content from Facebook . To access the actual content, click the button below. Please note that doing so will share data with third-party providers.
- Stream Your Favorite Sports
- Where to Watch WNBA Games
How to Copy a PowerPoint Design Template to Another Presentation
It's quick and easy to copy over a design template
- Brock University
What to Know
- In the source presentation, select View > Slide Master . In the Slide pane, right-click the Slide Master and select Copy .
- Go to View > Switch Windows and choose the second presentation. Go to View > Slide Master . Right-click the Slide pane and select Paste .
- Choose Use Destination Theme (keeps colors, fonts, and effects) or Keep Source Formatting (copies the source's colors, fonts, effects).
This article explains how to copy a PowerPoint design template over to another presentation. Instructions apply to PowerPoint 2019, PowerPoint 2016, PowerPoint 2013, and PowerPoint for Microsoft 365.
How to Copy a Presentation's Design Template
It's often quicker to copy a design template from a presentation than to find it in the list of PowerPoint templates.
Go to View in the presentation that contains the design template you want to copy and select Slide Master .
Right-click the Slide Master in the Slide pane on the left side of the screen and select Copy .
The Slide Master is the large thumbnail image at the top of the Slide pane. Some presentations contain more than one slide master.
Go to View , select Switch Windows , and choose the presentation you want to paste the Slide Master into.
If you don't see the other PowerPoint presentation on this list, it means that the other file isn't open. Open it now and return to this step to select it from the list.
In the second presentation, go to View and select Slide Master to open the Slide Master .
To insert the Slide Master from the other presentation, right-click on the Slide pane to the left, select Paste , and do one of the following:
- Choose Use Destination Theme to keep the theme colors, fonts, and effects of the presentation you are pasting to.
- Choose Keep Source Formatting to copy the theme colors, fonts, and effects of the template you are copying from.
Select Close Master View .
Changes made to individual slides in the original presentation, such as font styles, do not change the design template of that presentation. Therefore, graphic objects or font changes added to individual slides do not copy over to a new presentation.
To copy PowerPoint slides to another presentation , right-click the thumbnail of the slide you want to copy and choose Copy . Right-click a blank area of the Slides pane where you want to place it and choose one of the pasting options.
To save a copy of a PowerPoint presentation on your computer, go to the File tab and select Download As > Download a Copy . Select Download to continue.
To embed YouTube videos in PowerPoint , select Share > Embed . Select the HTML code and choose Copy . In your PowerPoint slide, select Insert > Video > Insert Video From Website . In the dialog box, right-click the blank area and choose Paste > Insert .
Get the Latest Tech News Delivered Every Day
- Copy Slides to Another PowerPoint Presentation
- Change the Default Font in PowerPoint Text Boxes
- How to Use Copilot in Powerpoint
- Use This PowerPoint Template for a Multiple Choice Quiz
- How to Use PowerPoint Slide Master Layouts
- How to Add an Excel Chart to a PowerPoint Presentation
- How to Merge PowerPoints
- Replacing All the Fonts in a Presentation at One Time
- How to Increase PowerPoint Slide Number Size
- What Is a PowerPoint Placeholder?
- Definition and Uses for a PowerPoint Design Template
- 10 Free PowerPoint Game Templates
- Create a Default Presentation Template in PowerPoint
- Add, Delete or Change the Order of PowerPoint Slides
- PowerPoint Master Slide
- The 10 Most Common PowerPoint Terms
Stack Exchange Network
Stack Exchange network consists of 183 Q&A communities including Stack Overflow , the largest, most trusted online community for developers to learn, share their knowledge, and build their careers.
Q&A for work
Connect and share knowledge within a single location that is structured and easy to search.
How to save a PowerPoint presentations's template?
I downloaded a presentation and I like its template. How can I save the template for my own future use?
- microsoft-powerpoint
To save it, click File -> Save as -> Choose .pot extention in the default Powerpoint template folder.
- 2 Or .potx if its a newer version of PowerPoint. – CharlieRB Nov 15, 2012 at 12:28
- By ".pot" do you mean PowerPoint Template? Note that I want to save the temple only and not the content of the presentation itself. – Gigili Nov 15, 2012 at 13:13
- I think you will need to remove the content first and save what you have as the template. – Dave Nov 15, 2012 at 13:15
- 2 Dave's correct. If you save a presentation as a template without first deleting the slides in it, when you start a new presentation based on that template, you get the slides too. That can be useful, if you want the new presentation to start with a selection of pre-made slides. Otherwise, delete all the slides, or leave just a blank title slide, for example. When you apply a template to an existing presentation, PPT won't add any slides from the template; you get the design but none of the content. – Steve Rindsberg Nov 16, 2012 at 21:02
You must log in to answer this question.
Not the answer you're looking for browse other questions tagged microsoft-powerpoint templates ..
- The Overflow Blog
- Why do only a small percentage of GenAI projects actually make it into...
- Spreading the gospel of Python
- Featured on Meta
- Our Partnership with OpenAI
- What deliverables would you like to see out of a working group?
Hot Network Questions
- Why did the authors use the phrase "the quantity of people" in these examples?
- Mtg: attacking effect, but the creature dies
- Timetable for Cercanias AM narrow gauge railway in Spain
- Teaching talks as part of the interview process for a faculty position?
- In what kinds of situations do you use "holder" and "owner"?
- Academic advisor asks to rewrite text (too?) many times
- Negation of "I think therefore I am"?
- Simple or Complicated mechanics, what benefits they have and should I be worried about overcomplication?
- How to provide opportunities for role playing in a single player campaign focused on travelling and wilderness survival?
- In the US, does the Social Security benefit calculator assumes you work until the retire age?
- Would it count as a story if nothing bad happens to the character anywhere in the story?
- Better way to add attributes to an enum in Rust for code scalability
- Fantasy book series about a girl with magical red hands
- Can I use a hose clamp to ground a wire to EMT?
- What's the minimum survivable mid-air collision altitude in a glider?
- Simplification of square roots as denominators with limits
- I was denied entry in the UK - is my visa cancelled?
- Does target of Geas know the penalty for disobeying?
- Is it illegal for a company to cross out the "To the order of" line on a check and change companies being paid?
- Refused entry stamp (c) in Paris. Will it create problems?
- Frank Stella's Protractor Series - Can we reproduce Lac Laronge IV?
- Emulation and BIOS Initialization for an IBM PS/2 Model 30
- What happens to a trial if the presiding judge is unable to finish the trial?
- Allow commercial use, but require removal of company name
How to Save a PowerPoint Template Folder: Easy Steps to Follow
Saving a PowerPoint template folder is a straightforward task. First, open the PowerPoint application, then click on File, and choose Save As. Select PowerPoint Template from the drop-down list, and finally, save the file in the designated folder on your computer.
After completing this action, your custom PowerPoint template will be readily available for future presentations, saving you time and ensuring consistency across your presentations.
Introduction
Imagine creating a stunning PowerPoint presentation, one that has the perfect balance of color, font, and layout that just screams ‘you’. Now, wouldn’t it be great if you could save that exact template to use again without going through the hassle of recreating it from scratch every time? That’s where saving a PowerPoint template folder comes into play. This skill is essential for anyone who frequently uses PowerPoint for work, school, or personal projects.
Saving a template folder not only streamlines your workflow but also helps maintain consistency in your presentations. It’s a time-saver and a game-changer for those who need to churn out professional-looking slideshows on the regular. Whether you’re a teacher, a business professional, or a student, knowing how to save a PowerPoint template folder can make your life a whole lot easier.
Step by Step Tutorial: Saving a PowerPoint Template Folder
This step-by-step guide will show you how to save your customized PowerPoint template so it’s always at your fingertips when you need it.
Step 1: Open PowerPoint
Open the PowerPoint application on your computer.
You’ll need to start by opening the PowerPoint application. If you have a specific presentation open that you want to save as a template, that’s fine too.
Step 2: Click on ‘File’
Click on the ‘File’ tab in the upper left corner of the screen.
Once you’ve opened PowerPoint, you’ll see a series of tabs at the top of your screen. Click ‘File’ to open the menu of options for managing your PowerPoint files.
Step 3: Choose ‘Save As’
From the menu, select ‘Save As’.
‘Save As’ is the option that allows you to save your current presentation as a new file, and in this case, as a template.
Step 4: Select ‘PowerPoint Template’
In the ‘Save as type’ drop-down menu, choose ‘PowerPoint Template’.
PowerPoint templates have a unique file extension, ‘.potx’. By selecting ‘PowerPoint Template’ from the drop-down menu, you’re telling PowerPoint to save your file in this format.
Step 5: Save the File
Save the file in your desired folder on your computer.
You might want to create a specific folder for your PowerPoint templates so you can easily find them later. Remember to give your template a descriptive name that you’ll remember.
Templates are a boon for anyone who values their time. Once you’ve created a template, you won’t have to spend hours on design every time you make a new presentation. Instead, you can dive straight into the content.
Consistency is key in professional settings. A template ensures that all your slides follow the same theme, which is particularly important for branding. It’s a simple step that can significantly improve the professionalism of your presentations.
Efficiency is what we all strive for, and templates are one shortcut that doesn’t cut corners on quality. By having the design pre-set, you can focus on what really matters: delivering a killer presentation.
While templates save time, they can also limit your creative expression. You might find yourself stuck in a design rut, recycling the same old template without exploring new ideas.
Becoming dependent on templates can also be a downside, especially if it stops you from experimenting with PowerPoint’s other features. There’s a wealth of tools available in the application that you might never discover if you always stick to your template.
File management can become a headache if you’re saving multiple templates without a clear system. It’s important to organize your folders and files to avoid a cluttered, confusing mess.
Additional Information
Now that you’ve saved your PowerPoint template, it’s important to know how to access it when starting a new presentation. Typically, when you open PowerPoint and choose to create a new presentation, your custom templates will appear alongside the default ones provided by PowerPoint. It’s like having your own personal set of blueprints ready to go whenever you need them.
Remember, while templates are fantastic for ensuring consistency, don’t be afraid to tweak things a bit for specific presentations. You might need to adjust your template for different audiences or topics, and that’s okay. Think of your template as a foundation; it’s up to you to build the house.
Using your saved PowerPoint template folder will streamline your presentation process, but don’t forget to back up your templates too. The last thing you want is to lose your perfect design to a computer crash.
- Open PowerPoint.
- Click on ‘File’.
- Choose ‘Save As’.
- Select ‘PowerPoint Template’.
- Save the file in your desired folder.
Frequently Asked Questions
Can i save multiple templates in the same folder.
Yes, you can save as many templates as you like in the same folder.
Will my templates work on all versions of PowerPoint?
Most templates are forward compatible, but features from newer versions may not work on older ones.
Can I share my templates with others?
Absolutely! Just send them the .potx file, and they can save it in their template folder.
How do I ensure my template is the default for new presentations?
You can set your template as the default by saving it in the default location for PowerPoint templates on your computer.
Can I edit a template once it’s been saved?
Of course, you can open your template, make changes, and save it again.
Saving a PowerPoint template folder is a nifty trick that can revolutionize the way you approach presentations. It’s a simple process that offers a wealth of benefits, from saving time to maintaining a consistent, professional look across all your slides. While there are some potential downsides, like stifling creativity or becoming too reliant on templates, these can be mitigated with good practices and a dash of flexibility.
Remember, a template is just a starting point—it’s up to you to fill it with content that captivates and informs your audience. So go forth, save that PowerPoint template folder, and make your future self thank you for being so organized and prepared.

Matthew Burleigh has been writing tech tutorials since 2008. His writing has appeared on dozens of different websites and been read over 50 million times.
After receiving his Bachelor’s and Master’s degrees in Computer Science he spent several years working in IT management for small businesses. However, he now works full time writing content online and creating websites.
His main writing topics include iPhones, Microsoft Office, Google Apps, Android, and Photoshop, but he has also written about many other tech topics as well.
Read his full bio here.
Share this:
Join our free newsletter.
Featured guides and deals
You may opt out at any time. Read our Privacy Policy
Related posts:
- How to Save Powerpoint as PDF with Notes
- How to Edit a Template in MS Word: A Step-by-Step Guide
- Can I Convert My Powerpoint to Google Slides?
- How to Create a Folder in Google Docs
- How to Convert PowerPoint Presentations to HTML: A Step-by-Step Guide
- How to Email a PowerPoint Slideshow: A Step-by-Step Guide
- How to Start PowerPoint: A Step-by-Step Guide for Beginners
- How to Make a Powerpoint Slide Vertical in Powerpoint 2013
- How to Drag Slides From One PowerPoint to Another: A Step-by-Step Guide
- How Is Microsoft PowerPoint Used in Business: A Comprehensive Guide
- How to Copy a PowerPoint to a New PowerPoint: A Step-by-Step Guide
- Can You Save a Powerpoint as a Video in Powerpoint 2013?
- How to Change Hyperlink Color in Powerpoint 2010 (An Easy 5 Step Guide)
- How to Loop a Slideshow on Powerpoint 2013
- How to Transfer From PowerPoint to Flash Drives: A Step-by-Step Guide
- How to: Effortlessly Create PowerPoint Looping Presentations
- Can I Create a Timeline in Powerpoint?
- How to Print Avery Labels in Word
- How to Create a Folder on iPhone [2023 Guide]
- How to Find the Memo Format in Word: A Step-by-Step Guide
How-To Geek
How to set a custom template as the default in powerpoint.
If you've created a nice custom PowerPoint template you frequently use, you can set it as the default template. Here's how.
Quick Links
Create a custom template, set a custom template as the default.
Microsoft PowerPoint allows users to set a custom template as the default theme when creating a new presentation. This provides a way for users to immediately start building a slideshow using a template specially designed for them.
Creating a custom template in PowerPoint is quite easy. To get started, go ahead and open a blank PowerPoint presentation. You can do so by opening PowerPoint, selecting “New” in the left pane, and then selecting “Blank Presentation” from the template library.
Now, with your blank presentation ready, go ahead and select the slide orientation and size, which you can do by choosing the “Slide Size” option in the “Customize” group of the “Design” tab.
Once you’re finished with that, it’s time to open PowerPoint’s Slide Master, which is where the rest of the customization will take place. To access the slide master, click on the “View” tab and select “Slide Master” in the “Master Views” group.
The Slide Master will appear in the left pane. Here, you can customize the fonts, headings, colors, text and image box placement, and more.
Related: How to Create a Custom Template in PowerPoint
Once you’re happy with your setup, save your template and exit out of PowerPoint. After that, it’s time to set it as the default template that PowerPoint opens with.
To set your custom theme as the default, open PowerPoint, select “New” in the left pane, and then click the “Custom” tab.
Next, select the “Custom Office Templates” option.
Your custom templates will appear. Select the one you want to make the default template.
A new window will appear, giving you a preview of the template and some basic information (if you input any). Click the “Create" button.
Next, head over to the “Design” tab and select the “More” arrow in the “Themes” group.
A list of themes will appear. Right-click your custom theme and then select “Set as Default Theme” from the drop-down menu.
Now, the next time you open PowerPoint, it will automatically begin with this theme.
How to Save a PowerPoint Presentation? [PPT & Other Formats!]
By: Author Shrot Katewa
![How to Save a PowerPoint Presentation? [PPT & Other Formats!]](https://artofpresentations.com/wp-content/uploads/2022/03/Featured-Image-How-to-Save-a-PowerPoint-Presentation.webp "save powerpoint template from presentation")
Saving a PowerPoint presentation is one of the most important things that you need to do when you are creating a presentation using PowerPoint. Unlike some of the modern web-based presentation applications, you need to make sure that you save a PowerPoint presentation when you are using an offline version!
To save a PowerPoint presentation, click on the “File” tab. Then, from the backstage view, click on the “Save” option from the left panel. Choose the location or the folder where you want to save the presentation on your computer, and click on “Save”.
In this article, we shall not only understand how to save a standard PPT or PPTx file, but we shall also take a look at how to save a PowerPoint presentation in different file formats such as a PDF, video or an image!
So, let’s get started!
1. How to Save a PowerPoint Presentation?
Once you have saved a PowerPoint presentation, you can easily save it again with just one click. Furthermore, you can also save a PowerPoint presentation in other formats. However, the process of saving a PowerPoint presentation is slightly different on Windows and on Mac.
Let’s understand the process in further detail.
1a. Saving a PowerPoint Presentation on Windows
To save a PowerPoint Presentation on Windows PC, you can follow either of the 2 simple methods.
Method-1: Using the “Save” button on Quick Access Toolbar
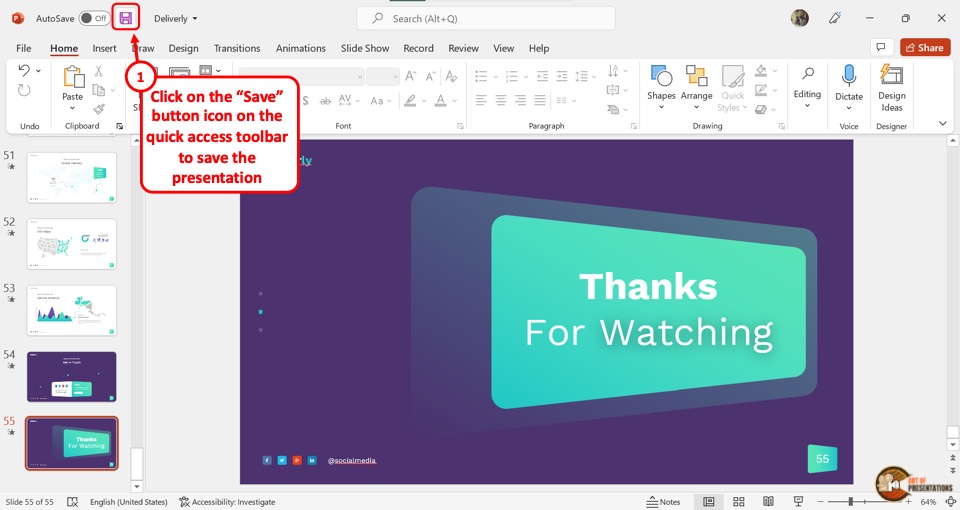
In the Quick Access Toolbar located at the very top of the screen, click on the “Save” icon.
The “Save” icon is located on the left side in the Quick Access Toolbar and looks like a floppy disk. Clicking on the “Save” button will immediately save the PowerPoint presentation in its current location as a “.pptx” file.
If you have opened a new presentation and you are saving it for the first time, clicking on the “Save” button will open a new explorer window. Simply navigate to the folder where you wish to save the new presentation on your computer, and click on “ Save “.
Method-2: Using the “File” tab
Another, more common method is to use the “File” tab in PowerPoint to save your PowerPoint presentation.
Here’s what you need to do –
Step 1 – Click on the “File” Tab
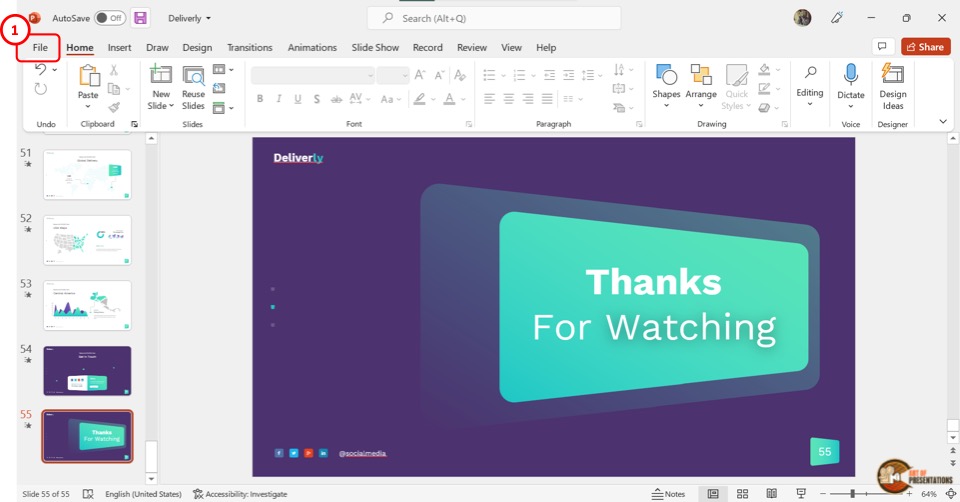
Another way to save a PowerPoint presentation is to use the “File” menu. You have to first click on the “File” tab located at the left corner of the menu ribbon at the top of the screen.
Step 2 – Click on the “Save” option
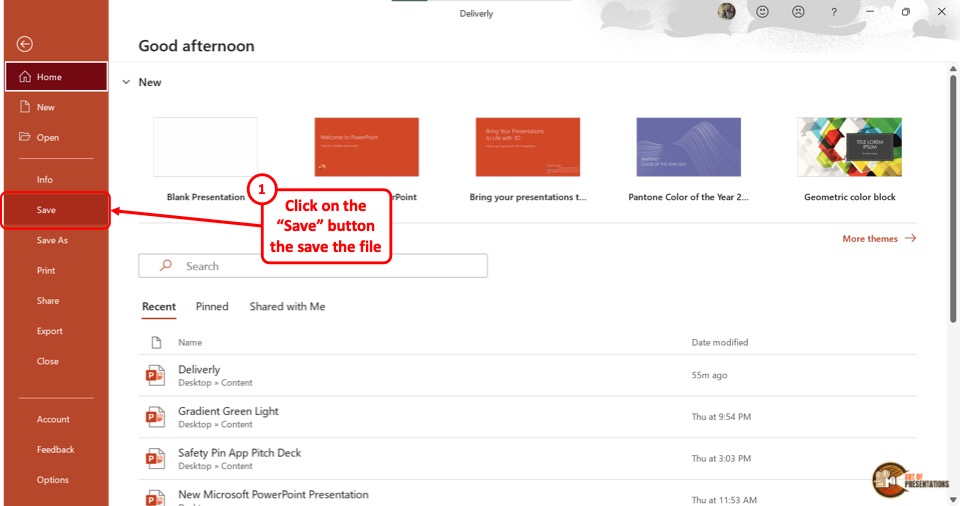
This will open the backstage view in PowerPoint. Now, click on the “Save” option from the sidebar on the left side of the screen. This will save the Microsoft PowerPoint as a “.pptx” file in the current location.
1b. Saving a PowerPoint Presentation on Mac
On a Mac computer, you can use the “File” menu as well to save the PowerPoint presentation.
The first step is to click on the “File” menu in the menu bar located at the top of the screen (above the PowerPoint window). This will open a dropdown menu. Click on the “Save” option from the dropdown menu to save the presentation as a “.pptx” file which is the standard format for presentations.
1c. Shortcut Keys to Save a PowerPoint Presentation
Microsoft PowerPoint also allows you to save a presentation with keyboard shortcuts. All you have to do is press the “Ctrl+S” keys on your keyboard in an open PowerPoint file. This will save the PowerPoint presentation.
1d. Best Format to Save a PowerPoint Presentation?
PowerPoint allows you to save a presentation in various different file formats! For instance, you can use the .ppt format if you wish to open the presentation file using PowerPoint 2007 or earlier. You can use .ppsx to open presentation directly as a PowerPoint Show file that opens it in the presentation mode.
In fact, there are several other formats you can save a presentation in. We shall explore how to save a PowerPoint presentation in several different formats later in the article.
However, the best format to save a PowerPoint Presentation is a “.pptx” file. This type can support all the latest as well as the older features of the PowerPoint presentation.
If you will be opening the presentation using a different software other than Microsoft PowerPoint, “.odp” is the best format. For printing, make sure to save the PowerPoint presentation as a PDF. That said, .pptx file format can help serve these purposes too.
2. How to Save a PowerPoint Presentation as PDF
Saving a PowerPoint presentation in PDF format is the suitable method for printing out your presentation. To save the PowerPoint presentation as a PDF file, follow the 4 easy steps.
Step-1: Click on the “File” Tab
First, click on the “ File ” tab in PowerPoint to open the back stage view of PowerPoint.
Step 2 – Click on the “Save As” option
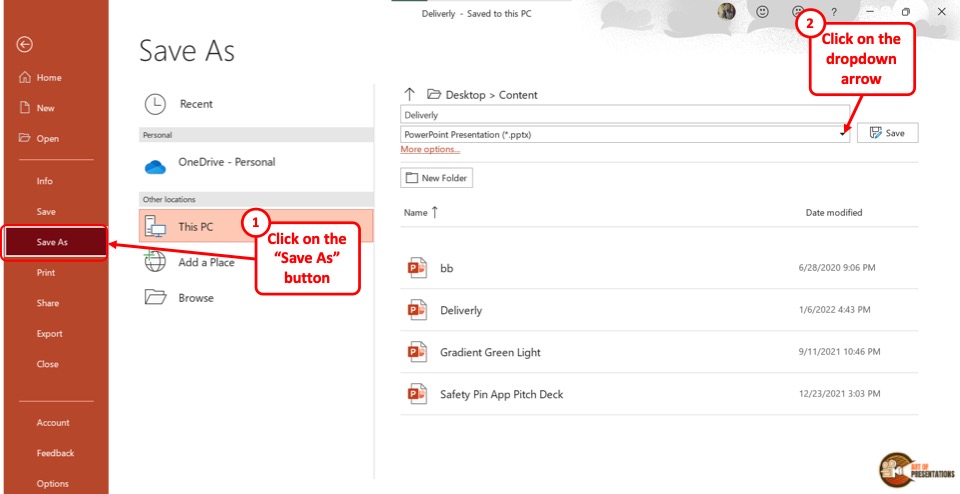
In the menu ribbon located at the top of the screen, click on the “File” tab. In the “File” menu, click on the “Save As” option from the sidebar on the left side of the screen.
Step-3: Click on the “PDF (*.pdf)” option
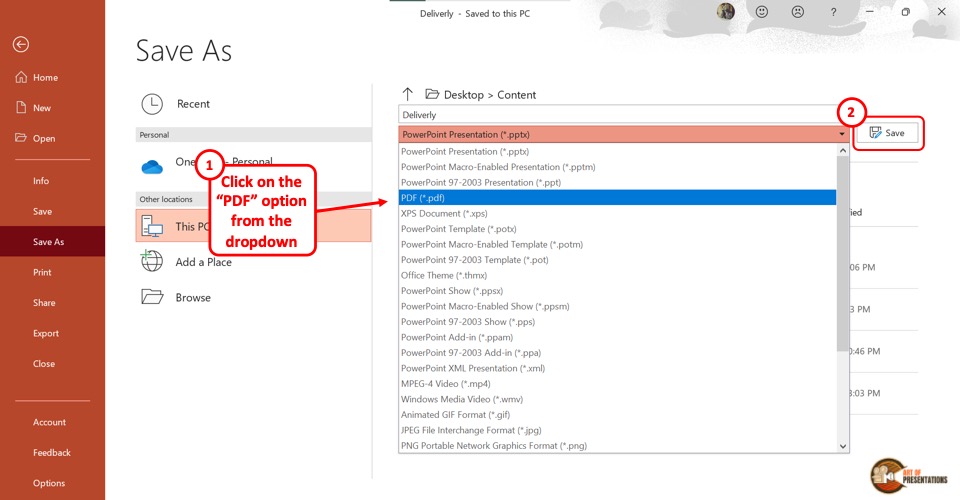
In the “Save As” screen, click on the box that shows “PowerPoint Presentation (*.pptx)” . This will open a dropdown menu. Click on the “PDF (*.pdf)” option from the dropdown menu.
Step-4: Click on the “Save” button
Now all you have to do is click on the “Save” button beside the box to save the PowerPoint presentation as a PDF file (as shown in the image in step 2).
3. How to Save a PowerPoint Presentation as a Video?
In Microsoft PowerPoint, you can also save a presentation as a video. This allows you to play the presentation slides as a video rather than a slide show.
3a. On Windows
To save a PowerPoint presentation as a video on a Windows PC, follow the 3 easy steps.
Step-1: Click on the “File” tab
The first step is to open the “Save As” screen. To do so, click on the “File” tab in the menu ribbon. In the “File” menu, click on the “Save As” option.
Step-2: Choose the “.mp4” file format from the “Save As” tab
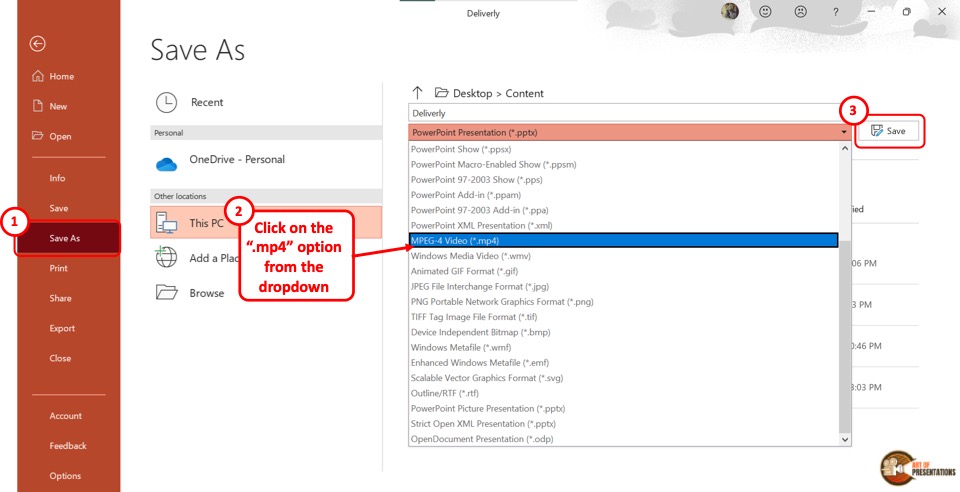
The next step is to click on the “Save As Options” box. It is the second box on the right side of the “Save As” screen. In the dropdown menu, click on either the “MPEG-4 Video (*.mp4)” option or the “Windows Media Video (*.wmv)” option.
Step-3: Click on the “Save” button
The final step is to click on the “Save” button (as indicated in step 2 above). It is located on the right side of the “Save As Options” box. This will save your PowerPoint presentation as a video.
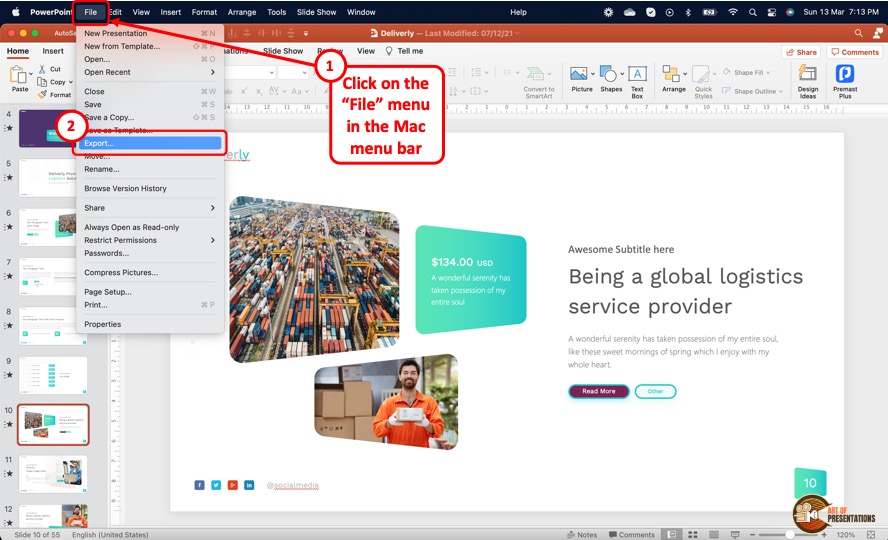
To save a PowerPoint presentation as a video on a Mac device, follow the 3 simple steps.
Step-1: Click on the “Export” option
In the menu bar at the top of the screen, click on the “File” option. In the “File” dropdown menu, click on the “Export” option. This will open a dialog box.
Step-2: Click on the “File Format” box
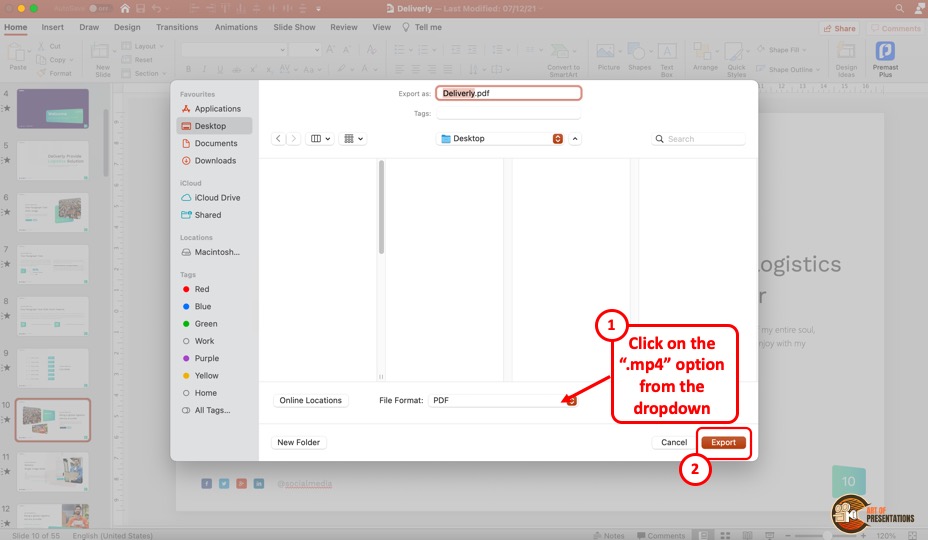
In the dialog box, click on the “File Format” box. This will open a dropdown menu. You can click on either the “MP4” option or the “MOV” option as you prefer.
Step-3: Click on the “Export” button
In the dialog box, you can also click on the “Quality” option to select the quality of the video. Once you are satisfied with the selections in the dialog box, click on the “Export” button at the bottom (as shown in the image in the previous step). This will save the presentation as a video.
4. How to Save a PowerPoint Presentation to Open in Slideshow Mode?
Microsoft PowerPoint allows you to save the PowerPoint presentation as a “PowerPoint Show” file. This opens directly as a slideshow. To save a PowerPoint presentation to open in slideshow mode, follow the 2 easy steps.
In the open PowerPoint file, click on the “File” tab from the menu ribbon which is located at the top of the screen. In the “File” menu, click on the “Save As” option.
Step-2: Click on the “PowerPoint Show (*.ppsx)” option
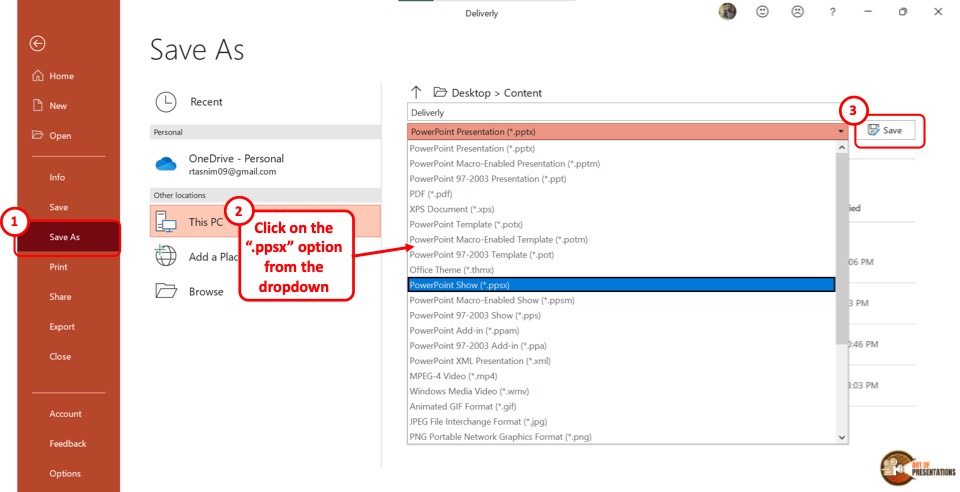
In the “Save As” screen, click on the “Save As Options” box which shows “PowerPoint Presentation (*.pptx)” . This will open a dropdown menu. Click on the “PowerPoint Show (*.ppsx)” option.
Now all you have to do is click on the “Save” button to save the PowerPoint presentation to open as a slideshow.
5. How to Save a PowerPoint Presentation as an Image?
In Microsoft PowerPoint, you can save the presentation as an image in five different formats: “Animated GIF Format (*.gif)” , “JPEG File Interchange Format (*.jpeg)” , “PNG Portable Network Graphics Format (*.png)” , “TIFF Tag Image File Format (*.tif)”, and “Scalable Vector Graphics Format (*.svg)” .
To save your presentation as an image, follow the 3 simple steps.
Step-1: Click on the “Save As” option from the “File” tab
The first step is to click on the “File” tab in the menu ribbon. Then click on the “Save As” option from the “File” menu.
Step-2: Select your preferred image format
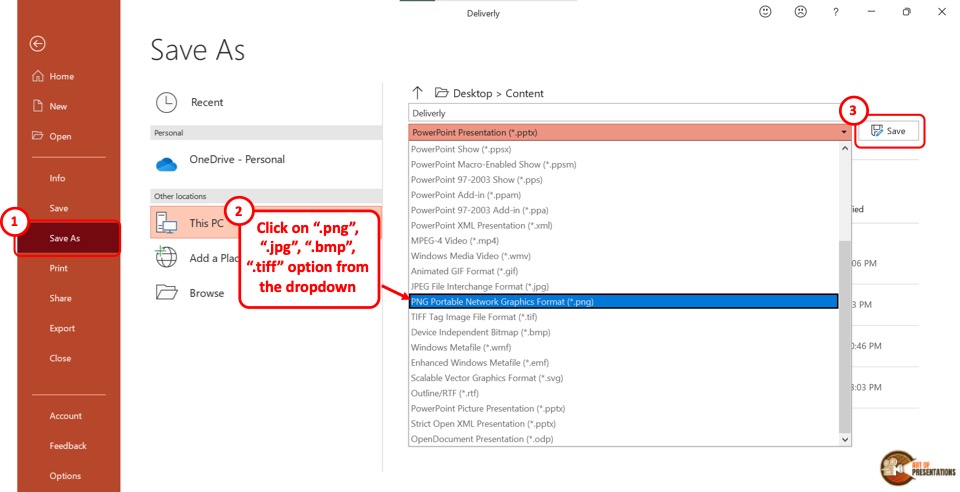
In the “Save As” screen, click on the “Save As Type” box which is the second box in the right column. From the dropdown menu, click on your preferred image format from the five available formats.
Now all you have to do is click on the “Save” button (as shown in the image in step 2) beside the “Save As Type” box. This will save your presentation in a folder containing each slide as a separate image file.
6. How to Save a PowerPoint Presentation as a Template?
A PowerPoint template is a predesigned presentation that you can edit to add your own content. To save a presentation as a template, follow the 3 easy steps.
The first step is to click on the “File” tab in the menu ribbon. Then click on the “Export” option from the sidebar in the “File” menu.
Step-2: Click on “Change File Type”
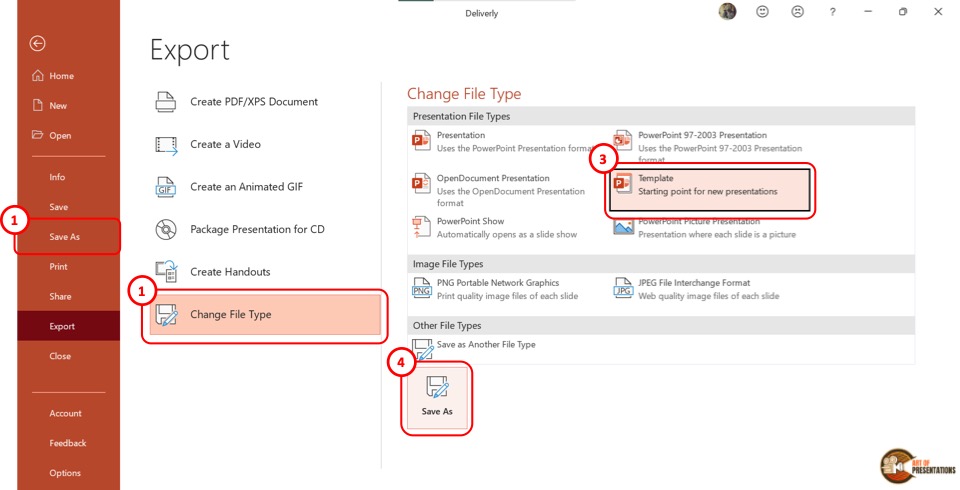
Now you have to click on the “Change File Type” option. Under the “Presentation File Types” group in the right column, click on the “Templates” option. Then click on the “Save As” button at the bottom of the screen.
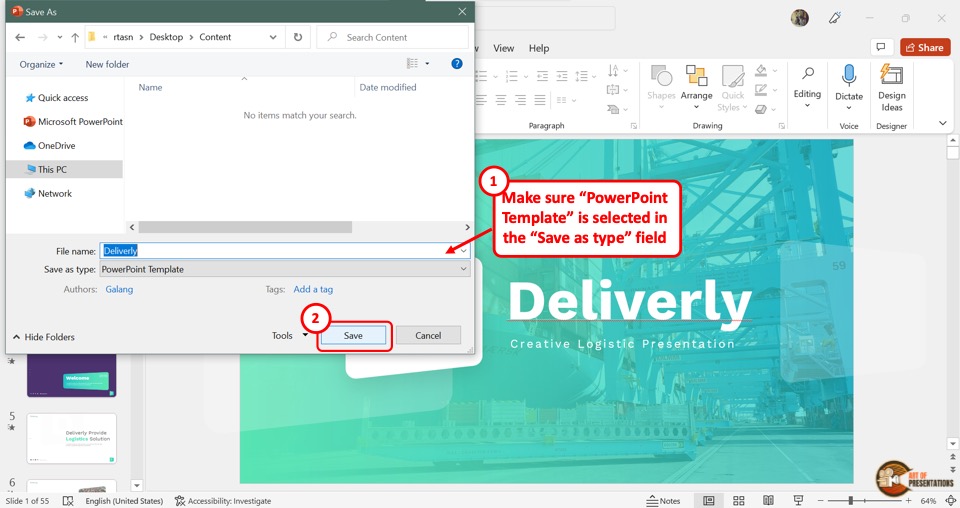
In the “Save As” dialog box, you will see that the “Save as type” box shows the “PowerPoint Template” format. Now all you have to do is click on the “Save” button.
7. How to Save PowerPoint Presentation as Google Slides?
Microsoft PowerPoint does not offer any feature to upload a presentation to Google Slides directly. However, Google Slides does offer you an option to upload your PowerPoint presentation and save it in Google Slides!
Step-1: Save Your PowerPoint Presentation
The first step is to save your PowerPoint presentation using any method described in the section 1 of this article.
Make sure that you note down the location of the folder in which you have save the PowerPoint file.
Step-2: Click on the “Open file picker” option in Google Slides
Now, the next thing you need to do is open your Google Slides account by visiting slides.google.com . If you aren’t logged in, make sure you sign in with your account credentials.
Next, you will be presented with Google Slides home screen (as shown in the image above). In Google Slides, click on the “Open file picker” icon which looks like a folder. This will open the “Open a file” dialog box.
Step-2: Click on “Upload”

In the “Open a file” dialog box, click on the “Upload” tab.
From your “File Explorer” window, drag and drop the PowerPoint presentation in the dialog box. Now the presentation will automatically open in Google Slides.
Also Read – How to “ Make a Copy of a Google Slides Presentation ” and how to “ Share a Google Slides Presentation Correctly ” with others!
You can also click on the “ Select a file from your device ” button (blue button in the center of the screen). This will open the file explorer window. Navigate to the folder in which you have saved your PowerPoint presentation, and click on “OK”. This will open and save the presentation file in Google Slides.
8. How to Save a PowerPoint Presentation to a Flash Drive?
To save a PowerPoint presentation on a flash drive or any external device, follow the 3 simple steps.
In the menu ribbon located at the top of the screen, click on the “File” tab. In the “File” menu, click on the “Save As” option.
Step-2: Click on “Browse”
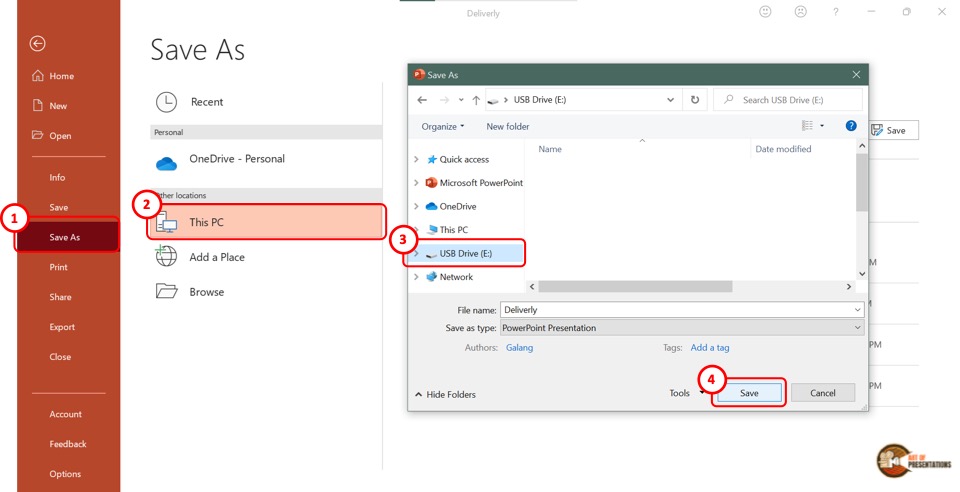
In the “Save As” screen, click on the “Browse” option which is the last option in the left column. This will open the “Save As” dialog box. In the sidebar on the left of the dialog box, click on the external disc.
Now all you have to do is click on the “Save” button at the bottom of the dialog box to save the PowerPoint presentation on the flash drive (as shown in the image in step 2).
9. How to Save a Copy of a PowerPoint Presentation?
The “Save A Copy” feature of Microsoft PowerPoint allows you to save changes in your presentation in a copied file without changing the original file.
Check out my article to learn detailed steps on how to save a copy of a PowerPoint presentation .
10. How to Save a Read-Only PowerPoint Presentation?
The “Read-Only” feature of Microsoft PowerPoint allows you to protect your PowerPoint presentation .
Using this feature, you can share your presentation with others without giving them the access to change your presentation. To save a read-only PowerPoint presentation, follow the steps mentioned below –
The first step is to click on the “File” tab in the menu ribbon. From the sidebar in the “File” menu, click on the “Info” option.
Step-2: Click on the “Protect Presentation” button

The next step is to click on the “Protect Presentation” option in the “Info” screen. This will open a dropdown menu. Click on the “Always Open Read-Only” option from the dropdown menu.
Step-3: Click on the “Save” option
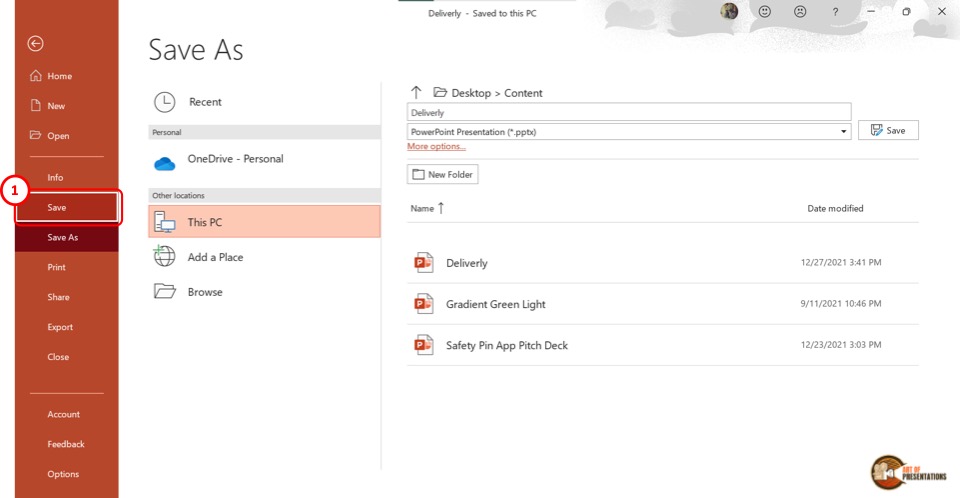
Now all you have to do is save the presentation. To do so, click on the “Save” option in the sidebar right under the “Info” option. Alternatively, you can press the “Ctrl+S” keys on your keyboard.
If you have received a presentation that opens only in the read-only mode, but you don’t know how to work with it, check out my other article on “ How to Edit a Presentation in Read-Only Mode “.
11. How to Save a PowerPoint Presentation Without Notes?
When saving a PowerPoint presentation, you might want to remove the speaker notes. To do so, all you have to do is follow the 5 quick steps.
In the menu ribbon, click on the “File” tab. Then click on the “Info” option from the “File” menu.
Step-2: Click on “Check for Issues” on the “Info” tab
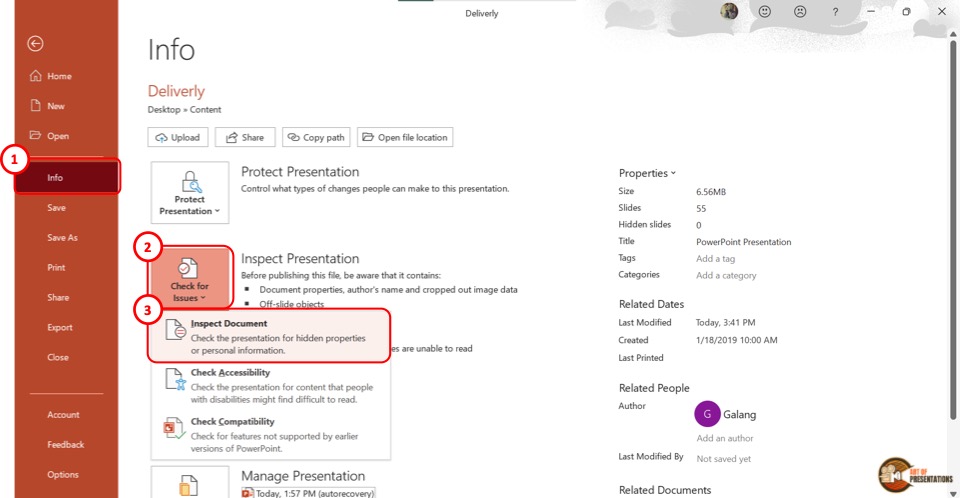
In the “Info” option, click on the “Check for Issues” button. Then click on the “Inspect Document” option from the dropdown menu. This will prompt a dialog box.
Step-3: Click on the “Inspect” option
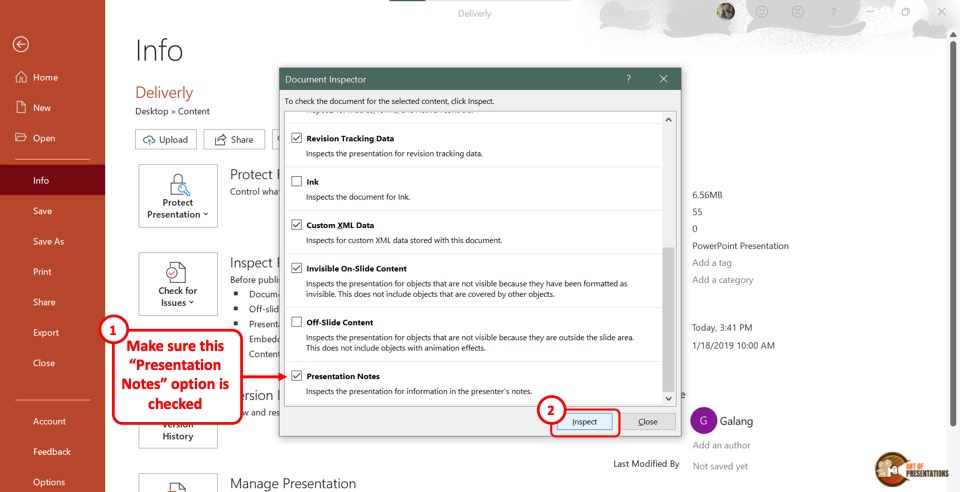
In the “Document Inspector” dialog box, scroll all the way to the bottom and make sure the “Presentation Notes” option is selected. Then click on the “Inspect” button at the bottom of the dialog box.
Step-4: Click on the “Remove All” option
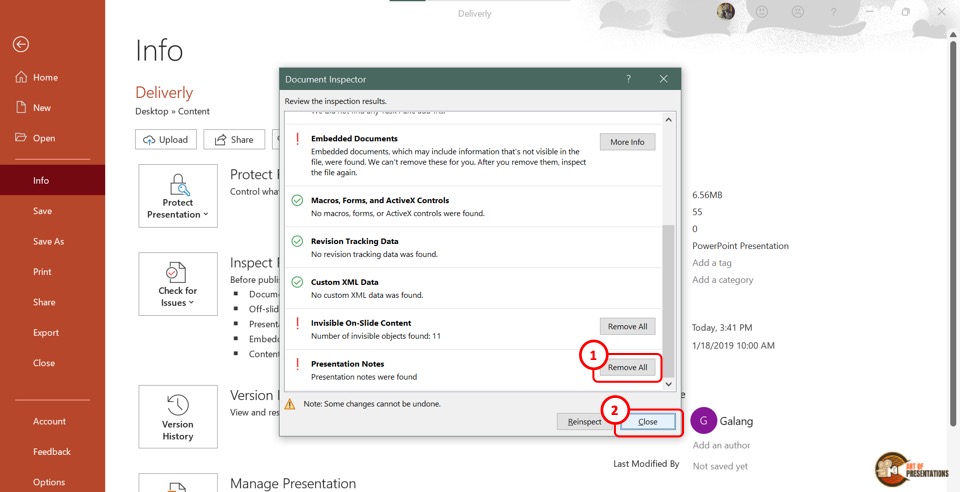
Once the inspection results are shown in the “Document Inspector” dialog, scroll to the bottom again to find the “Presentation Notes” option. Then click on the “Remove All” button at the right side of the “Presentation Notes” option.
Now all you have to do is click on the “Close” button at the bottom of the dialog box to finish the process.
Step-5: Click on the “Save” option
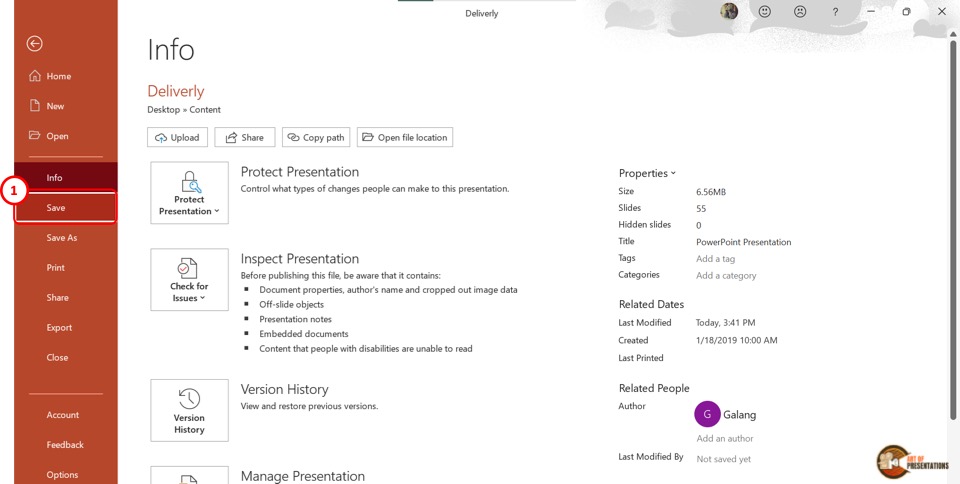
The final step is to click on the “ Save ” option in the sidebar of the “File” menu to save the presentation without notes. You can alternatively press the “Ctrl+S” keys on your keyboard.
12. How to Save PowerPoint Presentation Directly in Microsoft Teams?
If you are delivering a PowerPoint presentation to an audience using Microsoft teams, you can easily share a PowerPoint deck with your audience in the following steps –
- First, open the Microsoft Teams application and login to the meeting.
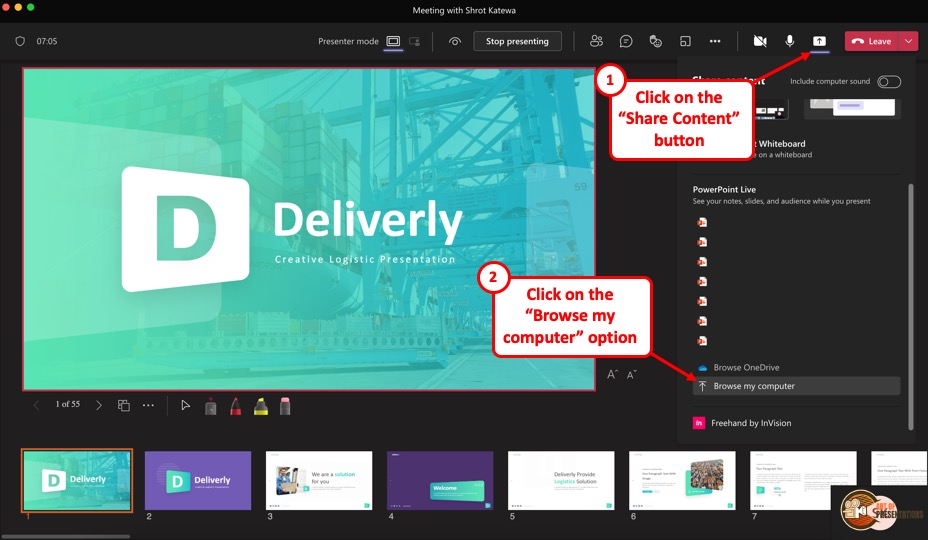
- On the “ Meeting Controls ” menu available in the top part of your meeting screen, locate the “ Share Content ” option.
- Click on the share content button. This will show the most recent PowerPoint files that you opened. You can either choose to click on one of the files visible. Alternatively, scroll down on the right panel and click on the “ Browse my computer ” option.
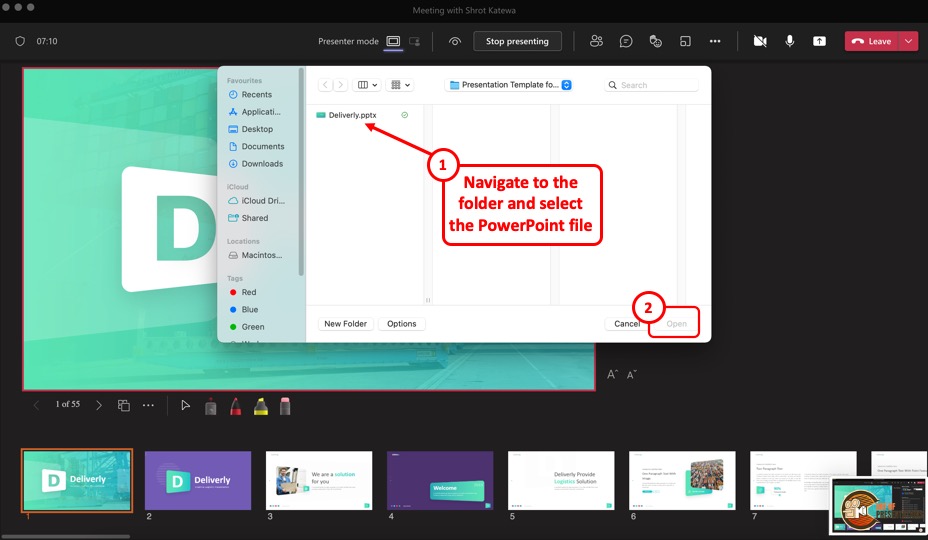
- This will open a new file browser window. Navigate to the respective location where your PowerPoint presentation is saved, click on it to select it. Then, click on “Open” to open the presentation in Microsoft Teams.
- The presentation will open by default in the presenter mode and shared with the audience of the meeting.
13. How to Enable Autosave in PowerPoint Presentation?
The autosave option is only available if you are using the Microsoft Office 365 version of PowerPoint . Other than that, you will have to manually save the PowerPoint file in all other versions.
You can autosave the PowerPoint presentation to the OneDrive cloud, and also autosave recovery files. To enable autosave in PowerPoint presentation, follow the 4 simple steps.
Step-1: Click on the “AutoSave” button
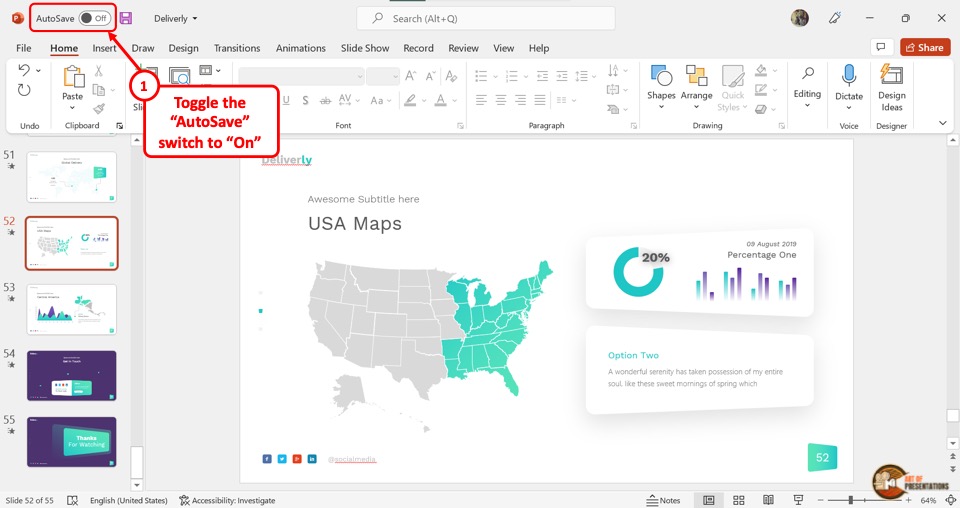
To simply turn on autosave in the OneDrive cloud for the PowerPoint presentation, all you have to do is click on the slider beside the “Autosave” option.
It is located in the left corner of the Quick Access Toolbar at the top of the screen.
Step-2: Click on “Options”
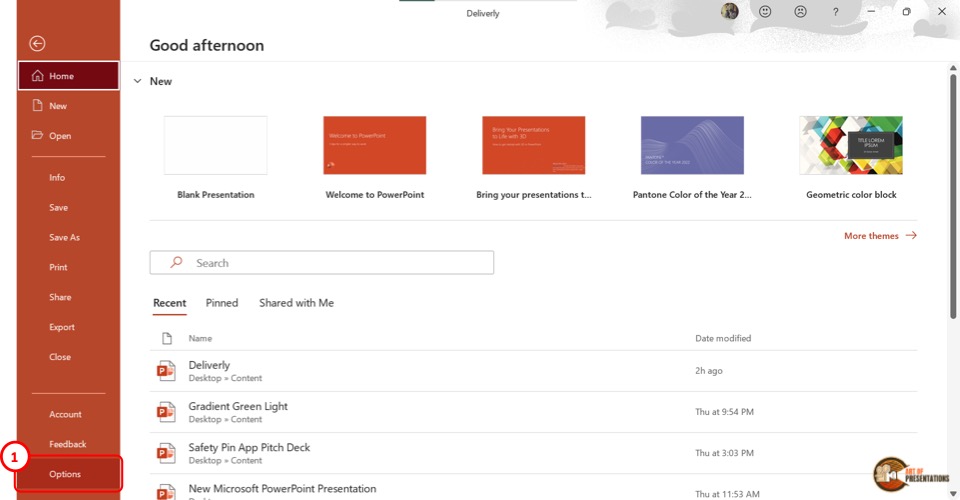
To access more autosave options, click on the “File” tab in the menu ribbon. Then click on the “Options” option which is the last option in the sidebar in the “File” menu. It will open a dialog box.
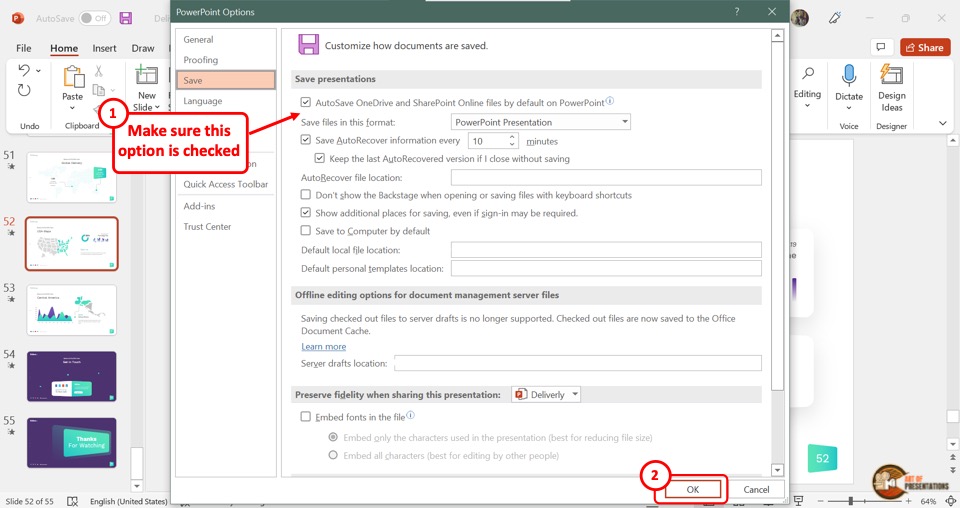
In the “PowerPoint Options” dialog, click on the “Save” option from the sidebar located on the left side. Now you can enable your preferred autosave options in the “Save presentations” section.
Click on the “Autosave OneDrive and SharePoint Online files by default on PowerPoint” for auto-saving on the cloud. You can also select how often the auto-recovery copy is saved by clicking on the box at the right side of the “Save Autorecover information” option.
Step-4: Click on the “OK” button
Now all you have to do is click on the “OK” button at the bottom of the “PowerPoint Options” dialog box to enable your autosave preference (as shown in the image in step 2).
Credit to Cookie_studio (on Freepik) for the featured image of this article (further edited).
- PRO Courses Guides New Tech Help Pro Expert Videos About wikiHow Pro Upgrade Sign In
- EXPLORE Tech Help Pro About Us Random Article Quizzes Request a New Article Community Dashboard This Or That Game Popular Categories Arts and Entertainment Artwork Books Movies Computers and Electronics Computers Phone Skills Technology Hacks Health Men's Health Mental Health Women's Health Relationships Dating Love Relationship Issues Hobbies and Crafts Crafts Drawing Games Education & Communication Communication Skills Personal Development Studying Personal Care and Style Fashion Hair Care Personal Hygiene Youth Personal Care School Stuff Dating All Categories Arts and Entertainment Finance and Business Home and Garden Relationship Quizzes Cars & Other Vehicles Food and Entertaining Personal Care and Style Sports and Fitness Computers and Electronics Health Pets and Animals Travel Education & Communication Hobbies and Crafts Philosophy and Religion Work World Family Life Holidays and Traditions Relationships Youth
- Browse Articles
- Learn Something New
- Quizzes Hot
- This Or That Game
- Train Your Brain
- Explore More
- Support wikiHow
- About wikiHow
- Log in / Sign up
- Computers and Electronics
- Presentation Software
- PowerPoint Presentations
How to Save a PowerPoint Presentation
Last Updated: May 26, 2022
wikiHow is a “wiki,” similar to Wikipedia, which means that many of our articles are co-written by multiple authors. To create this article, volunteer authors worked to edit and improve it over time. This article has been viewed 51,138 times. Learn more...
A PowerPoint presentation is an excellent way of presenting information or ideas to an audience. The software is easy to use and offers a lot of cool effects for your slideshows, too. But, what's all the use of this if you don't even know how to save your finished PowerPoint? This wikiHow will teach you how to save your file.
Design your PowerPoint presentation.

- You don't have to wait until you're totally finished to save your work. It can help to save along the way, too, to ensure you don't lose any progress.
Open the File menu when you're ready to save.

Choose the Save or Save As option.

Decide where to save the presentation.

Name and save your presentation.

Expert Q&A
You might also like.

About This Article
- Send fan mail to authors
Is this article up to date?

Featured Articles

Trending Articles

Watch Articles

- Terms of Use
- Privacy Policy
- Do Not Sell or Share My Info
- Not Selling Info
wikiHow Tech Help:
Tech troubles got you down? We've got the tips you need
We explain and teach technology, solve tech problems and help you make gadget buying decisions.
3 Best Ways to Extract Images From a PowerPoint Presentation

Pankil is a Civil Engineer turned freelance writer. Since his arrival at Guiding Tech in 2021, he delves into the world of how-tos, and troubleshooting guides for Android, iOS, and Windows. Besides his new-found love for mechanical keyboards, he's a disciplined footfall fan and loves international travel with his wife.
When you create a PowerPoint presentation, you’re likely to add images to enhance the visual appeal and convey information effectively. But what if you want to save those carefully chosen images for later use? Fortunately, there are several ways to extract images from your PowerPoint presentation.

Whether you want to extract just one or two images from your PowerPoint file or all of them, saving images from your presentation is fairly straightforward. This guide will walk you through three different methods to achieve this. So, let’s get right to it.
1. Use the ‘Save as Picture’ Option
The ‘Save as Picture’ option is the quickest way to extract an image from a PowerPoint file. This method is useful if you only want to save one or two images from your PowerPoint presentation. Here are the steps for the same.
Step 1: Launch PowerPoint on your PC and open the PPT from which you want to save images.
Step 2: Locate and select the image you want to extract. Right-click on it and choose the ‘Save as Picture’ option from the context menu.

Step 3: In the Save As Picture dialog, specify where you want to save the image. Then, click the drop-down menu next to Save as type to select your preferred file format for the image.

Step 4: Click the arrow next to the Save button and select ‘Save Original Picture’ to export the high-resolution image.

You can repeat the above steps to extract more images if you like.
Alternatively, if you want to use the image in another program on your PC, right-click on the image in your presentation and select Copy. After that, move to the program where you want to use the file and press Control + V keyboard shortcut to paste the image.

2. Save the PowerPoint Slides as Images
While the ‘Save as Picture’ option makes it easy to save images from your PowerPoint file, it’s not the most efficient method if you are looking to extract all the images from your PowerPoint presentation. In that case, it’s better to save your PowerPoint slides as images (in JPEG or PNG format ) using the steps below.
Step 1: Open the PowerPoint file from which you want to save images.
Step 2: Click the File menu at the top-left corner.

Step 3: Select Save As from the left pane. Then, click the Browse button.

Step 4: Click the drop-down menu next to Save as type to select ‘JPEG File Interchangeable Format’ or ‘PNG Portable Network Graphics Format’ from the list.

Step 5: Click the Save button.

Step 6: Select All Slides when the prompt appears.

After you complete the above steps, all the images within your presentation will be saved separately in the specified location.
3. Add a ZIP Extension to the Presentation File and Extract It
Another way to save all the images from a PowerPoint file simultaneously involves converting the presentation into a ZIP file and then extracting the file on your computer . This method allows you to save all of the images in your presentation in their original format. Here are the steps you can follow.
Step 1: Press the Windows key + E keyboard shortcut to open File Explorer and locate the PowerPoint from which you want to save images.
Step 2: Right-click on your file and select the rename option.

Step 3: Replace the PPTX or PPTM extension with the ZIP extension. Select Yes when the confirmation prompt appears.

Step 4: Right-click on the renamed file and select Extract All.

Step 5: Use the Browse button to select a location where you want to extract the file and click on Extract.

Step 6: Navigate to the folder where you extracted the ZIP file and double-click the ‘ppt’ folder.

Step 7: Double-click the ‘media’ folder to view all the images extracted from your presentation in their original format.

Step 8: Once you have all the images, you can rename the ZIP file and add the PPTX or PPTM extension to recover your original presentation.

Saving the Heart of Your Presentation
PowerPoint presentations are excellent for sharing information and ideas. Sometimes, you only need the images from a presentation, not the entire thing. Fortunately, extracting images from your PowerPoint presentation is rather simple using the methods mentioned above.
Was this helpful?
Last updated on 04 August, 2023
The above article may contain affiliate links which help support Guiding Tech. However, it does not affect our editorial integrity. The content remains unbiased and authentic.
Leave a Reply Cancel reply
Your email address will not be published. Required fields are marked *
The article above may contain affiliate links which help support Guiding Tech. The content remains unbiased and authentic and will never affect our editorial integrity.
DID YOU KNOW

Pankil Shah
More in windows.

Top 12 Microsoft Paint 3D Keyboard Shortcuts That You Should Use

How to Fix “Switch User” Missing From Windows Login Screen
Join the newsletter.
Get Guiding Tech articles delivered to your inbox.
- Create a template from a presentation Video
- Customize the design and layouts Video
- Create slide content Video
Create slide content

Now it’s time to create the slides that will be part of the template, then click File > Save As , and choose PowerPoint Template (.potx) as the file type.
Create and save a template
Use slide masters to customize a presentation
Apply and change a theme
I’ve got my design elements in place in the Coho Premium Selections presentation, and now I’m creating slides that will be part of the template.
The title slide always has this text. What does change is the year. I’ll use placeholder text for that and type “Year,” in brackets.
For slide 2, the mission statement slide, this title never changes. However, the bullet points do, so I’ve typed in placeholders.
I do want to format this list. Let’s select it, click Convert to SmartArt Graphic , and choose SmartArt for a list.
I’ll zoom in a little, and click this picture icon to insert an image I’ve prepared. I’ll do that for each bullet point.
Then with the SmartArt selected, I’ll click Design in SmartArt Tools , use Change Colors to tone down the colors, and add a SmartArt style.
With this formatting applied, all an author has to do is fill in the text.
Other slides we can add are the section headers-- let’s click New Slide , Section Header , add the title and subtitle, and a placeholder for the year.
With three section headers in, we’re adding both content and structure to the presentation.
Now we’ll click New Slide and use our new layout, Wine Profile .
Here we can add subheadings, such as: “Grape region,” and others.
I’ll format them with bold text and add text placeholders. This is optional, but these can also serve as authoring guidelines.
Now, to help with picture formatting, I’ll click Pictures and insert a piece of placeholder art.
Using Picture Tools , I’ll add a Picture Style , a black frame.
Working with Picture Border , I’ll change the frame color and increase its width. Then I’ll use Picture Effects to add a perspective shadow.
To benefit from this formatting, the presentation’s author would right-click the picture and choose Change Picture .
Then the finished picture retains the frame.
To make those steps clear, you could include guidelines in a text box, which the author would delete.
Because this slide is used a lot in the presentation, I’ll copy it several times, and the author can copy it again as needed.
We’re ready to save the file as a template. I’ll click File , Save As , and choose PowerPoint Template (.potx) as the file type.
Note that after I select the template file type, PowerPoint automatically creates a new location for the template: Custom Office Templates , within Documents , My Documents .
To make it very clear that this is a template, I’ll add “template” to the file name and click Save .
To use the template, I open PowerPoint, and on the New screen, click Personal .
There’s the template; I’ll click it and click Create . The template opens a fresh presentation, and this is where I’d update the slides for the current year.
If I had downloaded the template from a shared site, I would save it in a preferred folder and then double-click it to open a new presentation.
If I needed to edit the template itself, I would right-click the file, and click Open .
Creating a template takes some time up front. But once it’s in place, you’ll save yourself lots of effort down the road.
Next steps: For more information, see the Course summary, and experiment on your own.

Need more help?
Want more options.
Explore subscription benefits, browse training courses, learn how to secure your device, and more.
Microsoft 365 subscription benefits
Microsoft 365 training
Microsoft security
Accessibility center
Communities help you ask and answer questions, give feedback, and hear from experts with rich knowledge.
Ask the Microsoft Community
Microsoft Tech Community
Windows Insiders
Microsoft 365 Insiders
Was this information helpful?
Thank you for your feedback.
Got any suggestions?
We want to hear from you! Send us a message and help improve Slidesgo
Top searches
Trending searches

11 templates

8 templates

25 templates

9 templates

memorial day
12 templates

39 templates
My Students Are The Best
My students are the best presentation, free google slides theme and powerpoint template.
Download the My Students Are The Best presentation for PowerPoint or Google Slides. The education sector constantly demands dynamic and effective ways to present information. This template is created with that very purpose in mind. Offering the best resources, it allows educators or students to efficiently manage their presentations and engage audiences. With its user-friendly and useful features, everyone will find it easy to customize and adapt according to their needs. Whether for a lesson presentation, student report, or administrative purposes, this template offers a unique solution for any case!
Features of this template
- 100% editable and easy to modify
- Different slides to impress your audience
- Contains easy-to-edit graphics such as graphs, maps, tables, timelines and mockups
- Includes 500+ icons and Flaticon’s extension for customizing your slides
- Designed to be used in Google Slides and Microsoft PowerPoint
- Includes information about fonts, colors, and credits of the resources used
How can I use the template?
Am I free to use the templates?
How to attribute?
Attribution required If you are a free user, you must attribute Slidesgo by keeping the slide where the credits appear. How to attribute?
Related posts on our blog.

How to Add, Duplicate, Move, Delete or Hide Slides in Google Slides

How to Change Layouts in PowerPoint

How to Change the Slide Size in Google Slides
Related presentations.

Premium template
Unlock this template and gain unlimited access

IMAGES
VIDEO
COMMENTS
Open the presentation that contains the slide design (theme) that you want to save as a template. Select File > Save As. Browse to C:\Users\ <your username> \Documents\Custom Office Templates. In the Save As dialog box, in the File name box, type a name for the template. In the Save as type list, select PowerPoint Template, and then click Save.
To save a presentation template in PowerPoint, open the presentation to save as a template in PowerPoint. Then click the "File" tab in the Ribbon to show the presentation's Backstage view. At the left side of the Backstage view, then either click the "Save As" command if using a locally saved presentation or click the "Save a Copy ...
Step 6: Save your Custom PowerPoint Template. Once you're happy with the aesthetics of your slides, it's time to save your PowerPoint template: Go to the File tab. Click on "Save As" > "Browse." Then, select "Save as Type." Choose "PowerPoint Template" (see image). Change the name of the file if needed. Click on "Save," and that's it! There you go!
Click the "Save" button. Your template will now be saved and is ready to be used. To find your template next time you open PowerPoint, click the "File" tab and select the "New" button. Next, select the "Custom" tab and then select the "Custom Office Templates" option. You'll now see your custom template.
FREE Course! Click: https://www.teachucomp.com/free Learn how to save a presentation template in PowerPoint 2019 & 365 at www.teachUcomp.com. A clip from Mas...
First, open the presentation whose design you want to use. On the File tab, click Save As. In the dialog box that opens, from the Save as type list, choose PowerPoint Template. Then select Save. Now, open your existing presentation. In the Design tab, expand the Themes gallery and click the Browse for Themes option at the bottom.
To do that, simply: Select the Date and time placeholder and hit Ctrl + R on your keyboard to align the text to the right. Go up to the Insert tab and in the Text group, select Header & Footer. Click on Date and time so that there is a checkmark next to it. Click on the Date dropdown and select the option as required.
Created: Thursday, May 14, 2020, posted by Geetesh Bajaj at 9:45 am Learn how you can save your existing PowerPoint file with all changes applied as a custom Theme that you can use to create presentations with a similar look. (4 votes, average: 5.00 out of 5)
Step-1: Click on the "File" tab. The first step is to open any PowerPoint presentation file. Then click on the "File" tab, the first option in the menu ribbon at the top of the screen. Step-2: Click on the "New" option. The next step is to open a new presentation file with a template. To do so, click on the "New" option in the ...
What to Know. In the source presentation, select View > Slide Master. In the Slide pane, right-click the Slide Master and select Copy. Go to View > Switch Windows and choose the second presentation. Go to View > Slide Master. Right-click the Slide pane and select Paste. Choose Use Destination Theme (keeps colors, fonts, and effects) or Keep ...
Dave's correct. If you save a presentation as a template without first deleting the slides in it, when you start a new presentation based on that template, you get the slides too. That can be useful, if you want the new presentation to start with a selection of pre-made slides.
First, open the PowerPoint application, then click on File, and choose Save As. Select PowerPoint Template from the drop-down list, and finally, save the file in the designated folder on your computer. After completing this action, your custom PowerPoint template will be readily available for future presentations, saving you time and ensuring ...
Click the "Create" button. Next, head over to the "Design" tab and select the "More" arrow in the "Themes" group. A list of themes will appear. Right-click your custom theme and then select "Set as Default Theme" from the drop-down menu. Now, the next time you open PowerPoint, it will automatically begin with this theme.
First, let's duplicate the theme. You can achieve this by right-clicking on the .pptx file and clicking Copy in the menu. You can copy and paste the file and rename the new document. Instead of directly editing the template, we'll be copying slides that we'll use in our new document from the original theme file.
To save the PowerPoint presentation as a PDF file, follow the 4 easy steps. Step-1: Click on the "File" Tab. First, click on the " File " tab in PowerPoint to open the back stage view of PowerPoint. Step 2 - Click on the "Save As" option. In the menu ribbon located at the top of the screen, click on the "File" tab.
Choose the Save or Save As option. Download Article. Click Save to save to the current file, or Save as to create a new file. If you've already saved the file at some point, you'll have the option to click Save, which simply saves your changes to that file. Otherwise, choose Save as to create a brand new file. 4.
Here are the steps for the same. Step 1: Launch PowerPoint on your PC and open the PPT from which you want to save images. Step 2: Locate and select the image you want to extract. Right-click on ...
Download the Cartoon Family House Minitheme presentation for PowerPoint or Google Slides and start impressing your audience with a creative and original design. Slidesgo templates like this one here offer the possibility to convey a concept, idea or topic in a clear, concise and visual way, by using different graphic...
1. Open the template in Canva. 2. In Canva click on "Share" at the top right-hand corner, then click "More" 3. Scroll down further and you will see "Google Drive" button. 4. Choose the "PPTX" or Powerpoint file type. Make sure to click "All Pages" on select pages. 5. Your template is exported to Google Slides!
Training: Now it's time to create the slides that will be part of the template, then click File > Save As, and choose PowerPoint Template (.potx) as the file type. Related topics ×
Free Google Slides theme, PowerPoint template, and Canva presentation template. Craft a heartfelt tribute with our Floral Minimal Funeral Slideshow template, perfect for honoring a loved one's memory. This easy-to-use template, available for both PowerPoint and Google Slides, features a soothing gray palette and delicate floral designs ...
Free Google Slides theme and PowerPoint template . Download the My Students Are The Best presentation for PowerPoint or Google Slides. The education sector constantly demands dynamic and effective ways to present information. This template is created with that very purpose in mind.
powerpointpro2024 on May 15, 2024: " Don't forget to save this post! Get your FREE PowerPoint templates with the link in our Bio! #powerpoint #powerpointpresenta...". Power Point Pro | 👉Don't forget to save this post! 📑Get your FREE PowerPoint templates with the link in our Bio!📚 #powerpoint #powerpointpresenta... | Instagram
1. Open the template in Canva. 2. In Canva click on "Share" at the top right-hand corner, then click "More" 3. Scroll down further and you will see "Google Drive" button. 4. Choose the "PPTX" or Powerpoint file type. Make sure to click "All Pages" on select pages. 5. Your template is exported to Google Slides!
Free Google Slides theme, PowerPoint template, and Canva presentation template. Hey business pros! Keep your team and stakeholders in the loop without skipping a beat with our Project Status Report Executive Summary infographic template. Perfect for those who love to present data with a dash of style, this PowerPoint and Google Slides template ...