

How to add and format a text box in Microsoft PowerPoint
By default, PowerPoint slides have at least one text box when added to a presentation. However, if the text boxes are accidentally deleted, or an additional text box is needed, you can insert a new one. To insert and format a text box in a PowerPoint slide, select from the actions below and follow the steps.
- Add a text box.
- Format a text box.
- Related information.
Add a text box
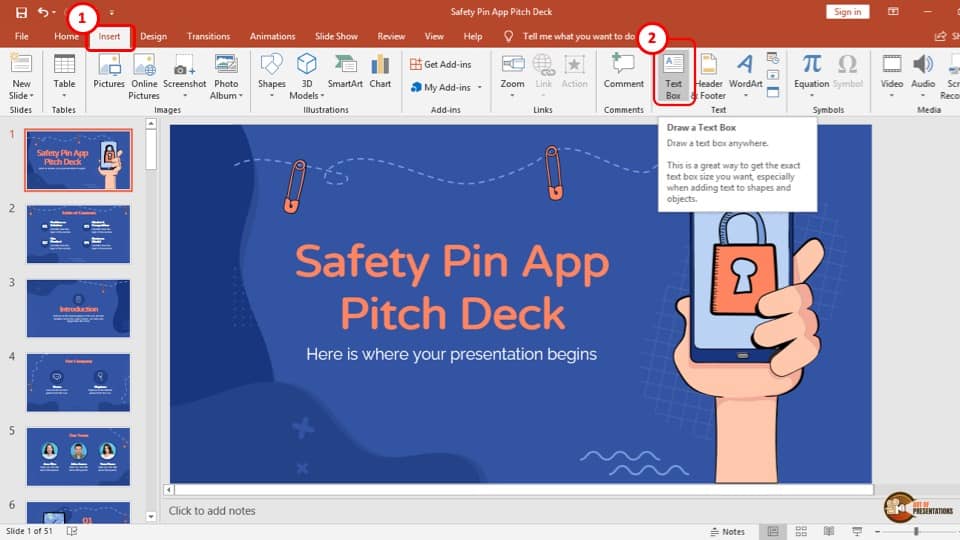
- In the slide preview pane on the left, click the slide where you want to add a text box.
- In the Ribbon menu at the top of the PowerPoint program window, click the Insert tab.
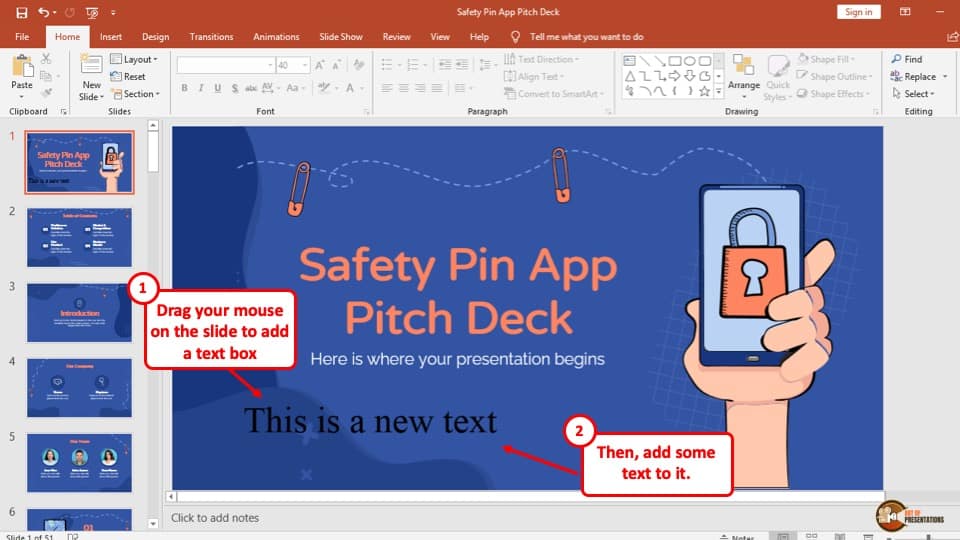
- In the slide, press the left mouse button where you want the top-left corner of the text box to be located. Then, while still pressing the mouse button, drag the cursor down and to the right to create a text box of the desired size.

- After creating the text box, type some text . If you click outside the text box without adding text first, the text box may disappear.
Format a text box
There are multiple format options for a text box. Select from the list below to learn about the most common formatting features.
- Format style, border, and color.
- Format text.
Format style, border, and color
- Click on the text box to highlight it.
- In the PowerPoint Ribbon , click the Shape or Shape Format tab that appears, depending on the version of PowerPoint you are using.
- Choose from the multiple options to format the style, fill, and border of the text box.
- Styles — Different preset and themed text box styles, including background and border colors, and shadow effects.

Format text
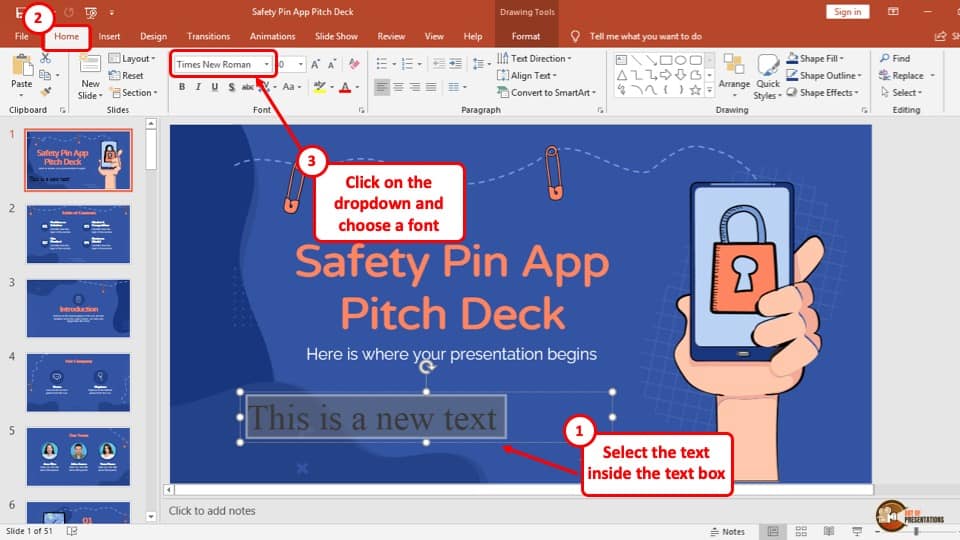
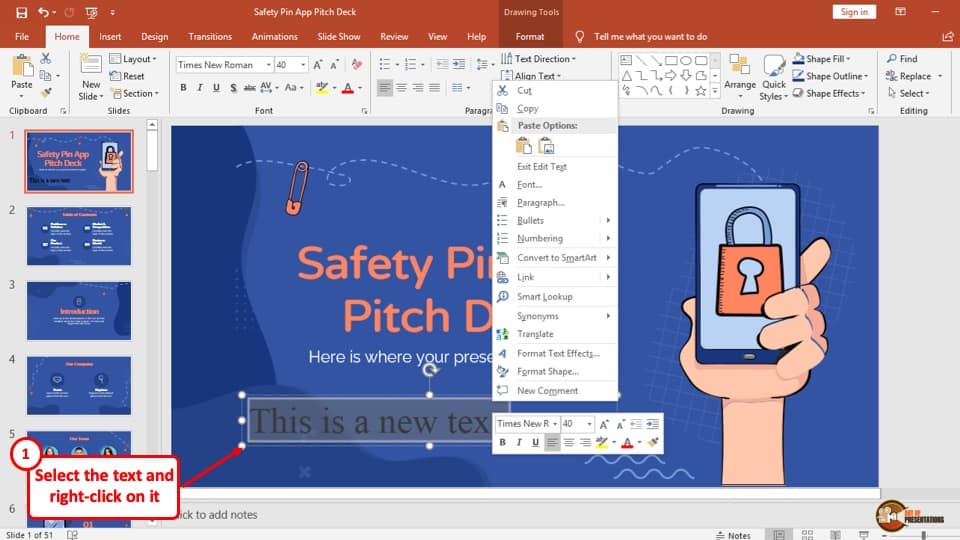
- To format the text in the text box, click it and then highlight the text inside that you want to format.
- If not already selected, click the Home tab in the PowerPoint Ribbon .
- Select the desired formatting options. You can choose from bold , italic , underline , and font type, size, and color. Also, you can change the text highlighting color.

Adding and formatting WordArt
PowerPoint lets you add and format WordArt in a slide for additional visual appeal.
WordArt can only be added to a slide in the PowerPoint desktop application. PowerPoint Online (the web version) does not currently support this feature.
- In a PowerPoint slide, click inside the text box where you want to place the WordArt.
- Click the Shape Format tab that appears in the PowerPoint Ribbon.
- In the WordArt Styles group, click the desired type of WordArt and add WordArt text to the slide.

- After adding WordArt, highlight the text and select a formatting option in the WordArt Styles group in the Ribbon.
Related information
- How to create or add a slide in Microsoft PowerPoint.
- How to insert a picture in Microsoft PowerPoint.
- How to add a video to a Microsoft PowerPoint presentation.
- See our Microsoft PowerPoint definition for further information and related links.
- Microsoft PowerPoint help and support.
- Software help and support.
- Slidesgo School
- PowerPoint Tutorials
How to Add, Copy and Delete Text Boxes in PowerPoint

A visually attractive presentation is usually an effective way to get your message across, but how about text? How can you type it into your slides? Fear not, because in this Slidesgo School tutorial, we’ll teach you how to insert, copy and delete text boxes in PowerPoint .
Adding a Text Box
Adding the same text to multiple slides, copying and pasting a text box, deleting a text box.
- Open your presentation in PowerPoint.
- Select the slide where you want to add a text.
- Go to the Insert tab and, in the Text group, click Text Box. As an alternative, you can press Alt + N to go to the Insert tab and then Alt + X to create a text box.
- You’ll notice that the cursor has changed. Now, click and drag to draw a text box. Release the mouse button when you’re happy with the size of the text box. You can move the text box around. Select it and, when the pointer becomes a four-headed arrow, drag it to its new placement.
- Enter the text that you want.
- Now you can edit the text. First, go to the Home tab.
- To change the font, the size or the color of the text, use the options from the Font group.
- To change the alignment, use the settings found in the Paragraph group.
- To change the fill color, the outline color or to apply effects such as a shadow, use the options found in the Drawing group.
For more information on how to edit the text, please refer to the " How to Format the Text in PowerPoint " tutorial.
- If you have several slides with a similar layout and want to add the same text to all of them in the same place, you can do so as long as they derive from the same layout master.
- Select one of the slides where you want to add a text.
- Access the master slides. To do so, on the View tab, in the Master Views group, click Slide Master.
- The master editor view will open. By default, the layout master from which your chosen slide derives will be selected.
- Go to the Insert tab and, in the Text group, click Text Box.
- You’ll notice that the cursor has changed. Now draw a text box by clicking and dragging.
- If you wish, you can further edit the text. As explained before, go to the Home tab and use the options found in the Font, Paragraph and Drawing groups. For more information on how to edit the text, please refer to the " How to Format the Text in PowerPoint " tutorial.
- Now exit the Slide Master by clicking Close Master View, located on the Slide Master tab.
- The text will appear in all the slides derived from that layout master.
- Please note that this text won’t be directly editable on the slides. If you want to change it, you’ll need to access the master slides again. Remember that this text will be the same in all the slides derived from the same layout master.
- If you want to add the same text to all the slides, with no exceptions, follow these same instructions, but this time insert the text into the slide master (which is the topmost one on the Slide Master View) rather than into a layout master.

- You can copy any text box and paste it elsewhere. To do so, first select the text box you want to copy and, on the Home tab, click Copy. As an alternative, you can press Control + C.
- Now select the slide where you want to paste it and, on the Home tab, click Paste. As an alternative, you can press Control + V.
- If you want to delete a text box, select it and then press the Delete key.
- Make sure you select the text box and not the text inside before pressing Delete. Otherwise, you’ll just delete the text inside, not the box.
Do you find this article useful?
Related tutorials.

New feature available: edit our templates with Canva
Whenever you need to create, Slidesgo is there. We’re continually enhancing your presentation design process with templates that are primed to impress for any occasion. And in order to let your ideas flow best, comfort is key. How could Slidesgo help you with this? By making you feel right at home with our resources, no matter your preferred platform.You spoke, and we listened. Now, your favorite slides can be accessed on a new platform: Canva! This new format adds to our existing options (PowerPoint and Google Slides), expanding your ways to utilize our first-rate presentation content. We’ve started with a selection of Canva-ready...

How to print PowerPoint notes
Crafting an impactful PowerPoint slideshow and delivering a captivating presentation are distinct skills. The first focuses on designing appealing visuals to convey a clear message, while the second involves employing effective presentation techniques to ensure the audience grasps the idea. The content of this article will help you with the latter part of this process, guiding future presenters on how to print PowerPoint with speaker notes to enhance your presentations success and effectiveness.

Discover Our Online Presentation Software for Free
We have great news for you today! If you’ve been a Slidesgo fan for years (or months, or weeks, or days, or mere hours, we welcome everyone!), you’ll probably know for now that our templates are available mostly in two formats: for use in Google Slides and PowerPoint.Google Slides is a free tool, since you only need a Google account in order to use it. PowerPoint, on the other hand, is part of the Microsoft Office suite, so it’s not a free program, but that didn’t stop it from being one of the most popular options in the world!What if we...

Webinar: Presentation Audit
With more than 15,000 templates released on Slidesgo and a user base composed of millions of people, we estimate that the total number of presentations created adds up to… um, a lot! Our team of professional designers work very hard to provide you with editable slides so that the only thing you need to do is, well, customize the elements to your liking. Starting from any given template, the results may vary a lot depending on the person who edited the contents.Have you ever wondered “Is my presentation good enough?” and wished that an expert on presentations looked at your template...
- Help Center
- Google Docs Editors
- Privacy Policy
- Terms of Service
- Submit feedback
- Insert shapes, images, and other objects
Insert and arrange text, shapes, diagrams, and lines
To enhance your presentation, you can add text, shapes, lines, and other objects in Google Slides.
Add text or objects to a slide
Insert a text box or object.
- On your computer, open a presentation in Google Slides .
- Go to the slide where you want to add a text box or object.
- At the top, click Insert .
- Choose what you want to add, then click Text box , Image , Shape , or Line .
- The object will get added to the slide and you can arrange or format it however you want.
Tip: To edit a presentation on a touchscreen device, like a Pixel Book, double-tap the text box to start typing.
- Select the text box or object you want to remove.
- At the top, click Edit .
- Click Delete .
Important: You can insert a diagram in any language that uses the Latin alphabet.
- Go to the slide where you want to add the diagram.
- Choose your style, number of levels, and template.
- The diagram will get added to the slide. You can change it how you want.
Arrange and align objects on a slide
Arrange objects.
- Go to the slide where you want to arrange an object.
- At the top, click Arrange .
- Order : Put the object behind or in front of text, other objects, or images.
- Align : When you select multiple objects, you can align the edges of the objects.
- Distribute : When you select three or more objects, you can evenly distribute the space between them.
- Center on page : Center objects vertically or horizontally on a slide.
- Rotate : Change the orientation of an object.
- Group : Lock multiple objects together to make them easier to move around and format.
Align objects on a slide automatically
To easily align objects on a slide, click and drag any object where you want. There are two ways to align:
- Snap to Guides : When you drag an object, you will see colored lines appear. These lines show what your object lines up with. This setting is turned on by default.
You can show rulers on the canvas to help you place text or objects.
You can add guide lines to the canvas to help you place text and objects.
- Drag the line where you want.
To remove a single line, right-click the line and click Delete guide .
- Go to the slide with the object or text box you want to change.
- Click the object or text box.
- At the right, click Size & Position .
- Make changes to the object or text box.
Tip : To keep the height and width proportions when you resize an object, click Lock aspect ratio .
Need more help?
Try these next steps:.
Using Google products, like Google Docs, at work or school? Try powerful tips, tutorials, and templates. Learn to work on Office files without installing Office, create dynamic project plans and team calendars, auto-organize your inbox, and more.
- Skill Assessments
- AI Course Builder
- Free Courses
- PowerPoint 2019 Basic
PowerPoint Text Box

Start Free Trial
Or log in with:
How to Add a Text Box in PowerPoint

A text box is a special type of drawing object that lets you insert and position text anywhere in a presentation.
Insert a Text Box
Even though most slides have one or two placeholders for you to insert text, it’s a good idea to learn how to insert your own so you can add more as needed.
- Click the Insert tab on the ribbon.
- Expand the Text group if necessary.

Type the text you wish to add.

- Select the text box.

You can change the text that appears in the text box or format it using the options on the ribbon.
Move and Resize

Notice that the position of the text inside the text box moves around as it is resized.
Be sure you’re clicking and dragging the edge of the text box. You won’t be able to move it if you click in the center.

FREE Quick Reference
Free to distribute with our compliments; we hope you will consider our paid training.
- LinkedIn-ready certificate
- Skill assessments
- Bite-sized, interactive lessons
- Saved progress
- DynamicPowerPoint.com
- SignageTube.com
- SplitFlapTV.com

Dynamic Text Boxes in PowerPoint
Jan 25, 2016 | DataPoint , DataPoint Real-time Screens , How-To
Set Up a Data Connection
First, you need to connect your presentation to your data. This data is often stored in a database or file. Supported databases are Microsoft Access, Microsoft SQL Server, MySQL and Oracle. Virtually any other database type on the market can be addressed via OLE DB or ODBC drivers. Files can be text files, comma separated text files, XML files or even Microsoft Excel datasheets are great for storing and manipulating data. To work with databases, you need to understand the structure of the database and you need to know SQL. So that, when you work with Excel, it will be much easier, so for this article I will use a simple Excel file. Nothing complicated. Let’s work with some data that everyone understands; beer! Yes, we are a Belgian company and like to promote some national products. We will display information about beer and pricing on our information screen. This is the Excel file I’m using. A simple file with one datasheet, where we list the names of the beers and the prices.

13 Comments

I am making a PPT presentation by DP, Excel and PPT animation function. Once DP detects updating in the data source (i.e. Excel), PPT presentation has reloaded on that page. That means all of animation has reset and restart from the initial. I would like to change only “changed” data. I don’t want to reload all page data. How can I control ??

We are aware of that and have no fix for this at this moment. When updating the data, the animation is replayed. We are looking for a solution to that.
Thanks for the comment.

Suggestion: I am a new user to this concept and process. I finally found this page, which I will use to understand a basic connection process with Excel. Suggestion, please include a link to files used in doing this process would be so helpful. (Excel and PowerPoint files in this case). Your software is so awesome and just need to find quick ways on how to use it. Including the demo file would help to speed up the learning curve.
P.S. The question here was asking about how to update manually the connection when data is changed in Excel to get it to show up in in PowerPoint. What is the best way to do it manually as to the update without having issues come up?
Thank you for providing a great product that will allow power users to keep growing as to meeting their needs.
Thanks Miles for the tip. We sometimes do include the PowerPoint and data files, but not always. We will plan to add this here too.

Is it possible to set up the data connection to something actually IN the presentation? For example, an imbedded table?
Dear Kevin, So you want to have an in-presentation-datatable where the data is not coming from an external data store, but is stored in an in-memory datastore in the pptx itself. Correct? When or why do you want to have this feature? Can you give an example? Currently that option is not available but I want to hear your story about this.

Hi, I plan on making a presentation where i can input text/number in a box. The text/number then store in Excel as data base. Is it possible?
Hi Hady, we have done such projects in the past. It is not done by a standard product that we have, but a customized presentation with macro scripting where you can capture the inputted information of the text boxes and then write it back to a file or database. Contact us if you want to explore this further as a custom project for you.

I would like to insert an audio clip associated to a datafield +text to speech functionality based on a corresponding value from a datafield in a concatenation. It would be used for explaining a product or comparing two or more products. Text to speech could be in any language selected by the user. Sometimes an explanation may be available and it would be great if some sort of sendkeys functionality is added to skip to the next previously defined point to avoid repeated info.
Sounds interesting. We have our text to speech option in DataPoint but that depends on the languages that you have installed in your operating system. Not sure if you can add multiple voices/languages there. I think we can do something with a linked object. Would it be possible to create a trouble ticket at our support section and send in some sample files like data and presentation so that we can play with it?

Is it possible to create text boxes that have examples already prepopulated in them that go away as soon as someone starts typing? Kinda like the “submit a comment” section of this web page. We are trying to use this for template creation. Thanks!
Yes, that is possible when you would use controls like text box, checkbox etc from the control toolbox (not the normal powerpoint textbox shape!) and use macros.
Submit a Comment
Your email address will not be published. Required fields are marked *
Pin It on Pinterest
- StumbleUpon
- Print Friendly
How to Create a Scrollable Text Box in PowerPoint: A Step-by-Step Guide
Creating a scrollable text box in PowerPoint is a straightforward process that provides an efficient way to manage large chunks of text within your slides. After inserting a text box and inputting your content, you’ll adjust the text box properties to make it scrollable. This allows your audience to manually navigate through the text, making it ideal for presentations with extensive information.
Once you’ve created a scrollable text box, your PowerPoint presentation will include an interactive element that enables viewers to scroll through text at their own pace. This feature is particularly useful when presenting detailed data, lengthy quotes, or any content that exceeds the space of a standard slide.
Introduction
Imagine you’re in the middle of a PowerPoint presentation and you reach a slide that’s crammed with text. It’s a challenge we’ve all faced, whether we’re the ones presenting or in the audience. Not only does it look cluttered, but it also makes it hard for your audience to digest the information. Enter the scrollable text box, a nifty solution to this all-too-common dilemma.
Scrollable text boxes are essential for those who need to present a large amount of text without overwhelming their audience. Think about it – wouldn’t it be easier if you could condense that novel of a slide into a compact, scrollable area? This allows the presenter to maintain a clean, professional look while also providing the viewers with the option to read through the text at their leisure.
This feature is particularly relevant for business professionals, educators, and anyone who uses PowerPoint to share information. Whether you’re delivering a report, teaching a class, or leading a seminar, a scrollable text box can make your presentation more engaging and accessible. Now, let’s walk through the process of creating one.
Step by Step Tutorial on How to Create a Scrollable Text Box in PowerPoint
The following steps will guide you through creating a scrollable text box in Microsoft PowerPoint, enhancing the interactivity of your slides.
Step 1: Insert a Text Box
Start by adding a text box to your slide where you want the scrollable content to appear.
Step 2: Input Your Content
Type or paste the text into the text box.
Step 3: Format the Text Box
Right-click on the text box and select ‘Format Shape.’
Step 4: Adjust the Properties
In the Format Shape pane, navigate to the ‘Text Box’ tab and check ‘Do not Autofit.’
Step 5: Add a Scroll Bar
Increase the size of the text box until a scroll bar appears.
Additional Information
Creating a scrollable text box in PowerPoint goes beyond just the steps mentioned above. It’s about understanding why and when to use this feature effectively. Scrollable text boxes should be used sparingly and strategically. It’s important to consider the pacing of your presentation and the nature of your audience.
For instance, if you’re presenting to a group that’s not likely to interact with the slide, a scrollable text box might not be the best choice. Additionally, remember to keep the text legible – choose a font size and style that’s easy to read even when scrolling.
Another tip is to use this feature for appendices or reference material that the audience can explore further if they wish, rather than for the main content that you’ll be speaking to. And of course, don’t forget to test your scrollable text box before the presentation to ensure it functions correctly.
- Insert a text box.
- Input your content.
- Format the text box.
- Adjust properties to disable autofit.
- Expand the text box until a scroll bar appears.
Frequently Asked Questions
Can i customize the scroll bar in a powerpoint text box.
You can adjust the scroll bar’s appearance by modifying the text box size and shape, but PowerPoint does not offer advanced customization options for scroll bars.
Will the scrollable text box work when I convert the presentation to a PDF?
No, the scrollable text box feature is specific to PowerPoint and will not function in a PDF.
Can I link a scrollable text box to another slide?
No, a scrollable text box is an independent feature and cannot be linked to other slides.
Is it possible to have multiple scrollable text boxes on one slide?
Yes, you can have multiple scrollable text boxes on a single slide, as long as there’s enough space to accommodate them.
Can I use a scrollable text box in PowerPoint Online?
Currently, PowerPoint Online does not support the creation of scrollable text boxes.
In conclusion, mastering how to create a scrollable text box in PowerPoint can elevate your presentations to new heights. It’s a simple tool with powerful potential, allowing you to present complex information in a more digestible format. Remember, the best presentations are those that consider the audience’s experience from start to finish. By incorporating scrollable text boxes, you’re not just sharing information; you’re creating an interactive, engaging learning environment.
For further exploration of PowerPoint’s capabilities, Microsoft offers a wealth of resources and tutorials. Dive in, experiment, and don’t be afraid to get creative with your presentations. And always keep your audience’s needs at the center of your design choices – after all, they’re the reason you’re presenting in the first place.

Matthew Burleigh has been writing tech tutorials since 2008. His writing has appeared on dozens of different websites and been read over 50 million times.
After receiving his Bachelor’s and Master’s degrees in Computer Science he spent several years working in IT management for small businesses. However, he now works full time writing content online and creating websites.
His main writing topics include iPhones, Microsoft Office, Google Apps, Android, and Photoshop, but he has also written about many other tech topics as well.
Read his full bio here.
Share this:
Join our free newsletter.
Featured guides and deals
You may opt out at any time. Read our Privacy Policy
Related posts:
- How to Insert Text Box in Google Docs
- How to Set Time for Slides in Powerpoint
- How to Save Powerpoint as PDF with Notes
- How to Add Page Numbers in Powerpoint 2010
- How to Loop a Slideshow on Powerpoint 2013
- How to Delete a Slide in Powerpoint 2010
- How to Unhide a Slide in Powerpoint 2013
- How to End Powerpoint on Last Slide in Powerpoint 2010
- How to Rotate a Slide in PowerPoint: A Step-by-Step Guide
- How to Make a Powerpoint Slide Vertical in Powerpoint 2013
- How to Hide a Slide in Powerpoint 2010
- How to Draw a Text Box in Word: A Step-by-Step Guide
- How to Make Curved Text in Powerpoint 2013
- How to Change Hyperlink Color in Powerpoint 2010 (An Easy 5 Step Guide)
- How to: Effortlessly Create PowerPoint Looping Presentations
- How to Convert PowerPoint Presentations to HTML: A Step-by-Step Guide
- How to Email a PowerPoint Slideshow: A Step-by-Step Guide
- Can I Convert My Powerpoint to Google Slides?
- How to Duplicate a Slide in Powerpoint 2010
- How to Change Line Spacing in Powerpoint for Every Slide at Once
Home PowerPoint Templates Text Boxes
Text Boxes for PowerPoint
Download Text Boxes for PowerPoint . These presentation templates provide elegant text boxes for presenting presentation text in a visually appealing manner.
The below templates offer text box slide designs ranging from 3D text boxes to minimalist, yet attractive text box slides, which are highly customizable to match any presentation topic.
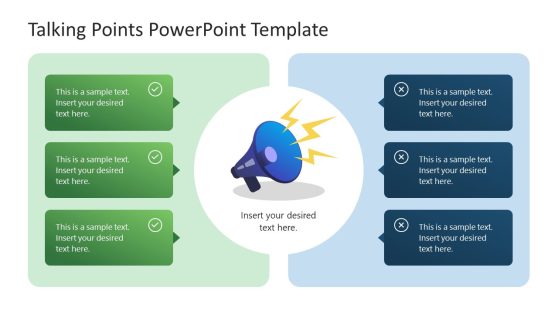
Talking Points PowerPoint Template
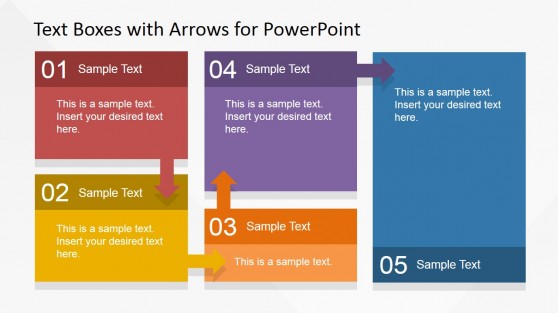
Text Boxes Table with Arrows for PowerPoint
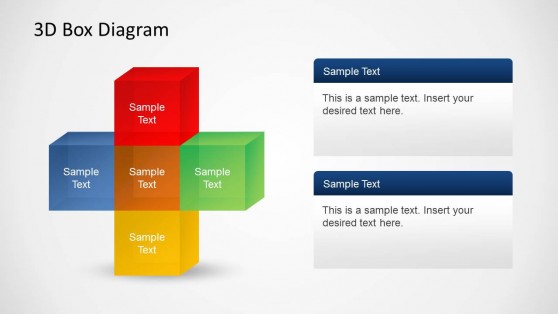
3D Box Diagrams with Text Boxes for PowerPoint
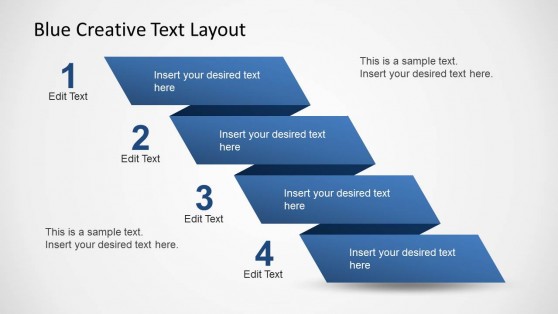
Blue Creative Text Layout for PowerPoint
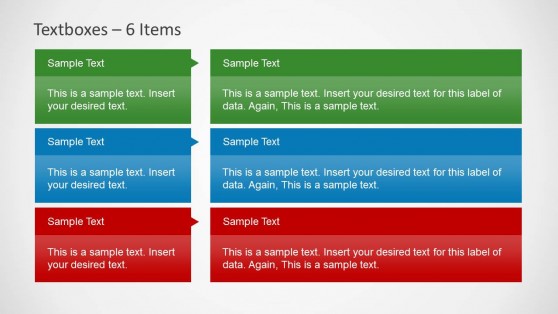
Textboxes Template for PowerPoint with Red, Green and Blue Header Color
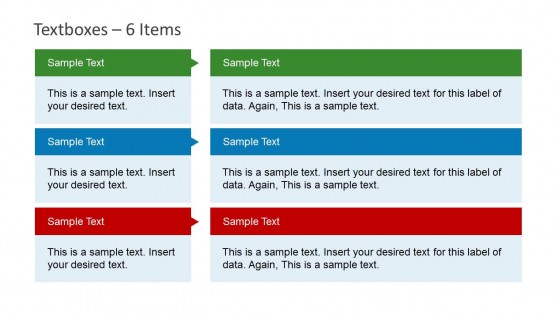
Textboxes Template for PowerPoint with Colorful Header
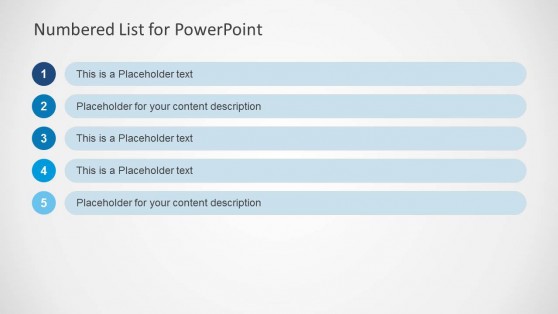
Numbered List Template for PowerPoint
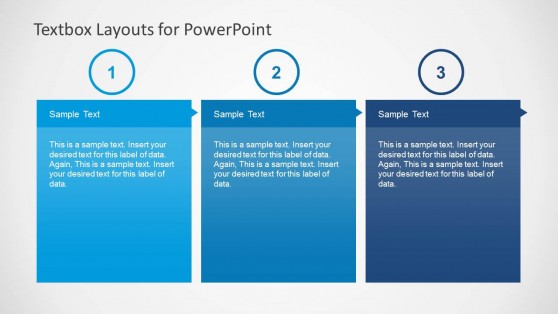
Textbox Layouts for PowerPoint
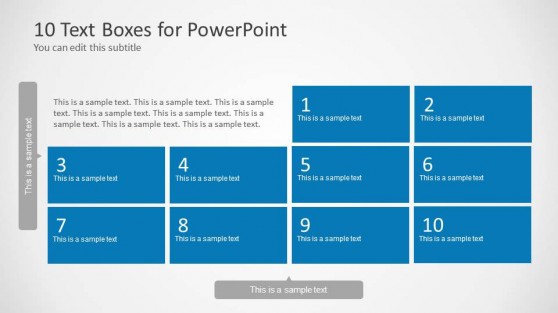
10 Text Boxes with Numbers for PowerPoint
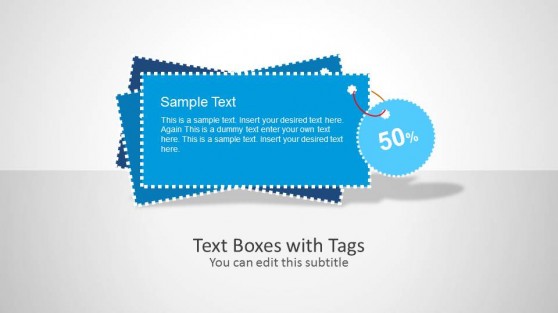
Text Boxes with Tag Shapes for PowerPoint
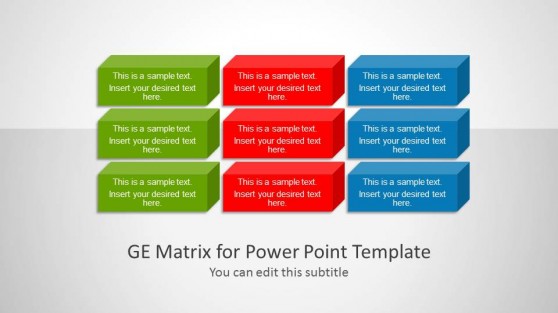
GE Matrix for PowerPoint
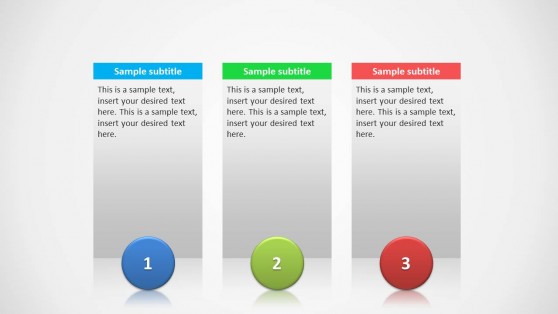
3 Columns Slide Design for PowerPoint
Download unlimited content, our annual unlimited plan let you download unlimited content from slidemodel. save hours of manual work and use awesome slide designs in your next presentation..
PowerPoint: How to Wrap Text in a Text Box
- Recent Posts
- How to Add Bullet Points in PowerPoint: A Step-by-Step Guide - May 25, 2024
- Where is Slide Master in PowerPoint: A Comprehensive Guide for Beginners - May 25, 2024
- How to Use Copilot in PowerPoint: A Step-by-Step Guide - May 25, 2024
PowerPoint is a powerful tool that allows me to create engaging presentations. One of the most important aspects of a presentation is the ability to convey information in a clear and concise manner. One way to achieve this is by wrapping text in a text box. By doing so, I can ensure that the text is easily readable and does not extend beyond the boundaries of the text box.

To wrap text in a text box in PowerPoint, I can follow a few simple steps. First, I need to create a text box by going to the Insert tab and clicking on Text Box. Then, I can click and drag on the slide to create a text box of the desired size. Once I have created the text box, I can start typing my text, and it will automatically wrap within the boundaries of the text box. If I need to adjust the size of the text box, I can simply click and drag on the handles around the edge of the box.
In addition to wrapping text in a text box, I can also adjust the direction and position of the text within the box. This can be useful if I want to create a more visually appealing presentation. To do this, I can right-click the edge of the shape or text box, select Format Shape, and then choose the desired option under Text Box. With these simple tools, I can create a professional-looking presentation that effectively conveys my message.
JUMP TO TOPIC
Understanding Text Wrap Options
Inserting and formatting text boxes, aligning and resizing objects, working with images and shapes, incorporating videos and templates, adjusting margins and spacing, exploring text direction and positioning, justifying text, utilizing advanced text options, maintaining consistency across documents, mastering text wrapping in word and powerpoint.

As someone who has spent countless hours creating presentations, I can attest to the importance of mastering text wrapping in Word and PowerPoint. It can make all the difference in the world when it comes to creating professional-looking and visually appealing slides. In this section, I’ll share some tips and tricks for understanding text wrap options, inserting and formatting text boxes, and aligning and resizing objects.
Text wrapping is a feature that allows text to flow around an image or shape. It’s an essential tool for creating visually appealing slides that are easy to read. In PowerPoint, there are several text wrap options to choose from, including square, tight, through, and top and bottom.
When you select a text box or image, you can access the text wrap options by clicking on the “Format” tab and selecting “Wrap Text.” From there, you can choose the text wrap option that best suits your needs. For example, if you want the text to flow around an irregularly shaped object, you might choose the “Tight” option.
Text boxes are an essential tool for creating professional-looking slides in PowerPoint. They allow you to add text to your slides and format it in a way that is visually appealing. To insert a text box, simply click on the “Insert” tab and select “Text Box.”
Once you’ve inserted a text box, you can format it by changing the font, size, color, and alignment of the text. You can also add effects such as shadows and reflections to make the text box stand out.
Aligning and resizing objects is an essential part of creating visually appealing slides in PowerPoint. When you align objects, you ensure that they are positioned correctly on the slide. When you resize objects, you ensure that they are the right size for the slide.
To align objects, select the objects you want to align and click on the “Format” tab. From there, you can choose the alignment option that best suits your needs. For example, if you want to align two objects to the left, you would choose the “Align Left” option.
To resize objects, select the object you want to resize and drag the handles that appear on the corners of the object. You can also resize objects by entering the desired dimensions in the “Size” section of the “Format” tab.
In conclusion, mastering text wrapping in Word and PowerPoint is essential for creating visually appealing and professional-looking slides. By understanding text wrap options, inserting and formatting text boxes, and aligning and resizing objects, you can create slides that are easy to read and visually appealing.
Enhancing Presentations with Visual Elements
As a professional, I’ve learned that incorporating visual elements into my presentations can make a huge difference in the engagement level of my audience. In this section, I’ll be discussing how to use images, shapes, videos, and templates to enhance your PowerPoint presentations.
Images and shapes can be used to add emphasis to your PowerPoint slides. When using images, it’s important to ensure that they are high-quality and relevant to your presentation. You can also use shapes to create visual interest and highlight important information. For example, a circle can be used to draw attention to a specific section of your slide.
To wrap text around an image or shape, you can create a text box and adjust the text wrapping options. This will help to ensure that your text is neatly aligned with your visual elements. You can also use the “Wrap text in shape” option to contain your text within a specific shape.
Videos and templates can also be used to enhance your PowerPoint presentations. Videos can be used to demonstrate a process or showcase a product, while templates can help to create a cohesive and professional look for your presentation.
When incorporating videos, it’s important to ensure that they are relevant to your presentation and of high quality. You can also use templates to create a consistent look and feel throughout your presentation. PowerPoint offers a wide range of templates that can be customized to suit your needs.
Overall, incorporating visual elements into your PowerPoint presentations can help to engage your audience and make your presentations more memorable. By using images, shapes, videos, and templates, you can create a professional and cohesive presentation that will leave a lasting impression.
Optimizing Layouts for Readability and Impact
When creating a PowerPoint presentation, it’s essential to optimize the layout for readability and impact. This includes adjusting margins and spacing, exploring text direction and positioning, and justifying text. Here are some tips to help you optimize your presentations and make them more effective.
One of the most critical aspects of optimizing your PowerPoint presentation is adjusting margins and spacing. It’s crucial to ensure that your text is not too close to the edges of the slide or too cramped. A good rule of thumb is to keep at least a half-inch margin around the text box.
You can also adjust the spacing between lines of text to improve readability. Increasing the spacing between lines can make the text easier to read, especially for people with visual impairments. In contrast, decreasing the spacing can help fit more text onto a slide, but it can also make the text harder to read.
Another way to optimize your PowerPoint presentation is by exploring text direction and positioning. You can choose to orient your text horizontally or vertically, depending on your design needs. Horizontal text is the most common orientation and is suitable for most presentations. However, vertical text can be useful for emphasizing a point or creating a unique design.
It’s also essential to position your text correctly on the slide. A good rule of thumb is to align your text to the left or right margin, depending on the orientation of your text. This will create a clean, professional look and make your presentation easier to read.
Finally, justifying your text can help improve the readability of your PowerPoint presentation. Justifying text means that the text is aligned to both the left and right margins, creating a clean, even look. However, it’s crucial to use this technique sparingly, as it can make the text harder to read in some cases.
In conclusion, optimizing your PowerPoint presentation for readability and impact is essential. By adjusting margins and spacing, exploring text direction and positioning, and justifying text, you can create a professional, effective presentation that engages your audience.
Advanced Techniques and Best Practices
As I have mentioned earlier, wrapping text in PowerPoint can be a challenging task. However, utilizing advanced text options can make it easier to accomplish. In this section, I’ll discuss some advanced techniques and best practices that will help you wrap text in PowerPoint like a pro.
One of the most important things to keep in mind when wrapping text in PowerPoint is to maintain consistency across documents. This can be achieved by using the same formatting, such as font size, color, and style, throughout your presentation. Additionally, using tabs to align your text can help you maintain consistency and make your presentation look more professional.
Another useful feature is the ability to insert multiple text boxes. This can be helpful when you have a lot of text to wrap and want to keep it organized. You can also manually wrap text by dragging and dropping it into the desired location.
Another advanced technique is to use the “send to back” option to place text behind an object or graphic. This can create a more visually appealing presentation and make your text stand out.
Maintaining consistency across documents is crucial when it comes to creating professional-looking presentations. One way to achieve this is by using the same formatting and style throughout your presentation. This includes font size, color, and style.
Another way to maintain consistency is by using the same size and shape for your text boxes. This can be achieved by creating a new text box and then copying and pasting it throughout your presentation.
Finally, it’s important to ensure that your presentation is secure, especially if you’re sharing it with others. Microsoft 365 offers subscription benefits, including training courses and access to communities, that can help you learn how to secure your device and your presentation.
In conclusion, wrapping text in PowerPoint requires some advanced techniques and best practices to achieve a professional-looking presentation. Utilizing advanced text options and maintaining consistency across documents can help you achieve this goal.
Related posts:
- Unfortunately, PowerPoint Cannot Read: Troubleshooting Tips
- Error Occurred When PowerPoint Was Saving the File: How to Fix It
- Add Sound to PowerPoint Animation: A Step-by-Step Guide
- Vielen Dank für Ihre Aufmerksamkeit PowerPoint: Tips for an Engaging Presentation
- How to Easily Add Annotations in PowerPoint
- How to Easily Delete Comments in PowerPoint: A Step-by-Step Guide
- Remove Page Numbers in PowerPoint: A Simple Guide
- Why Does My PowerPoint Keep Crashing: Troubleshooting Tips
- PowerPoint Comments: Web-Only Functionality Explained
- Adding a Slide to an Existing PowerPoint Presentation: A Step-by-Step Guide
- Locating the Present Button on PowerPoint: A Tech Guide
- What Video Formats are Supported by PowerPoint?
Leave a Comment Cancel reply
Save my name, email, and website in this browser for the next time I comment.
How to Format Text in PowerPoint? [A Complete Tutorial!]
By: Author Shrot Katewa
![How to Format Text in PowerPoint? [A Complete Tutorial!]](https://artofpresentations.com/wp-content/uploads/2021/06/Featured-Image-How-to-Format-Text-in-PowerPoint.jpg "presentation text box")
When you have to create presentations using PowerPoint, knowing how to format text in PowerPoint the correct way can actually save you a ton of time! It is one of the most important tasks that we invariably need to perform on any presentation i.e. formatting text in PowerPoint!
To format the text in PowerPoint, select the text first. Then, on the home tab, you can use the various formatting options such as Font Type, Font Size, Font Styles, Line Spacing, Font Color, Text Highlight, etc.
Formatting text correctly in PowerPoint can add emphasis and grab the attention of the audience where needed. This can not only make your presentation look good, but also help you deliver it effectively!
So, in this article, we shall take a deep dive and understand all the nuances of formatting the text correctly in PowerPoint. I shall try my best to provide information about everything you need to know when it comes to editing and formatting the text!
So, let’s get started!
A Quick Note Before We Begin – if you want to make jaw-dropping presentations, I would recommend using one of these Presentation Designs . The best part is – it is only $16.5 a month, but you get to download and use as many presentation designs as you like! I personally use it from time-to-time, and it makes my task of making beautiful presentations really quick and easy!
1. How to Add Text to a Slide in PowerPoint?
You probably may already know this, but let’s just start with the basics to make sure we are all on the same page!
You can add text to the slide in PowerPoint using a text box. Click on the “Insert” tab. Then, select the “Text Box” option. Next, click and drag on any part of your slide to add the text box. Finally, start typing to add text as soon as you have created the text box in PowerPoint.
Here’s a step by step process described in detail:
Step 1: Click on the “Insert” tab
The first step to adding text to a slide in PowerPoint is to click on the “Insert” tab which is the third tab in the ribbon and located at the top left of the PowerPoint window.
Step 2: Select the “Text Box” option
Click on the “Text Box” option which in on the right side of the “Insert” tab in the “Text” section. After clicking on the “Text Box” option, your cursor will change on the slide.
Now to add the text box to the slide, simply click and drag your cursor to draw the text box with your preferred size.
Step 3: Add text to your presentation
To add text, you can directly start typing as soon as you create the text box. Click outside the box when you are done, and your text will be added to the slide.
If you want to edit the text again, then click inside the text box anywhere on the text. Alternatively, you can select the text box and right-click on it, and from the menu, click on “Edit Text”.
In case you are new to PowerPoint and want to know more about the nuances of adding text such as adding text over an image, shape, or even a video, check my other article on how to add text in PowerPoint that goes in-depth on this topic.
2. How to Change the Font of the Text?
There are at least two methods you should know on how to change the font of your text in PowerPoint. However, make sure to check out our detailed guide on how to change fonts in PowerPoint where I’ve added even more relevant information explained in a step-by-step manner.
Nevertheless, the two methods are described below –
Method 1 – Using the “Home” Ribbon
The first method is by using the “Home” tab in PowerPoint . Here’s the detailed process explained –
Step 1: Select the Text
The first step is to select the text inside the text box for which you want to change the font. If you want to change the font of all the text inside the text box, you can also click on the text box itself!
Step 2: Change the Font
The next step is simply to change the font! To do that, make sure the “ Home ” ribbon is selected. (as shown in the image above). Then, under the “ Fonts ” section, click on the “ Font ” dropdown and choose the font as per your desire.
Method 2 – Using the Right-Click Option
The whole process is described through three simple steps below:
Step 1: Select the text
The first step is to select the text located in text boxes. You can do that by double-clicking on a word in the “Text box” or dragging your cursor over the texts while holding the “left mouse button”
Step 2: “Right-click” on your selected text.
“Right-click ” on the text which you have selected. This will open a drop-down menu. The drop-down menu has the “Font” section of the “Home” tab which you can use to edit the font style, color, and size.
Step 3: Click on the “Font” drop-down menu.

Click on the “Font” option to open its drop-down menu. The drop-down menu has a variety of fonts that will appear in the middle of the screen.
Click on your preferred font style and it will change accordingly.
3. How to Change Font Size of Text in PowerPoint?
The steps of changing the font size are very similar to that of changing the font of the text. The process is described in simple steps below:
Step 1: Select the text.
Select the text in which you want to increase or decrease the size of the font and then “Right-click” on it. A drop-down menu with the “Font” section of the “Home” tab will appear.
Step 2: Click on the “Font size” option.

Right beside the current font style, a number is showing the size of the font, that is the “Font size” option.
To change the size of the text, click on the “Font size” dropdown menu and different numbers will show up. Click on the size you want, and the font size will be changed immediately.
You can also type in the exact font size that you want if it is not present in the dropdown list.
4. How to Add Styles to Text in PowerPoint?
You can also take advantage of the Font Styles in PowerPoint to emphasize the text! There are primarily 4 text styles available in PowerPoint. These are –
- Strikethrough
There are also superscript and subscript text options, which we shall cover in detail later in this article.
To change the font style to bold, italics, underline, or strikethrough in your slide, first you have to select the texts you want to change the style of and then follow the instructions below:
How to Bold the Text in PowerPoint?

At first, select the text you want to bold. The “Home” tab has a “Font” section. On the bottom left of the “Font” section, there is a “B” button which will turn your text to a “Bold” style text. Click on the “B” button and your text will turn bold.
Alternatively, you can also use the shortcut i.e. “Ctrl + B” buttons on your keyboard after selecting the text to get the job done faster.
How to Make the Text Italics in PowerPoint?

Click on the button that looks like an “ I” which is the “Italic” style font option after selecting the text. It is located on the right side of “Bold” option. The selected text will be changed to an “ Italic ” style font immediately.
Alternatively, you can also use the keyboard shortcut for italicizing the text in PowerPoint. Just press the “Ctrl + I” buttons on your keyboard after selecting the text to get the job done.
How to Underline Text in PowerPoint?
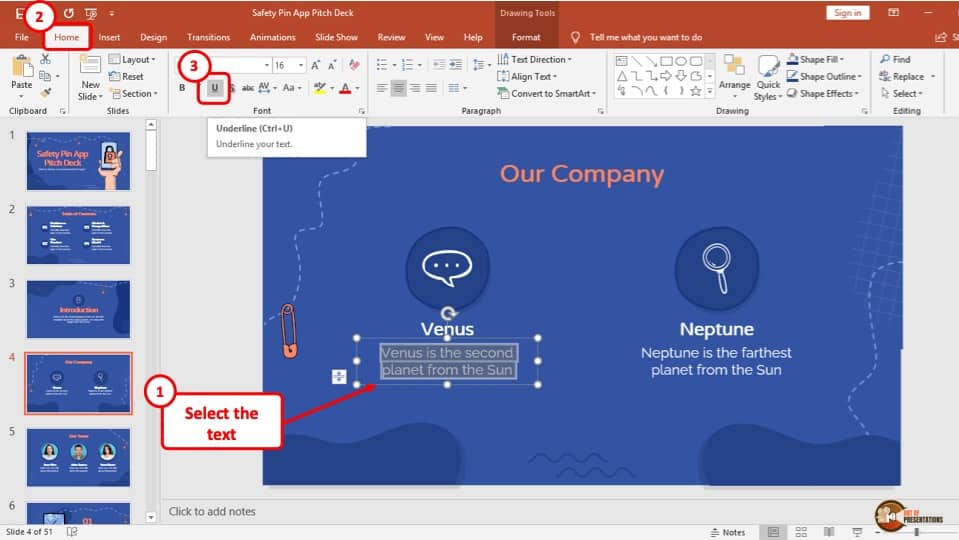
Underlining texts can be done by selecting the text and clicking on the button that looks like a “ U ” . This is the “underline” option in the “Font” section. The “ U ” button is right beside the “ I” button in the Home tab.
Alternatively, you can also use the keyboard shortcut to underline text by pressing the “Ctrl + U” buttons on your keyboard after selecting the text.
How to Strikethrough Text in PowerPoint?
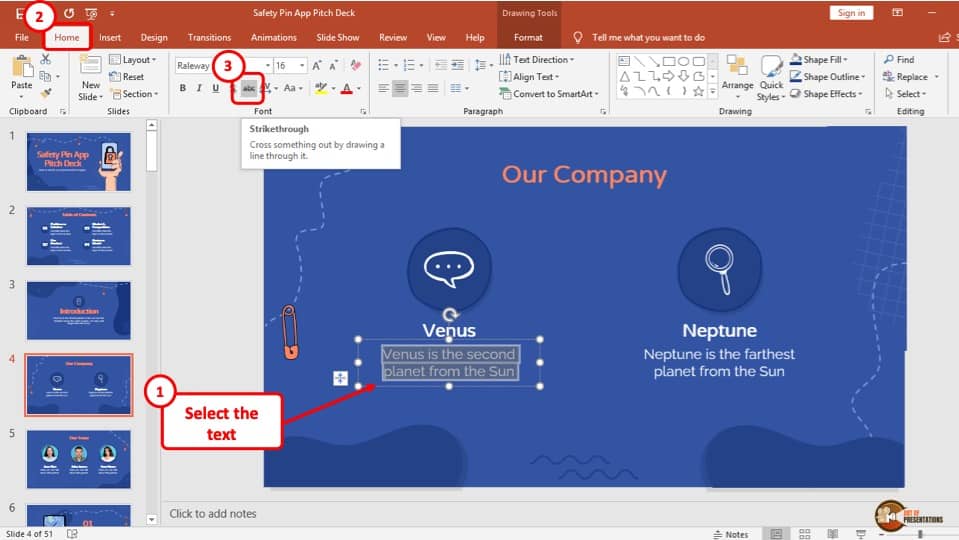
The strikethrough text is used when you want to cross out the text.
The “Strikethrough” button is beside the “Underline” button in the “Font” section and the icon has a line going through lower case “ ab ” .
After selecting the text, click on the “Strikethrough” option and it will cross out the text.
5. How to Highlight the Text in PowerPoint?
You can use the “Text Highlight Color” button to highlight the text in PowerPoint. However, this button is only available for the Office 365 version of PowerPoint .
If you are using an older version of PowerPoint, check out my other article on how to highlight text in PowerPoint . It provides you with multiple other ways to make your text stand out on a slide in PowerPoint.
That said, here’s a step-by-step process on how to highlight text in PowerPoint using the text highlight color option!
Step 1: Select the Text and Click the “Text Highlight Color” button
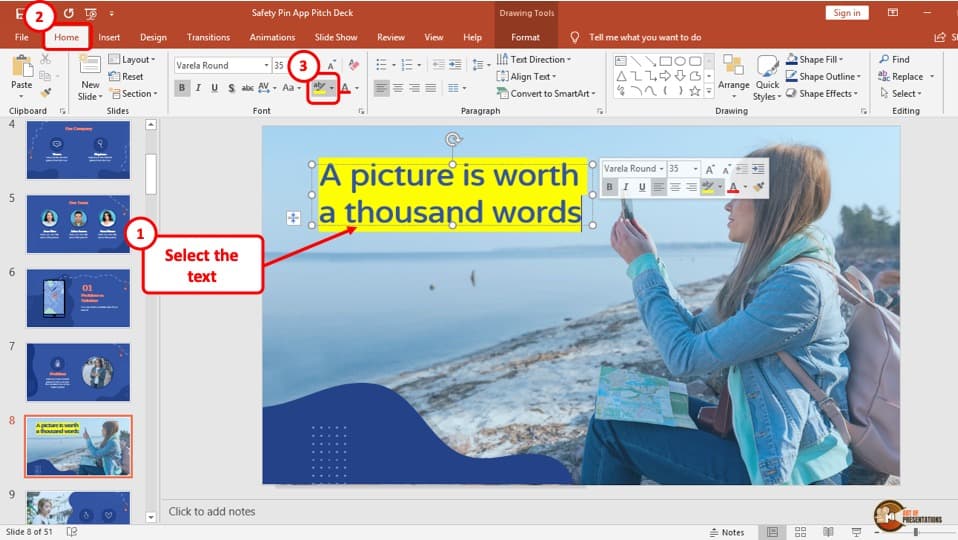
At first, you have to click on the text you want to highlight and select it. Then, you have to click the “Text Highlight Colour” button.
This button has a pen in the icon with a yellow line underneath it and it is located at the “Font” section of the “Home” tab. Doing so will instantly highlight your text.
If you want to highlight text across multiple text boxes, you can also first click on the “Text Highlight Colour” button on the “Home” tab. This will turn the cursor into a pen from the “Arrow” icon.
Now, simply click on the text box for the text you want to highlight. The text will be highlighted instantly.
6. How to Change Font Color in PowerPoint?
There are multiple ways in which you can change the color of your font in PowerPoint. I’ve listed the easiest method to change the font color below.
If you want to know ninja tips on how to change the font color for all text in PowerPoint, check out my other article. (by clicking on the link)
Follow the step-by-step guide to change your font color in PowerPoint:
Step 1: Click on the “Font Color” drop-down menu button
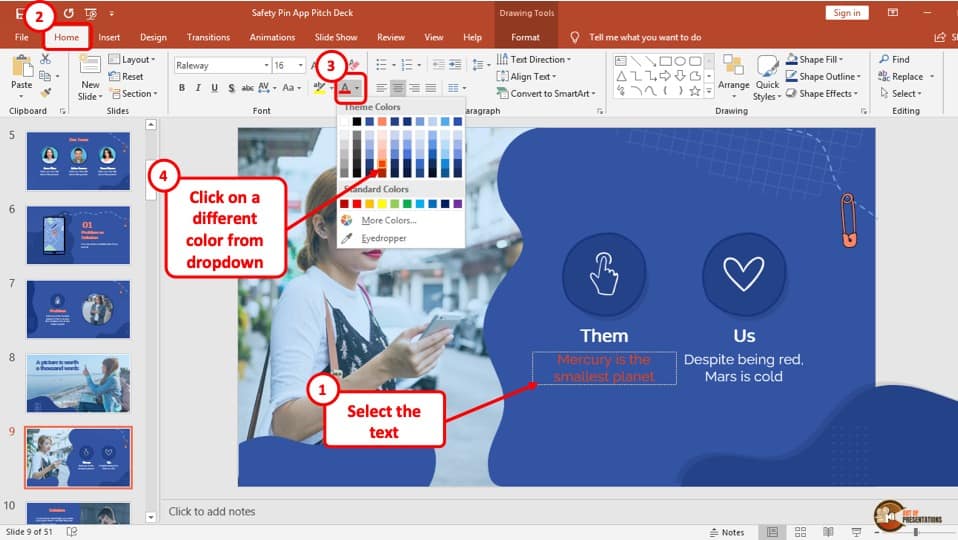
To change the color of your text, the first step is to select the text using your cursor. Then click on the “dropdown” button beside the “Font Color” button.
This button is located at the right of the “Font” section in your “Home” tab. It is an icon with a capitalized “A” and a red underline.
Step 2: Choose new font color
When you click on the dropdown menu, a color palette appears. Hover your cursor to the color you want, and you will see the text changing its color. Now, click to alter the text font color.
7. How to Clear Text Formatting in PowerPoint?
Sometimes, you don’t particularly like the changes that you’ve made to the text and perhaps you want to start over from scratch. This is when the clear text formatting option in PowerPoint comes in handy!
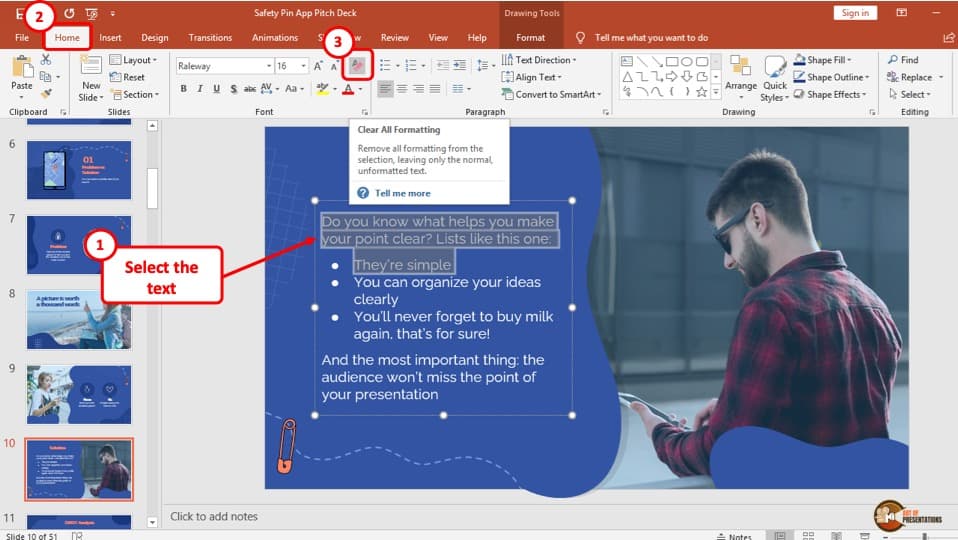
To clear the text formatting in your PowerPoint presentation, select the text you want to remove the formatting from and click on the icon with the red eraser called the “Clear All Formatting” button.
This icon is located in the “Font” section of the “Home” tab and clicking it will erase all formats such as bold, italics, underline, highlight, etc. from the text. The text will then revert to the default text of the theme.
If you want to learn how to clear formatting in PowerPoint on all slides, make sure you click on the link and check out the other article where I have gone into detail on this topic and provided tips on how to do so quickly!
8. How to Add Text Outline in PowerPoint?
You can outline text in PowerPoint to create emphasis on certain text that you want the audience to look at.
Here’s how you can outline text in PowerPoint –
Step 1: “Right-click” on the text and select “Format Text Effects”

Select the text you want to outline and “Right-click” on it. A drop-down menu will appear with different options. Click on the “Format Text Effects” option from the menu.
Step 2: Click on the “Text Fill & Outline” button
After you click on the “Format Text Effects” option, the “Format Shape” sidebar will pop up on the right of the slide.
It usually automatically displays the “Texts Effects” option which is the icon in the middle that looks like an “A” . In case it doesn’t, click on “ Text Options ” first.
Click on the “A” icon beside it and then click on the “Text Outline” option. A menu will appear with the options like, “No line” , “Solid line” , and “Gradient line” .
Step 3: Select your desired Text Outline
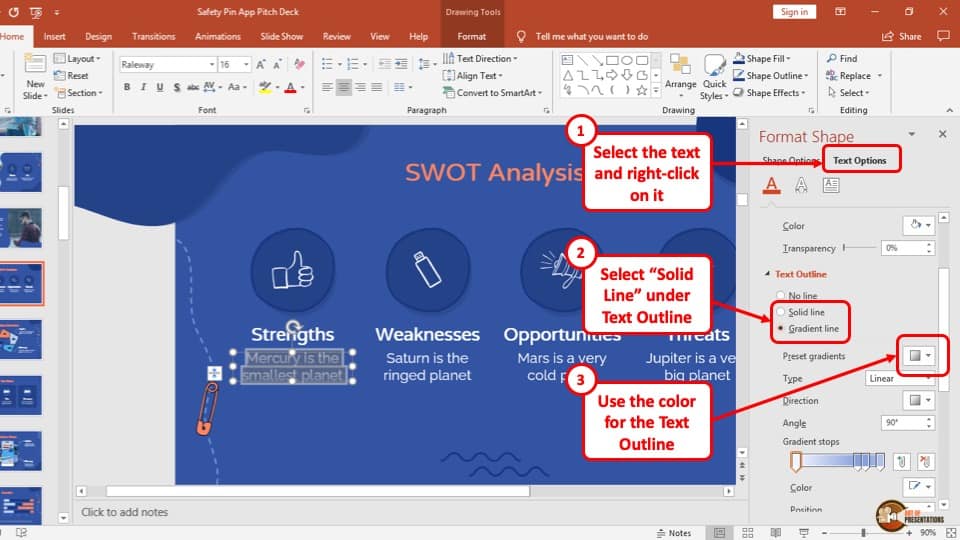
Choose the text outline you want to apply to the slide text. Gradient line will create a transparent border around your text, and a solid line will fill up your text border.
Choose a color as per preference to add the outline to text in PowerPoint.
9. Using WordArt in PowerPoint
I’ve written a detailed article on how to use WordArt in PowerPoint along with steps to customize your WordArt. So, make sure you click on the link and check out that article to learn more about WordArt. But, here’s a quick highlight on using WordArt –
To use WordArt in your PowerPoint presentation, you have to go to the “WordArt” option in the “Insert” tab. The whole process is described in easy steps below:
Step 1: Go to the “Insert” tab
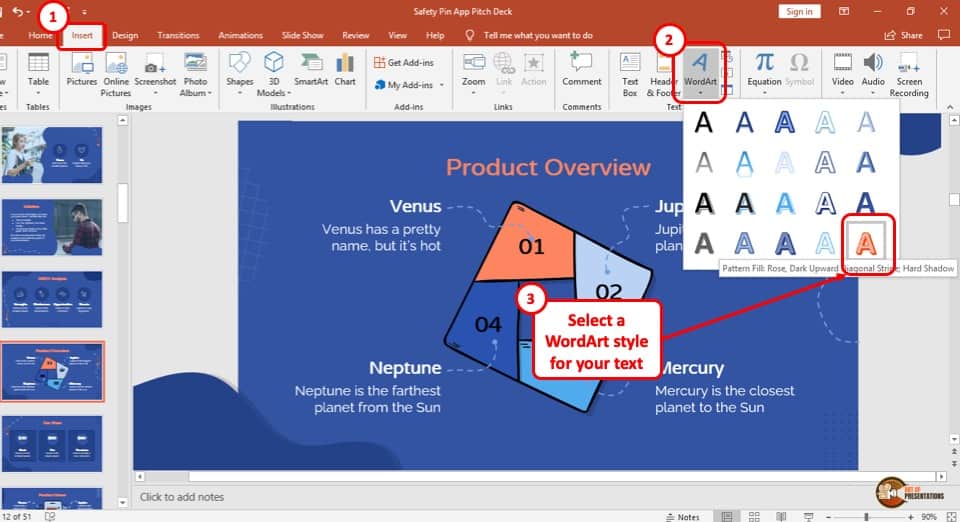
The third tab from the right in the ribbon is the “ Insert” tab. Click on the “ Insert” tab to access the “ WordArt” option.
Step 2: Click on the “WordArt” button
Now, on the “Text” section of the “Insert” tab is a leaning “A” icon which is the “WordArt” button. Click on that button to access WordArt.
Step 3: Choose your WordArt style
Different styles of WordArt appear in a drop-down menu after you click on the “WordArt” button. Now select your preferred WordArt style to place it on the slide.
Step 4: Insert the WordArt into your presentation.
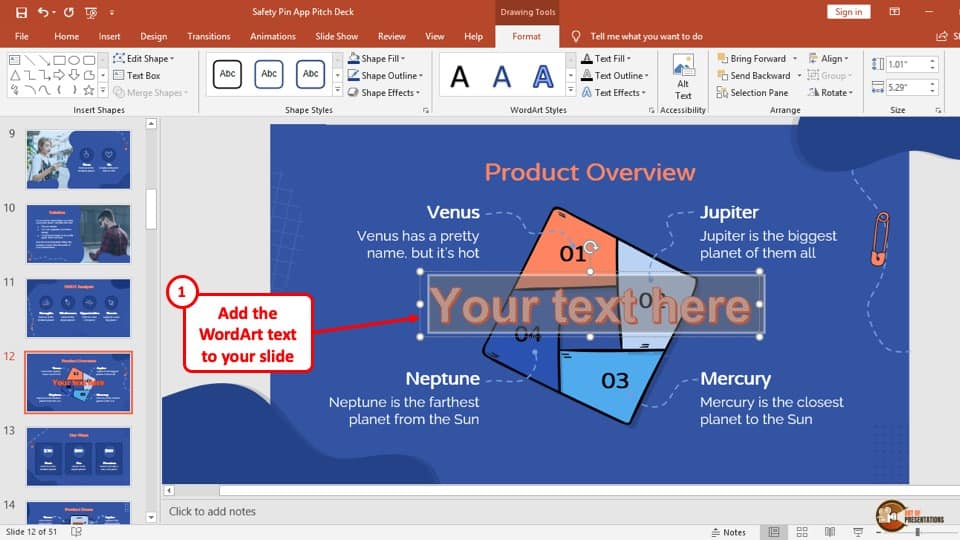
A “Text box” with the chosen style will be displayed in the middle of the slide. Select the “Your text here” texts and erase it.
Now, you can write any text with WordArt you want and then place it in your preferred location.
10. How to Change Text Direction in PowerPoint?
The method to change the text direction in PowerPoint is similar to that of changing the text outline in that it needs the user to open the format settings.
Follow the steps mentioned below to change the direction of the text in PowerPoint –
Step 1: Click on the “Format Shape” button
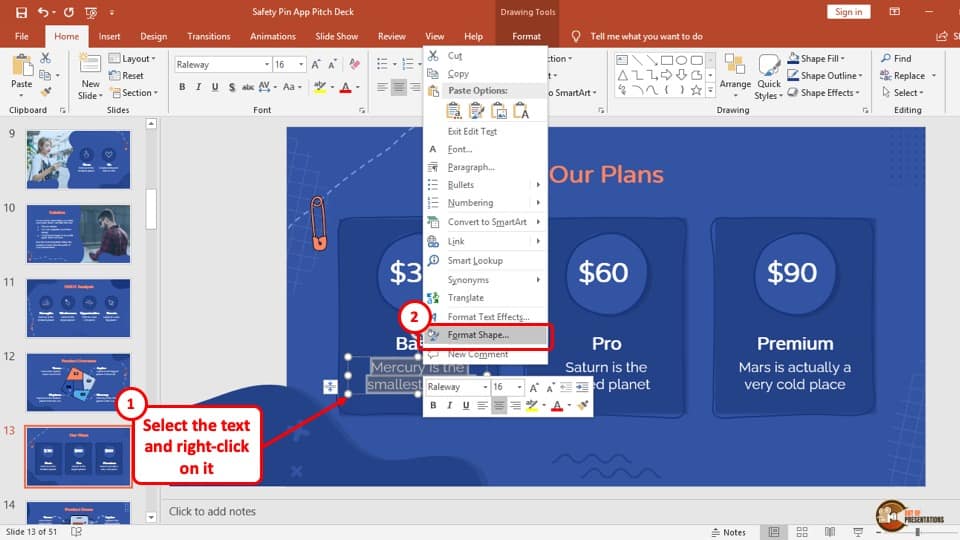
The first step to changing text direction is to select the text you want to change and “ Right-clicking” on it. A drop-down menu with many options will be displayed on the screen. Click on the “Format Shape” option which is located right below the “Formatting Text Effects” button.
Step 2: Click on the “Size and Properties” option
A sidebar with the title “Format Shape” will appear on the right of the screen. Click the square icon on the right side called the “Size & Properties” option.
Step 3: Click on the “Text Direction” dropdown menu
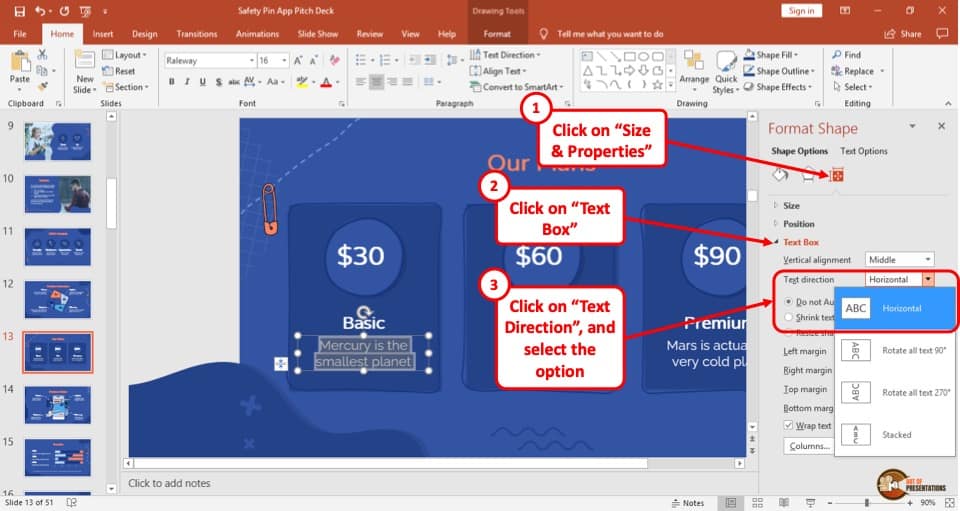
Below the “Text Box” button is the “Text Direction” option.
Every text is horizontal by default so if you want to change it, you will have to click on the arrow-mark besides the “Horizontal” option to open a dropdown menu. This will show you different text direction options. Click on the direction you want your text to move in.
You can also rotate text in PowerPoint. There are actually multiple different ways in which you can rotate the text Check out our detailed guide on how to rotate text in PowerPoint !
11. How to Cut, Copy, Paste and Duplicate Text in PowerPoint?
Copy and paste in PowerPoint are perhaps one of the most important functions in PowerPoint! Furthermore, knowing how to cut and duplicate can also help you move your text around quickly.
I’ve written a detailed guide on how to copy and paste in PowerPoint with visual references. So, make sure you check that article out for the details. For brevity, I’m just sharing the basics here –
- How to Copy Text in PowerPoint – Copying text allows you to create a photocopy of the selected text. To copy the text in PowerPoint, select the text. Then, use the keyboard shortcut by pressing the “Ctrl + C” keys simultaneously. Alternatively, “Right-click” on the text that you want to copy and press the “Copy” button from the dropdown menu.
- How to Cut Text in PowerPoint – The “Cut” function allows you to remove a text and then place it again in a different location. It is almost the same as the copy function but copying creates a photocopy while the cut function deletes the object from its original location and places it on the location where you paste it. The keyboard shortcut to cut text in PowerPoint is “Ctrl + X” . Or alternatively, “Right-click” on the object that you want to cut and hit the “Cut” button from the drop-down menu.
- Paste Text in PowerPoint – The “Paste” function allows you to place the text to a preferred location that has been copied or cut. Hence, it is done after the cut or copy function. You need to paste the text after copying or cutting it to finish the process. The keyboard shortcut of pasting text is “Ctrl + V” . Or alternatively, “Right-click” on the location that you want to paste the object and hit the “Paste” button from the dropdown menu.
- Duplicate Text in PowerPoint – Duplicating texts is a combination of the copy and paste function. After selecting your texts, if you press “Ctrl + D” then it creates a duplicate of the original. It is, however, not an alternative to the cut function. But, it can be used instead of copy and paste. One drawback, though, of this function is that it can’t duplicate elements across slides. For that, you will need to use copy and paste functions.
12. Using Format Painter to Apply Text Formatting
Format painter is a tool that allows the user to easily copy the font style, size, and color of a certain text and apply it to another text.
Actually, the format painter has the capability to do much more than just copying the formatting of the text! It can be used to apply the formatting of shapes, text boxes, images, etc. It is a super helpful tool!
In fact, I covered the use of format painter in PowerPoint in a detailed manner in another article. Make sure you check out that article too as it will save you a ton of time while editing your presentation!
Meanwhile, I’ve covered the basics of using the format painter below –
Step 1: Select the text and go to the “Format Painter” option
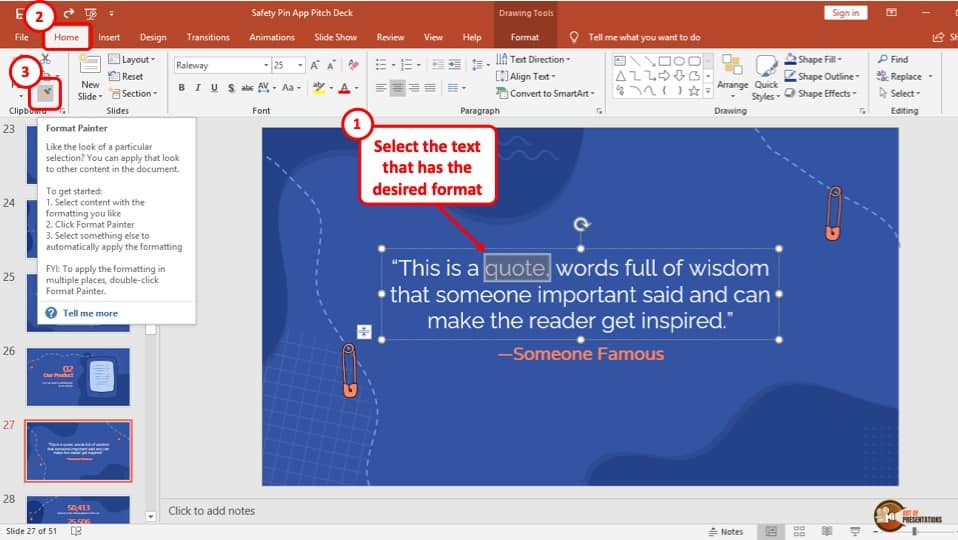
At first, you have to select the text you like the font of. This should not be the text you want to paint over. Now below the “Home” tab, and in the “Clipboard” section, there is a paintbrush icon called the “Format Painter” button. Click on it.
Step 2: Format paint the text.
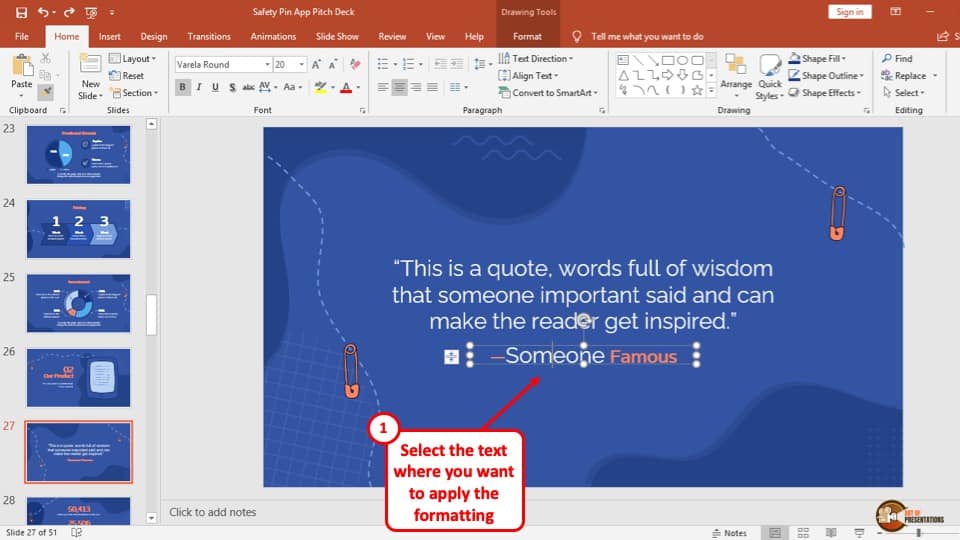
Your cursor will change into a paintbrush after you click on the “Format painter” button. Now, move the cursor to the text you want to apply the formatting on and click it. It will change to the font of your choice.
This is a single-use format painting because your cursor will change back to normal after one use.
Step 3: Format painting multiple words at a time (optional)
If you want to change the font of multiple texts using the “Format Painter” option, then instead of clicking the icon once, “Double click” on the “Format painter” button.
This time, the cursor will not change back and allow you to format the font of several texts.
Once you are done using the format painter, simply click on the icon again or press the “Esc” key on the keyboard.
13. How to Align Text in PowerPoint?
In this section, I will be describing the different alignments options for text in PowerPoint. I’ve written a detailed article on how to align in PowerPoint where I also talk about aligning objects and shapes with respect to each other and provide tips to save time! So, make sure you check out that article for further details.
Meanwhile, below are step-by-step guides to align text in PowerPoint horizontally or vertically.
Horizontal Align – left, right, centre, justify
The horizontal alignment allows the text to be aligned in the text box on a horizontal axis.
The process of aligning texts in different horizontal styles is described in the simple steps given below:
To change the alignment of text, the first step is to select all the texts inside a “Text box” using your cursor.
Step 2: Choose your desired horizontal alignment
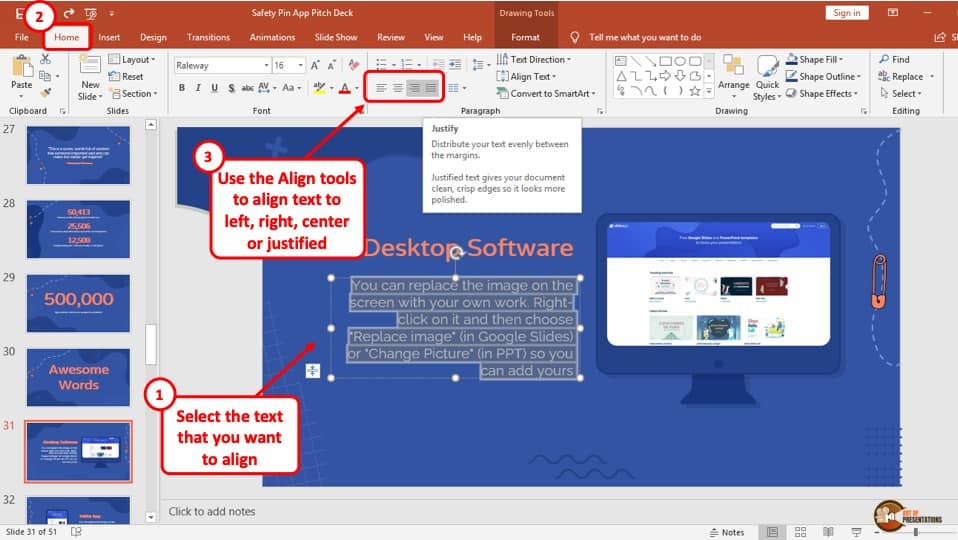
There are four icons made up of lines in the “Paragraph” section of the “Home” tab. From the left, they are “Align Left” , “Centre” , “Align Right” , and “Justify” .
Click on your preferred horizontal alignment to change the text position inside the text box.
Vertical align – Top, bottom, middle
The vertical text alignment will allow you to align the text in the box in a vertical axis with respect to the text box.
The process of aligning texts in different vertical styles is described in the following steps:
The first step is to simply select the text that you want to change the vertical alignment of.
Step 2: Change the Vertical Alignment
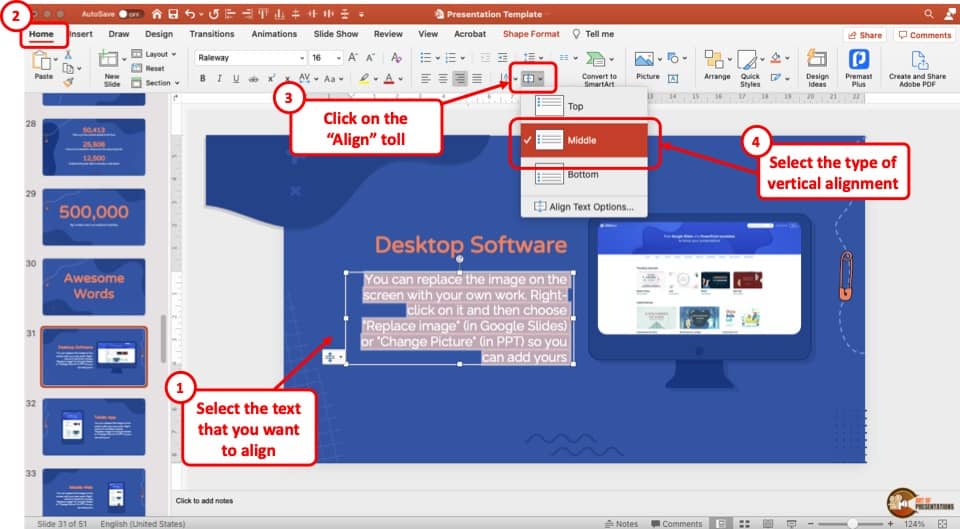
Next, simply go to the “ Home ” ribbon. Then, click on the “Align” Tool as indicated in the image above. From the dropdown, choose the vertical alignment options from “ Top “, “ Middle “, or “ Bottom “.
14. How to Add Superscript and Subscript to Text in PowerPoint?
Using superscript or subscript text style can be especially helpful when creating a presentation for students or when adding an equation.
I wrote a detailed post explaining the steps to superscript or subscript text in PowerPoint (with images). Make sure you check out that article for full details. I’ll share the brief steps below –

- To subscript text in PowerPoint, first, select the text. Then, click on the “ home ” tab, and click on the “ arrow ” button at the bottom right corner under the “ Fonts ” section of the Home ribbon.
- This will open a “ Fonts ” window dialog box. In the window select the “Subscript” text option. Make sure that the box is checked.
- You can also add the “Superscript” using the same process. Just make sure that the box before the superscript text is checked.
15. How to Add Bullet Points or Numbering to Text in PowerPoint?
Here’s how you can add bullet points or numbered list to your text in PowerPoint –
Step 1 – Select the Text
To add bullet points or numbering to text in your PowerPoint presentation, first, you have to select the text or navigate the blinking cursor in the place where you want the bullet point or numbering to be
Step 2 – Add Bullets from the “Home” Ribbon
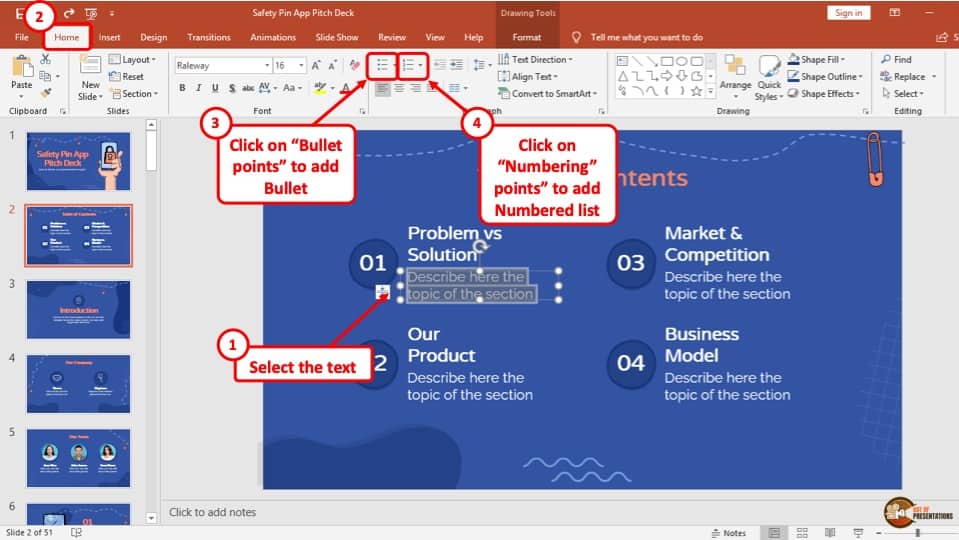
Next, click on the “ Home ” tab. From the “ Paragraph ” section on the home tab, you can choose to add either bullets or numbering in PowerPoint.
You can choose to customize the bullet points if you don’t like the default design. Alternatively, you can also change the bullet style in PowerPoint to create your own design style.
16. How to Add Indent to Text in PowerPoint?
You can also indent text in PowerPoint – meaning you can add some space before the text starts in a new paragraph or a new line. (And no, you don’t need to keep pressing the space bar for that!)
Add or Increase Indent in PowerPoint
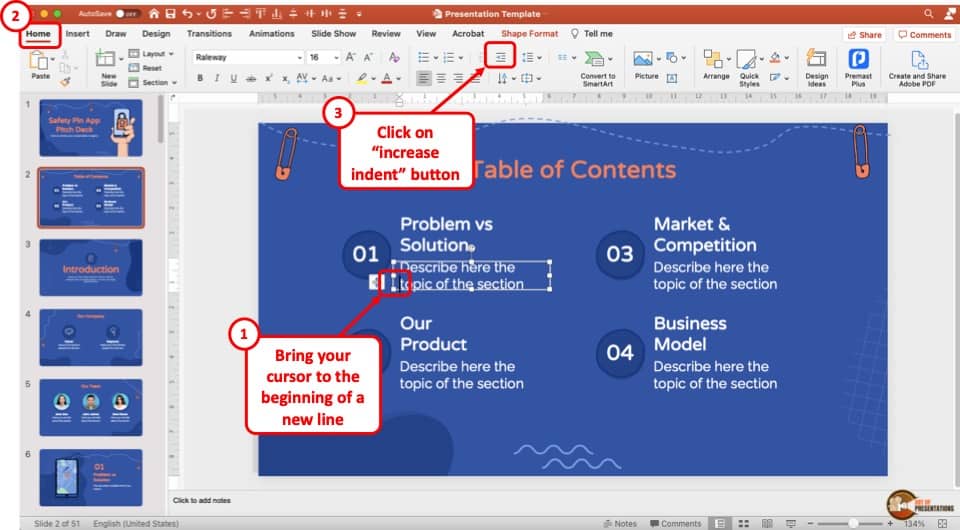
The first step is to move your cursor to the beginning of the paragraph you want to add indent to. It is important to note that the sentence that you want to indent should not be in the middle of the paragraph. Alternatively, you can bring the cursor to the start of a sentence and press “Enter” .
Now, click the icon with lines and an arrow pointing towards the right. This is called the “Increase Indent” button and is used to add or increase an indent level. You can find it in the “Paragraph” section of the “Home” tab. (check the image above for reference)
How to Decrease Indent in PowerPoint?
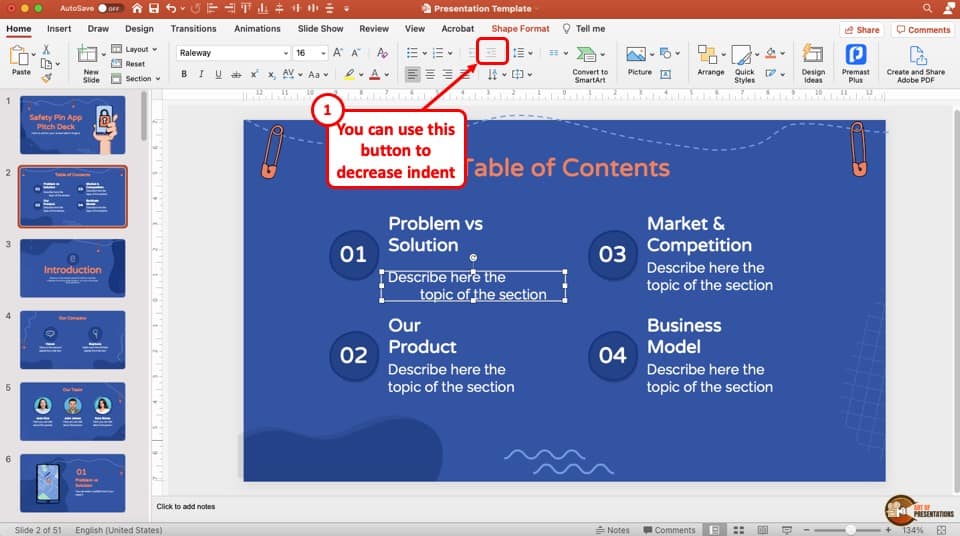
To decrease indent in a paragraph text, click on the button called “Decrease List Level.” The icon will have lines and a left-pointing arrow. It is to the left of the “Increase List Level” icon. Clicking it once will decrease one indent level.
17. Choosing Line Spacing of Text in PowerPoint
Line spacing can help increase or decrease the space between the line of text. You can add a line spacing between lines or between paragraphs. This explanation perhaps requires a detailed article.
[Edit – I’ve written a detailed article on Line Spacing in PowerPoint that highlights the nuances and explains everything in a beginner-friendly manner. Make sure you check it out by click on the hyperlink]
Nevertheless, the basic steps to choosing the line spacing in PowerPoint is described below:
If you want to modify the line space in a single paragraph, at first you have to select the paragraph you want to change the line spacing of using your cursor.
Step 2: Click on the “Line Spacing” button.
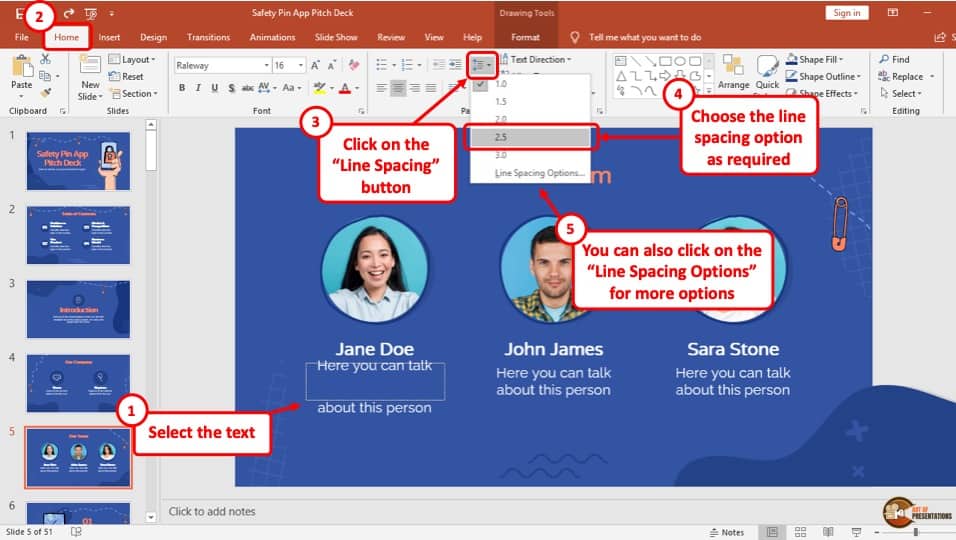
You can find the “ Line Spacing ” button in the “Paragraph” section of the “Home” tab (as showcased in the image above).
After selecting the text, click on the “Line spacing” button to display a drop-down menu. Choose your preferred line spacing and the paragraph will change accordingly.
Step 3: Click on the “Line Spacing Options” button for Advanced Options
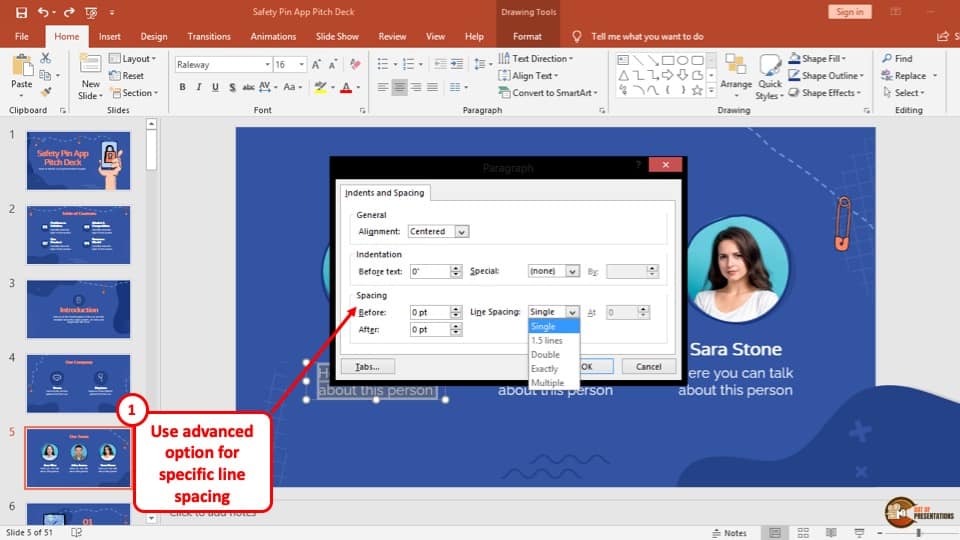
If you want more options to choose from, click on the “Line Spacing Options” button from the drop-down menu. It will open a dialogue box in the middle of the slide. Here, if you want to increase the space above your paragraph, you have to increase the “Before” option.
Or, if you want space after a paragraph, increase the “After” option. These work vice-versa. To change the space between lines, click on the dropdown menu button next to the “Line Spacing” option.
18. How to Add Text in Columns in PowerPoint?
The process of adding text in columns in your PowerPoint presentation is described in 2 easy steps below:
Step 1: Select the text or the text box
At first, select the text where you want to add the columns.
Step 2: Click on the “Add Column” button
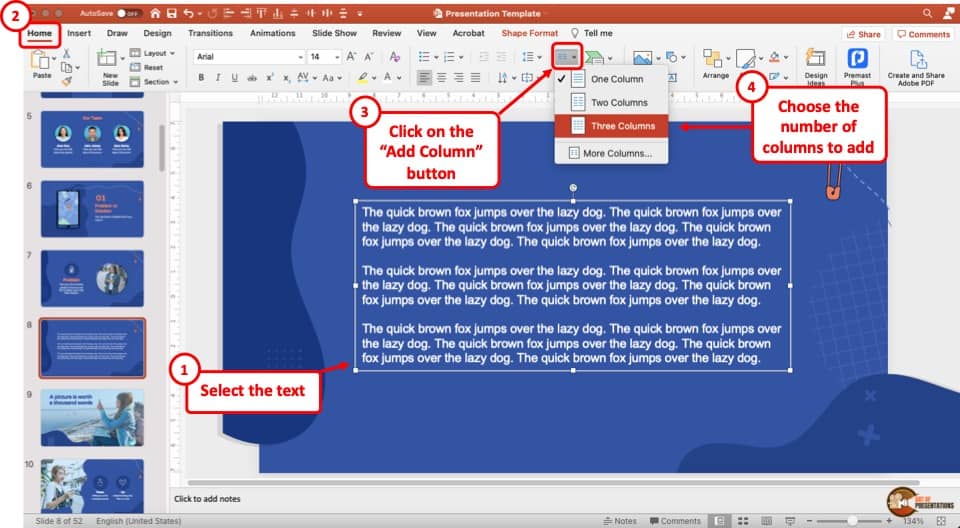
Click on the “ Home Tab “. Then, under the “ Paragraph ” section, click on the “ Add or Remove Column ” button (check out the image above for references). You can usually locate it next to the indent or line spacing buttons. You can also hover over the button and wait for the name of the function to pop-up if you are unsure.
Once the button is clicked, a dropdown menu will appear. From the dropdown, choose the number of columns you would like to add.
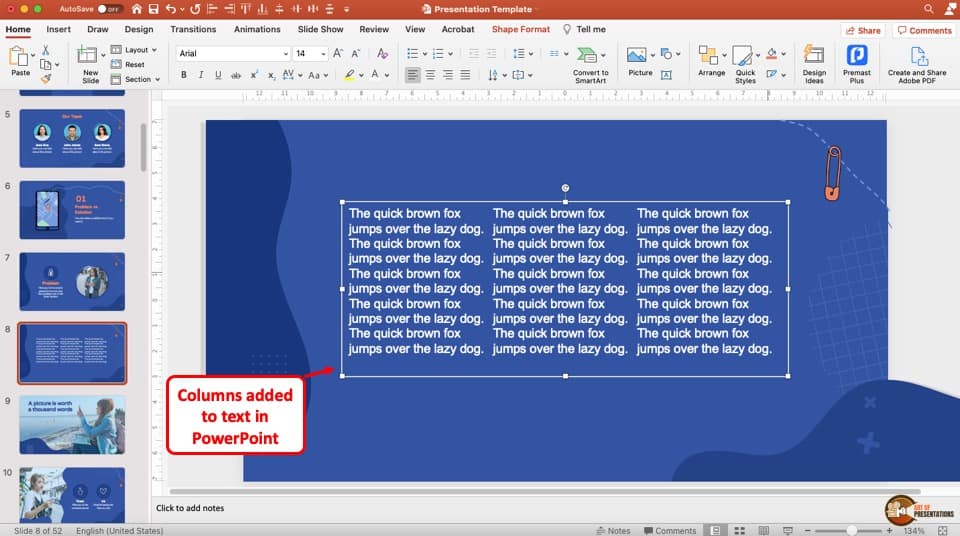
You will notice that the columns have been added to the text immediately!
More PowerPoint Related Topics
- How to Use a Presentation Clicker to Deliver Presentations Effectively!
- How to Crop a Picture in PowerPoint? [Complete Step-by-Step Tutorial!]
- How to Give a Presentation on Zoom? A Helpful Resource!
- How to Convert a PowerPoint to PDF? [A Simple Guide!]
- PowerPoint vs Google Slides: Which is Better? [ULTIMATE Test!]
- How to Change Bullet Style in PowerPoint? A Complete Guide
Credit to Nakaridore (on Freepik) for the Featured Image (further edited) of this Article
Home » Microsoft Powerpoint » How to create a text box with rounded corners in Powerpoint
How to create a text box with rounded corners in Powerpoint
A text box with rounded corners is more attractive than one with regular sharp corners. So, if you want to create a text box with rounded corners in your PowerPoint presentation, you can easily do so. You may be creating a new presentation, where you can add text boxes with rounded corners. You may already have a presentation where the text boxes are with regular sharp corners.
2 ways to create text box with rounded corners in Powerpoint
- Change existing text boxes to rounded corners
- Create new text boxes with rounded corners
Let us start.
Method #1: Change existing text boxes to rounded corners
Step #1: open a powerpoint presentation.
Open your presentation that has at least one text box with regular sharp corners.

Step #2: Edit the shape
Click on the text box boundary to select it.
In the top menu bar, under Drawing Tools, click on the Format tab to change the ribbon.

In the section Insert Shapes, click on Edit Shape.

This will open another menu.
Click on Change Shape

In the new menu, under Rectangles, click on the second rectangle with rounded corners.

PowerPoint will change the text box to one with rounded corners.

Method #2: Create new text box with rounded corners
Step #1: open a powerpoint presentation..
Open a presentation where you want to add text box with rounded corners.
Step #2: Insert a text box
In the top menu bar, click on the Insert tab to change the ribbon.

In the section Text, click on the Text Box icon.

The cursor will change to a cross.
Click the left mouse button, and while keeping it pressed, drag the mouse to create the text box.
PowerPoint will create a regular text box.
Fill in the text box.

In the section Shape Styles, select any one of the preset text boxes with rounded corners.

PowerPoint will change the style of the text box.

You can use the menu entries in Shape Styles to change the text box:
- Shape Fill — change the fill color
- Shape Outline — change the boundary color and style
- Shape Effects — add extra effects to the text box

Follow our step-by-step instructions to change the way your text box will look. We have shown you how to change your existing text box. You can also create new text boxes to have rounded corners.
1 thought on “How to create a text box with rounded corners in Powerpoint”
Note that there is a bug in some versions of PowerPoint that Microsoft still has not addressed. If you are using a version with this bug (which by now it is clear we can expect Microsoft will never fix it) Method 2 will not work — it creates a square box instead of a rounded one. So you then have to go back and update the shape to rounded.
Leave a Comment Cancel reply
Save my name, email, and website in this browser for the next time I comment.

Add text to a slide
You can add text to a PowerPoint slide or a slide master by inserting a text box and typing inside that box. You can then format that text by selecting the text or the entire box. You can also add text to placeholders and shapes.
Select a heading below to open it and see the detailed instructions.
Insert a text box
Open the slide you want to add the box to.

On the slide, click and drag to draw the text box in the position and size you want.
Add text to a placeholder
To add text to a text placeholder on a slide, do the following:
Click inside the placeholder, and then type or paste the text.
Note: If your text exceeds the size of the placeholder, PowerPoint reduces the font size and line spacing incrementally as you type to make the text fit.
Below, the dotted border represents the placeholder that contains the title text for the slide.
Add text to a text box
To add text to a text box that anyone can edit, in Normal view, click inside the text box, and then type or paste the text.
To add text to a text box that is permanent and un-editable, in Slide Master view, click inside the text box, and then type or paste the text.
Use text boxes to place text anywhere on a slide, such as outside a text placeholder. For example, to add a caption to a picture, create a text box and position it near the picture.
Note: When you add a text box in Normal view, the text is editable by anyone. When you add a text box in Slide Master view, the text you add to it will become permanent and un-editable outside the Slide Master.
Add text that is part of a shape
Shapes such as squares, circles, callout balloons, and block arrows can contain text. When you type text into a shape, the text attaches to the shape and moves and rotates with it.
To add text that becomes part of a shape, select the shape, and then type or paste the text.
Add text that is independent of a shape
A text box is handy if you want to add text to a shape, but you don't want the text to attach to the shape. You can add a border, fill, shadow, or three-dimensional (3-D) effect to text in a text box.
To add text that moves independently of a shape, add a text box, and then type or paste the text.
Add a text box
On the Insert tab, in the Text group, click Text Box .
Note: If you are using an East Asian language, from the Text Box drop-down menu, click either Horizontal or Vertical alignment.
Click the slide, and then drag the pointer to draw the text box.
Notes: In Slide Master view, there's a difference in how you use a text placeholder versus a text box :
Add a text placeholder from within Slide Master view when you want to prompt users of your template to replace the prompt text with text that is pertinent to their own project. (Normal behavior of custom prompt text in a text placeholder is that it disappears when you begin typing.)
Add a text box from within Slide Master view when you want it to contain permanent, uneditable text.
When you add a text box in Normal view, the text is editable by anyone.
Add, rearrange, and delete slides
Create and print notes pages
Add one or more content placeholders to a layout
Click inside the border and type or paste your text.
You can add text boxes and put them anywhere on a slide. When you add a text box in normal view, the text can be edited directly in the slide. If the text box is added in slide master view, you can edit the text only in the slide master.
On the Home tab, in the Insert group, click Text Box .
On the slide, click the location where you want to add the text box.
Type or paste your text in the text box.
Add text to a shape
On the Home tab, in the Insert group, click Shapes .
In the list, click the shape that you want to add.
On the slide, click the location where you want to add the shape, and then drag the sizing handle until the shape is the size that you want.
To add text that becomes part of a shape, select the shape, and then type or paste your text.

Need more help?
Want more options.
Explore subscription benefits, browse training courses, learn how to secure your device, and more.

Microsoft 365 subscription benefits

Microsoft 365 training

Microsoft security

Accessibility center
Communities help you ask and answer questions, give feedback, and hear from experts with rich knowledge.

Ask the Microsoft Community

Microsoft Tech Community

Windows Insiders
Microsoft 365 Insiders
Was this information helpful?
Thank you for your feedback.
Text Box Process for PowerPoint

3 options , Arrows , Chronologic , Comparison , Connection , Conversion , Evolution , Horizontal , Linear , List , Price , Pricing , Table , Timeline
Free text box process for PowerPoint. Illustration of three (3) text shapes with a horizontal arrow on top (with folded effect) and shadow. Editable graphics with text placeholders.
Text Box Process
This template is adapted for large amounts of text.
Use this versatile text box process template for various purposes:
- (as a better alternative) to replace the classic bulleted list of information
- to illustrate up to 3 ideas, concepts
- to show 3 groups of information
- to compare ideas or concepts
- to show a progression or 3 steps in a task, process, or workflow
You can also use these text boxes as pricing tables , or even as a timeline .
Shapes are 100% editable : colors and sizes can be easily changed.
Includes 2 slide option designs: Standard (4:3) and Widescreen (16:9).
Widescreen (16:9) size preview:

This ‘Text Box Process for PowerPoint’ document features:
- 2 unique slides
- Light and Dark layout
- Ready to use template with text placeholders
- Completely editable shapes
- Standard (4:3) and Widescreen (16:9) aspect ratios
- PPTX file (PowerPoint)
Free fonts used:
- Helvetica (System Font)
- Calibri (System Font)
Terms of use:
Requires attribution, personal and educational use, commercial use, (re)sell, (re)distribute, read the full terms of use.
Comments are closed.
You may also like these presentation templates
Search Templates by categories
Search templates by colors.
Love our templates? Show your support with a coffee!
Thank you for fueling our creativity.
Charts & Diagrams
Text & Tables
Graphics & Metaphors
Timelines & Planning
Best-Ofs & Tips
Terms and Conditions
Privacy Statement
Cookie Policy
Digital Millennium Copyright Act (DMCA) Policy
© Copyright 2024 Ofeex | PRESENTATIONGO® is a registered trademark | All rights reserved.

To provide the best experiences, we and our partners use technologies like cookies to store and/or access device information. Consenting to these technologies will allow us and our partners to process personal data such as browsing behavior or unique IDs on this site and show (non-) personalized ads. Not consenting or withdrawing consent, may adversely affect certain features and functions.
Click below to consent to the above or make granular choices. Your choices will be applied to this site only. You can change your settings at any time, including withdrawing your consent, by using the toggles on the Cookie Policy, or by clicking on the manage consent button at the bottom of the screen.
Thank you for downloading this template!
Remember, you can use it for free but you have to attribute PresentationGO . For example, you can use the following text:
If you really like our free templates and want to thank/help us, you can:
Thank you for your support
Donald Trump found guilty on all counts in N.Y. hush money trial
Donald Trump has been convicted on all 34 felony counts of falsifying business records. Trump, who was indicted in connection with a hush money payment made to an adult-film actress ahead of the 2016 presidential election, is the first former president convicted of a crime.
- Trump was convicted in his hush money trial. Here’s what he could face next
- Donald Trump addressed reporters as he left the courtroom, calling the trial a “disgrace.”
- The jury found Donald Trump guilty on all 34 counts of falsifying business records, a felony....
Here's what to know:
Here's what to know, live coverage contributors 32.

10:38 p.m. EDT 10:38 p.m. EDT
9:54 p.m. EDT 9:54 p.m. EDT
9:42 p.m. EDT 9:42 p.m. EDT
9:38 p.m. EDT 9:38 p.m. EDT
9:28 p.m. EDT 9:28 p.m. EDT

8:52 p.m. EDT 8:52 p.m. EDT
8:50 p.m. EDT 8:50 p.m. EDT
8:39 p.m. EDT 8:39 p.m. EDT
8:32 p.m. EDT 8:32 p.m. EDT
8:19 p.m. EDT 8:19 p.m. EDT
7:45 p.m. EDT 7:45 p.m. EDT
7:41 p.m. EDT 7:41 p.m. EDT
7:36 p.m. EDT 7:36 p.m. EDT
7:32 p.m. EDT 7:32 p.m. EDT
7:30 p.m. EDT 7:30 p.m. EDT
7:26 p.m. EDT 7:26 p.m. EDT
7:25 p.m. EDT 7:25 p.m. EDT
7:07 p.m. EDT 7:07 p.m. EDT
7:01 p.m. EDT 7:01 p.m. EDT
7:00 p.m. EDT 7:00 p.m. EDT
6:45 p.m. EDT 6:45 p.m. EDT
6:42 p.m. EDT 6:42 p.m. EDT
6:22 p.m. EDT 6:22 p.m. EDT
6:13 p.m. EDT 6:13 p.m. EDT
6:10 p.m. EDT 6:10 p.m. EDT
6:09 p.m. EDT 6:09 p.m. EDT
6:04 p.m. EDT 6:04 p.m. EDT
6:00 p.m. EDT Reporting from outside New York courthouse 6:00 p.m. EDT
5:57 p.m. EDT 5:57 p.m. EDT
5:54 p.m. EDT 5:54 p.m. EDT
5:51 p.m. EDT 5:51 p.m. EDT
5:48 p.m. EDT REPORTING FROM CALIFORNIA 5:48 p.m. EDT
5:46 p.m. EDT REPORTING FROM THE NEW YORK COURTHOUSE 5:46 p.m. EDT
5:44 p.m. EDT 5:44 p.m. EDT
5:41 p.m. EDT 5:41 p.m. EDT
5:36 p.m. EDT REPORTING FROM THE NEW YORK COURTHOUSE 5:36 p.m. EDT
5:36 p.m. EDT Key update 5:36 p.m. EDT
5:33 p.m. EDT 5:33 p.m. EDT
5:32 p.m. EDT REPORTING FROM THE NEW YORK COURTHOUSE 5:32 p.m. EDT
5:28 p.m. EDT 5:28 p.m. EDT
5:23 p.m. EDT Key update 5:23 p.m. EDT
5:23 p.m. EDT REPORTING FROM THE NEW YORK COURTHOUSE 5:23 p.m. EDT
5:19 p.m. EDT REPORTING FROM THE NEW YORK COURTHOUSE 5:19 p.m. EDT
5:18 p.m. EDT REPORTING FROM THE NEW YORK COURTHOUSE 5:18 p.m. EDT
5:17 p.m. EDT REPORTING FROM THE NEW YORK COURTHOUSE 5:17 p.m. EDT
5:15 p.m. EDT REPORTING FROM THE NEW YORK COURTHOUSE 5:15 p.m. EDT
5:14 p.m. EDT REPORTING FROM THE NEW YORK COURTHOUSE 5:14 p.m. EDT
5:13 p.m. EDT REPORTING FROM THE NEW YORK COURTHOUSE 5:13 p.m. EDT
5:12 p.m. EDT REPORTING FROM THE NEW YORK COURTHOUSE 5:12 p.m. EDT
5:11 p.m. EDT REPORTING FROM THE NEW YORK COURTHOUSE 5:11 p.m. EDT
5:10 p.m. EDT REPORTING FROM THE NEW YORK COURTHOUSE 5:10 p.m. EDT
5:08 p.m. EDT Key update 5:08 p.m. EDT
5:08 p.m. EDT REPORTING FROM THE NEW YORK COURTHOUSE 5:08 p.m. EDT
5:07 p.m. EDT REPORTING FROM THE NEW YORK COURTHOUSE 5:07 p.m. EDT
5:01 p.m. EDT 5:01 p.m. EDT
4:56 p.m. EDT 4:56 p.m. EDT
4:54 p.m. EDT 4:54 p.m. EDT
4:53 p.m. EDT 4:53 p.m. EDT
4:51 p.m. EDT 4:51 p.m. EDT
4:50 p.m. EDT 4:50 p.m. EDT
4:46 p.m. EDT 4:46 p.m. EDT
4:44 p.m. EDT 4:44 p.m. EDT
4:42 p.m. EDT 4:42 p.m. EDT
4:41 p.m. EDT 4:41 p.m. EDT
4:39 p.m. EDT 4:39 p.m. EDT
4:23 p.m. EDT 4:23 p.m. EDT
4:16 p.m. EDT 4:16 p.m. EDT
4:14 p.m. EDT 4:14 p.m. EDT
4:01 p.m. EDT 4:01 p.m. EDT
3:49 p.m. EDT 3:49 p.m. EDT
3:21 p.m. EDT 3:21 p.m. EDT
2:57 p.m. EDT 2:57 p.m. EDT
2:34 p.m. EDT 2:34 p.m. EDT
2:12 p.m. EDT Key update 2:12 p.m. EDT
1:41 p.m. EDT 1:41 p.m. EDT
1:19 p.m. EDT 1:19 p.m. EDT
12:57 p.m. EDT 12:57 p.m. EDT
12:24 p.m. EDT 12:24 p.m. EDT
11:55 a.m. EDT 11:55 a.m. EDT
11:34 a.m. EDT 11:34 a.m. EDT
11:20 a.m. EDT REPORTING FROM THE NEW YORK COURTHOUSE 11:20 a.m. EDT
11:17 a.m. EDT REPORTING FROM THE NEW YORK COURTHOUSE 11:17 a.m. EDT
11:15 a.m. EDT 11:15 a.m. EDT
10:58 a.m. EDT REPORTING FROM THE NEW YORK COURTHOUSE 10:58 a.m. EDT
10:53 a.m. EDT 10:53 a.m. EDT
10:39 a.m. EDT REPORTING FROM THE NEW YORK COURTHOUSE 10:39 a.m. EDT
10:32 a.m. EDT REPORTING FROM THE NEW YORK COURTHOUSE 10:32 a.m. EDT
10:31 a.m. EDT REPORTING FROM THE NEW YORK COURTHOUSE 10:31 a.m. EDT
10:23 a.m. EDT REPORTING FROM THE NEW YORK COURTHOUSE 10:23 a.m. EDT
10:14 a.m. EDT Key update 10:14 a.m. EDT
10:06 a.m. EDT REPORTING FROM THE NEW YORK COURTHOUSE 10:06 a.m. EDT
9:58 a.m. EDT REPORTING FROM THE NEW YORK COURTHOUSE 9:58 a.m. EDT
9:55 a.m. EDT REPORTING FROM THE NEW YORK COURTHOUSE 9:55 a.m. EDT
9:43 a.m. EDT REPORTING FROM THE NEW YORK COURTHOUSE 9:43 a.m. EDT
9:40 a.m. EDT REPORTING FROM THE NEW YORK COURTHOUSE 9:40 a.m. EDT
9:32 a.m. EDT REPORTING FROM THE NEW YORK COURTHOUSE 9:32 a.m. EDT
9:13 a.m. EDT 9:13 a.m. EDT
9:06 a.m. EDT 9:06 a.m. EDT
9:00 a.m. EDT 9:00 a.m. EDT
8:58 a.m. EDT 8:58 a.m. EDT
8:57 a.m. EDT Key update 8:57 a.m. EDT

IMAGES
VIDEO
COMMENTS
2. Door Hangers. Don't leave your audience hanging! Show them your ideas thanks to the 3 door hangers of this original template for PowerPoint and Google Slides. It consists of a gray horizontal banner, over which you can find colorful door hang tags. Inside them, you can include your titles, numbers, text and icons.
Step-1: Click on the "Copy" option. In the open slide where you want to create multiple text boxes, "Right Click" on the text box. Then click on the "Copy" option from the right-click menu. You can alternatively press the "Ctrl+C" keys on your keyboard to copy the text box. Step-2: Click on "Paste".
On the Home tab, in the Insert group, click Text Box. On the slide, click the location where you want to add the text box. Type or paste your text in the text box. Add text to a shape. Shapes such as squares, circles, callout balloons, and block arrows can contain text. When you type text into a shape, the text attaches to the shape and moves ...
Bold - make your text stand out by making it bold (keyboard shortcut: CTRL+B). Italic - italicize your text (keyboard shortcut: CTRL+I). Underline - underline the text you want to emphasize (keyboard shortcut: CTRL+U). Shadow - click the S button if you want to add a slight shadow behind your selected text.
Explore our wide range of 102 Text Boxes templates for PowerPoint and Google Slides, specifically designed to help you present your content in a visually appealing and effective manner. These unique and customizable templates are perfect for highlighting key information, quotes, or facts in your presentations. Text Boxes templates offer various ...
Step-1: Click on the "Insert" menu. The first step is to open the slide where you want to insert the text box. Then click on the "Insert" button from the menu bar located at the top of the screen. It will open a dropdown menu. Step-2: Select the "Text box" option. In the dropdown menu, click on the "Text box" option.
In a PowerPoint slide, click inside the text box where you want to place the WordArt. Click the Shape Format tab that appears in the PowerPoint Ribbon. In the WordArt Styles group, click the desired type of WordArt and add WordArt text to the slide. After adding WordArt, highlight the text and select a formatting option in the WordArt Styles ...
Copying and Pasting a Text Box. Deleting a Text Box. Adding a Text Box. Open your presentation in PowerPoint. Select the slide where you want to add a text. Go to the Insert tab and, in the Text group, click Text Box. As an alternative, you can press Alt + N to go to the Insert tab and then Alt + X to create a text box. Text Box button.
Insert a text box or object. On your computer, open a presentation in Google Slides. Go to the slide where you want to add a text box or object. At the top, click Insert. Choose what you want to add, then click Text box, Image, Shape, or Line. The object will get added to the slide and you can arrange or format it however you want.
To add a new text box to PowerPoint on your slide, choose the Insert > Text Box option. This is how to add a text box in PPT from scratch. To add a new section of text to a slide, go to Insert > Text Box on PowerPoint's ribbon. Now, click and drag on the slide to draw in your text box. I like to make my text box slightly larger than the text ...
Step-1: Go to the "Insert" tab. The first step of adding a " Text box " in your PowerPoint presentation is to go to the " Insert " tab. It is usually the 3 rd tab in the ribbon of your PowerPoint software, directly to the right of the "Home" tab. Step-2: Click on the "Text Box" button. In this next step, simply click on the ...
Learn how to add text boxes to your PowerPoint slides during your presentation without macros or coding. With a few simple steps, you can add text boxes, and...
Insert a Text Box. Even though most slides have one or two placeholders for you to insert text, it's a good idea to learn how to insert your own so you can add more as needed. Click the Insert tab on the ribbon. Expand the Text group if necessary. Click the Text Box button. Click and drag to create the text box. Type the text you wish to add.
To do this, use the full range of presentation design tools available to you. Images, backgrounds, and text boxes themselves can be used in a variety of ways to create slides that catch and hold your audience's interest. Mix up your layouts and your presentation will feel both dynamic and informative. 6. Let your audience take a breath
To Insert multiple text boxes in your PowerPoint slide, all you need to follow is: Go to the "Insert" tab and select the "Text box" button from the text group. Click and drag the text box to the desired place to insert it, then type the words you want to appear on your text box. Right-click the text box and select "Copy" from the context menu.
Select the field that you want to link dynamically to the text box. For the last step, set the row number. If you want to show the value of the first data row (first beer in this example), then, select 1 as row number here. Click OK to save the selections. As you can see, the value 4.2 is copied into the text box.
Step 5: Add a Scroll Bar. Increase the size of the text box until a scroll bar appears. By using a scrollable text box, you ensure that your slide remains uncluttered and easy to read. This feature prevents your audience from feeling overwhelmed by too much text on the screen at once.
Download Text Boxes for PowerPoint. These presentation templates provide elegant text boxes for presenting presentation text in a visually appealing manner. The below templates offer text box slide designs ranging from 3D text boxes to minimalist, yet attractive text box slides, which are highly customizable to match any presentation topic.
To wrap text in a text box in PowerPoint, I can follow a few simple steps. First, I need to create a text box by going to the Insert tab and clicking on Text Box. Then, I can click and drag on the slide to create a text box of the desired size. Once I have created the text box, I can start typing my text, and it will automatically wrap within ...
Click on the "Text Box" option which in on the right side of the "Insert" tab in the "Text" section. After clicking on the "Text Box" option, your cursor will change on the slide. Now to add the text box to the slide, simply click and drag your cursor to draw the text box with your preferred size. Step 3: Add text to your ...
Open your presentation that has at least one text box with regular sharp corners. Step #2: Edit the shape. Click on the text box boundary to select it. In the top menu bar, under Drawing Tools, click on the Format tab to change the ribbon. In the section Insert Shapes, click on Edit Shape.
On the Home tab, in the Insert group, click Text Box. On the slide, click the location where you want to add the text box. Type or paste your text in the text box. Add text to a shape. Shapes such as squares, circles, callout balloons, and block arrows can contain text. When you type text into a shape, the text attaches to the shape and moves ...
This template is adapted for large amounts of text. Use this versatile text box process template for various purposes: You can also use these text boxes as pricing tables, or even as a timeline. Shapes are 100% editable: colors and sizes can be easily changed. The "Lorem Ipsum" text is for illustrative purposes only.
46. Creative Brief Presentation. This creative brief presentation template can help you communicate your brand style and design requirements to video editors, graphic designers, creative agencies and freelancers. Swap the existing images, icons, text and colors for your own content and create a branded creative brief.
Former president Donald Trump prepares to make comments to the media Thursday after being found guilty on all 34 felony counts in his hush money trial in New York.