- - Google Chrome
Intended for healthcare professionals
- My email alerts
- BMA member login
- Username * Password * Forgot your log in details? Need to activate BMA Member Log In Log in via OpenAthens Log in via your institution

Search form
- Advanced search
- Search responses
- Search blogs
- How to prepare and...
How to prepare and deliver an effective oral presentation
- Related content
- Peer review
- Lucia Hartigan , registrar 1 ,
- Fionnuala Mone , fellow in maternal fetal medicine 1 ,
- Mary Higgins , consultant obstetrician 2
- 1 National Maternity Hospital, Dublin, Ireland
- 2 National Maternity Hospital, Dublin; Obstetrics and Gynaecology, Medicine and Medical Sciences, University College Dublin
- luciahartigan{at}hotmail.com
The success of an oral presentation lies in the speaker’s ability to transmit information to the audience. Lucia Hartigan and colleagues describe what they have learnt about delivering an effective scientific oral presentation from their own experiences, and their mistakes
The objective of an oral presentation is to portray large amounts of often complex information in a clear, bite sized fashion. Although some of the success lies in the content, the rest lies in the speaker’s skills in transmitting the information to the audience. 1
Preparation
It is important to be as well prepared as possible. Look at the venue in person, and find out the time allowed for your presentation and for questions, and the size of the audience and their backgrounds, which will allow the presentation to be pitched at the appropriate level.
See what the ambience and temperature are like and check that the format of your presentation is compatible with the available computer. This is particularly important when embedding videos. Before you begin, look at the video on stand-by and make sure the lights are dimmed and the speakers are functioning.
For visual aids, Microsoft PowerPoint or Apple Mac Keynote programmes are usual, although Prezi is increasing in popularity. Save the presentation on a USB stick, with email or cloud storage backup to avoid last minute disasters.
When preparing the presentation, start with an opening slide containing the title of the study, your name, and the date. Begin by addressing and thanking the audience and the organisation that has invited you to speak. Typically, the format includes background, study aims, methodology, results, strengths and weaknesses of the study, and conclusions.
If the study takes a lecturing format, consider including “any questions?” on a slide before you conclude, which will allow the audience to remember the take home messages. Ideally, the audience should remember three of the main points from the presentation. 2
Have a maximum of four short points per slide. If you can display something as a diagram, video, or a graph, use this instead of text and talk around it.
Animation is available in both Microsoft PowerPoint and the Apple Mac Keynote programme, and its use in presentations has been demonstrated to assist in the retention and recall of facts. 3 Do not overuse it, though, as it could make you appear unprofessional. If you show a video or diagram don’t just sit back—use a laser pointer to explain what is happening.
Rehearse your presentation in front of at least one person. Request feedback and amend accordingly. If possible, practise in the venue itself so things will not be unfamiliar on the day. If you appear comfortable, the audience will feel comfortable. Ask colleagues and seniors what questions they would ask and prepare responses to these questions.
It is important to dress appropriately, stand up straight, and project your voice towards the back of the room. Practise using a microphone, or any other presentation aids, in advance. If you don’t have your own presenting style, think of the style of inspirational scientific speakers you have seen and imitate it.
Try to present slides at the rate of around one slide a minute. If you talk too much, you will lose your audience’s attention. The slides or videos should be an adjunct to your presentation, so do not hide behind them, and be proud of the work you are presenting. You should avoid reading the wording on the slides, but instead talk around the content on them.
Maintain eye contact with the audience and remember to smile and pause after each comment, giving your nerves time to settle. Speak slowly and concisely, highlighting key points.
Do not assume that the audience is completely familiar with the topic you are passionate about, but don’t patronise them either. Use every presentation as an opportunity to teach, even your seniors. The information you are presenting may be new to them, but it is always important to know your audience’s background. You can then ensure you do not patronise world experts.
To maintain the audience’s attention, vary the tone and inflection of your voice. If appropriate, use humour, though you should run any comments or jokes past others beforehand and make sure they are culturally appropriate. Check every now and again that the audience is following and offer them the opportunity to ask questions.
Finishing up is the most important part, as this is when you send your take home message with the audience. Slow down, even though time is important at this stage. Conclude with the three key points from the study and leave the slide up for a further few seconds. Do not ramble on. Give the audience a chance to digest the presentation. Conclude by acknowledging those who assisted you in the study, and thank the audience and organisation. If you are presenting in North America, it is usual practice to conclude with an image of the team. If you wish to show references, insert a text box on the appropriate slide with the primary author, year, and paper, although this is not always required.
Answering questions can often feel like the most daunting part, but don’t look upon this as negative. Assume that the audience has listened and is interested in your research. Listen carefully, and if you are unsure about what someone is saying, ask for the question to be rephrased. Thank the audience member for asking the question and keep responses brief and concise. If you are unsure of the answer you can say that the questioner has raised an interesting point that you will have to investigate further. Have someone in the audience who will write down the questions for you, and remember that this is effectively free peer review.
Be proud of your achievements and try to do justice to the work that you and the rest of your group have done. You deserve to be up on that stage, so show off what you have achieved.
Competing interests: We have read and understood the BMJ Group policy on declaration of interests and declare the following interests: None.
- ↵ Rovira A, Auger C, Naidich TP. How to prepare an oral presentation and a conference. Radiologica 2013 ; 55 (suppl 1): 2 -7S. OpenUrl
- ↵ Bourne PE. Ten simple rules for making good oral presentations. PLos Comput Biol 2007 ; 3 : e77 . OpenUrl PubMed
- ↵ Naqvi SH, Mobasher F, Afzal MA, Umair M, Kohli AN, Bukhari MH. Effectiveness of teaching methods in a medical institute: perceptions of medical students to teaching aids. J Pak Med Assoc 2013 ; 63 : 859 -64. OpenUrl
As you can see in the slide (giving presentations)
- Business Skills
- Presentation Skills
Vocabulary - presenting

LESSON OVERVIEW
The main objectives of this lesson are to:
- learn and practise vocabulary for presentations;
- watch a video on how to present your ideas effectively;
- develop skills in structuring a presentation.
In this lesson, students explore vocabulary for presentations (e.g. I’m going to tell you about…, As you can see…, I’d like to turn to… , etc.), practise using it and discuss their perspectives on presentations. They also read the text of a presentation and watch a video with tips on how to communicate their ideas with clarity.
WARM-UP AND VOCABULARY
Students start this lesson with a warm-up in which they identify presentations they have seen recently and list things they remember from them. Afterwards, students discuss questions about skills and their personal experiences related to presentations. Then, they read a short text of a presentation and point out who it is for. After that, students create phrases by completing gaps in the text with verbs. Next, students read the text again and identify the phrases to structure a presentation ( beginning of a presentation, explaining examples, moving to another topic and finishing a presentation ). Then, they order statements to make a presentation. They also rewrite the beginnings of the statements using five phrases from the previous task.
VIDEO AND DISCUSSION
In this part of the lesson, students watch a video about how to present their ideas clearly and complete statements from the video with one word. After that, they discuss questions about tips on how to deliver a good presentation and talk about the exercises they would do to improve their presentation skills. Next, students brainstorm scenarios related to work presentations, where they determine the most appropriate situation from a pair and justify their reasons (e.g. using coloured pictures OR using charts and graphs ). Finally, they think of a work-related task and present it using phrases from the lesson. Students also use the points listed in the activity to help them prepare what to say.
HOMEWORK/REVISION
This lesson also includes an additional task that you can use as homework or revision. In the task, students match halves to create sentences and add one more related sentence to each of them. The task is available in the teacher’s version of the worksheet. You can print it and hand it out to your students. It’s also included in the e-lesson plan.
Unlock the e-lesson plan with the Premium subscription
Leave a Reply Cancel reply
You must be logged in to post a comment.
Hi, I would say “on the slide” rather than “in the slide” (British English)
Hi! I think that both options are OK 🙂
Very nice lesson!
Browse other materials recommended for you

How about a little improvement?
With this lesson, students practise quantifiers in various contexts. They discuss work conditions and employee feedback and watch a video about employee satisfaction.

Workplace safety
Engage in talking about safety in the workplace with this lesson! Students explore vocabulary to talk about injuries, watch a video about safety at work and discuss workplace rules.

I was wondering if… (making requests)
With this lesson, students talk about ways to make requests. They watch a funny ad and discuss requests at work. Students also practise phrases to make requests and do a role play activity.

All for one and one for all
With this lesson, students engage in the exploration of teamwork. They discuss the importance of teamwork, explore vocabulary to talk about the topic, watch a video and discuss useful tips about how to create better teams.

Changing careers
With this speaking lesson, students navigate the territory of career changes. They discuss job market trends, as well as benefits and challenges of transitioning careers. They also talk about important skills and watch a video about a woman who changed careers.

Prioritizing and to-do lists
With this insightful lesson, students practise vocabulary to talk about priorities, watch an explainer video about the Eisenhower Matrix and discuss time management. They also give advice on how to organize tasks.

How to deal with misunderstandings
With this speaking lesson, students discuss situations that might cause misunderstandings, watch a short and funny ad and analyse tips on how to avoid miscommunication.

As per my last email…
Dive into the intriguing world of emailing and talk about what annoys people the most. With this lesson, students expand their vocabulary, express irritation, and analyze real-life situations.

Is a degree worth it?
Engage your students in a discussion on the ins and outs of higher education. Explore education and career-related vocabulary and work on comprehension skills by watching a news report on the job market.
Is there a minimum subscription period if I choose a monthly subscription?
What currencies can i pay in for my subscription, how can i edit an e-lesson plan.
Username or Email Address
Remember Me
- Submit Your Lesson Plans
- Testimonials
FREE Newsletter
Lesson plans.
- By Grade Level
Dog Gone “Paw”erful Writing
Students research a dog breed and create note cards to reflect a variety of research and information. Students then develop a five-page PowerPoint presentation that reflects the information.
- Advertise With Us
- Your Privacy
- Valentine's Day
- Black History Month
- Teacher Planet: themes, resources
- Grants: grant search for teachers
- Rubrics: complete teacher's guide
- Liberty Online
- Teacher Freebies
- Math Worksheets
- Certificates: printable certificates
- ESL for Teachers
- Websites for Teachers: directory
- Lesson Plan Templates
- Sunday School Lessons
- Articles / Oral Presentations
4 Fun Ways to Practice Short Oral Presentations
by MiddleWeb · Published 07/17/2018 · Updated 07/03/2022
When our book The ELL Teacher’s Toolbox was published this spring, the KQED MindShift blog published an excerpt titled “How to Use Oral Presentations to Help English Language Learners Succeed.” MiddleWeb asked to share our tips for short presentations that appear in the book right after this excerpt.
You might find it helpful to read both posts. We think our strategies for ELL students can be adapted for any group of students working to improve speaking and listening skills. ~ Larry & Katie
By Larry Ferlazzo and Katie Hull Sypnieski

Speed Dating
Speed dating is a quick way for students to present their work to classmates while gaining speaking and listening practice. The teacher divides students into two rows facing each other (students can be standing or seated in desks).
One row is assigned as the movers . The teacher tells students the amount of time each partner will have to speak (this depends on the length of what they are sharing). When time is up, the teacher says “switch” and the mover row stands and moves one person to the right. This can be done several times so that students can present to multiple partners. (When the movers shift, one person in the stationary row will be without a partner. Have that person move to the other end of their row.)
Students can share their work in different ways (e.g., by sharing specific parts of a mini-poster or explaining something they’ve written). To boost listening skills, we often require students to ask a question after their partner presents (sometimes providing question and answer frames).
The previous paragraphs describe individual presentations. An easy way to do speed dating after students have worked in groups to prepare joint presentations is to assign half the groups to different parts or corners of the room (they become the stationary groups). Each remaining group (who will be the movers) is assigned to start with a stationary group partner. After each of the paired groups makes its joint presentation to the other, the mover group rotates and the process repeats itself.
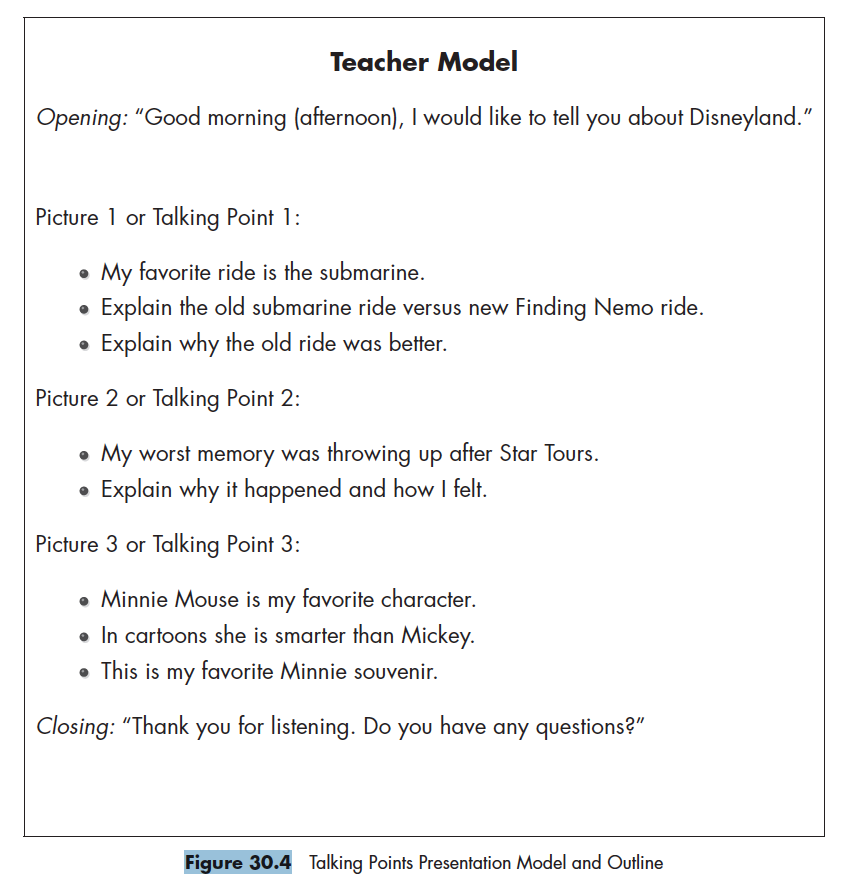
Talking Points Presentations
This activity is a fun way for students to practice the presentation skill of speaking from their notes, not reading from them.
In this activity, the teacher first asks students to generate a quick list of topics they know a lot about (we often have students consult their heart maps or writing territories, which are discussed in Strategy 18 of our book, “Writer’s Notebook”).
Students then choose one topic to write about for several minutes—writing anything they know or that comes to mind. The teacher can model the same process on the document camera with a topic of his or her choice.

Teacher model: “My worst Disneyland memory was throwing up after Star Tours.”
After writing, the teacher shows students how they can use this quickwrite to create several talking points or categories by looking for ideas that they can expand upon from their original writing. For example, if they wrote about Disneyland then the categories might include “my favorite rides,” “my best memory at Disneyland,” “my worst memory at Disneyland,” or “my favorite Disney character.”
Students then choose three of their categories and draw a quick picture representing each one. For the Disneyland example, Katie modeled drawing a picture of the submarine ride, a picture of her throwing up after going on Star Tours, and a sketch of Minnie Mouse!
The teacher then gives students a simple outline and models using it as an assist while speaking for a brief amount of time (no more than two minutes). See Figure 30.4: Talking Points Presentation Model and Outline for the teacher model and the outline we used for this activity.
Click to enlarge
The teacher reinforces the difference between reading the talking points (a don’t ) and speaking from the talking points (a do ). Students are then given time to practice presenting using the outline as a guide—an opening, talking about each picture (using the talking points as cues), and a closing.
Students can give their presentations in small groups or in pairs (preferably with different students than they practiced with). Depending on their English proficiency level and the amount of practice they’ve had, students may or may not need to look at their outline. Listeners can be tasked with thinking of a relevant question to ask the speaker at the end of their presentation.
Top Five Presentations
This activity involves students working in groups to develop a top five list based on their interests and then preparing a short presentation to share with the class. We were introduced to the idea by ELT specialist Clare Lavery in her British Council post “Short Projects to Get Them Talking.”
In our version of the activity, we put students in groups of three and give them a few minutes to come up with three to four topics they all find interesting. Sometimes students need a few ideas to get them started so we list some examples on the board (animals, sports, music, fashion, etc.).

Students use the outline to develop their presentation ideas – to list their choices for the top five in their topic and to explain why they believe each one belongs in the top five.
We’ve found it is also helpful and enjoyable for students to create a visual aid to further communicate their points. In the past, students have created top five posters and five to seven slide PowerPoints. Students have also incorporated songs and movie clips into their presentations. We usually give groups a speaking time limit of three minutes with the requirement that each person in the group must speak during the presentation.
Students are then given time to practice their presentations. It might be necessary for the class to review our dos and don’ts for speaking and listening . The presentations can be done in front of the whole class or small groups can be paired up and present to each other. Listeners can be asked to provide feedback on a sticky note (writing something they liked about the presentation or a question they had).
PechaKucha Book Talks
PechaKucha (“chit-chat” in Japanese) is a popular presentation format in which 20 slides are shown for 20 seconds each (20 × 20) – about six and a half minutes. The slides, which usually contain one to two images and minimal text, are programmed to advance automatically as the speaker talks along with them.
In other words, each slide is used as a background or visual cue as the speakers progress through their presentation. Many language teachers use the PechaKucha presentation format because it can be easily modified. PK presentations have several advantages for ELLs—they are short, structured, highly visual, and informal.
Students can use the PechaKucha format to develop presentations on basically any topic. Teachers can adjust the time format if they want to give students more time on each slide or have students present fewer slides (e.g., 10 slides × 30 seconds each).
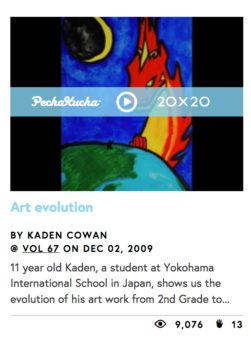
One variation of Pecha Kucha we’ve used in our classes was introduced to us by educator Anthony Schmidt in his helpful blog post “The Power of PechaKucha.” His modified version has students create a short PechaKucha presentation on a book they’ve read. We often have students do book talks with a partner and this is a great way to give those a different spin. Here is the outline Anthony used with his intermediate students:
Five Slide PechaKucha (2:40)
- Slide 1—10 seconds: Introduction, title of book
- Slide 2—60s: Plot, summary
- Slide 3—30s: Favorite scene, character, part
- Slide 4—60s: Evaluation and recommendation
- Slide 5—0 s: Thank you
We provided our students with this outline. Students then created their slide presentations about their books. They selected online images based on a key idea for each slide (e.g., one student chose an image of the cover of his book for Slide 1 and an image of a gold medal for Slide 4).
Because we had beginners and intermediates, we gave students the option of using sentence frames to write their notes for each slide and posted them on the front board (e.g., “The title of my book is.” “I recommend this book because.” ).
Students then printed out a copy of their PowerPoint to use for practice and sent them to us. We had one or two students present their PechaKucha book talks each day over the course of a few weeks.
Short presentations build confidence
Short presentations help us meet our goals of teaching students to develop and deliver effective oral presentations, providing them with lots of practice, and enabling them to feel empowered, not overwhelmed, by the experience.

NOW AVAILABLE: The ESL/ELL Teacher’s Survival Guide: Ready-to-Use Strategies, Tools, and Activities for Teaching English Language Learners of All Levels, 2nd Edition in April 2022.
Share this:
Tags: ELL English learners Katie Hull Sypnieski larry ferlazzo listening oral presentations speaking teaching ELLs

MiddleWeb is all about the middle grades, with great 4-8 resources, book reviews, and guest posts by educators who support the success of young adolescents. And be sure to subscribe to MiddleWeb SmartBrief for the latest middle grades news & commentary from around the USA.
2 Responses
- Pingbacks 0
Great resources to help teachers’ teaching.
Really great ideas, thank you for sharing.
Leave a Reply Cancel reply
Your email address will not be published. Required fields are marked *
Notify me of follow-up comments by email.
Notify me of new posts by email.
This site uses Akismet to reduce spam. Learn how your comment data is processed .
- Popular Posts
- Recent Posts
- Recent Comments

Book Reviews / Writing
Engaging All Students with Imaginative Writing

Articles / Literacy
2 Questions Help Move Kids Deeper into Texts

Articles / Mathematics
Do Less This Year to Let Kids Do More in Math

Book Reviews / Teaching Insights
Reflections on Teachers’ Life-Shaping Power

Articles / Coteaching
How to Create a Co-Teaching Power Zone

Artificial Intelligence / New Teacher Tips
What Will You Teach Your Students About AI?

Book Reviews / mathematics
Engage All Students with Offbeat Math Problems

First Days of Math Class / Meaningful Math
Low Prep Math Activities to Start the Year Right!

Articles / Group Work
4 Tips to Support Group Work in Middle School

Book Reviews / Leadership
Use Emotional IQ Skills to Navigate Turbulence

Articles / Back to School
3 Ways to Relieve Back to School ‘Overwhelm’

Articles / Reading
Welcome Students with New Fiction for Fall

Book Reviews / Reading
How Reader’s Theater Builds Reading Fluency

Start 24/25 with Super Ideas from MiddleWeb

Articles / New Teacher Advice
New to Teaching Grades 4-6? Try These Ideas
- Anne Jolly says: Thanks, Daniel, for your insight. I agree with you wholeheartedly. Business...
- Daniel Bassett says: Thanks for providing a wealth of knowledge for new STEM teachers.
- Matthew Kinney says: As a middle school reading intervention teacher, I find MiddleWeb’s resources...
- Tricia Buonacore says: Thanks for sharing this. As I prepare to head back to...
- Cynthia Delacruz says: Laurie and Patti, I just finished a course and your book,...
Sign Up & Receive the Latest News about Our Content…
Email address:
First Name:
Read our Privacy Policy
BOOK REVIEWS

Reach Past the Timeline with Thematic History

Literacy Instruction Can Promote Social Justice

Centering Love, Justice & Liberation in Schools

Routines for Creating Reading Communities
All the Tools You’ll Need for Differentiation
What MATH-ish Can Add to Your Math Classes
Coaching That Builds GT Teacher Capacity

Building Skills in the World Language Class
Mapping Out Diverse Gifted Programs
Using 100-Word Stories for Expansive Writing

What to Expect from AI in Class and Beyond
Strategies for Teaching Against Disinformation
The Democratic Roots Essential to Literacy
How to Reclaim Your Energy, Passion, & Time
A Leadership Blueprint for Growth and Success
- Elephango for Families
- Elephango for Schools
- Standards Search
- Family Sign-Up
Oral Presentation: Note Cards
Contributor: Delaine Thomas. Lesson ID: 12337
How would you describe a breathtaking nature scene to your audience? How would you describe the feeling of forgetting your speech? Avoid the misery of both -- learn to use note cards and visual aids!
Verbal Communication
Lesson plan - get it.
Do you plan to memorize your entire speech and present it flawlessly? No pressure! When you describe something like statistics or a building, are you going to wave your arms around like a windmill and expect your audience to picture what you are trying to illustrate? No way! Learn how to use note cards and visual aids to help you and your audience!
The adults pictured above are giving an oral presentation to an audience.
As you can see, some of the adults are using a visual aid to help their audience understand the topic and make the presentation more interesting. You will also notice that they are not reading their speech to the audience. In this lesson, you will create note cards that you will use when you give your presentation. You will also create a visual aid to liven up your presentation and help your audience better understand the topic.
You will need your rough draft that you completed in the previous lesson and your outline. You will also need some white 4x6 index cards and a pencil. If necessary, you can also refer back to the first Related Lessons in our Oral Presentation series, found in the right-hand sidebar.
- How do you write note cards?
Your note cards are your speaking notes. You will make them from your outline and rough draft. You want to only use key words and phrases on your note cards so you are not just reading your outline to your audience. You will only write complete sentences if you have a direct quote or fact that you copied word-for-word from a text.
- So, what do you write on your note cards?
You want to write key words and phrases that will trigger your memory for the entire sentence or paragraph you are speaking. You can use as few as one or two note cards or as many as five or six. Do not use more than six because you might get your cards out of order and mess up your speech!
You will also want to practice giving your speech several times with your note cards so you are prepared to give your speech in a way that will be approved by your teacher or parent and received well by your audience.
Remember, you should put your main points on your index cards in short phrases; you will only write complete sentences when you are giving a direct quote or fact from a book or other source. Don’t forget to cite your sources on your note cards so you have accurate information for your audience.
You may continue to the Got It ? section, where you will create your note cards.

Resources and Extras
- white 4x6 index cards
- outline and rough draft from previous lessons
- supplies for visual aid
Related Lessons
- Oral Presentation: Introduction
- Oral Presentation: Rough Draft
- Oral Presentation: Delivery
Related Badges
Esteemed Orator

Let Me Hear You

Stand and Deliver

Suggested Lessons

Creating an Outline

Illustrations and Text Working Together!

Mastering Homonyms

Teach Starter, part of Tes Teach Starter, part of Tes
Search everything in all resources
Oral Presentation – An Adult I Admire
- Zip File (zip) Sign up to Plus
A 60 minute lesson in which students will present a biography as an oral presentation.
Login to view the lesson plan.
Plan, create, rehearse and deliver spoken and multimodal presentations that include information, arguments and details that develop a theme or idea, organising ideas using precise topic-specific and technical vocabulary, pitch, tone, pace, volume, and visual and digital features
Use interaction skills, varying conventions of spoken interactions such as voice volume, tone, pitch and pace, according to group size, formality of interaction and needs and expertise of the audienceElaborationsparticipating in pair, group, class, s...
Plan, rehearse and deliver presentations, selecting and sequencing appropriate content and multimodal elements for defined audiences and purposes, making appropriate choices for modality and emphasisElaborationsusing technologies to collaboratively p...
Teach Starter Publishing
We create premium quality, downloadable teaching resources for primary/elementary school teachers that make classrooms buzz!
- Speaking and Listening →
- Text Types →
- Informative Writing →
- Biography Writing →
IMAGES
VIDEO
COMMENTS
Introducing Expectations for Oral Presentations: A 55-Minute Lesson Plan. 1. Do Exercise: Similarities and Differences Between Writing and Speaking. 1. 3-minute free write about similarities between writing and speaking, especially similarities between writing a paper and giving a presentation. 2. 3-minute free speak with peer partner about ...
Personal online tutoring. EnglishScore Tutors is the British Council's one-to-one tutoring platform for 13- to 17-year-olds. Giving an oral presentation as part of a speaking exam can be quite scary, but we're here to help you. Watch two students giving presentations and then read the tips carefully.
With this lesson plan, students practise giving a presentation in English by doing a lot of different speaking activities. The lesson is the third of the three-part series of lessons about delivering presentations. Unlimited Plan Show. B2 / Upper Intermediate. Standard Lesson 75 min.
Pecha Kucha Oral Presentations & Lesson Plan | Public Speaking | English & ESL. by . The Laughing Linguist. $2.00. Zip. OverviewPecha Kucha is a presentation style that comes from Japan. It is great for building confidence in public speaking and helps promote well-paced and engaging presentations. The original Pecha Kucha involved 20 slides ...
Normally a presentation lesson will have an outline like this: Revision of key language areas; Example presentation, which could be from a textbook or given by the teacher; Students are given a transcript or outline of the presentation; Students identify key stages of the example presentation - greeting, introduction, main points in order of ...
Oral Presentations. Or. l Presen. ations1. PlanningOral presentations are one of the most common assignments i. college courses. Scholars, professionals, and students in all fields desire to disseminate the new knowledge they produce, and this is often accomplished by delivering oral presentations in class, at conferences, in public lectures, or i.
This Preparing & Delivering Oral Presentations Lesson Plan is suitable for 9th - 12th Grade. Students consider the important characteristis of an effective oral presentation. Students participate in an activity to discover the essential elements of evaluation an audience, timeliness of the topic, and delivery of the speech.
Define your topic. Arrange your material in a way that makes sense for your objectives. Compose your presentation. Create visual aids. Practice your presentation (don't forget to time it!) Make necessary adjustments. Analyze the room where you'll be giving your presentation (set-up, sight lines, equipment, etc.). Practice again.
With this lesson plan, students practise giving a presentation in English by doing a lot of different speaking activities. The lesson is the third of the three-part series of lessons about delivering presentations. You will find the first part of the series here and the second part of the series here.
Oral Presentation. Practice public speaking in this oral presentation lesson plan. Middle schoolers list the characteristics of a powerful speaker. They watch a video of two speakers, compare them and discuss the qualities of a good speech. Afterwards, they prepare and present a 10 minute speech about volunteering for a philanthropic organization.
Classroom Considerations. This Oral Presentation Lesson Plan is suitable for 7th - 12th Grade. Practice your speaking skills! Using a chosen visual aid, pupils present a previously written essay to the class. During the oral presentation, the listeners identify and write down the author's purpose and a question for the author.
Delivery. It is important to dress appropriately, stand up straight, and project your voice towards the back of the room. Practise using a microphone, or any other presentation aids, in advance. If you don't have your own presenting style, think of the style of inspirational scientific speakers you have seen and imitate it.
The main objectives of this lesson are to: develop skills in structuring a presentation. In this lesson, students explore vocabulary for presentations (e.g. I'm going to tell you about…, As you can see…, I'd like to turn to…, etc.), practise using it and discuss their perspectives on presentations. They also read the text of a ...
Students then develop a five-page PowerPoint presentation that reflects the information. Found in: 6th Grade • 7th Grade • 8th Grade • All Year Long • Language Arts Information
Oral Presentation - Lesson Plan Candidates will create a lesson plan that covers a particular chapter out of the text. Element. Levels of Performance. 1.€Content standard __Target(3) The lesson meets goals and criteria for specific content standards __Acceptable(2) The lesson develops some of the criteria for the specific content standard ...
Speed Dating. Speed dating is a quick way for students to present their work to classmates while gaining speaking and listening practice. The teacher divides students into two rows facing each other (students can be standing or seated in desks). One row is assigned as the movers.
Elephango Makes Is Easy To Find Full Lesson Plans On A Huge Variety Of Subjects. Use As Core Content Or Supplementary Lessons To Enrich Your Student's Learning Experience. BY SUBJECT. College & Career; ... Oral Presentation: Note Cards. Contributor: Delaine Thomas. Lesson ID: 12337.
This lesson plan aims to teach 9th grade students, including English language learners, the skills needed to conceptualize, prepare, and deliver an effective oral presentation. The lesson begins with introducing the key elements of oral presentations using a flow map. Students then identify these elements on a handout. Next, students work in small groups to list good and bad oral presentation ...
A 60 minute lesson in which students will present a biography as an oral presentation. Login to view the lesson plan. ... Plan, rehearse and deliver presentations, selecting and sequencing appropriate content and multimodal elements for defined audiences and purposes, making appropriate choices for modality and emphasisElaborationsusing ...
Oral Communication Lesson Plan. Artem has a doctor of veterinary medicine degree. This lesson plan uses a warm-up activity, discussion, quiz, main activity, and extension to help your students ...
Find esl oral lesson plans and teaching resources. From esl oral grammar lessons worksheets to esl oral assessment videos, quickly find teacher-reviewed educational resources. ... oral presentations, and reading and writing prompts abound in this 11-page packet of activities for English language learners. ESL worksheets are also included in ...
ORAL PRESENTATIONS LESSON PLAN 2 Oral Presentations Lesson Plan DANNY ORRAJ Subject(s) ESL, Language Arts (English) Topic or Unit of Study Oral Presentations Grade/Level Grade 9 Objective Objective #1: After being shown a flow map on a whiteboard/chalkboard, the student will identify and summarize on an
Following the four-part lesson plan - Revisit and Review, Teach, Practise and Apply - children develop their oral and written segmenting skills before applying what they have learnt to read sentences in a minibook including taught GPCs and tricky words. Use the lesson presentation alongside the 'or, ur' Weekly Plan.
***The content in this resource reflects the September 2024 updates to Level 3 of the Twinkl Phonics scheme.*** Consolidate week seven's phonics learning with this complete lesson and follow-up activity pack. Following the four-part lesson plan - Revisit and Review, Teach, Practise and Apply - children develop their oral and written segmenting skills before applying what they have learnt to ...
Oral Presentation Lesson Plan Candidates will create a lesson plan related to the health topic of their oral presentation. Element. Levels of Performance. 1.€Content standard __Target(3) The lesson meets goals and criteria for specific content standards __Acceptable(2) The lesson develops some of the criteria for the specific content standard.