Vesa Nopanen – Future Work today
Welcome to explore the Future Work.

The Ultimate How To Guide for Presenting Content in Microsoft Teams

Sharing / presenting content in Teams meeting is at the same time simple but is also has some options available that may not be known enough by everyone. This guide lets you get started and dive deeper what happens when you share your window, document or desktop in Microsoft Teams.
This article will be updated when there are new features or based on feedback.
Updated 22.3.2021 Presenter View section.
Community: I am happy to add Mac and iOS screenshots into the article as well if someone is willing to collaborate & provide them. 😎💪
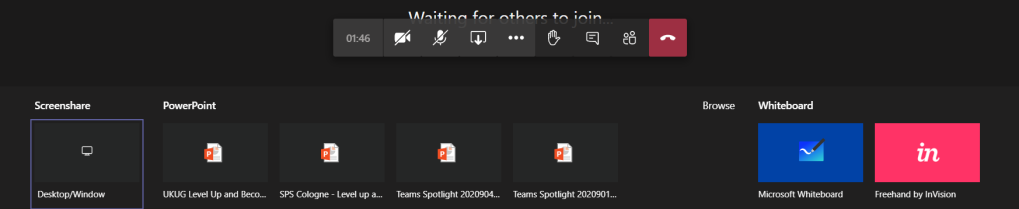
Teams Desktop: sharing a screen (Windows)
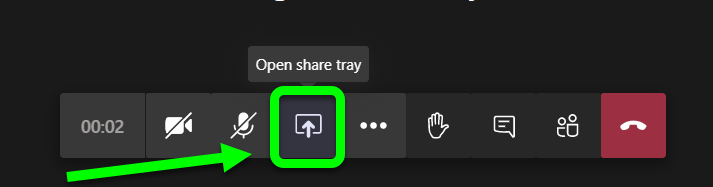
Opening the sharing with Microsoft Teams Desktop (in the New Meeting experience mode).
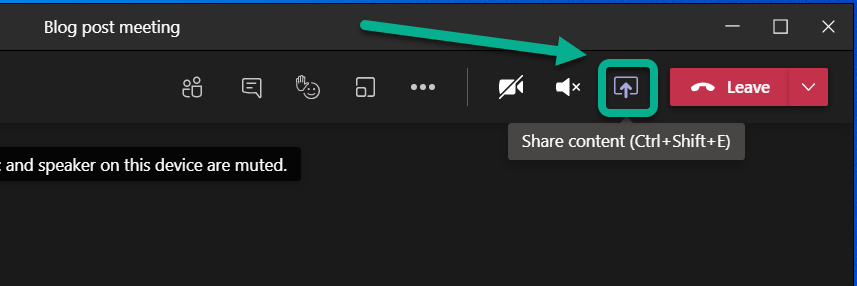
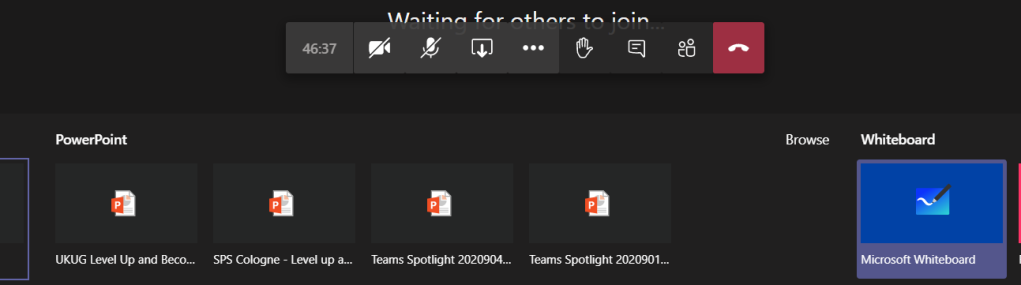
This opens the Share Tray. From it you can choose to start sharing
- Your Desktop (Screen share)
- Specific application (Window)
- Whiteboard application: either Microsoft Whiteboard (natively with Microsoft 365) or available 3rd party Whiteboards
- PowerPoint document
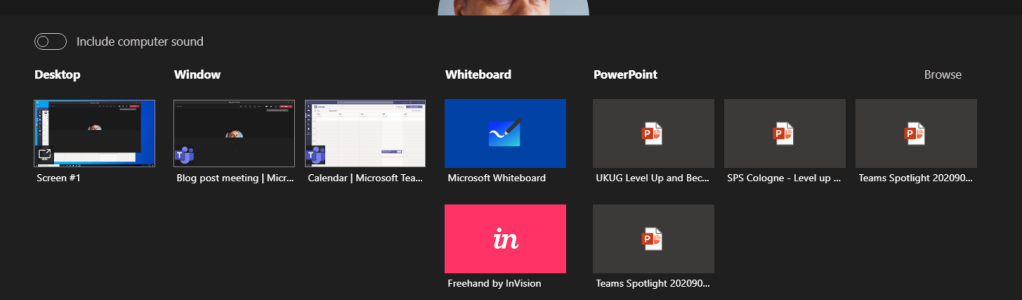
TIP: When you choose to share something using Teams Desktop you can choose to include your computer sounds to meeting. This is a must-have option if you are playing music or video to your participants. You can not toggle this on later – you need to choose this when you start sharing.
When you choose to include computer sound included with the sharing you need to have configured the speaker for computer and Teams meeting to be the same one.
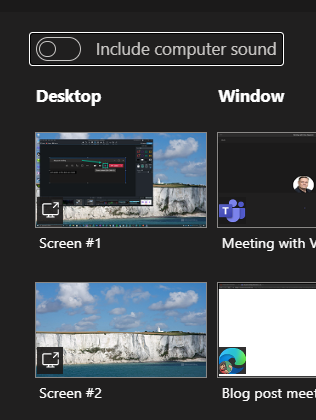
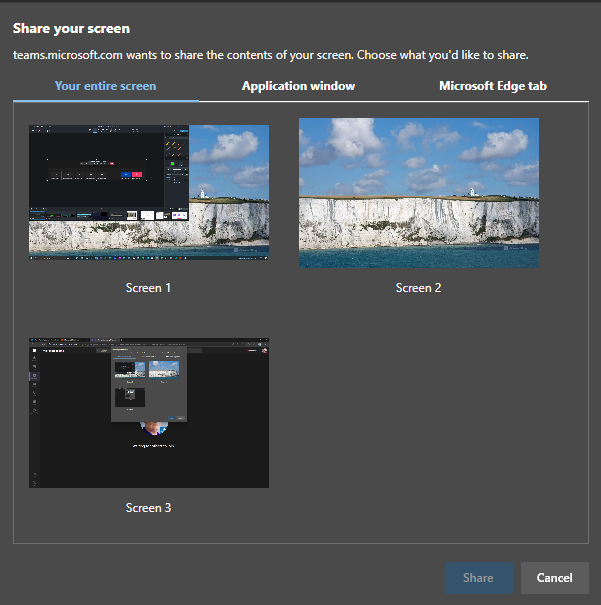
If you have multiple monitors available for your Microsoft Teams you can choose any of those displays.
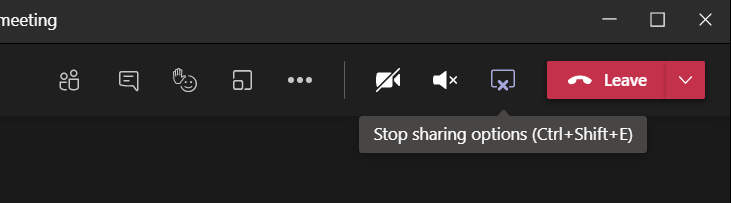
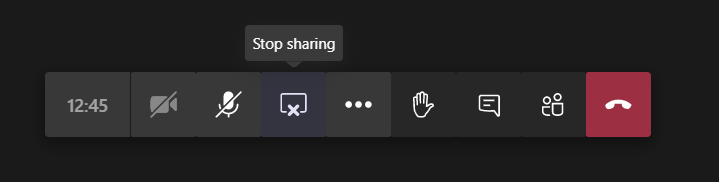
And you have the sharing open. Shared area is marked with red rectangle around it. You will find the more smaller Teams meeting control window in one of your desktops – and if you have the camera on it will show the video.
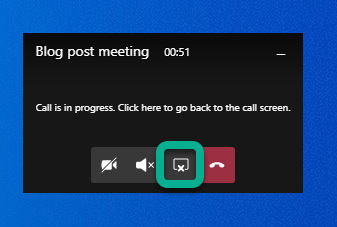
But more importantly you can use that small window to control camera, audio or sharing (ending it with one press). Or you can click on the small window (not on meeting toolbar) and it will expand back to the full size.

You can use that same icon to stop sharing in the expanded window.
Tip: If you have two screens available you should consider presenting your PowerPoint presentation so that you share the external screen and project your presentation there (PowerPoint – Slide Show – Monitor). Share that external screen to Teams meeting so you can be sure that whatever you show in that screen it is shown to attendees. Just check that your second screen is not a ultra-wide display or 8k (or preferably even 4k) because the content is going to be tough to read and view by attendees. FullHD screen works the best here.
Tip2: when you are presenting PowerPoint in external screen (and sharing that to Teams meeting) do they advantage of inking and pen if you are using a device with touch screen (like Surface)!
Tip3: if you have an embedded video in your PowerPoint and you use screen/display sharing to present it to the audience: Don’t forget include computer sound with your share!
Teams Desktop: sharing a PowerPoint
You can choose from your recent PowerPoint documents in the list
- A PowerPoint document you opened or edited in Microsoft Teams (in a team you belong to) or in your OneDrive
- Browse for more
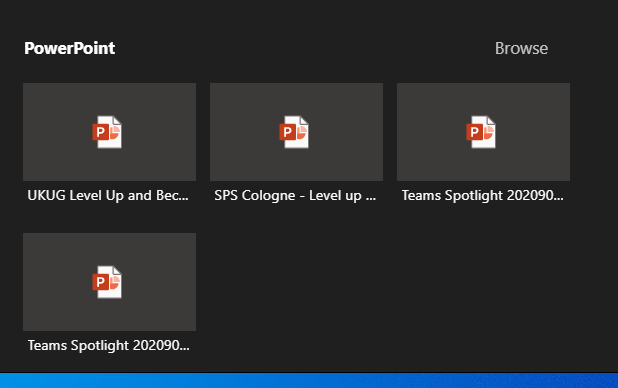
This list of sharing PowerPoints is causing often some big questions. PowerPoints will appear in the list once you edit or open the PowerPoint presentation in Teams or OneDrive (there may be some short delay). Generally it applies to the next meeting you join. Make sure you prepare for the meeting by opening the document in advance. Simply uploading a presentation to OneDrive or Teams does not bring it to the list – you need to open/edit it as well.
Browse-option lets you choose a PowerPoint from your OneDrive or from your computer.

What this one lacks is the ability to choose a file from a team you belong to.
TIP: Use OneDrive syncing to have an easy access to files in the most relevant teams you belong to .
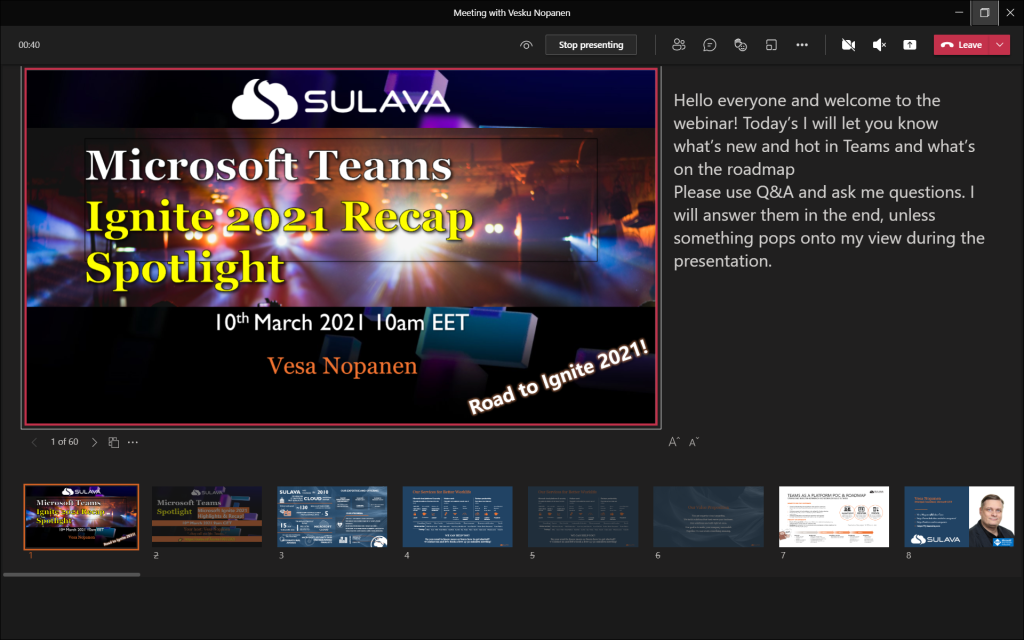
Once you are sharing the PowerPoint you can see it in the presenter view mode! This feature is generally available ! This makes it easy to do presentations using Teams – without having to have a PowerPoint desktop app open at the same time. Seems to work only on Teams Desktop with new meeting experience mode at the moment.
The presented area (PowerPoint) is shown surrounded with a red rectangle.
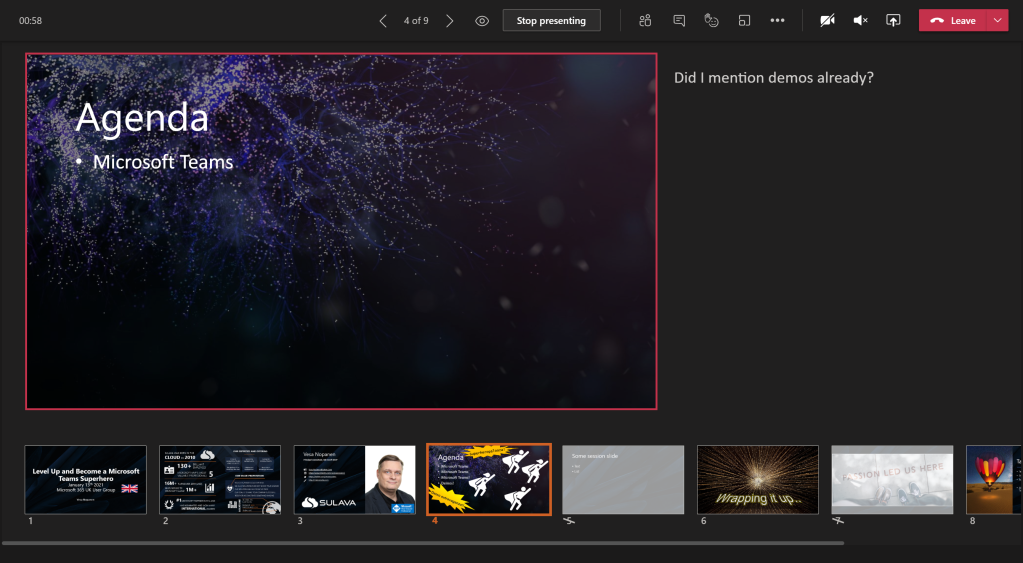
Updated 22.3.2021. There are other controls in this as well for jumping between slides and accessibility controls.
I have a another article diving deeper to Presenter view in here !
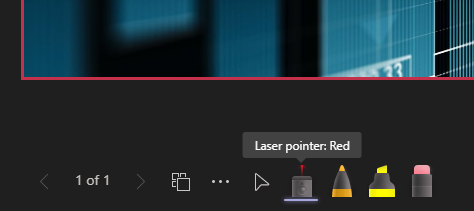
NEW: PowerPoint Live has now laser pointer and inking capabilities. Read about them here !
Once the presentation is shared you can move back and forth easily with arrows in the screen.

Note: there is the “eye” icon. If you press that one it locks the PowerPoint for the participants so that they see the same slide as you do: they can not browse the deck on their own. This is called private viewing disable (arrows for other participants will be disabled). Private viewing is enabled on default.

Note: if you are a presenter in the meeting where a PowerPoint is shared to you can take control of the shared PowerPoint to advance slides. This does not ask for any confirmation and the feature is really useful when you have multiple presenters who use the same slide deck. Just be careful that everyone else are not presenters – or they know not to touch it.

You will get a warning that someone has taken the control and can easily take it back.

Whoever is in control of the presentation has also the control to disable/enable private viewing mode. As can be seen in the picture above (with Take control) the eye is missing and arrows are greyed out: this means someone else than you have the control and they have disable the private viewing.
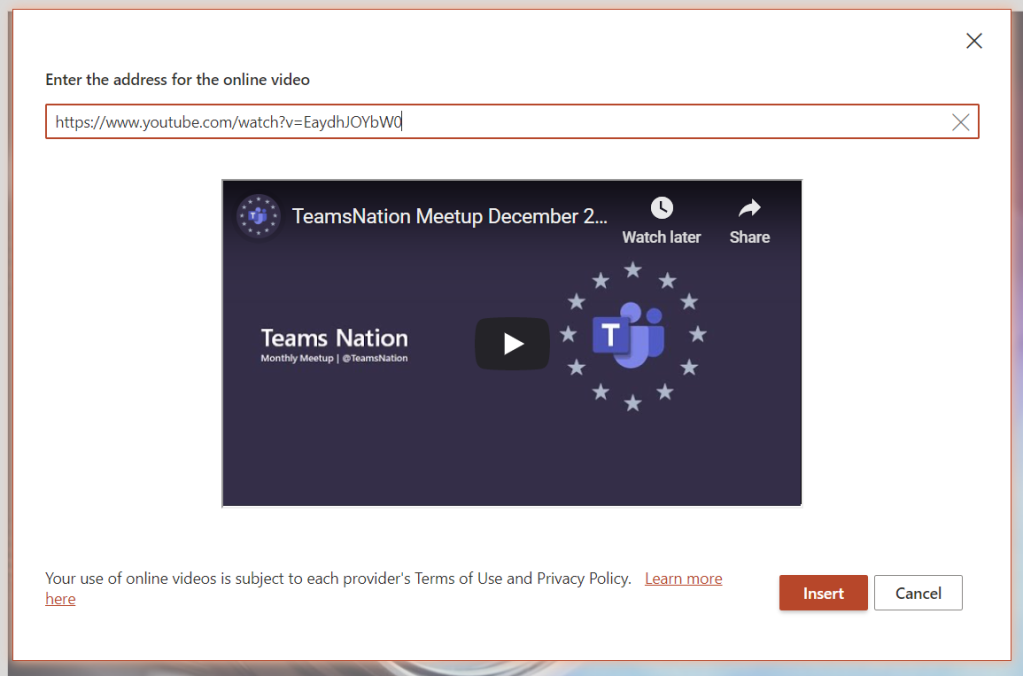
Note: When you share PowerPoint to a meeting this way participants can click links you have in your presentation. Thank you Joe for this reminder!

If you add a online video to your presentation your participants can activate that on their own as well. It is good also to note that if you hit “play” it doesn’t reflect to attendees (=they need to play the video themselves)
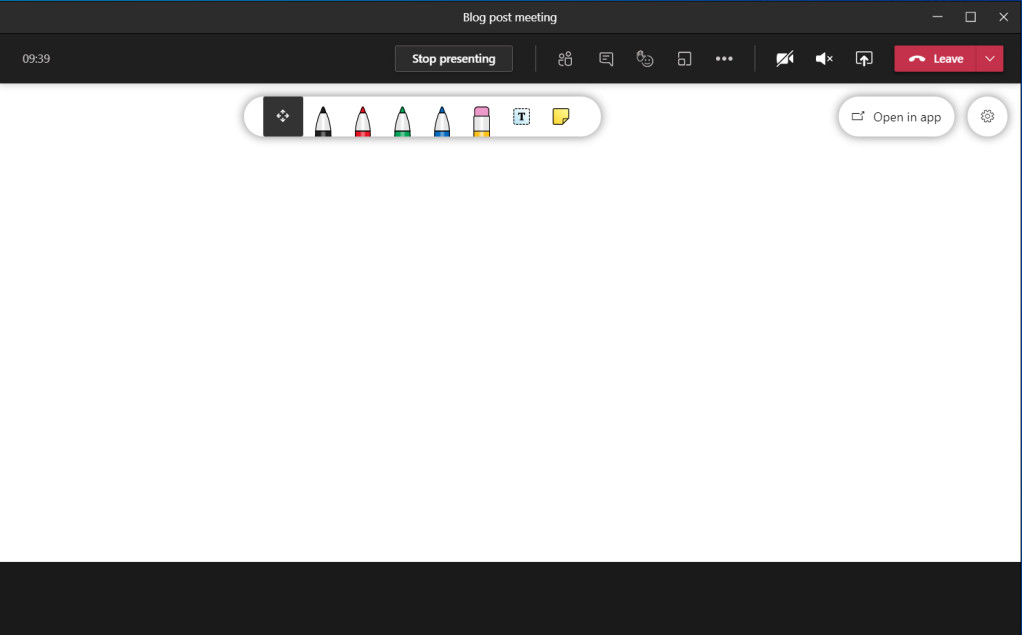
Teams Desktop: sharing a Whiteboard
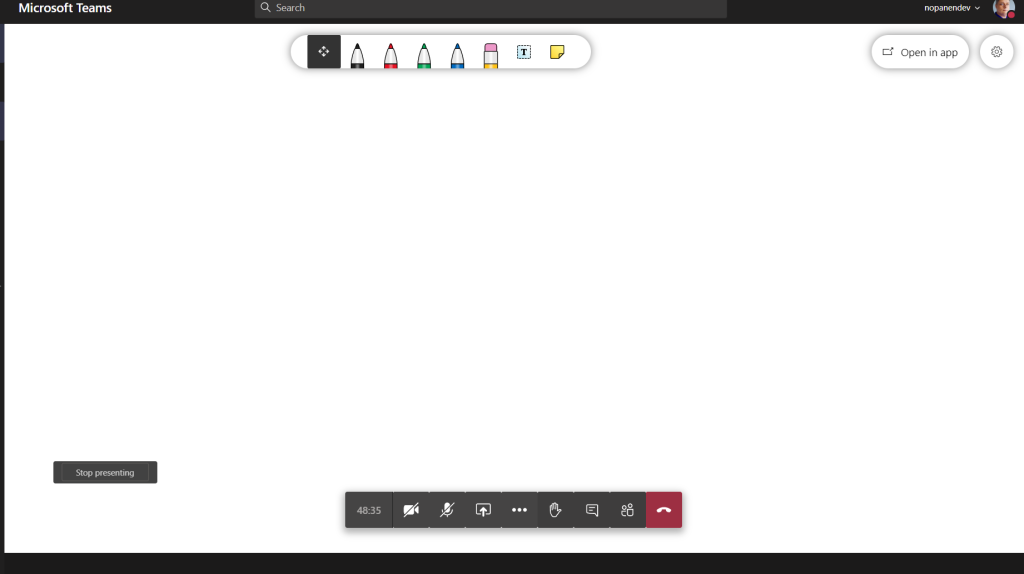
When you choose Microsoft Whiteboard from the Share Tray you are taken directly to the Whiteboard view. Everyone who is in the same organization as you are (the situation in January 2021) can co-author the Whiteboard with you. Once you are done you can Stop presenting (middle top screen) or share something else.
Teams web client: sharing a screen (Microsoft Edge)
Sharing looks a bit different when you are using Teams web client. Sharing is available in (new) Microsoft Edge and Google Chrome browsers. The toolbar is hovering on top of the meeting. From the toolbar you can open the share tray.
When you have the share tray open you can choose to share something of following
- Desktop (Screenshare)
- A specific PowerPoint document
- Whiteboard: either Microsoft Whiteboard or Freehand (3rd party).
- Entire screen
- Application window (a specific application only)
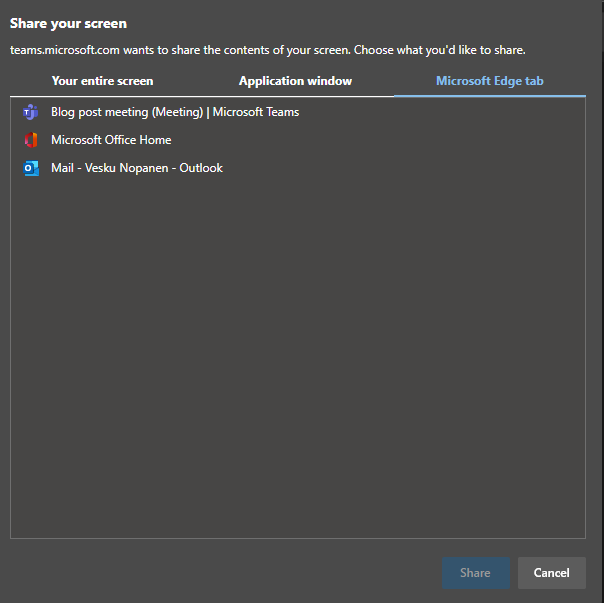
- With Microsoft Edge you have option to choose a selected, specific, tab
When(if) you have multiple monitors it is easiest to just share a one of them: it makes the sharing really simple and easy to manage: anything on that display is shared.
If you don’t have multiple monitors then you might want to just share a single application.
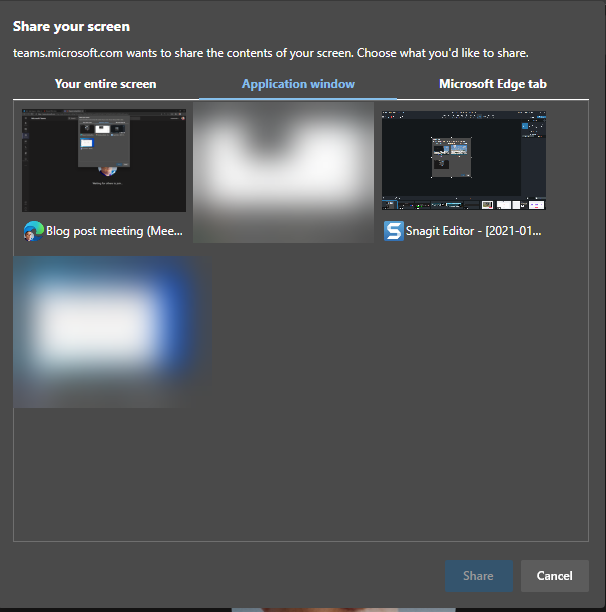
This is useful when you want to show something specific that runs in it’s own application but you can not share anything else on your screen.
Note: Teams is not in the list (not even on blurred ones) and nor is Spotify or ToDo. Not every application can be shared with this.
Note2: you can not share desktop audio to the meeting using Teams web client.
And the last option is to share a selected Edge tab – and if you have multiple Edge profiles open you can share from any of those by clicking the desired Edge active and choosing the tab.
In my example I chose to share one of my screens. You don’t get much feedback – you just click on the screen and hit Share. In one of your screens you will have this toolbar:

You can end sharing using either that toolbar or you can navigate to your web Teams meeting and choose Stop sharing from the toolbar there.
Teams web client: sharing a PowerPoint
This list of sharing PowerPoints is causing often some big questions. PowerPoint presentations will be in the list once you edit or open the PowerPoint presentation in Teams or OneDrive (there may be some short delay). Generally it applies to the next meeting you join. Make sure you prepare for the meeting by opening the document in advance. Simply uploading a presentation to OneDrive or Teams does not bring it to the list – you need to open/edit it as well.

Note: there is the “eye” icon. If you press that one it locks the PowerPoint for the participants so that they see the same slide as you do: they can not browse the deck on their own. This is called private viewing disable. Private viewing is enabled on default.

Whoever is in control of the presentation has also the control to disable/enable private viewing mode.
Teams web client: sharing a Whiteboard
Sharing a Whiteboard is initiated simply by choosing Microsoft Whiteboard (or Freehand or other available 3rd party application) from the share tray.
I have found out that sometimes when you start sharing Microsoft Whiteboard to the meeting using Teams web client it doesn’t do anything. The solution is to try again.
Once the Whiteboard opens you can work on it normally – or choose to open it in the Whiteboard app to have a broader set of tools available.
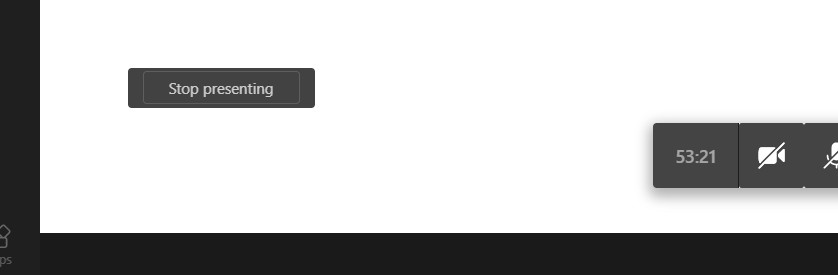
When you are done you can choose the “Stop presenting” that is hovering on the left bottom area (left of meeting toolbar).
Teams mobile: sharing a screen
Were you aware that you can also share content using your mobile device? I have examples and screenshots using a Android device but these also work with iOS – the user interface might be slightly different.
You initiate the sharing via … menu selection in the mobile to open the list of options
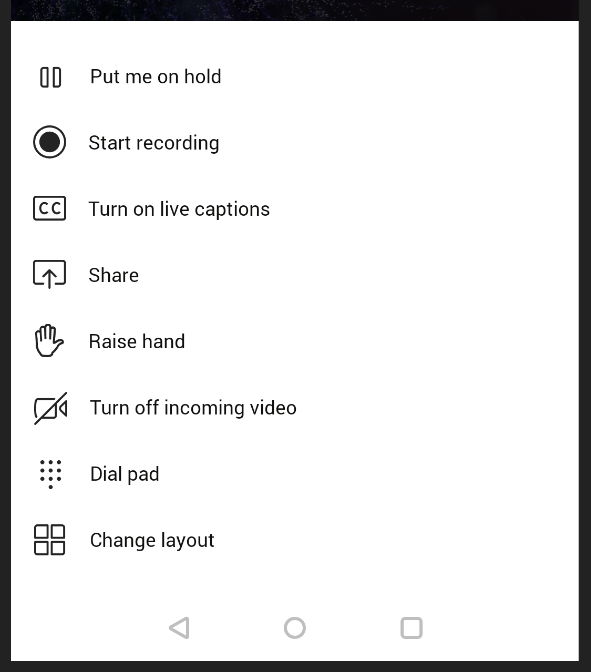
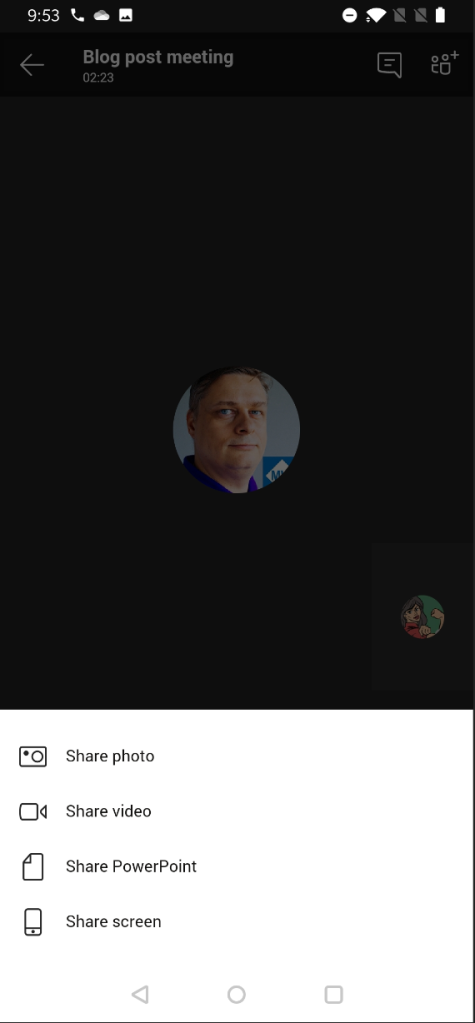
You choose Share and you get to choose what to share
Yes – you can share your mobile device screen to the meeting. This is really useful if you have a application you want to show or train to others.
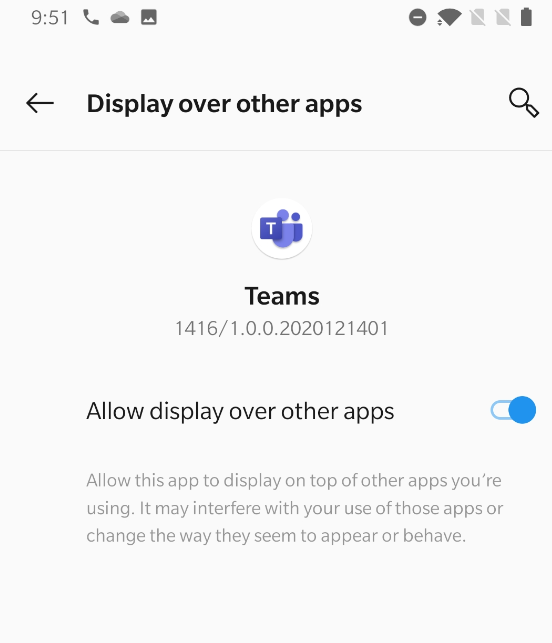
You may have to adjust settings to turn on allowing Teams to display over other apps.
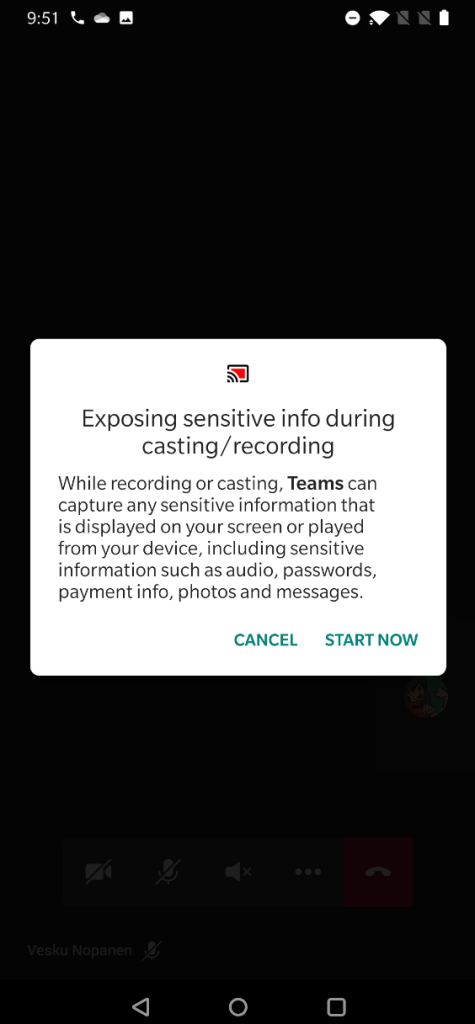
After that one you may have reshare the screen. And you get the next warning.
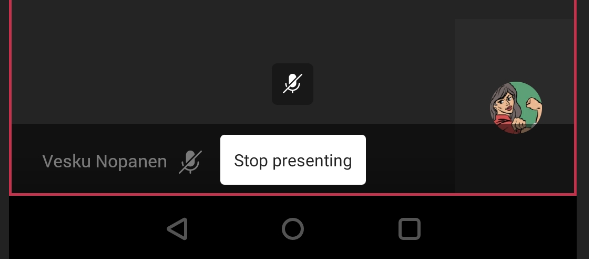
And your screen is now shared. You can see the red block that lets you know what are of your mobile device screen has been shared.
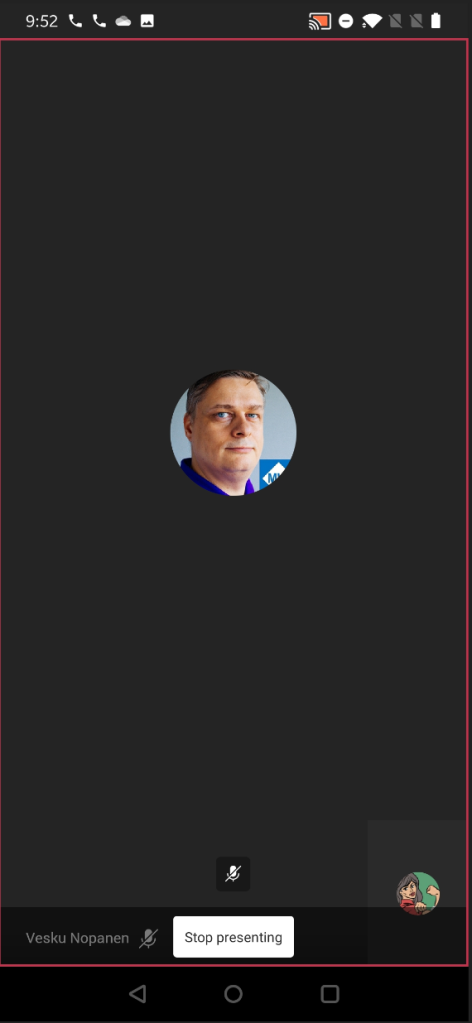
And if you pull down notifications area you have option to return to Teams meeting (if you have been using some other app) and there is also the notification that you are sharing your screen.
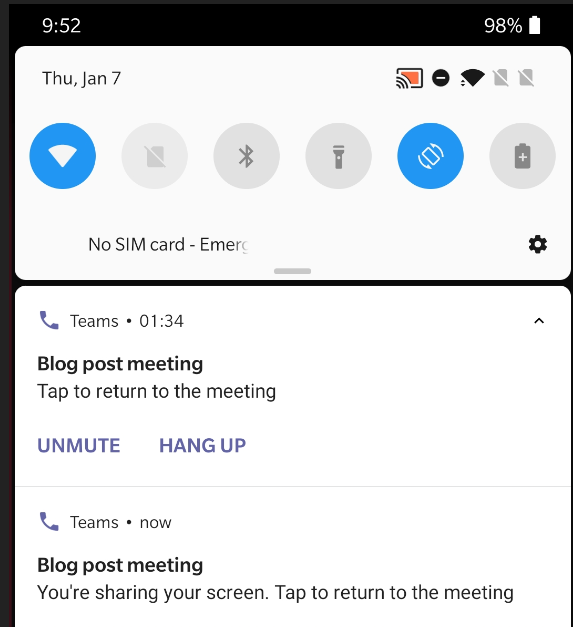
When you are done sharing you can return to Teams meeting and then choose to Stop presenting.
Teams mobile: sharing a PowerPoint
Sharing a PowerPoint works really well on Teams mobile! It is in fact even better than the version in other clients.
You start by imitating the sharing (as with screen share) and choosing the PowerPoint instead. You get a screen:
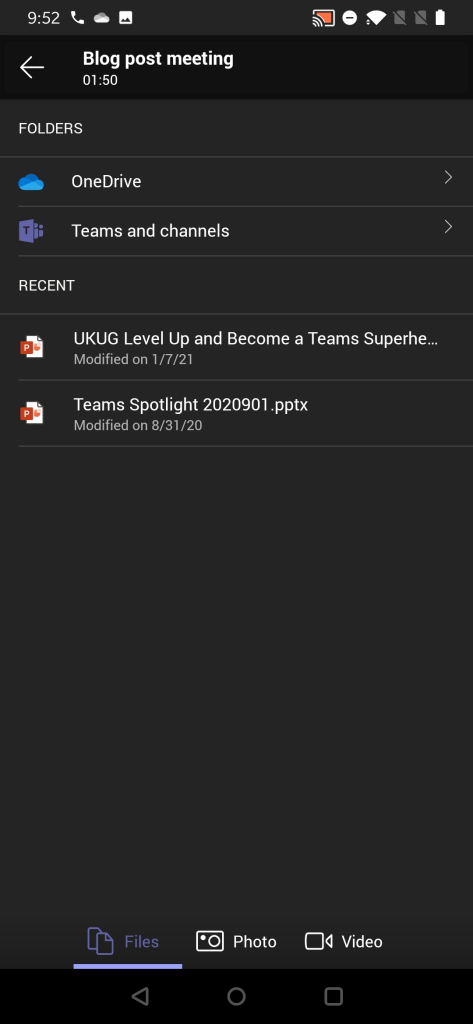
From this screen you can choose to browser thought
- A PowerPoint presentation from any Team and channel you belong to!
- Choose a PowerPoint presentation you opened or edited most recently (as you notice compared to other examples that this isn’t 1:1 in sync.. There are differences so that is why I am really happy that you can browse through Teams for sharing)
Once you have selected the PowerPoint to present it is very straight forward from that moment.
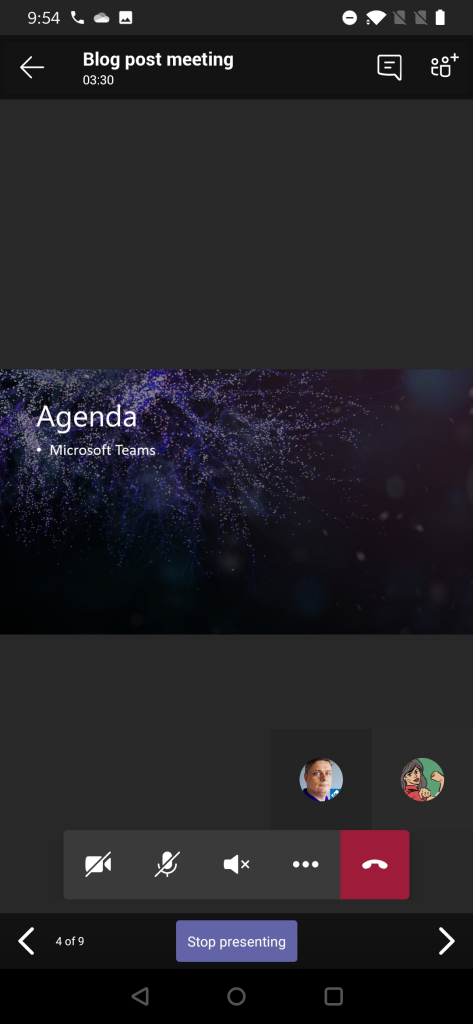
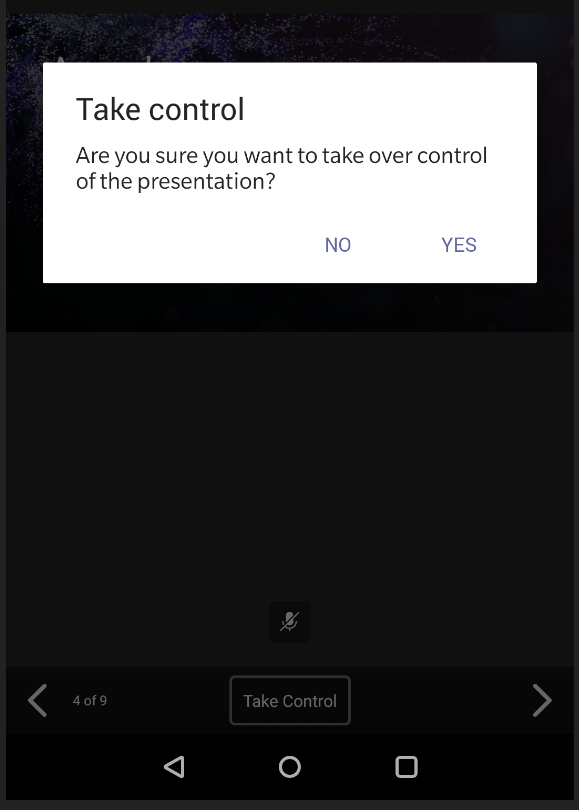
Using Teams mobile you can also take control of a PowerPoint someone else is presenting (if you are a presenter in the meeting). This means that you can participate in a multi-presenter meeting quite easily by using just your mobile device and Teams!
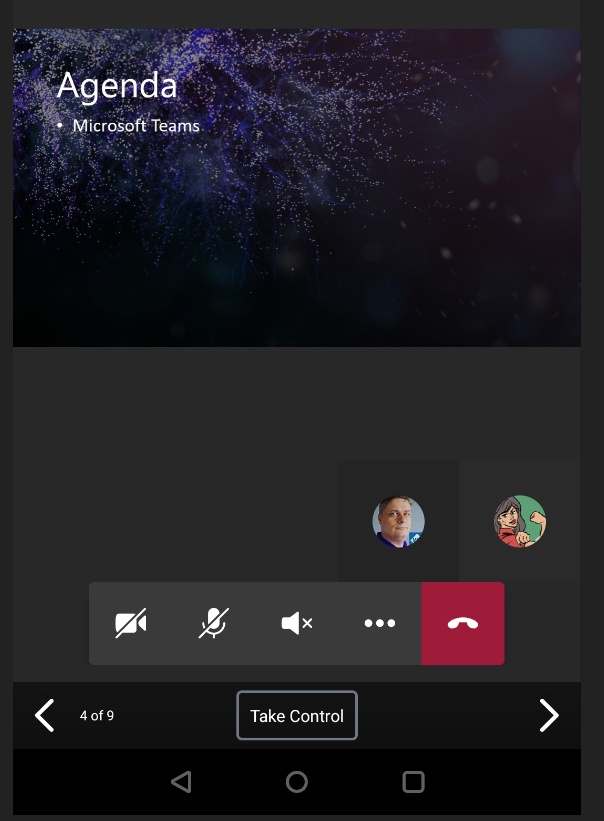
You will get a warning before you take the control – in case you pressed Take Control accidentally.
Teams mobile: sharing a photo or video
Follow the steps laid out earlier and instead of screen or PowerPoint you select this time a picture (from device’s picture gallery) or a video (using device’s video camera). Since sharing a picture is very straight forward I use the video instead as example.
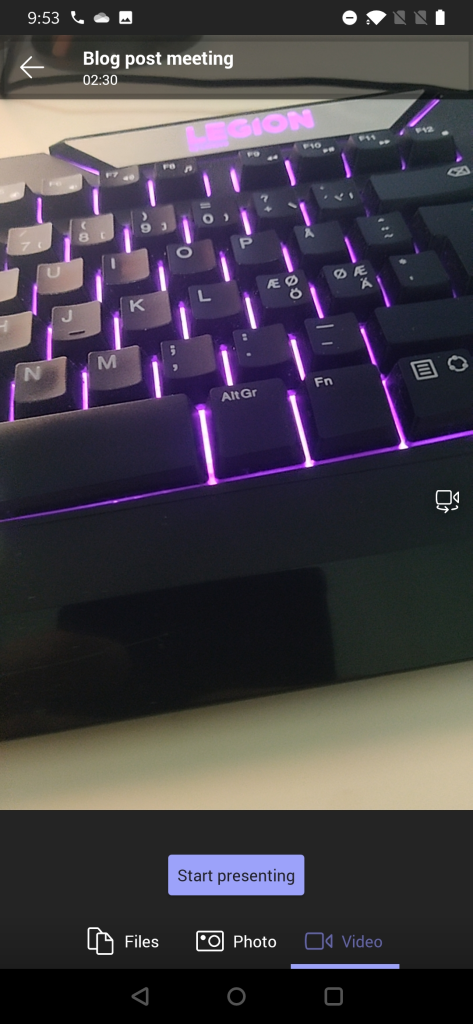
You get to see a preview of video first. You can switch to other camera (front/back usually) & position the device properly and once you are ready you just hit Start presenting .
And when you are done you can press on “Stop presenting” to end your video feed.
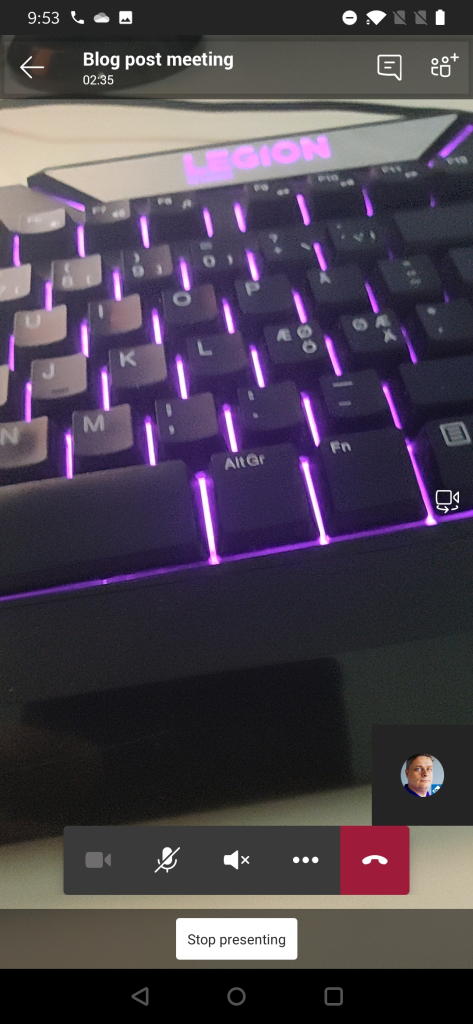
This video is different from showing your own video using Camera icon the meeting toolbar. Instead of being a attendee video this one is shown in the shared area for every participant in the meeting. This is useful when you have something in the same room/space that you want to share to others in the meeting. Possible use cases: a model on table, physical whiteboard, view from the window, interviewing someone, view in the outside, …
Best practices from my experience
The way I use to share content when in Microsoft Teams meetings is
- I share one of my screens (I have three screens so this is a natural choice for me). This way I know what is being shared all the time since I always share the same screen (the one in the middle, my camera is on top of that screen). Be careful what you drag to the shared screen. This is the way I share my PowerPoint presentations (projecting the presentation to the shared screen)
- If you have a touch-screen device (like Surface-laptop) you should use pen/inking to enhance the presentation experience. This also works when you are sharing the external screen & presenting from touch-screen device: make your presentation stand out!
- Prepare the content you share in advance. Open PowerPoints, apps, browsers etc so you don’t have to spend any time with them when you are live.
- Share your screen early rather than later. This will give you time to reshare.
- When doing a presentation with multiple persons using just the PowerPoint deck share it directly to Teams meeting so you can switch between speakers easily. With the new Presenter view -support this is now a good option.
- Make use of Teams features: Put everyone but real presenters else as attendee so they can’t start sharing their screen accidentally – and you can hard mute them as well. Use meeting options -setting before they join in.
- When people complain they don’t see the share: check that you are actually sharing your screen. If someone is seeing your share and some others not: those who can’t see your share need to leave and rejoin the meeting. Sometimes restarting your sharing can fix that issue too but usually the issue is in the participant end.
- I rarely use application / window -sharing.
- Sharing a video in Teams meeting (or in Live event) is usually ok but you can expect some quality drop – especially if you have a lower bandwidth. Have a backup link to the video available. People seem to struggle more with videos embedded inside a PowerPoint.
- Use Windows Focus Assist and Teams Do Not Disturb mode so you don’t get any unwanted popups on your shared screen. Microsoft Teams will also have a upcoming feature (currently usable in public preview) that let’s users to choose if Teams notifications do their own “toast” (pop-up banner) or do they go directly to Windows notification area (honoring the Focust Assist setting).
- Use Teams Desktop version + new meeting experience when possible. Check that you have the latest version.
More information or different view into this?
Check out Microsoft Support article about Sharing content in Microsoft Teams meetings .
I hope you have enjoyed this guide and it has provided to be useful. Please do drop a comment from below if you have any questions or you want to send me greetings!
Sharing is Caring! #CommunityRocks
Aiheeseen liittyy.

Published by Vesa Nopanen
Vesa "Vesku" Nopanen, Principal Consultant and Microsoft MVP (M365 and AI Platform) working on Future Work at Sulava. I work, blog and speak about Future Work : AI, Microsoft 365, Copilot, Microsoft Mesh, Metaverse, and other services & platforms in the cloud connecting digital and physical and people together. I have about 30 years of experience in IT business on multiple industries, domains, and roles. View all posts by Vesa Nopanen
5 thoughts on “ The Ultimate How To Guide for Presenting Content in Microsoft Teams ”
- Pingback: Dew Drop – January 18, 2021 (#3361) – Morning Dew by Alvin Ashcraft
- Pingback: [m365weekly] #19 – M365 Weekly Newsletter
- Pingback: PowerPoint Live / Presenter View in Microsoft Teams – Vesa Nopanen – My Teams & Microsoft 365 Day
- Pingback: PowerPoint Live / Presenter View in Microsoft Teams - Tech Daily Chronicle
- Pingback: Microsoft Tech News and Product Updates: 4/26/2021 – Mr. Wombat
Leave a comment Cancel reply
This site uses Akismet to reduce spam. Learn how your comment data is processed .

- Already have a WordPress.com account? Log in now.
- Subscribe Subscribed
- Copy shortlink
- Report this content
- View post in Reader
- Manage subscriptions
- Collapse this bar
This browser is no longer supported.
Upgrade to Microsoft Edge to take advantage of the latest features, security updates, and technical support.
Manage the meeting presentation experience for sensitive Teams meetings
- 5 contributors
- Applies to: Microsoft Teams

Using Teams admin policies, sensitivity labels, and templates, you can control a wide variety of settings that determine the in-meeting experience for participants, including:
- Who can present and who can give or request control
- How content is shared and what collaboration tools are available
- Attendee video, audio, and reactions
Meeting organizers can specify many of theses settings when they create the meeting, but you can enforce specific options for different users and groups in your organization by using admin policies, or for different types or meetings by using sensitivity labels and templates. This can help you meet your compliance needs for different types of meetings and meetings where sensitive information is being shared.
Meeting settings in sensitivity labels and custom meeting templates require Teams Premium.
Manage who can present
The following table shows where settings are available to manage who can present in meetings:
| Setting | Admin policy | Sensitivity label | Template | Meeting organizer |
|---|---|---|---|---|
| Who can present | Yes | Yes | No | Yes |
| Participants can give or request control | Yes | No | No | No |
| External participants can give or request control | Yes | No | No | No |
By using these controls, you can limit who is able to share content on screen in meetings.
Default value for who can present in meetings
The Teams admin meeting policy Who can present has the following options:
- Only organizers and co-organizers
- People in my org and guests
This setting doesn't enforce the value, but rather specifies the default for new meetings created by users. Users can override this setting and choose any of the other options unless a specific value is enforced by a sensitivity label.
The default value of Everyone allows anyone to present in a meeting by default. If you have compliance requirements in your organization around who can present in meetings, consider changing this value to People in my org and guests or Only organizers and co-organizers to provide a more secure default for users.
To set the Who can present policy
In the Teams admin center, expand Meetings , and then select Meeting policies .
Select the policy that you want to modify.
Under Meeting join & lobby , select a value for Who can present .
Select Save .
Manage who can present by using sensitivity labels
Meeting organizers can choose from the following options for who can present in a meeting:
- Only me and co-organizers
- Specific people
The default value shown when a user creates a meeting is specified by the Who can present policy mentioned above.
You can restrict this setting by using a sensitivity label. For sensitive or highly sensitive meetings, consider restricting this setting to Only me and co-organizers or Specific people by using a sensitivity label.
Teams admin policy: Participants can give or request control
By default, meeting participants can give control of their shared screen to another participant in the meeting. This is controlled by two Teams admin meeting policies:
Participants can give or request control - This setting determines whether the user with this policy can give control of their shared desktop or window to other meeting participants. It's On by default.
External participants can give or request control - This setting determines a guest or anonymous participant can be given control of an internal user's shared screen. It's Off by default.
Depending on the compliance requirements of your organization, you can change these settings for some or all of your users.
To configure who can give control of a shared screen
Under Content sharing :
To prevent participants from giving control of a screen share to others, set Participants can give or request control to Off .
To prevent external participants from being given control of a screen share, set External participants can give or request control to On .
Manage which content and video is shared with attendees
In meetings where sensitive information is being shared, it can be important to minimize the risk of sharing inappropriate information.
The following table shows settings that can help manage what content and video is shared on screen in meetings.
| Setting | Admin policy | Sensitivity label | Template | Meeting organizer |
|---|---|---|---|---|
| Screen sharing | Yes | No | No | No |
| Manage what attendees see | No | No | Yes | Yes |
Screen sharing is a teams admin policy. With this policy, you can control if meeting attendees can share their entire screen or only a single application. Sharing the entire screen can be convenient, but it can increase the chances of accidentally sharing inappropriate information such as an email or open document. Consider if you want to restrict sharing to a single application for users or departments that often present sensitive information. You can also turn off screen sharing entirely with this policy. For more information, see Manage meeting policies for content sharing .
Manage what attendees see is an option available to meeting organizers that can also be set by using a template. When this option is enabled, meeting organizers can control what content is shared on screen and who's video is visible. Organizers must intentionally bring shared content and video on screen before attendees can see it. This can help minimize the risk of sharing inappropriate content in a meeting. Consider if you want to enable or enforce this experience for sensitive meetings by using a meeting template. For more information, see Manage what attendees see in Teams meetings .
Manage presentation tools
Teams offers several presentation tools that allow for interactive participation of meeting attendees. The following table shows features that can help manage these tools.
| Setting | Admin policy | Sensitivity label | Template | Meeting organizer |
|---|---|---|---|---|
| PowerPoint Live | Yes | No | No | No |
| Whiteboard | Yes | No | No | No |
| Shared notes | Yes | No | No | No |
Each of these features can be managed through admin policies, but not through templates or sensitivity labels, nor by the meeting organizer. As such, they can be applied to users or groups, but not to specific meetings. For more information, see Meeting policy settings - Content sharing .
If you have meetings where sensitive information is being shared, you may want to disable Whiteboard and shared notes to avoid having sensitive information added to them.
PowerPoint Live allows attendees to navigate forward and back in a PowerPoint presentation being shared on screen. This may allow attendees to see sensitive information before it's presented by the organizer.
Consider if there are users or groups in your organization who shouldn't use these features to avoid sharing sensitive information.
Manage how meeting attendees interact
The following table shows features that can help manage how meeting attendees interact during a meeting.
| Setting | Admin policy | Sensitivity label | Template | Meeting organizer |
|---|---|---|---|---|
| Allow camera for attendees | No | No | Yes | Yes |
| Allow mic for attendees | No | No | Yes | Yes |
| Reactions | Yes | No | Yes | Yes |
Attendee audio and video can make it easy for attendees to communicate during a meeting. These can both be controlled by the meeting organizer or by a meeting template. Depending on the type of meeting, you may want to allow or restrict these capabilities.
For meetings that are presentations with minimal interaction from attendees, turning video and audio off can minimize distractions.
When recording meetings, video from participants might be considered personal data and infer regulatory requirements.
If you choose to turn off reactions, remember that this will disable the hand-raise feature. (For presentation-style meetings, the Q&A feature may allow the needed interaction for attendees to ask questions.)
Related topics
Configure Teams meetings with three tiers of protection
Manage access to Microsoft Whiteboard for your organization
Was this page helpful?
Additional resources
- How to Login
- Use Teams on the web
- Join a meeting in Teams
- Join without a Teams account
- Join on a second device
- Join as a view-only attendee
- Join from Google
- Schedule a meeting in Teams
- Schedule from Outlook
- Schedule from Google
- Instant meeting
- Add a dial-in number
- See all your meetings
- Invite people
- Meeting roles
- Add co-organizers
- Hide attendee names
- Tips for large Teams meeting
- Lock a meeting
- End a meeting
- Manage your calendar
- Meeting controls
- Prepare in a green room
- Present content
- Share slides
- Share sound
- Apply video filters
- Mute and unmute
- Spotlight a video
- Multitasking
- Raise your hand
- Live reactions
- Take meeting notes
- Join a breakout room
- Customize your view
- Laser pointer
- Cast from a desktop
- Use a green screen
- Join as an avatar
- Customize your avatar
- Use emotes, gestures, and more
- Get started with immersive spaces
- Use in-meeting controls
- Spatial audio
- Overview of Microsoft Teams Premium
- Intelligent productivity
- Advanced meeting protection
- Engaging event experiences
- Change your background
- Meeting themes
- Audio settings
- Manage attendee audio and video
- Reduce background noise
- Voice isolation in Teams
- Mute notifications
- Use breakout rooms
- Live transcription
- Language interpretation
- Live captions
- End-to-end encryption
- Presenter modes
- Call and meeting quality
- Meeting attendance reports
- Using the lobby
- Meeting options
- Record a meeting
- Meeting recap
- Play and share a meeting recording
- Delete a recording
- Edit or delete a transcript
- Customize access to recordings or transcripts
- Switch to town halls
- Get started
- Schedule a live event
- Invite attendees
- organizer checklist
- For tier 1 events
- Produce a live event
- Produce a live event with Teams Encoder
- Best practices
- Moderate a Q&A
- Allow anonymous presenters
- Attendee engagement report
- Recording and reports
- Attend a live event in Teams
- Participate in a Q&A
- Use live captions
- Schedule a webinar
- Customize a webinar
- Publicize a webinar
- Manage webinar registration
- Manage what attendees see
- Change webinar details
- Manage webinar emails
- Cancel a webinar
- Manage webinar recordings
- Webinar attendance report
- Get started with town hall
- Attend a town hall
- Schedule a town hall
- Customize a town hall
- Host a town hall
- Use RTMP-In
- Town hall insights
- Manage town hall recordings
- Cancel a town hall
- Can't join a meeting
- Camera isn't working
- Microphone isn't working
- My speaker isn’t working
- Breakout rooms issues
- Immersive spaces issues
- Meetings keep dropping

Engage your audience with presenter modes in Microsoft Teams
Meeting participants tend to be more focused and have a better experience when they see a presenter along with a presentation. An interactive presenter also helps guide an audience along with visual cues while reducing information overload. By using a presenter mode such as Standout , Side-by-side , or Reporter in a Teams meeting instead of sharing screen or window content only, you become a more engaging and integral part of your presentation. The following examples show how each presenter mode appears to an audience:

Use a presenter mode

Under Presenter mode , choose the mode that you want. Also, be sure that your camera is turned on.

To start your presentation, choose to share your S creen or Window on your PC or device.
Note: Using interactive presenter modes with PowerPoint Live will soon be available.

Note: Presenter mode customization is available as part of the public preview program and might undergo further changes before being released publicly. To get access to this and other upcoming features, switch to Teams public preview .
Presenter modes also allow presenters to customize how their content will be oriented on screen and adjust the size of the video to better fit the presentation.
Customize video display
1. Use the Position buttons in the preview window to direct where videos will appear in relation to the content.

2. Enlarge or reduce video size using the Size slider. Slide the circle to the left to reduce the size of a video, or to the right to enlarge the size of a video.

More things to know
Interactive presenter modes are only available for the desktop version of Teams.
Meeting attendees using the mobile or online versions of Teams will see a shared window or screen and presenter video separately.
When you use an interactive presenter mode, a small, moveable picture-in-picture window pops up to show you what your audience sees. If you close this window and need it again, restart the presenter mode.
Related links
Meetings in Teams Schedule a meeting in Teams Share content in a meeting Introducing PowerPoint Live in Teams

Need more help?
Want more options.
Explore subscription benefits, browse training courses, learn how to secure your device, and more.

Microsoft 365 subscription benefits

Microsoft 365 training

Microsoft security

Accessibility center
Communities help you ask and answer questions, give feedback, and hear from experts with rich knowledge.

Ask the Microsoft Community

Microsoft Tech Community

Windows Insiders
Microsoft 365 Insiders
Was this information helpful?
Thank you for your feedback.
COMMENTS
To present content in a meeting: Select Share in your meeting controls. Choose to present your entire screen, a window, a PowerPoint file, or a Whiteboard. Select Stop sharing in your meeting controls when you're done. Note: In Teams for web, you can share your screen using Google Chrome or the latest version of Microsoft Edge.
To manage who can present and request control, follow these steps: In the Teams admin center, expand Meetings and select Meeting policies. Select the policy that you want to edit or create a new one. Navigate to the Content sharing section.
Roles in Microsoft Teams meetings. If you're organizing a meeting with multiple attendees, you may want to assign roles to each participant to determine who can do what in the meeting. There are three roles to choose from: co-organizer, presenter, and attendee.
Grant presentation permissions. In a Teams meeting, you can assign roles to. specific participants to set permissions. Make them a presenter. During a meeting, select Show participants to see a list of everyone in the meeting. Hover over someone whose role needs to be changed and click the ellipsis to see. More options.
Sharing / presenting content in Teams meeting is at the same time simple but is also has some options available that may not be known enough by everyone. This guide lets you get started and dive deeper what happens when you share your window, document or desktop in Microsoft Teams.
Share the Slide Show window. Share the editing window with a clean look. Run the Slide Show in a window and share that window. Use the PowerPoint sharing option in Teams. Use Presenter View to show the audience your slides while you see Presenter View. Present with your video beside your PowerPoint slides.
Configure Teams meetings with three tiers of protection. Overview of custom meeting templates in Microsoft Teams. Use Teams meeting templates, sensitivity labels, and admin policies together for sensitive meetings. Use sensitivity labels to protect calendar items, Teams meetings and chat.
Manage presentation tools. Manage how meeting attendees interact. Related topics. Some features described in this article require Teams Premium. Using Teams admin policies, sensitivity labels, and templates, you can control a wide variety of settings that determine the in-meeting experience for participants, including:
PowerPoint Live transforms your presenting experience - only in Microsoft Teams. PowerPoint is used around the world to share compelling stories—from personal to professional. As the world shifted to working remotely, we all faced new challenges presenting without a live audience.
By using a presenter mode such as Standout, Side-by-side, or Reporter in a Teams meeting instead of sharing screen or window content only, you become a more engaging and integral part of your presentation. The following examples show how each presenter mode appears to an audience: Standout presenter mode. Side-by-side presenter mode