Unsupported browser
This site was designed for modern browsers and tested with Internet Explorer version 10 and later.
It may not look or work correctly on your browser.
- Presentations

How to Present a PowerPoint Slideshow With Presenter View (+ Video)
- Bahasa Indonesia
Giving a presentation can be intimidating, even to seasoned speakers. Learn how to use PPT Presenter View , which is your private cockpit view.

This is a view that you'll see on your own screen while giving a presentation using PowerPoint. While the audience will see the presentation on the projector or big screen, you'll have your own private view on a second monitor.
This feature is like a cockpit for giving presentations. You'll keep all the most important controls front and center while presenting.
PowerPoint Presenter View gives you at least four essential tools that make presenting your slideshow more comfortable:
- In Presenter View , this display keeps your speaker notes in view to reference while speaking.
- You'll see a thumbnail for the next slide to begin preparing for your next key point, and you can jump to other slides quickly.
- A timekeeping tool helps you track how long you've been speaking to ensure you don't overrun any time limits.
- Drawing tools allow you to add illustrations on screen while presenting to draw attention to specific parts of your slides.
You need every advantage you can get when it's time to give a presentation. In this tutorial, you'll learn how to make the most out of Presenter View in PowerPoint.
In this tutorial, I'm going to focus on an underused feature of PowerPoint: Presenter View.
How to Present a PowerPoint Slideshow With Presenter View (Video)
In this video, I'll teach you how to get started with Presenter View in PowerPoint. You'll learn how to enable Presenter View and then use the tools inside of it. I'll teach you to use the special Presenter View features to keep your notes and tools close, that way you can present more confidently.

Keep reading to find out more about using Presenter View in PowerPoint and the best features to try out.
Turn On PowerPoint Presenter View
In PowerPoint for macOS, simply click on Presenter View on the Slide Show tab to kick off the presentation in Presenter view .

You'll see the Presenter View interface on one screen. The other display will show the "audience version" of the presentation. In other words, it shows what they'll see on a projector screen, or even their own display.
How to Make the Most of Presenter View
Let's dive into some of my favorite features that Presenter View brings to the table. Using even one of these is reason enough to try out Presenter View in PowerPoint. But when you combine them together, it's a no-brainer.
This is how to use Presenter View on PowerPoint. But the real question is why to use presenter mode PowerPoint. The reason is twofold:
- It helps your slides look better.
- It keeps you organized.
You can share neat, uncluttered slides that aren’t packed with content. That’s because you can keep your supporting content to yourself.
For this Presenter View in PowerPoint tutorial, we’ll be using the beautiful Tezia - Corporate PowerPoint Template from Envato Elements. Tezia has 40 stunning slide layouts. Each one works great in PowerPoint Presenter View . Download it today and follow along.

Now, let’s learn how to use Presenter View in PowerPoint fast!
1. Speaker Notes
Speaker Notes is a top feature that works best with Presenter View in PowerPoint. Many presenters will spend time filling out cards or scribbling ideas onto paper. But it's much easier to add them directly into your PowerPoint file.

To add Speaker Notes to a presentation, start off by working in Normal view on PowerPoint's View tab. At the bottom of your screen, you can click on Notes to open up the Speaker Notes section and add your own text.

Speaker Notes and Presenter View go hand in hand. When you're in Presenter View , your speaker notes will show up on the right side of your screen. You can adjust the text size with the icons near the lower right corner.

Speaker Notes show how to use Presenter View in PowerPoint to your advantage. They help keep you on track as you present on your key topics.
Speaker Notes are important because they avoid the potential of you reading off your slides. Why? Because you don’t have to commit every key detail to memory! You can engage with your audience, all while referring to pre-built notes that they’ll never see.
2. Slide Previews
Let’s face it: you might be sharing a presentation with dozens of different slides inside. When you know how to put PowerPoint in presentation mode, you can get a sneak preview as you present. It’s easy to forget exactly how you sequenced slides together.
With Presenter View , you can stop guessing. That’s because you’ll always have a preview of the next slide in your deck.
As you work in Presenter View in PowerPoint, notice the slide thumbnail in the upper right corner. It’s labeled Next Slide , and that’s exactly what you’re seeing. This helps you transition smoothly from slide to slide. Often, you may set up some closing narration on one slide to help introduce the next. Guesswork and delays are gone, thanks to using Presenter View in PowerPoint.
Knowing how to present on PowerPoint involves keeping slides in a logical order. That means that on occasion, your next slide should no longer be the next one in line. Presenter View helps you handle this situation.

Across the bottom of the view is a filmstrip of every slide’s thumbnail. You can scroll through it and click on any slide to jump directly to it.
This way, you can jump around in your slide deck without your audience ever knowing it! This helps you drive the flow of your slide deck in real time, with no interruptions or distractions.
3. Drawing Tools
Like sports commentators do during a broadcast, you can use drawing tools to draw on top of your slides. This is perfect if you've got a tablet for example, but the feature works well for computer users with a mouse too.
To enter the drawing tools, you can click on the icon shown in the PowerPoint screenshot below. This turns on the tools you need to add highlights and annotations to the selected slide.

Annotations are great if you want to call out key details in real time. You can highlight, mark up, or circle any element on a slide. This is how to use Presenter View in PowerPoint in a live environment. You can use it to capture audience attention and focus on details as your narrative flows.

Choose from tools like the Laser Pointer, Pen, and Highlighter to add annotations to a slide. A laser pointer is a digital version of the popular tool used to draw attention to parts of a slide.
The Pen and Highlighter tools will actually add new marks on top of the slide that your audience will see.
4. Timekeeping
This feature is straightforward to use, but I can't stress enough how helpful it is. Nothing is worse than giving a presentation and realizing that you used only half of the time. Or that you went far over the time limit.
In Presenter View , you'll see a feature that keeps time above the current slide thumbnail. You can pause this feature with the Pause button or reset the counter with the icon on the far right. But often, it's best to leave it running. This keeps you on pace, on track, and focused on your message.

Plus, this is how to put PowerPoint in presentation mode to work for you. At a glance, you can see how much time you have left. This may encourage you to speed up your dialogue. Or it may afford you extra time to expound on a key point or new supporting detail.
I can think of many times when this feature would have been a big help during presentations in college. When you're graded or judged based upon your runtime, it's a great idea to keep that time total in view.
5. Navigate Effortlessly with Keyboard Shortcuts
Presenter mode PowerPoint presentations are easy to navigate. That’s because they work well with a variety of keyboard shortcuts. By using these shortcuts, you can see how to present on PowerPoint efficiently.

Presenter View offers an array of keyboard and mouse shortcuts that you can use as you present. Again, your audience won’t notice this.
For a look at them, click on the Tips button in the upper left corner of Presenter View . You’ll see a complete cheat sheet of shortcuts listed. Refer to it often and use these tips to navigate through your slides.
The Best Source for Stunning PowerPoint Templates (With Unlimited Downloads)
Envato Elements is the best place to find stunning PowerPoint templates in 2022 . For a flat, monthly rate, you can download as many PowerPoint templates as you want. Plus, Elements offers an array of other creative content. This includes stock photos, music, fonts, and more.

When you’re using Presenter View in PowerPoint, you need templates that look their best. It’s tempting to turn to free options. But premium templates from Envato Elements are always your best bet.
Why? They’re designed by creative experts with you in mind. You simply fill in the blanks to add your own content. You don’t have to spend time and effort designing slides from scratch. This gives you even more time to craft a compelling narrative to wow any audience.

With premium Envato Elements templates, you’ll unlock an array of features. Each of these helps you shine when you use presenter mode PowerPoint features:
- easy-to-edit text placeholders
- photos and illustrations throughout
- charts and infographics
- pre-built animations
As you learn how to put PowerPoint in presentation mode, you’ll see how all these benefit you.
Learn More Powerful PowerPoint Tools
We can use tools like Presenter View to reduce the anxiety that comes along with giving presentations. It may still take time to prepare and feel confident about your presentation. But Presenter View keeps those key features in easy view so that you aren't scrambling for written notes.
Check out these tutorials to learn more about giving presentations using Microsoft PowerPoint :

Download Our eBook on Making Great Presentations (Free PDF)
We have the perfect complement to this tutorial, which will walk you through the complete presentation process. Learn how to write your presentation, design it like a pro, and prepare it to present powerfully.
Download our eBook: The Complete Guide to Making Great Presentations . It's available for FREE with a subscription to the Tuts+ Business Newsletter.

Start Using Presenter View Today
You just learned how to use Presenter View in PowerPoint. You're the pilot, and now you're in the cockpit of your presentation plane! The features you saw in this tutorial will keep everything you need in view while you give a presentation.
Don't forget to launch your presentation in presenter mode PowerPoint mode. That means you'll always have your slide cues, notes, and more while you speak to an audience.
Editorial Note: This post has been updated with contributions and a video from Andrew Childress . Andrew is a freelance instructor for Envato Tuts+.

View Options in PowerPoint – A Complete Beginner’s Guide!
By: Author Shrot Katewa

There are many different types of presentations view available in PowerPoint including Normal View, Outline View, Presenter View, and Slide Show View to name a few. All these views serve different purposes and it is important to know how to use them appropriately to get the most out of PowerPoint!
In this article, we will talk about what each type of view does in PowerPoint and how to access them so that you can choose the best for your needs! So, let’s get started!
[ A Quick Note Before We Begin – for this article, I will be using one of the presentation templates from Envato Elements . With Envato Elements, you get access to thousands of presentation designs with unlimited downloads so you never run out of options again. Plus, you get free previews so you know exactly what you’re getting before buying! It is also very affordable. Check out their pricing here ]
1. What are the Different Type of View Options Available in PowerPoint?
Microsoft PowerPoint is equipped with a variety of Slide View options that can be used for different purposes.
These are the different view options available in PowerPoint –
- Normal View
- Slide Sorter View
- Notes Page View
- Reading View
- Outline View
- Slide Show View
- Presenter View
- Slide Master View
2. How to Access the Different View Modes in PowerPoint?
To access the different view modes in PowerPoint, you have to click on the ‘View’ tab in the ribbon. The 2-step process is described below.
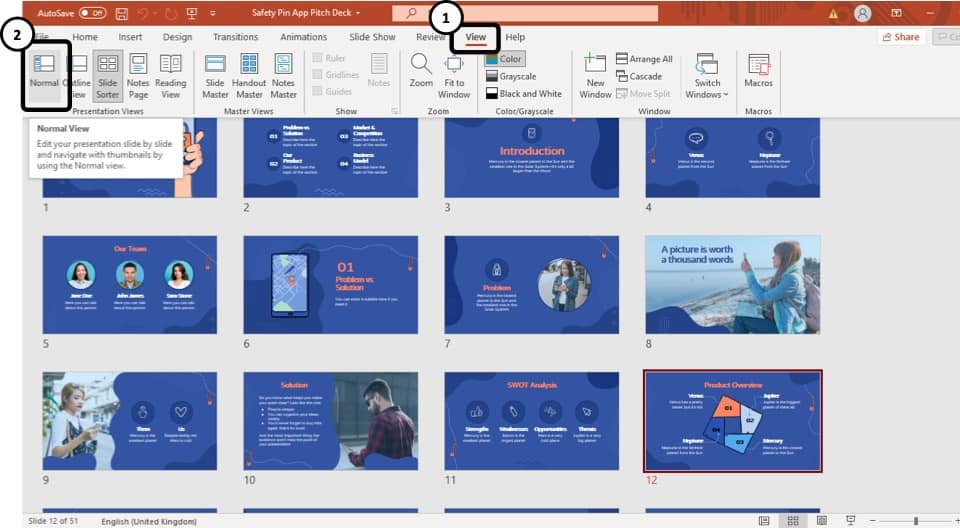
Step-1: Click on the ‘View’ tab
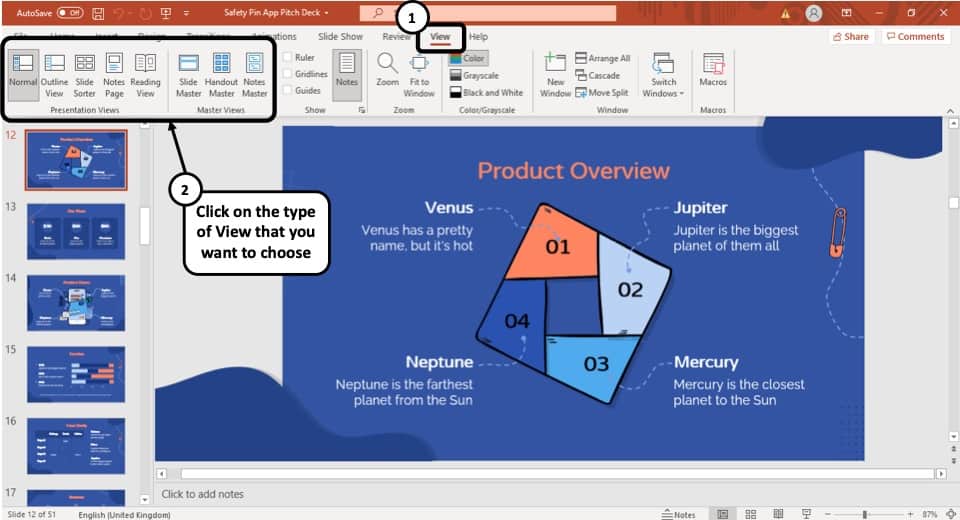
At first, select the ‘View’ tab, which is the second to last tab in the ribbon section of your PowerPoint Window.
Step-2: Select your preferred ‘View Mode’
Once you have access to the ‘View’ tab, you can select your preferred view mode such as the Outline View , Slide Sorter view, Slide Master view, etc. from the Presentation View section or the Master View section. (as shown in the image in step 1)
3. What is the Purpose of Various View Modes in PowerPoint?
Each view mode in PowerPoint has its own purpose. Let’s go through the purposes of the different slide view options one by one below –
1. Normal View
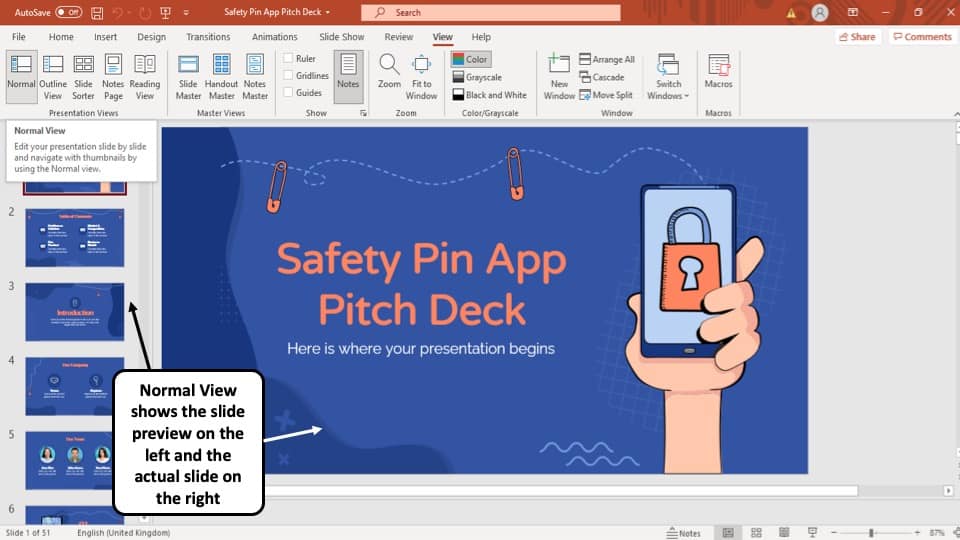
The ‘Normal View’ option is the first option in the ‘Presentation Views’ section of the ‘View’ tab. It is the most commonly used viewing option and is also the default slide view for PowerPoint.
The slides appear on the left of the PowerPoint window in the ‘Slide Navigation’ bar. Thumbnails of the slide are represented as boxes in the ‘Slide Navigation’ bar with its consecutive serial number to the left of it.
The main function of normal view mode in PowerPoint is to navigate through slides in a vertical grid while allowing you to add, design, or edit the slides while getting a preview of the slides on the left.
2. Slide Sorter View
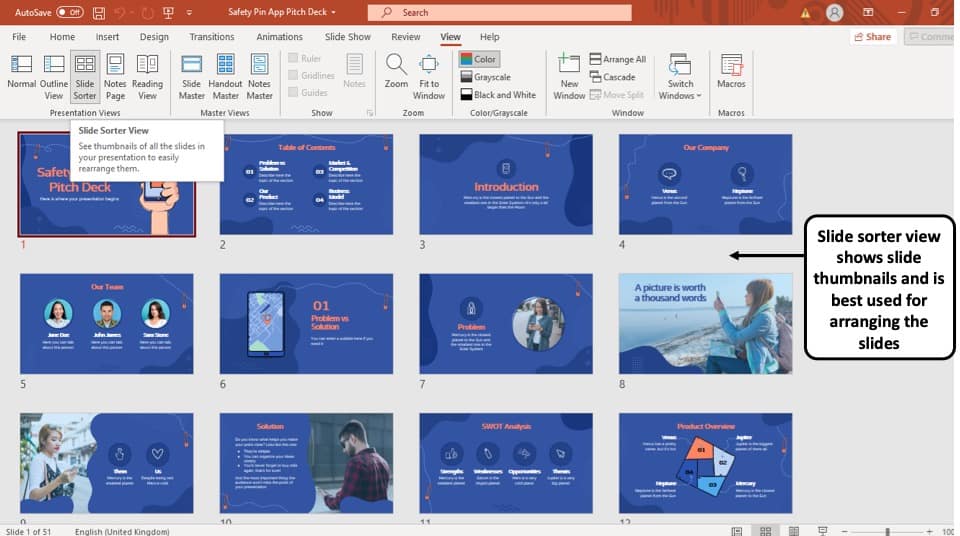
The ‘Slide Sorter’ option gives you an overview of all the slides in your PowerPoint presentation.
The slides are represented as thumbnails as a grid of boxes arranged side by side. The serial number of the slide is given on the bottom left corner of the slide thumbnail.
This option serves the purpose of viewing the slides together in one window making it easier to rearrange and organize them in a quick fashion.
3. Notes Page View

The ‘Notes Page View’ option gives you the view of each slide and its speaker notes in one page.
In this view, the slides appear at the top and the speaker notes are given on the bottom of the two sections. The serial number of the slide is not shown in this view. You can also edit speaker notes from here.
The main purpose of the notes page view in PowerPoint is to preview what each page will look like before you print the slides with speaker notes.
4. Reading View:
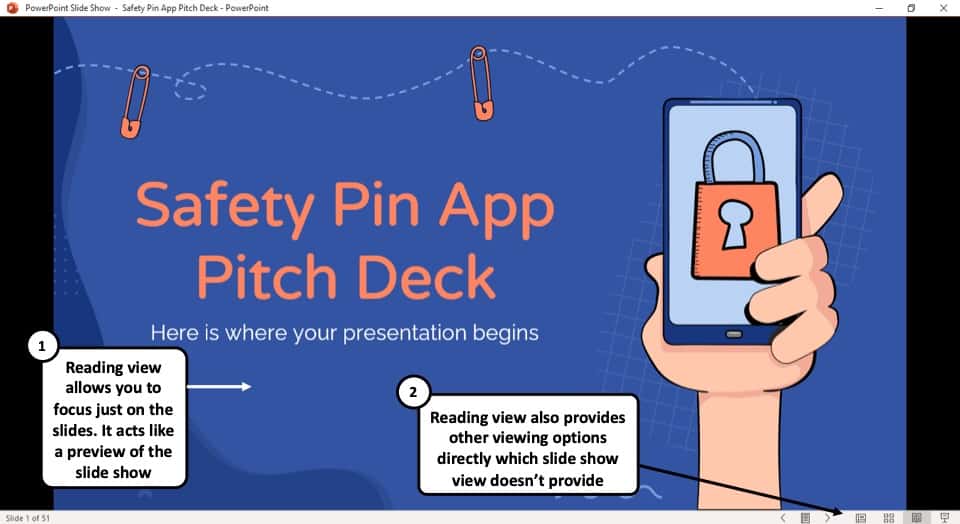
The Reading View option allows you to view your PowerPoint presentation without going into Full Screen mode. All the transitions and animations can be seen in this view. The serial number of the slide is given at the bottom right corner of the window.
It is used to preview the slide and review the slides with full focus. This mode also makes other view options easily accessible, which is not the case in ‘Slide Show’ mode where the presentation is shown in the full screen, and the options are not visible on screen.
The reading mode is actually more useful for word documents, as it allows the reader to focus just on the text. In my opinion, it adds little value to a PowerPoint presentation.
5. Outline View:
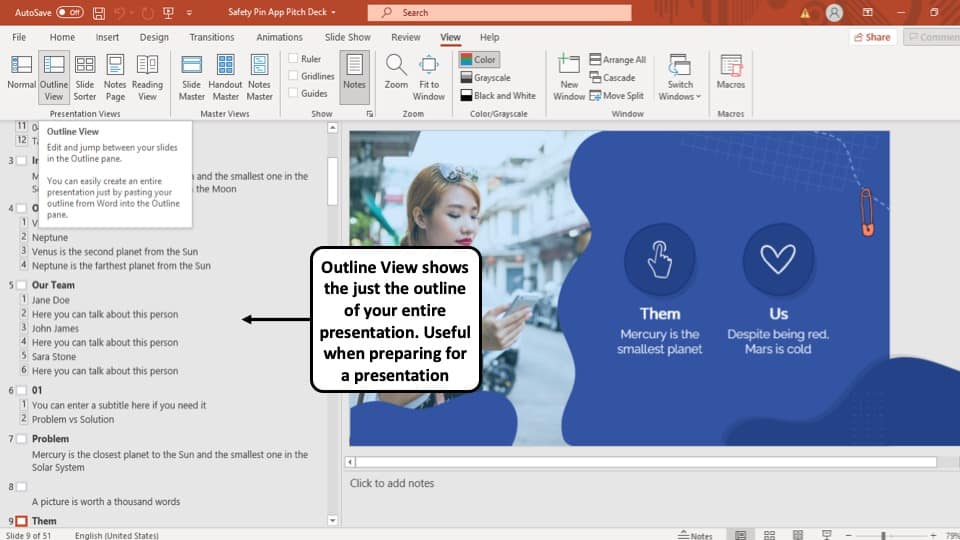
The ‘Outline View’ shows you the entire outline of your PowerPoint presentation in the ‘Slide Navigation’ bar.
In this view, there is no thumbnail of the presentation. Instead, there is an outline of all the data present in that slide. The serial number of the slide is at the left followed by a small white box that represents a slide and then the outline of that slide.
You can also create an entire slide in the pane of this view by copy and pasting data from Microsoft Word. However, you will have to design the slide separately once the data has been added to each slide.
6. Slide Show View:
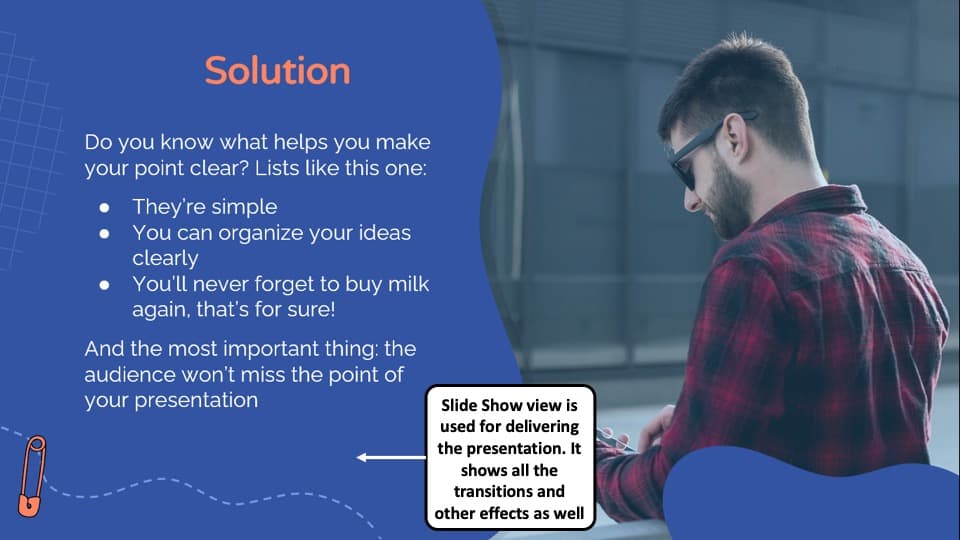
The Slide Show View is the view that your audiences are going to see. This view shows each slide of your PowerPoint presentation in full screen.
All the transitions, animation, and multimedia files in your PowerPoint presentation are played here. Consecutive slides can be accessed using the direction keys on your keyboard or by clicking once on the slide.
7. Presenter View:
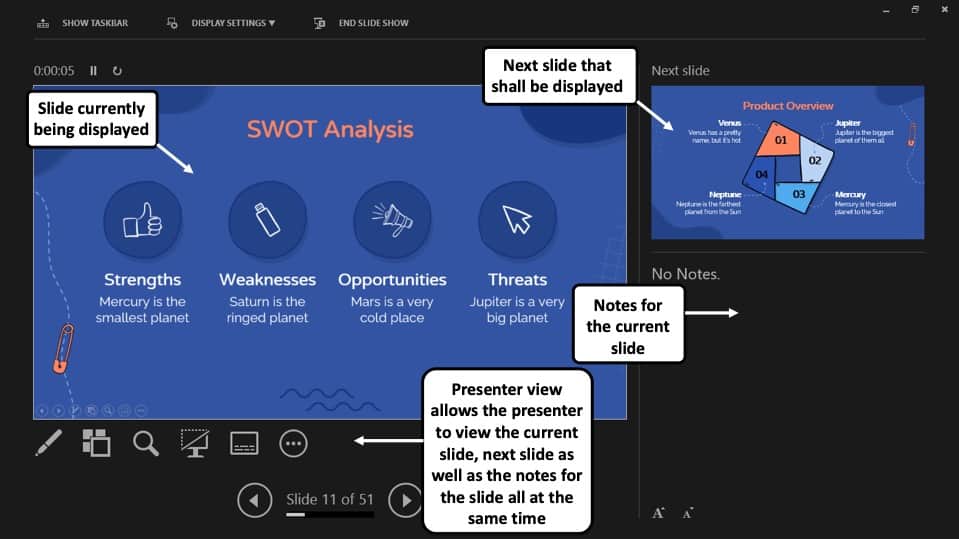
This is the view that you as a presenter are going to see while the audience is seeing the ‘Slide Show’ view.
Although you can give a presentation even in the slide show view, but it is always recommend to deliver the presentation using the “Presenter View” mode in PowerPoint as it provides you with additional features and benefits!
This view mode in PowerPoint will split the screen in multiple windows. The window on the left represents the current slide that is being displayed (the one that is visible to your audience).
The window in the top right section indicates the next slide in the queue. Whereas, the notes section displays the notes or key points made by each slide. Both, the notes section as well as the next slides window are only visible to the presenter and not to the audience!
The purpose of the “ Presenter View ” is to give the presenter all the aids to be prepared for the next slide and highlight the key points to be made on the current slide while delivering the presentation.
8. Slide Master View:
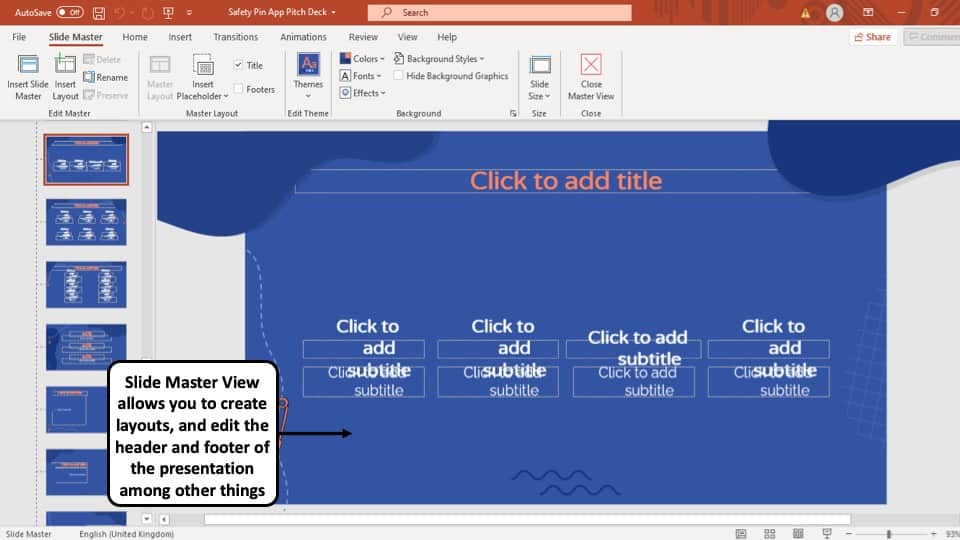
This view gives you a view of all the layouts used on the slides of your PowerPoint presentation.
The ‘ Slide Master View ’ option allows you to edit all the aspects of the layouts in your presentation such as fonts, background, color, and pretty much everything you can think of.
You can edit all the slide layouts of the presentation. Furthermore, you can also edit the header and footer of the presentation using the “ Slide Master View ” in PowerPoint.
4. How to Open the Presenter View in PowerPoint?
There are 2 different ways you can enter into Presenter View in PowerPoint –
- Using Slide Show View
- Using the short cut key i.e. Alt+F5
If you are using the Office 365 version of PowerPoint , you can actually directly access the “Presenter View” in the View section. Simply click on “View”. Then, click on “Presenter View”
Let’s look at both the methods quickly –
Method 1 – Using the Slide Show View
Step-1: Click on the ‘Slide Show’ button at the bottom right corner of the screen
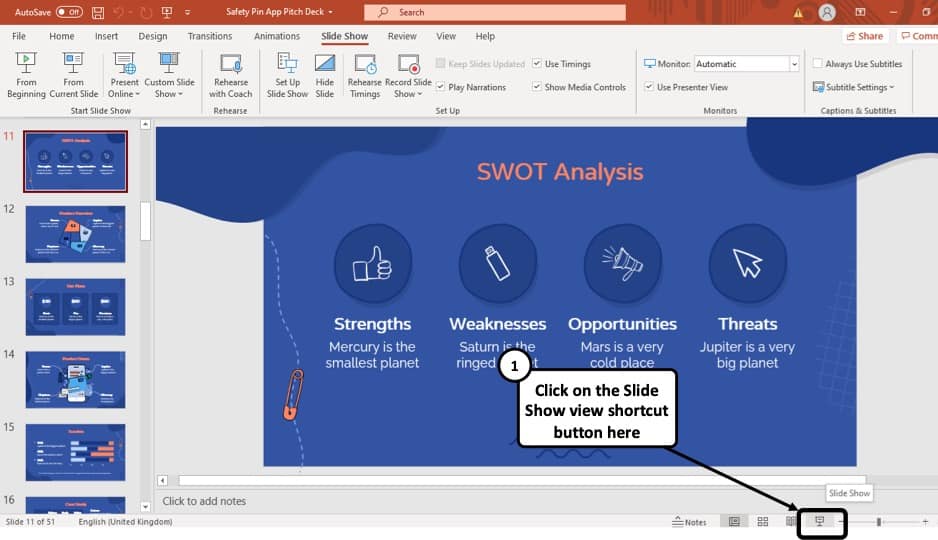
At first, you have to click on the ‘Slide Show’ button that looks like a projector screen which is located at the bottom right corner of your PowerPoint window. (as indicated in the image above)
Step-2: Right-click and choose “Show Presenter View”
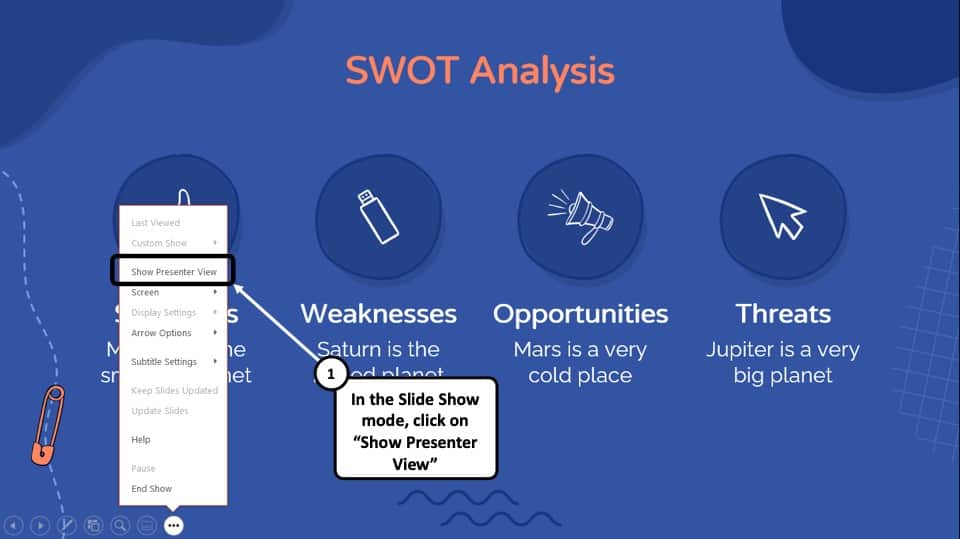
Once you are in the ‘Slide Show’ mode, using your mouse right-click anywhere on the screen. From the menu that appears, choose the “ Show Presenter View ” option
Method 2 – Using the Keyboard Shortcut
Alternatively, you can press ‘ Alt + F5 ’ on your keyboard and that will immediately open the ‘Presenter View’ mode.
The keyboard shortcut to open the “Presenter View” in PowerPoint on Mac is “Option+Enter” key.
5. How to Change PowerPoint Back to Normal View?
To change your PowerPoint back to ‘Normal View’ from ‘Slide Show’ mode, ‘Presenter View’ option or the ‘Reading View’ option, all you have to do is simply press the ‘ESC’ button on the keyboard of your computer. This will take you back to Normal View.
If you are using any other view apart from these 3 view modes in PowerPoint, you need to do the following –
If you are in a different viewing option, such as ‘Slide Sorter’ option, or the ‘Reading View’ option then you have to select the ‘Normal View’ option from the ‘View’ tab instead of the ‘Slide Sorter’ option or the different slide view option you are currently on.
More PowerPoint Related Topics
- How to Crop a Picture in PowerPoint? [Complete Step-by-Step Tutorial!]
- How to Give a Presentation on Zoom? A Helpful Resource!
- What is a Presentation Clicker? [And How to Use it!]
- How to Convert a PowerPoint to PDF? [A Simple Guide!]
- PowerPoint vs Google Slides: Which is Better? [ULTIMATE Test!]
- How to Change Bullet Style in PowerPoint? A Complete Guide
Credit to Pressahotkey (via Freepik) for the featured image of this article
- Slide Library
- Slide Library for PowerPoint
- Downloadable slides and shapes
- Slide Library search
- Search Library via shortcut keys
- Slide Library update alerts
- Rename or delete objects
- Share Slide Library
- Save slides or shapes to Slide Library
- Save presentation to Slide Library
- Manage Templates
- View all templates and set default
- Agenda Wizard
- Create Agenda Slides
- Update Agenda Slides
- Agenda Slide Numbering
- Navigate via Agenda
- Table of Contents
- Import Agenda Items
- Save Agenda Format
- Manage Colors
- Color Palette Toolbar
- Customize Color Toolbar
- Apply fill with outline color
- Recolor Charts
- View RGB color values & names
- Theme Color Tints and Shades
- Share Color Palette with team
- Insert Shapes
- Standard PowerPoint shapes
- Callouts / Speech Bubbles
- Hand Drawn Circles
- Harvey Balls
- Create Mini Slides
- Move to Multiple Slides
- Right Facing Centered Triangle
- Status Indicators
- Arrange and Align Shapes
- Select same color or size
- Select shapes by attribute
- Align shapes
- Align to first selected shape
- Choose Align anchor point
- Align using shortcut keys
- Copy paste position multiple shapes
- Straighten Lines
- Swap positions
- Distribute evenly
- Set Horizontal Gaps
- Set Vertical Gaps
- Squeeze or expand gaps
- Remove gaps
- Group Objects by Row
- Group Objects by Column
- Send to back, bring to front
- Send backward, bring forward
- Flip or rotate
- Group, ungroup and regroup
- Edit Shapes
- Same height, same width
- Copy paste position, size
- Resize shapes
- Slice shapes
- Multiply shapes
- Stretch shapes and fill gaps
- Toggle line weight and style
- Change margins toggle
- Chevrons same angle
- Paragraph Styles
- Save Paragraph Styles
- Apply Paragraph Styles
- Use PowerPoint Indent Increase/ Decrease to apply bullet styles
- Reset Paragraph Styles
- Ticks and Crosses bullets
- Paint Formatting
- Advanced Format Painter
- Position & Size Painter
- Table Format Painter
- Style Painter
- Text Format Painter
- Change Shape Painter
- Chart Format Painter
- Angles & Curves Painter
- Animation Painter
- Cycle Accent Colors
- Format Text
- Fit text to textboxes
- Wrap Text Toggle
- Merge Textboxes
- Split Textboxes
- Increase/ Decrease Font size
- Change Text Case
- Color Bold Text
- Delete Text or Replace
- Insert Superscript text
- Format Tables
- Create table from text boxes
- Convert table to text boxes
- Convert text to table
- Insert columns and rows
- Paste Excel data without source formatting
- Paste Excel data into text box tables
- Export Table or Box Table Data to Excel
- Set cell margins
- Express Table layout
- Table stripes
- Autofit columns
- Evenly space columns
- Align shapes over tables
- Harvey Balls for Tables
- Status Indicators for Tables
- Customizable PowerPoint Shortcut Keys
- Extra PowerPoint shortcuts
- Add PowerPoint shortcuts
- Search shortcut keys
- Reassign PowerPoint shortcuts
- Reset PowerPoint shortcuts
- McKinsey PowerPoint shortcuts
- F4 or Ctrl+Y redo or repeat
- Printable PowerPoint Shortcuts PDF
- How to Print a Custom Shortcuts list
- Search Shortcut Keys
- Searchable PowerPoint Shortcuts list
- Format Toolbar Overview
- Format Toolbar Layout Options
- Lock or Unlock Objects
- Lock objects
- Lock objects to the Slide Master
- Unlock objects
- Proofing Tools
- Fix Lines & Outlines
- Fix Layout, Transitions, Animations
- Fix Punctuation & Language
- Fix Margins, Bullets, Indents
- Check for Confidential items
- Reduce File Size
- Check Slide Master
- Sync Template Settings
- Set Proofing Language
- Change set language for PowerPoint presentations
- Flip PowerPoint Slides
- Flip Slides for Translation
- Slide Numbering
- Manage Slide Numbering
- Slide Numbers with totals
- Add words to Slide Numbers
- Change Starting Slide Number
- Skip Slide Numbers on Hidden Slides
- Slide Navigator
- Footers & Footnotes
- Filename Footer
- Enlarge Footnotes
- Refine Slides
- Add summary slide
- Format slide title
- Display No Fly Zone
- Send slide to appendix
- Camouflage mode
- Format Painter
- Set Grayscale
- Format Images
- Compress file size
- Format Charts
- Charts Toolbar
- Config Options
- Customize Settings
- Dark Mode Display
- Review Slides
- Customizable Status Stamps
- Sticky Notes
- Tag slides with filename and page number
- Share Slides
- Email selected slides in PPT or PDF format
- Print selected slides
- Save selected slides
- Slide Library for Teams
- Team Slide Library
- Create multiple Team Slide Libraries
- Synchronize Team Slide Libraries
- Synchronize Team Slide Library to your company Dropbox/ Box/ OneDrive folder
- Updating your Team Slide Library
- Import entire presentation to the Slide Library
- Share Slide Library with a colleague
- Share Custom Settings
- Share Custom Settings with Team
- Getting Started
- Getting started with PPT Productivity add-in for PowerPoint
- Downloadable PowerPoint Elements for Slide Library
- Tutorial - How to Create Custom Paragraph Styles for PowerPoint
- Can I use PPT Productivity on a Mac?
- PPT Productivity Basic Tools Tutorial
- PPT Productivity Plus Tools Tutorial
- New Features
- August 2023 update: Color Toolbar enhancement, new icons and more
- February 2023 update: New Slide Libraries available to download!
- January 2023 Update: Agenda Wizard, Format Painters + More
- How to copy and paste formatting in PowerPoint
- PowerPoint How To
- What are the most popular PowerPoint shortcuts?
- Where are PPT templates stored? Finding templates in PowerPoint
- Pasting data into a PowerPoint table without source formatting?
- Consulting Toolkit
- How to create effective consulting slides using Minto Principles
- Missing the McKinsey PowerPoint Shortcuts?
- Missing the Accenture QPT for PowerPoint?
- Missing the BCG PowerPoint Tools?
- Missing the Bain Toolbox for PowerPoint?
- How to add Stamps or Stickers to PowerPoint slides?
- Looking for a Consulting PowerPoint Toolbar?
- Top 10 PowerPoint Hacks / Shortcuts used by strategy consultants
- PowerPoint Tips
Mastering Presenter View in PowerPoint for Online Presentations
- June 6, 2024
Microsoft PowerPoint's Presenter View, also known as Presenter Mode in PowerPoint, is a great tool for maintaining your presentation flow and engaging your audience. This guide will walk you through the steps for how to use presenter view in PowerPoint, tailored for both single and dual monitor setups, and provide tips for presenting on Zoom, Microsoft Teams and Google Meet. We’ll also cover common troubleshooting tips to ensure a seamless presentation experience.
Setting Up Presenter View in PowerPoint
Step 1: preparing your presentation:.
- Open your PowerPoint presentation.
- Click on the “Slide Show” tab on the Ribbon.
- Check the “Use Presenter View” box (refer to the image below for guidance).

Step 2: Configuring Display Settings
Additional steps if you are using dual monitors:
- Connect your second monitor.
- In PowerPoint, go to the “Slide Show” tab and click “Set Up Slide Show.”
- Under “Multiple monitors,” select your primary display as “Automatic” or select the monitor you want to use for Presenter View.
- Click “OK.”

Presenting on Zoom with PowerPoint Presenter View
Presenting in zoom via dual monitor setup.
- Start your Zoom meeting and share your screen.
- Select the window with your PowerPoint presentation (the one that shows your Presentation).
- When you have a share screen active in Zoom, a thin green bar will display around the window being presented - it's worth checking to make sure you can see the thin green bar around the screen you are presenting, rather than your Presenter view)
- Start your presentation. Your audience will see your slides, while you see the Presenter View.

Presenting in Zoom via Single Monitor Setup
How to view notes in PowerPoint while presenting with one monitor - in Zoom:
- Open your PowerPoint presentation and start the slide show.
- In Zoom, select “Share Screen” and choose your presentation window.
- When you have a share screen active in Zoom, a thin green bar will display around the window being presented.
- You can use Alt+Tab to switch between Zoom controls and Presenter View.
Presenting on Google Meet with Presenter Mode in PowerPoint
Presenting in google meet with dual monitor setup.
- Start your Google Meet call and click the “Present now” button (refer to the image below)
- Choose the “Window” option and select your PowerPoint presentation from the available windows (refer to the second image below for an example).
- Start your presentation. Your audience sees the slides, while you see the Presenter View.
Presenting in Google Meet with Single Monitor Setup
How to view notes in PowerPoint while presenting with one monitor - in Google Meet:
- Start your presentation in Presenter View.
- Use Alt+Tab to navigate between Google Meet and Presenter View.

Presenting on Microsoft Teams with PowerPoint Presenter View
Dual monitor setup.
- Start your Microsoft Teams meeting.
- Click the “Share” button.
- Choose the window with your PowerPoint presentation (the one that shows Presenter View).
Single Monitor Setup
- Select your entire screen or the window with your PowerPoint presentation.
- Use Alt+Tab to switch between Microsoft Teams and Presenter View.
How to turn off Presenter View in PowerPoint
Once you have completed presenting, you can turn off presenter view
Tips for a Seamless Presentation with PowerPoint Presenter View
- Practice Beforehand: Familiarize yourself with Presenter View’s features, such as the timer, notes, and navigation controls.
- Use Notes Wisely: Presenter View allows you to see your notes without displaying them to the audience. Keep notes concise and relevant.
- Engage with Your Audience: Maintain eye contact with the camera, not the screen. Use the pointer or annotation tools to highlight key points.
- Check Your Setup before the event: Test your audio, video, and internet connection before the presentation. Have a backup plan in case of technical difficulties.
Troubleshooting Common Issues in PowerPoint Presenter View
Here are some troubleshooting suggestions for common issues when presenting using PowerPoint presenter mode:
- Go to the “Display Settings” in Presenter View and swap displays (refer to the screenshot below for guidance on how to find this option), or simply stop your share and then restart the share so that you can select the correct screen
- Ensure your monitor configuration is correctly set in your operating system settings.

- Close unnecessary applications to free up system resources.
- Ensure a stable internet connection.
- Reduce video resolution in your meeting application if necessary.
- Check your microphone and speaker settings in your meeting application.
- Ensure your audio devices are properly connected and selected.
- Double-check the screen/window you are sharing.
- Verify permissions and settings in your meeting application.
- Ensure you are using a version of PowerPoint that supports Presenter View (available in Microsoft 365 and certain standalone versions).

See our tools at work
Book a personal demo with our PPT professionals

Start 30 Day Free Trial
Start your 30 day free trial - Microsoft Office for Windows
Download and Install
Existing customers download to install on a new computer
Related productivity tips

How to organize PowerPoint Presentations with PowerPoint Sections
What are PowerPoint Sections? PowerPoint sections are section breaks which you can use to group ...

How do I get more icons in PowerPoint?
This hints and tips post gives you an overview of what icons are, why icons in PowerPoint are ...

How to reduce file size of PowerPoint Presentations?
You’ve spent hours creating an awesome presentation, including lots of well thought-out images and...
How to use Presenter View in PowerPoint
- Categories: PowerPoint productivity , Presentation skills
- Comments: 1

Think of PowerPoint’s Presenter View like the cockpit of an aeroplane (or airplane for our American readers!). Like an experienced pilot, you have all the controls you need at your fingertips when you’re navigating your slides, whether you’re presenting online or in person, helping you give a seamless presentation and leave your audience seriously impressed.
Presenter View in PowerPoint works best if you have two monitors. On one monitor, you can display your slides for your audience to see. On the other, you have your own private view (which isn’t visible to your audience), where you can see your notes and the upcoming slide while you’re presenting.
How to start using Presenter View in PowerPoint:
– Open your presentation. – Select Slide Show in the top ribbon. – Make sure Presenter View is selected in the Monitors section. – Choose from the dropdown menu which monitor you want your presentation to appear on. (Presenter View will automatically appear on whichever monitor you don’t choose.) – When you’re ready to start presenting, click From Beginning in the Start Slide Show section of the PowerPoint ribbon, or click the Slide Show icon in the bottom right of the screen, or hit the Alt + F5 keys on your keyboard to start your presentation in Presenter View.

PowerPoint Presenter View’s most useful features (by number!):
- This is your current slide. This shows you what your audience can see. This should be the same content that is displayed on your other monitor. The timer in the top-left corner lets you keep an eye on how long you’ve spent on the slide so far, helping you to pace your presentation. You can pause or reset the timer using the icons to the right.
- Here you can see your speaker notes. While we don’t generally recommend that you read out your speaker notes like a script (because it can make you sound like a monotonous robot and make your audience disengage very quickly), it can be useful to have some prompts in the speaker notes so that you know what happens with each mouse click and so that you don’t forget the key points on each slide. You can use the font icons in the bottom left of this panel to make your speaker notes larger or smaller.
- The tracker shows you how far through your presentation you are. Click the forward or back arrows to navigate to your next or previous animation. Hitting the forward or back keys on your keyboard will do the same thing.
- This is a preview of your next animation or next slide. This shows you what’s coming up next, which helps you to transition seamlessly from one slide to another.
- The Pen and laser pointer: This allows you to write on or highlight a particular part of your slide as you present. Adding ink annotations while you’re presenting won’t change your original slides – you can choose whether to keep or discard your annotations when you end your slide show.
- The See all slides tool: Click this to view thumbnails of all the slides in your presentation without your audience seeing. This means you can jump straight to a specific slide without flicking through all the slides in between.
- The Zoom tool: Use this to magnify a specific part of your slide. This is handy if you need to draw your audience’s attention to a particular detail.
- The Black or un-black tool: Use this to blank out the screen the audience sees. This is helpful whenever you want to release your audience’s attention from the slide content and back to you (e.g., during a Q&A). You can choose whether you want the blank screen to be black or white by clicking on the More slide show options icon at the far-right end of the toolbar.
- Toggle subtitles: Use this to turn automated subtitles on or off. You can adjust subtitle settings (such as language and where the subtitles appear on your slide) by clicking on the More slide show options icon.
- Click Show taskbar to open another program on your private monitor. This can be useful if you need to pull up another document without changing what your audience sees.
- Select Display settings to swap the monitors your slides and Presenter View appear on.
- Click End slide show when you’ve finished presenting. Hitting the Esc key on your keyboard will also close Slide Show mode and Presenter View.
And there you have it! Now you know everything there is to know about PowerPoint’s Presenter View. Give it a try next time you present – you might find it helps you to navigate and deliver your slides more confidently.
And for more tips on presenting, check out our ULTIMATE guide to presentation skills .
Related articles
7 steps towards presenting inclusively.
- Presentation skills
The goal of presenting inclusively is to make sure none of your audience are excluded due to their background or abilities. Even if you think you know your audience – many people could be experiencing invisible disabilities or situational limitations that could affect their ability to participate. But taking steps to ensure your presentation is inclusive and accessible is likely to benefit everyone!

5 presentation resolutions for 2024 (with BrightSlide!)
- PowerPoint productivity
Here are five things you should commit to doing this year powered by our productivity and design PowerPoint add-in BrightSlide!

Presentation tips & tricks advent calendar
- Presentation skills / Visual communication
It’s finally here, the holiday season! As the nights grow longer and the air grows colder, we know that all you want to do is settle down near a roaring fire, and snuggle up under the blankets with a good book PowerPoint presentation. Well BrightCarbon are here to help, with our festive presentation advent calendar.

Also you can resize the sections (next slide preview, notes etc) if necessary: https://imgur.com/a/2NnYECf
Leave a Reply Cancel reply
Save my name and email in this browser for the next time I comment.
Join the BrightCarbon mailing list for monthly invites and resources
Throughout all stages of this project we have had a world class experience. The team was uber-responsive and open to feedback and collaboration to ensure we were getting the best presentation possible. Marc Chaanine Jamaica Bearings

How to view Notes in PowerPoint with Presenter view
How to view notes in powerpoint presenter view, hemants@twc.
How to See Your Notes When Presenting in PowerPoint

As a presenter, delivering a seamless and confident presentation is key to making a lasting impression. However, it can be challenging to remember every detail of your presentation, especially if you have a lot of content to cover. Fortunately, with PowerPoint’s Presenter View, you can easily access your notes and confidently deliver your presentation. In this article, we will cover all aspects of using PowerPoint’s Presenter View to enhance your presentation.
Table of Contents
Why You Need to See Your Notes When Presenting in PowerPoint
Presenting without having your notes at hand can be daunting and can affect the quality of your presentation. Whether you are presenting in front of a small group or a large audience, you will need to have access to your notes. This will help you deliver your presentation confidently, as you will have a clear idea of what to say or do next. In addition, having your notes visible can help you stay focused on the topics you want to cover and avoid straying off-topic.
Another reason why it is important to see your notes when presenting in PowerPoint is that it can help you manage your time effectively. By having your notes visible, you can keep track of the time and ensure that you are covering all the important points within the allocated time frame. This can help you avoid rushing through the presentation or running out of time before you have covered all the key points.
Furthermore, having your notes visible can also help you engage with your audience better. When you are confident and well-prepared, you are more likely to make eye contact with your audience and use body language effectively. This can help you build a connection with your audience and keep them engaged throughout the presentation.
How to Access Presenter View in PowerPoint
Before you can access Presenter View, you need to have a PowerPoint presentation open in Slide Show mode. Once your presentation is open, simply click on the ‘Slide Show’ tab and check the box beside ‘Use Presenter View.’ Your screen will then automatically switch to Presenter View, allowing you to see your notes and other helpful controls.
Presenter View is a great tool for giving presentations, as it allows you to see your notes and upcoming slides while your audience only sees the current slide. You can also use Presenter View to zoom in on specific parts of your slide, draw on your slides, and even use a virtual laser pointer to highlight important information. To exit Presenter View, simply press the ‘Esc’ key on your keyboard.
Understanding the Presenter View in PowerPoint
Presenter View is a powerful tool that enables you to manage your presentation effectively. It comprises several elements, including:
- The slide display area, which shows the slide that your audience sees.
- The notes section, which displays any text that you have added as notes or comments.
- The timer, which can help you stay within your allotted time.
- The navigation controls, which let you move forward and backward in your presentation easily.
- The zoom slider, which enables you to zoom in and out of your slides for added detail.
- The laser pointer and highlighter tools, which allow you to emphasize important points on your slides.
Presenter View also allows you to preview upcoming slides, giving you a chance to prepare for the next section of your presentation. This feature can be especially helpful if you need to refer to specific information on a later slide.
In addition, Presenter View provides a way to keep your audience engaged by allowing you to add annotations to your slides. You can draw attention to specific areas of your slide, highlight key points, or even add additional information that may not be included in the slide itself.
Setting Up Presenter View: Step-by-Step Guide
If you want to customize your Presenter View experience, follow these steps:
- On the ‘Slide Show’ tab, click ‘Set Up Slide Show.’
- Under ‘Multiple Monitors,’ select the ‘Use Presenter View’ checkbox.
- If you’re using a single monitor, select the ‘Display slide show on’ option and choose your primary monitor.
- If you’re using dual monitors, select the ‘Display slide show on’ option and choose the monitor that you want to display Presenter View on.
- Customize the Presenter View by selecting the options that you want to use, such as speaker notes, the timer, and the navigation controls.
- Click ‘OK.’ Your Presenter View should now be set up.
It’s important to note that not all versions of PowerPoint have the Presenter View feature. If you don’t see the ‘Use Presenter View’ checkbox under ‘Multiple Monitors,’ it’s likely that your version of PowerPoint doesn’t support this feature. In this case, you may need to upgrade to a newer version or use a different presentation software that offers Presenter View.
How to Customize Presenter View Settings in PowerPoint
If you have specific preferences for Presenter View, you can customize it by following these steps:
- Click the ‘Settings’ button in the Presenter View toolbar.
- Select the options that you want to use, such as the color scheme, font size, and slide size.
- Click ‘Save Changes’ to apply your changes.
Customizing your Presenter View settings can greatly enhance your presentation experience. For example, you can choose to display your notes on one screen while your audience sees only the slides on the other screen. Additionally, you can select the option to display a timer or a clock to help you keep track of time during your presentation. Experiment with different settings to find what works best for you and your audience.
Using Presenter View on Dual Monitor Setup
If you have a dual-monitor setup, you can use Presenter View to present your slides on one screen while managing your notes and tools on the other screen. To do this, simply select the ‘Use Presenter View’ checkbox under ‘Multiple Monitors’ in the ‘Set Up Slide Show’ dialog box. Once you start presenting, the Presenter View screen will appear on the secondary monitor, while the slides will appear on the primary screen.
Presenter View is a great tool for presenters who want to keep their notes and tools hidden from the audience. With Presenter View, you can see your notes, upcoming slides, and a timer, while your audience only sees the current slide. This feature is especially useful for longer presentations, where you may need to refer to your notes or keep track of time.
Another benefit of using Presenter View is that it allows you to easily navigate through your presentation. You can use the arrow keys on your keyboard to move forward or backward through your slides, or you can use the thumbnails on the Presenter View screen to jump to a specific slide. This makes it easy to adjust your presentation on the fly, without having to interrupt the flow of your presentation.
Troubleshooting Common Issues with Presenter View in PowerPoint
If you experience common issues with Presenter View, such as notes not displaying correctly, audio not working, or distorted visuals, try these troubleshooting tips:
- Make sure that your computer meets the minimum system requirements for using Presenter View.
- Check that the correct audio output is selected in the control panel.
- Review your slides and notes to ensure that there are no formatting errors.
- Try closing other open applications to free up system resources.
- Ensure that your computer is updated with all available updates.
- Try reinstalling or repairing PowerPoint to eliminate any software conflicts.
However, if these troubleshooting tips do not resolve your issues, there may be other factors at play. One possible cause of issues with Presenter View is outdated or incompatible drivers for your computer’s graphics card. Check with your computer manufacturer or graphics card manufacturer to see if there are any updates available.
Another potential issue could be related to your computer’s display settings. Make sure that your display settings are optimized for the resolution and aspect ratio of your presentation. You may also want to try adjusting the scaling settings to see if that improves the display of your slides and notes.
Tips and Tricks for Effective Note-taking During Presentation
To get the most out of Presenter View, try these effective note-taking tips:
- Organize your notes by slide or topic to stay on track during the presentation.
- Use bullet points and keywords to keep your notes concise and easy to read.
- Include cues or action words to remind you of any demonstrations, animations, or other interactive elements in your presentation.
- Use the highlighter tool to draw attention to the most critical points.
Enhancing Your Presentation with Presenter View
Presenter View can enhance your presentation in several ways, such as by allowing you to add visual aids and multimedia elements, manage your time effectively, and engage your audience. By using Presenter View, you can keep your presentation on track, highlight key information, and maintain your audience’s attention throughout.
The Importance of Rehearsing Your Presentation with Presenter View
Practicing your presentation with Presenter View can help you become familiar with the interface, identify any errors or issues, and ensure that your presentation will run seamlessly. Use Presenter View during your presentation rehearsal to simulate the actual presentation environment and get a feel for how it works.
Taking Advantage of the Laser Pointer and Highlighter Tools in Presenter View
The laser pointer and highlighter tools are handy for emphasizing key points on your slides and improving audience engagement. To use them, simply press and hold the ‘Ctrl’ key and click the mouse to activate the laser pointer or highlighter. Release the key to deactivate them.
How to Switch Between Slides and Notes during a Presentation
If you need to switch between slides and notes during your presentation, simply click the ‘Notes’ button in the Presenter View toolbar. This will display your notes and allow you to scroll through them as needed.
Utilizing the Timer and Countdown Features of Presenter View
The timer and countdown features are useful for keeping your presentation on track and ensuring that you do not exceed your allotted time. To use them, simply enable the ‘Timer’ feature in the ‘Settings’ section of Presenter View. You can then set the countdown time and choose whether to display it during the presentation or keep it hidden.
Sharing Your Screen Using Presenter View in Microsoft Teams or Zoom Meetings
If you are using Microsoft Teams or Zoom Meetings to deliver your presentation remotely, you can still use Presenter View by sharing your screen. To do this, simply select the ‘Share Screen’ option and choose the ‘Presenter View’ screen. This will allow you to present your slides while keeping your notes and controls visible to you for an uninterrupted presentation experience.
By following the steps and tips outlined in this article, you can use PowerPoint’s Presenter View to deliver a polished and professional presentation that wows your audience. Always remember to rehearse your presentation before the actual day so that you’re comfortable with the tools and settings for Presenter View, and ready to tackle any issue that might arise.
By humans, for humans - Best rated articles:
Excel report templates: build better reports faster, top 9 power bi dashboard examples, excel waterfall charts: how to create one that doesn't suck, beyond ai - discover our handpicked bi resources.
Explore Zebra BI's expert-selected resources combining technology and insight for practical, in-depth BI strategies.

We’ve been experimenting with AI-generated content, and sometimes it gets carried away. Give us a feedback and help us learn and improve! 🤍
Note: This is an experimental AI-generated article. Your help is welcome. Share your feedback with us and help us improve.

Present Better with PowerPoint Presenter View: Tips & Tricks
The PowerPoint presenter view is the ideal tool for your presentation. The PowerPoint presenter view is the ideal tool for your presentation. It allows you to display your speaker notes and slides on your computer while presenting. Meanwhile, your audience will see the presentation without your notes on another screen or projector.
What is PowerPoint presenter view?
The PowerPoint presenter view is a presentation mode that allows presenters to see a preview of the next slides as well as their speaker notes. The advantage of this mode is that your audience will only see the current slide and nothing else.
PowerPoint presenter view: advantages

Presenter view offers a number of features that can help you streamline and improve the flow of your presentations:
1. You can add notes to each slide. This gives you more freedom and you won’t have to struggle with clumsy index cards. You can individually design the notes for each slide and, when you switch slides, you’ll see that slide’s notes as well.
2. You always see the current slide number (e.g., slide 5 of 13). That way, you can begin preparing for the next slide. You receive an overview of the entire presentation throughout.
3. A preview image on the side of your presentation always shows you the next slide.
4. A timer notifies you of how much time has elapsed. This is especially helpful if you have a limited amount of time to present.
5. You can use the pen tools to mark, highlight and augment your slide content . These freehand markups can even be saved afterwards.
6. You can view a thumbnail overview of all your presentation slides. This lets you choose slides freely and jump from slide to slide.
7. You can use the magnifying glass to enlarge individual sections of the current slide. The virtual laser pointer allows you to highlight specific points .
8. During breaks and discussions, you can fade to a black screen and don’t have to turn off the projector. This allows you to restart the presentation in less time.
How to set up PowerPoint presenter view with a projector
PowerPoint presenter view requires two separate monitors. This often includes a projector. Here’s how to properly set up a projector:
1. Connect your laptop to the projector. Make sure the laptop isn’t switched on.
2. When you turn on the laptop, the projector will recognize it as a second screen.
3. When you start Microsoft PowerPoint, you should see the same image on both screens.
4. Now press the Windows + P key combination and then select Extend . Click on the check mark to the right of Presenter View in the Slide Show tab.

5. You’ll now see the different views on your two monitors. As the presenter, you’ll see the presenter view while your audience will see the current slide.
6. Normally, presenter view is automatically displayed on the correct monitor (namely, yours). If it still appears on the audience screen, set it to Primary Monitor in the Monitor drop-down menu. Presenter view should now run on your monitor.

How to disable PowerPoint presenter view
To disable presenter view during your presentation, simply uncheck the Presenter View box in the Slide Show tab.
Tips for optimal use of the PowerPoint speaker view
1. practicing the presentation in advance.
If you want to use this tool effectively, you should be confident in using it . Therefore, test it extensively beforehand to be able to confidently operate the tool when it matters. In addition, also go through your presentation whilst projecting the speaker view. This way you can guarantee a more fluent presentation and fill in missing or insufficient notes.
2. Designing effective presentation notes
To ensure your notes are effective, keep them concise and to the point so you can access them quickly and easily during the presentation. Avoid long paragraphs and instead focus on bullet points that summarize the main ideas and important details .
By highlighting key terms or using abbreviations , you can make your notes easier to read. Your notes should also be large enough. To adjust the size of notes and previews, simply drag the edges of the relevant elements until they reach the desired size.
Be sure to structure your notes well to support the flow of your presentation and ensure a smooth transition between slides.
3. Managing time and breaks during the presentation
The integrated timeline allows you to always keep track of time during the presentation. To make the best use of your time, it is important to plan your presentation carefully and include breaks, if necessary, to give your audience time to process the information.
Be sure to use pauses deliberately, for example, to answer questions or emphasize important points. Also use the time display to keep track of your presentation speed so you don’t speak too fast or too slow to keep your audience’s attention.
This way, you guarantee a well-structured and engaging presentation that is both informative and enjoyable for your audience.
4. Integration of interactive elements
It’s no secret that interactivity in presentations helps keep the audience’s attention . Speaker View in PowerPoint offers the possibility to insert media and interactive elements into your presentation to make it more visually appealing and interesting.
For example, you can integrate videos, audio clips, animations, and interactive polls . Use the Speaker View to control the flow of media playback and make sure everything works smoothly.
For more ideas on how to make your presentations interactive, see the article “ Interactive presentations “.
5. Updating slides
PowerPoint presenter view allows you to update slides during your presentation. Dies This is really useful if you’ re in a team working on your presentation and changes are still being made, possibly right up to the last minute. To activate this setting, go to Set Up Slide Show from the Slide Show tab and select Keep slides updated .

Pro tip: Use shortcuts during your presentation
Shortcuts are keyboard combinations that allow you to quickly access certain PowerPoint functions. Here are five useful shortcuts which can simplify your presentations, especially in presenter view:
- Fade to the next slide by pressing the Enter key or the right or down arrow keys .
- To go back to the previous slide, press either the up or left arrow key .
- To jump to the last slide of your presentation, press the End key .
- If you want to skip slides during your presentation, press the slide number on your keyboard + Enter .
- To make your screen appear white or black, select either W or the comma key for a white screen and B or the period key for a black screen . These functions can be especially helpful when you want to make sure that the audience’s entire attention is on you and not the screen.
For more useful shortcuts to make working with PowerPoint easier, feel free to check out our blog .
Use PowerPoint presenter view for better presentations
Presenter view makes it much easier for you to present and navigate your presentation. Thanks to many useful features, you can make your presentation more fluid and hold your audience’s attention.
Feel free to contact us at [email protected] with any questions about presenter view and PowerPoint in general. We’ll help you out.
Are you looking for visually supportive and professionally designed slide templates? Feel free to have a look around our store. Here we have numerous slides prepared for you to download on a wide variety of (business) topics. Take a look today! ► To the store
Share this post
- share
- save

Design Thinking: Problem Solving with a Difference

Why Corporate Mission Statements Are So Important

7 Tips & Learnings from the Apple Keynote

May 9, 2022
Edit your notes in Presenter view in PowerPoint
Victoria Tran
- Add our blog to your RSS feed reader" href="/rss/blog.xml" data-bi-name="RSS Subscription" data-bi-id="rss_feed" data-bi-bhvr="120" data-bi-socchn="RSSSubscription" title="Microsoft 365 Insider Blog RSS" target="blank" class="d-inline-block">
Hey, Officer Insiders! My name is Victoria Tran, and I’m a Program Manager on the PowerPoint team. I’m thrilled to share that you can now edit notes in Presenter view in PowerPoint for Windows. No more switching to Editor view to type or change your notes, even during a presentation!
Edit notes in Presenter view
Accessing and editing your slide content whenever the need arises is a key part of the PowerPoint workflow. Whether you’re making an important edit to your speaker notes during a presentation rehearsal or jotting down feedback during your presentation, the ability to edit notes in Presenter view increases your productivity and eliminates the need to toggle between views.
We are excited to add this highly requested feature and expand the use of PowerPoint notes. In the future, we’ll continue to add support for editing notes in other views, such as Teleprompter view.
How it works
Ready to edit notes in Presenter view?

NOTE: You can also press the F6 key to select the Notes pane in Presenter view. When a white outline appears around the pane, press Enter and start typing to make any updates you want.
Known issues
Presenter view currently only allows basic formatting of notes, such as bold, italics, and underlining (via keyboard shortcuts). Formatting such as text color, highlighting, and other options aren’t yet available.
Tips and tricks
- If you are using keyboard commands to navigate through your slides during a presentation, make sure the text insertion point is not showing in the Notes pane. If it is, the arrow keys will move the insertion point around in the pane instead of navigating the slides.
- If you have two monitors, a full-screen slide will show on one monitor and Presenter view on the other monitor, featuring a view of the next slide, your speaker notes, a timer, and more. If you have just one monitor, you can press Alt + F5 to try out Presenter view.
Availability
We will be rolling the edit notes in Presenter view feature out to Office Insiders running Beta Channel Version 2204 (Build 15225.20000) or later.
Don’t have it yet? It’s probably us, not you.
Features are released over some time to ensure things are working smoothly. We highlight features that you may not have because they’re slowly releasing to larger numbers of Insiders. Sometimes we remove elements to further improve them based on your feedback. Though this is rare, we also reserve the option to pull a feature entirely out of the product, even if you, as an Insider, have had the opportunity to try it.
We want to hear from you! Please click Help > Feedback to submit your feedback about this feature.
Learn what other information you should include in your feedback to ensure it’s actionable and reaches the right people. We’re excited to hear from you!
Sign up for the Office Insider newsletter and get the latest information about Insider features in your inbox once a month!
Sorry, JavaScript must be enabled to use this app.
Home Blog PowerPoint Tutorials How to Work with Presenter View in PowerPoint
How to Work with Presenter View in PowerPoint

Not all presenters have excellent memory recall or the ability to speak flawlessly to the audience without any cues. However, many of them are good at hiding it by using Presenter View in PowerPoint. It is a presentation mode that enables the presenter to hide speaker notes and presentation controls from the audience while leveraging the various handy features offered by PowerPoint.
How to Use Presenter View in PowerPoint
To start using Presenter View, ensure it’s enabled before you begin your slideshow. If you are new to this feature, we recommend using this option to familiarize yourself with the various navigation options for this presentation mode. This might also be helpful if the PowerPoint templates you are accustomed to using might have animations that you might want to preview in this mode to understand when to give the next visual cue.
How to Enable Presenter View in PowerPoint
To enable PowerPoint presenter view, go to the SlideShow tab and make sure the Use Presenter View option is enabled. This will ensure that you can access Presenter View when you switch your slides to SlideShow mode.

Adjust Display Settings
You can swap between the presenter view and slideshow mode or duplicate the slideshow to exit the Presenter View from the Display Settings menu from the top toolbar.

Navigate Slides in Presenter View
Like any standard PowerPoint presentation in SlideShow mode, you can navigate between slides by using the arrow keys or with a presentation remote. Presenter View also provides slide navigation buttons to move the slides back and forth.

View Taskbar in Presenter View
The Show Taskbar option at the top enables viewing the taskbar. This can be helpful if you require using the taskbar, such as to view your battery charge, see the time, enable or disable another app from the taskbar menu, etc.

Reset or Pause the Timer
Once you start your presentation in Presenter View, a timer starts showing how much time you have spent in slideshow mode. This is an excellent way to understand how much time you have consumed for your session and to keep an eye out for good timekeeping. You can also hit Pause or reset the timer anytime.

Change the Size of the Speaker Notes
How to view notes in PowerPoint while presenting? If you have any speaker notes added to your slides, they will appear in Presenter View on your screen. You can increase or reduce the size of the text via the two options at the bottom of the speaker notes pane.

Using Annotation Tools in Presenter View
PowerPoint annotation tools can be accessed from the bottom toolbar in Presenter View. The Pen and Laser Pointer Tools button gives you access to the pen, ink colors, laser pointer, and eraser and also allows you to show or hide the mouse pointer via Arrow Options .

View All Slides in Presenter View
If you need to go back and forth to find a relevant slide for an ongoing discussion or query during your presentation, you can view all slides in Presenter View via the See all slides option.

Zoom Slides using Presenter View
PowerPoint’s Zoom feature lets presenters quickly pick a portion of the slide to zoom into. Presenter View allows you to leverage this feature by instantly selecting a portion of the slide to enlarge it after selecting Zoom into the slide option. To exit the Zoom mode or hit the Esc key.

Black or Unblack SlideShow
Sometimes, you might want to turn the screen blank for a while, such as during a mid-presentation break. The Black or Unblack SlideShow option blanks the slides for your audience while continuing to show you all navigation options via Presenter View.

Toggle Subtitles in Presenter View
One of the most revolutionary features introduced by Microsoft for PowerPoint over the past decade has been Live captions. This feature enables subtitles by converting speech to text as you present. You can toggle Live subtitles on or off while in presenter view to help your audience read what you speak.

Toggle Camera in Presenter View
Like subtitles, you can also toggle the camera on or off in Presenter View.

End Slideshow in Presenter View
There are different ways to end or exit a SlideShow from Presenter View. You can hit the Esc key or click End Slide Show . Similarly, you can click the three dots at the bottom and select End Show .

More Slideshow Options
Other than the various visibility prominent menus available to navigate, annotate, and present your slides, you can also find a few additional options via More slideshow options , which are accessible via the three dots at the bottom toolbar. These include adjusting the position of the subtitles, turning your screen white or black, ending the slideshow, etc.

How to Use Presenter View on a Single Screen
While Presenter View can be enabled to work with dual monitors, you can also use Presenter View on a single monitor with remote meeting apps like Zoom. A simple method for switching to Presenter View on a single monitor is to click the three dots ( More slideshow options ) at the bottom in SlideShow mode and select Show Presenter View .

You can also switch to Presenter View on a single monitor anytime using the ALT+F5 hotkey.

The presenter can easily manage a PPT in presentation mode, with the utility to view speaker notes, annotate or zoom slides, toggle subtitles or camera on or off, and keep your audience engaged via better slideshow management. However, if you’re new to this presentation mode, a bit of practice might help you avoid confusion when presenting before an audience in Presenter View for the first few times. For more information, check our article about PowerPoint presentation shortcuts .
Like this article? Please share
PowerPoint Tools, Presentation Skills Filed under PowerPoint Tutorials
Related Articles

Filed under Presentation Ideas • August 29th, 2024
How to Make a Presentation Longer: 7 Strategies to Master
Extend your talk in style. Join us to discover how to make a presentation longer while providing a high-end experience to your audience.

Filed under Presentation Ideas • August 22nd, 2024
How to Write a Presentation Script
The script of a speech is a vital aspect for a presentation’s success. Join us here to learn the process of writing a presentation script.

Filed under Business • August 7th, 2024
How to Moderate Question-and-Answer Sessions in Your Presentation
Reduce your anxiety over Q&A sessions by learning how to moderate this part of your presentations. A step-by-step guide.
Leave a Reply
Your current User-Agent string appears to be from an automated process, if this is incorrect, please click this link:
- Presentation Tips
What is a PPT and How to Make Impactful Presentations with PowerPoint?

PowerPoint Presentations, commonly known as PPTs, have become an essential tool in various fields such as business, education, and even personal use. With PowerPoint, you can convey information in a structured, visually appealing, and engaging manner. But what exactly is a PPT, and how can you make impactful presentations with PowerPoint? This blog will guide you through the basics and provide practical tips for creating presentations that captivate your audience.
What is a PPT?
A PPT is a file format used by Microsoft PowerPoint, a popular software application developed by Microsoft for creating digital presentations. Each PowerPoint presentation consists of a series of slides, which can include text, images, graphs, videos, and animations. The flexibility and user-friendly interface of PowerPoint make it a preferred choice for presenting information clearly and effectively.
Importance of a Well-Designed PPT
A well-designed PPT can significantly enhance your communication by:
- Clarifying Complex Information: Visual aids can simplify complex data, making it easier to understand.
- Engaging the Audience: Interactive elements and appealing visuals keep the audience interested and engaged.
- Professional Appearance: A polished presentation reflects professionalism and attention to detail.
- Memory Retention: Visual and auditory elements help the audience remember the content better.
How to Make Impactful Presentations with PowerPoint

Creating impactful presentations involves a combination of good design principles and effective content organization. Here are some key tips for creating effective PowerPoint presentations :
1. Plan Your Content
Before diving into the design, outline your content. Determine the key message you want to convey and organize your ideas logically. This will help you maintain a clear flow throughout your presentation.
2. Choose a Consistent Theme
Use a consistent theme for your slides to maintain a cohesive look. PowerPoint offers various built-in themes, or you can download free professional PowerPoint templates available online. These templates are designed to be visually appealing and save you time on design work.
3. Use High-Quality Images and Graphics
Visual elements play a crucial role in making your presentation engaging. Use high-quality images, icons, and graphics that are relevant to your content. Avoid using too many visuals on a single slide, as it can be overwhelming.
4. Keep Text Concise
Slides should support your spoken words, not substitute them. Utilize bullet points to emphasize important details and keep your text brief. Aim for a maximum of 5-6 bullet points per slide to avoid clutter.
5. Use Readable Fonts
Choose simple, readable fonts and ensure a good contrast between the text and background. Stick to a maximum of two different fonts throughout your presentation to maintain consistency. For tips on adding fonts to your presentations, check out our blog post on how to add fonts for unique presentations.
6. Incorporate Data Visualizations
Charts and graphs can help present data in a visually appealing way. Use them to highlight trends, comparisons, and key statistics. Make sure your data visualizations are clear and straightforward.
7. Add Animations and Transitions
Animations and slide transitions can make your presentation more dynamic. However, use them sparingly to prevent distracting your audience. Simple, subtle animations are often more effective than flashy effects.
8. Practice Your Delivery
Even the best-designed slides won’t have an impact if your delivery is poor. Practice your presentation multiple times to become familiar with the content and improve your confidence. Be mindful of your pacing, tone, and body language.
9. Engage with Your Audience
Involve your audience by asking questions, encouraging discussions, or incorporating interactive elements such as polls or quizzes. Engaging your audience keeps them interested and makes your presentation more impactful.
Using Free Presentation Templates
One of the best ways to enhance your presentation is by using free PowerPoint templates . These templates are designed by experts and provide a polished, professional look without requiring you to spend hours on design work.
Benefits of Using Free Templates
- Time-Saving: Quickly create presentations without starting from scratch.
- Professional Design: Access high-quality, professionally designed templates.
- Customization: Easily edit and tailor templates to match your brand or topic.
By using these free resources, you can focus on delivering your message effectively rather than worrying about the design details.
Creating an impactful PowerPoint presentation involves careful planning, effective content organization, and good design principles. By following the tips outlined in this blog, you can create professional presentations that will engage and inform your audience. Happy presenting!
Spread Love
Related blogs.

Arockia Mary Amutha
Arockia Mary Amutha is a seasoned senior content writer at SlideEgg, bringing over four years of dedicated experience to the field. Her expertise in presentation tools like PowerPoint, Google Slides, and Canva shines through in her clear, concise, and professional writing style. With a passion for crafting engaging and insightful content, she specializes in creating detailed how-to guides, tutorials, and tips on presentation design that resonate with and empower readers.
Recent Blogs

PowerPoint Presentations, commonly known as PPTs, have become an essential tool in various fields such as business, education, and even...

How to Draw on Google Slides: Easy Step-by-Step Guide
Drawing on Google Slides can significantly enhance your presentations, making them more engaging and visually appealing. Whether you’re a teacher,...

How to Include Business Report with Infographic Presentation
These days because we live in a data-driven business world, to be able to express complex information concisely and effectively...
SIGNUP FOR NEWSLETTER
August 26, 2024
How to enable Copilot in PowerPoint (Easy guide with screenshots)
Learn the quickest way to find, purchase, and enable Microsoft Copilot and use AI tools in PowerPoint
If you’re reading this page, you’re one of many frustrated users struggling with what should be a basic task: enabling Copilot in PowerPoint.
Believe it or not, enabling PowerPoint is a common issue that stems from a confusing design that makes it hard to purchase its very own AI companion. We’ve been there too, and it took us a bit of time to navigate Microsoft’s many account, profile, and sales pages to finally come up with a quick way of launching Copilot in PowerPoint and other Microsoft 365 apps.
To make your life easier, we’ll walk you through the crucial steps of subscribing to the right Copilot plan, after which the companion icon should appear on your PowerPoint ribbon. We’ll also explain how to make a presentation quickly with Copilot, and show you an AI alternative that could be a better fit for creating more professional slide decks.
How to subscribe to Copilot Pro from your Microsoft 365 account
Before you can use Copilot in PowerPoint (or any other Microsoft app), you’ll need a Copilot Pro subscription — the regular Copilot does not work in PowerPoint. The process can get a bit convoluted, so we’ll explain it in detail below.
- Sign in to your Microsoft 365 account , and click on the circle with your initials in the top right corner. In the menu that opens, click on “My Microsoft account”.

- Find and subscribe to Copilot Pro in your Microsoft account. Hopefully, you’ll see a large icon with a button that says “Try Copilot Pro” or “Get Copilot Pro.” If you do, click on it and subscribe to the service.

Can’t see Copilot Pro in your Microsoft 365 account? Here’s what you do
Sometimes, you won’t see any buttons or icons labeled “Copilot Pro” in your Microsoft 365 account, even though the regular (free) Copilot may show up. In this case, don’t waste your time sifting through the Microsoft account in hopes of finding the elusive AI tool. Instead, simply type “Copilot Pro” in Google search and click on the “Copilot Pro Plan & Pricing” result .

You should finally see a window that invites you to try Microsoft’s premium AI assistant, so go ahead and click “Start your free trial,” then subscribe to the service.

Once you see the screen below, Copilot Pro should become available in your PowerPoint app.

How to enable Copilot Pro in the web-based PowerPoint app
- Restart PowerPoint. After signing up for Copilot Pro, it’s best to restart Microsoft 365. Once you’ve signed out and back in, go ahead and open the PowerPoint app:

- Look for Copilot on the ribbon. The Copilot icon should show up on the right hand side on both the Single Line Ribbon:

And on the Classic Ribbon:

You’ve now enabled Copilot on your PowerPoint app! Go ahead and launch it by clicking on the Copilot button.
How to enable Copilot on the PowerPoint desktop app
Once you’ve subscribed, the Copilot icon should show up on the desktop PowerPoint app as well. Simply restart the program, then look for Copilot on the ribbon:

Now you can click on the Copilot icon and start using the assistant to make PowerPoint presentations.
Using Copilot to create PowerPoint presentations
With Copilot Pro, you can auto-generate PowerPoint presentations using AI.
Here’s how:
- Launch Copilot in PowerPoint by clicking on the corresponding icon in the ribbon.

- Choose “Create a presentation about” in the Copilot interface. Then, enter a prompt describing the presentation in the Copilot chat window:

- Review the slide deck. Your presentation should show up in a few minutes. At this point, you can review the slide content and imagery for accuracy and relevance — this is an important step you shouldn’t skip. The deck may look sleek at a glance, but the content may be a bit simplistic and repetitive, and the images may be less relevant than you’d want them to be (or absent altogether):

Best PowerPoint AI slide maker alternative to Copilot
Copilot is a decent starting point tool for making AI presentations. However, if you feel like the Copilot slides don't meet the bar of professionalism you need for a work or school presentation, try out Plus AI.
Plus AI is an add-on for PowerPoint and Google Slides that creates professionally-designed slide decks in minutes. Below, we’ll input use the same prompt in Plus that we used with Copilot above. And here is the slide deck Plus AI created:

In addition to providing a prompt to Plus AI , you can also use Plus AI to create a slide deck based on an uploaded document . This option (which Copilot lacks) allows you to create more information-rich presentations in which the AI maker creates slide content based on the data you specify.
You can read more about the best AI presentation makers (and see more examples) in our detailed reviews.
FAQs on using Copilot in PowerPoint
Why can’t i see the copilot icon in powerpoint .
Here are three possible reasons you don’t see the Copilot icon in PowerPoint:
- You don’t have a Pro subscription: The free version of Copilot comes with Microsoft 365. However, to get the AI assistant working in PowerPoint (or other apps in the Microsoft ecosystem) you’ll need to upgrade to the paid Pro version.
- You haven’t restarted PowerPoint after subscribing: Once you’ve subscribed to Copilot Pro, you need to restart PowerPoint; otherwise, the AI assistant may not show up on the slide maker’s ribbon.
- Your desktop PowerPoint app is out of date: Copilot may fail to show up if your PowerPoint app hasn’t updated. Make sure your settings allow automatic updates to avoid this scenario.
How to get access to Microsoft Copilot?
You can get access to both the free Copilot and the paid Copilot Pro version through your Microsoft 365 account . Log into Microsoft 365, click on your initials in the top right corner, then follow the “My Microsoft account” link in the menu that appears. Copilot should show up on the page that opens.
If you already have the Pro subscription, you can also access Copilot from the top ribbon of PowerPoint, Excel, and other apps in the Microsoft 365 ecosystem.
Is Copilot free with Microsoft 365?
There is a free version of Copilot that included with a Microsoft 365 subscription. This free AI assistant functions as a chatbot that can answer basic queries and create images.
However, the free Copilot does not work in apps such as PowerPoint. If you want an AI companion to help you make PowerPoint presentations, you’ll need to subscribe to Copilot Pro, which costs $30/month for business use.
Alternatively, you can opt for a more comprehensive AI-powered slide maker, like Plus AI. Plus AI’s feature-packed Pro plan enables you to auto-generate entire presentation-ready slide decks in just minutes and costs only $20 per month .
Enabling Copilot in PowerPoint: Final Thoughts
Once you get over the initial hurdles of subscribing for Copilot Pro, adding Microsoft’s AI companion to PowerPoint is a breeze. If you want to learn more about making presentations using AI — and checking out some worthy alternatives to Copilot — check out Plus AI’s resource library .
Latest posts
Latest post.

Announcing Plus AI for PowerPoint
The Plus AI PowerPoint add-in brings Plus AI to the Microsoft 365 ecosystem and offers new ways for teams and individuals to create PowerPoint presentations using AI
PowerPoint Karaoke: Rules, tips, and free slide decks
Overview of PowerPoint Karaoke, rules, and free slide decks for PowerPoint Karaoke
How to use ChatGPT to create a PowerPoint
Looking for ChatGPT for PowerPoint? Here's a step-by-step guide to using AI in PowerPoint and Google Slides
More resources
Extend your productivity by using these 10 best chrome extensions in 2024.
There’s a Google Chrome extension for every (digital) problem. But, where do you find them? Here are ten to transform your workdays from a slog to a success.
Find the right Notion Project Management template for you
Notion can do a lot of things and replace a lot of other tools in your library. In this article we’ll run through some of your best options for Notion project management templates.
How to embed Asana tasks In Notion
A step-by-step guide to embedding Asana tasks in Notion for increased team productivity
What are the ways that you can share your presentation so others can view it?
Discover various methods to share your presentation so others can easily view and access it.
Different Ways to Share Your PowerPoint Presentation
Method #1: uploading to google drive, step 1: save your powerpoint presentation.

Step 2: Upload to Google Drive

Step 3: Generate a Shareable Link

Step 4: Share the Link
Method #2: sharing directly from powerpoint, step 1: open your powerpoint presentation.

Step 2: Share as a Link

Step 3: Share the Link
Method #3: sending via email.

Step 2: Attach and Send via Email

Method #4: Using Online Platforms

Step 2: Upload to SlideShare

Frequently Asked Questions:
How do i ensure my powerpoint presentation remains private when sharing via google drive, can i share a powerpoint presentation directly from powerpoint if i don't have an internet connection, what are the file size limitations for sending a powerpoint presentation via email.
- Gmail: Up to 25 MB per email. If the file exceeds this limit, Gmail automatically uploads it to Google Drive and sends a link instead.
- Outlook: Up to 20 MB per email. Larger files can be sent via OneDrive with a link.
- Yahoo Mail: Up to 25 MB per email. Larger files can be sent using Dropbox integration.
- Other Email Clients: Check the specific file size limits as they can vary.
Create PPT using AI
Just Enter Topic, Youtube URL, PDF, or Text to get a beautiful PPT in seconds. Use the bulb for AI suggestions.
character count: 0 / 6000 (we can fetch data from google)
upload pdf, docx, .png
less than 2 min
Sanskar Tiwari
Founder at MagicSlides
What is the shortcut for opening a new presentation in PowerPoint
1 August 2024
How to apply a template to an existing presentation in PowerPoint
How to create a dos and donts slide in PowerPoint
How do I enable design ideas in PowerPoint?
How to delete a PowerPoint presentation completely
In a presentation, what is layout?
How to Create a QR Code for a PowerPoint Presentation
How to Email a PowerPoint Presentation
How can shapes enhance your PPT Presentation?
Stunning presentations in seconds with AI
Install MagicSlides app now and start creating beautiful presentations. It's free!

Get AI-Generated Presentations Ready in Seconds
Free AI PPT Tools
How to Create Interactive Polls and Surveys in PowerPoint Using Microsoft Forms

In today’s digital age, making your presentations more engaging and interactive is crucial. It is actually the most important aspect. You must be able to get your audience involved, whether you’re teaching a class or leading a team meeting. This approach will make your presentation unique, effective, and memorable.
I know what you’re thinking: ‘How can I achieve this creatively?’ The answer is by using interactive polls and surveys directly in your PowerPoint slides with Microsoft Forms.
Imagine you’re presenting a new project to your team and want quick feedback on the proposal. Or maybe you’re teaching a workshop and want to check participants’ understanding right away. By adding polls and surveys to your presentation, you can create a two-way conversation with your audience, making your sessions more engaging and interactive.
This article will walk you through how to create and add interactive polls and surveys to your PowerPoint presentations using Microsoft Forms. Ready to make your presentations more fun and engaging? Let’s get started and see how easy it is!
Step 1: Open Your PowerPoint Presentation
Start by opening the PowerPoint presentation where you want to include a poll or survey. Navigate to the slide where you plan to add the interactive element.
Step 2: Access Microsoft Forms
Go to the “Insert” tab on the ribbon at the top of your PowerPoint window. Here, you’ll find various options for adding content to your slide. Look for the “Forms” option to start integrating Microsoft Forms into your presentation.
Step 3: Create a New Poll or Survey
Click on the “Forms” button, and a pane will appear on the right side of your screen. You can either choose an existing form or create a new one. To create a new poll or survey, select “New Form.”
Step 4: Design Your Poll or Survey
In the Microsoft Forms pane, you can start adding questions. You can choose from different question types like multiple-choice, text, rating, or date. Customize your questions to fit the purpose of your poll or survey.
Step 5: Embed the Poll or Survey in Your Slide
Once you’ve created your poll or survey, it will automatically be embedded into your PowerPoint slide. You can resize and position it as needed. Your audience will be able to interact with the form directly within your slide during the presentation.
Step 6: Collect and Display Responses in Real-Time
As your audience submits their responses, you can display the results in real-time on your slide. This feature is especially useful for generating discussion or gathering immediate feedback during your presentation.
Final Thoughts
Integrating polls and surveys into your PowerPoint presentations using Microsoft Forms is an effective strategy to enhance audience engagement and increase interactivity. Whether your goal is to collect feedback, assess comprehension, or actively involve your audience, this tool provides a straightforward yet highly impactful solution.
So, why not try adding a poll or survey to your next presentation? It’s a small step that can make a big difference in how your message is received and remembered by your audience.
At SlideBazaar, we help you create engaging and memorable presentations. Choose from our collection of professional templates or opt for our custom design services for a personalized touch. Your presentations deserve to be elevated to new heights, and we’re here to help you achieve just that!
BROWSE BY CATEGORY
- PowerPoint Templates
- Keynote Presentations
- Infographic
- Free slides
QUICK LINKS
- Frequently Asked Questions
- Terms & Conditions
- Privacy Policy
- DMCA Policy
EMAIL NEWSLETTER
Get updates of our PowerPoint templates and slide designs before anyone else.

View a presentation without PowerPoint
If you don't have PowerPoint installed on your computer, you can still open and view presentations by using PowerPoint for the web or PowerPoint on your mobile device.
Use PowerPoint in a web browser
If you have a Microsoft account (hotmail.com, outlook.com, live.com, msn.com) or a Microsoft 365 work or school account, you can view and edit a presentation for free in a web browser. Save the file to OneDrive or Dropbox and use PowerPoint for the web to open it.
If you don't already have a Microsoft account, you can create one for free .
Get PowerPoint for a smartphone or tablet
The free mobile versions of PowerPoint let you open presentations on your smartphone or tablet:
Get PowerPoint from Google Play
Get PowerPoint from iTunes
PowerPoint Viewer has been retired
PowerPoint Viewer was retired on April 30, 2018. It's no longer available for download.

Need more help?
Want more options.
Explore subscription benefits, browse training courses, learn how to secure your device, and more.

Microsoft 365 subscription benefits

Microsoft 365 training

Microsoft security

Accessibility center
Communities help you ask and answer questions, give feedback, and hear from experts with rich knowledge.

Ask the Microsoft Community

Microsoft Tech Community

Windows Insiders
Microsoft 365 Insiders
Was this information helpful?
Thank you for your feedback.
PowerPoint Slide or Lecture Note References
This page contains reference examples for PowerPoint slides or lecture notes, including the following:
- PowerPoint slides available online
- PowerPoint slides from a classroom website
Use these formats to cite information obtained directly from slides.
If the slides contain citations to information published elsewhere, and you want to cite that information as well, then it is best to find, read, and cite the original source yourself rather than citing the slides as a secondary source.
Writers creating PowerPoint presentations in APA Style should present information clearly and concisely. Many APA Style guidelines can be applied to presentations (e.g., the guidance for crediting sources, using bias-free language, and writing clearly and concisely).
However, decisions about font size, amount of text on a slide, color scheme, use of animations, and so on are up to writers; these details are not specified as part of APA Style.
1. PowerPoint slides available online
Jones, J. (2016, March 23). Guided reading: Making the most of it [PowerPoint slides]. SlideShare. https://www.slideshare.net/hellojenjones/guided-reading-making-the-most-of-it
- Parenthetical citation : (Jones, 2016)
- Narrative citation : Jones (2016)
- When the slides are available online to anyone, provide the site name on which they are hosted in the source element of the reference, followed by the URL of the slides.
2. PowerPoint slides from a classroom website
Mack, R., & Spake, G. (2018). Citing open source images and formatting references for presentations [PowerPoint slides]. Canvas@FNU. https://fnu.onelogin.com/login
- Parenthetical citation : (Mack & Spake, 2018)
- Narrative citation : Mack and Spake (2018)
- If the slides come from a classroom website, learning management system (e.g., Canvas, Blackboard, Moodle, Sakai), or company intranet and you are writing for an audience with access to that resource, provide the name of the site and its URL (use the login page URL for sites requiring login).
- If the audience for which are you writing does not have access to the slides, cite them as a personal communication .
PowerPoint slide references are covered in the seventh edition APA Style manuals in the Publication Manual Section 10.14 and the Concise Guide Section 10.12
Free Shipping and Fast Delivery Within 2-3 Days
Best Practices for Online Presentations:The Ultimate Guide

Online presentations have become an integral part of our professional and personal lives, especially in today's digital age. Whether you're presenting to colleagues, clients, or a virtual audience, delivering a flawless online presentation requires careful planning, preparation, and execution. In this comprehensive guide, we'll explore the best practices for online presentations, covering crafting engaging content, essential tips, mastering virtual presentation technology, overcoming challenges, and advanced techniques to take your presentations to the next level.
Crafting Engaging Virtual Presentation Content
- Simplify Your Slides : Keep your slides concise, visually appealing, and easy to read. Use a clear, legible font size (at least 24 points) and limit the amount of text on each slide. Opt for high-quality images, charts, and graphics to support your key points and maintain audience interest.
- Use Visual Aids : Incorporate relevant images, videos, and graphs to break up text and make your slides more engaging. Ensure that all visuals are high-resolution and clearly visible to your audience. Use animations and transitions sparingly to avoid distracting from your core message.

Essential Tips before Deliver a Flawless Virtual Presentation
- Proper Webcam & Lighting : Invest in a high-quality webcam and ensure that your lighting is optimal to make a great first impression on your audience. Position your webcam at eye level and use soft, natural light to illuminate your face evenly, avoiding harsh shadows or back lighting. Proper lighting can significantly enhance the quality of your video feed. In addition, Position yourself facing a window for natural light or use a ring light or desk lamp to illuminate your face. Avoid sitting with a window behind you, as it can create a silhouette effect.
- Check Internet Connection : A stable and fast internet connection is crucial for a smooth virtual presentation. Test your connection speed beforehand and consider using a wired connection instead of Wi-Fi for better reliability. Have a backup plan, such as a mobile hotspot, in case of connectivity issues.
- Dress Professionally : Even though you're presenting virtually, dressing professionally can boost your confidence and make a positive impression on your audience. Choose attire that is appropriate for the occasion and avoid busy patterns or distracting accessories.
- Eliminate Distractions : Minimize background noise and distractions to keep your audience focused on your presentation. Close unnecessary applications, silence notifications, and inform others in your household about your presentation to avoid interruptions.
- Present in a Quiet Space : Find a quiet, dedicated space for your virtual presentation to minimize background noise and interruptions. If possible, use a room with a door that you can close and consider using a noise-canceling headset or microphone for better audio quality.
Mastering Virtual Presentation Technology
- Master the virtual presentation platform : Take the time to learn the features and capabilities of the virtual presentation platform you'll be using. Explore options such as screen sharing, chat, polls, and breakout rooms to engage your audience effectively.
- Test equipment : Before the presentation, thoroughly test your audio, video, and screen sharing capabilities to ensure a seamless experience. Check your microphone and webcam settings, and practice using the virtual presentation platform to avoid technical hiccups during the live event.
- Use Audience Engagement Tools : Incorporate interactive elements like live polls, Q&A sessions, and chat to keep your audience engaged throughout the presentation. Encourage participation by asking questions, seeking feedback, and fostering discussions.
Overcoming Virtual Presentation Challenges
- Managing Nerves and Anxiety : To manage nerves and anxiety, practice deep breathing exercises before your presentation. Take slow, deep breaths to calm your mind and reduce stress. Use positive self-talk and visualize a successful presentation to boost your confidence.
- Handling Technical Issues : Despite thorough preparation, technical issues can still arise. Have a backup plan in place, such as sharing your slides or notes with the audience in advance. Remain calm and communicate with your audience if you experience technical difficulties, and have a co-host or technical support on standby to assist if needed.
- Encouraging Audience Participation : To encourage audience participation, start by setting expectations and providing clear instructions on how to engage. Use icebreakers or polls to initiate interaction and create a welcoming atmosphere. Allocate dedicated time for Q&A and actively monitor the chat for questions and comments.

Advanced Virtual Presentation Techniques
- Using Body Language : Even in a virtual setting, body language plays a crucial role in effective communication. Maintain good posture, make eye contact with the camera, and use appropriate hand gestures to emphasize key points. Avoid fidgeting or making distracting movements.
- Varying Tone and Pace : Keep your audience engaged by varying your tone and pace throughout the presentation. Use vocal inflections to convey enthusiasm and emphasize important information. Adjust your speaking pace to allow for pauses and give your audience time to process the content.
Summarize the strengths and weaknesses of the presentation
- Collect feedback : Actively seek feedback from the audience through post-presentation surveys or sending follow-up emails. Let the audience share their thoughts, ask questions, and provide suggestions.
- Summarize and improve : Analyze the collected feedback. Summarize the strengths and weaknesses of the presentation. Incorporate valuable insights into future presentations to continuously improve your online presentation skills.
Delivering a successful online presentation requires a combination of technical proficiency, engaging content, and effective communication skills. By following the best practices outlined in this guide, you'll be well-equipped to navigate the challenges of virtual presentations and captivate your audience. Remember to invest in quality equipment, master the virtual presentation platform, craft compelling content, and engage your audience through interactive elements and storytelling. With practice and persistence, you'll become a confident and impactful virtual presenter, ready to tackle any online presentation with ease. If you have any other questions regarding online presentations, feel free to leave a message. Additionally, you are welcome to share the online presentation skills. Meanwhile, if you find this article useful, please share it with your friends or on social media.
What are the most important technical considerations for online presentations?
The most important technical considerations for online presentations include:
Ensuring a stable and fast internet connection
Investing in a high-quality webcam and microphone
Familiarizing yourself with the virtual presentation platform
Testing your audio, video, and screen sharing capabilities before the presentation
Having a backup plan in case of technical issues
How can I make my virtual presentation content more engaging?
To make your virtual presentation content more engaging, consider the following:
Keep your slides concise and visually appealing
Use high-quality images, charts, and graphics to support your key points
Incorporate storytelling techniques to make your content more relatable and memorable
Use interactive elements like polls, Q&A sessions, and chat to encourage audience participation
Vary your tone and pace to maintain audience interest
What should I do if I experience technical issues during my online presentation?
If you experience technical issues during your online presentation, remain calm and take the following steps:
Communicate with your audience and inform them of the issue
Have a backup plan, such as sharing your slides or notes in advance
Seek assistance from a co-host or technical support team
If the issue persists, consider rescheduling the presentation or providing alternative means of accessing the content
How can I manage nerves and anxiety before an online presentation?
To manage nerves and anxiety before an online presentation, try the following techniques:
Practice deep breathing exercises to calm your mind and reduce stress
Use positive self-talk and visualize a successful presentation
Rehearse your presentation multiple times to build confidence
Ensure that you are well-prepared and familiar with the virtual presentation platform
Create a comfortable and distraction-free environment for your presentation
What are some advanced techniques for delivering impactful virtual presentations?
Advanced techniques for delivering impactful virtual presentations include:
Using appropriate body language, such as maintaining good posture and making eye contact with the camera
Varying your tone and pace to keep your audience engaged
Encouraging feedback and actively seeking audience input
Incorporating storytelling techniques to create an emotional connection with your audience
Leveraging advanced features of the virtual presentation platform, such as breakout rooms or whiteboarding tools, to enhance interaction and collaboration.
RELATED ARTICLES

OLED vs LED Screen: Ultimate Guide for Display Technology Selection

Ultimate Guide to Tech Gifts for Travelers: 2024 Edition

Do Laptop Monitor Extenders Work: The Ultimate Guide

What Is Ghosting on a Monitor and How to Fix It Instantly

How to Clean Your Monitor Screen Safely and Effectively

What is VA on a Monitor? Understanding Vertical Alignment Display Technology

Are Portable Monitors Worth It? A Comprehensive Guide

Why Do My Dual Monitors Keep Switching:A Comprehensive Guide to Solving Display Issues
Leave a comment.
Your email address will not be published. Required fields are marked *
Please note, comments must be approved before they are published
- Choosing a selection results in a full page refresh.
IMAGES
VIDEO
COMMENTS
Start presenting. On the Slide Show tab, in the Start Slide Show group, select From Beginning. Now, if you are working with PowerPoint on a single monitor and you want to display Presenter view, in Slide Show view, on the control bar at the bottom left, select , and then Show Presenter View.
Select the Use Presenter View checkbox. Select which monitor to display Presenter View on. Select From Beginning or press F5. In Presenter View, you can: See your current slide, next slide, and speaker notes. Select the arrows next to the slide number to go between slides. Select the pause button or reset button to pause or reset the slide ...
Turn On PowerPoint Presenter View. In PowerPoint for macOS, simply click on Presenter View on the Slide Show tab to kick off the presentation in Presenter view. Turn on Presenter View by clicking on Presenter View on the Slide Show tab. You'll see the Presenter View interface on one screen.
Take advantage of the PowerPoint Presenter View to practice and present your PowerPoint speaker notes. This view also helps you as a presenter by showing you...
Check the box beside the "Use Presenter View." Select from the "Start Slide Show" section to start your presentation "From the Beginning." Click the three dots menu on your full-screen slideshow view and select "Show Presenter View." When your presentation displays "Presenter View," you can scroll and use it for your speech.
With Presenter view, the audience views your slides on a main screen, while you control the show on another screen that only you can see. Want more? View your speaker notes as you deliver your slide show. Draw on or highlight slides during a presentation. Turn your mouse into a laser pointer.
To access the different view modes in PowerPoint, you have to click on the 'View' tab in the ribbon. The 2-step process is described below. Step-1: Click on the 'View' tab. At first, select the 'View' tab, which is the second to last tab in the ribbon section of your PowerPoint Window. Step-2: Select your preferred 'View Mode'.
Step 2: Configuring Display Settings. Additional steps if you are using dual monitors: Connect your second monitor. In PowerPoint, go to the "Slide Show" tab and click "Set Up Slide Show.". Under "Multiple monitors," select your primary display as "Automatic" or select the monitor you want to use for Presenter View. Click "OK.".
In this screencast, you'll learn how to present a PowerPoint slideshow with Presenter View. Download unlimited PPT templates with Envato Elements: https://...
On the other, you have your own private view (which isn't visible to your audience), where you can see your notes and the upcoming slide while you're presenting. How to start using Presenter View in PowerPoint: - Open your presentation. - Select Slide Show in the top ribbon. - Make sure Presenter View is selected in the Monitors section.
Look for Slide Show tab. When found, click it and select From Beginning visible under Start Slide Show group. If you are working with PowerPoint on a single monitor and still want to display ...
To see the full course that this video came from, go here: ️https://www.simonsezit.com/courses/microsoft/powerpoint-2021-online-course/In this Microsoft Pow...
If you want to customize your Presenter View experience, follow these steps: On the 'Slide Show' tab, click 'Set Up Slide Show.'. Under 'Multiple Monitors,' select the 'Use Presenter View' checkbox. If you're using a single monitor, select the 'Display slide show on' option and choose your primary monitor.
3. When you start Microsoft PowerPoint, you should see the same image on both screens. 4. Now press the Windows + P key combination and then select Extend. Click on the check mark to the right of Presenter View in the Slide Show tab. 5. You'll now see the different views on your two monitors.
To open Presenter view in PowerPoint, click the Slide Show tab and select the Use Presenter View check box. 2. Start your slide show. 3. Click the Notes pane in the lower right corner of the PowerPoint window, then start typing. NOTE: You can also press the F6 key to select the Notes pane in Presenter view. When a white outline appears around ...
A simple method for switching to Presenter View on a single monitor is to click the three dots (More slideshow options) at the bottom in SlideShow mode and select Show Presenter View. You can also switch to Presenter View on a single monitor anytime using the ALT+F5 hotkey. The presenter can easily manage a PPT in presentation mode, with the ...
Six steps for creating a slide show. 1. Plan your slide show. Before getting too deep into your slide show project, it's a good idea to select and save the photos and videos you want to use. This helps you create a slide show more efficiently and purposefully, ensuring a better outcome. 4.
Slide Sorter view. You can get to Slide Sorter view from the task bar at the bottom of the slide window, or from the View tab on the ribbon. Slide Sorter view (below) displays all the slides in your presentation in horizontally sequenced, thumbnails. Slide show view is helpful if you need to reorganize your slides—you can just click and drag ...
When I turn "Slide Show" on Powerpoint, no matter what is the monitor configuration under Slide Show tab, Monitors group, I get one of the following: 1. The presentation is shown on one of the monitors, while the Presenter View is shown on the laptop screen. 2. The other way around: the Presenter View is shown on one of the monitors, while the ...
How to use Presenter View in PowerPoint to present your slides like a PRO (Presentation Delivery Tips). This view is for the presenter only - when the slides...
Invite collaborators: Share the presentation with your team members by sending them a link or inviting them directly through the software. Work together in real time: Once your team members have access, they can start editing the slide presentation simultaneously.Use the built-in chat and comment features to communicate and provide feedback in real time.
How to Make Impactful Presentations with PowerPoint. Creating impactful presentations involves a combination of good design principles and effective content organization. Here are some key tips for creating effective PowerPoint presentations: 1. Plan Your Content. Before diving into the design, outline your content.
Now you can click on the Copilot icon and start using the assistant to make PowerPoint presentations. Using Copilot to create PowerPoint presentations. With Copilot Pro, you can auto-generate PowerPoint presentations using AI. Here's how: Launch Copilot in PowerPoint by clicking on the corresponding icon in the ribbon.
Discover various methods to share your presentation so others can easily view and access it. Discover various methods to share your presentation so others can easily view and access it. ... Sharing your PowerPoint presentations effectively is crucial for successful communication, whether in a professional, academic, or personal setting. ...
In this video, you'll learn the basics of presenting your slide show in PowerPoint 2019, PowerPoint 2016, and Office 365. Visit https://edu.gcfglobal.org/en/...
Let's get started and see how easy it is! Step 1: Open Your PowerPoint Presentation. Start by opening the PowerPoint presentation where you want to include a poll or survey. Navigate to the slide where you plan to add the interactive element. Step 2: Access Microsoft Forms. Go to the "Insert" tab on the ribbon at the top of your ...
Use PowerPoint in a web browser. If you have a Microsoft account (hotmail.com, outlook.com, live.com, msn.com) or a Microsoft 365 work or school account, you can view and edit a presentation for free in a web browser. Save the file to OneDrive or Dropbox and use PowerPoint for the web to open it. If you don't already have a Microsoft account ...
This page contains reference examples for PowerPoint slides and lecture notes, including slides available online and slides from a classroom website. ... Writers creating PowerPoint presentations in APA Style should present information clearly and concisely. Many APA Style guidelines can be applied to presentations (e.g., the guidance for ...
Advanced Virtual Presentation Techniques. Using Body Language: Even in a virtual setting, body language plays a crucial role in effective communication.Maintain good posture, make eye contact with the camera, and use appropriate hand gestures to emphasize key points.