
- Get started with computers
- Learn Microsoft Office
- Apply for a job
- Improve my work skills
- Design nice-looking docs
- Getting Started
- Smartphones & Tablets
- Typing Tutorial
- Online Learning
- Basic Internet Skills
- Online Safety
- Social Media
- Zoom Basics
- Google Docs
- Google Sheets
- Career Planning
- Resume Writing
- Cover Letters
- Job Search and Networking
- Business Communication
- Entrepreneurship 101
- Careers without College
- Job Hunt for Today
- 3D Printing
- Freelancing 101
- Personal Finance
- Sharing Economy
- Decision-Making
- Graphic Design
- Photography
- Image Editing
- Learning WordPress
- Language Learning
- Critical Thinking
- For Educators
- Translations
- Staff Picks
- English expand_more expand_less

Google Classroom - Creating Assignments and Materials
Google classroom -, creating assignments and materials, google classroom creating assignments and materials.

Google Classroom: Creating Assignments and Materials
Lesson 2: creating assignments and materials.
/en/google-classroom/getting-started-with-google-classroom/content/
Creating assignments and materials
Google Classroom gives you the ability to create and assign work for your students, all without having to print anything. Questions , essays , worksheets , and readings can all be distributed online and made easily available to your class. If you haven't created a class already, check out our Getting Started with Google Classroom lesson.
Watch the video below to learn more about creating assignments and materials in Google Classroom.
Creating an assignment
Whenever you want to create new assignments, questions, or material, you'll need to navigate to the Classwork tab.

In this tab, you can create assignments and view all current and past assignments. To create an assignment, click the Create button, then select Assignment . You can also select Question if you'd like to pose a single question to your students, or Material if you simply want to post a reading, visual, or other supplementary material.

This will bring up the Assignment form. Google Classroom offers considerable flexibility and options when creating assignments.
Click the buttons in the interactive below to become familiar with the Assignment form.

This is where you'll type the title of the assignment you're creating.
Instructions
If you'd like to include instructions with your assignment, you can type them here.
Here, you can decide how many points an assignment is worth by typing the number in the form. You can also click the drop-down arrow to select Ungraded if you don't want to grade an assignment.
You can select a due date for an assignment by clicking this arrow and selecting a date from the calendar that appears. Students will have until then to submit their work.
In Google Classroom, you can sort your assignments and materials into topics. This menu allows you to select an existing topic or create a new one to place an assignment under.
Attachments
You can attach files from your computer , files from Google Drive , URLs , and YouTube videos to your assignments.
Google Classroom gives you the option of sending assignments to all students or a select number .
Once you're happy with the assignment you've created, click Assign . The drop-down menu also gives you the option to Schedule an assignment if you'd like it to post it at a later date.
You can attach a rubric to help students know your expectations for the assignment and to give them feedback.
Once you've completed the form and clicked Assign , your students will receive an email notification letting them know about the assignment.
Google Classroom takes all of your assignments and automatically adds them to your Google Calendar. From the Classwork tab, you can click Google Calendar to pull this up and get a better overall view of the timeline for your assignments' due dates.

Using Google Docs with assignments
When creating an assignment, there may often be times when you want to attach a document from Google Docs. These can be helpful when providing lengthy instructions, study guides, and other material.
When attaching these types of files, you'll want to make sure to choose the correct setting for how your students can interact with it . After attaching one to an assignment, you'll find a drop-down menu with three options.

Let's take a look at when you might want to use each of these:
- Students can view file : Use this option if the file is simply something you want your students to view but not make any changes to.
- Students can edit file : This option can be helpful if you're providing a document you want your students to collaborate on or fill out collectively.
- Make a copy for each student : If you're creating a worksheet or document that you want each student to complete individually, this option will create a separate copy of the same document for every student.
Using topics
On the Classwork tab, you can use topics to sort and group your assignments and material. To create a topic, click the Create button, then select Topic .

Topics can be helpful for organizing your content into the various units you teach throughout the year. You could also use it to separate your content by type , splitting it into homework, classwork, readings, and other topic areas.

In our next lesson , we'll explore how to create quizzes and worksheets with Google Forms, further expanding how you can use Google Classroom with your students.
/en/google-classroom/using-forms-with-google-classroom/content/
Teaching Writing With Google Classroom
When it comes to teaching writing, there is one thing I could not survive without: Google Classroom. Early on in my teaching career, I even went rogue and used Google Classroom when I was supposed to be religiously using my school’s other LMS. (Whoops! Anyone else who hated My Big Campus?) I used Classroom before my students had Chromebooks, back in the old computer lab days. I would jokingly tell my teacher friends that “Google was taking over the world” and that we would eventually go Google. Maybe I was a little obsessed, but we did go Google! And once you go Google, you can’t go back. (Trust me…I tried. And I resigned.)
But seriously, Google Classroom makes it ridiculously easy to streamline your writing instruction. And with the new normal of remote learning, Classroom is more important now than ever. Admittedly, I don’t have much experience with other platforms, and I am biased, but Google Classroom will help you make the most of distance learning, especially when it comes to teaching writing. Not only will Classroom improve your writing instruction, but it will help you stay connected to students throughout the entire writing process.
Google Classroom is intuitive enough that you figure out the basics on your own (assigning work, posting materials, grading, etc), but you can really maximize the platform with a few tips and tricks. Teaching writing will never be easy, but it can be much more manageable with the help of good old Google. Whether you’re brand new to Google Classroom or a techie teacher who is figuring out how the heck to teach during this time, here are 10 practical tips for teaching writing remotely:

1. MONITOR STUDENT PROGRESS WITH GOOGLE CLASSROOM & GOOGLE DOCS
Instead of assigning an essay and hoping for the best when it’s deadline time, you can use Google Classroom & Docs to monitor students’ progress throughout the entire writing process. The next time you want to assign an essay, create a template for the assignment in Google docs. It can be as simple as instructions and text that says “Type here.” You can even set it up with the right formatting (font size, double-spacing, MLA header) if you’re feeling generous. Then, assign that doc on Google Classroom and select the “Make a copy for each student” option. Selecting this option is crucial because it will create individual copies for every single student.
This way, you will be able to see students’ writing progress in real time. If a student is writing, you can simply open up their doc and watch them type. Students’ docs live in their Google drives and your drive, so you can’t lose anything. Everything is already organized in Google drive folders for you, which is a blessing for Type-B teachers like me. You can leave comments and even use the Chat feature to instantly message students as they write. While it’s not as ideal as communicating with students face-to-face in a classroom, it’s definitely the next best thing.

2. PROVIDE FEEDBACK VIA GOOGLE DOC COMMENTS
THIS is the real reason I went rogue back in the day. THIS is why once you go Google, you can’t go back. Once you have the ability to give students instantaneous feedback at every step of the writing process, you’ll never be able to teach writing the same way again. The more feedback you can give students during the writing process, the more they will grow as writers. More feedback also means less time writing comments on final drafts. Win-win! To give feedback via comments on Google docs, simply select (highlight) the text you want to comment on, and then select the plus sign speech bubble icon that should appear in the right margin. As students view your comments and make the necessary revisions, they can “resolve” your comments and effectively check each edit off their list.
I always try to give as much feedback as I can, especially in the earlier phases of the writing process. So I have students brainstorm and submit topic proposal docs, draft different versions of their thesis statements, and send in their topic sentences to make sure they support their thesis.
Feedback is my number #1 priority in the earliest stages of teaching writing, because I want my students to have a successful foundation for the rest of the process. Before I “release” my students to really, really write (as in draft their entire essay), they have already received lots of feedback from me. The best part? It’s all documented…so if weeks later, I’m grading an essay and thinking, “I know I told this student to revise their thesis,” I can quickly check the comment history.

3. SCAFFOLD THE WRITING PROCESS WITH MINILESSONS, GRAPHIC ORGANIZERS, AND OTHER RESOURCES
The writing process is already daunting for students, so it’s even more intimidating in the virtual setting. To make writing more manageable, scaffold the process by breaking it down into smaller chunks/steps. Here’s how I support my students when I’m teaching writing:
- Giving students an outline to help them structure their writing. This helps me give students feedback before they really dig into the rest of the writing process.
- Posting mini-lessons for each step/element of the writing process. I usually provide these in slideshow form AND screencast video form. ( Loom is my favorite tool for creating screencast videos.) I provide students with writing workshop minilessons on everything from crafting a thesis statement to selecting strong & thorough textual evidence.
- Offering students additional graphic organizers and resources to use if they need them . These resources, like the thesis statement “fill in the blank” organizer pictured below, help scaffold the writing process for students.
- Familiarizing students with the rubric I will use to assess their final drafts. This means posting it on Classroom, explaining it, referring to it during minilessons, providing feedback that gives students an idea of where they are on the rubric, asking students to self-evaluate throughout the writing process, and making sure all expectations are 100% clear.

4. CURATE & ORGANIZE RESOURCES WITH HYPERDOCS
It’s easy for students to become overwhelmed with all of the resources you are offering them. Even though students have the entire internet at their fingertips, they don’t always know how to use it. That’s where hyperdocs come in. Like its name suggests, a hyperdoc is a document of hyperlinks to other documents, resources, videos, websites, etc. Depending on how you use it, a hyperdoc can function as a self-paced lesson module or a resource hub. When it comes to writing workshop, I use hyperdocs for the latter, linking up all of the minilessons, videos, graphic organizers, and outside resources students might need throughout the writing process. I carefully curate resources to help every type of learner at every step of the writing process.
In this way, hyperdocs help me scaffold and differentiate for students. Not to mention, they answer students’ questions and free up more of my time to provide valuable feedback. I love hyperdocs because everything is in one place, and anytime students have questions, you can direct them to the hyperdoc. (Eventually, you’ll train them to head straight to the hyperdoc when they need some help.) A hyperdoc is a great way to accommodate all of your learners and support them as they work through the writing process. To learn more about how to create your own hyperdocs, check out this blog post.

5. USE DAILY “CHECK INS” TO SUPPORT EVERY STUDENT, EVERY DAY
Checking in with every student is challenging enough in the traditional classroom, but it can feel even more overwhelming in the virtual setting. But there’s an easy solution that will allow you to check in with every student, every day of writing workshop: A daily check-in. You can do this via Google forms OR Google Classroom questions. (I prefer the latter.) I assign these as exit tickets at the end of each writing workshop day, and the check-in reads the same almost every day: What did you accomplish today? What questions do you have, and how can I help you?
If students want specific feedback on their writing, I encourage them to give me specific instructions. It takes some time and practice to move students away from the “Can you check my writing and see if it’s good?” questions to the “Can you check my thesis to see if it clearly previews my claims?” questions. But within a few days, you’ll see students asking specific, purposeful questions. These simple check-ins will give you a chance to help the student who need it the most. They’ll help you provide more precise, helpful, and efficient feedback for students.
While you can easily create a check-in Google form, I prefer using Google Classroom questions because I can easily reply to students, whether it’s with a general “I left a comment on your doc!” or “It looks great; keep up the good work.” Helping students is even easier when you have a hyperdoc of resources, because you can direct students to the appropriate minilesson and post the link in the comments on Classroom.

6. ASSIGN CHECKPOINTS TO BREAK UP THE WRITING PROCESS
In addition to daily check-ins, I also like to assign formative checkpoints for essential parts of the writing process. Once again, I do this to a) scaffold the writing process and b) provide meaningful formative feedback along the way. Here are examples of various checkpoints I use:
- Topic Proposal: Students submit a topic proposal via a Google Classroom question. I provide feedback and approve their topics by replying to their submissions.
- Thesis Statement Checkpoint: After rounds of drafting and revising a thesis statement, students submit their thesis through a Google Classroom question. Once again, I offer comments in the replies. After reviewing my feedback, I ask students to revise their thesis and post it as a reply. This way, I can visually see how they have taken my feedback into account and revised their thesis.
- Outline Checkpoint: After completing an outline on a Google doc, I ask students to copy/paste the “bare bones” of their outline (thesis, claims, and one piece of evidence per claim) in a Google Classroom question. I usually use a rubric to assess the outline and provide formative feedback. Students do not begin the rest of the essay until I have approved their outlines in this way.

7. ADD IN OPPORTUNITIES FOR PEER FEEDBACK
Writing can feel like a lonely, tedious process, especially in the online setting. Give your students the opportunity to connect with peers and offer feedback. Yes, it can be done online! Here are a few different ways to incorporate meaningful peer feedback remotely:
- For focused peer feedback on a specific part of an essay (such as a thesis, topic sentence, even an entire paragraph), I love using a Google Classroom question. For example, I will ask students to submit their thesis statement via a question, and then I will have them give feedback to 2 of their peers. Sometimes, I will give students the option to pick a specific part of their paper and ask for feedback on that. For example, a student could post their introduction and ask their peers if it’s engaging and clear. Or they could post a claim, piece of evidence, and commentary, and ask their peers if their evidence and commentary is strong enough to defend the claim.
- For peer feedback on an entire essay, I often ask students to share their Google doc with a peer and require that they provide feedback via the comments or even the rubric. To structure this, I give students a checklist, the rubric, or other guidelines.
No matter how you facilitate peer feedback, the most important part is giving students some structure and guidelines. Instead of just asking them to give comments, tell them what to look for. Give them your rubric and allow them to familiarize themselves with the language of instruction/assessment as they peer-edit.

8. SCHEDULE VIRTUAL OFFICE HOURS OR CONFERENCES
In my opinion, one of the most rewarding parts of teaching writing is simply talking to students about their writing. While there is a certain magic in face-to-face writing conferences, you can still find a way to “meet” with students in the online setting. Depending on your district’s guidelines, video conferencing through Zoom or Google Hangouts may be an option. If it’s not, you can still arrange virtual meetings by scheduling times to “meet” on a student’s document at the same time. This way, you can communicate in real time through comments or the Chat feature (if your district has this enabled; some may not). It’s certainly not as good as the real thing, but at least you’ll be in the same doc at the same time, looking at the same piece of student writing.
To create a virtual sign-up sheet like the one pictured below, create a Google form with your time slots in check-boxes. Then, use the add-on Choice Eliminator so that slots are removed from the form when students claim them. For a slightly easier option, simply create an editable Google doc and allow students to sign up directly on the document.

9. ENCOURAGE THE USE OF OTHER TECH TOOLS
Even with all of the wonderful technology at your disposal, you can only do so much for students. Foster some independence by encouraging students to utilize the various other tech tools that exist outside of Google Classroom and your arsenal of resources. Learning to maximize the internet’s resources is a skill that will serve students well when they attend college, join the workforce, and enter the “real world.” While there are countless options out there, here are my favorites:
- Grammarly is a Google Chrome “writing assistant” that will help students understand and correct their grammar and spelling mistakes. Once Grammarly is activated, students will see suggestions and explanations as they type in docs.
- Diigo is a convenient bookmarking website and extension that allows users to curate, organize, and annotate various sources. It’s especially helpful for research writing or projects where students need to keep track of a body of articles.
- Kami is a helpful tool that allows students to annotate PDFs right in their browser. It integrates with Google Classroom, and the premium subscription is currently free due to COVID-19.
- Read&Write is a Google Chrome extension that can help scaffold the writing process with its text-to-speech and speech-to-text tools. While it is a paid extension, students can access it free for 30 days. (FYI: Teachers can receive a free premium subscription, but obviously that doesn’t help students at home.)

10. ASK STUDENTS TO REFLECT & SELF-EVALUATE
Don’t let the writing process abruptly end when students attach their doc and click submit on Google Classroom! Instead, facilitate thoughtful reflection and connect with your students one more time by asking them to self-evaluate. In my experience, this works well with a Google form or a rubric copied/pasted at the end of the essay document. If you feel disconnected from your students, this exercise will help you stay connected AND it will give you meaningful data that goes beyond what any rubric or grade could tell you.
When I ask students to reflect, I keep it simple by giving them a copy of the rubric I use to assess them. I ask them to give themselves scores in the different categories, justify those ratings, and then reflect on the writing process. I also give them a chance to tell me what I could have done to better support them and express any other concerns about the writing unit. My students’ reflections always teach me more than any other kind of data I could collect and analyze.

BONUS TIP: SHARE OR “PUBLISH” STUDENT WRITING
The act of writing can feel isolating, and even more so in the online setting. Don’t forget to find a way to publish student writing and celebrate the last (but often forgotten) phase of the writing process. Publishing doesn’t have to be as formal as it sounds; even the simple act of sharing one’s work and connecting with fellow writers will go a long way in the virtual environment. Thankfully, technology gives us plenty of options for sharing & publishing student writing. Here are just a few ideas:
- Share student writing on a class blog or Google Site. (Or better yet, have students create their own sites and update them throughout the process).
- Invite students to share their work via a Padet or Flipgrid (video responses).
- Create a virtual gallery walk, or compilation of student work, via Google docs, slides, or forms.
- Combine student submissions into an e-book, and post it on your LMS. (It’s as simple as combining all docs, adding a nice cover, and converting the file to a PDF).
Whatever you do to share, celebrate, or publish student writing, I guarantee it will help you and your students stay connected and feel rewarded for your hard work!
I hope these tips help you navigate the uncertain world of teaching writing remotely. Please let me know if you have any questions or if there are any other blog posts I can write to help you during this time. Best of luck, and stay healthy!
If you’re interested in digital writing resources, you may find the following materials helpful:
- Writing Workshop Minilessons
- How to Write an Essay Brochure
- Synthesis Writing Unit: Has society taken science, technology, or social media too far?
- Literary Analysis Writing Rubrics
If you liked this post, check out these other blog posts on virtual teaching, technology, and writing:
- How to Structure Learning Stations Online
- How to Use Hyperdocs in the Classroom
- 7 Ways to Use Google Classroom’s “Ask a Question” Feature
- 20 Free Tech Tools for Online Teaching
- The #1 Mistake You Might Be Making on Your Writing Rubrics
- Top 5 Apps for Teachers
Share this:
- Click to share on Twitter (Opens in new window)
- Click to share on Facebook (Opens in new window)
You may also enjoy:
Back to school activities for middle & …, 10 activities for any dystopian novel, 10 activities for teaching the hunger games, how to use the “what do you ….
You have given me some great ideas in this post. My school uses Canvas, and I integrate multiple Google features. The one draw back that I have had in the past is with rubrics and grading essays in Google Docs. While not perfect, Canvas is easier for me. However, can you explain how you grade essays using rubrics in Google. Has Google added a grading feature that I do not know about? Thank you in advance for your reply.
Yes! So there are a few different ways to do it. I like copying & pasting the rubric at the bottom of a template doc that I assign to “make a copy for every student” on Classroom. There are also extensions like Orange Slice, Doctopus, and Goobric that automate the process a bit more. But Classroom has added a rubric feature; it’s relatively new and I haven’t had a chance to use it yet but I know teachers love it!
Hi. I am HATING teaching , and I do teach writing, because I cannot get Google Classroom. One thing I am looking for though, is how can I show them how to write in real time? Like doing a 4 square with them? Is there such a program online?
Hi there! Teaching is definitely tough when it’s facilitated online (which is what I’m assuming you’re doing). Even if you don’t have Google Classroom, you could use a view-only Google doc to model how you’re writing in real time. All you would need to do is set the sharing settings to view only (meaning students cannot edit) and then share the document link with your students.
I hope this makes sense, and I hope teaching gets better for you. Hang in there!
Leave a Reply Cancel reply
Your email address will not be published. Required fields are marked *
Notify me of follow-up comments by email.
Notify me of new posts by email.
Check out my most popular posts!
August 5, 2018: why i don’t review the syllabus on the first day …, december 16, 2018: 10 ideas for planning engaging novel units, december 11, 2017: comfort in the classroom with flexible seating, july 21, 2018: teaching american literature: my units & favorite lessons.
MAKE WAVES WITH THIS FREE WEEKLONG VOCABULARY UNIT!
How to Make Assignments in Google Classroom
New to the digital teaching world and looking for a quick way to add assignments to Google Classroom?
Here are 8 easy steps on how to get started.

Open your Google Classroom page in your browser. Google Classroom will automatically open up to the Stream tab. Think of the Stream tab as the notification center, similar to the homepage on Facebook. Here, students will see announcements, classwork, questions, and resources.
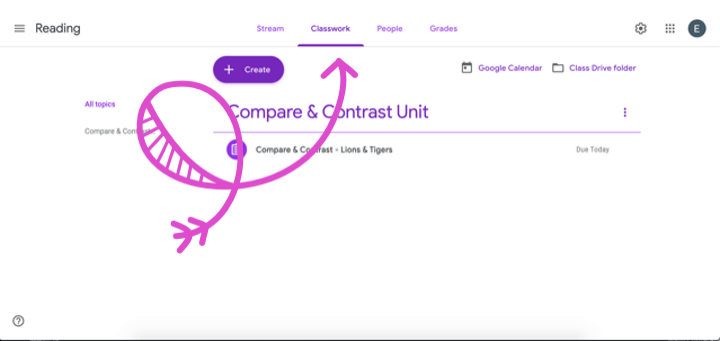
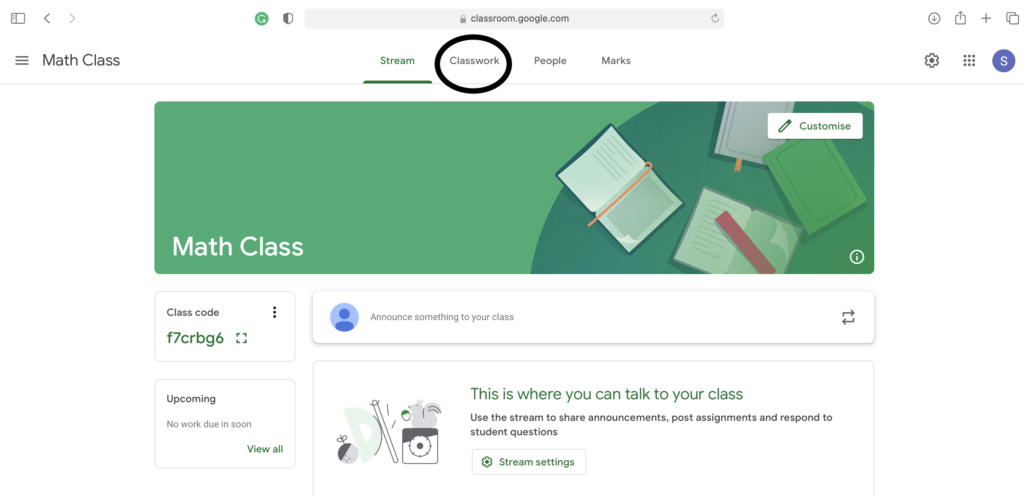
Select the Classwork tab. This is where you will see and add assignments.
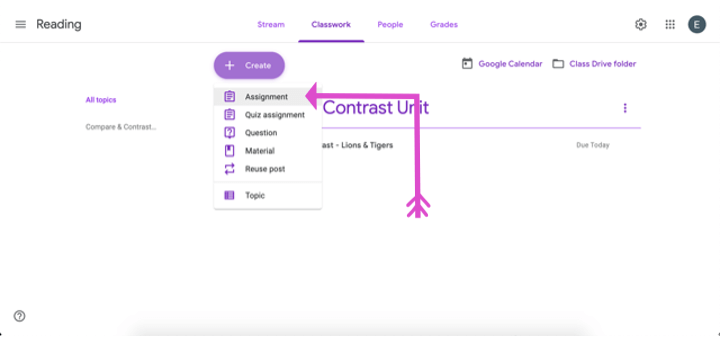
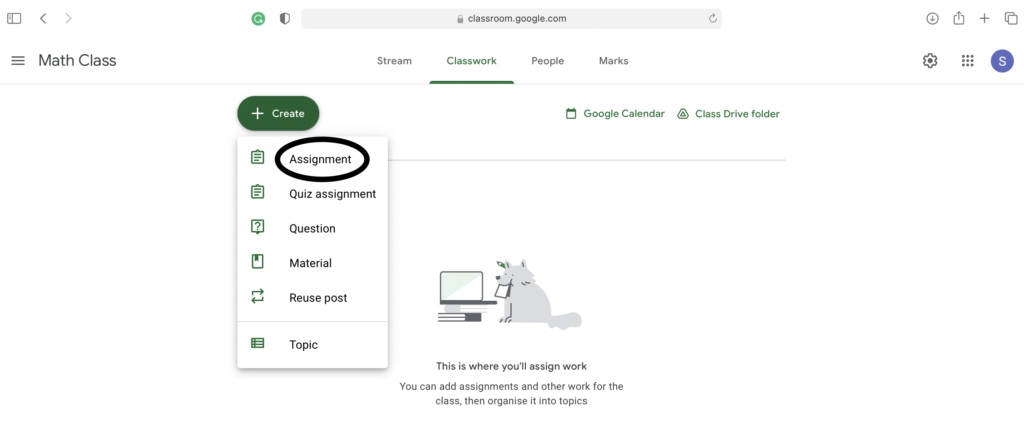
Click the Create button and select “Assignment” from the list.
You can also select the options: Quiz assignment, Question, Material, or Reuse post.
Here’s a mini explanation of each.
- Quiz assignment : Uses Google Forms to auto-grade assessments.
- Question: Post a quick, open-ended question for students to answer from the Stream page.
- Material: Need to quickly share a digital resource with students? Select Material from the list and add a link, PDF, or video for students to view.
- Reuse post: Find yourself retyping instructions again and again? Select Reuse post from the list to use a previous post as a template.

Click here to view my FREE Digital Morning Work for grades 3 through 6!
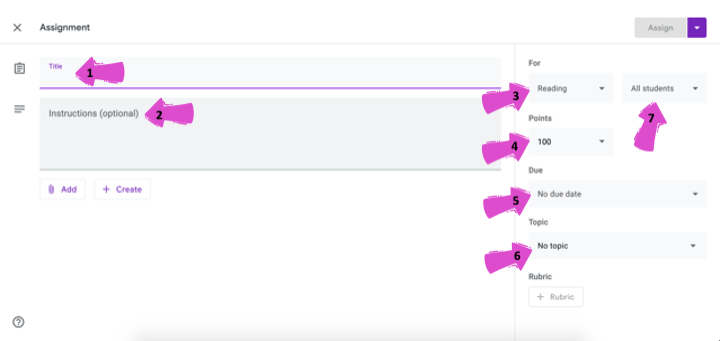
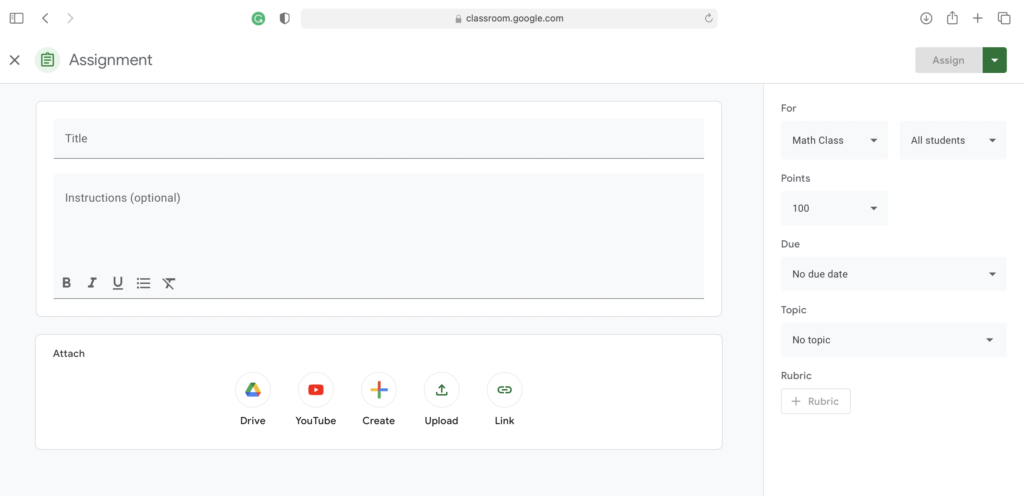
When creating an assignment, you will want to complete the following steps:
- Title your assignment
- Write instructions
- Select which subject this assignment is for
- Create a point value (if the assignment is being graded)
- Select a due date
- Select or create a topic (This will make it easy for you and your students to filter through assignments throughout the school year. I’d suggest not skipping this step!)
- Select which students should complete this assignment. (This is a great way to differentiate!)
Select the Add button and select the source where you will be attaching your resource from. If your assignment is interactive, you’ll most likely select Google Drive.
If you have purchased your assignment through Teachers Pay Teachers you’ll want to make sure that you have made a copy of the resource to your Google Drive. You can do this by selecting File -> Make Copy within the resource or through a special link provided to you by the Teachers Pay Teachers author.
Don’t Forget: You must make your own copy of the resource and add it to your Google Drive account before posting to Google Classroom.
Find the assignment you’d like students to complete and click the Add button.
The next step is important. Select the dropdown menu to the right of
the assignment. Select the option “Make a copy for each student” from the menu list. If you do not select this option students will open the same Google resource and will be able to edit the same document. (Cue the raised hands or emails!) It can make for quite a mess.
Just as you would pass out a paper-based assignment in class to each student, be sure to select “Make a copy for each student” from the menu list.
Once selected, review your assignment, and press the Assign button.
Once you have assigned your assignment you will be redirected to the teacher page. From here you will see which students you’ve assigned work to and how many have completed the assignment. This page will help you keep track of your students’ work!
That’s it! Now you’re ready to assign your first assignment in Google Classroom!
Looking for digital resources that are aligned to standards and fun? These digital reading units for Google Classroom are easy to assign and easy for students to use. All of the slides (except the reading passages) are interactive!
CLICK THE LINK BELOW EACH PHOTO FOR MORE INFORMATION!

3rd Grade Digital Reading Bundle
4th Grade Digital Reading Bundle

5th Grade Digital Reading Bundle
If you’re interested in reading more about Google Classroom check out these blog posts below:
Google Classroom™ FAQ
Why You Will Love Using Google Slides™
How to Support ALL Students Using Google Slides™
- Read more about: Technology
You might also like...

Why You NEED to Use Interactive PDF Games
Classrooms have been turned upside down and inside out these past few years. Teachers everywhere are longing for routine and a return to normalcy. I

How to Assign PDF Games to Google Classroom™
With the need for more digital activities for socially distanced classrooms or distance learning, I took some of my most popular reading games and made

How to Convert Google Slides to Powerpoint – Digital Learning Hack
Have you ever downloaded a teaching resource to find that it was created in Google Slides, but you need to use it in PowerPoint?
Hi, I’m Jenn, CEO and owner of The Teacher Next Door!
I know that you strive to be an effective upper elementary teacher while maintaining a healthy work-life balance.
In order to do that, you need resources that are impactful, yet simple .
The problem is that most resources and curriculums out there are far from simple. The pages upon pages of daily lesson plans are just plain overwhelming .
At TTND, we believe teachers should be living their lives outside of the classroom, and not spend hours lesson planning and searching for resources.
We understand that now, more than ever, teachers need space to be themselves which is why we create and support teachers with timesaving tips and standards-aligned resources.
Want access to TTND's Free Resource Library? Sign up for our newsletter and we'll email you the exclusive password!
Trending posts.

SEARCH BY TOPIC
- Classroom Ideas
- Holidays and Seasonal
- Mentor Texts
- Reading Block
- Uncategorized
- Writing & Grammar
POPULAR RESOURCES

JOIN MY NEWSLETTER
Gain access to a library of FREE resources for upper elementary grades!
Facebook Group
Teachers Pay Teachers
Free Resource Library
💌 Contact Us
Disclosures
Privacy Policy
Refund Policy
Purchase Orders
Your Downloads
Reward Points
© The Teacher Next Door, LLC. All rights reserved.
")
* Please note: If your school has strong email filters, you may wish to use your personal email to ensure access.
- PC & Mobile
How to Create an Assignment in Google Classroom
Lee Stanton Lee Stanton is a versatile writer with a concentration on the software landscape, covering both mobile and desktop applications as well as online technologies. Read more September 22, 2021
Device Links
- Individual Student
- Whole Class
- Make a Copy
- Device Missing?
Google Classroom is one of the top tools for teaching online classes. If you’re a teacher, learning how to manage assignments on the platform is a great skill. In addition to creating them, you can save draft versions, copy them, schedule them to be sent later, choose which students receive them, etc.
If you’re new to Google Classroom and wondering how to make an assignment, you’ve come to the right place. This article will discuss assigning them to all or specific students as well as offer tips and tricks to fully take advantage of Google Classroom.
How to Create an Assignment in Google Classroom for Each Student
Sometimes, you’ll need to create different assignments for different students. Whether your students need extra homework, want a better grade, or received detention and need to make up a lesson, learning how to make assignments for individual students is essential. Fortunately, Google Classroom made the process easy.
How to Create an Assignment in Google Classroom for Each Student on a PC
Here’s how to make an assignment for individual students in Google Classroom:
- Go to Google Classroom .

- Select the students.

How to Create an Assignment in Google Classroom for Each Student on an Android
If you’re on the go or don’t have your computer nearby, you can use the Google Classroom app on your Android device. Although you may think it’s hard to work on a smaller screen, Google Classroom did an excellent job of making the process quick and simple.
Follow these steps to create assignments for each student on your Android device:

- Tap “All students” twice to deselect them.
- Type the names of the students to which you want to send the assignments.
- Tap “Assign” to send the assignment right away or schedule it.
How to Create an Assignment in Google Classroom for Each Student on an iPhone or iPad
The Google Classroom app is also available for iPhone/iPad users. Creating an assignment for each student can be done in several clicks. Follow the instructions below to make an assignment for individual students on your iPhone/iPad:

- Add a student by typing their name. You can select up to 100 students.

How to Create an Assignment in Google Classroom for All Students
If you’ve prepared one assignment for the whole class, Google Classroom allows you to send it to all students at once. In fact, this is the default option that you can customize if necessary. You can also choose whether you want to save it as a draft, assign it right away, schedule it for later, etc.
How to Create an Assignment in Google Classroom for the Whole Class on a PC
Create an assignment for all students in your class by following the steps below:

How to Create an Assignment in Google Classroom for the Whole Class on an Android Device
If you’re not near your computer but want to send the assignment to your students, you can use the Google Classroom app for Android. Creating and sending an assignment on your Android is just as easy as doing it on your computer.
Here’s what you need to do:

- Double-check whether the “All students” option is selected.
- Send the assignment right away, schedule it for later, or save it as a draft.
How to Create an Assignment in Google Classroom for the Whole Class on an iPhone
iPhone/iPad users will be happy to know they can download the Google Classroom app from the App Store . Navigating through the app is straightforward, so you can create assignments for all your students even when you’re not at home or near your computer.
Here’s how to make an assignment in Google Classroom for all students on your iPhone/iPad:

How to Make a Copy of an Assignment in Google Classroom
If you have one assignment for multiple classes or want to use one from previous years, the good news is you don’t have to waste time creating it from scratch. Instead, Google Classroom offers the “Reuse” option that enables you to send an existing assignment to students in other classes.
How to Make a Copy of an Assignment in Google Classroom on a PC
If you’re using a PC and want to create a copy of an existing assignment, here’s what you need to do:
- Select the class to which you want to send the assignment.

- If you want, you can change information, customize the attachments or instructions.

How to Make a Copy of an Assignment in Google Classroom on an Android Device
Google Classroom’s “Reuse” option is perfect for when you’re not near your computer and want to “recycle” an old assignment. The Android app allows you to do this in just a few clicks:

- Edit the assignment’s information if you want.

How to Make a Copy of an Assignment in Google Classroom on an iPhone
iPhone/iPad users can copy an existing Google Classroom assignment and share it with a class or save it for later. Follow the steps below to do it:
- If needed, change information or edit existing attachments.
Google Classroom Has a Lot to Offer
As one of the best online teaching tools, Google Classroom allows you to take advantage of numerous options regarding assignments. It’s available on both your computer and phone/tablet, which makes creating assignments more convenient. If you’ve already created an assignment, you can easily copy it and send it to a different class, which can be a real time-saver.
We hope this article taught you how to make an assignment in Google Classroom. Along with that, we hope you learned additional information about the app’s useful options.
Have you ever used Google Classroom? Which option is your favorite? Tell us in the comments section below.
Related Posts

Disclaimer: Some pages on this site may include an affiliate link. This does not effect our editorial in any way.

Afam Onyimadu August 20, 2024

Supreeth August 1, 2024

Afam Onyimadu July 25, 2024
Send To Someone
Missing device.
Please enable JavaScript to submit this form.
Colour My Learning is supported by our readers. As an Amazon Associate we earn from qualifying purchases and display ads. When you purchase through links on our site, we may earn an affiliate commission. Learn more
Google Classroom: When to Use the Different Assignments & How to Assign Work
Samuel J Tan Classroom Technology , Learning , Popular , Technology , Tutorials , VLEs 0
Here is a guide to set the different assignments under the Classwork tab in Google Classroom. This brief tutorial shows the different options; assignment, quiz assignment, question and material, when and how to assign them.
Table of Contents
The object of this tutorial is to give you an overview of what you can achieve with the different assignments supported on Google Classroom. You will need to first head over to the Classwork tab, second after Stream on the top once you are inside your classroom. This tutorial assumes that you have created your first classroom. You can see how to start your own virtual classroom in under 2 minutes for help. We will cover the following:
- create assignments and questions
- use topics to organise classworks into modules or units
- order work by dragging them up or down in Classwork page
Types of Assignment
There are four types of assignments you can create on Google Classroom. They are as follows:
- Assignment (points awarded, good for final assignment with manual marking and use of Rubric)
- Quiz assignment (points awarded, good for automatic marking and grading)
- Question (no points awarded, good for single question quick survey, short answer, multiple choice)
- Material (no points awarded, good for reading assignment or lesson preparations)
Apart from the above, you have the ability to reuse existing post and create topic header. The former lets you reuse posts you have published on Stream in this or other Classes. The latter is topic header you can add to organise the classwork by modules or units. Let’s start looking at each of these different classwork, when to use them and how to create them.
A. Assignment
Probably the most commonly used classwork is the assignment. Here you can pick one of the following top options when creating an assignment. Beyond filling in the title and instruction, choose to:
- Add an existing resource: Google Drive , Link , File or YouTube
- Create a new document: create a new Google Docs , Slides , Sheets , Drawings or Forms
The first option allows you to add a Google Drive, Link to web resources, upload or choose an online file to add to Classroom’s Google Drive. You can use this to assign work like “access the work files or resources in Google Drive”, “revise or research using this link”, “download, open and read the document attached” and “watch this video tutorial or recorded seminar”.
The second option lets you create online documents. This can be a word document, slide presentation file, spreadsheet, drawing or forms. There is no need to upload a document. Here is where your assignment is created and marked totally online. Use the option to assigning a copy to each student and marking them separately with in-line feedback, grade and comments.
As you can see Assignment covers a lot of grounds in terms of resources and online document format supported.
Step by Step Guide on How to Create an Assignment using Google Docs
Here is how to create an online assignment using Google Docs. [number correspond to image in gallery below]
- Open your class
- Click on the second tab, Classwork
- Click “ + Create ” button and choose Assignment
- In the pop up window, add Title and Instructions
- Click “ + Create ” button and choose Docs [4]
- A new tab will open to show the new Google Docs [5]
- Change the title of the document by clicking on Untitled document (top left corner)
- Enter the instruction for assignment into the body, look for All changes saved in Drive status in top bar then close tab and return to previous Assignment tab [5]
- Don’t worry if the document still says Untitled document, next to this click drop down menu and choose Make a copy for each student . [6]
- Complete the options in the right side bar (for course, all or select students, grade points, due date, topic and marking rubric (optional) then click Assign button. [7]
NOTE: You can also choose to Schedule the assignment, save or discard draft by clicking on the drop down arrow next to the Assign button.
You will then be returned to the Classwork page where you can see the assignment you have just created, click on it to open a summary card. [8]
B. Quiz Assignment
Based on Google Forms, the quiz is the other assignment you can create as classwork. This is great to gauge the students understanding of the subject. Like any questionnaire or form, you can use different field types when designing your form.
Step by Step Guide on How to Create an Quiz Assignment
- Click “ + Create ” button and choose Quiz Assignment
- A new pop-up window will appear, enter the Title and Instructions for this quiz
- Click on the Blank Quiz link to open the Google Forms file. Click on the title Blank Quiz to change this and start editing the quiz by completing and adding more questions including answers and points for automatic marking.
- Once you have completed your editing, look for All changes saved in Drive , close the tab and return to previous Assignment tab.
- Complete the options in the right side bar (for course, all or select students, grade points, due date, topic and marking rubric (optional) then click Assign button.
You will then be returned to the Classwork page where you can see the assignment you have just created, click on it to open a summary card.
C. Question
The third type of assignment is Question. This is more of a simple single question survey with option to choose between a short answer or multiple choice answer. Nothing more beyond that. It is probably the quickest to set up and least complicated. This is useful to get quick answers from the group. Students can be allowed to see everyones answers and change their answer. No points can be awarded for this assignment.
Step by Step Guide on How to Create Question as Assignment
- Click “ + Create ” button and choose Question
- A new pop-up window will appear, enter the Question and Instructions for this question
- Choose from drop down menu to select Short answer or Multiple choice .
- Here you can also add resources or create online files in Google Drive.
- Complete the options in the right side bar; class(es) the Question is for, assign to All or specific students, Points, Due date and Topic. Also choose if other students can reply to each other and edit their answer if Short answer is chosen. Or, choose if students can see class summary if Multiple choice is chosen.
- Click the Ask button when ready.
D. Material
The last and final assignment is the Material. Here you can assign learning materials for students to study and prepare. As before, you can upload a resource or create online file as material. Like Questions assignment type, no points can be awarded for Material assignment type.
Step by Step Guide on How to Create Material as Assignment
- Click “ + Create ” button and choose Material
- In the pop-up window, complete Title and Description field
- Choose to add a resource or + create online document
- Then configure the assignment using right sidebar, pick to assign to All students or select individuals and pick the Topic this comes under.
- When ready click the Post button.
Featured Products
Interested in the product(s) featured here, use the links below to check the price , availability and offers . As an affiliate, we may earn a commission from qualifying purchases.
Links to visit major online retailers
Related Posts
Tablets , Technology
Which Big iPad to Choose? Apple iPad Air 13 M2 (2024), iPad Pro 12.9 M2 (2022) or iPad Pro 13 M4 (2024)
Xiaomi redmi pad se 11-inch tablet quick review & alternatives.
Monitors , Technology
MacBook Air with M3 Now Supports Two(2) External Monitors with a Caveat
Hardware , Monitors , Technology
Maximum Displays Supported by Apple M3, M3 Pro and M3 Max Systems
Laptops , Technology
Affordable MacBook Air and Pro Choices for Students
Smartphones , Technology , Tutorials
How to Tell Siri to Shoot or Record a Video
Classroom Technology , Tablets , Technology
Essential Accessories for the Google Pixel Tablet for Productivity
Software & Web Apps , Technology
The Role of Social Media in Education: Collaboration, Communication & Beyond
Education , Learning , Technology
The Internet of Things (IoT) in Education: Shaping the connected learning environments
Share your thoughts cancel reply.
This site uses Akismet to reduce spam. Learn how your comment data is processed .
Discover more from Colour My Learning
Subscribe now to keep reading and get access to the full archive.
Type your email…
Continue reading
- Book a Tutoring Session
- Math Tutoring
- Flipped Learning
How to Assign an Assignment on Google Classroom
Introduction.
Google Classroom is a free web-based platform that integrates your Google Apps for Education account with all of your classes. Assigning and grading assignments is easy and efficient with Google Classroom. You can even attach files from Drive, link to YouTube videos, and add images to make your instructions clear. Here’s a step-by-step guide on how to assign an assignment on Google Classroom.
HOW-TO STEPS
1. go to https://classroom.google.com and sign in if needed..

2. Once you’ve successfully signed in you will see all your classes. Find the class you want to assign an assignment to and click it.
3. To create a new assignment, click the Classwork Tab at the top of the page.
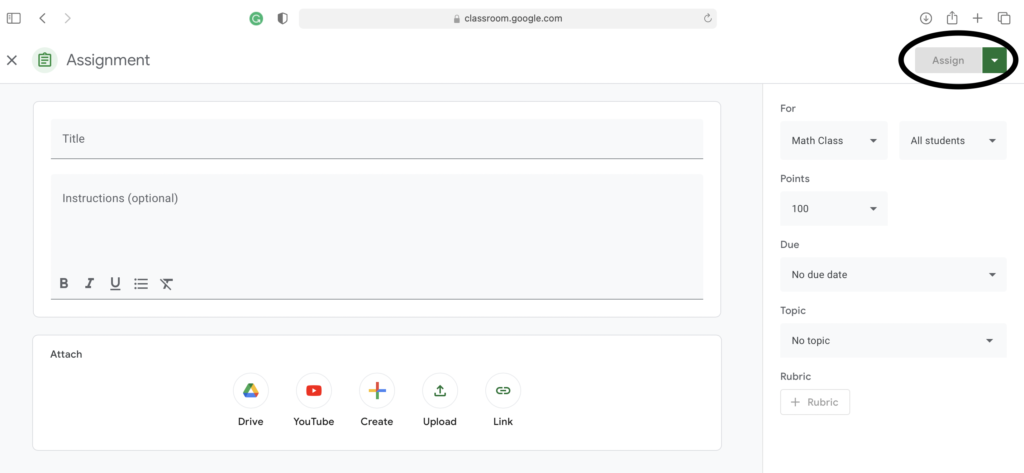
4. Click the + Create icon in the top left-hand corner. A pop-up window will appear where you choose what kind of attachment you wish to upload. Click on the assignment tab.
5. Fill in all of the relevant details for your assignment, such as the title, due date, description, attachments, grade, and even rubric.
6. When you’re finished adding all of the details for your assignment, click the assign button on the top-right-hand corner.
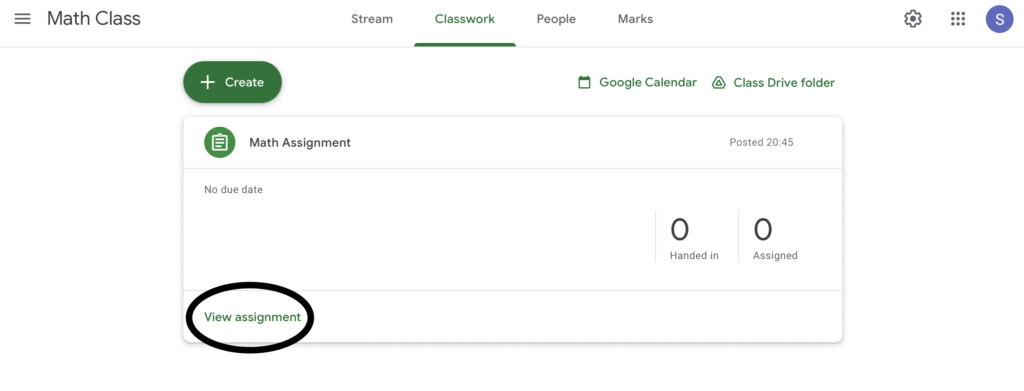
Your assignment will now appear on the Classwork page for your class! Students can click on it to view all of the details and begin working on it right away.
GRADING ASSIGNMENTS
Google Classroom also allows teachers to grade students assignment directly on Google Classroom. To do so, follow the steps below!
1. Find the assignment you want to assign a grade and click view assignment.
2. Click on a students’ name you wish to correct and assign a grade.
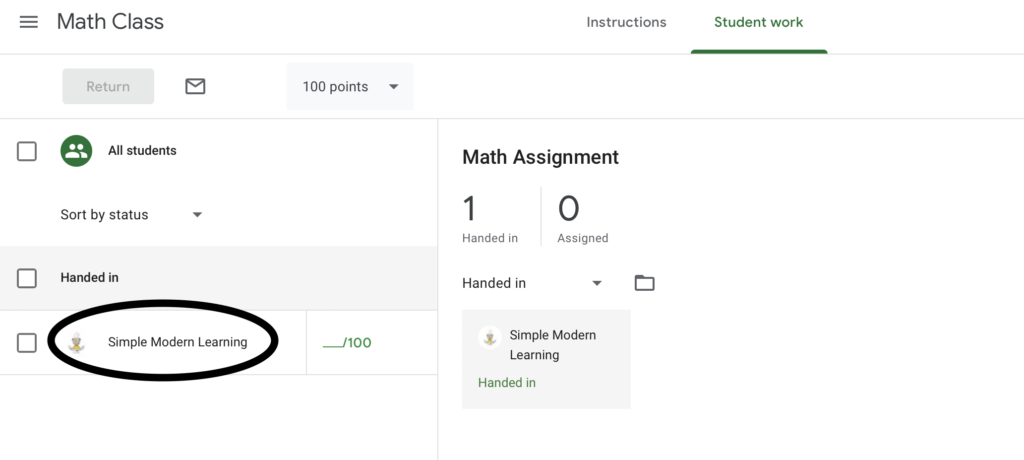
You can also add comments for each student by clicking in the box next to their name and typing out your feedback.
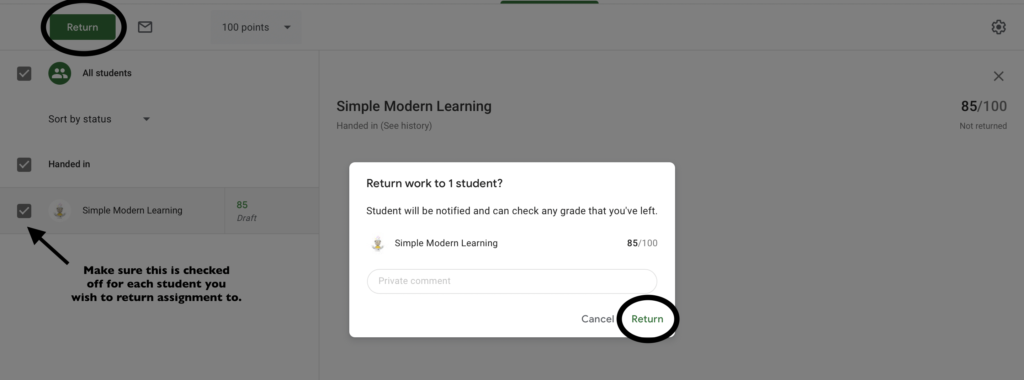
3. Once you’ve finished correcting the assignment, select the return button at the top left. Confirm by clicking the return button displayed on the pop up box.
Assigning assignments on Google Classroom is quick and easy! Just follow these simple steps and you’ll have your students’ assignments ready in no time at all. With Google Classroom, gone are the days of forgotten homework or misplaced handouts—now everything is organized digitally in one central location. So why wait? Get started with Google Classroom today! To learn more about the ways to use Google Classroom in your class click here .
Sponsored ads
Popular posts
3 ways to improve problem-solving skills with flipped learning today, how to create engaging math videos for flipped learning, 5 reasons why flipped learning is the future of education, how to create an assessment using google forms, you might also like these articles..

Flipped Learning - How to Get Students to Watch the Videos
October 7, 2022 Flipped Learning

How Technology is Transforming Education
November 15, 2022 Education

Comparing the Benefits and Drawbacks of Popular Video Platforms for Teachers
January 23, 2023 Flipped Learning
5 Free Online Formative Assessments to Use in Your Classroom
April 19, 2023 Flipped Learning

Flipped Learning - What Does A Flipped Classroom Look Like?
September 24, 2022 Flipped Learning

Flipped Learning - The Classroom Dynamic
October 17, 2022 Flipped Learning
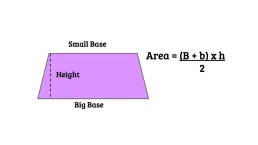
How to Calculate the Area of a Trapezoid
November 30, 2022 Mathematics

Flipped Learning For All Learners: Visual, Auditory, and Kinaesthetic
November 12, 2022 Flipped Learning

How Teachers Can Use a Random Team Generator in a Flipped Classroom
May 3, 2023 Flipped Learning

June 20, 2023 Flipped Learning

How Flipped Learning Benefits Introverted Students
December 9, 2022 Flipped Learning

The Importance of Math in Everyday Life
October 24, 2022 Mathematics

Flipped Learning - How to Successfully Flip Your Math Class
September 30, 2022 Flipped Learning

The Importance of Teaching Students How to Learn
November 7, 2022 Education

5 Challenges & How to Overcome Them
September 19, 2022 Flipped Learning

Flipped Learning - How To Spend Less Time Flipping Your Math Class
October 14, 2022 Flipped Learning
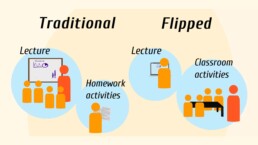
Flipped Learning - Traditional Versus Flipped Classroom: What is the Difference?
September 27, 2022 Flipped Learning

Flipped Learning - Why More Math Teachers Are Choosing to Flip Their Class
October 21, 2022 Flipped Learning
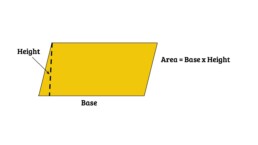
How to Find the Area of a Parallelogram
October 31, 2022 Mathematics
The Benefits of a Flipped Classroom Model for Building Independent Students
January 16, 2023 Flipped Learning

5 Ways to Use Google Classroom in Your Math Class
February 21, 2023 Flipped Learning

Flipped Learning - 5 Reasons to Flip Your Math Class Today

Knowing How to Find The Area Can Help You In The Real World
October 28, 2022 Mathematics

Flipped Learning - How Flipped Learning Promotes a Growth Mindset
October 10, 2022 Flipped Learning

October 25, 2023 Flipped Learning

Flip Your Classroom With These Online Tools
December 20, 2022 Flipped Learning
Flipped Learning - How to Incorporate Flipped Learning in Any Class
October 3, 2022 Flipped Learning

4 Ways Flipped Learning Teaches Students How To Learn
May 12, 2023 Flipped Learning

5 Reasons to Consider a Math Tutor in High School
February 6, 2023 Tutoring

How to Find the Area of a Triangle
November 4, 2022 Mathematics

Flipped Learning Tips and Tricks for Teachers
April 4, 2023 Flipped Learning

July 19, 2023 Flipped Learning

November 29, 2023 Flipped Learning

The Role of the Teacher in a Flipped Classroom
November 22, 2022 Flipped Learning

How to Keep Students Organized in a Flipped Classroom
January 6, 2023 Flipped Learning

How To Create An Assignment In Google Classroom
Google Classroom lets teachers teach from the cloud by organizing classes, responding to writing, checking file access, and more.

How Do You Create An Assignment In Google Classroom?
by TeachThought Staff
Google Classroom is a simple digital filing system provided by Google that allows teachers to teach from the cloud by organizing classes, responding to writing, checking file access, and more. We’ve provided ways teachers can use Google Classroom in the past. Below, we provide Google’s own how-to instructions on creating assignments in Google Classroom for PC, Android, and iOS.
You can read more on Google Classroom’s support page .
Create an assignment
- Sign-in.
- Click the class.
- Enter the title and any instructions.
Change an assignment due date or time
By default, the assignment is due the next day. To change it:
- Click the date and select a date.
- (Optional) To set a due time, click Time and type a time.
Add materials to an assignment
You can add attachments, such as Google Drive files, YouTube videos, or links to your assignment.
- To upload a file, click Attach, select the file, and click Upload.

- Select the item and click Add .
- Students can view file —Students can read the file, but not change it.
- Students can edit file —Students can make changes to the file.
- Make a copy for each student —Students receive an individual copy of the file that they can change.
- Click Video search .
- Type keywords in the search bar.
- Click the video and click Add .
- Click URL .
- Enter the URL and click Add .
Post an assignment to multiple classes
- Check the box next to the class you want to include.
How To Create An Assignment On Google Classroom On Android
By default, the assignment is due the next day, but you can change it.
- Tap Due date , select a different date, and tap Done .
- (Optional) Tap Time , select a time, and tap Done .
You can add Drive files, links, images, or Youtube videos to your assignment.
- To upload a file, tap Attach, select the file, and tap Upload .
- Delete —Remove the attachment.

- Tap Video search .
- Type keywords in the search bar.
- Tap the video and tap Add .
- Enter the URL and tap Add .
How To Create An Assignment On Google Classroom On iOS/iPad/iPhone
- Tap Due date , select a different date, and tap OK .
- (Optional) Tap Add time , select a time, and tap OK .
You can add Drive files, links, images, or photos to your assignment.
- To attach a photo, tap Pick photo and choose your photo. Or, tap Use camera and take a photo.
TeachThought is an organization dedicated to innovation in education through the growth of outstanding teachers.
for Education
- Google Classroom
- Google Workspace Admin
- Google Cloud
Google Classroom is turning 10. Find out what we've learned and what we're doing next. 🎉
Easily distribute, analyze, and grade student work with assignments for your lms.
Assignments is an application for your learning management system (LMS). It helps educators save time grading and guides students to turn in their best work with originality reports — all through the collaborative power of Google Workspace for Education.
- Get started
- Explore originality reports

Bring your favorite tools together within your LMS
Make Google Docs and Google Drive compatible with your LMS
Simplify assignment management with user-friendly Google Workspace productivity tools
Built with the latest Learning Tools Interoperability (LTI) standards for robust security and easy installation in your LMS
Save time distributing and grading classwork
Distribute personalized copies of Google Drive templates and worksheets to students
Grade consistently and transparently with rubrics integrated into student work
Add rich feedback faster using the customizable comment bank
Examine student work to ensure authenticity
Compare student work against hundreds of billions of web pages and over 40 million books with originality reports
Make student-to-student comparisons on your domain-owned repository of past submissions when you sign up for the Teaching and Learning Upgrade or Google Workspace for Education Plus
Allow students to scan their own work for recommended citations up to three times
Trust in high security standards
Protect student privacy — data is owned and managed solely by you and your students
Provide an ad-free experience for all your users
Compatible with LTI version 1.1 or higher and meets rigorous compliance standards

Product demos
Experience google workspace for education in action. explore premium features in detail via step-by-step demos to get a feel for how they work in the classroom..
“Assignments enable faculty to save time on the mundane parts of grading and...spend more time on providing more personalized and relevant feedback to students.” Benjamin Hommerding , Technology Innovationist, St. Norbert College

Classroom users get the best of Assignments built-in
Find all of the same features of Assignments in your existing Classroom environment
- Learn more about Classroom
Explore resources to get up and running
Discover helpful resources to get up to speed on using Assignments and find answers to commonly asked questions.
- Visit Help Center

Get a quick overview of Assignments to help Educators learn how they can use it in their classrooms.
- Download overview

Get started guide
Start using Assignments in your courses with this step-by-step guide for instructors.
- Download guide

Teacher Center Assignments resources
Find educator tools and resources to get started with Assignments.
- Visit Teacher Center

How to use Assignments within your LMS
Watch this brief video on how Educators can use Assignments.
- Watch video

Turn on Assignments in your LMS
Contact your institution’s administrator to turn on Assignments within your LMS.
- Admin setup

Explore a suite of tools for your classroom with Google Workspace for Education
You're now viewing content for a different region..
For content more relevant to your region, we suggest:
Sign up here for updates, insights, resources, and more.
WELCOME! Find what you need

Elementary Math

Elementary Ela-Reading

Teaching Tips

Career Exploration
How to assign student work with google classroom.
Here’s an easy step-by-step guide for teachers about how to assign work to students using Google Classroom for digital classroom lessons and remote teaching.
Google Classroom is user-friendly, but anything new can be confusing for teachers who aren’t tech-savvy.

Here’s a quick, easy-to-follow guide for assigning student work with Google Classroom . You can do this!
Go ahead and open Google Classroom and create your class. Give your classes names like “Period 1” or “Morning ELA” so you can quickly identify the class you want.

1) Your class’s unique code is identified here. You’ll need that code when adding students to your class. You can add students directly or give the code to students, and they can join the class.
Click Classwork .

2) Click Create, then click on the dropdown menu and choose Assignment .

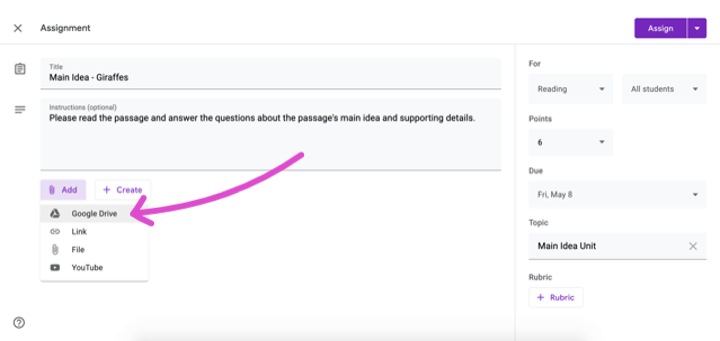
3) Give your new assignment a title, and then you choose to add instructions to your students, points, due date, an optional rubric, and choose to which students you want the work assigned.

4) Click the ADD tab, and you can attach a Google Drive assignment, link to a website, add a file (such as a PDF, Word, or PowerPoint document), or attach a YouTube video for students to watch.

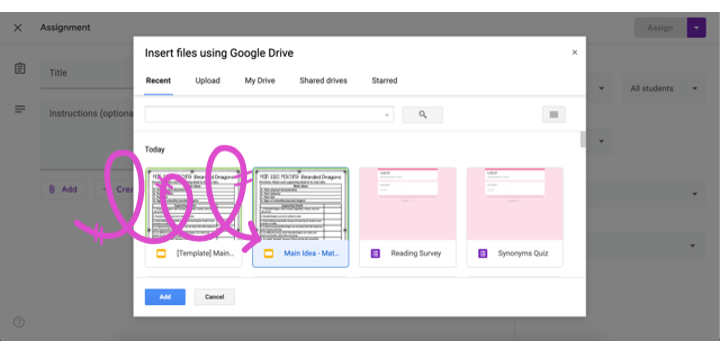
5) Find the file you want to share with your students and double-click on it. That will bring up a box with a dropdown menu.

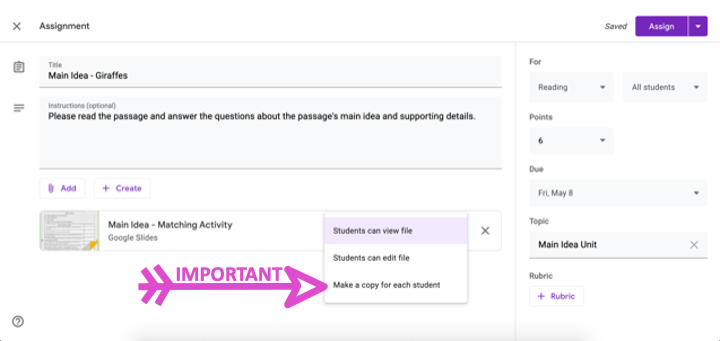
6) IMPORTANT : On the dropdown menu, choose Make a copy for each student .
You want to make sure each student receives their own copy of the file, so your original file won’t be shared and changed when they begin to interact with it! Ultimately, you want students to make changes on their own individual copies.

7) Next, you should double-check the points, due date, and other details to make sure you didn’t forget to add anything important.
8) Click the Assign button.
*You can also choose the down arrow by Assign and choose the Schedule option if you’d like to select a future date. A calendar will open up, and you can choose the date and the time you want the assignment posted.
More about converting resources to digital and using Google
Step-By-Step: Convert Worksheets for Distance Learning
How to Assign Just One or Two Slides in Google Classroom
If you plan to use Google Classroom, there’s also a FREE Google Chrome Extension you can use.
Try Kami (free) for Learning Management Systems:
Here’s a tutorial from Kami you’ll find helpful:
Kami Tutorial
Shop this article
Interested in the graph paper math resources shown above? Click the image below to learn more and visit my Teachers Pay Teachers shop.

Please follow me on Teachers Pay Teachers , Pinterest , Facebook , and Instagram if you found this article helpful. I post educational content that can help you in your own classroom.
Thank you for being a part of the Caffeine Queen Teacher community! Your support means a lot to me. Together, we can make learning fun and interesting!
Hi, I’m Jules
Find it fast, browse the blog, visit my teachers pay teachers shop.


Paperless Is Not a Pedagogy
Alice keeler, google classroom: writing assignment directions.

Google Docs TABS – Organize Your Document

Google Classroom Tutorial: How Students Turn in Work

Who Didn’t Respond to a Google Form

One thing I love about Google Classroom is it’s simplicity. Almost any teacher can be up and running with a blended classroom in 30 minutes. However, Google Classroom is not a learning management system (LMS). You are not able to reuse classes and parents can not view the stream of assignments. When creating assignments the directions space is not a rich text editor. This means you can not bold text, change font size, insert images or embed video.
I recommend you create your directions in a Google Doc and attach it as the first asset in Google Classroom. This has many advantages.
Reusability
Directions created in a Google Doc can be inserted into any Google Classroom assignment. They can be used semester after semester.
Sharability
Google Docs can be made visible to parents through your classroom website. The directions documents can also be shared and collaborated on with other teachers.
If you create an assignment in Google Classroom and assign it to multiple sections, you have to edit each section individually if you need to edit or update the directions. Keeping the directions in a Google Doc allows you to make edits in one place but be updated in all of your Google classes.
Consistency
Get in the habit of always providing your directions in a Google Doc. Students will look for the first asset in your lesson set to find the directions.
Rich Text Editor
While you can not embed a video in a Google Doc, you are able to insert images and screenshots into your directions. You can also vary the font size, type and color. Directions in a Google Doc can be more detailed.
Lengthy directions in the Google Classroom stream can clutter the stream. Make it easier to find assignments in Classroom by limiting the amount of text in the description section of an assignment.
Assignment Descriptions
Instead of listing the full directions for an assignment in the description area, give a brief overview of the learning objective and procedural directions for how to submit the assignment.
If you attach a document where every student receives a copy, the document is not visible in the stream. Include in your description box “Click on the OPEN button and locate the Google Doc template. ”
Suggested Descriptions
For this assignment, you will be adding a slide to the collaborative presentation attached. Open the directions document for full details. When you have added your slide, come back to Classroom and click on OPEN. Use the Add button to link to the slide you contributed. Click on the blue ” TURN IN ” button.
For this assignment, you will be writing an essay explaining the challenges of world peace. Open the directions document below for full details. Click on the OPEN button and click on the “Create” button to create a Google Doc for your essay. Click on the blue “TURN IN” button after completing your essay.
Recent Teacher Tech Blog Posts

How to Delete Multiple Tabs in Google Sheets

Wow! Daily Agenda Slides for Google Slides

Create Scratchers in FigJam

Standing Desks for School Administrators: A Game Changer

Why a Student Centered Classroom
2 thoughts on “ google classroom: writing assignment directions ”.
Hi Alice, I was sent in your direction for Google Classroom inquiries and I’d like to ask a question about the assignment section of Google classroom. The assignment I am planning is book review that students share with their class. I’d like to create this as an assignment for record-keeping/marking purposes. Unless I’m mistaken though, assignment submissions are only visible to the teacher… Is this correct? Is there an option to change this that I have not found? Or is my only way around this to get students to submit twice – once as a post in the classroom and again to the assignment section? Thanks, Jess.
I have a script you might really like https://alicekeeler.com/studentcritique
Leave a Reply Cancel reply
You must be logged in to post a comment.
This site uses Akismet to reduce spam. Learn how your comment data is processed .
© 2024 All Rights Reserved.
- Español – América Latina
- Português – Brasil
- Tiếng Việt
- Knowledge Center
- Google Workspace Knowledge Center
How to schedule assignments or assign material
Environment.
- Google Classroom
Add materials
- Go to Google Classsroom .
- Click the class > Classwork .
- At the top, click Create > Material .
- Enter a title and a description.
Schedule materials
- To schedule the same material across multiple classes, make sure to select all classes you want to include.
- Next to Post , click the Down arrow Schedule .
- When you enter a time, Classroom defaults to PM unless you specify AM.
- (Optional) Select a topic for each class.
- (Optional) To replicate your selected time and date for the first class into all subsequent classes, click Copy settings to all .
- Click Schedule . The material will automatically post at the scheduled date and time.
Except as otherwise noted, the content of this page is licensed under the Creative Commons Attribution 4.0 License , and code samples are licensed under the Apache 2.0 License . For details, see the Google Developers Site Policies . Java is a registered trademark of Oracle and/or its affiliates.
Last updated 2024-04-27 UTC.
- Help Center
- Privacy Policy
- Terms of Service
- Submit feedback
- Announcements
IMAGES
COMMENTS
Follow the steps above to create an assignment and select classes. To schedule the same assignment across multiple classes, make sure to select all classes you want to include. Next to Assign, click the Down arrow Schedule. Next to the date, click the Down arrow and select a publish date and time for each class.
Are you using Google Classroom for at-home learning? I have created two weeks of FREE writing video lessons for your students. These lessons are ideal for gr...
Whenever you want to create new assignments, questions, or material, you'll need to navigate to the Classwork tab. In this tab, you can create assignments and view all current and past assignments. To create an assignment, click the Create button, then select Assignment . You can also select Question if you'd like to pose a single question to ...
This video shows how to create a Google Doc inside of Google Classroom like you might do for a writing assignment in your classes.
We'll show you how to create assignments in Google Classroom and share them with your students. There are a few options you can change, like the point value,...
Instead of assigning an essay and hoping for the best when it's deadline time, you can use Google Classroom & Docs to monitor students' progress throughout the entire writing process. The next time you want to assign an essay, create a template for the assignment in Google docs.
Step 3. Click the Create button and select "Assignment" from the list. You can also select the options: Quiz assignment, Question, Material, or Reuse post. Here's a mini explanation of each. Quiz assignment: Uses Google Forms to auto-grade assessments. Question: Post a quick, open-ended question for students to answer from the Stream page.
Tap the classwork icon. Tap the plus sign and tap "Assignment.". Enter the name and write the necessary instructions. Tap "All students" twice to deselect them. Type the names of the ...
Create an assignment (details above). At the top, tap More Edit Topic . Choose an option: To create a topic, tap New topic, then enter a topic name. To select a topic in the list, tap the topic name. To confirm, tap Done. Tip: You can only add one topic to an assignment.
Step by Step Guide on How to Create an Quiz Assignment. Open your class. Click on the second tab, Classwork. Click " + Create " button and choose Quiz Assignment. A new pop-up window will appear, enter the Title and Instructions for this quiz. Click on the Blank Quiz link to open the Google Forms file. Click on the title Blank Quiz to ...
1. Go to https://classroom.google.com and sign in if needed. 2. Once you've successfully signed in you will see all your classes. Find the class you want to assign an assignment to and click it. 3. To create a new assignment, click the Classwork Tab at the top of the page. 4. Click the + Create icon in the top left-hand corner.
Next to Due Tomorrow, click the Down arrow . Click the date and select a date. (Optional) To set a due time, click Time and type a time. To create an assignment with no due date, click Due date and click Remove next to the date.
The assignment will automatically post on the scheduled date, at the scheduled time. After scheduling multiple assignments at once, you can still edit assignments later by clicking into each class and changing them individually. Save an assignment as a draft. Follow the steps above to create an assignment; Next to Assign, click the down arrow ...
Easily distribute, analyze, and grade student work with Assignments for your LMS. Assignments is an application for your learning management system (LMS). It helps educators save time grading and guides students to turn in their best work with originality reports — all through the collaborative power of Google Workspace for Education. Get ...
Learn how to create assignments using Google Docs in Google Classroom. This is a great idea for ELA classes to make essay writing digital.-This video and con...
Click Classwork. 2) Click Create, then click on the dropdown menu and choose Assignment. 3) Give your new assignment a title, and then you choose to add instructions to your students, points, due date, an optional rubric, and choose to which students you want the work assigned. 4) Click the ADD tab, and you can attach a Google Drive assignment ...
Click the class Classwork.; Click the quiz View instructions.; Click the form and answer the questions. Click Submit. If the form is the only work for the assignment, the status of the assignment changes to Turned in.; If there's more work to do for the assignment, click Open assignment.; Turn in an assignment with an assigned doc
Click on the blue " TURN IN " button. For this assignment, you will be writing an essay explaining the challenges of world peace. Open the directions document below for full details. Click on the OPEN button and click on the "Create" button to create a Google Doc for your essay. Click on the blue "TURN IN" button after completing ...
Solution. Go to Google Classsroom. Click the class > Classwork. At the top, click Create > Material. Enter a title and a description. Follow the steps above to create material and select classes. To schedule the same material across multiple classes, make sure to select all classes you want to include. Next to Post, click the Down arrow Schedule.
Research projects strike fear into the heart of most students. These projects are detailed and challenging. These projects also strike fear into the hearts o...
Click the class and then choose an option: Click the assignment or question. Click View all on the assignment or question, click View details. Under Your work, click Unsubmit and confirm. Note: After you unsubmit, you can continue working on your previous copy of the doc. To start over with a new copy, continue to the next step.
http://bit.ly/tarversub Subscribe to join the best students on the planet!!----Have Instagram? DM me your math problems! http://bit.ly/tarvergramHangout with...
This help content & information General Help Center experience. Search. Clear search