Instructional Design & Technology Services, IITS
Haverford College

The Moodle Assignment: Collect and grade submitted work
The Moodle Assignment module lets you collect student assignments—including research papers, spreadsheets, presentations, photographs, and short audio or video recordings—online. The video below is a great resource for seeing how to add an assignment and to understand many of the most useful options. A text version of the information, along with some specific recommendations for Haverford faculty follows the video.
Add the assignment
Configure the assignment.
Now you need to configure assignment settings. By selecting the correct options, you will be able to grade student and give feedback the way you want. You can generally accept the defaults, but we recommend changing a few of the options to make submission easy for students and grading easy for you.
General settings
You must fill in the general setting to give your assignment a name. You need to enter an Assignment name –the name that students see on the main course page.
You can also give an assignment Description to explain the assignment to your student. What are your expectations for the assignment? What file format, if any, should they use? If you are allowing drafts, what do you expect in the drafts and what do you expect in the final project?
You can also upload instructions, templates, or other relevant files in the Additional files area.
Availability
OPTIONAL: Next, you will see an Availability section. Use this to give your students due dates. Date information from your assignments will flow to the Moodle calendar. Students can see upcoming assignments on their Moodle dashboard.
You can also set a “remind me to grade by” date; this will appear on your dashboard.
Submission types
OPTIONAL: In the Submission types area, determine what your students will be submitting. If you leave the defaults, students will submit one file, up to 5 MB in size. This works for many types of assignments. However , if you have any of the scenarios below, you will want to change the defaults.
Do you want students to submit a short reading response, or other short entry, directly into the assignment text area? Check the “ online text ” box.
Do you want to set a word limit for online submissions? In addition to checking the “ online text ” box, enable and set a “ Word limit .”
Do you want student to submit draft copies of their submission? Increase the “ maximum number of uploaded files .”
Will students submit documents over 20MB in size? 20MB is a pretty large file. Hopefully, students will be uploading files much smaller, to avoid taxing our system resources. If 20MB is not large enough, contact [email protected] and see if there is a better tool for your needs.

Do you want students to submit assignments in a particular format, such as a PDF, Microsoft Word format, Microsoft Excel, MP3 audio file, etc.? Click the “ Choose ” button and select your desired file type for student submissions or type the file extension name into the box. Require PDFs (“.pdf”) if you want to mark up assignments directly in the Moodle gradebook.
Feedback types
OPTIONAL: In the Feedback types area, state what type of feedback you will give students–and how you will give that feedback. All options should be checked by default. However, if any options are unchecked that may prevent you from delivering feedback in your preferred way.
Check the “ Feedback comments ” box to give comments on each submission.
Check the “ Offline grading worksheet ” box, if you want to enter grades in Excel and upload them to Moodle.
Check the “ Feedback files ” box, if you want to return student submissions with your markups, or submit other types of feedback files such as voice comments.
Set “ Comment inline ” to yes , for an easy way to comment on text students submit directly into the assignment tool. This is only useful if you enable the “Online Text” submission type.
More options
In addition to the settings above, many other options are available. A few options:
- group assignments
- blind marking , to hide student identities when you grade
- activity completion tracking, so you can make other activities in your course dependent upon this assignment, or just help students see where they are in the course
Once you have the desired settings, click the button to save and return to course .
Grade submissions and provide feedback
Once you have created your assignment activity and students have submitted work, you will want to collect and grade student submissions. You can either download all the assignments, grade them offline, and then upload feedback files with comments or mark papers directly in Moodle.
Download all submissions and mark papers outside of Moodle
The Moodle Assignment module lets you bulk downloaded student submissions for organization and offline grading. This can be helpful in a number of situations:
- Organize and locally store submitted assignments
- Provide assignments feedback using by marking-up student submissions using tools available in desktop or tablet apps such MS Word, Adobe Acrobat Pro, Explain Everything, etc.
- Efficiently enter grades and general feedback comments using Excel, which can be faster the Moodle online grading interface
- Grade assignments anywhere; internet access is not needed
It’s not hard to use the offline grading option, but it has a number of steps both within Moodle and your local computer operating system. Watch this video on off-line marking for more information.
Mark directly within Moodle
- Enter the student’s grade.
- Type or record feedback comments.
- Download the submission to look at it or annotate it outside of Moodle.
- Mark up a PDF submission.
- Return a file with your annotations or comments.
- Save the grade and continue to the next student.
- Depending upon what the student submitted, you may want to change the layout of your marking window.
- You can also select a different student from the upper right drop-down menu.
- By default, students are notified when you grade, but you can uncheck that option before saving.
Moodle Tutorials: Uploading an Assignment to Moodle
- Linking Your Course to Moodle
- Navigating in Moodle
- Beginning of Semester Checklist
- Setting up the Layout of Your Course Site
- Editing Your Moodle Profile
- Copying Course Materials from Another Site
- Using Meta Link (combining enrollments from multiple course sections into one site)
- Quick-Start Video Guides for Moodle 4.2
- Adding an Announcement
- Uploading a File
- Creating and Editing Folders
- Managing Groups: Creating Groups and assigning student to them
- Adding Text and Images to Your Course Home Page
- Adding a Web Link
- Hiding and Revealing Items
- End-of-Term Checklist
- Adding a user to your course
- Setting up a Forum
- Enabling Groups in a Forum
- Setting up Whole Forum Grading
- Creating Assignments
- Grading Assignments
- Using Rubrics for Assignments
- Creating a Quiz
- Quiz Settings
- Adding Questions to a Quiz
- Using the Question Bank
- Adding Safe Exam Browser
- Adding a New Column (Grade Item)
- Rearranging Columns (Grade Items)
- Entering and Editing Grades
- Creating Categories in the Grade Book
- Adding Extra Credit
- Exporting Grades Into Excel Spreadsheet
- Importing Grades from an Excel Spreadsheet
- Accessing Moodle
- Taking a Quiz in Moodle
- Uploading an Assignment to Moodle
- Participating in Discussion Forums
- Viewing Grades on Moodle
- Safe Exam Browser
- Adding H5P Interactive Content
- Embedding Google Drive Videos
- Embedding YouTube Videos
- Embedding Box Videos
Uploading an Assignment
1. If you have to upload a file into Moodle, click on the assingnment you need to submit. These activities can be identified by this icon:

2. This will bring you to the Submission Status page where you click on Add Submission.
3. Click on "Add.." then click Browse then Upload this File . You can also drag and drop your file into the area below then Save Changes .
4. You will receive a confirmation that the file has been uploaded successfully. In the assignment window, you should see your file listed in the middle of the page.
5. Depending on how your instructor has set up the assignment, you may be able to edit my submission . If not then your file has been submitted.
- << Previous: Taking a Quiz in Moodle
- Next: Participating in Discussion Forums >>
- Last Updated: Jan 2, 2024 9:37 AM
- URL: https://pacificu.libguides.com/moodle
Copyright © Pacific University, all rights reserved
2043 College Way, Forest Grove, Oregon, 97116
[email protected] | 503-352-1400 | Staff Directory
Swarthmore College – ITS Blog

How to allow extra time on exams, quizzes and assigments in Moodle (Moodle Accessibility – Part 1)
Faculty are frequently asked for extra time on quizes, exams and written assignments. In some cases, these requests are to accommodate a disability that impacts a student’s speed in completing such work. Fortunately, it’s easy to manage extra time with Moodle’s quiz functionality and in Moodle assignments! What’s more, you can allow extra time for as many students as appropriate with all the same time allowance, and you can have separate time allowances for students with different needs.
From our Knowledge Base article ( Extended time on quizes ): It is possible to give specific students (or groups of students) a different time limit on quizzes and assignments. This is useful for students that need extended time. It is also possible to modify the quiz or assignment start and end dates in case students need an extension or provide an additional attempt for the work if a student needs a retake.
Instructions:
To make these changes follow the steps below.
- Click the “ Turn Editing On” button at the top right of your Moodle course page.
- Enter the quiz or assignment by clicking on its title.

- Select the student(s) from the list.
- You may set a password to access the quiz or assignment
- The “Time limit” option allows you to set the length of time allowed for the student
- Set the number of attempts under “Attempts allowed”

- These overrides will be listed on the User overrides page
- User overrides need to be set independently for each applicable quiz or assignment in the course
While this works for both the built-in Moodle quizes and assignments, I would note that it is not available for Turnitin Assignments nor for Questionaires or Google Assignments, as those tools both use external plug-ins that don’t have this functionality. And in general, external plug-in tools will not have the same flexibility for accommodating students needs as the built-in tools.
Share this:
Learning and Teaching
- Assessment & Feedback
How to mark an Assignment online in Moodle
Preparing to grade an assignment.
Before beginning marking it’s important to understand how your assignment has been setup, so that you can ensure that you are not showing marks and feedback to students before you are ready for them to see them .
By default, Moodle assignments hide grades and feedback from students through the ‘Marking Workflow’ option.
When you create an Assignment, the ‘Marking Workflow’ setting will be enabled. This automatically hides any marks and feedback that you upload for students until you take specific steps to release the marks and feedback. This is a ‘safer’ option for the requirements of most Teachers .
Guidance on releasing Marks and Feedback, and sending a notification to students with a few clicks, using marking workflow can be found below.
If you prefer instead to turn off the marking workflow option you can do so within the Assignment’s settings, under the ‘Grade’ settings. Note that doing this will mean that any marks and feedback added to Moodle will be immediately visible to students!
If you have turned off Marking Workflow, but you also don’t want students to see marks and feedback as soon as they are uploaded, you will need to hide the Assignment link and Gradebook item until you are ready to reveal the marks and feedback.
The guidance below shows how to turn off Marking Workflow (if you wish) and how to hide the Assignment link and Gradebook item:
- Find your Assignment and select Settings

- Scroll down to ‘ Grade ’ settings and expand them
- Set use marking workflow to no
- Save changes

Note: Any marks and feedback you add will now be immediately visible to students!
To manually hide marks and feedback from students you will need to hide the Assignment’s Gradebook item and the Assignment link (which is often not practical where there are late submissions)
To hide the Gradebook item:

- Go to the Course Homepage and choose the Grades tab
- From the Grader Report drop-down menu, choose Gradebook Setup .

- In the row for the Assignment that you wish to hide, in the Actions column, choose Edit then Hide .

- Save Changes .
- The Gradebook item will now appear to be greyed out to show that it is not visible to students.

To hide the Assignment link from students:
- Navigate to the Assignment and, from its Edit drop-down menu, choose Hide .

- You can now begin marking.
Note : When are ready to release marks and feedback to students, don’t forget that you’ll need to make the Gradebook item and Assignment link visible again.
Lock submissions to prevent changes
Before you begin marking it’s a good idea to lock submissions. This will prevent students from making any changes to their submissions once marking is underway. To do so, navigate to your Assignment and View all submissions .
- Tick the box at the top of the ‘select’ column to select all user submissions.
- From the ‘ With selected…’ drop-down menu choose Lock Submissions .

Note: If you have a large number of students you will need to select the option under the table to ‘show all students on one page’.
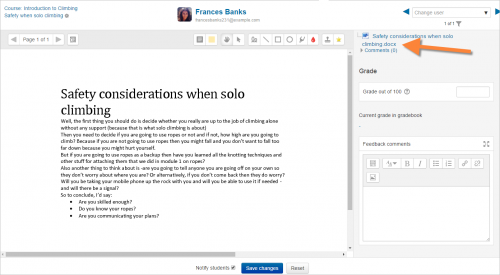
Moodle grading interface overview
Moodle has a built-in grading interface that allows you to annotate student assignments, add summary comments and award marks. Student submissions are displayed in PDF form and include a link to the Ouriginal similarity report (where activated).
The image below gives an overview of the built-in grading interface:

- Use the next and previous arrows to move to the next page of the student’s document or choose a page from the drop-down menu.
- Add an annotation to comment (with option to choose background colour).
- Use the arrow tool to select, move or delete existing annotations.
- Other tools such as the pen (squiggly line) for free form drawing or writing, shape tools, line, highlighter)
- Stamp tool/x tool.
- Anchor for an annotation (if you hover over it, it expands to reveal the annotation)
- An annotation
- Click the sub-menu icon in annotation (top right corner) to delete or add annotation to a ‘quicklist’ for the assignment).
- Use navigation to see Previous/Next student’s assignment or filter.
- Add grade here in the right-hand pane.
- Summary feedback can be entered here
- Don’t forget to save any changes made!
- Click to cycle through the options for screen layout
The video below provides an introduction to the grading interface, shows how to annotate student scripts, view Ouriginal reports and award marks. It also details how you can lift anonymity (where anonymous marking is being used) at the end of the marking process.
Marking Assignments Online
Marking a Group Assignment
Where one student has uploaded a file on behalf of her Group, the file will appear against all Group members, and any of these can be marked. On the individual student grading page, an option to ‘ Apply grade and feedback to all members of group ’ will appear. If ticked the grades and feedback will be applied to all group members.

Allocate Assignments to another Marker
You can use the Marking Allocation feature to assign student submissions to a specific marker in your Moodle space.
- Marking allocation – this allows allocation of markers to work after the deadline. Marking allocation depends on Marking workflow being enabled.
Marking Workflow and Marking Allocation must be enabled in your assignment settings.

Once these have been enabled, you can allocate assignments to a marker.
- Click on your Assignment link
- Click on View all submissions

- Tick the box to the left of the student whose assignment you want to allocate, then choose Set allocated marker and click Go .
- At the prompt click Ok , then on the next page select your allocated marker from the drop-down menu and click Save Changes .
How to lift anonymity in an Assignment
If you are using Anonymous Marking (blind marking) in Moodle, once you have completed marking, it is necessary to lift anonymity in order to release grades to the Gradebook. Please note that lifting anonymity can only be done once, (you cannot return the assignment to an anonymous state once it has been lifted), so ensure that you have completed all marking before going ahead.
To lift anonymity.
- Click on the assignment link, then click on View all submissions
- From the grading actions menu choose Reveal student identities:

This video also shows the process for lifting anonymity: https://uniofbath.cloud.panopto.eu/Panopto/Pages/Viewer.aspx?id=dbdb18a7-e4f2-40af-a7fe-acd800a3803c&start=0
Lifting Anonymity
Related Articles
- Anonymous marking in Moodle
- Advanced Grading in Moodle
- Group Peer Review for Teachers
- How to mark an Assignment offline and upload feedback
- Using Ouriginal
- How to create an Assignment
Article Contents
Documentation
Assignment settings.
- Assignment quick guide
- Using Assignment
- Assignment FAQ
- Upgrade tool
- 1 Adding an assignment
- 2.1 General
- 2.2 Availability
- 2.3 Submission types
- 2.4 Feedback types
- 2.5 Submission settings
- 2.6 Groups submission settings
- 3 Notifications
- 4.1 Anonymous marking
- 4.2.1 Example use cases
- 4.3 Use marking allocation
- 5 Locally assigned roles
- 6 Assignment capabilities
- 7.1 Assignment settings
- 7.2 Submission plugins
- 7.3.1.1 Check Ghostscript
Adding an assignment
- Go to the course where you want the assignment; turn on the editing, and in the section you want the assignment, click 'Add an activity or resource'.
- From the Activity chooser, click the Assignment button and click 'Add'.
(If you want to edit an existing assignment, click the Edit link to its right and choose the action you wish to take, eg 'Edit settings'.)
Give your assignment a name (which students will see to click on) and, if required, a description. If you want the description to display on the course page, check the box.
Availability
Submission types.
Here you can decide how you wish students to submit their work to you.
Note: If Submission comments are enabled in Administration>Plugins>Activity modules>Assignment>Submission plugins , students will be able to add a note to their teacher on submitting work. If Anonymous (blind) marking is enabled, student comments display in the gradebook as from "Participant 01 etc" to avoid revealing identities.
It's possible to set a word limit on an online text assignment. Students get a warning if they try to exceed the word limit. Numbers are counted as words and abbreviations such as I'm or they're are counted as single words.
Comments may be collapsed to make it easier to read the original text:

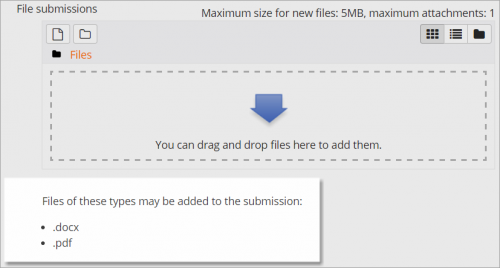
If the file types have been restricted, then when students attempt to submit the assignment, they will see a message telling them which files are accepted:
Feedback types
Annotate PDF appears if this setting is enabled by the Site administrator in the Manage assignment feedback plugins section of Site admin and will allow the teacher to annotate using comments,stamps and other features.
When the teacher has completed their grading offline, they can then upload the spreadsheet, confirm the changes and the grades and comments will be transferred over into Moodle's gradebook:
See also Offline grading worksheet blog post by Gavin Henrick.
Uploading multiple feedback files is also possible:
- Download the students' assignments using the "Download all submissions" link from the same dropdown menu;
- Extract the folder offline and add your comments to the student's submissions.Keep the names the same.
- Select the students' submissions and zip them into a new folder. Important: Don't just edit them inside their original folder and re-zip this; it will not work. The folder name does not matter as long as the feedback files have the same names as before.
- Upload this newly zipped folder.
- You will be presented with a confirmation screen displaying your feedback files. (If you zip files from a Mac,make sure to remove the folder _MACOSX)
Submission settings
Groups submission settings.
These settings allow students to collaborate on a single assignment, eg, working in the same online area or uploading , editing and reuploading an MS Powerpoint in the common assignment area.
When grading, the teacher may choose to give a common grade and feedback to all students in the group or to give individual grades and feedback to each member.
Notifications
Please note that if you are using group mode then course teachers need to be members of the group in order to receive submission and late submission notifications.
- See Grade points and Advanced grading methods for more information on the settings here.
- Setting a passing grade may be connected with Activity completion and Restrict access such that a student will not be able to access a follow up activity until they have passed this assignment.
Anonymous marking
Sometimes known as 'blind marking', anonymous marking prevents assessors from seeing students' names on submissions. Instead, they will see randomly generated Participant numbers. (The student view of the assignment does not change.) This is also the case if student comments have been enabled.
Because of the nature of anonymous marking, the students cannot see the final grade until all of the students' names have been revealed. If you are grading an assignment using an advanced grading method such as a rubric, the rubric will also be hidden from students' view until the names are revealed. To reveal student names after you are finished grading, look under Assignment settings > Reveal student identities . Feedback comments will appear whether or not student names are hidden or revealed. Note that this level of anonymity might not suit the privacy requirements of your organisation. See MDL-35390 for more details.
Users with the capability mod/assign:viewblinddetails can view student identities and participant numbers (in Moodle 3.0.3 onwards).
Use marking (grading) workflow
Enable Marking Workflow if you need to:
- keep grades and feedback hidden until you are ready to release them (otherwise by default they display to each student as you save them).
- state where you are up to in your grading.
- coordinate multiple markers.
One advantage of using marking workflow is that the grades can be hidden from students until they are set to 'Released'. The phases are:
- Not marked (the marker has not yet started)
- In marking (the marker has started but not yet finished)
- Marking completed (the marker has finished but might need to go back for checking/corrections)
- In review (the marking is now with the teacher in charge for quality checking)
- Ready for release (the teacher in charge is satisfied with the marking but wait before giving students access to the marking)
- Released (the student can access the grades/feedback)
Example use cases
One marker, Marker, wants to release all grades at the same time
- Marker enables "Use marking workflow"
- Marker marks each submission and transitions the grading to "Marking completed" as each submission is graded.
- Marker then uses the batch operations to transition all grades to "Released" at the same time.
Multiple markers,
Use marking allocation
If marking workflow (see above) is set to Yes, it is possible to enable marking allocation. This means that teachers can be selected to grade or review the submitted work of specific students. Colleagues can monitor progress through the displayed marking workflow states:
Locally assigned roles
In Administration > Assignment administration > Locally assigned roles selected users can be given additional roles in the activity. See the Using Moodle Custom role for 'Course Monitor' forum discussion for an example.
Assignment capabilities
- Export own submission
- Grade assignment
- Submit assignment
- View assignment
Role permissions for the activity can be changed in Course administration > Assignment administration > Permissions .
Site administration settings
Administrators can access assignment configuration options by expanding Administration > Site administration > Plugins > Activity modules > Assignment .
Here, the administrator can set defaults for certain settings. They may also make certain settings 'Advanced' which means a course teacher has to click the 'Show more' link to see them, or they may 'lock' settings which means a course teacher cannot alter that setting.
If the site contains courses with over 100 participants, the number of assignments listed on the assignment grading page may be limited using the Maximum assignments per page (assign | maxperpage) setting. This removes 'All' from the 'Assignments per page' setting.
If it is left as the default "No", then teachers will have the choice within their own assignments to force this or not.
The submission statement may be shown in different languages. See Multi-language content filter for how to do this.
Submission plugins
Here the administrator can enable, disable or change the order and default settings for any submission plugins.
Feedback plugins
Manage assignment feedback plugins.
Here the administrator can enable, disable or change the order and default settings for any feedback plugins.
Check Ghostscript
You can also check the ghostscript path from here:
If the default stamps are deleted by accident, they can be found in mod/assign/feedback/editpdf/pix and re-uploaded.
Synergy Learning blog post: Assignment resubmissions
A Guide to Collecting Drafts in Moodle Assignments
I recently completed my graduate studies, and after 3+ years of intensive study and a lot of writing, I have an ardent belief that scholarly writing is NOT a solitary activity. Good teachers show students to that writing is a process. Usually, this requires collecting drafts and creating opportunities for feedback and iterative improvement.
But, how to be paperless and also manage lots and lots of student drafts? I know that from an instructor’s standpoint, it’s not always apparent how to best set-up Moodle assignments to support drafts, feedback, and revisions. With that in mind, I wanted to write up a quick post on some of the possible workflow options for instructors to collect multiple drafts with Moodle Assignments. There is no perfect combination of settings, but these are some important settings to consider.
Submission types
There are a few powerful settings under the Submission types heading in the Assignment settings.
Files: One or Many?
The question here is: when collecting work at various stages, do you want students to upload a new file each time that sits alongside the previous draft, or replace the previous draft with a new one? If you expect multiple versions to be uploaded at once, ensure that the Maximum number of uploaded files is set to a number that will allow for this. Conversely, if you’d rather just deal with a single file from each student, make sure to set this to 1. As they move through different drafts, students will be able to replace their previous drafts with a new version of their document.
The other settings are less crucial for drafts but may still be on interest. For instance, if you depend on using Track Changes in Microsoft Word, you can use the Accepted file types option to prevent students from submitting PDFs or Apple Pages files.
If you are adventurous, you can skip students uploading files altogether. Instead, ask them to upload a file to a cloud service (at UP we have Microsoft OneDrive) and share a link to an online document with you. This allows a more involved and collaborative feedback process. To try this out, disable the File submissions option under Submission types and enable Online text that students can paste a sharing link to. Note that students may need an extra bit of support if they have not shared writing in this way before.
Submission settings
You’ll want to attend carefully to these settings as they determine how Moodle treats submissions.
Use the Submit Button?
One approach is to let students decide when to share a work-in-progress and when to ask you to consider a submission as final. Moodle assignments can allow for this if you enable the optional Submit button. This works with multiple file or single file submissions.
When the Submit button is on, students can upload files to an assignment, but they will be considered a draft until the student clicks the Submit button. You can provide feedback or grades for a student to review and they can choose what (if any) changes to make to their submission before hitting the Submit button.
One other possible benefit of this approach is that students can no longer make changes to their submissions after clicking the Submit button. When a file is submitted automatically upon upload, their file is considered submitted, but they can still make changes to it unless you manually lock submissions.
You can find this option under Submission settings by clicking Show more… to reveal the Require student to click the submit button selection field.
Note: because our default setting for Assignments is for the Submit button to be off, you should proactively remind students that they will need to click the submit button for your assignment.
If you want to allow students to optionally resubmit to work towards a higher grade, you can set the Maximum number of allowed attempts option to a specific number, or to unlimited attempts. You can then set the Attempts reopened setting to Manually if you want to reopen attempts yourself, or Automatically until pass if you set a Passing grade for the assignment.
Notifications
If you feel it would be helpful to get email notices when a student submits, look under the Notifications options and set Notify graders about submissions to Yes.
One Assignment, or Many?
A final piece to consider is if you might want to use separate assignment activities for each draft. In the end this might be the simplest approach, especially if the drafts have different due dates or if you would like to grade each one separately. Another option that I have enjoyed as a student is to use an ungraded activity, like a forum, for learners to post early drafts. This allows the instructor and peers to give constructive feedback that the whole class might benefit from. Longer drafts and the final submission would then be uploaded to a separate Moodle Assignment for grading.
Moodle assignments offer a lot of choices to customize how you want to collect drafts. It can be a bit complex, but hopefully you see how these options can be combined to create a workflow that supports an effective digital writing, feedback and revision process.
Photo by ron dyar on Unsplash
Reblogged from my personal blog @hirebenjam.in
Benjamin Kahn
Leave a reply cancel reply.
Your email address will not be published. Required fields are marked *
Save my name, email, and website in this browser for the next time I comment.
skip to content
Search Google Appliance
Information technology, services at a glance.
- Instructional Technologies
- Network Connectivity
- Online Storage & Collaboration
- Web Hosting
- Classroom Technologies
Article Details
- Grading and Tracking Student Activity
Last Updated:
Grade assignments in moodle, we're taking you to an updated version of this article..
UMass Amherst Information Technology support articles are now updated in the new IT Knowledge Base. We found an updated version of this article, so we're sending you there.
Taking you to:
Stay here to view this page in the legacy Support Center . Information may be outdated as these articles are no longer maintained.
Find answers to your tech questions in the new IT Knowledge Base .
UMass Amherst Information Technology support articles are now updated in the new IT Knowledge Base.
This article is part of our archived legacy Support Center and may be outdated or inaccurate . We did not find an updated version of this article. That means this archived content is more likely to be outdated or no longer relevant. Check the new IT Knowledge Base for updated information:
More tech help options
On This Page:
View submissions, download student submissions, enter grades and feedback for one student at a time, enter grades and feedback for multiple students at once, grant extensions beyond the cut-off date.
- Upload Multiple Feedback Files Using a .Zip File
The View/grade all submissions page for a Moodle assignment activity allows you to do several important grading functions. Grades entered on this page will appear in the corresponding grade column of the gradebook. We recommend grading Assignments from this page, rather than manually entering grades in the Grader report , especially if you want to provide feedback as online text comments or in files.
- When Offline grading worksheet is enabled in the assignment activity settings, you can also download and upload a spreadsheet to input grades and feedback comments. See Offline Grading for Moodle Assignment Submissions .
- When Blind grading is enabled, student submissions are anonymous until grading is completed. See Blind Grading for Moodle Assignment Submissions .
- For large classes and classes with more than one instructor or TA, Grading workflow and/or Grading allocation may be useful. See Grading Workflow and Allocation for Moodle Assignments .
To begin grading, you can access student submissions from the View/Grade all submissions page.
- On your course page, click the name of an Assignment activity. The Assignment page opens and displays the description of the assignment and a summary of submissions.
- Below the summary, click View/grade all submissions . The View/grade all submissions page will open.
- To view and grade individual submissions, under the Grade column heading, click Grade . The Grading page will open showing the full text of Online text submissions and links to download submitted files. See Enter Grades and Feedback for One Student at a Time (below).
- For File submissions: Under the File submissions column heading , click the file name . You will be prompted to save the file to your computer.
- For Online text submissions: Under the Online text column heading, click the magnifying glass icon (above the text excerpt in the grading table). The full text submission will open in a new window.
Moodle offers several different ways for downloading student work, including downloading all submissions, selected submissions, or individually. For more on this, see Download Student Submissions from a Moodle Assignment .
You can view each student's submission, and enter grades and feedback on individualized pages. This method ensures feedback is saved after you review each student's submission. Note : Use this method if you are grading Online text submissions, grading with Rubrics or Marking Forms , or if there is more than one instructor or TA grading the assignment.
- On your course page, click the name of an Assignment activity. The Assignment page will open and display the description of the assignment and a summary of submissions.
- Below the summary, click View/grade all submissions . The View/Grade all submissions page for the assignment will open.
- To change the number of students shown on the page, select a value from the Assignments per page drop-down menu.
- To filter the table to show only those students with submissions, or submissions that require grading, use the Filter drop-down menu.
- As you set options, the page will automatically refresh to reflect changes.
- If there is more than one page of students, below the table, you'll see links with Page numbers, Next, and Previous .
- To grade a student's submission, in the Grade column for the student, click Grade . The Grading page will open.
- For online text submissions, the page opens to show information about the status and due date, with a full view of the student's submission. To collapse the online text area, click the [-] above the entry. To expand it click the [+] .
- If you are grading with Rubrics or a Marking form , a form will be displayed on the grading page. For details, see Grade with Rubrics or Grading Guides in Moodle .
- To notify students of a grade change via email, click the N otify students checkbox before saving entries.
- To remove entries made in the current grading view, click Reset .
- To view the submission of another student, use the arrow buttons ◀▶ or the Change user drop-down menu to select a student.
Quick grading lets you enter grades and feedback for multiple students directly on the View/grade submissions page. Important : Do not grade with this method if multiple instructors or TAs are grading in a course at the same time; scores can be inadvertently overwritten by other graders. Also, this method is not compatible with Grading with Rubrics or Marking forms (see Grading with Rubrics or Grading Guides in Moodle ) and is not recommended for online text submissions. In these cases, see Enter Grades and Feedback for One Student at a Time (above).
- On your course page, click the name of an assignment activity. The Assignment page will open and display the description of the assignment and a summary of submissions.
- Below the summary, click View/grade all submissions . The Submissions page will open displaying the Submissions table , with a row for each student, and columns determined by the settings for the assignment.
- To be able to enter grades and feedback directly on the Submissions table , below the table , under Options , select the Quick grading check box. Note: Once you select the Quick grading option, Moodle will remember the setting the next time you open this Submission screen.
- To change the number of students shown on the page, use the Assignments per page drop-down menu. Note : If there is more than one page of students, below the table, you'll see links with Page numbers, Next , and Previous .
- To collapse a column, at the top of the column , under the column name , click Hide [-] . The screen will refresh with the column collapsed.
- To reopen a collapsed column, click Show [+] above the column you wish to show.
- Enter grades in the boxes under the Grade column heading. Scroll right in the table to find boxes under the submission comments column heading and type comments and click save comment under the box. Once you've input student grades and feedback for this page of students, click Save all quick grading changes to save your work. To notify students of a grade change via email, select Yes in the Notify students drop-down menu before saving changes. Important: You must click Save all quick grading changes before navigating to another page or you will lose any grades or feedback comments.
Ordinarily, students cannot submit their work beyond the assignment's cut-off date (if enabled). However, you can grant individual students an extension as follows:
- Below the summary, click View/grade all submissions . The Submissions page will open.

- Click Grant extension . The Grant extension page will open.
- Select the Enable check box next to the Extension due date and use the drop down menus to specify the new due date.
- Click Save changes. The Submissions page will open and the extension will be reflected under the Status column heading for that student.
Upload Multiple Feedback Files Using a ZIP File
If you like to make comments on files (such as using Track Changes in a Word document, or adding comments to a PDF), you can return annotated files to students through a Moodle Assignment. Additionally, Moodle can automatically match feedback files to the correct student provided you have downloaded all submissions to a .zip file, preserved the original file names assigned by Moodle, compressed the files into a new .zip file, and upload the .zip file to a Moodle Assignment. This is especially useful if you want to annotate several files and don't want to upload these files individually to return feedback to students.
- Above the table of submissions (top left), in the Grading actions drop-down menu, click Choose... and select Download all submissions. Submissions will automatically download to your computer as a .zip archive. Note: You may also choose to download submissions of a selection of students. For each submission you would like to download, click the checkbox to the left of the student name . Below the table of submissions, for With selected ... click Choose and select Download selected admissions from the drop-down menu.
- Unzip the .zip archive on your computer. You will see a folder containing multiple files each beginning with students' names.
- Open individual files to add your annotations, and save files to record your changes. Important : Do not change file names when saving, otherwise Moodle will not be able to correctly upload feedback files.
- Create a new .zip file (see instructions below).
- On the assignment Submissions page, above the table of submissions (top left), in the Grading actions drop-down menu, click Choose and select Upload multiple feedback files in a .zip. The Upload multiple feedback files in a .zip page will open.
- Drag and drop the new .zip file into the Upload a file box. Alternatively, click Choose a file... to open the File picker pop-up window where you can manually select the file from your computer.
- After the .zip file has been selected, click Import feedback file(s) . The Confirm .zip upload page will open displaying a list of all files you have modified.
- Click Confirm to upload the files. A confirmation screen will open showing the total number of uploaded files. Click Continue to return to the Submissions page.
Working with ZIP Archives in Windows
Windows 7, 8, 8.1, and 10 users have a built-in utility for compressing files. For other versions of Windows you will need to download a compression software, such as 7-.zip. To compress a folder or group of files into a .zip file in Windows:
- Right-click the folder or files you wish to compress and click Send to .
- In the drop-down menu, select Compress (zipped) folder . A new .zip file will appear in the same directory (folder) as the files you selected.
Working with ZIP Archives on a Mac
The Mac OS has a built in utility for compressing files. To compress a folder of group of files into a .z ip file in Mac OS:
- To compress a folder or group of files, right-click (control+click) on the folder or files and select Compress "..." .
- A new .zip file will appear on your computer in the same directory (folder) as the files you selected.
Related Topics
Get it help.
Ask an expert at the IT Service Desk.
IT Service Desk Thanksgiving Recess Hours
- Wednesday, 11/22 and Friday, 11/24 : Email/chat, phone, and in-person support available 8:30 a.m. - 5 p.m.
- Thursday, 11/23 : IT Service Desk closed
- Email and Chat Support 8:30 a.m. - 9:45 p.m. Monday - Friday 10 a.m. - 10 p.m. Saturdays & Sunday
- Phone Support | 413-545-9400 8:30 a.m. - 4:45 p.m. Monday - Friday
- In-Person Support ( Campus Center ) 8:30 a.m. - 7:45 p.m. Monday - Friday No appointment necessary. Walk-ins and calls accepted until 15 minutes before closing.
- Computer, Phone & Other Device Repairs

Digital Education team blog
Ideas and reflections from UCL's Digital Education team

Moodle Assignment with Turnitin default settings change
By Eliot Hoving, on 4 June 2024
Turnitin can be used as an assignment activity on Moodle (option a), or in a Moodle assignment where it checks the submission for text-matching but the marking remains in Moodle assignment (option b).
These two options have mostly the same settings, but currently there is inconsistency in some of default settings between the two.
To ensure the default settings are the same for both, the DLE team will change the default settings for the following options from No to Yes for Turnitin in Moodle assignment (option b).
- Display Similarity Reports to Students
- Allow submissions of any file type?
- Exclude Bibliography
- Exclude Quoted Material
These new defaults will only apply if Turnitin is enabled in a Moodle assignment. Staff can choose to override the default values if they require.
These changes will take effect at 10am on the 28th of June 2024.
Any questions or issues please contact the DLE team .
Filed under Moodle
Leave a Reply
Name (required)
Mail (will not be published) (required)
We support staff and students using technology to enhance education at UCL.
Here you'll find updates on institutional developments, projects we're involved in, updates on educational technology, the latest digital skills training schedule, events, case studies and personal experiences (or views!).
Find out more about using technology for learning and teaching at UCL.
Latest posts
- Moodle Assignment with Turnitin default settings change June 4, 2024
- MATLAB Online Courses LTI now available May 13, 2024
- Moodle course rollover for 2024/25 May 7, 2024
- Digital Adventures in Vilnius April 24, 2024
- Moodle Exam guard April 19, 2024
- MyPortfolio and Moodle integration April 15, 2024
- Important Notice: Moodle groups April 12, 2024
- ABC Learning Design (18)
- Accessible Moodle project (11)
- Quantitative subjects (4)
- Case Studies (21)
- Connected Curriculum (13)
- Connected Learning Baseline (1)
- Copyright (3)
- curriculum design (19)
- Digital Assessment (13)
- Lecturecast (15)
- Digital literacies (107)
- Digital Skills Development News (32)
- Distance Learning (44)
- e-Assessment (67)
- E-Learning Baseline (13)
- E-Learning Events (56)
- e-Learning Publications (22)
- ELDG: E-Learning Development Grants (6)
- Evaluation (11)
- External Learning Technology events (70)
- General Learning Technology (358)
- Guest Posts (9)
- LearnHack (5)
- Learning analytics (22)
- Learning designs (54)
- Learning spaces (16)
- LinkedIn Learning (5)
- Lynda.com (12)
- Mathematics (1)
- Move to Moodle 2 (8)
- Open education (9)
- Caroline's Commentaries (3)
- Clive's Contributions (95)
- Domi's Discussions (85)
- Eileen's Ideas (5)
- Eliot's Elements (18)
- Farmer’s Floofing (7)
- Fiona's Findings (5)
- Geraldine's Graffiti (1)
- Janice's Jazz (3)
- Jason's Jottings (7)
- Jessica's Journal (62)
- Jo's Jabberings (2)
- Karen's Kibitz (5)
- Leo’s Leanings (4)
- Matt's Musings (42)
- Mira's Mire (35)
- Moira's Meanderings (14)
- Nataša's Notes (12)
- Neumann’s Noise (2)
- Paul’s Postings (3)
- Rod's Reflections (5)
- Rowett's Ramblings (23)
- Samantha's Scribbles (31)
- Silvia's Soliloquies (2)
- Tyson's Tyrades (9)
- Vicki's Verisimilitudes (6)
- Wong Writes (1)
- Peer Feedback (5)
- Provost's Teaching Awards (1)
- Quality (9)
- Quick Post – not categorised (2)
- Reflect (4)
- social media (18)
- Special Interest Groups (21)
- Statistics (1)
- Students (42)
- Students as ChangeMakers (9)
- Teaching and Learning Events (23)
- Teaching and Learning Network (43)
- Teaching continuity (12)
- Blackboard Collaborate (1)
- Electronic voting systems (16)
- Lecturecast (53)
- Move to Moodle 4 (16)
- MS Teams (1)
- MyPortfolio (24)
- SMS / text messaging (3)
- Software review (4)
- Spotlight (2)
- Turnitin (50)
- Virtual classroom (9)
- Web 2.0 (36)
- UCL CMALT (12)
- UCL E-Learning Champions (56)
- Websites (19)
- Entries RSS
- Comments RSS
COMMENTS
If you have high level feedback you want to give to an entire cohort, it is generally a good idea to give this feedback in the context of the assignment, rather than e.g. separately via a Forum. Moodle allows you to select some or all students and attach a single, common feedback file to their assignment feedback.
In a course, with the editing turned on, choose 'Assignment' from the activity chooser. Give it a name and, in the description explain what the students must submit. You can upload a help or example document from the Additional files area. Expand the other settings to select, for example, availability times, how you want them to submit and how ...
1. In the upper right-hand corner, click the "Edit Mode" on the top right: 2. Next click Add an activity or Resource on the course front page within a topic or a week field: Select Assignment. 3. Add a title in the assignment name box and add the assignment details in the description box: 4. Select appropriate for your assignment values in the ...
This video provides a brief explanation of how to create an assignment activity in Moodle. Useful for beginners new to MoodleSee more on our blog at https://...
Add the assignment. Turn Editing on from the course settings on the upper right corner of your course window.; In the appropriate week/topic, click on the "+ Add an activity or resource" link. Select the assignment activity and click the save button.; Configure the assignment. Now you need to configure assignment settings.
Moodle will give the student information about the due date and the current status of their submission (not yet submitted, submitted, graded, etc). Grading and Providing Feedback for Student Work After students have begun to submit their assignments, instructors can click on the assignment from the Moodle course page, and click on View/grade ...
How to Set Up a Moodle Assignment (3.1) Learning, Teaching and Curriculum, 2016 The assignment activity provides a space into which students can submit work for teachers to grade and give feedback on. This saves on paper and is more efficient than email. Students can type directly into Moodle, upload files or add
Assignments in Moodle allow you to collect and evaluate student work. Managing student work using an Assignment activity gives you these benefits:. Paperless management of student work: The Assignment activity provides a convenient database of student submissions that you can organize and manage online. Grading and feedback through Moodle: The Assignment activity includes a grading interface ...
1. If you have to upload a file into Moodle, click on the assingnment you need to submit. These activities can be identified by this icon: 2. This will bring you to the Submission Status page where you click on Add Submission. 3. Click on "Add.." then click Browse then Upload this File. You can also drag and drop your file into the area below ...
If you want students to be able to see each other's work, consider using a Forum, Wiki, or Database instead of an assignment. A group of students works together to make a common assignment submission See Configure & Grade Group Assignments in Moodle if you want students in a group to make a common submission that represents their joint work ...
In this video, CBU's Dr. Rob Power demonstrates how to grant an extension to an individual student for an assignment in Moodle.
It is also possible to modify the quiz or assignment start and end dates in case students need an extension or provide an additional attempt for the work if a student needs a retake. Instructions: To make these changes follow the steps below. Click the "Turn Editing On" button at the top right of your Moodle course page.
In this video, I 'll show you how to extend the assignment deadline for specific students in MoodleSTEPS:1. Click on the assignment.2. Click on the Settings ...
How is it set up? In a course, with the editing turned on, choose 'Assignment' from the activity chooser. Give it a name and, in the description explain what the students must submit. You can upload a help or example document from the Additional files area. Expand the other settings to select, for example, availability times, how you want them ...
Click on your Assignment link. Click on View all submissions. Tick the box to the left of the student whose assignment you want to allocate, then choose Set allocated marker and click Go. At the prompt click Ok, then on the next page select your allocated marker from the drop-down menu and click Save Changes.
Watch our step by step guide to see how the assignment collapsible comments in Moodle 3.3 works. Assignment collapsible comments. Download Moodle 3.3 or contact a Moodle Partner for upgrading assistance; Download the Moodle 3.3 assignment collapsible comments explainer poster; Read the Moodle 3.3 release notes
Adding an assignment. Go to the course where you want the assignment; turn on the editing, and in the section you want the assignment, click 'Add an activity or resource'. From the Activity chooser, click the Assignment button and click 'Add'. (If you want to edit an existing assignment, click the Edit link to its right and choose the action ...
In Moodle you can create assignments where students work in groups and each group makes an assignment submission. For example, students in a group can submit one file that represents their joint work. Any group member can download, modify, and re-upload a file, or edit a text entry. Note: Group submission is distinct from Common module settings.
This allows the instructor and peers to give constructive feedback that the whole class might benefit from. Longer drafts and the final submission would then be uploaded to a separate Moodle Assignment for grading. Conclusion. Moodle assignments offer a lot of choices to customize how you want to collect drafts. It can be a bit complex, but ...
If you want individualized instruction, set up your courses with one teacher and one student in each. That's what I do (I do one-on-one tutoring). Then Assignment will work exactly the way you want it to. Incidentally, Exercise can be set it up so that every student gets different instructions.
There are a couple of ways: you can put bonus points for all students on a category-all students get an extra 5 points for the category. This is done in the "Set Weights" tab. You can also add an "Extra Credit" Assignment to a category. If you do this, then only the students who you give points to on the extra credit assignment will get the ...
To begin grading, you can access student submissions from the View/Grade all submissions page. On your course page, click the name of an Assignment activity. The Assignment page opens and displays the description of the assignment and a summary of submissions. Below the summary, click View/grade all submissions.
Seeing the Student ID Number in the Assignment Submissions. We have a significant number of international students at our campus with either identical or very similar firstnames and lastnames. We would like to be able to see the Student ID Number (Student Number) in the Assignment submission list. We have this enabled in the gradebook which is ...
Turnitin can be used as an assignment activity on Moodle (option a), or in a Moodle assignment where it checks the submission for text-matching but the marking remains in Moodle assignment (option b). These two options have mostly the same settings, but currently there is inconsistency in some of default settings between the two.