How to make a show-stopping video presentation in 5 simple steps
Learn how to make a show-stopping video presentation to engage your audience, using Dropbox Capture to record your screen, voice, and camera simultaneously.
Whether you’re a teacher, student, business professional, or even a YouTube content creator—for many of us, delivering presentations quickly becomes a standard part of everyday life.
But what happens if you can’t be there to deliver your presentation in person, need a key point to land perfectly, or you need your audience to watch it asynchronously in their own time? Have no fear, video presentations can be a great solution to all these challenges.
In this guide, we’ll cover everything there is to know about creating your own high quality video presentations, so your audience can benefit from your content whenever they need it.
Jump to section
- What is a video presentation

What makes a good presentation video?
What tools do you need to make a video presentation, how to make a video presentation.
- Making a video presentation in PowerPoint
- Making a video presentation in Keynote
Starting from the top: What is a video presentation?
A video presentation is a method of communication through which information is delivered partially or entirely through video. In other words, it’s the process of using video to deliver a message or presentation.
Common formats for video presentations might include pre-recorded slide presentations, instructional videos, sales material, inspirational talks, entertainment, or anything you can think of.
While the reaction to a video presentation will be subjective, there are a few general qualities that can be beneficial to keep in mind:
- Make your video valuable —have a clear intended outcome for the viewer and be sure to reach it
- Make sure your audio and video are clear —you want your audience to focus on your message, not your video quality
- Bring your key points to life —use stories, questions, and examples to illustrate key concepts and engage viewers
- Establish expectations —use your introduction to set clear expectations, either with an agenda or teasing where the session is heading
- Don’t rely on slides —if the slides added all the value, you could just send your audience a PDF. Ask yourself: what are you adding to the content by presenting it?
- Keep an eye on time —don’t make your video presentation longer than it needs to be.
- Mix it up —break the monotony and change pace at appropriate intervals
- Don’t start over for the sake of perfection —if you make a mistake during recording, you can always edit it out later
Before you can start creating your own video presentations, you’ll first need a few basic tools.
Hardware for a video presentation
Let’s start with the basics, your tech. In most cases, you’ll have everything you need if you have a standard laptop or desktop computer.
Here’s what you’ll need to start making video presentations:
- A laptop or PC —you’ll need something to make the presentation recording on
- A microphone —to record your voice-over, either built-in or USB
- A camera —if you want to include video of yourself, either as a built-in webcam or a USB camera
Video recording software
With your tech set up, you’ll need software to record your presentation. Depending on your needs, this might be something to record your screen, record your voice, or record yourself with your camera.
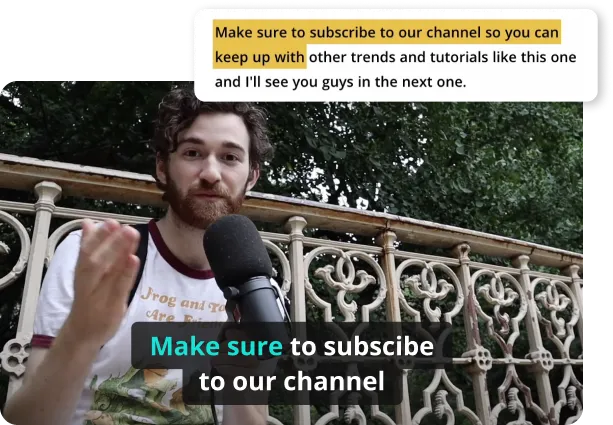
With Dropbox Capture , you can do all three at the same time .
Dropbox Capture is video and screen recording technology, designed to make it easy to quickly capture whatever you need. All without needing advanced editing skills or specialist equipment.
With Capture, it’s easy to:
- Record your screen, webcam, and microphone simultaneously
- Create GIFs
- Draw on or annotate recordings
- Automatically generate closed captions
- Share in just a few clicks
While presentation applications like PowerPoint and Keynote have some built-in screen and presentation recording capabilities, they only allow you to record the presentation.
Whereas with Dropbox Capture, you’re free to jump between windows and applications throughout your presentation recording—giving you greater freedom on what you present.
File storage and sharing tools
Ultimately, you’re going to want to make your video presentation available for viewers somewhere.
With Dropbox cloud storage , this is as easy as copying a link , with full control over access and permissions for your files.
We’ll now cover all the steps to create an impactful video presentation, starting from the very beginning—your plan.
1. Plan your topic, examples, and intended audience
You likely already have an idea of what you’ll want to cover in your video presentation, but it can help to formally get this down on paper:
- Presentation aim —what do you want your audience to understand by the end of the video?
- Approach —broadly, what will you cover to help them understand this concept?
- Resources —what examples will you be able to share to illustrate the key concepts?
To help with the planning process, Dropbox Paper has a number of pre-built templates to get your creative juices flowing, like the brainstorming template .
2. Create your presentation slides and your video presentation storyboard
If you haven’t already done so, it’s time to create your slides.
While doing this, you should also think about the overall storyboard of your video presentation—what are the key beats, how will you present them, and what slides do you need?
A storyboard is a visual tool, used by video producers to map out the narrative flow of a video and the visuals that will accompany it. In many cases, your presentation will almost act as a storyboard, but it might help to get this down on paper first.
You can learn more about the storyboarding process in our in-depth guide to storyboards .
3. Record your video presentation
With your storyboard and presentation ready, it’s time to go about creating your recording.
You can record your screen first, then later record a voice-over or video narration and edit the two together. Or with Dropbox Capture , you can record your screen, webcam, and microphone simultaneously. Using Dropbox Capture makes it easy to create your pre-recorded video lesson in one take. Perfect, if you don’t have access to advanced video editing software.
To record with Dropbox Capture , it’s a simple as the following steps:
- Open Dropbox Capture
- Click Screen recording & camera
- Choose which part of your screen you’d like to capture
- Click the Record icon to start recording, click it again to stop recording
- Click the Pause icon in the side panel while recording to pause or resume recording
- Click the Draw icon in the side panel while recording to draw on your recording
4. Edit your video presentation
If you’re already happy with your recording, there is no further editing required.
In any other cases, you can use video editing software to apply finishing touches to your video as you see fit. These edits might include:
- Editing your screen recording and voice-over together (if you have separate files)—with Dropbox Capture you can record your microphone and camera simultaneously, without the need to use editing software
- Cut and delete unwanted sections of video—like an awkward pause or a dog barking, with Dropbox Capture you can do this directly within the app, no editing software required!
- Remove awkward filler words—clean up those pesky “ums” and “ahs”, with Dropbox Capture you can do this automatically, directly in the app
- Adding text overlays to emphasize key points of video sections
- Additional flair and visual elements
- Adding background music to create an atmosphere
5. Share your video presentation
With your video presentation finished, you’ll need a way for your viewers to access it.
If you're using Dropbox Capture, sharing your presentation couldn’t be easier, simply click the Share button and the sharing link will automatically copy to your clipboard.
If you’re not using Capture, Dropbox cloud storage makes it easy to share your video files with anyone and see who’s viewed your video presentation. All you need to do is copy a link to the file.
If you want to send a copy of the full video, complete with its cumbersome file size, Dropbox Transfer makes it easy to send large files securely.
How to record a video presentation in PowerPoint
It’s worth keeping in mind that, when recording directly within PowerPoint, you can only record your slides and your editing options will be limited. The best way to give yourself complete control over what you record—and how you edit it afterwards—is with a purpose-built screen recording app like Dropbox Capture .
If you’d still prefer to record directly in PowerPoint, you can do this by following these steps:
- Open PowerPoint and open your presentation file
- Navigate to the slide you’d like to start recording from
- Select Record in the top-right corner of the PowerPoint window
- Click the red Record button, wait for the countdown, then start your presentation
With your presentation recorded, you can then save it to your Dropbox cloud storage , making it easy to share your video files with anyone and see who’s viewed your video presentation.
How to record a video presentation in Keynote
If you’re a Mac user and would prefer to record directly in Keynote, here’s how to do it:
- Open Keynote and open your presentation file
- Select Record Slideshow from the Play menu at the top of the screen
With your Keynote presentation recorded, you can then save it to your Dropbox cloud storage and share it simply by copying the link.
Again, your control over what you record and how the final edit turns out will be limited when recording directly within the Keynote app. To give yourself complete control over how your video presentation turns out, a purpose-built screen recording app like Dropbox Capture will be more suitable.
Elevate your video presentations with Dropbox Capture
It’s never been so simple to create an engaging and memorable video presentation, with Dropbox.
With Dropbox Capture , it’s never been easier to get your message across with video recordings of your presentations. So you can clearly say what you mean and nail the delivery, every single time.
Capture your audience’s attention.
Try Dropbox Capture
- Presentations
- Most Recent
- Infographics
- Data Visualizations
- Forms and Surveys
- Video & Animation
- Case Studies
- Design for Business
- Digital Marketing
- Design Inspiration
- Visual Thinking
- Product Updates
- Visme Webinars
- Artificial Intelligence
How to Make a Video Presentation With Audio in 8 Steps

Written by: Orana Velarde
Wondering how to make a video presentation with audio?
You're in the right place.
In this guide, we’ll cover the 8 steps to creating video presentations with voiceovers, pictures and music. We've also included tips for powerful presentations to help you get maximum results.
Here’s a short selection of 8 interactive presentation templates you can edit, share and download with Visme. View more templates below:

Jump to your desired section in the table of contents below.
8 Steps to Creating a Video Presentation
What is a video presentation, what makes a good video presentation, step #1: plan and strategize, step #2: organize your content, step #3: log in to visme and choose a template, step #4: input your content into the slides, step #5: add animations and transitions, step #6: add audio to your presentation, step #7: review and edit, step #8: download and share.
A video presentation is a presentation that can be shared and viewed as a video. Technically, for a presentation to be a video presentation, it must be an MP4 or MOV file type.
A video presentation can be shared online on YouTube, Vimeo and other social media platforms . The best part of a video presentation with audio is that you can share it widely without the need of being there to present the information in person.
Even a live presentation can be improved with a video slideshow. Simply give a live introduction during your webinar or summit, and then play your video presentation to the audience.
A video presentation becomes even more valuable and high-quality when you add audio to it. For example, adding a music clip or a narrated voiceover can do wonders to help you get your message across and leave a lasting impact.
Check out this "2021 Year in Review" video presentation we created at Visme.
Made with Visme Presentation Maker
Make your own video presentation in Visme! Create Now
A good video presentation will capture your audience’s attention until the very end.
When it comes to creating a video presentation, there is no definite checklist as to what constitutes a good video presentation. But there are some things you can do to make sure that yours is good enough to keep the viewer engaged.
For example:
- Think of your presentation as a video from the very beginning.
- Take the time to create an outline or storyboard of your slides.
- Make sure the information flows from one slide, or scene, to another.
- Preview your presentation as you put it together, making sure it flows well.
- Add animations and motion graphics only if they bring visual value.
- Stay balanced with animations and transitions throughout the scenes.
- Tell a story to improve content retention.
Using the tips above, you’re well on your way to creating a video presentation that is sure to make an impact.
Ready? Let’s get started with a step-by-step tutorial!
If you prefer watching over reading, here's a short video tutorial on how to create engaging presentations in Visme.

For any successful project to be a success, including your new video presentation, you must plan and strategize. You and your team need to know the purpose of the video presentation before you even start putting together content or visuals.
Because you need to know the reason, the why, behind the project. That way, the creation process will reflect those goals and take you in the right direction faster.
For example, if you want to create an explainer video about your new product line, do you want the goal to be brand awareness or sales, or both?
If it’s sales, then the messaging and visuals must be created for that purpose. If it’s awareness, then you can take a different approach at how to portray the new product line.
If you want both, then you can do a bit of both and tell a story about the product that explains how it’s made and how it will improve your customers' lives.
Hey marketers! Need to create scroll-stopping visual content fast?
- Transform your visual content with Visme’s easy-to-use content creation platform
- Produce beautiful, effective marketing content quickly even without an extensive design skillset
- Inspire your sales team to create their own content with branded templates for easy customization
Sign up. It’s free.

Questions to ask before you create a video presentation.
Here are the most important questions to ask yourself and your team before you create a video presentation:
- Why do you need a video presentation?
- Who will watch this video presentation and where?
- What are you planning to convey?
- What story are you telling?
- Who do you want to convince, of what?
- How would you like the audience to feel when seeing your video presentation?
- Will it be in-house and private or public for the world to see?
- How can your company or brand sound like an expert in the topic?
- Do you want the audience to engage when they are done watching?
- Do you need a voiceover or maybe a music track will be enough?
- Is it necessary to hire voice talent or maybe a presenter you can film?
- Will you need to write a video script or not?
Write down a list of goals for your video presentation and make sure they are on-hand during every step of the process. Use these goal-setting worksheets and templates to get started.
Every person involved in the creation of the video needs to know about the purpose, goal and plan at all times — from stakeholders and designers to content creators, marketers and social media managers.
Here's a sample plan template you can use to keep up with your project goals, target audience, tactics and more. Share it with your team to help everyone stay on the same page.

Customize this template and make it your own! Edit and Download
Now that your team is on board and you know the purpose of your video presentation, it’s time to get organized.
This is a step with more value than you can imagine. In fact, it should be an un-skippable step to every visual project you create, along with the first step of planning and strategizing.
Start by organizing all the content for the presentation into a folder on your desktop. Include all the graphics, photos, video clips, audio bites and any brand assets. Create a document with all the written content and make notes on what the audio will be.
- For a voiceover, draft a script.
- For music, choose the perfect track.
Altnertiavely you can work smarter by using AI voice generator for your voiceovers or use Visme AI writer to craft a script if you're pressed for time.
With the written content, draft a simple outline or storyboard. For a video presentation, in particular, you should try a storyboard.
This step is especially important if you have stakeholders invested in seeing the final product and want to see the process.
How to create a storyboard in Visme.
It's easy! Use one of the Visme storyboard templates to put one together.
Remember, storyboards don’t need to be too detailed. The purpose of making one is to give an idea of what will be created. Don’t invest too much time in trying to perfect it.
Here are some templates to get you started.

Microwave Lunch TVC Storyboard

Real Estate Business Customer Journey Storyboard

Tree Plantation Program Storyboard

Mobile App Pros and Cons Storyboard

Art Therapy Storyboard

Web Development Storyboard
Create your storyboard View more templates
It’ll be easier to create a storyboard once you’ve already created the outline. The slide layout for a video presentation is much like the layout of a regular presentation.
For example, here is a broad outline for a regular presentation with sections:
- Slide1: Title and Subtitle
- Slide 2: Introduction - Table of Contents
- Slides 3: Section 1 Title
- Slides 4-7: Section 1 content
- Slide 8: Section 2 Title
- Slide 9-11: Section 2 content
- Slide 12: Summary or Review
- Slide 13: Conclusion and Closing
If your presentation doesn’t have defined sections to separate the content in, choose a good flow from one slide to another . For example:
- Chronological Order
- Problem and Solution
- Before and After
- Hero’s Journey progression

Browse presentation templates in Visme! Create Now
Now that you have a good idea of the purpose of your video, an outline or even a storyboard, it’s time to put it all together.
Log in to your Visme account and select a starting point for your video presentation. This could be:
- One of the four presentation themes with hundreds of slides and layouts to mix and match.
- A full-scale pre-designed presentation template with animation effects.
- One of our animated video templates.
- A previously created and imported PowerPoint presentation.
- An existing Visme slideshow without animation, video or audio.
Use your outline or storyboard to set up your slide order in the editor. Make sure you have all the slides you need to fit your content.

Now, it’s time to add the content to your slides. If you are starting with a blank canvas, you can use content blocks to help you layout the content in balanced compositions.
When adding the content to your slides, remember that people don’t want to read slides on videos. Keep the text to a minimum and use more visuals instead.
If you’ll be using a voice over for the online video presentation, then you’ll need hardly any text on the slides apart from titles and section titles.
For complementary visuals like images and backgrounds, look through the library on the left side menu of your editor. It’s also likely that you have a selection of images from your company that you want to use in your slides. Upload them to your library.
Add some uniqueness to your images by placing them inside frames or cropping them to fit next to colored shapes and sections.
For backgrounds, you have lots of choices — from full colors to gradients to animated and video backgrounds. Try photographs with filters for a subtle background that doesn’t compete with the foreground elements.
You can also add videos inside your video presentation, either uploaded or with a link to YouTube, Vimeo or Wistia. We suggest you use short videos in this case so that your final project isn’t excessively long.
Do you know how to make a video presentation that is impactful and fun to watch?
Just add animations and moving elements!
Visme comes with built-in with the following animated assets:
- Animated icons
- Shapes and lines
- Animated illustrations
- Animated characters
- Special effects
- Animated gestures
- Animated charts and data widgets
It’s time to bring it all to life and go from regular static presentation to video presentation.
At this point, you might already have some animated elements in your slides, maybe some animated icons or animated characters. Before you go ahead and animate anything else, review all the transitions between slides.
It’s important to understand that the animated elements, embedded or background videos, and audio you use must all match the transition between slides.
This is the magic sauce for transforming a normal presentation into a video presentation.
Let’s look at all the animation and transition options in your Visme dashboard and how you can use them to your advantage.
Animated characters, icons, illustrations and special effects.
All these elements have options to select the number of repetitions of their action and the speed. The higher number of repetitions you choose, the longer it will take to finish its action. The speed will make the action faster or slower. You can toggle both to find the perfect combination.
The completed action of any of these animated elements will override a timed transition. The transition will wait until the animation is finished to go ahead and start. You can adjust the final length of your animated elements by previewing your slide and taking note of its length.
Additionally, you can customize the poses that the characters portray and also the color of their clothes and skin. These deep customization options will help you stay on brand when creating your video presentations.
Stock videos and video backgrounds.

Videos you add from the editor or import from your computer have the option to trim to a desired length, loop or autoplay.
Alternatively, use video as a background. Stretch it to fit the entire slide and position it behind all the other content. The edit settings are the same as a regular video.
Visme offers a large selection of quality video clips to use as backgrounds or as complementary visuals. it's also easy to upload your own video to the library.
Animated backgrounds.
These loop on their own and are ruled by the transition settings. Animated backgrounds stand out so make sure you are keeping a balance with the elements in the foreground.
Manual animations.
Animations can be added to everything on your slide, including the videos and animated icons. You can tweak the settings to control when elements enter and exit the slide.
There are lots of options for these animations and you can time them using the animation settings. Try to keep animations on the same slide to a minimum so they're not distracting.
Smooth transitions.
Transitions can be added slide by slide or to the entire presentation at once. If you don’t go into the transitions menu at all, Visme will apply a staggered enter from the side that already looks great for presentations that you have to click on to continue to the next slide.
For video presentations, you’ll need to edit your transitions to happen automatically according to what is going on in your slide.
In general, you can make the transition happen after a specific number of seconds but if you have an animated element or audio clip that lasts longer, the transition won’t happen until the longest one has finished its action.
For slides with added video, make the transition happen either when the video ends or at a calculated time after the video has ended. Both are available options in the transition settings.
Transitions can be set in different styles, slide from the side top or bottom, or a simple fade or zoom. For a balanced composition, use the same style of transition throughout.
But if you want to get creative, use different transitions to design a more creative flow. Just make sure you don’t go overboard.

In the section above, we already talked a little about how audio works together with the transitions for a seamless video experience.
Now, let’s take a look at how to add audio inside Visme.
As you work on your video presentation, you might feel the need to work on animations, transitions and audio at the same time so that it all fits together in the best way possible.
To add audio to your presentation in Visme, you have several options:
Adding audio in the background.
Adding audio to each slide., tweaking the audio inside video clips., adding a voice over or narration..

To add a background sound clip, click on the top-left hamburger menu and select “Publish Settings”. This is where you can tweak your project's main settings. Click on the third tab "Sound."
Toggle background music on to release a dropdown that shows the options inside the editor or any .mp3 file you’ve added to your library.
Adjust the volume of this clip and choose if it will loop, fade in or fade out. You can also choose if the background audio will play at a specific point in time.
Any background audio will play under all other audio or video you add to the presentation. So make sure these are balanced and make sense together.
Inside the editor, you have the option of adding individual audio clips to each slide.
Choose from any inside the editor or upload your own. You’ll have the option to trim the length of the audio, its volume and if it loops or fades in and out.
Similar to the background audio, you can choose to start at a specific time during that slide’s progression.
When you add a video file that has audio in it, you can choose to keep the audio or turn it off. The option is inside the video settings in the “muted” tab.
You can add voiceovers to your video presentation in three different ways;
- A track in the background
- An imported clip to each slide
- Recorded over every slide using the Visme voiceover recording feature
Whichever you choose, remember to calculate all the play lengths along with the transitions so that everything flows well.

Now it’s time to review everything and make sure it’s perfect.
First up, do some proofreading of your text to fix any typos or grammatical issues. Make sure all the text is in the correct font and size to stay on brand and maintain a visual hierarchy.
Use the Present button and watch the entire video presentation from start to finish. Take notes along the way of things you notice that need a fix or edit.
If you want to see what the final project will look like to your audience, download a video version and watch it on your video player. Once again, take note of any necessary edits.

You’re done! That was easy, wasn’t it?
It’s time to share your video presentation with its intended audience. Click on the download button and select the MP4 file option.
If your video is especially long or full of features, it will take a bit longer to download. We’ll send you an email when it’s ready so you don’t have to watch the progress bar.
Go get a coffee or take a break for a job well done!
Once downloaded, upload your video to YouTube, Facebook or any of your favorite social media platforms.
If you created the video as part of a larger Visme project, upload it back into your editor. Use your video as part of an interactive report, or for your website, landing pages or email campaigns.
Ready to Create Your Video Presentation with Audio?
Are you ready to create your video presentation with audio? Visme offers all you need to create professional-looking video presentations with audio for any purpose and industry.
With plenty of ready-made presentation templates , you don't need video editing experience. And, since Visme is a web-based app, it doesn't matter if you use a Mac or PC computer.
Video presentations with audio are great for projects like:
- Annual reports
- Explainer videos
- Sales pitches
- E-learning courses
- Pitch decks
- Informational reports
- Advertising
- Explanations
- School reports
- Medical reports
If you’re still doubting if you know how to make a video presentation, just remember to follow the steps in this guide and use the tips in the first section to guide you through the process.
Don’t forget that the ultimate goal for your video presentation with audio is to leave a powerful, lasting impact on your audience.
Sign up for our presentation software and get started right away. Make simple video presentations or rich, interactive and memorable video presentations with audio, animations, characters, links, embedded content and other exclusive features.
Create beautiful presentations faster with Visme.

Trusted by leading brands
Recommended content for you:

Create Stunning Content!
Design visual brand experiences for your business whether you are a seasoned designer or a total novice.
About the Author
Orana is a multi-faceted creative. She is a content writer, artist, and designer. She travels the world with her family and is currently in Istanbul. Find out more about her work at oranavelarde.com
Video Presentation Maker
Create memorable video presentations that drive your message home. Start making a video presentation with your own content or generate one with AI.

Everything you need to make a presentation you’re proud of
Start creating a video presentation without having to set up any equipment. With a screen recorder and a microphone, you can record video presentations online yourself. Or, browse the stock footage library to craft the perfect presentation video.
Visualize your presentation with Video Generator
Easily experiment with different visual elements using the AI video generator . Spark inspiration from each generated video or choose one to edit directly.
Perfect for slideshows, reviews, video presentations
Make a video presentation your audience will remember. This video presentation maker is perfect for creating any kind of presentation from slideshows to talking head videos.

How to Make a Video Presentation
.webp "video presentation about computer")
Open a new project with a blank canvas. Choose the size you want your video presentation to be; apply preset aspect ratios 9:16, 4:5, 1:1, and vice versa.
Open the “Record” tab in the left-hand side and choose your recording settings to start recording. Or, browse the stock footage library to create a presentation without recording.
(Optional): Use the AI video generator to create a video presentation for you with subtitles, background music, and an AI voiceover.
Trim, crop, or add subtitles to your video presentation. Apply subtle background music to fill in silences, or remove silences automatically with Smart Cut.
Export your video presentation, download a video file, and share its unique video link. Have others leave comments at specific points in your video—all in real time.
The best way to create video presentations without feeling overwhelmed
Unless your racing against the clock and coming up on a deadline (we've all been there), create video presentations online without feeling overwhelmed by a complex-looking video editor.
Kapwing's video presentation maker offers you a full creative suite of video editing tools with a user-friendly interface. Start creating video presentations without a learning curve.
Professionalize your video with AI-powered features
Use the AI voiceover generator to add an AI voice so you don't have to record narration yourself. (TIP): Apply text-to-speech for both subtitles and a voice over.
Store brand colors and logos in a shared Brand Kit
Easily access brand assets to have consistent branding across different social media platforms. Create video presentation templates and save them for your team to create the next video presentation in a breeze.
Make a video presentation in under 10 minutes
Jump directly into the editor and generate a video presentation using the slideshow generator. Edit the generated subtitles accordingly and make any additional changes to your video. Create and edit a video presentation all on one platform—no download or software installation required.
Collaborate with your team in real-time
Leave feedback at key points directly on the playback timeline. Share your video presentation with just a link. Never see a "file upload limit" notification on your screen again.
What's different about Kapwing?

Kapwing is free to use for teams of any size. We also offer paid plans with additional features, storage, and support.
You’re using an older browser version. Update to the latest version of Google Chrome , Safari , Mozilla Firefox or Microsoft Edge for the best site experience. You are using an outdated browser, so there may be issues with displaying the page. To make the website work correctly, use the latest version of one of these browsers: Google Chrome , Safari , Mozilla Firefox or Microsoft Edge .
- Corporate Training
- Course Selling
- Academic Learning
- Learning Basics
- Instructional Design
- Online Training Tools
- Manufacturing
- Products iSpring Suite iSpring Learn
- Use Cases Training organizations Onboarding Compliance Training Induction Training Product Training Channel Partner Training Sales Training Microlearning Mobile Learning
- Company About Us Case Studies Customers Partnership Course Development Contact Us
- Knowledge Hub Knowledge Hub Academy Webinars Articles Guides Experts on iSpring
- Language EN English Français Deutsch Español Italiano Nederlands Português Polski 中文 日本語 العربية Indonesia
- Shopping Cart
How to Create a Video Presentation in PowerPoint

content creator
Helen Colman See full bio →

Have you ever gone on YouTube to watch just one video, only to find yourself stuck there a few hours later? You aren’t the only one. TechJury reports that last year the combined watch count on YouTube was 5 billion views per day.
People love watching videos. According to a report by Forrester Research , videos are 75% better at keeping the audience engaged than documents, articles, and other forms of plain media. This is why more and more companies are using them for video marketing and other business tasks. One of the more popular forms of video is a video presentation.
In this article, we’ll explain what a video presentation is, show you how to create one, and share some helpful video presentation tips. Let’s dive in.
- What Is a Video Presentation
- Why Create a Video Presentation
- How to Create a Video Presentation
The Top 5 Tools for Making Video Presentations
How to turn your powerpoint presentation into a video, tips and best practices for making video presentations.
- FAQ on Video Presentations
What Is a Video Presentation?
A video presentation is a popular format of video content with a duration of several seconds or minutes that shows the benefits of a product, service, or a new idea with the help of relevant images, concise text, and appropriate audio narration.
People use video presentations in various aspects of business to keep their audience engaged. As such, presentation videos can be used in marketing campaigns and sales presentations for new clients, employee training and onboarding, B2B communication, and even to present an enterprise at expos or conventions.
Video presentations can take a variety of formats. They can include fully animated explainer videos, cartoons, invitation videos, screencasts, tutorials, video ads, promo videos, marketing videos, product demos, or a PowerPoint presentation narrated by a talking head. Ultimately, the choice of format is yours.
Why Create a Video Presenation?
Besides being more appealing than a basic cut-and-dry content piece, video presentations are also:
- Persuasive . Video presentations more effectively persuade your target audience through audio-visual design, storytelling, and bringing emotions, ideas, and sounds into the mix.
- Better for information retention . Invisia reports that viewers retain 95% of a message in video form, as compared to 10% when reading it in text. Thus, educators often use video presentations within the framework of the digital storytelling concept or when pre-installing new educational material. Here you will find detailed information about how you can apply digital storytelling in your lessons.
- Accessible anytime, anywhere . Most people like to spend time on their phones and tablets, and they prefer to browse videos on them. Emarketer found that 75% of all videos are played on cell phones and tablets.
- Time-efficient . They say that a picture is worth a thousand words. Video presentations are meant to convey information in smaller chunks that are easy to process. This allows viewers to explore larger amounts of information more quickly and easily.
Video Presentation Examples
Do you need some inspiration for your video presentation? Take a look at some examples of quality video content created for different purposes and audiences.
Product/Sales video presentation
A good video presentation is a winning format if you want to present your product or service to potential customers to drive conversions and sales. You can highlight the key features, benefits, and value propositions of your offerings effectively and easily distribute the presentation via online platforms, such as your company website, social media channels, email newsletters, and video posting sites.
This is a short product presentation of Character Builder, one of iSpring Suite’s flagship features. The video is concise yet clear, explaining the feature and outlining its use in eLearning content creation. In just under 35 seconds, the viewers (aka potential or actual customers) can see how characters look and get an idea of how to create them.

Once the iSpring Narration Editor window appears, you can either record a new video narration or import an existing video file.
How to import a video file
To import an existing video file, click on the Video button in the Import tab.

Find the video file and click on the Open button.
Pro tip : You can insert multiple videos at the same time. To do that, press and hold the Ctrl key while selecting several files.
In the Import Video window, you have the choice of importing your video at the current cursor position or at the beginning of the slide of your choice.

Note: If you choose to import your video at the beginning of a certain slide, you will have the option of selecting the Adjust slide duration option. This will adjust the slide you have selected to the length of your video.

How to record a video in PowerPoint
To film yourself on a webcam, you can use the video narration feature. Click on the Record Video button on the editor’s toolbar.

The Record Video Narration panel will appear.
You can add a video narration for one or several slides at a time. To start recording video for the current slide, mark Process current slide only.

Step 2. Synchronize video with slides
Now it’s time to synchronize your video with your slides and animation effects. The latter are displayed as yellow bars on the Slides timeline. The great thing is that you’ll be able to choose the exact moment when an animation will appear while watching the video. This way, the effects will perfectly correspond to the narration in your video presentation.
Note : This is only applicable if you have animation effects attached to your slides.
The sync process is quite simple to use. Just place the cursor where the sync should begin and click the Sync button on the toolbar.

A Sync panel will appear above the timeline. Click on the Start Sync button to start the process.
The Start Sync button will be replaced with the Next Slide or Next Animation button, depending on the next element in the sequence. Click on those buttons at the appropriate moment. Hit the Next Animation button at the point in the narration where you would like to start the next animation. For example, if you are listing information, you can have each new item appear when the narrator mentions it in the video narration.

Once you have finished, click on Done to quit the Sync mode. Then hit the Save & Close button in the upper-left corner.
Step 3. Switch layouts in Slide Properties
iSpring allows you to publish materials using one of two players: the highly customizable Universal player or the Video Lecture player. The latter displays the video presentation in a 50/50 layout and allows viewers to change the proportion between video and slides at any time.
The Universal player features three layouts for a video presentation:
- The Full layout displays the slide, sidebar, and navigation panel.

The No Sidebar layout displays the slide and the navigation panel only.

The Maximized Video layout displays the video in the center, the slide on the sidebar, and the navigation panel.

Your presentation doesn’t have to have the same layout everywhere. You can highlight key points by changing the proportion between the on-screen information and the video for each slide.
To do that, click on Slide Properties on the toolbar.

In the Layout column, pick the desired layout for a particular slide from the drop-down list.

The layouts for the Video Lecture player can be changed at any time during playback. You can still preset them, and they will work as follows:
- The Full layout displays video and the presentation in equal proportions.

The No Sidebar layout displays the full slide with a miniaturized video.

The Maximized Video layout will show the enlarged video and a smaller slide.

It is recommended that you set slides to advance automatically during the entire presentation. To do that, in Presentation Explorer , select all slides and click on the Auto button .
Step 4. Customize your player template
The built-in presentation player has flexible customization options for creating presentation templates: you can provide your viewers with the presenter’s info, a brand logo, an outline, and more. First, let’s choose which player to use. Click on Player on the product ribbon, and choose whether to use the Universal or Video Lecture player, as shown in the image below.

For this guide on making a video presentation, we’ll use the Universal player. To customize it, click on Templates . There are several player templates to choose from. We’ll use the Online Lecture with Video template as an example.

You can also experiment with the settings, doing things like turning off the outline and notes by clicking on the Layout button on the ribbon. Here’s what our player will look like:

Additionally, you can customize a presentation to match your brand colors by choosing one of the built-in color schemes or creating your own.

When you have finished customizing the player, click on Apply & Close in the upper left corner. Well done! You’ve put the finishing touches on your video presentation.
Step 5. Publish your video presentation
When your video presentation is ready, the last step is to publish it to a web format so it can be easily accessed via a browser.
In the Publish Presentation window, select the My Computer tab from the menu at the left. Enter the presentation title and select a local folder where the presentation will be saved. Under Output Options , choose a format. We’ll be publishing to the HTML5 format to make our video presentation play seamlessly across all platforms and devices. You can learn more about publishing presentations here .

In case you want to know more about other presentation software to create engaging video presentations, there are software solutions available that also come with a shallow learning curve. These apps range from video recording or video editing software to animating your cartoons. Here’s an overview of five of the most powerful yet easy-to-learn video presentation makers.
1. Camtasia
If you want to create a video presentation but don’t have the time to put layouts together, you can use the Camtasia video recorder software. Camtasia offers a library of video presentation templates and assets that users can use to make their own presentation videos. Users can also create their own video templates and save them for future projects.
Like iSpring, Camtasia is a video presentation maker that allows you to record both screen and webcam. You can’t create a slide deck in it, but it’s a good solution if you need to record and show yourself as well as everything you do on your screen.

2. PowToon
Animation is a universal language without limits; it hooks any audience immediately. Promotional cartoons are now available to everyone, thanks to software like PowToon . This service can function as a video presentation maker that has an intuitive user interface and amazing comic-style graphics. You can start from scratch or use ready-made scenes and layouts that are editable with a drag-and-drop feature. The complete animated presentation can then be uploaded to YouTube channels or social media with a single click.

3. Biteable
Biteable is a video presentation maker and video editing software that allows you to make professional-quality video presentations and animated videos online within minutes. It sacrifices the ability to capture video and record voice in favor of the creation of powerful animations. The ingredients are your photos, texts, pre-made templates, and stock video footage. Styles of presentation videos produced vary from animated illustrations to live action. What’s cool about this video presentation maker is its ability to create engaging video infographics.

With Emaze , spectacular video presentations are at your fingertips. With an intuitive creator interface and a number of ready-made templates available, creating a video presentation is no longer time-consuming. If you already have a PowerPoint presentation that you want to enhance, you can import it into Emaze and use its collection of tools to attach photos, GIFs, videos, and 3D images.

Animoto is an online video presentation maker that allows you to create video presentations by simply dragging and dropping your own images and video clips into a pre-built video presentation template. To customize your videos, you can quickly adjust colors, fonts, background music, add your company watermark, and more. No video editing experience is required.

If you’d like to know more about other tools for making video presentations, read our article on the Top 10 Video Presentation Makers for Promotion and Education .
By default, you can make your PowerPoint presentation into a video by saving it as one. This can be a solid choice if you don’t need narration for your video. But if you need to, you’ll still be able to record narrations from that menu without going back to the original PowerPoint presentation.
Here’s what you need to do to download your slides as a video in PowerPoint:

- Click on the Create video tab to start downloading your video.
To make your presentation even better, consider the following tips for creating a successful video presentation:
- Make your videos short and sweet . Keep your video clips long enough to grab the attention of your target audience but short enough to incite curiosity. Your goal is to maintain the viewer’s interest. Remember, the optimal length of a video presentation is no longer than 4-7 minutes.
- Keep to the point . Make your goals and objectives known at the start of the presentation, and don’t stray from the message. Your text and visuals should relate to the subject matter and not detract from the goal of your video presentation.
- Add engaging elements . Enrich your video presentation with useful and interesting content. For example, add background music, colorful infographics, embed YouTube videos, or insert interactive quizzes to engage learners.
- End on a meaningful note . Leave your audience with something they can take away from the presentation. A new idea, a short story, a visual representation of your product, or even a link to your website works to provide the strong ending needed to create a lasting impression.
FAQ on Creating Video Presentations
Here are answers to a few popular questions about making a video presentation.
How do I make an effective video presentation?
First and foremost, think about your target audience before you create video presentations. What are their ages, genders, and occupations? What is their prior knowledge on a topic or their level of proficiency? After you define the audience, choose the way you will be presenting accordingly. You should connect with your audience emotionally and ‘speak their language.’ In this way, you’ll communicate the right message to the viewers.
Second, it will be useful to prepare a script for your video. Of course, the slideshow will support you, and you can base your speech on its content. But if you write an intro, outro, some key points, and transition words in advance, you will present more confidently and reduce rambling or unnecessary pauses. This will help you focus on the effectiveness of your message.
How can I prepare myself for a video presentation?
Make sure you’re physically and technically prepared. When delivering a presentation, prevent your mouth and throat from getting dry. You can use a lip balm and have a glass of water nearby to refresh during pauses. This will make you sound better, and your recording will be clearer. For recording, it’s better to choose a smaller, quieter space to avoid echoes and check your microphone’s sound.
Also read → How To Record PowerPoint Presentation With Audio
What is the best video format for a PowerPoint presentation?
PowerPoint allows you to save your presentation in these video formats: MPEG-4 (or MP4 / .mp4) , Windows Media Video (.wmv), or MOV (if it’s PowerPoint on a Mac). MPEG-4 is the most common video format and is widely supported. Opt for this if you have PowerPoint versions 2013, 2016, or 2019. With PowerPoint 2010, the Windows Media format is preferable.
We hope this post will help you turn static slides into an engaging video presentation that captivates your audience. To start creating video presentations and other kinds of eLearning content, try iSpring Suite today. Get a 14-day free trial and access all of its advanced features without spending a cent.
Table of Contents
iSpring Suite
Create online courses and assessments in record time.

Content creator
Helen Colman
She enjoys combining in-depth research with expert knowledge of the industry. If you have eLearning insights that you’d like to share, please get in touch .

The 8 Best Training Video Software for 2024
How to Make a How-To Video in a Breeze

The 21 Best Video Tutorial Software Programs: Free & Paid
We use cookies to collect info about site visits and personalize your experience. See our Cookie Policy for more details.
Manage your cookies
Essential cookies are always on. You can turn off other cookies if you wish.
Essential cookies
Analytics cookies
Social media cookies
How to Create Pro-level PowerPoint Videos with Audio
Senior Marketing Manager at Loom

The power of a presentation lies in its ability to educate and inspire.
But why limit access to inspiring ideas because of the time slot in which they were presented? Microsoft PowerPoint, Google Slides, and Keynote slides have become the go-to formats for delivering supporting content to help audiences from classrooms to boardrooms engage with ideas. But once the content is complete, what happens to it?
Getting used to the sound of your own voice can take some time, but the benefits of using Loom to record PowerPoint presentations are worth it.
Depending on the content and intended audience, a few will be published, stored, or made available on a marketplace. However, many will be lost, all your hard work never to be seen again. PowerPoint slides that aren't accompanied by a presentation are incomplete and don't do a sufficient job of expressing the author's ideas.
If you want to get ahead of the curve and preserve the integrity of your hard work, learn how to record a presentation by recording your screen .
Loom is one of the most popular choices for recording a video presentation—and for a good reason. The user interface is straightforward and easy to use. Mastering it requires little effort.
The benefits of presenting a PowerPoint in video
There are several reasons someone would want to learn how to record a PowerPoint presentation. Whether they’re explaining the quarterly statistics in a sales meeting , creating a webinar as a marketing tool , or recording training sessions for onboarding new hires, communicating ideas clearly and succinctly via video becomes more crucial every day.
With Loom, you can engage directly with your audience, allowing you to interact with a large group of people in a small, intimate environment. Let's look at some advantages of knowing how to record slide show presentations and the procedure for doing so.
Scheduled attendance is not guaranteed
Unless your presentation is a mandatory work meeting or you're teaching a paid course, many individuals will drop out before or during the presentation. However, by providing a presentation recording for them, you can still interact with those people, and they’ll feel supported by your accessibility.
Provides on-demand access to your presentation
Using Loom's video recording capabilities, you provide access to your material long after you've presented it. Giving your audience access to resources is one of the best ways to build trust and support.
Enhances your search engine optimization (SEO)
If you don't want to make your recorded presentations available on-demand but want to reap the benefits of SEO-driven traffic, you may post all or part of it on YouTube as a free resource in the future to attract new prospects.
Practice makes perfect
Another reason to learn how to record a presentation is that you can review your work before showing it to a live audience. By recording yourself before a meeting or lecture, you can review the footage to ensure you cover every aspect of the topic, make improvements, and eliminate those pre-performance jitters.
Tips for video recording yourself presenting a PowerPoint
While technology and practice are your two best allies in confidently presenting PowerPoint video presentations, a few extra tips can make yours even more effective and professional. Consider following these best practices:
Choose the right equipment
Video communications technology has flourished in the last few years. There are more options than ever to record presentations and deliver them digitally to a worldwide audience. A tool like Loom makes it easy to record webcam videos, screen captures, and recorded narration quickly and easily. This lets you present your PowerPoint or any other content to a digital audience without extensive and time-consuming video editing.
Include direct-to-camera (DTC) content
Personalization is the heart of every good video—nothing builds a personalized experience like a friendly face. Use a simultaneous webcam and screen capture to record yourself explaining the slides and information on the screen. Adding picture-in-picture DTC elements creates rapport and trust with your audience and ensures they stay engaged with your presentation.
Slide text: Less is more
Text is great for outlining the major themes of a presentation and adding context to discussions, but with a PowerPoint presentation, treat text as the seasoning in a recipe. Use what you need to enhance the experience, but don’t overwhelm.
Build your slides as an outline for each discussion topic and a home for visual elements like charts, infographics, and embedded video clips. But you, as the presenter, should do most of the talking. Building your presentation this way keeps viewers focused and engaged instead of hurrying to keep up with the reading.
Structure your presentation
Well-structured content is vital to the flow and digestibility of your presentation. When building your slides and video script, organize your information similarly to a blog post or an ebook. Start with an introduction to share your personal info and a general topical overview. Create segments that logically lay out each point or step in the process. Wrap things up with a conclusion and (if needed) a call to action that invites the viewer to take the next step—booking a call, downloading a resource, or signing up for a service.
Keep videos concise and skimmable
Digital fatigue is real. With so many videos and messages competing for our attention, creating a streamlined presentation results in longer view duration . The average view duration of a YouTube video may be as short as 40 seconds, with the median watch time averaging just over a minute and a half .
Another trick to increase viewability is to make it easy for viewers to skim. A well-structured presentation offers natural segments to help viewers zero in on the information they need. YouTube offers a Chapters feature that lets you insert a linkable outline so viewers can easily skip to specific timestamps.
Basic recording in PowerPoint
Microsoft offers basic tools to start recording your PowerPoint presentation. Here’s a quick step-by-step guide to recording a simple presentation:
Step 1: From PowerPoint, open the slide with which you want to start your presentation.
Step 2: Select Record from the upper right hand corner of the PowerPoint window.
Step 3: Make sure your recording and voice settings are set properly, then click the round Record button. Begin your presentation.
Step 4: Click through your slide presentation and record your audio. Be sure to pause during slide transitions, as PowerPoint will not record audio during slide changes.
Step 5: Save your finished PowerPoint video to your local device and share it through email or upload it to sharing platforms like Vimeo, YouTube, etc.
An important note: PowerPoint’s native recording features offer some editing and highlight features. You’ll need a screen recorder app like Loom to film direct-to-camera or make substantial edits.
How to use Loom’s presentation recording software
It's simple to record yourself and your screen presentation side-by-side using only your laptop, a built-in camera, a mic, and Loom. Using Loom to record presentations on a computer is a fantastic way to save time and guarantee that your presentation goes precisely as planned. Loom's basic version is free to use and provides users with different options to meet their unique needs best. You may record the material on your screen and even take a video of yourself presenting alongside your screen capture.
Loom is available as a PC screen recorder , Mac screen recorder , iOS screen recorder , and Android screen recorder . The two primary methods are through the Desktop Client or the Chrome Screen Recorder . The desktop versions offer a higher recording resolution (4k compared to 1080p in the Chrome extension) and additional features like camera frames and backgrounds.
In either case, learning to record a presentation is simple with Loom’s easy-to-use presentation recorder. Here’s some information to help you get started.
You can create a Loom account using a variety of methods. Users may log in with their Google account information, or connect their Slack account information, email address, password, and name. You must first complete the registration process to have access to the program.
What is the Loom desktop client, and how can I use it?
Search for Loom in the Windows search box or click the red pinwheel Loom logo to launch the Loom Desktop Client. After you've opened it, choose the type of video recording you wish to make. Cam Only, Screen Only, and Screen + Cam are the three possibilities for the basic Loom version. As their names suggest, Cam Only and Screen Only allow you to record the material on your screen or yourself through a camera. Screen + Cam will enable you to make a presentation recording with both yourself and the information in real time, allowing others to watch your reactions to the material and connect with you as the presenter.
If you wish to record your screen, the presentation recorder has three options for defining the parameters of your video: Full Screen, Window, and Custom Size.
Full Screen captures everything on your monitor or display, allowing others to watch and follow along.
You may use the Window option to record a single computer application if you want to construct a more restricted lesson without interruptions.
Custom Size is exclusively available to Pro account holders, allowing users to build custom windows to capture particular areas of their screen.
To record your Loom videos, use the built-in webcam and microphone on your smartphone or computer or additional devices as needed. Loom recommends using high-quality microphones for better audio.
Using the Loom Google Chrome Extension to capture videos
First, download and install the Loom Google Chrome Extension from the Chrome Web Store. Then launch the extension's user interface by clicking on the red pinwheel Loom logo in the browser's top right corner. You can choose Cam Only, Screen Only, and Screen + Cam, the same as the desktop client. Unfortunately, users of the Google Chrome Extension can only record their entire screen or the contents of a single tab.
The Video Control menu differs from the desktop extension, appearing in the bottom left corner of the browser window. Users may only utilize three buttons: Start/End Recording, Pause Recording, and Delete Recording.
Using the Loom desktop client to record videos
Each option lets you use Loom's camera bubble , which allows you to see and record yourself as well as a video. There is no set limit on the duration of the video, but Loom will provide you alerts to ensure you don't keep recording by accident. Once you've decided on your selections, go to the four-button Video Control menu on the left side of your screen. To start your video, press the Recording button at the top of the menu. This button has two purposes: When the button is red, it indicates that you’re currently recording, and it stops the recording when clicked a second time.
The Pause button is located beneath the Recording button and is used to pause your video. However, depending on your computer, you may alternatively use Alt + Shift + P or Option + Shift + P . The Delete option is represented by a garbage can icon, which pauses the recording and completely deletes the video once you confirm your decision via a dialog box.
How to use the speaker notes feature
Loom makes presentations easier with speaker notes , an on-screen cue card feature visible only to you. Speaker notes are bullet points or full scripts written by you and activated during recording. These prompts allow you to deliver your message with confidence, without the need to remember your whole script or utilize physical note cards.
From the desktop app, open Loom and click Speaker Notes. Use the pop-up window to type in your notes, then resize the notes window to suit your needs before recording. Speaker notes are always presented on top, so there’s no need to switch windows during your presentation.
How AI-generated chapters work
Want your viewers to be able to skip to the most useful portion of a presentation? The AI-generated chapter feature allows viewers to select important topics within your presentation and navigate to them easily. These time-stamped chapters also allow users to link and respond to content.
How to use the drawing tool
Finally, the drawing tool , symbolized by a pen icon and available with the Pro subscription, can assist you in focusing on certain facts and numbers. Using this button, which includes picking a preset color, lets you make graphics that will draw your viewer's attention to key information.
Preserve your ideas with Loom’s Presentation Recorder
If you’re just starting out, learning to record a presentation with Loom is an excellent tool for creating quality content. As the world continues to move towards remote work environments, the ability to give an online presentation (and record it for posterity) becomes more essential every day.
Loom is free, so don’t wait to see how you can enhance your video presentation with video capture software.
Jan 8, 2024
Featured In:
Share this article:.
Jeong Lee works in Marketing at Loom.
How to Record a Presentation with Webcam, Narration, and More

Justin Simon

Table of contents
- Benefits of Recording a Presentation
How to record your presentation (with Snagit)
How to record a presentation from powerpoint with audio and webcam, how to turn your powerpoint presentation slides into a video.
- How to edit a presentation video (in Camtasia)
Recording a PowerPoint Presentation, the FAQs
Subscribe to techsmith’s newsletter.
Everyone has, at some point, put a load of time and effort into creating the perfect PowerPoint presentation, only to use it once or twice. But isn’t it a shame for all that hard work to be discarded so quickly? Is every slide deck destined for deletion after just a couple of uses?
Isn’t there a better way to make the most out of your presentations? Well, yes. Yes, there is.
Rather than simply creating and presenting your work once or twice, recording your presentations can give them a new lease of life. Whether it’s a data report or a self-recorded PowerPoint, you can record a presentation in real-time, or in advance to make it available on-demand.
In this guide, we’ll explore two distinct ways of recording your presentation. First, we’ll discuss how to record a presentation from PowerPoint with audio and webcam, and then we’ll look at how to turn your .ppt slides into a video.
Benefits of Recording a Presentation
As well as there being many different ways to record a presentation, there are also many benefits of recording them. So, before we show you the ‘how,’ let’s talk about the ‘why.’
- Encouraging asynchronous communication : One key benefit is fostering asynchronous communication . By recording presentations, you’re letting your audience engage with the content in their own time, breaking the constraints of time zones and scheduling conflicts. This also ensures your viewers can absorb information at their own pace, and revisit it as needed.
- Boosting SEO : You can use your presentation to create a YouTube video and share it on your website to increase your online visibility and attract prospective customers. This can be a great way to expand your audience, increase web traffic, and establish yourself as an expert in your field.
- Perfecting your presentation : Whether it’s in-person or over Zoom, you don’t get second chances with live presentations. However, a pre-recorded keynote lets you perfect the content and the narration before anyone sees it. This is a great way to combat stage fright while honing your presentation skills and building confidence.
With this in mind, turning your slides into a video is a no-brainer. It’s an easy way to grow your audience and make the information you’re sharing more accessible and easier to digest.
Video messages > meetings
Record your screen and camera with Snagit for quick updates and feedback.

Depending on your audience and the type of presentation you need to deliver, TechSmith’s Snagit could just be the perfect tool for recording your PowerPoint. With its user-friendly interface and advanced features, Snagit is ideal for capturing top-notch presentation videos, in just a few clicks.
Now, there’s no denying that presentations are better when you can see the presenter… Fortunately, Snagit lets you capture your screen and webcam at the same time to create a Picture-in-Picture video.
In this section, we’ll guide you through the steps to record your presentation and webcam with Snagit.
Step 1: Open video capture
First, open Snagit and navigate to the Capture window. Select the Video tab, and start by clicking the big red Capture button.
Step 2: Select a recording area
Next, you’ll be prompted to choose which parts of your screen you want to record. Use Snagit’s orange crosshairs to select a specific region, window, or your entire screen.
Step 3: Configure recording settings
With the Video Recording toolbar, you can set options like Cursor Capture and Effects, System Audio, and Webcam.
If your webcam isn’t showing, click on the webcam icon. If you have an external webcam, select the one you want to use by clicking the dropdown arrow next to the webcam icon.
Step 4: Adjust your webcam
Next, adjust your webcam options to ensure your Picture-in-Picture recording looks how you want it. Here you can change the Picture-in-Picture placement as well as the shape and size of your webcam recording. You can even toggle between Picture-in-Picture and fullscreen webcam modes as you like.
The best part? You can make these adjustments even while recording.
Step 5: Manage recording
When you’re ready to roll, hit the Record button and click the Stop button when you’re finished. It’s that simple!
And remember, if there’s an interruption (like an unexpected visit from the mailman), just hit Pause. It’s okay to take a break — your video won’t be ruined by a little interruption.
Step 6: Edit your video
Once you’ve finished recording, Snagit will automatically open your video in the Snagit Editor, which is super easy to use. From here, you can make light edits to the footage as needed.
For example, if you need to cut or trim your footage , you can! Here’s how:
- Set Start Point : Drag the Start handle (green) on the timeline to your desired starting point.
- Set End Point : Similarly, drag the End handle (red) to where you want to end the cut.
- Review the Segment : Before making any cuts, you can review the segment by dragging the Playhead (white) left and right across the timeline. This ensures you’re only cutting the footage you intend to.
- Make the Cut : Once you’re satisfied with the selection, click the Cut button, which will pop up once you’ve made a selection.
And that’s all there is to it! If you want to go the extra mile, you can also use Snagit to save individual frames of your video as images , which can be used to create a thumbnail for your video .
Record your screen with Snagit
Snagit makes it easy to share quick updates and how-to’s by capturing exactly what’s happening on your screen.

Now, Snagit is great for recording less formal videos in a flash, but if your presentation is intended for a particularly large or important audience, you might be looking to create something more polished. This is where TechSmith’s Camtasia comes in.
Camtasia is one of the smartest and most intuitive pieces of editing software out there, but it also makes for a pretty nifty screen recorder too. Camtasia is great for recording presentations when you need more control and editing powers over the final product.
But best of all, Camtasia streamlines the process by letting you record your presentation and voice over directly within PowerPoint.
Step 1: Set up your presentation video recording
If you’re a Windows user, you’ll have the option to include a PowerPoint Add-in Toolbar when you install Camtasia. While this feature isn’t currently available on MacOS, the Camtasia Add-in Toolbar allows you to start, stop, and control your recordings from within PowerPoint — so you don’t need to switch between applications.

Just open the presentation you want to record and locate the Add-in toolbar under the Add-ins tab.
Don’t see the add-in toolbar? Go to File > Options > Add-ins, to enable it. Click on the Manage drop-down, select Disabled Items, then click Go. If the Camtasia Add-in is listed, select it, and click Enable.
If you’re an Apple user, don’t panic! You can still record your screen (with audio) on a Mac using Camtasia, and it’s just as easy. Alternatively, you can skip ahead to the next section and import your slides directly into Camtasia.
Step 2: Customize your recording options
Now let’s walk through each of the options on the toolbar before we begin recording.

Record audio
The microphone button controls whether or not audio is recorded as part of your presentation. When you enable it, you’ll be able to record your narration using a microphone.
If you are planning to record audio, this is where you’ll select your microphone. If you want to record great audio , we suggest using an external microphone, rather than the one that’s built into your laptop.
Some of the best microphones for recording video are likely to be less expensive than you think. But, if you’re on a shoestring budget, even the mic that’s built into your headphones could produce better audio than your laptop.
Once you’re set up, be sure to test the mic and adjust the volume slider as needed. You’ll also need to decide whether or not to record your system audio, which is any sound that comes out of your speakers, such as email notifications.
Record webcam
If you have a webcam, you can also record your camera during the presentation to create a Picture-in-Picture clip — just as you can with Snagit!

To customize even more of the recording settings, click the Recording Options button. Here you’ll find settings that let you record with a watermark and adjust your video frame rate . There are a few more options too, but the default settings should work just fine.
When you’re ready, click OK to close this window and save any changes made.
Step 3: Record your presentation
The final step is as simple as clicking the Record button in the toolbar. This will launch your slides into the Presentation Mode and start recording.
When you exit Presentation Mode or reach the end of your slideshow, you can either continue recording your screen, or stop recording and save your file. Pretty easy right?
Before you get started, let us show you another way to turn your presentation into a video, without recording your desktop .
Another way to create a video from your presentation is to import your PowerPoint slides into Camtasia. This way you can adjust how long each slide appears on screen, as well as add Behaviors and Annotations to personalize your presentation and highlight important information.
By importing your slides into Camtasia, and recording your voice over separately, you get a lot more flexibility with the editing process, which means you have more control over the finished article.
If you do decide to record your audio separately, you might want to take a look at TechSmith’s Audiate . This advanced audio recorder will transcribe your voice over in real-time and let you edit the audio file as if it were a text-based document. We don’t want to brag, but it’s probably the best way to add a voice over to a PowerPoint .
Regardless of how you decide to narrate your PowerPoint, here’s how to turn your presentation into a video:
1. Import your PowerPoint slides
First, start by importing your PowerPoint slides directly into Camtasia. Once your media is imported, you can edit it by dragging your slides into the Editing Toolbar.

You can now add the images to the Timeline, and edit them like any other media in a Project.

If you drag your slides to the Timeline, the slides will be placed in the order of the presentation, each with a default 5-second duration.

With your presentation on the timeline, use Ripple Move to create space in between slides to adjust the timing of each one. To do this, hold shift, then click and drag.

Once you’ve imported your slides and adjusted the duration of each one to correlate with your voice over, it’s time to start editing.
How to edit a presentation video (in Camtasia)
Add behaviors.
Firstly, add some visual interest with Camtasia Behaviors . A Behavior is an animation that brings movement to your slides, making them stand out on screen. This is a great way to bring parts of your presentation to life and take it from ordinary to extraordinary — because nobody likes a boring presentation .
To add a Behavior, click and drag the Behavior you wish to use onto the slide you want to animate. Once added, you can adjust the Behavior using the Properties tab.
Add annotations
Another good way to grab and direct your audience’s attention is to add some Annotations, which are great for highlighting important information.
To insert an Annotation, click the Annotation tab on the left side of the screen and drag it into the designated slide. You can then re-position and edit the Annotation in the Properties tab as needed.
Absolutely! Both Snagit and Camtasia are excellent choices for recording a professional and polished presentation. Snagit is perfect for no-fuss recording and editing. If you require more sophisticated editing capabilities, Camtasia is the ideal choice, offering the added convenience of recording your slideshow and voice over directly within PowerPoint.
Click the Record button in the toolbar to launch your slides into the Presentation Mode and start recording. When you exit Presentation Mode or reach the end of your slideshow, you can either continue recording your screen or stop and save your file.
If you’re planning to record audio, select your microphone in the recording options. The microphone button controls whether or not audio is recorded as part of your presentation. If you have a webcam attached to your computer, you can also record your camera to create a Picture-in-Picture clip, perfect for showing the presenter during the presentation.
With Snagit, you can conveniently record your voice over as you go through your presentation, capturing both the audio and visuals in one go. If you’re looking for more advanced recording and editing options, you might also consider using Camtasia, which allows you to record your voice over while presenting. For even more control, use Audiate to record your audio separately and then import it into Camtasia for fine-tuning.
Additional Resources
How to improve editing performance with proxy video, how to enhance or remove the mouse cursor from video, how non-linear editors make video creation more powerful.
The ultimate guide to making video presentations
Heads up! This content is relevant for Clipchamp for personal accounts. Try this link If you're looking for information about Clipchamp for work accounts.
On this page
What is a video presentation?
Benefits of video presentations, popular video presentation formats , how to plan your video presentation, branding for video presentations, crafting voiceovers for video presentations, how to create an engaging video presentation , downloading format options for video presentations, repurposing video presentations, bonus tips to make your video presentations stand out .

Are you looking for innovative ways to share information with your team, students, or followers? Engage your audience with captivating video presentations they can watch anytime, anywhere.
Did you know that 83% of people prefer watching videos over reading or listening to information? This makes video presentations more impactful than traditional slides. Luckily, creating a video presentation is easy with a little planning and an online video editor like Clipchamp . Read on to learn how to make fun and effective presentation videos.
A video presentation combines videos, images, webcam footage, voiceovers, and animations to deliver a message. It’s a great alternative to tried-and-tested formats like PowerPoint.
Presentation videos are useful to share with groups and remote teams working asynchronously, to enliven online learning and even generate customized marketing and sales presentation pitches. Depending on the content, video presentations can be created to be shared and repurposed or be edited to match the presenter’s needs.
Video presentations are becoming increasingly popular due to their ability to engage audiences and convey information in a dynamic and visually appealing manner. Here are some key benefits.
Enhanced engagement
Visual and auditory elements in video presentations capture and hold viewers' attention more effectively than static text or images alone.
Interactive features, such as clickable links or embedded quizzes, can further increase engagement.
Versatility
Video presentations suit various purposes, including education, marketing, business pitches, and more.
They can be tailored to different audience needs and preferences, making them a flexible communication tool.
Improved accessibility
Videos can be easily shared and viewed across multiple devices and platforms, making them accessible to a wider audience.
They can be hosted on websites, shared via social media, or distributed through email, ensuring broad reach.
Retention and understanding
Combining visual and auditory information helps improve comprehension and retention of the presented content.
Using storytelling techniques and clear visuals can make complex information easier to understand.
Professionalism
Well-crafted video presentations can enhance your professional image, making your message appear more polished and credible.
High-quality visuals, animations, and voiceovers can elevate the production value.
1. Slideshow presentation video
We’re all familiar with making PowerPoint slides. A slideshow presentation video takes this to the next level. Instead of static backgrounds and tiny bullet points, a slideshow presentation video allows you to tell a story. It's a creative way to present information.
Start by arranging stock video backgrounds to create the foundation of your video and place smooth transitions between slides or topics. Share your key messages using animated texts, lower thirds and graphics which make your video memorable. You can stop here, or add a webcam recording or record an audio voiceover .
It’s a popular format for school projects, corporate intro videos, and even product launches, and the process can be simplified even further by using an online video presentation maker.
2. Video presentation with audio narration
Another effective video presentation format is when you create a screen recording of a website, process, workflow or PowerPoint presentation and add a voiceover to guide viewers. It’s comparatively low effort to a slideshow presentation video, but still ensures engagement from viewers. With new tools like lifelike text to speech generators , narrations can be created in global languages in just a few minutes.
Effortlessly record your screen online, trim away unnecessary frames and use graphics like arrows and circles to highlight key points. Next, type your ideal video voiceover and let AI create a flawless voiceover that explains your video well.
This is a great video solution if you’re trying to whip up a group presentation by collecting information from different team members as it can help you make a consistent and high-quality video. It’s also super useful if you’re hosting an online learning session, webinar or creating a demo video .
3. Video presentation with talking head
Wait, what’s a “talking head”? It simply refers to when a webcam recording is inserted into a presentation video to make it easy to follow. This may be bad news for the camera-shy presenters out there–adding your friendly face captures the attention of your audience while building interest and trust in your presentation.
The good news is that such videos are super easy to create. Simply record your webcam footage online and layer it on top of your slideshow presentation video . Finetune the size of your webcam video, overlay the video in a corner or place it side-by-side with your presentation visuals. Don’t forget to add captions to make your video stand out even when played on mute, like on social media feeds.
Sales, explainer videos, and even video resumes can benefit from the personal touch of a talking head presentation video.
4. Animated presentation video
Evoke emotions from your viewers when you create an animated presentation video. While there are whiteboard animation softwares out there, that’s not the only option in this format. If you think a cartoon character could educate your class, tell your business story or simplify a big idea, consider this video format. If you’re wondering how that would suit your budget (or lack of), explore free cartoon stock videos and turn up your creativity to make them suit your needs.
Remember that choosing the right background music, adding your brand logo and adjusting the aesthetics of your stock video (like adding a filter) can truly help your video look custom-made.
Identify your main audience: Choose your key audience, whether it’s potential or existing customers, colleagues, or others. Map their needs, interests, and pain points to help you create valuable content.
List your key messages: Identify the main points to convey in the video, and prioritize them based on how relevant they are to your viewers. Make sure they match your video’s goal and are crafted in a way that’s useful to your main audience.
Consider your video’s lifetime: Consider where you’ll host, post, or share your video, how long it will stay current and relevant, and whether it will need revisions.
Decide your branding needs: Don’t miss a good branding opportunity. Think about adding your logo , brand colors or other elements that link your presentation video closer to your brand.
Create a script or storyboard: Structure matters! Plan out the content and flow of your video in advance to help achieve its goals. A storyboard is a shot-by-shot outline of what main frames in your video will look like. If your video only needs a voiceover, write a script so your visuals match the audio narration .
Consider audio and video tools: If you aim for a professional look and feel, choose your toolkit wisely. Clipchamp is an easy online tool that can record your screen and webcam , generate voiceovers, and even has royalty-free stock and video elements to confidently edit video presentations.
Nothing says "we've got our act together" like using your company’s logos, colors, and fonts throughout your presentation videos to reinforce your brand recognition. Adding your branding shows attention to detail and commitment to quality, which makes a good impression on your viewers.
Incorporating strong calls-to-action (CTAs) with logos into presentation videos can encourage viewers to take the next step and boost your conversion rates. According to a study by Lucidpress, consistent branding can increase revenue by up to 23% . That's why Clipchamp makes it easy to customize videos to match your corporate identity using our brand kit feature , ensuring your presentation maintains a professional and cohesive look.
Use branded fonts and colors to make your slideshow videos and presentations easy to identify, no matter where they are shared.
A well-crafted voiceover script is key to delivering a clear and engaging presentation. Here are some tips to help you write an effective script for a presentation.
Keep your script conversational: write your script as if you’re speaking directly to the audience. Use simple language and avoid jargon to make your narration relatable and understandable. If you need help with writing, try these useful AI prompts to write video scripts .
Be concise: assume your viewers have short attention spans and keep your sentences short and to the point. Break down any complex information into bite-sized pieces.
Emphasize key points: repeat or summarize key points to highlight the most important information.
If you're recording your own voice, leverage the simplicity of the voice recorder feature in Clipchamp to produce voiceovers with ease. It's good to practice your delivery to sound more natural and confident during the actual recording.
Voice recordings not your thing? Try our AI voiceover generator instead .
Step 1. Create video slides or record your screen and webcam
To import your own presentation videos, photos, and audio, click on the import media button in the your media tab on the toolbar to browse your computer files, or connect your OneDrive.

You can also use free stock media like video clips, photos, video backgrounds, and GIFs. Click on the content library tab on the toolbar and click on the visuals drop down arrow, then videos, photos, or backgrounds. You can also use the search bar to search through the different stock categories.

If you would like to record your presentation, click on the record & create tab on the toolbar, then record using either screen and camera, camera, screen or audio options .

Drag and drop your media onto the timeline side-by-side to create a slideshow video.

Step 2. Edit your video presentation
To trim the length of your video , click on the video on the timeline so it’s highlighted green. Move the handles to the left of the timeline to trim the video length. If you trim too much footage off your video, just drag the handle back to the right to recover your footage.

To crop your assets , click on the video so it’s highlighted green on the timeline, then click on the crop button on the floating toolbar. Here, you can freely crop away unwanted areas of your video using the cropping handles. Click on the done button when you’re finished.

Step 3. Add transitions, animated text and stickers
Add transitions between clips by clicking on the transitions tab on the toolbar. Drag and drop a transition onto the timeline between two videos. Repeat this process for the rest of your videos added to the timeline.

Place text and titles on your video by clicking on the text tab on the toolbar. Drag and drop a title onto the timeline above your video. Use the text tab on the property panel to customize your title.

Overlay stickers onto your video by clicking on the content library tab on the toolbar. Next, click on the visuals drop down arrow, then select stickers, shapes & annotations, frames & borders, or overlays . Search through the categories then drag and drop an asset onto the timeline above your video.

Step 4. Preview and save your video presentation
Before saving your new video, make sure to preview using full-screen mode . When you’re ready to save, click on the export button and select a video resolution. For the best quality, we recommend saving all videos in 1080p. Paid subscribers can save in 4K video resolution.

Once your video presentation is complete, it's important to know how to export and share it effectively. Clipchamp offers multiple exporting formats such as MP4 and GIF.
We recommend saving video presentations in 1080p video resolution for high-quality playback wherever you choose to share it, including social media, website, and email. You can also explore different exporting options (like seamless OneDrive integration ) in Clipchamp to find the right balance between quality, convenience, and file size.
Get the most bang for your video presentation buck by repurposing it for different uses. Here are some ideas.
Presentation teaser
Create a short highlight video from your presentation to share with external customers or internal employees. This gives them a sneak peak of what to expect from attending the meeting or watching the video presentation.
Embed into email campaigns
Embed your video presentation into newsletters to provide additional value to your readers. Repurposing content in this way extends its reach and impact.
Video clips for websites
Trim and create video snippets that could support users searching for information on your website. This can also drive traffic back to your full presentation.
Adjust the colors or apply a filter to help your webcam videos look and feel consistent, especially if you are combining webcam footage from more than one speaker.
Share additional information to support your visuals, from locations, names of speakers, or key takeaways using animated lower thirds .
Highlight important sections in your screen recording using a colored shape like a hand drawn circle to give your presentation a polished look.
Choose presentation background music that complements your video goals and doesn’t overpower the video narration, if any.
Use an intro and outro slide to make a lasting impression. It can be as simple as a logo animation .
Add captions to your video to make it accessible and easy to view even when on mute.
Embed a YouTube video in Google Slides so you don't need to exit your presentation or open a new window/tab.
Frequently asked questions
Can i turn my powerpoint into a video presentation.
Yes, you can save your PowerPoint presentation as an MP4 file directly or use the screen recorder in Clipchamp to record your screen instead. When you’re happy with the recording, you can edit it in the timeline.
How to end a video presentation?
It depends on your video’s goal. Corporate presentations usually end with a reminder of the brand name or animated logo, and some call-to-actions to learn more on the website or email the contact person.
Easily create captivating video presentations in Clipchamp and share your video with ease on social media or OneDrive.
Learn more ways to create videos trouble-free with our beginner-friendly video templates or get inspired with these great explainer video examples .
Start editing with Clipchamp for free or download the Clipchamp Windows app.
More from the Clipchamp blog

Inside the major update for Clipchamp on iOS

How to convert video from MOV to MP4

How to make an image transparent
Start creating free videos with clipchamp.
- AI Video Generator
- Text to Video AI
- AI Animation Generator
- AI Logo Maker
- AI Website Builder
- AI Business Name Generator
- YouTube Name Generator
- Video Editing
- Website tips
- Onboarding Videos
- Contact Support
- Knowledge Center
- Video Tutorials
My Projects
- My favorites
- My colors & fonts
- Subscriptions
Video Presentation Maker Online
Browse our large collection of presentation toolkits and find the one that perfectly suits your needs. Create animated explainers, whiteboard animations, and corporate videos to meet different business objectives. Share important research information with infographics and other educational videos.
Presentations
58 Templates

1300 scenes

1000 scenes

1400 scenes

Presentation Video Templates by Renderforest
Build informative video presentations online, create animated explainer videos, visualize important data, make whiteboard animations, all-inclusive presentation toolkits, engaging presentations for various settings, large collections of scenes, different styles and transitions.
We use cookies to improve your experience. By clicking agree, you allow us such use.
13 Best Video Presentation Software in 2024
By Eva Williams 10 days ago, Software reviews

With proper video marketing strategy and the best video presentation software, your brand and business will be developing. There is a strong demand for bringing personalized content to education and business training. The best choice for creating screencasts and authoring is animated educational videos and informative webinars.
Top 13 Video Presentation Software
- Powtoon - Free animated presentation software
- Prezi - Free non-linear live video presentation software
- Microsoft PowerPoint - Slideshow video presentation software for Windows
- Biteable - Universal presentation maker
- Google Slides - Free presentation software for all Google account holders
- Keynote - Free software for Mac and iOS
- Animaker - The best video presentation software
- TechSmith Camtasia - Supports screen recording
- Pitch - Beautiful presentation templates
- iSpring Suite - For video courses development
- Vyond Studio - For DIY animated video presentation with characters
- Wideo - The easiest online tool for creating video presentations
- Animoto - Simple video presentation maker from photos
Presentation video software helps you create a presentation that effectively tells your story without your participation. Video presentations can also be formatted as video ads in email newsletters, video graphics in social networks, video stories and video banners: you only need to change the size.
Video presentations provide a visual and compelling way to deliver content for commercial, educational and technological purposes. The best way to engage your audience is with eye-catching visuals and smooth animations that can unleash your creativity and produce a vivid presentation.
1. Powtoon – Our Choice
- Free and intuitive with Drag’n’drop
- Ready-made templates
- Easy content sharing
- Customizable characters, animations
- Media without license fees
- Limited free version
Verdict: This cloud-based online tool creates animated slides with audio, comments and embedded videos. Slides are used to control and drag elements from the image library (dynamic transitions, shapes, backgrounds, speech bubbles). The familiar Powtoon interface has an editor with content settings in the template and a creator with many other options.
This video presentation software integrates with Google Disc and Fiverr to hire a professional composer. It is suitable for voice-over or recording music directly in the software. There are thousands of animated characters and graphics, icons, shapes and video clips.
You can use charts as data visualization tools and import PowerPoint presentations. Videos can be embedded and uploaded in MP4, PPT or PDF formats, published in social networks or shared.
- Animated or live presentations
- Easy and smooth to use
- Collaborative video editing
- Unique dynamic formats
- Talking head video
- No chat for co-authors
- Makes it difficult to visualize structured data
Verdict: Prezi suggested an alternative to the slide show format for correcting a typical corporate presentation. This live video presentation software gives you one giant canvas in a mind map style.
If you need to jump around a lot of content, Prezi lets the speaker easily proceed to any part of the presentation by moving around the canvas and zooming in with the virtual camera. The difference is in adding animated paths from one part of the canvas to another.
Some viewers may find the flight animation style unusual. You can use it to create interactive presentations, talking head videos and more. You can add blocks of text and images, or create miniature slides, record your speech and add graphics. Prezi is an excellent alternative to traditional slide decks.
3. Microsoft PowerPoint
- User-friendly interface, QuickStarter
- Collaboration, cloud storage
- Detailed analytics
- Corporate identity with logo and template
- No restrictions on the duration
- Doesn’t correspond to the formats compatible with LMS
- No sharing via social networks or email
Verdict: It is a robust multi-functional platform for digital slide show presentations with various design themes, collaborative real-time editing, as well as an array of creative transition tools, animated titles and glossy effects. Use any of the classic templates or download them from specialized sites. You can manage access rights and permissions, track statistics via filtering by slides, views or tasks.
In this free presentation software you can save the presentation as an mp4 or .mov video. The output is played in a browser that supports HTML5. There are many visual elements: shapes, images, text animations, tables, charts, graphs and 3D models.
You can import data from Excel or enter it. Import audio files or voice-over recordings directly into the platform. The smart design section offers visual element templates: flowcharts, loops and other types of layouts.
4. Biteable
- Professional video templates
- Easy-to-use helpful guide
- Ready-made templates, media library
- Unlimited video duration
- Integration with social networks
- Restrictions in the free version
- No undo, redo, or data visualization tools
Verdict: Biteable refers to its cloud-based software as the easiest creator of marketing video presentations and animated infographics from your materials or hundreds of pre-designed templates.
The library of images and videos offers thousands of ready-to-use photos and clips from Unsplash. Styles range from animated graphics to live performances, covering ads, presentations, invitations, logo animation and slide shows.
This online video maker is divided into text, video and music tracks. A simple drag-and-drop timeline is easy to set up. It is possible to add a watermark, upload fonts and brand colors. Biteable offers a standard sound, but you can upload your own. Videos can be published on the Internet or uploaded in .mp4 format to social networks.
5. Google Slides
- Free in Google Docs
- Import of new templates
- Reliable collaboration features
- Ability to send questions to the audience, integrated chat
- User-friendly
- Without importing audio, exporting to video
- Limited templates, transitions and effects
Verdict: Being a part of the Google G Suite cloud office package, it helps you edit and collaborate on presentations. This video presentation software supports embedding videos, creating charts and adding animation to slides. You can import hundreds of additional templates or create your own ones. Several people can work on a slideshow at the same time. Besides, there is an integrated group chat.
One of the strengths of Google Slides is that you don’t need to install, pay or learn much. With a Google account, you can create a slideshow, collaborate with others on it, present it quickly and easily. Also, Slides offers several bonuses, such as the ability to generate a unique URL where the audience can send questions to the speaker in real time.
- Appealing, customizable templates
- Intuitive UI
- Tight integration with macOS
- No restrictions on duration
- Cancellation and refund options
- MP4 isn’t supported for export
- No library or integration with social networks
Verdict: This video presentation app comes free for all Apple devices. Windows users can get Keynote with an Apple iCloud account. Great templates and close integration with Apple apps cover a simple, no-frills interface. There are several templates available, and you can import any template from third-party sites, such as Envato.
Visual elements in Keynote are icons, graphs and charts in three different styles: flat, three-dimensional and interactive. All available visual effects can be animated. Images, audio and video can be downloaded from your device. There are no audio files available within the app, but you can record a voiceover using a microphone. You can upload video presentations in .mp4 or animated GIF format.
7. Animaker
- No time limit
- Two versions of the interface
- Many templates, tools and resources
- Extensive character animation options
- Animated or live video
- No data visualization, branding, undo and redo tools
- Not the easiest video editing process
Verdict: Animaker provides a platform for corporate teams to create professional video presentations using the drag-and-drop interface. It has a full and lightweight version of the interface with switching: all the tools for creating scenes, parameters for animated characters, and frame editing. With 8 visual tools, multi-user collaboration features and the largest animated library, it is the best video presentation maker for businesses.
Animaker offers millions of image templates and animated video clips, audio files, shapes, icons, text layouts, customizable characters and scene effects in animation or live-action format. The video can contain music or voiceover. You can also upload audio files.
With one of the best YouTube intro makers , video presentations can be published on Facebook, YouTube and Twitter, uploaded to certain social networks, such as Slack and Flickr, with optimization for each channel.
8. TechSmith Camtasia
- No duration limit
- Multiple video editing options
- Integration with PowerPoint, social networks
- Support for major media formats
- Interactive video, built-in hyperlinks
- No web option, heavyweight
- No digital camera support
Verdict: If you need to record your actions on a monitor, consider Camtasia as the best video presentation software. The function of capturing and displaying screen activity is powerful and convenient, with high-quality recording. For presentations, there is a special add-in panel that lets you control the recording process: open the file in PowerPoint, launch the presentation and start recording. Then you can add graphics and music, titles, animations, transitions, edit audio and video.
Camtasia offers an expandable multi-track timeline that, thanks to the drag-and-drop approach, can include screen content, recordings of streaming webcams , multiple audio tracks, effects, callouts, etc.
When recording is finished, Camtasia will mark the output so that you can edit the system sound by removing background noise and adjusting the levels; video, cursor and microphone separately. The software provides open and hidden subtitles. Also, you can export captions for translation.
- Feature-rich
- Web, desktop, and mobile versions
- Impeccable security
- Limited storage
- Some features are unavailable in a free version
Verdict: Using Pitch , it is possible to make bite-size clips and add them to presentations to attract more viewers. The best part is that you can create slides on any device and at a convenient tempo.
There is a library replete with stylish presentation templates that you can use to embed your videos. Just choose a suitable template and start customizing it. It is great that you can alter pre-designed elements and even set the playback speed.
Another advantage of Pitch is that it comes with multiple integrations, even if you use a free plan. Besides, all processes are straightforward, so even beginners will understand how to make a catchy presentation. You can insert tables by providing links to Google Sheets, or metrics by linking Google Analytics. Moreover, it is even possible to add video content from YouTube and Vimeo, as well as images from Unsplash and Giphy.
10. iSpring Suite
- Converts PowerPoint to Flash/HTML5
- Integration, support for PowerPoint effects
- Detailed reporting on grades and courses
- Easy publication in social networks
- MS PowerPoint is required for recording
- No advanced video editing, screen recording features
Verdict: If you need to improve your slides with a speaker, iSpring Suite is an effective way to convert PowerPoint slides into an interactive video presentation. It expands the possibilities of video communication and interaction with the audience.
The integrated editor lets you add videos from the Internet or a live presentation using webcams for YouTube , record voiceover or import audio files, and sync it with slides and effects.
In this presentation video software, you can add tests, Flash videos, web pages with navigation, files, documents and links to your slides. The output file is converted to a browser-friendly Flash, HTML5, MP4 or LMS-compatible format.
11. Vyond Studio (GoAnimate)
- Excellent combination of video and infographics
- Customizable charts, font import
- Online guide, integrated learning
- Lip auto-sync, camera movement
- Undo and redo, preview
- Limitations of the free version
- Requires some skills
Verdict: Vyond offers cloud-based features for creating custom animated videos using drag-and-drop tools. The main visual effects are characters, props, backgrounds and music. Characters are customizable, including the face angle and animated actions. The software includes libraries with numerous backgrounds, characters, interactions, props, tracks, sound and video effects.
When you select a template, Vyond opens the start scene with an expandable timeline editor that lists scenes, frames and objects in the order of animated settings. There are hundreds of props and scenarios that can be infinitely combined with characters and backgrounds. If you want to make a flipbook in addition to a presentation, have a look at the tool by Flipsnack .
- Preview of a single scene or the entire video
- Unlimited length video in the premium version
- Horizontal, square, vertical orientation
- Detailed control of animations and transitions
- Ability to embed
- Restrictions in the free trial
- No data visualization, branding
Verdict: Wideo is a simple cloud-based video presentation software that lets you activate social media campaigns using professional videos. The interface of the video editor appears neat and has enough space to work from a template or from scratch. At the bottom, there is the timeline editor, which controls one scene at a time, and there are undo and redo controls.
You have a choice of about a hundred video presentation template options. If that isn’t enough for you, head to the TemplatesWise resource and download more cool templates there. You can still add slides to the selected template. Besides, Wideo offers visual effects and elements – backgrounds, images, videos, text effects, and scenes with animated text.
13. Animoto
- A quick way to make a video from photos
- Simple drag and drop interface
- Access to over a million stock assets
- Universal professional templates
- You can’t control the properties of a video
- You can’t edit one section of a video separately
Verdict: Making a short family video will require a few photos and minutes, as well as your creativity. You don’t need to know anything about video editing, because Animoto will do everything for you. Just mix the photos, add a soundtrack and click the “Create video” button. If you aren’t satisfied with the results, the software offers other mixing options.
This online slideshow maker meets the needs of the business. You can add video frames and text frames to your photos, making your project more attractive, and quickly apply styles.
In addition, you can create video clips for marketing purposes with minimal effort and cost. This lets any video creator work productively in social networks.
- Top video presentation software
- With free trial

- Video Editing Services
- Virtual Staging Services
- Outsource Photo Editing
- Retouching Tips
- Photo Editing Freebies
- Free Raw Images for Retouching
- Free Photoshop Actions
- Free Lightroom Presets
- Affiliate Program
- Privacy Policy
- Cookie Policy

Your current User-Agent string appears to be from an automated process, if this is incorrect, please click this link:
How to video record yourself presenting a PowerPoint

What type of content do you primarily create?

Recording yourself presenting a PowerPoint can be challenging, especially getting the technical aspects right. You need to capture your screen, webcam, and audio seamlessly while delivering your content naturally and avoiding awkward transitions between slides.
Finding a tool that integrates all these components can seem daunting. However, recording yourself presenting a PowerPoint doesn't have to be reserved for the tech-savvy or professional speakers.
Whether you're a teacher creating online lessons, a marketer producing a product demo, or someone looking to improve their presentation skills, this guide will walk you through user-friendly tools and strategies that will teach you how to video record yourself presenting a PowerPoint.
- Recording yourself presenting a PowerPoint can be challenging, but it doesn't have to be reserved for experts.
- Video recording offers unlimited reach, repurposing opportunities, and a more engaging experience.
- Use PowerPoint's built-in recording feature or tools like Descript for a polished presentation.
- Other tools like Zoom, Loom, OBS Studio, Clipchamp, and Quick Time Player can also be used for recording.
- Tips include practicing your script, using slide notes, ensuring high-quality audio and lighting, and incorporating storytelling techniques.
Why video record yourself presenting a PowerPoint?
Video recording your PowerPoint presentations offers several advantages:
- Unlimited reach : Unlike in-person presentations confined to a specific time and location, recorded videos allow your message to reach audiences globally at their convenience.
- Repurposing opportunities: Recorded presentations can be repurposed as evergreen content across multiple platforms, such as social media, online courses, webinars, and internal training materials, maximizing their value.
- Personal and engaging : Recording yourself narrating a presentation adds a personal touch and dynamic element that static slides alone cannot replicate. Your viewers can see and hear you deliver the content, creating a more immersive and engaging experience.
How to record your presentation with the PowerPoint app
Built-in recording feature in powerpoint.
1. Open the PowerPoint slide you want to record.
2. Click on the Record tab of the top toolbar.
3. Click on the Record button and choose from any of the following options:
- From Current Slide
- From Beginning
4. You'll see the PowerPoint screen recording window.
5. Select the microphone and camera from the icon on the top-right.
6. Click the Stop and Replay buttons to end or replay your recording.
7. To export your presentation's recording, click Export to Video within the Recording tab.
Benefits : Easy to use, no external tools needed
Limitations : Limited editing capabilities.
How to make a more polished recording of your presentation with Descript
While PowerPoint's built-in recording features are helpful, they may not produce the refined result you want for your presentation. That's where Descript comes in handy.
It’s a whole production studio at your fingertips, with video recording, transcription, and editing capabilities, ready to transform dull PowerPoint slides into an engaging experience for your audience. Descript also has a built-in screen recorder.
You can use Descript on Windows, Mac, or even straight from your web browser.
Here's step-by-step guide to recording your PowerPoint presentation with Descript.
Set up your screen recording
1. Install and open Descript. At the top of the editor, click and open the Record panel.
2. Select Screen.
3. Set Recorder settings:
Adjust the default recording settings to your liking, including the transcription language, the maximum recording resolution, and more.
4. Set recording options. Choose which audio and video sources to record (e.g., microphone, computer audio, camera). Remember to turn the camera on to capture your talking head video alongside your PowerPoint presentation.
5. Click the Additional Settings icon for
- Studio Sound (Optional): Enhance audio quality with noise reduction and background removal
- Transcription (Optional): Enable automatic transcription for easier editing
- Recording separate audio tracks
6. Add (optional) Speaker labels for each audio track (e.g., "Narrator," "Expert") by typing them in the text box next to your audio inputs.
Capture your screen recording
1. Select the right recording option:
- Recording into script : Choose this if you haven’t recorded anything yet.
- Replace selection : Choose this if you already have a script and want to replace a specific section with a new recording.
- Record new layer : Pick this for recording your video as a new layer on top of an existing recording.
2. Click Record at the bottom of the Record panel.
3. Drag over the area of your screen you wish to record. Click Start Recording. Press Space to start recording the full screen.
4. Click Stop to finish recording
Bonus: Descript creates separate tracks for camera, microphone, and computer audio. You can edit each track individually for more precise control.
- Do a short test recording to ensure everything is set up correctly.
- Set your recording to transibe for easier editing.
Editing and polishing your PowerPoint recording in Descript
Descript's AI video editing tool makes it a breeze to trim, cut, and splice your video footage, ensuring a seamless flow from start to finish. You can add smooth transitions and other visual effects to make your presentation pop.
Here’s a glimpse of how to edit and polish your PowerPoint recording in Descript:
Edit your recording like a doc
Did you make a mistake during a slide transition? No problem. Just delete those sections in the text transcript (created automatically by Descript) and the video will adjust to match.
Remove filler words
Sound smoother and more confident by easily removing filler words like "um" and "uh" from the transcript.
Fix voiceover mistakes by typing
Didn't nail your delivery on a specific slide? No need to start from scratch! Descript's Overdub feature lets you simply type in the correct narration and replace the audio on that slide with AI voice cloning.
Boost video quality and engagement :
- Crisp up audio quality by reducing background noise and room reverb with the AI-powered Studio Sound feature.
- Replace your background completely with the Green Screen Video Editor —look like you're presenting in a sleek studio or broadcasting from a beach.
- Enable Eye Contact simulation with AI, so it appears you're making direct eye contact with viewers, even if you’re looking or reading something off-camera.
Other ways to video record yourself presenting a PowerPoint
Use Zoom’s meeting recording feature to record yourself giving a PowerPoint presentation. Start a Zoom meeting with yourself, share your PowerPoint window, and enable recording
Loom is a handy screen recording tool that also offers a webcam overlay. Launch the Loom app or Chrome extension and set it to record your screen and webcam. Expect high-quality recordings but no advanced editing features. The free plan offers only five minutes of recording at a stretch.
3. OBS Studio
OBS Studio is a free, open-source screen recorder/streaming software with a steeper learning curve. It’s popular among advanced or tech-savvy users who need granular customization and control.
To record your presentation, add a "Screen Capture" source to capture your PowerPoint window and a "Video Capture Device" source for your webcam.
4. Clipchamp: Recording natively in Windows
You can use Microsoft’s Clipchamp , the built-in screen recorder and video editor for Windows, to simultaneously capture your computer screen, webcam, and audio for recording your PowerPoint presentation. It’s also available as a browser-based app. You can record up to 30 minutes on screen and webcam recordings.
Users can also adjust the screen and webcam recordings in the editing timeline separately.
5. Quick Time Player Recording natively in Mac
Use Mac’s Quick Time Player to record your PowerPoint presentation. It’s not as straightforward as the other options on this list, so here’s a quick guide to help you out:
- Launch Quick Time Player.
- Select File and go to New Movie Recording.
- You'll be recording your entire screen in addition to recording your face, so adjust the size and location of the recording window so that it's in a nonintrusive corner of your PowerPoint.
- Go to View and select Float on Top .
- Next, go to File and select New Screen Recording.
- On the menu that appears, select Record Selected Portion and drag a border around your PowerPoint and the webcam recording window.
- Press Record and start presenting.
- You can adjust the video quality and the audio source in the webcam recording window.
How to turn your PowerPoint presentation slides into a video
Did you know PowerPoint lets you save your presentation as a video, too?
Here's a breakdown of the two ways you can do so—keeping all the presentation elements (narration, animation, pointer movements, timings, and so on) intact in the presentation itself.
Save your PowerPoint presentation as a video
This creates a separate video file (MP4 or WMV) that anyone can play, even without PowerPoint.
Follow these steps:
- Save your presentation
- Go to File > Export > Create a Video
- Ultra HD (4K): Best for large screens (if you have Windows 10+)
- Full HD (1080p): Great for computers and TVs
- HD (720p): Good for streaming online or on DVDs
- Standard (480p): Smallest size, good for phones
4. Decide on narration
- If you haven't recorded yourself talking, choose "Don't Use Recorded Timings and Narrations" from the dropdown menu
- If you have a recording, choose "Use Recorded Timings and Narrations." You can also set how long each slide shows for (default is 5 seconds)
5. Click Create Video
6. Name your video, pick a folder to save it in, and choose a file type (MPEG-4 or Windows Media Video)
Creating the video might take a while, especially for longer presentations. You can even leave it running overnight. Once done, find your video in the chosen folder and double-click to play it.
Save your PowerPoint presentation as a slideshow
This saves your presentation as a special file (PPSX) that starts playing automatically on full screen when opened. It only works with PowerPoint.
Here’s how it works:
- Make sure your presentation is saved (regular PowerPoint file)
- Go to File > Save As .
- Pick a folder to save the slideshow in.
- Under Save as type, choose PowerPoint Show (*.ppsx) .
- Click Save .
Now when someone opens the file, it will automatically play the slideshow.
Pro tips for making better video PowerPoint presentations
Practice your script.
Recording a flawless PowerPoint video rarely happens in one take. The key is practice.
Record practice run-throughs and watch them back. Make notes on areas that need improvement or parts lacking clarity. The more you drill your script, the more confident and natural you'll sound in the final recording.
Take advantage of PowerPoint's built-in Speaker Coach . The feature shows you whether your pace is too fast or slow, your use of filler words like "um," and suggestions to improve your voice modulation.
Use slide notes for coherent delivery
Wouldn’t a personal teleprompter make presentations so much easier? That’s what slide notes are for.
Having your thoughts and talking points organized within your PowerPoint file lets you have all crucial information and prompts readily available when recording.
Go ahead and add detailed notes or even a full script for each slide. This will help you stay on track and provide a handy transcript reference if you need to do any editing or voiceover work in post-production.
Use high-quality audio equipment or turn on Studio Sound
Poor audio recording quality is a surefire way to make even the most visually polished video feel amateurish. Do your presentation justice by investing in a decent external or Bluetooth microphone and audio interface to capture clear voiceover audio.
If you must use a built-in mic, record in a quiet environment to minimize background noise pickup. Or better yet, pair up with an AI-powered audio enhancement tool like Descript's Studio Sound , which reduces background noise , reverb, and other artifacts.
Ensure a clean background and even lighting
Ditch cluttered backgrounds. You want people to focus on the content of your PowerPoint and not be distracted by the funny shapes and colors in your video.
Your video lighting and framing matters, too. Position yourself facing a natural light source or bring supplemental video lighting to eliminate weird shadows and squinting-level glare.
Look directly into the camera or turn on Eye Contact
Looking directly into the camera is essential to create a sense of connection with the audience. Position your webcam or camera at eye level and imagine you're talking to a friend. If you're using Descript, enable the Eye Contact feature to auto-adjust your gaze towards the camera.
- Dress professionally and maintain a good posture to project confidence and authority.
- Use visuals, animations, and multimedia elements to enhance your presentation and keep your audience engaged.
- Consider adding closed captions or subtitles to your video for better accessibility and engagement, especially for those watching without sound.
- Speak clearly and at a moderate pace, using vocal variety to emphasize key points and maintain interest.
- Incorporate storytelling techniques, real-life examples, or personal anecdotes to make your video presentation more relatable and memorable .
Take your PowerPoint presentations from amateur to amazing
Recording yourself virtually presenting a PowerPoint allows you to distribute your message using the most engaging type of content: video. And there are many screen recording tools out there that can capture your screen and web camera footage with just a few clicks.
But how do you stand out?
By focusing on the presentation's depth, your delivery, and the video's quality. The first two are the bare minimum to communicate your message effectively.
But the right screen capture software and all-in-one video creation tool like Descript can help you with third. Use the tool to improve the quality of your recorded PPT presentations.
With Descript, it's easier than ever to record your screen, polish up the audio, and create stunning visuals all in one place. So why wait?
Sign up for Descript today and simplify your workflow while creating a PowerPoint presentation video that sticks with your audience in the long term.
How do you make a presentation video with your face?
To create a presentation video with your face, follow these steps:
- Open your presentation in PowerPoint.
- Go to the Slide Show tab.
- Click on Record and choose From Current Slide or From Beginning .
- Choose your microphone and camera by clicking on a sound icon on the top-right.
- Start recording by clicking on the record button.
- Speak into your microphone to narrate the presentation.
- Your webcam will capture your face during the recording.
- Click Stop when you finish recording.
- Export your recorded presentation by clicking on File> Export>Create a video.
How do you present yourself in PowerPoint?
To present yourself effectively in PowerPoint, follow these steps:
- Determine the key information to include in your presentation.
- Design and prepare your PowerPoint slides with a cohesive theme.
- Craft a compelling introduction to engage your audience.
- Tailor your presentation to different time constraints for flexibility.
- Capture the audience's attention before you begin speaking.
Related articles

Featured articles:
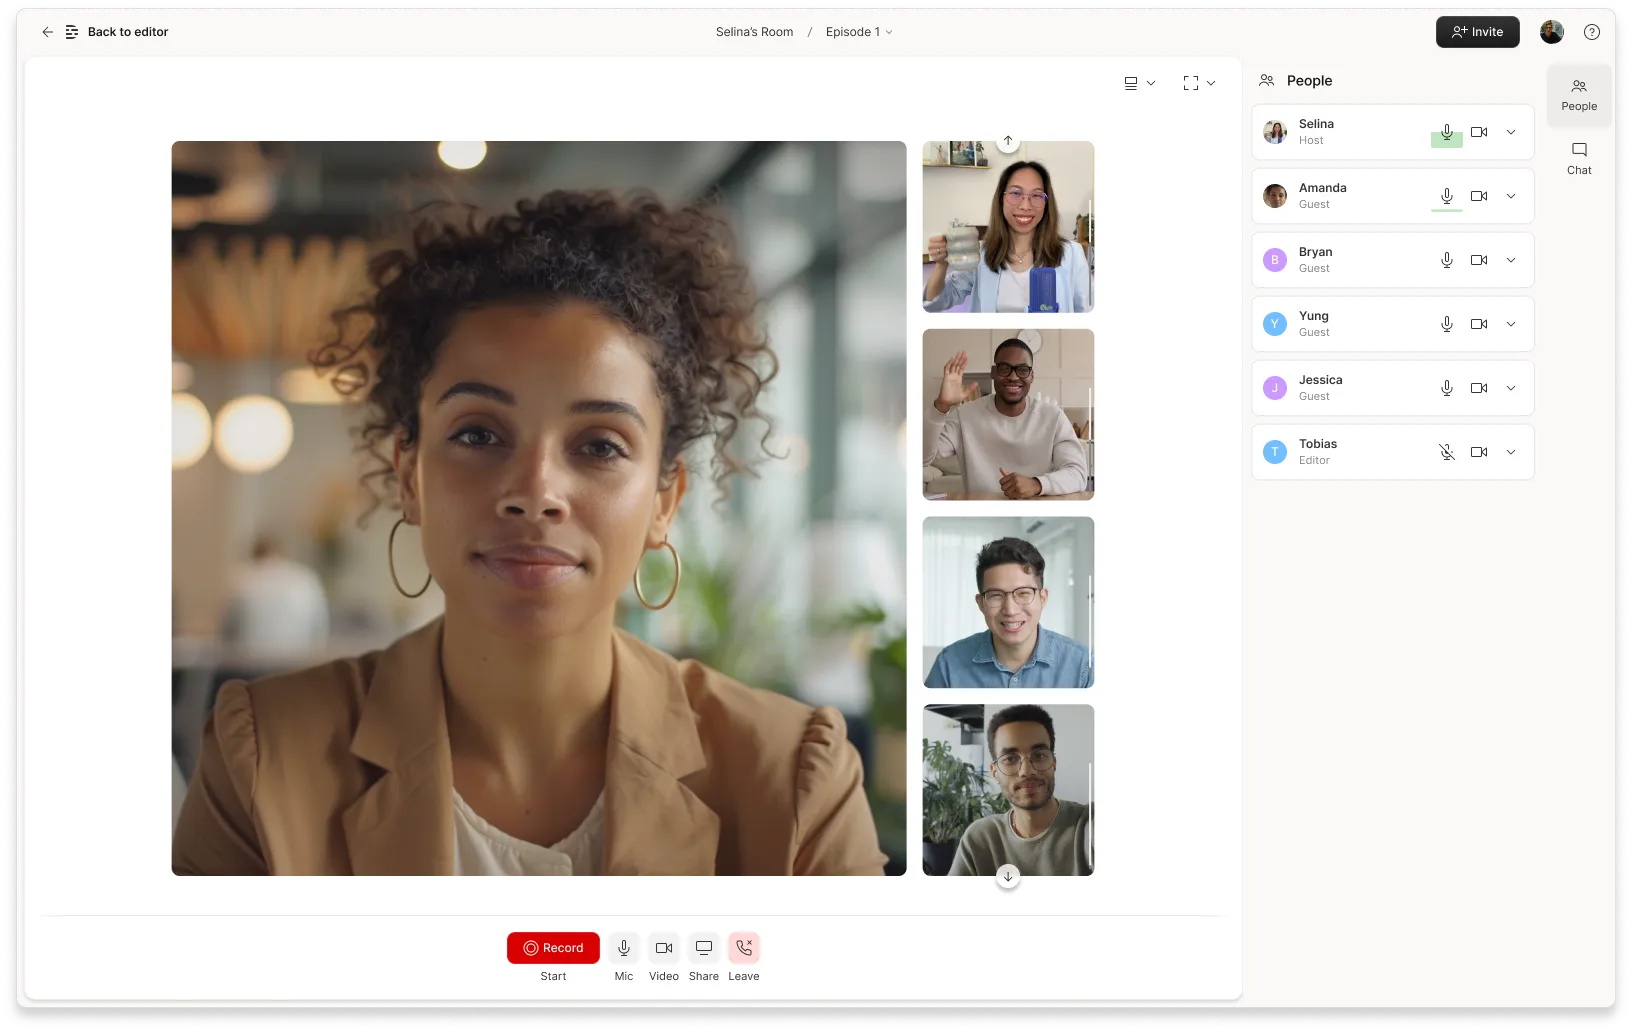
Product Updates
Descript Season 7: Rooms, Zoom & Automatic Multicam
Descript's newest release makes recording and editing video with multiple people easier than ever.

How and why to add a game show segment to your podcast
Get ideas and tips for a successful game show segment to freshen up your content and engage your audience.

10 excellent Loom alternatives to record your screen
Looking for the best ways to record your screen without Loom? Find out 10 Loom alternatives, their features, and pricing.

How to record a YouTube video: A guide for all devices
If you want to record a YouTube video for personal use or fair-use repurposing, here are the steps to get started.

For Business
Social media video marketing: Everything you need to know
Learn how to win over potential customers (and the algorithms) with the right social media video marketing tools, strategy, and optimizations.

How to record a podcast on Zoom: A beginner’s guide
Follow this step-by-step guide on how to record a podcast on Zoom, then learn about why it may not be your best recording option.

Articles you might find interesting
Choosing the best fonts for video: The importance of typography
Choosing a font may not be the first thing that comes to mind when you plan a video editing project, but text fonts play an important role in your overall production design.

Forget something? Here's a handy podcast episode posting checklist
Here’s a useful checklist of things you’ll need to take care of before you hit publish on any given episode of your show.
%20(1).JPG)
New in Descript: Multicam support, plus a lot more
Hot on the heels of our video editing and screen recording release, we’re back with more! Nothing huge, but some nice, smaller things.

How to make a YouTube banner that attracts an audience, with examples
Your YouTube channel needs to give visitors a clear, enticing reason to stick around and hit subscribe. Your YouTube banner can do just that — as long as you follow some simple rules.

AI for Creators
How to use ChatGPT to improve your creative process
ChatGPT can improve your creative process by sparking new ideas, saving you time on tedious tasks, and providing valuable revisions to your work — as long as you use it right. Here's how to do that.

Editing For YouTube Videos: Unique Platform, Unique Approach
No matter what kind of video you want to edit, there is a generalizable approach you can use to turn your raw footage into something YouTube-worthy.
Join millions of creators who already have a head start.
Get free recording and editing tips, and resources delivered to your inbox.
Related articles:
Share this article
How-To Geek
How to add a video to a microsoft powerpoint presentation.

Your changes have been saved
Email is sent
Email has already been sent
Please verify your email address.
You’ve reached your account maximum for followed topics.
Quick Links
Embedding videos versus linking to videos, supported video formats in powerpoint, how to insert a video into a powerpoint presentation, manage an embedded video's playback in powerpoint.
Videos can make presentations even more interesting or exciting. If you're looking to add a video to your Microsoft PowerPoint presentation, it's easy to do so. We'll show you how.
In PowerPoint, you can either embed a video or link to a video from your presentation. If you embed a video, your video becomes part of the presentation, which increases the overall size of the presentation file.
Related: How to Send PowerPoint Presentations With an Embedded Video
If you link to a video, PowerPoint only adds a reference to that video in your presentation. The downside of this method is that you need to send the video file separately if you share your presentation with someone. We have written a guide on how to send PowerPoint presentations with videos , so check that out.
In this guide, we'll focus on embedding a video in your presentation so you don't have to worry about sending separate files. And, if you're looking to add a YouTube video to your presentation , there's a way to do that, too.
Related: How to Embed a YouTube Video in PowerPoint
PowerPoint supports multiple video formats, including ASF, AVI, MP4, M4V, MOV, MPG, MPEG, and WMV. If your video is already in one of these formats, you can quickly add that to your presentation.
If your video is in another format, you can convert it to a supported format and then add it to your presentation.
Related: How to Use Handbrake to Convert Any Video File to Any Format
First, make sure the video you want to add to your presentation is saved on your Windows or Mac computer. Then, open your presentation with PowerPoint on your computer.
On the PowerPoint window, in the left sidebar, click the slide in which you want to add a video.

At the top of the PowerPoint window, click the "Insert" tab.

In the "Insert" tab, under the "Media" section (which is to the extreme right side of the interface), click "Video."

You'll now see an "Insert Video From" menu. Here, select "This Device."

Your computer's standard "open" window will open. In this window, access the folder that has your video file. Then double-click your video file to add it to your presentation.

You'll see your selected video in your presentation. To resize this video, click it and use the handles around the video to change its size. Then drag the video to place it at its desired location in your slide.

If you'd like to test the video, at the bottom-left corner of the video, click the play icon.

And you're all set.
Now that you have added a video to your presentation, you might want to change how it plays in your slides. In PowerPoint, you have multiple ways to change your video's playback.
To access these playback options, first, click your video in your presentation. Then, at the top of the PowerPoint window, click "Playback."

In the "Playback" tab, under the "Video Options" section, you will find various options to manage your video's playback.

For example, to change how your video starts to play in your presentation, click the "Start" drop-down menu and select one of these options:
- In Click Sequence : This plays your video in the click sequence. This means if you press the button for the next slide, your video will play.
- Automatically : This option automatically plays your video when the slide with your video opens.
- When Clicked On : Select this option to play your video only when you click it.

The other options are "Play Full Screen," which opens your video in full screen, and "Loop Until Stopped" that plays your video over and over again until you manually stop it.
Before you close PowerPoint, make sure you save your presentation so that your embedded video is saved with it. Do this by clicking File > Save in PowerPoint's menu bar.

And that's how you make your PowerPoint presentations even more engaging by including videos in them. Exciting!
If you don't want to add a video but you do want audio, you can add music to your presentations . This also helps enhance your presentation quality.
Related: How to Add Music to Your PowerPoint Presentation
- Microsoft Office
- Microsoft PowerPoint
- Get In Touch

19 Video Presentation Tips to help you give a great presentation (even if you hate the way you look on camera)
by Kolarele Sonaike

I know you don’t want to hear it, but video is eating the world!
Video is everywhere. it’s taking over everything. video even killed the radio star.
Vlogging; sales promo videos; skype; online video workshops; Facebook feeds; Youtube; Instagram; Facetime; webinars; Periscope; video conferencing. There’s no getting away from the video presentation (or the video presentation tips you’ll get from friends and family).
At some point, you’re going to have to get comfortable giving a video presentation – even if you hate the way you look on camera and you cringe listening to the sound of your voice played back to you.
Fortunately, like most things public speaking, you can go a long way with some careful techniques, eliminating silly mistakes, and good old fashioned practice.
To warm things up, how about a short clip in how not to do video. Take a minute to watch ‘Little’ Marco Rubio’s painful delivery of the official Republican response to Obama’s State of the Union address in 2013. It’ll make you feel better about your own struggles.
(Keep the FREE CHECKLIST – 19 Video Presentation Tips to hand for the next time you’re on camera)
(or And you’ll definitely want to take my Free Video Workshop Series: Why most speeches suck and how to make sure yours wont’.
So, now that you’ve had your own sip of water, let’s begin with my own video presentation tips:
There’s basically three key aspects to giving a great video presentation:
- The Technicalities.
- What you say.
- How you say it.
The Technicalities
So, you’re going to speak on video. Just pull out your camera or smartphone and start recording, right? Wrong!
Before you even think about hitting the record button, there are a whole load of technicalities you should sort out first.
1) AUDIO – Get a damn good microphone
As counterintuitive as it may sound, the single most important factor in a good video, is the audio quality. People will readily watch a shaky, grainy, amateur video with good sound, but force them to struggle to hear what’s being said and they’ll switch off in seconds.
A good mic is a great investment.
For video, a lavalier lapel mic is excellent as it sits close to your mouth so picks everything up strongly. I personally use the Rode Smartlav+ Lavalier Mic as it’s pretty cheap, plugs into my iPhone, but still gives good sound. For a USB mic to record straight to computer, I love the Blue Yeti USB Mic , which has great sound and a cool old school look.
2) ELIMINATE AMBIENT NOISE – Close the windows
Still on sound, you want to find a quiet spot to do your recording. Close all the windows, and ask your neighbour to turn the music down or suspend the lawn mowing whilst you record. You’d be surprised how much environmental noise gets picked up.
3) DON’T OVER WORRY ABOUT THE CAMERA
Despite the fact that people often get consumed by the type of camera to be used, this is actually one of the least problems you will have. Nowadays cameras are just so damn good you are almost always guaranteed to get decent HD footage.
I do all my recordings with my iPhone 6 and it’s sufficient for my needs. Any half-decent smartphone, or camera, now records nearly as well as the highest spec video recorders of yesteryear. So, unless you need to shoot at Hollywood blockbuster levels, just find a camera that isn’t too old and consider that box ticked off.
4) LIGHTING – not overhead!
Do think about lighting.
Next to good audio, it’s another one of those big technicalities that can have a big impact on the quality of your video. (Amazon have some good options like this one )
Don’t put any lights or windows behind you. They’ll mess with the light levels on your video. Don’t stand under your room spotlights – especially if the top of your head gets really shiny like mine!
Go for bright, soft lighting coming from behind the camera to light up your beautiful face.
5) BACKGROUND – not just a white wall, please!
White walls are boring. Have something innocuous but discernible in the background. Don’t be afraid to show your natural environment e.g. bookcases, plants, painting – as long as they are not too distracting.

I love my podcasts and video blogs, especially anything done by Pat Flynn of the Smart Passive Income .
He does his videos in his office with books, pictures and files in the background.
6) FRAMING – don’t put yourself dead centre.
You may want to be the centre of attention, but don’t put yourself bang in the centre of your video. It’s a neuroscientific thing, but basically, you want to be slightly off centre to the left or right, rather than directly in the middle of the frame – again check out my man Pat above. He’s ever so slightly to the left of centre. It also leaves a nice space for any text overlay you want to do.
7) CAMERA HEIGHT – don’t show us the inside of your nostrils
Your frame should be slightly off centre, but the camera height can be dead centre.

Be careful of the angle though. The lens should either be directly level or be pointing ever so slightly downwards towards your face.
Try to avoid the Blair Witch Project ‘up the nostrils’ approach.
It’s just not a great look.
So, those are the technicalities. Now for the sexier stuff.
(Did I mention the video presentation tips checklist that goes with this article?)
WHAT YOU SAY
8) preparation – yes, you’ve heard it before but i’m saying it again.
What can I say? If you take one thing from all my articles combined (though I hope there are other things of value that I’ve said), it will be this: PREPARATION. PREPARATION. PREPARATION IS EVERYTHING. Fortunately, I’ve got you covered with this handy checklist called the Ultimate Speech Preparation Checklist
Don’t start speaking til you know exactly what it is you want to say.
9) KEEP IT SHORT
If people are watching you on video, chances are they have many other distractions competing for their time and attention – that YouTube clip of the baby biting his brother’s finger; facebook notifications popping up every 30 seconds; that email from their boss that has to be answered.
Keep it short. Keep it engaging. If it’s going online, remember that anything longer than 3 minutes will experience a sharp drop off in audience viewing.
10) HAVE A POINT – the video will be around for eternity
Most speeches last minutes. Unless someone erases it, your video presentation will last a lifetime, so be sure to have a point to what you’re going to say or people will be watching your pointless video for generations to come.
Don’t ramble. Don’t waffle. Get to the point.
11) USE A STRONG STRUCTURE
However compelling the content of your speech, it will fall flat if it is not set within a strong structure that carries your audience towards a strong climactic conclusion.
And, you guessed it, here’s a Speech Structure Checklist to help you work out a great structure for your presentation.
12) SIMPLE WORDS
Video is no place for tongue twisters so use short simple words.
Don’t forget to sign up for my Free Video Series Workshop on how not to give a speech that sucks and download the free checklist on my video presentation tips to help with your next video presentation
HOW YOU SAY IT
In the iconic scene of one of my favourite films, Broadcast News, journalist Aaron, finally gets the chance he has been angling for his entire career, to present as a news anchor. What follows is movie gold, as he nervously sweats his way through the news segment to learn that there is a vast difference between writing and presenting.
Here are the things to consider about how you present on video.
13) WHAT YOU WEAR
No need to over-worry about what you wear as long as you avoid some basic mistakes. Don’t wear stripes or overly bold patterns (they look odd on camera). Don’t wear clunky jewellery. Do try to match your appearance to the impression you want to project about yourself i.e. dress formally if trying to convey a sense of professionalism; dress down if trying to look casual.
I don’t know enough about makeup to say what you should or shouldn’t do about it. If you suffer from shiny head and shiny face syndrome like me, then some powder apparently will dampen that down – never tried it personally despite my wife’s urging – so this is just what the internet suggests!
14) CONSIDER A TELEPROMPTER
How do you remember what you’re going to say? There are techniques you can use ( as I’ve talked about before ) but the great thing about video is that you can have an entire script in front of you, if you so wish.
I tend to forget my words when in front of a camera, so if recording at home, I love the Teleprompter app on my iPad , which just eliminates that particular worry.
Another trick I’ve used is to stick talking points up on a wall behind the camera in the right order to help keep me on track. And of course, there’s always editing if you are in charge of the video.
15) BE YOURSELF – only more
The camera is a microscope. It reveals authenticity and exposes fakeness. So be yourself, and no one else. But, be even more of yourself than you are in real life (if that makes sense). Dial it up a few notches so your true personality fills the screen.
Keep your energy levels up.
16) TALK TO THE CAMERA LIKE IT’S YOUR FIRST DATE
If memory serves me right (it’s been a very long time) you are on best behaviour on a first date, and you make every effort to look into the eyes of your date. Your own eyes are lively and smiley and you speak with an earnest intensity, as you try to interest and impress your date. (Ah, the fun of youth.)
You basically want to do that!
17) GOOD POSTURE – Sit up straight (like your mama told you)
What feels odd in person, looks good on camera.
Think about the way people pose for red carpet shots (like the ladies of the wonderfully uplifting Hidden Figures movie). No one stands like that in real life, but on camera it looks great.

Sit or stand straight, even if it’s uncomfortable. Don’t hunch over, don’t use odd angles.
I have sloping shoulders (again according to Mrs S) so when recording on camera I actually lift my shoulders up ever so slightly. It feels odd, even fake, but it works.
We are psychologically wired to be more accepting and attracted to symmetry. So aim for clear, straight lines where you can.
18) USE YOUR HANDS – but not too much
Movement is fine, but too much is distracting.
Don’t be afraid to use hand gestures (studies show that complex thinkers use more hand gestures). Just don’t over do it. The camera is a microscope remember. It amplifies everything.
19) PRACTICE. PRACTICE. PRACTICE
The other half of Preparation is Practice. There is no substitute for it. If you asked for my personal #1 of all the video presentation tips, it would be this one.
Record yourself on camera and force yourself to watch it back (but leave a week between recording and reviewing it as you can’t be objective immediately afterwards).
Send it to a trusted friend and get their feedback. If you really want to go for it, give them a questionnaire to complete to get some dispassionate commentary e.g.
On a scale of 1 – 10:
How engaging was I?
How clear was my message?
How good was the sound?
How sharp was the video image?
How naturally do I come across on camera?
There you go! 19 Video Presentation Tips (and one Checklist)
Now, in case you are wondering whether I really do practise what I preach (and I seem to do a whole load of preaching), the answer is: I don’t! Got to be honest. No one gets everything right, however much we try. So here’s a video I recorded for a crowdfunding campaign I worked on for the charity The 100 Black Men of London.
Can you spot how many of the 19 steps I didn’t apply?
If you’ve got this far, why not keep going with “How to make an audience love you. Give them a car”
Kolarele sonaike, the great speech consultancy, p.s. i’m running some free 1-2-1 coaching sessions on communication skills. this is a deep coaching session so grab your spot now https://www.greatspeech.co/book-a-call/, pin it on pinterest.
By continuing to use the site, you agree to the use of cookies. more information Accept
The cookie settings on this website are set to "allow cookies" to give you the best browsing experience possible. If you continue to use this website without changing your cookie settings or you click "Accept" below then you are consenting to this.
How to Make a High-Quality Video Presentation

Featured In
Table of contents, how do you make a presentation video, how can i make a video presentation for free, how do i make a presentation with audio and video, can i video myself presenting a powerpoint, how do i make a presentation video in powerpoint, where can i find a how-to video on making a presentation, how do i record a presentation on my computer, what are the steps for making a presentation video, how do you record a video presentation, top 8 software or apps for making video presentations.
Presenting information through a video presentation is an engaging way to hold your audience’s attention. It combines audio, visuals, and text to convey...
Presenting information through a video presentation is an engaging way to hold your audience’s attention. It combines audio, visuals, and text to convey your message effectively. Let's delve into how to make a video presentation, customizing it with unique templates, incorporating transitions, adding voiceover , and more.
Creating a video presentation entails various steps. From creating a PowerPoint presentation to adding transitions and voiceovers, you must ensure every element blends together seamlessly to create a compelling visual content.
- Prepare Your Content : Start with a storyboard outlining the entire presentation's flow.
- Create Your Slideshow : Use PowerPoint or Google Slides to make your slides. Customize the fonts and infographics for a unique look.
- Add Transitions : Transitions add dynamism to your presentation. Be mindful not to overuse them, as it can distract your viewers.
- Record Audio : Record a voiceover narration for your presentation. Make sure the audio quality is clear and audible.
- Incorporate Video Clips : Add relevant video clips to your presentation. You can also video yourself presenting a PowerPoint to add a personal touch.
- Edit Your Video : Use video editing software to fine-tune your video, add background music, and synchronize your audio with your slides.
Several free online tools allow you to make a video presentation. Canva, Google Slides, and Microsoft Sway offer templates that you can customize for your presentation. They provide an array of options like adding your own video, subtitles, GIFs, and more.
Adding audio and video to your presentation can make it more interactive and engaging. To add audio, simply record a voiceover and import the audio file to your presentation. As for the video, you can import video footage or even YouTube videos directly into your slides.
Absolutely. You can use a webcam to record yourself giving a live presentation. Use screen recording software to capture both the PowerPoint slides and your webcam feed. Once recorded, use a video editor to blend your footage into the presentation.
PowerPoint allows you to convert your slideshow into a video. Simply go to the 'File' menu, select 'Export', and choose 'Create a Video'. You can also add voiceover and record timings for each slide.
Several online platforms provide tutorials on making video presentations. YouTube is a vast resource for video guides and tutorials on this topic.
Recording a presentation on your computer is easy with screen recording software. Software like OBS Studio, Screencast-O-Matic, and Camtasia can record your entire screen, specific windows, or regions.
One of the most comprehensive platforms for how-to videos is YouTube. Simply type in "How to make a video presentation" in the search bar, and you'll find numerous tutorials covering various aspects of making a presentation video.
LinkedIn Learning and Coursera also offer professional video courses on the topic, although these might require a subscription. Some software vendors also provide tutorials on their official websites or user communities.
- Plan Your Content : Outline your presentation's content, main points, and structure before you begin creating slides or recording video.
- Design Your Slides : Use software like PowerPoint or Google Slides to create a visually appealing slideshow. Incorporate key details, infographics, and graphics to make it engaging.
- Add Transitions and Animation Effects : Transitions between slides and animation effects can make your presentation more dynamic. Use them sparingly to maintain a professional feel.
- Record a Voiceover : Narrate your presentation to provide more information and guide your viewers through the slides.
- Incorporate Video : You can add video clips or screen recordings to your presentation to illustrate points or show practical examples.
- Edit and Finalize Your Video : Use video editing software to combine your slides, voiceover, and video clips into a single, cohesive video presentation. You can also add background music at this stage to enhance the mood of your presentation.
- Review and Adjust : Watch your video presentation multiple times to spot and correct any mistakes or awkward transitions. Adjust the timing of slides and voiceover as necessary.
- Export and Share : Once you're satisfied with your video presentation, export it as a video file and share it with your audience.
To record a video presentation, you can use screen recording software like OBS Studio, Camtasia, or Screencast-O-Matic. Here are the steps:
- Set up Your Software : Download and install your preferred screen recording software. Familiarize yourself with the controls and settings.
- Prepare Your Slides : Have your slides ready and open in presentation mode on your screen.
- Start Recording : Start your screen recording software and select the area of your screen where the presentation is displayed. If you want to record yourself presenting, ensure your webcam is enabled and properly positioned.
- Present Your Slides : Go through your slides as if you were presenting to an audience. Speak clearly for your voiceover, and ensure your presentation is paced appropriately.
- Stop Recording : Once you've finished presenting, stop the screen recording.
- Edit Your Recording : Import your recording into a video editor to trim any unnecessary parts at the beginning or end, adjust the audio, and add any additional effects or annotations.
Remember to save your work regularly, especially during the editing process, to avoid losing any progress. If you're new to video editing, there are numerous tutorials online that can help you get started.
- PowerPoint : A robust tool for creating presentations, offering a wide range of templates, animations, and transition effects.
- Canva : An online design tool that also serves as a video presentation maker with templates for social media, marketing videos, and more.
- Google Slides : A free tool to create slideshows, compatible with PowerPoint files.
- Prezi : A cloud-based presentation tool offering dynamic, zoomable canvas making it perfect for explainer videos.
- Adobe Spark : Offers high-quality video creation with a focus on professional design.
- Vyond : Great for creating animated video presentations with built-in templates.
- Biteable : Easy-to-use video editor for creating marketing videos, animated videos, infographics, and more.
- Animaker : A free online animated video maker, offering a range of characters, animations, properties, BGs, and more.
When making video presentations, always keep in mind your audience’s attention and retention. Crafting a powerful intro and outro, utilizing fullscreen playback, and ensuring your video file is in a widely compatible format like .mov or .mp4 will make your presentations stand out.
Creating a professional video presentation is more than just compiling PowerPoint slides. It's about telling a story, captivating your audience, and conveying your message in an engaging and memorable way
How to read George R.R. Martin’s books in order
How to read James Patterson books in order

Cliff Weitzman
Cliff Weitzman is a dyslexia advocate and the CEO and founder of Speechify, the #1 text-to-speech app in the world, totaling over 100,000 5-star reviews and ranking first place in the App Store for the News & Magazines category. In 2017, Weitzman was named to the Forbes 30 under 30 list for his work making the internet more accessible to people with learning disabilities. Cliff Weitzman has been featured in EdSurge, Inc., PC Mag, Entrepreneur, Mashable, among other leading outlets.
Best presentation software of 2024
Perfect slideshows for speeches, talks, and presentations

- Best overall
- Best for media
- Best unique
- Best for branding
- Best for marketing
- Best for themes
- How we test
We list the best presentation software, to make it simple and easy to make and manage slideshow presentations to display to an audience.
Presentation software runs at the heart of business sales, management, and development, so it's important to ensure you have the best presentation software for your needs. This is especially when looking to share ideas, concepts, and workflows, and the ability to present these in a simple and understandable way is essential.
However, while presentation software has been traditionally limited to text and images, it has widened its ability to work with different media such as video and audio.
Therefore it's important for the best presentation software to not simply be easy and simple to use, but also be able to support additional media so that presentations can be more engaging, lively, and ultimately serve their purpose in educating and updating their intended audience.
Below we've listed the best presentation software currently on the market.
We've also listed the best free presentation software .

The best office software in the world is: Microsoft 365 There are many different office software suites out there, but Microsoft Office remains the original and best, offering an unsurpassed range of features and functionality that rivals just can't match.
Even better, Microsoft 365 - previously branded as Office 365 - is a cloud-based solution which means you can use it on any computer, mobile device, or smartphone, without having to worry about compatibility. All your files are saved in the cloud and synced between devices, so you can begin work on a document at home or in the office, then continue working on it on the go.
You can sign up to Microsoft 365 here .
The best presentation software of 2024 in full:
Why you can trust TechRadar We spend hours testing every product or service we review, so you can be sure you’re buying the best. Find out more about how we test.
Best presentation software overall

1. PowerPoint
Our expert review:
Reasons to buy
For most people, Microsoft 's PowerPoint remains the original and best of all the presentation software platforms out there. While other companies have managed to catch up and offer rival products worthy of consideration, the fact is that PowerPoint's familiar interface and ubiquitous availability means it remains a favorite for the majority of people.
On the one hand, it's long been a staple of the hugely popular Microsoft Office suite, meaning that for most users this is going to be the first - and last - presentation software they are going to need to use.
Additionally, Microsoft has made PowerPoint, along with their other office products, available as free apps (with limited functionality) on both iOS and Android for mobile use, meaning it's even harder to avoid them. And this is before we even consider the inclusion of PowerPoint in Microsoft's cloud-based Microsoft 365.
It does everything necessary that you'd expect of presentation software, allowing you to add text and media to a series of slides, to accompany a talk and other presentations. There are easy-to-use templates included to help spice things up a little, but even a general user with little experience of it is likely to find themselves able to use PowerPoint without much trouble at all.
Overall, it's hard to go wrong with PowerPoint, and although Microsoft 365 has a nominal cost, the apps are free to use even if they do have more limited functionality.
Read our full Microsoft PowerPoint review .
Our Microsoft discount codes can help you save on your next purchase.
- ^ Back to the top
Best presentation software for media

2. SlideDog
Reasons to avoid.
It’s all too easy to end up creating a presentation that’s unappealing, and the last thing you want to do is make the audience fall asleep. SlideDog lets you combine almost any type of media to create a rich presentation that’s sure to keep the viewers’ peepers open, avoiding the ‘cookie cutter’ look that makes presentations seem dull.
Marketed as a web-based multimedia presentation tool, it gives you the ability to combine PowerPoint presentations, graphics, PDF files, Prezi presentations, web pages, pictures, videos, and movie clips. You can drag these into custom playlists and display them to your audience with ease.
You’re able to remotely control your presentations and playlists from your smartphone, the web, or a secondary computer, and there’s also the option to share slides in real-time. Audience members can even view your slide from their own devices by clicking a link. That’s a handy feature if you’re looking to create an immersive presentation experience.
SlideDog is probably the cheapest of the presentation software featured, with a free account that will cover the essential features. However, for live sharing and premium support, you need to upgrade.
Read our full SlideDog review .
Best unique presentation software

Prezi is one of the more unique presentation tools. Instead of presenting your graphics and text in a slide-to-slide format, you can create highly visual and interactive presentation canvases with the goal of “emphasizing the relationship between the ideas”.
Presentations can also be tailored to the specific audience, as this is a flexible platform that’s capable of skipping ahead, or veering off into a side topic, without having to flip through all the slides to get to a particular bit.
For business users, there are a variety of handy tools available. By downloading Prezi , you can build and edit presentations with your colleagues in real-time, which is perfect for companies with teams based around the globe.
When you have created a presentation you’re happy with, you can present it live (in HD) and send a direct link to viewers. There are some analysis tools here, too – you can see who’s accessed your presentation, which parts of it, and for how long. The app is available for Mac and Windows devices.
Read our full Prezi review .
Best presentation software for branding

4. CustomShow
Branding says a lot about a business, and it’s something firms need to get right from day one – from a good logo to a suitable font. CustomShow is business presentation software that puts all these elements of branding first.
Using the system, you can design and present customized, branded presentations that reflect your company and the products you offer, featuring the aforementioned logo and custom fonts. As well as this, you get a slide library and analytics to ensure your presentations are a success.
What’s more, you can import presentations into the software, and use it to tweak them further. There’s also integration with SalesForce , and because the platform is cloud-based, you can access your presentations on computers, tablets, and smartphones.
Considering the focus on branding, this offering could be good for marketing and sales teams, and it's used by major companies such as HBO and CBS Interactive.
Best presentation software for marketing

5. ClearSlide
Just like CustomShow, ClearSlide has a niche focus for companies. The platform is targeted at firms looking to generate successful marketing campaigns, pushing sales via presentations (and more), not least through a range of analytics and metrics to work for sales and marketing.
With the product, you can upload a range of files, including PowerPoint, Keynote, PDF, and Excel. ClearSlide is integrated with other platforms, including Google Drive, Dropbox, and Salesforce.
This system is pretty complex and may offer too many irrelevant features for some businesses, but you can create customized content that reflects your company and the message you’re trying to get out to customers. There are also some good metrics and analysis features, and you can sign up for a free trial before making any decisions.
The real strength of ClearSlide comes from its focus on sales and marketing data, not least being able to track user engagement alongside other metrics.
Best presentation software for themes

6. Haiku Deck
Any presentation app will allow you to personalize your slides to at least some extent, but Haiku Deck goes one step further than the competition. It comes with a wide range of themes suited to different needs, and you also get access to 40 million free images from the Creative Commons collection.
When it comes to creating a presentation, you have the option to do so on the web, which means your presentation is accessible across a range of mobile devices as well as desktops. Regardless of the device used, you’re able to select from a variety of different fonts, layouts, and filters to make the perfect presentation.
The great thing about these various customization options is that they’re categorized into different industries and use cases. For instance, you’ll find themes for teaching, cooking, real estate, and startups. Most of the features require you to be online, but hopefully, you’ll have a sturdy net connection wherever you go.
Other presentation software to consider
Google Slides is part of the Google Workspace (formerly G Suite) office platform intended as an online alternative to Microsoft Office. It may seem a little limited by comparison to PowerPoint, but as it's browser-based that means cross-platform compatibility. Additionally, it allows for collaborative work, and Google Slides really works well here. On top of the fact that it integrates with the rest of the Google Workspace apps, not least Google Drive, and you have a contender.
Zoho Show is another of the many, many tools and apps that Zoho has made available for business use. It also operates in the cloud so it's accessible to any device with a browser, and it also allows for collaborative work. You can also easily share the link for users to download, or provide a live presentation online. The updated version has a simpler and easier to use interface and comes with a free version and a paid-for one with expanded features.
Evernote is normally thought of as just note-taking software, but it does provide the option to create a presentation you can share online or with an audience. In that regard, it's a little more limited than the other options in not being dedicated presentation software. However, as an easy and handy way to pull together a presentation quickly, it could serve as a backup or last-minute option, especially if Evernote is already being commonly used by you.
LibreOffice Impress is part of the open-source suite offered as a free alternative to Microsoft Office, and comes with a powerful array of tools and editing options for your presentation, not least working with 3D images. It's supported by a large community, so it's easy to find an array of additional templates. If there is a limitation it's that it's software you download and install rather than web-based, but any presentations created should be easily portable to the web if needed.
Adobe Spark does things a bit differently, as rather than just use images it's geared toward video as well. This makes for potentially more powerful multimedia presentations, especially as Adobe also has a big selection of photos and images available for its users. There is a free tier for core features but requires a subscription for custom branding, personalized themes, and support.
Slides comes with a lot of features in an easy-to-use interface, and involves setting up presentations using drag and drop into an existing grid. It's also internet-based so there's no software to download, and it only requires a browser to use and access.
Presentation software FAQs
Which presentation software is best for you.
When deciding which presentation software to download and use, first consider what your actual needs are, as sometimes free platforms may only provide basic options, so if you need to use advanced tools you may find a paid platform is much more worthwhile. Additionally, free and budget software options can sometimes prove limited when it comes to the variety of tools available, while higher-end software can really cater for every need, so do ensure you have a good idea of which features you think you may require for your presentation needs.
How we tested the best presentation software
To test for the best presentation software we first set up an account with the relevant software platform, whether as a download or as an online service. We then tested the service to see how the software could be used for different purposes and in different situations. The aim was to push each software platform to see how useful its basic tools were and also how easy it was to get to grips with any more advanced tools.
Read how we test, rate, and review products on TechRadar .
We've also featured the best alternatives to Microsoft Office .
Get in touch
- Want to find out about commercial or marketing opportunities? Click here
- Out of date info, errors, complaints or broken links? Give us a nudge
- Got a suggestion for a product or service provider? Message us directly
- You've reached the end of the page. Jump back up to the top ^
Are you a pro? Subscribe to our newsletter
Sign up to the TechRadar Pro newsletter to get all the top news, opinion, features and guidance your business needs to succeed!
Nicholas Fearn is a freelance technology journalist and copywriter from the Welsh valleys. His work has appeared in publications such as the FT, the Independent, the Daily Telegraph, The Next Web, T3, Android Central, Computer Weekly, and many others. He also happens to be a diehard Mariah Carey fan!
- Jonas P. DeMuro
Conductor SEO tool review
Hasleo Backup Suite review
Corsair announces new acquisition of the sim racing company Fanatec
Most Popular
- 2 Two more Nintendo Switch console bundles are on the way - and you won’t get any prizes for guessing the pack-in game
- 3 New PS6 report claims AMD will be designing the console's chip
- 4 Hands on: Orico Data Matrix Pro
- 5 Amazon announces dates for Prime Big Deal Days - the second Prime Day sale of the year
- PRO Courses Guides New Tech Help Pro Expert Videos About wikiHow Pro Upgrade Sign In
- EDIT Edit this Article
- EXPLORE Tech Help Pro About Us Random Article Quizzes Request a New Article Community Dashboard This Or That Game Happiness Hub Popular Categories Arts and Entertainment Artwork Books Movies Computers and Electronics Computers Phone Skills Technology Hacks Health Men's Health Mental Health Women's Health Relationships Dating Love Relationship Issues Hobbies and Crafts Crafts Drawing Games Education & Communication Communication Skills Personal Development Studying Personal Care and Style Fashion Hair Care Personal Hygiene Youth Personal Care School Stuff Dating All Categories Arts and Entertainment Finance and Business Home and Garden Relationship Quizzes Cars & Other Vehicles Food and Entertaining Personal Care and Style Sports and Fitness Computers and Electronics Health Pets and Animals Travel Education & Communication Hobbies and Crafts Philosophy and Religion Work World Family Life Holidays and Traditions Relationships Youth
- Browse Articles
- Learn Something New
- Quizzes Hot
- Happiness Hub
- This Or That Game
- Train Your Brain
- Explore More
- Support wikiHow
- About wikiHow
- Log in / Sign up
- Computers and Electronics
- Presentation Software
- PowerPoint Insertions
5 Ways to Embed a Video File in Microsoft PowerPoint
Last Updated: June 14, 2024 Fact Checked
Embedding a Web Video
Embedding a video file, embedding a stock video, using android, linking movie files (powerpoint 2007).
This article was co-authored by Mitch Harris and by wikiHow staff writer, Rain Kengly . Mitch Harris is a Consumer Technology Expert based in the San Francisco Bay Area. Mitch runs his own IT Consulting company called Mitch the Geek, helping individuals and businesses with home office technology, data security, remote support, and cybersecurity compliance. Mitch earned a BS in Psychology, English, and Physics and graduated Cum Laude from Northern Arizona University. This article has been fact-checked, ensuring the accuracy of any cited facts and confirming the authority of its sources. This article has been viewed 1,148,942 times.
If you want to spruce up your PowerPoint presentations, you can add a video to your slides. If you have a video file on your computer, you can easily embed it into your presentation. You can also embed YouTube videos, use looping stock videos, or, on older versions of PowerPoint, link to the videos. This wikiHow will show you how to add a video to Microsoft PowerPoint using your Windows, Mac, or Android device.
The Best Ways to Embed a Video in PowerPoint
- Copy a YouTube URL. In PowerPoint, click "Insert' → "Video" → "Online Videos/Movie". Paste the URL and click "Insert".
- To embed a video file, click "Insert" → "Video" → "This Device" → select a file → "Insert".
- To use a stock video, click "Insert" → "Video" → "Stock Videos" → select a video → "Insert".

- You must have a subscription to use Office 365 . [1] X Trustworthy Source Microsoft Support Technical support and product information from Microsoft. Go to source
- Adding a video to your PowerPoint can help you make a great presentation .

- You can insert a video from supported websites such as: YouTube, SlideShare, Vimeo, Microsoft Stream, and Flip.

- On Mac, this will look like Online Movie .

- You'll see a preview of the video.

- To adjust when the video plays, click the drop-down menu next to Start: . Select In Click Sequence , Automatically , or When Clicked On .
- Check the boxes to apply any of the following: Play Full Screen , Hide While Not Playing , Loop until Stopped , and/or Rewind after Playing .
- Click Volume to adjust the video's volume. Select Low , Medium , High , or Mute .

- Select the web video and click the Video Format tab.
- Click Poster Frame on the left of the toolbar.
- Click Image from File… .
- Select From a File , Stock Images , Online Pictures , or From Icons .
- Select the image source from the chosen method, and then click Insert .

- Stock videos work best as a background graphic to your PowerPoint text, since these videos loop seamlessly

- The stock video will be added to your slide. By default, it will cover the entire slide.

- PowerPoint is available for Android in the Google Play Store .

- The menu will open.

- If you want to take a video using your camera, tap Open Camera instead.
- The video file will be added to your PowerPoint.

- Videos can only be "embedded" (included in the presentation file itself) in PowerPoint 2010 or newer.

- Click the Office button and select "Publish."
- Select "Package for CD" and then select your presentation.
- Ensure that "Linked files" is selected in the "Options" menu.
Community Q&A
Tips from our Readers
- In the newest version of PowerPoint, to embed a YouTube video, all you have to do is go to insert, video, online video and then paste the link for the video.
You Might Also Like

- ↑ https://support.microsoft.com/en-us/office/insert-a-video-from-youtube-or-another-site-8340ec69-4cee-4fe1-ab96-4849154bc6db#OfficeVersion=Windows
- ↑ https://support.microsoft.com/en-us/office/insert-audio-or-video-in-powerpoint-for-android-95e0a2af-35fb-405a-8536-cdcd934f659a
- ↑ https://support.office.com/en-us/article/My-movie-doesn-t-play-190cf574-183d-4b7f-b627-3783a14b7b07?ui=en-US&rs=en-US&ad=US
- ↑ https://support.office.com/en-us/article/Add-and-play-a-movie-in-a-presentation-f3fcbd3e-5f86-4320-8aea-31bff480ed02
About This Article

1. Open the slide. 2. Click Insert . 3. Click Movie . 4. Click Movie from File or Video on my PC . 5. Select the video and click OK . 6. Click Playback . 7. Choose how to play the video. 8. Save your presentation. Did this summary help you? Yes No
- Send fan mail to authors
Reader Success Stories
Rjan Berglund
May 26, 2017
Is this article up to date?

Jun 20, 2017
Nov 7, 2016
Jul 27, 2016

Featured Articles

Trending Articles

Watch Articles

- Terms of Use
- Privacy Policy
- Do Not Sell or Share My Info
- Not Selling Info
Keep up with tech in just 5 minutes a week!
- International
- Education Jobs
- Schools directory
- Resources Education Jobs Schools directory News Search

Computer Integrated Manufacturing Theory
Subject: Design, engineering and technology
Age range: 16+
Resource type: Lesson (complete)
Last updated
17 September 2024
- Share through email
- Share through twitter
- Share through linkedin
- Share through facebook
- Share through pinterest
The Lesson includes objectives, keywords, engaging activities, videos and current real-world examples that students can relate to. Lessons consist of tasks that apply directly to their internal assessment (IA) so that they can practically apply the key theory that they have learned. This best prepares students for both internal and external IB assessments.
↠ Projects work in PowerPoint or Google Slides. This file may be zipped. Once downloaded right-click the file and select ‘extract all’ to open. ↞
✎Please note I am a UK seller and unless otherwise stated the product uses standard English. This should not affect the use of this product in other countries.
♥ After using this product please leave a rating and comment.
♦ If there are any issues with the product please contact me (via the Ask a Question tab) before leaving feedback and I will happily support you with any issues.
Tes paid licence How can I reuse this?
Get this resource as part of a bundle and save up to 11%
A bundle is a package of resources grouped together to teach a particular topic, or a series of lessons, in one place.
Design Technology Theory HL Complete Bundle IB DT
This bundle includes all HL (higher level) content required for the Design Technology IB DP course. In this series of lessons, students gain an understanding of the required topics: **7. UCD** * 7.1 7.2 UCD * 7.3 Strategies for user research * 7.4 Strategies for user centered design (UCD) * 7.5 Beyond usability - designing for pleasure and emotion 8. **Sustainability** * 8.1 Sustainable Development * 8.2 Sustainable Consumption * 8.3 Sustainable Design * 8.4 Sustainable Innovation **9. Innovation and Markets** * 9.1 Corporate Social Responsibility * 9.1 Corporate Strategies * 9.2 Market Sectors and Segments * 9.3a Marketing mix 4P's * 9.3b Place * 9.3c Price * 9.4 Consumer reaction * 9.4 Market research and strategies * 9.5 Branding, Brand Loyalty * 9.6 Packaging and brand identity **10. Commercial Production** * 10.1 Jit and JIC * 10.2 Lean production * 10.3 Computer integrated manufacturing (CIM) * 10.4 Quality management * 10.5 Economic viability Lessons include objectives, keywords, engaging activities, videos and real-world examples that students can relate to. Lessons culminate in a task where students consolidate and apply the key theory that they have learnt so that they are prepared for any IB DP assessments. Lessons cover the entirety of what students need to learn for the topic and can be taught in any order. If you enjoyed this project/scheme of work. Please visit my shop where there is a range of creative and engaging design and engineering projects.
Your rating is required to reflect your happiness.
It's good to leave some feedback.
Something went wrong, please try again later.
This resource hasn't been reviewed yet
To ensure quality for our reviews, only customers who have purchased this resource can review it
Report this resource to let us know if it violates our terms and conditions. Our customer service team will review your report and will be in touch.
Not quite what you were looking for? Search by keyword to find the right resource:
IMAGES
VIDEO
COMMENTS
Create branded video presentations by selecting color palettes, using your brand fonts and adding your logo. Branded templates can be saved for future use to stay on brand. Audio Capabilities. Import any audio files from your computer to your video presentation. PowerPoint doesn't offer an audio library inside the program.
Learn how to publish your own video using Microsoft PowerPoint with narration, annotations, animations, and timings. As full disclosure, I work at Microsoft ...
Go to the "Preview" section to see the final version of your presentation video. Ensure that there are no more changes to be made in there. Once the video is final, export it in your preferred quality. Then, instantly share the video to digital platforms, or download it to your device. Browse Presentation Templates.
Choose which part of your screen you'd like to capture. Click the Record icon to start recording, click it again to stop recording. Click the Pause icon in the side panel while recording to pause or resume recording. Click the Draw icon in the side panel while recording to draw on your recording. 4.
A video presentation is a presentation that can be shared and viewed as a video. Technically, for a presentation to be a video presentation, it must be an MP4 or MOV file type. A video presentation can be shared online on YouTube, Vimeo and other social media platforms. The best part of a video presentation with audio is that you can share it ...
How to Make a Video Presentation. Open a new project with a blank canvas. Choose the size you want your video presentation to be; apply preset aspect ratios 9:16, 4:5, 1:1, and vice versa. Open the "Record" tab in the left-hand side and choose your recording settings to start recording. Or, browse the stock footage library to create a ...
A video presentation is a trending type of eLearning content. Learn to create captivating video presentations in PowerPoint in 5 simple steps. ... In the Publish Presentation window, select the My Computer tab from the menu at the left. Enter the presentation title and select a local folder where the presentation will be saved. Under Output ...
How to create a video presentation. Step 1. Plan and prepare. Proper planning and preparation can help the rest of your presentation creation process run smoothly. Think about what you'll say, and use a storyboard to build out a visual plan of your presentation ideas.
Step 1: From PowerPoint, open the slide with which you want to start your presentation. Step 2: Select Record from the upper right hand corner of the PowerPoint window. Step 3: Make sure your recording and voice settings are set properly, then click the round Record button. Begin your presentation.
Step 3: Configure recording settings. With the Video Recording toolbar, you can set options like Cursor Capture and Effects, System Audio, and Webcam. If your webcam isn't showing, click on the webcam icon. If you have an external webcam, select the one you want to use by clicking the dropdown arrow next to the webcam icon.
How to create an engaging video presentation. Step 1. Create video slides or record your screen and webcam. To import your own presentation videos, photos, and audio, click on the import media button in the your media tab on the toolbar to browse your computer files, or connect your OneDrive.
The slideshow format is the classic presentation option, and the best two apps in this category are Microsoft PowerPoint and Apple Keynote, which is a part of the former Apple iWork suite (the ...
Video Presentation Maker Online. Browse our large collection of presentation toolkits and find the one that perfectly suits your needs. Create animated explainers, whiteboard animations, and corporate videos to meet different business objectives. Share important research information with infographics and other educational videos.
Animaker - The best video presentation software. TechSmith Camtasia - Supports screen recording. Pitch - Beautiful presentation templates. iSpring Suite - For video courses development. Vyond Studio - For DIY animated video presentation with characters. Wideo - The easiest online tool for creating video presentations.
Six steps for creating a slide show. 1. Plan your slide show. Before getting too deep into your slide show project, it's a good idea to select and save the photos and videos you want to use. This helps you create a slide show more efficiently and purposefully, ensuring a better outcome. 4.
Record new layer: Pick this for recording your video as a new layer on top of an existing recording. 2. Click Record at the bottom of the Record panel. 3. Drag over the area of your screen you wish to record. Click Start Recording. Press Space to start recording the full screen. 4. Click Stop to finish recording.
On the PowerPoint window, in the left sidebar, click the slide in which you want to add a video. At the top of the PowerPoint window, click the "Insert" tab. In the "Insert" tab, under the "Media" section (which is to the extreme right side of the interface), click "Video." You'll now see an "Insert Video From" menu.
10) HAVE A POINT - the video will be around for eternity. Most speeches last minutes. Unless someone erases it, your video presentation will last a lifetime, so be sure to have a point to what you're going to say or people will be watching your pointless video for generations to come. Don't ramble. Don't waffle.
Add Transitions: Transitions add dynamism to your presentation. Be mindful not to overuse them, as it can distract your viewers. Record Audio: Record a voiceover narration for your presentation. Make sure the audio quality is clear and audible. Incorporate Video Clips: Add relevant video clips to your presentation.
Marketed as a web-based multimedia presentation tool, it gives you the ability to combine PowerPoint presentations, graphics, PDF files, Prezi presentations, web pages, pictures, videos, and movie ...
Adjust the playback settings. Select the video and click the Playback tab. You'll be able to edit how your video plays on the slide. To adjust when the video plays, click the drop-down menu next to Start:.Select In Click Sequence, Automatically, or When Clicked On.; Check the boxes to apply any of the following: Play Full Screen, Hide While Not Playing, Loop until Stopped, and/or Rewind after ...
Computer Integrated Manufacturing Theory. Subject: Design, engineering and technology. Age range: 16+ Resource type: Lesson (complete) ... The Lesson includes objectives, keywords, engaging activities, videos and current real-world examples that students can relate to. Lessons consist of tasks that apply directly to their internal assessment ...