
How to Make a PowerPoint on Mac? (A Step-by-Step Guide)
If you’ve ever wanted to create a professional-level PowerPoint on your Mac, you’re in luck! In this step-by-step guide, we’ll walk you through the entire process from start to finish.
You’ll learn what Keynote is and how to open it on your Mac, how to create a PowerPoint, customize the slides, add text, images, and media, utilize themes and animations, and finally, save and share your PowerPoint.
By the end of this guide, you’ll be a PowerPoint pro on your Mac!
Table of Contents
Short Answer
Making a PowerPoint on a Mac is easy.
First, open up the Pages application on your Mac.
Then, select the File menu and choose New from Template.
From there, you can select a PowerPoint template and customize it to fit your needs.
When you are finished, you can save your presentation and share it with others.
What is Keynote?
Keynote is a presentation software program developed by Apple Inc.
and is available on all Mac computers.
It is a powerful program that allows users to easily create engaging and professional presentations.
Keynote provides users with a wide range of tools and features, including customizable slides, themes, animations, and more.
With Keynote, users can create stunning presentations in minutes.
It is a great tool for creating presentations for business, education, and personal projects.
Keynote is easy to use and is a great choice for anyone who wants to make a professional-looking PowerPoint on a Mac computer.
How to Open Keynote on Mac
Opening the Keynote app on a Mac computer is quite simple.
To open the app, you can either use the “Finder” app in your Applications folder, or you can use the “Spotlight Search” tool to quickly find the Keynote app.
If you choose to use the Finder, simply open the Finder app and navigate to the Applications folder.
From there, you will find the Keynote app.
You can then double-click on the Keynote icon to open the app.
Alternatively, you can use the Spotlight Search tool to quickly locate the Keynote app.
To do this, click on the magnifying glass icon in the top-right corner of your screen.
You can then type in “Keynote” in the search bar and hit the “Enter” key.
The Keynote app should appear in the search results.
You can then click on the Keynote icon to open the app.
Once the Keynote app is open, you can begin creating your PowerPoint presentation.
You can customize your slides by adding text, images, and other media.
You can further customize your slides by using various themes and animations.
Once you have created your presentation, you can save it as a .pptx file and share it with others.
With the Keynote app, you can easily create a professional-looking PowerPoint on a Mac computer.
Creating a PowerPoint on a Mac
Creating a PowerPoint presentation on a Mac computer is a straightforward process, whether youre creating a presentation for work or school.
The first step is to open the Keynote app on the computer.
Keynote is the presentation software for Mac computers, and it makes creating a presentation simple and easy.
Once you have opened the Keynote app, you can begin customizing your presentation.
You can add text, images, and other media to your slides, as well as utilize various themes and animations to make your presentation look professional and eye-catching.
You can also customize the layout of your slides, allowing you to add different elements and adjust their placement.
When your presentation is complete, you can save it as a .pptx file and share it with your colleagues, classmates, or anyone else who needs to view it.
You can also export your presentation as a PDF, a movie file, an HTML file, or a JPG file, depending on your needs.
With the Keynote app, creating a professional-looking PowerPoint on a Mac computer is easy and stress-free.
All you need to do is open the app, customize your slides, and then save your presentation in the desired format.
Whether youre creating a presentation for work or school, the Keynote app will help you get the job done quickly and efficiently.
Customizing the Slides
Customizing the slides is an important part of creating a stunning PowerPoint presentation on a Mac.
The Keynote app provides a variety of tools and features to help you design your slides.
You can easily add text, images, and other media to customize your slides.
To add text to your slides, simply select the text box and type in your desired text.
To add images, you can either drag and drop them into the slide or use the Insert Image button.
You can also insert shapes, charts, and other media to customize your slides.
Additionally, Keynote offers a range of themes and animations to help you further customize your presentation.
Themes allow you to quickly change the overall look and feel of your slides.
Animations can be used to add a touch of flair to your slides, such as transitions between slides and animated text.
To access the themes and animations, simply click on the Themes or Animations tabs in the upper right-hand corner of the app.
By taking advantage of the Keynote apps customization features, you can easily create a professional-looking PowerPoint on a Mac computer.
With just a few clicks, you can customize your slides and make them look stunning.
So, if youre looking to create an impressive presentation, the Keynote app is the perfect tool for the job.
Adding Text, Images, and Media
When it comes to creating a professional-looking PowerPoint on a Mac computer, adding text, images, and other media is key.
With the Keynote app, you can easily customize your slides by adding text, images, and other media elements.
To add text, select the text box icon from the top menu, and then type in the text you want to include in the text box.
You can also adjust the font type, font size, font color, and other text properties.
Once you have finished editing the text, click the Done button to save your changes.
To add images, click the Add Image icon from the top menu, and then select an image from your computer, or add an image from the web.
You can also adjust the size, position, and transparency of the image to make it look more professional.
Finally, you can add other media elements such as audio and video to your slides.
To do this, click the Add Audio or Add Video icon from the top menu, and then select the audio or video file you want to include.
You can also adjust the size, position, and playback settings of the media element to make it look more professional.
By using these methods, you can easily add text, images, and other media elements to your PowerPoint slides on a Mac computer.
Once you have added all the elements, you can save your presentation as a .pptx file and share it with others.
Utilizing Themes and Animations
Creating a PowerPoint presentation on a Mac computer is made easier with the help of the Keynote app.
Not only can you easily create a professional-looking presentation, but you can also customize your slides with various themes and animations.
With the help of themes and animations, you can create a presentation that is visually appealing and engaging.
When creating a presentation, you can choose from a wide variety of themes and animations.
You can choose from a variety of colors, fonts, and designs to give your presentation a unique look.
You can also choose from several animation styles to give your presentation a more dynamic feel.
For example, you can choose to have your slides transition in with a fade or a slide, or you can animate specific objects within your slides.
Themes and animations can also help to emphasize certain points in your presentation.
For instance, you can use animations to draw attention to a particular slide or element in your presentation.
Additionally, you can use themes to create a professional and consistent look throughout your presentation.
Creating a presentation with themes and animations is easy.
In the Keynote app, simply select the themes tab to access the available themes and animations.
From there, you can customize your slides with the desired theme and animations.
You can also preview your slides and animations before you save them.
Creating a professional-looking and engaging presentation on a Mac computer is easy with the help of the Keynote app.
With the help of themes and animations, you can create a presentation that is visually appealing and will help to emphasize certain points you want to make.
With a few clicks, you can quickly create a presentation that will be sure to impress.
Saving and Sharing Your PowerPoint
Once you have finished creating your PowerPoint presentation, you can save it as a .pptx file and share it with others.
To save your PowerPoint, click the File menu at the top of the Keynote window and then click Save.
You will be given the option to save your file to your Macs hard drive or to the cloud.
If you wish to share your presentation with others, you can do so by exporting it as a PDF file or by sharing it directly with other users.
To export your presentation to a PDF file, click the File menu and then select Export.
You will be given the option to export your PowerPoint as a PDF file.
If you would like to share your presentation directly with other users, you can do so by clicking the Share menu at the top of the Keynote window and selecting Share with Others.
Here, you can enter the email addresses of the people you would like to share your presentation with.
You can also set a password for your shared presentation if you wish.
Once you have saved and/or shared your presentation, you can open it up again at any time by double-clicking on the .pptx file.
This will open up the presentation in the Keynote app and you can make any changes that you wish.
With the Keynote app, creating a professional-looking PowerPoint on a Mac computer is easy and convenient.
The steps outlined above will help you create a great presentation and save/share it with others in no time.
Final Thoughts
Creating a professional-looking PowerPoint on a Mac computer doesn’t have to be difficult.
With the help of the Keynote app, you can easily create slides with text, images, and other media, and customize your slides with themes and animations.
Now that you know how to make a PowerPoint on Mac, you’re ready to create your own presentations and share them with others.
So get to it and start making your own PowerPoint today!
James Wilson
James Wilson has extensive knowledge in the information technology industry.His second love, besides dealing with computers, is smart home technology. He is continually updating information to better comprehend this problem and has a deep understanding of the apartment’s support system.
Recent Posts
Is Airtable a Public Company? Unveiling the Truth
No, Airtable is not a public company. As of now, Airtable is a private company that has raised funds from various investors but has not gone through an initial public offering (IPO) to be listed on...
How to Make Money with Airtable: Top Strategies and Success Stories
To make money with Airtable, you can offer consulting services to businesses looking to optimize their workflows through the platform. You can also create and sell templates or automation scripts...
Microsoft PowerPoint 4+
Create impactful presentations, microsoft corporation.
- 4.7 • 396.6K Ratings
- Offers In-App Purchases
Screenshots
Description.
This application requires a qualifying Microsoft 365 subscription. Microsoft 365 includes premium Word, Excel, and PowerPoint apps, 1 TB cloud storage in OneDrive, advanced security, and more, all in one convenient subscription. With Microsoft 365, you get features as soon as they are released ensuring you’re always working with the latest. Create, edit, collaborate, and share presentations using PowerPoint for Mac. Now it’s easier than ever to create, edit, and share presentations seamlessly across your devices and with others. Share your files and collaborate in real time within a document or edit Office docs attached to emails. Get smart assistance features as soon as they are released in Word, Excel, and PowerPoint so you’re always working with the latest. Whether you need to show off your school project, business plan, or family vacation photos, PowerPoint is your go-to app for presentations. Kickstart your creativity • Achieve more and enhance your documents with access to a growing catalog of premium templates for Word, Excel, and PowerPoint. • Advanced formatting and layout options produce beautifully pristine documents on any device including laptops, iPads, and iPhones. Present with confidence • Get your ideas across with beautiful design, rich animation, cinematic motion, 3D models, and icons. • Save documents right to Microsoft OneDrive or another cloud provider to access them on any device and at any time you have internet access. • Dark Mode allows you to focus on creating presentations in low-light environments. Accomplish more together • Whether it’s a school project, sales pitch, or family slideshow, seamlessly work with others with real-time co-authoring to bring your ideas and plans together faster. • Share your documents with the click of a button to invite others to edit in real time. Easily manage permissions and see who’s currently working in a document. • Add comments or assign tasks to people in your group for clean editing and organization. Learn more about Microsoft 365 Microsoft 365 is a cloud-based subscription service that brings together premium versions of Word, Excel, PowerPoint, Outlook and OneDrive, with the best tools for the way people work today. Please visit: http://go.microsoft.com/fwlink/?linkid=2015120 for information on Licensing Terms. Unlock the full Microsoft Office experience with a qualifying Microsoft 365 subscription for your phone, tablet, PC, and Mac. Microsoft 365 annual subscriptions purchased from the app will be charged to your App Store account and will automatically renew within 24 hours prior to the end of the current subscription period unless auto-renewal is disabled beforehand. You can manage your subscriptions in your App Store account settings. This app is provided by either Microsoft or a third-party app publisher and is subject to a separate privacy statement and terms and conditions. Data provided through the use of this store and this app may be accessible to Microsoft or the third-party app publisher, as applicable, and transferred to, stored, and processed in the United States or any other country where Microsoft or the app publisher and their affiliates or service providers maintain facilities. Please refer to the Microsoft Software License Terms for Microsoft Office. See “License Agreement” link under Information. By installing the app, you agree to these terms and conditions.
Version 16.85
• Bug fixes
Ratings and Reviews
396.6K Ratings
Canvas Rearranges Design Elements when Uploading
If you are a college student and you create a PPT on Mac and you save and then upload itt as an assignment on Canvas, a lot tof tthe design elements get moved around and it makes a mess of the presentaion. pics and texts boxes are no longer where you placed hem, so your design looks bad. What I have to do no is export the presentation to a PDF an dupload that as the assignment, and then email the instructor to tell them that Canvas is wrecking my presentaion so I sent a pdf instead. My college moved from Moodle to Canvas last year and I have had this trouble ever since. When the PPT presentation is saved as a PDF, you lose all the extras you added like voice narration and sound effects, music, notes, etc.
You're getting better but the product still has many frustrating parts. For instance the open folder is now gone on this version and on other versions I use with different customers, it's there and useful. The library of icons and art that you can use is also lacking. Why don't you allow all the types of icons that Visio uses? It would make it usable. Also, the section part is great but it's clumbsy and when you open you always have to collapse. Why can't you select a flag that lets you open collapsed. that would make the tool much more usable. Integration with teams is still terrible and with email if the product is open, you can't send the file. Why? just version it and send. Theres' much more but it's useful but not a product that has the power of things like Lucid, or visio, but it could be much more usable, so you get a three for teasing me with function and ideas, then falling short when I try to use it my way as the main unit. It's keeping this type of work, design and developent documentation, a dark art...who knows maybe AI might help you.
Printing Slides is a Joke
To my knowledge, this is mainly an issue with PowerPoint for Mac as my colleagues who use PCs don't have this issue. When you go to print the slides, they look fine if there are multiple on a page or if you print the notes version, but if you try to print 1 slide per page the images blur when printing! And not just a little fuzzy, they turn out with lines going through them and just look like they never completed loading. This also happens when exporting to a PDF. The PDF looks fine on the screen, and then as soon as you go to print it, a random image will blur out like that. Is it the same image everytime? NOPE! It picks and chooses which image it wants to blur out each time it prints. There is no rhyme or reason to this issue. I exported to PDF, Exported each slide to jpeg, even took screen shots as a last resort and had to just deal with the fact that the color was completely different on the printed screen shot slides. This has been an issue for MONTHS and is all over every forum - the fact that this hasn't been addressed by the MS team is unacceptable! If I'm printing client copies of proposal presentations it shouldn't take me all day due to troubleshooting!
App Privacy
The developer, Microsoft Corporation , indicated that the app’s privacy practices may include handling of data as described below. For more information, see the developer’s privacy policy .
Data Linked to You
The following data may be collected and linked to your identity:
- Contact Info
- User Content
- Identifiers
- Diagnostics
Privacy practices may vary, for example, based on the features you use or your age. Learn More
Information
English, Arabic, Czech, Danish, Dutch, Finnish, French, German, Greek, Hebrew, Hungarian, Indonesian, Italian, Japanese, Korean, Norwegian Bokmål, Polish, Portuguese, Russian, Simplified Chinese, Slovak, Spanish, Swedish, Thai, Traditional Chinese, Turkish
- Microsoft 365 Personal $69.99
- Microsoft 365 Personal Monthly $6.99
- Microsoft 365 Family $99.99
- Microsoft 365 Family $9.99
- Microsoft Copilot Pro $20.00
- Microsoft 365 Personal $119.99
- Developer Website
- App Support
- Privacy Policy
Featured In
More by this developer.
Microsoft Outlook
Microsoft Teams
Microsoft Authenticator
Microsoft Word
Microsoft Excel
PowerPoint for Mac: Best tips for a successful presentation
- 0 Shares Share

The maxim of “Death by PowerPoint” does not fit in today’s tech-savvy era. Numerous startups and corporates pitch their ideas to their clients through presentations every day. They leverage stunning templates to design them and sweep their stakeholders off their feet. Slideshows hold an enormous audio-visual appeal that helps you to hook your audience throughout.
Whether it is Keynote or PowerPoint, showcasing a slideshow on your Mac must appear seamless. Be it slide layout, design, visuals, or overall aesthetics, a collection of well-thought, pixel-perfect slides is the key to presentation success. So, how to craft splendid and eye-catching Mac presentations? This article will enlighten you perfectly. Let us begin!
Here are seven best tips for creating successful and compelling presentations on your Mac:
Minimalistic slides
Gone are the times when people assumed that designing a ppt meant overloading it with information. You’ll be doing your audience a huge favor if you opt for minimalism in your slide content. Often presenters overload the slides unnecessarily and thus, end up overwhelming the audience. Embed your decks with one topic per slide. Ensure that you build your pitch decks with less text and more graphics. Keeping the slide content simple and precise will bestow your MAC slideshow with a decluttered look. It will help you to further your brand aesthetics as well.
You may consider following the famous 10-20-30 rule of PowerPoint presentations. The rule states that your presentation should be no longer than ten slides. It must not take beyond 20 minutes to deliver the entire presentation. And at last, the slides should feature a font size of at least 30 px. The revolutionary 10-20-30 rule helps you keep your slides minimalistic, deliver a captivating presentation and engage with the audience like never before.
Engaging multimedia
Humans have a limited attention span. Keeping this in mind, you must always integrate enchanting visuals to liven up your presentation. Employ vector images, 1080p videos, infographics, and GIFs to render the slides attractive. The truth is, no one likes to read raw data right off the slides! As a presenter, you should consider transforming raw data into engaging visuals that bind the interest of the audience to the presentation.
The incorporation of audio and other media forms assists you with a seamless slideshow. You can infuse your slides with visuals corresponding to your presentation topic. It will work as a double-edged sword. First, it will garner your slides appealing. Second, it will reinforce the textual content in your audience’s minds as well. Hence, slides without dedicated multimedia contribute to the phenomenon ‘Death By PowerPoint’.
Top-notch templates
Breaking the monotony of stock templates in your Mac is essential to stay a step ahead of your competitors. Utilizing age-old templates will not impress your clients as effectively as you desire. There is a high chance that your audience is already familiar with the stock template from some other presentation. Hence, the wow factor goes for a toss!
Well, you can leverage ready-to-use PowerPoint templates from SlideModel that offer 100% customization, superior graphics, and pixel-perfect design. Users can utilize the avant-garde slide templates to boost their presentation goals. The goal here is to woo the audience with your presentations’ design! Gorgeous graphics and tailor-made slide content will save your precious time from making a presentation from scratch. This business Pitch Deck PowerPoint Template is a boon for all entrepreneurs to construct wow-worthy pitches.
Elegant color-palette
An excellent way to highlight the key points of your Mac slideshow is to create a color contrast on the slides. You can design your slides in relevance to your brand colors or choose a vibrant color scheme. A golden tip here is to blend your presentation with high-contrast colors. It will aid you and your audience in capturing the slide essence. Place the dark-toned text with a light-toned background and light-colored slide content on a dark background. It will bring out the effect of aesthetic contrast.
A great tip here is embedding your presentation with your brand colors for making it impressive beyond measure. Choose only two to three colors throughout to maintain an equilibrium. One should try not to use all the contrast colors to attract the audience. Design consistency in your slides is a key to presentation success. Rather than overwhelming the audience with different high-contrast, mismatching colors, try to include a couple of color schemes and palettes across your presentation.
Captivating data visuals
Whether you’re presenting to an assembly of investors, pitching to a client, or presenting a company’s quarterly results, always back your data with rich visuals. Rather than reading random numbers from the slides, you should introduce a wow factor to your slides by leveraging state-of-the-art data visualizations. Render your PowerPoint presentations on Mac an awe-inspiring look with data visuals such as 3D charts, diagrams, infographics & graphs.
Display your research and statistics with mind-blowing data visuals. Employ alluring charts, tables, diagrams, trend lines, shapes, and infographics. You can color-code them to show comparisons and differences. Choose data visuals for bullets to leave an indelible mark on your audience. Projecting data with these tools helps your clients to retain information and comprehend it as well. SlideModel offers innumerable templates with exemplary data visuals for influencing the audience.

Hierarchical structure
Many people do not know the fact that information displayed first captures the attention of your audience before others. Thus, visual hierarchy is a way to organize your slide content based on its importance. Every presentation is intended to initiate a call-to-action amidst the audience. Presenters can reinforce the critical subject content through rich hierarchical structures. Prioritize placing the slide content in a manner that you want your clients to see initially.
Recognize the slide elements in the order of their significance and place them accordingly. Use good contrast placements, bolder texts, and large visuals. This way, your stakeholders will view your highlighted information first and then move to the other content. Hence, with your presentations, be it remote or in-person, you can encourage your audience to close the deal with you rather than missing the opportunity.
Master the typography
Every slideshow looks tidy when crafted with good typography. Apply corporate-grade typography fonts such as Helvetica instead of unprofessional or artistic Comic Sans. It assists in keeping easy readability for your slide content, plus helps in boosting the integrity of the content. Remember to place the size of your fonts as 30 px or more for your audience in the back as well. You won’t want your audience to squint their eyes while seeing your ppt.
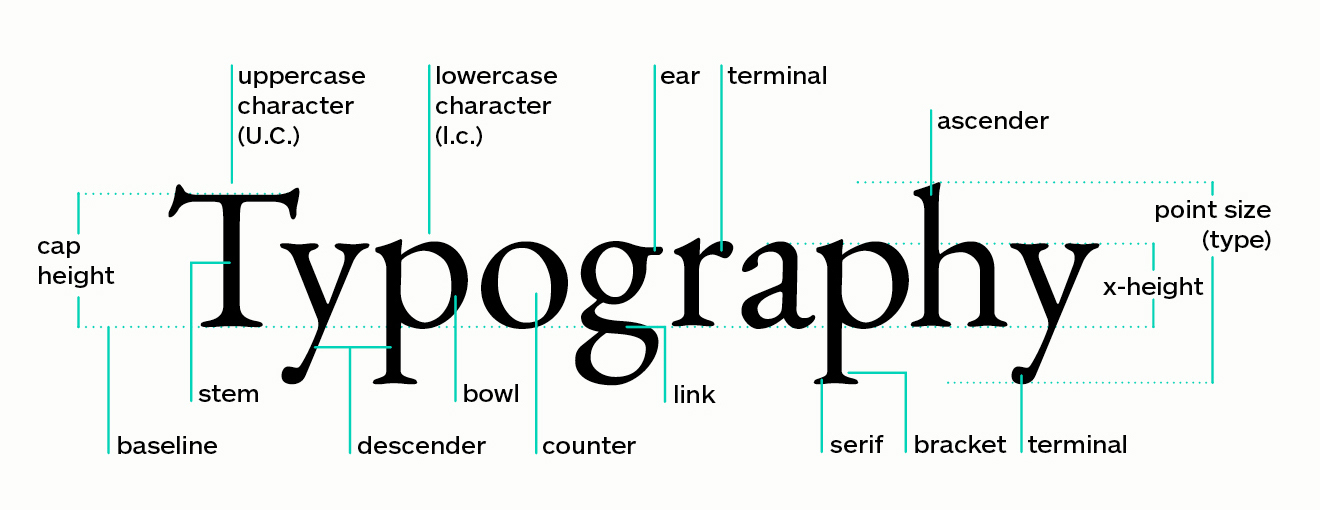
As a presenter, you should always take care of the content length. One should avoid typing hefty paragraphs. Instead, go for one-liners and bullets. You may use six bullet points in each slide. Another great tip is to position the title of your slide to a slightly bigger font than the text. While presenting, you can further elongate the one-liners and help your audience understand the crux of the subject matter without throwing them off the track.
Mac PowerPoint presentations having a beautiful style can result in having a colossal effect on your audience. A well-crafted PowerPoint presentation can be a deciding factor between a closed deal and a missed opportunity.
Keep these seven enlightening and professional tips in your mind before structuring your next ideal presentation. Integrate a pinch of style, creativity, and vigor in your slide deck to create modernistic slides. The key is to attract your audience with minimalistic, yet engaging slide content.

News content on AppleMagazine.com is produced by our editorial team and complements more in-depth editorials which you’ll find as part of our weekly publication. AppleMagazine.com provides a comprehensive daily reading experience, offering a wide view of the consumer technology landscape to ensure you're always in the know. Check back every weekday for more.
Editorial Team | Masthead – AppleMagazine Digital Publication
- @http://twitter.com/applemagazine
- Follow me on Facebook
- Send me an email!
Related Stories
Can apple become a console gaming giant, apple rolls out new features for iwork suite across mac, ipad, and iphone, the lowdown on applecare+ (is it worth buying), demystifying apple pay: your ultimate guide, security features that keep your apple devices safe, apple set to discontinue ‘my photo stream’ service in july 2023, end of an era: apple infinite loop store shuts down, apple unveils ‘vision pro’ headset & visionos, why apple devices are better for media production, apple showcases ‘scary fast’ event filming techniques with iphone 15 pro max, you may also like.

How Businesses of All Sizes Can Benefit from Embedded Payments

What is Apple’s AI Future?

How Tech Innovations Are Transforming Data Center Monitoring Systems

How Tech Innovations Are Reshaping Investment Management Strategies

6 Pieces of Equipment Every Construction Operation Should Have

5 Tips to Help MacBooks Last Longer
- I Tried Both: Apple Watch 9 vs Fitbit Charge 6
- Best Places to Print Photos Online
How to Get PowerPoint on a Mac
Get the widely used presentation tool
:max_bytes(150000):strip_icc():format(webp)/SamCostello-d7fcf106ec2048ccb06d1e2190b3396d.jpg "how to make power point presentation in macbook")
- Ithaca College
:max_bytes(150000):strip_icc():format(webp)/ryanperiansquare-de5f69cde760457facb17deac949263e-180a645bf10845498a859fbbcda36d46.jpg "how to make power point presentation in macbook")
- Western Governors University
What to Know
- From the Mac App Store: Apple Menu > App Store > search for PowerPoint > Get > Install > enter Apple ID if prompted > Open .
- PowerPoint requires a subscription from Microsoft. You can sign up via In-App Purchase or at the Microsoft website.
- Keynote, Apple's alternative to PowerPoint, comes pre-installed on new Macs (and can be downloaded from the Mac App Store).
This article explains how to get PowerPoint on Mac, its requirements—including a subscription—and some free alternatives available on the Mac.
How Do I Get PowerPoint on Mac?
Getting PowerPoint on your Mac is very easy. Just a few clicks, and you'll be ready to start making slides and building presentations. Here's what to do:
Open the Mac App Store by going to the Apple menu > App Store or the Applications folder > App Store .
You can also download PowerPoint directly from Microsoft , but these instructions focus on the Mac App Store.
Search for PowerPoint .
On the search results screen, click Get .
Click Install .
Enter your Apple ID password when prompted.
When the download is finished, click Open to launch PowerPoint.
Once you've opened PowerPoint, you'll need to sign into your Microsoft account or use a free trial.
Is PowerPoint Free for the Mac?
PowerPoint is not free on the Mac (or on Windows, for that matter). Microsoft offers a free, 30-day trial after you download PowerPoint. Once the free trial expires, you need to pay to keep using the app. Options include a one-time purchase price or a monthly or annual subscription , which provides cloud storage features and ongoing technical support. You can subscribe through Microsoft's website or use in-app purchases via your Apple ID.
Do Macs Come With PowerPoint?
No. To get PowerPoint on your Mac, you need to download and install it using the steps from the first section of this article (or, as noted before, directly from Microsoft).
What Is the Mac Version of PowerPoint?
While PowerPoint may be the most well-known program for making slides and creating presentations, it's far from the only one. Your Mac probably came with one of the alternatives pre-installed.
Apple makes a program called Keynote which is a direct competitor to PowerPoint. It offers all of the core features of PowerPoint—creating slides and presentations, animations, templates, presenter mode, etc. It integrates tightly with Apple's other software and services like iCloud.
Keynote comes pre-installed for free on all modern Macs. It's likely in your Applications folder as you read this. If it's not, and if your Mac and version of the macOS are compatible with it, you can download it for free from the Mac App Store by searching for "Keynote."
Need to make slides and want to avoid both PowerPoint and Keynote? There are many other PowerPoint alternatives , but one place to start is Google Slides , which is free, web-based, and integrates with your Google account and other Google productivity tools.
To print PowerPoint slides with Notes on a Mac, open your presentation and select Print . In the Print dialog box, select Show Details . In the Layout box, select Notes . Configure the rest of your printing options and select Print .
The easiest way to record a voiceover in PowerPoint on a Mac is to record by slide. Select the slide where you want to add the narration, then select Insert from the menu bar and click Audio > Record Audio . Enter a name for the narration, select Record , read your script, and select Stop when you're finished recording.
To convert PowerPoint to video on a Mac, open the presentation you want to save and select File > Export . In the export window, next to File Format , select a file format option, such as MP4 or MOV . Choose your video quality, choose whether you want to include narrations, adjust timing, and select Export .
Get the Latest Tech News Delivered Every Day
- How to Use Copilot in Powerpoint
- How to Use Microsoft's Free PowerPoint Viewers
- The Best Free Productivity Apps for the iPad
- 4 Ways of Transferring Files From Android to Mac
- How to Install Mac OS on PC
- The 10 Best Word Processing Apps for iPad in 2024
- How to Use WhatsApp on a Mac
- What Is Microsoft PowerPoint and How Do I Use It?
- The 20 Best Mac Apps of 2024
- How to Fix 'Cannot Be Opened Because the Developer Cannot be Verified' Error on Mac
- How to Transfer Files Between an iPhone and a Mac
- How to Convert PowerPoint to Video
- How to Update PowerPoint on Windows and Mac
- What Is an Animation in Presentation Software?
- What Is Microsoft Word for Mac?
- How to Make a Poster in PowerPoint

Powerpoint and Macbooks: How to use mirrored Presenter View in a 3 screen setup
Mac + Powerpoint
Using Powerpoint Presenter View for speakers on Corporate Events
When a presenter shows their Powerpoint-presentation from a stage or a studio, they usually want to see the presenter-view while they are talking. Here they can see their slides and presenter-notes.

The presenter-view in Powerpoint for mac.
In corporate events, there are two ways to play the presentation. For smaller events, the presenter can bring their own laptop to the stage and use this to play the presentation. By plugging the laptop straight to the projector, the presenter can see the presenter-view on the internal display, and the actual presentation is shown on the external display.
But for bigger events, the A/V team wants more control of the presentation-computer, so the presentation needs to be played from a computer placed at the Front of House. From there it can feed the projector, the streaming-device, and send the presenter-view to a separate monitor on the stage.
In order to display Presenter View on a separate display using laptops, you normally want to mirror your internal display with the stage monitor. Then both monitors will show the presenter view, and the external display will show the full presentation.

Screen setup when using a laptop placed at FOH to play the presentation. The laptop-display is mirrored with a monitor on the stage, and the projector shows the full presentation
MacBook screen setup for mirrored display
With Macs you can set up the screen-configuration from the Displays settings in System Preferences. (Example below is from Mac OS Ventura)

One of the external displays can mirror the main display.

When you go to “arrange”, the stacked images shows which screens are mirrored.
In Powerpoint, make sure that presenter-view is enabled from the settings. Go to Slide Show from the preferences in the top menu bar.

Go to “Set up slide show” from the Slide Show tab above the edit-window. Select Monitor 2 or Auto as the Slide Show monitor.

You would assume that this would be enough to ensure that the presenter-screen is mirrored and the presentation shown on the external display. But, to our surprise, when we play the presentation, the presenter-view is no longer mirrored on the stage-monitor. Instead, only the desktop is shown:

In PC this works seamlessly. So why doesn’t it work in Mac? And can we solve it? Yes! After years of grey hair and frustration, I think I have finally found a way around this issue:
How to solve the problem – what works for me
- Identify what Powerpoint means by Monitor 2
First you must stop all mirroring on your MacBook. Have your internal display set up as the Main display, and the two connected displays as extended. You will then have 3 separate displays in the display settings

Now go to Powerpoint. In the Slide Show settings, go to Set up slide show. Set the Monitor to Monitor 2, or Automatic. (same as earlier before)
Then play the presentation, and take note of what is the screen where the presentation is displayed. In this example, Monitor 2 from Powerpoint is the stage monitor. This won’t work. (see next step)

2. Make sure that Monitor 2 in Powerpoint is routed to the display where you want to show the presentation
From step 1: If Monitor 2 is the display used to show the presentation to the audience, then you can proceed to step 3. If Monitor 2 is the stage-monitor that you want for presenter-view, then you need to swap the routing of two hdmi-outputs from your Macbook . If you send the hdmi-cables through a hardware switcher, then you can do this internally in the switcher. This would be my preferred way of action as it doesn’t involve any physical unplugging and patching. Also, the Macbook wouldn’t be aware of these changes, so you won’t change any internal mac-settings.

Routing the HDMI-outputs from the Macbook throug video switcher. Pictured is Roland v-1hd

After swapping HDMI cables from the MacBook, we change what is defined as Monitor 2 in Powerpoint
3. Turn on Mirrored screen
Now you can turn the mirror back on, with the stage monitor mirroring the internal display on the mac

We have identified that DAC70 is the stage-monitor, and we set that as mirrored display.
4. Check that the Monitor in Powerpoint is set to Automatic or Monitor 2

Now you are good to go: If you play the presentation, you will get the configuration with presenter view on the stage-monitor

Hurra, it finally works!
Equipment used for testing
To reach the conlusions above, I have tested with these Macs: – 15″ Macbook Pro 2015 – 14″ Macbook Pro 2021 – 15″ MacBook Pro 2018. OS: Monterey. Powerpoint-version: 16
Using this method with APS
Auto Presentation Switcher , gives you more ways to open, display and switch presentations. When opening presentations on Mac with APS, the monitor where the presentation is shown is taken from the Powerpoint settings. So you don’t need any additional preparation to use this method with APS.
Update 5. October 2022:
Since I wrote this text I have used the 3-screen Powerpoint Mac setup on several events. It hasn’t failed me so far. I feel more confident now than before that this article describes how you can use the 3 screen setup with Powerpoint for Mac. However, there is no guarantee that this solution will work for every Mac that has 3 screen outputs. It would be very interesting if more people could test this method, and share how it works for them.
Written by Morten Brekke Stensland
Subscribe to our Newsletter
Be the first to know about the latest news from PresentationTools
Contact & Follow
Company Invoicing
© PresentationTools A/S 2024
Presentations that stand out. Beautifully.
With its powerful tools and dazzling effects, Keynote makes it easy to create stunning and memorable presentations, and comes included with most Apple devices. Use Apple Pencil on your iPad to create diagrams or illustrations that bring your slides to life. And with real‑time collaboration, your team can work together, whether they’re on Mac, iPad, iPhone, or a PC.
See what’s new in Keynote
Present your story. Your way.
Keynote sets the stage for an impressive presentation. A simple, intuitive interface puts important tools front and center, so everyone on your team can easily add beautiful charts, edit photos, and incorporate cinematic effects. And Rehearse Mode lets you practice on the go, with the current or next slide, notes, and clock — all in one view.
Start with a gorgeous layout.
Choose from over 40 eye‑catching themes that instantly give your presentation a professional look. Or create your own slide designs, background images, and page‑by‑page customization.
Create next-level animations.
Add drama to your presentation with more than 100 cinematic transitions and effects. Make your words pop by adding textures, color gradients, and even photos — with just a tap. And animate objects along a path using Apple Pencil or your finger on your iPhone or iPad.
Make every slide spectacular.
Add subtle movement to your slides with dynamic backgrounds. Illustrate your point with over 700 Apple-designed shapes, or add photos, videos, music, image galleries, and charts. Easily remove backgrounds from supported images and live videos or manually refine adjustments as needed. You can even use your iPhone to take a photo or scan a document, and Continuity Camera can send it straight to Keynote on your Mac.
What’s new in Keynote.
Learn about everything you can do in Keynote
Get the updates. Then get in touch.
Stay up to date when people join, edit, or comment in collaborative presentations and easily get in touch with your team using Messages and FaceTime.
Get more done on iPad.
Quickly insert objects, find settings, and get to your favorite tools with the customizable toolbar. And Stage Manager makes it easy to multitask across multiple presentations and apps at the same time. 1
Make backgrounds disappear.
Now you can more easily remove backgrounds from supported images — and even live videos — or adjust them to your liking.
Add live video feeds to any slide.
Appear in a window, right on your slides, with a picture-in-picture display during remote presentations. Or include a live feed of your iPhone or iPad screen to show off apps.
Get started with dynamic themes.
Start with one of three beautiful new animated themes, then customize it to set the tone for each slide with 18 adjustable background presets — from understated to highly visual, monochrome to colorful, calm to energetic.
Captivate your audience with dynamic backgrounds.
Make your presentation stand out by adding stunning color and visual interest to your slides. Create motion on a title or closing slide for a bold statement, and keep viewers engaged with subtle movement throughout the presentation.
Present with your team. Seamlessly.
For slideshows with multiple presenters, you can take turns controlling a single deck — from anywhere — on Mac, iPad, and iPhone.
Play YouTube and Vimeo videos right in Keynote.
Embed a video from YouTube or Vimeo, then play it right in your presentations, without the need to download or open the video in a media player. 2
Present over video conference. Like a pro.
Play a slideshow in its own window so you can access other apps while you present. You can view your presenter notes, upcoming slides, and navigation in a separate window as well.
Outline your presentation. Easier.
With outline view for iPhone and iPad, quickly jot down your thoughts, restructure ideas, and move concepts from slide to slide. Then switch to slide view and start designing.
Present like never before. From anywhere.
With Keynote, presenting remotely can be just as seamless as presenting in person. Say goodbye to saying “Next slide, please” — now multiple people can present together, even remotely, with each person taking control of their section of the deck. Add a live video feed of yourself to any slide for a picture-in-picture experience. Or when presenting on your Mac, include a live feed of your iPhone or iPad screen to walk through your apps. You can even play a slideshow in its own window, so you can simultaneously access your notes and other apps.
Any presentation. Any device. Anytime.
You don’t work in one place on just one device. The same goes for Keynote. Work seamlessly across all your Apple devices. The slides you create using a Mac or iPad will look the same on an iPhone or web browser — and vice versa.
You can also work on presentations stored on iCloud or Box using a PC.
Start using Keynote at iCloud.com
Create and present together. Even when apart.
Work together in the same presentation, from across town or across the world. You can see your team’s edits as they make them — and they can watch as you make yours, too. You can even get notifications when people join, edit, or comment. When presenting as a team, you can also take turns controlling a single deck from anywhere.
Use Apple Pencil when inspiration strikes.
Add color, illustrations, and handwritten comments for more beautiful presentations with Apple Pencil on your iPad.
Plays well with Office.
Teaming up with someone who uses Microsoft PowerPoint? Keynote makes it a great working relationship. You can save Keynote presentations as PowerPoint files. Or import and edit PowerPoint presentations right in Keynote.
Learn more about Microsoft PowerPoint compatibility
See everything that’s new in Keynote
- What’s new in Keynote for iPhone and iPad
- What’s new in Keynote for Mac
- Keynote for iCloud release notes
Additional Resources
- Get Keynote support
- Learn about Microsoft Office compatibility
- Learn about collaboration for Pages, Numbers, and Keynote
- Use Keynote in a video conference app
Keynote User Guides
- Keynote User Guide for Mac
- Keynote User Guide for iPad
- Keynote User Guide for iPhone
- Keynote User Guide for Web
Build spreadsheets that are bottom-line brilliant.
Create documents that are, in a word, beautiful.
How to share your Microsoft PowerPoint presentation on a Mac, PC, or web browser
- It's easy to share a PowerPoint presentation on your Mac or PC app.
- You can also share a presentation if you use the online version of PowerPoint.
- Sharing a presentation can help you collaborate with friends or coworkers.
- Visit Business Insider's Tech Reference library for more stories .
When creating Microsoft PowerPoint presentations for work or school, it's often necessary to collaborate with others on your projects.
Thankfully, it's easy to share a PowerPoint presentation no matter what version you use. The process looks fairly similar on both Mac and PC programs, as well as on the online version that can be accessed from any web browser. The online option is helpful if you don't have the Microsoft Office program downloaded to your desktop.
For all of these options, you can add a collaborator (which operates similarly to sharing Google Slides ) or opt to send your file as a presentation or PDF via email. There are also alternative methods, such as sending via social media.
Here's how to share a presentation.
Check out the products mentioned in this article:
Apple macbook pro (from $1,299.00 at apple), acer chromebook 15 (from $179.99 at walmart), microsoft office (from $149.99 at best buy), samsung chromebook (from $269.00 at amazon), how to share a powerpoint presentation on a pc.
Sharing a presentation on the PC version of PowerPoint should look similar on most computer types. The following steps and accompanying photos detail the process on a Samsung Chromebook.
1. Open the PowerPoint presentation you wish to share on your PC.
2. Click the "Share" symbol in the upper right hand corner of the screen. This should give you the option to share either the full document or just the current slide.
- If you prefer to add a collaborator instead (similar to Google Slides functions), you will need to click the orange button to save a copy of the file to your OneDrive.
3. Choose how you'd like to share the document or slide as an attachment. You can choose to send an email via Outlook or as a message via Zoom, for example.
Additionally, when you first launch the program, you can also find a "Share" tab on the left hand side. This will provide you with the same options for sharing a file.
How to share a PowerPoint Presentation on a Mac
1. Open the PowerPoint presentation on your Mac desktop or laptop.
2. Click the "File" tab in the top left corner.
3. Select "Share" from the dropdown menu. This will grant you the option to either send or copy a link to share, send the file as a presentation or PDF, or manage access to a shared file. Select whichever option you'd like and follow the directions to add contact information.
- If you wish to manage access and add collaborators, you will have to make sure the file has been uploaded to your OneDrive before proceeding. (If it hasn't, PowerPoint should prompt you to do so at this time.)
4. Sending the file as an email is the most common choice. Selecting this option will automatically open a new draft with the file attached. (Be sure to select "Send PDF" if you'd prefer it to send as a PDF file instead of as a presentation.) Add an address, subject, and body text before sending.
You can also share a presentation by clicking the "Share" button in the upper right hand corner. (This is similar to how it appears on a PC.)
This option is extremely helpful as it provides all of your possible options in a single pop-up. Enter a name or email address (along with an optional message) to send the document.
You can change the permissions settings at the top before clicking "Send," "Copy Link," or "Mail" to share your work. Click "More Apps" to browse additional options, such as sending via social media or text message. Lastly, you can select "Send a Copy" to send as a traditional attachment.
How to share a PowerPoint presentation on a web browser
You can access PowerPoint online on either a Mac or PC, as long as you have your login information for Microsoft Office. Regardless of what browser you prefer to use, the steps to share a presentation are exactly the same.
1. Log in to your Microsoft Office account on your preferred web browser and open the presentation you wish to share.
2. Click the "Share" button in the upper right hand corner of the screen.
3. This will open a pop-up in the center of the page. Enter a name or email address (along with an optional message) to send the document. You can change the permissions settings at the top before sending the link by clicking the "Send" or "Copy Link" option. (Those who have followed these steps on a Mac will recognize that it looks similar.)
Additionally, when you open the main menu, you can click the "Share" tab on the left hand side. This will allow you to invite others to edit the presentation or embed the presentation for a blog or website.
If you are looking to embed online, this will open a different pop-up that will generate a code for you. Select the dimensions desired and then paste the text as needed. Click the "Close" or "X" buttons to minimize the window.
Related coverage from Tech Reference :
How to embed a youtube video into your microsoft powerpoint presentations using a mac or pc, how to convert a powerpoint to google slides in two different ways, how to convert google slides to a powerpoint presentation in 4 easy steps , how to copy or duplicate a powerpoint slide and put it anywhere in your slideshow, how to download and access microsoft powerpoint on your mac computer.
Insider Inc. receives a commission when you buy through our links.
Watch: A diehard Mac user switches to PC
- Main content
Free All-in-One Office Suite with PDF Editor
Edit Word, Excel, and PPT for FREE.
Read, edit, and convert PDFs with the powerful PDF toolkit.
Microsoft-like interface, easy to use.
Windows • MacOS • Linux • iOS • Android

- Articles of PPT
How to Make A PowerPoint on Macbook [Totally Free]
Many users wonder how to make PowerPoint presentations on a MacBook without Microsoft Office. While some of PowerPoint’s features are only available on Windows, Mac users have great alternatives through Apple's Keynote app or the impressive WPS Office suite. This guide will walk through your options to easily create PowerPoints on a Mac.
Microsoft PowerPoint Version: Windows vs Mac
PowerPoint was originally created by Microsoft for Windows operating system. The Mac version was released later and had limited capability compared to the Windows version for a long time.
Over the years, Microsoft has considerably improved PowerPoint for Mac, bringing it closer to feature parity with Windows. But there are still some differences:
Presenter View Differences: Certain elements in Presenter View operate uniquely on Mac, providing a distinct user experience.
Additional Mac Features: Mac boasts exclusive features such as AppleScript and automator support, enhancing user capabilities.
Dynamic Reorder: a noteworthy addition on Mac, facilitates seamless adjustment of layered objects in presentations.
Missing Features on Mac : Notable omissions on Mac include the absence of Animation Painter, the inability to enter correctly formatted equations, the lack of support for video or animation triggers, and video trimming.
Zoom Functionality Discrepancy: Zoom, a valuable PowerPoint tool, is currently exclusive to PCs, posing a limitation for Mac users. Future availability on Mac is anticipated with Office updates.
Color Representation Variations: When opening the same Microsoft Office file on both platforms, subtle differences in color representation may be observed due to the distinct ways Macs and PCs interpret colors.
The distinctions between PowerPoint on Mac and Windows result in subtle variations in user experience.
Keynote – PowerPoint on Mac
Keynote is a presentation software developed by Apple, designed to create stunning and memorable presentations. Its powerful tools, dazzling effects, and intuitive interface stand out. Keynote enhances presentations by offering over 40 eye-catching themes, animations, and dynamic backgrounds. It allows real-time collaboration across Apple devices, including Mac, iPad, iPhone, and PC.
Keynote stands out with its user-friendly design, featuring Apple Pencil integration for illustrations and animations. It's compatible with PowerPoint – presentations can seamlessly switch between the two platforms, ensuring smooth collaboration for users of Microsoft PowerPoint.
How to Create a PowerPoint on Mac
Here are step-by-step instructions to make a PowerPoint presentation using Keynote on your Mac:
Step 1 : Open Keynote, located in the Applications folder on your Mac. You can choose a theme or start with a blank presentation when launched.
Step 2 : If using a theme, click to select one that fits your presentation style. Themed slides will automatically populate.
Step 3: Customize slides by adding text, changing layouts, inserting images, and more. Edit and arrange slides from the left sidebar.
Step 4: When finished, export your Keynote project to PowerPoint format. Go to File > Export To > PowerPoint.
Step 5: In the Export Your Presentation window, select a file format from the Advanced Options field and then click Next to save your presentation.
And that's it! You now have a PowerPoint presentation created completely on your Mac. The process is very intuitive for both new and experienced users.
Create a Presentation Using a Theme
Keynote offers many professionally designed themes to jumpstart your presentation building. Themed slides provide layouts, fonts, colors, and graphics matching your selected style.
Explore themes efficiently in the theme chooser by browsing categories. Double-click the one that aligns closely with your vision. Refine your options by selecting a category from the left sidebar.
Using a theme saves tons of time designing layouts and formatting – you can focus on the content! And themes are easy to make your own by tweaking fonts, colors, and images.
Free Alternatives to Make a PowerPoint – WPS Presentation
If you want a free Office suite that works seamlessly across Windows and Mac, WPS Office is an excellent choice. The WPS Presentation software has all the key features of PowerPoint for creating stunning slide decks.
Compared to older versions of Microsoft Office, WPS offers significant advantages:
Lightweight and Feature-Rich: WPS Office is a lightweight and feature-rich office suite.
High Compatibility: Recommended for low-configuration computers, ensuring widespread usability.
Comprehensive Suite: Includes Writer, Presentation, Spreadsheet, and PDF editing functionalities in one platform.
Effortless Creation and Collaboration: Users can effortlessly create, edit, and collaborate on Word, Spreadsheets, Presentations, and PDFs in a unified environment.
Airpage Cloud Documents: Real-time synchronization and seamless collaboration across platforms.
Extensive Template Library: Over 100,000 professional templates across categories for creative document designs.
User-Focused Segmentation: Tailored features for students, teachers, business users, and finance professionals.
How to Create a Presentation Using WPS on Mac
Follow these simple steps to make presentations using WPS Presentation on your Mac:
Step 1: Open WPS Office, and click on New.
Step 2: Choose Presentation.
Step 3 : Select a blank presentation or template.
Step 4: From now on, you can edit slides by adding text boxes, images, shapes, and charts using WPS Presentation.
Multiply Templates of WPS Presentation
WPS Presentation offers a wide selection of professional templates and themes for free. Some of the noticeable themes are:
Blue Business Strategy Planning

This template is likely for business presentations focusing on strategic planning. Expect a professional, blue-themed design with elements conducive to illustrating business strategies.
Green Business Activity Planning

This template seems suitable for business activity planning presentations. A green color scheme might convey a sense of growth and productivity, aligning well with business-oriented content.
Blue Technology Big Data Product Display

This template likely targets presentations related to technology and big data. Anticipate a blue-themed design, possibly with futuristic and data-centric visual elements to convey a tech-savvy vibe.
Business Style Investment Analysis

Enhance your investment pitches with our sophisticated business template designed for in-depth analysis. Boasting a significant download record, expect compelling financial charts and visuals for clear communication of intricate investment ideas.
Browse all the templates at: https://template.wps.com/
How to Download WPS Office
Step 1: Go to https://www.wps.com/download/
Step 2: Select your operating system – Windows, Mac, Linux, Android, iOS and click on the Free Download button.

Step 3: Click on the downloaded file to open WPS Office Installer.

Step 4: Click on Install Now and follow the prompts to complete the installation.

Use Word, Excel, and PPT for FREE, No Ads.
Edit PDF files with the powerful PDF toolkit.
Microsoft-like interface. Easy to learn. 100% Compatibility.
Boost your productivity with WPS's abundant free Word, Excel, PPT, and CV templates.
How do I open PowerPoint on my Mac keyboard?
To open PowerPoint on your Mac, press Command + Space to open Spotlight, type "PowerPoint," and hit return when it appears in the results.
As for useful shortcuts, here are some for Mac:
Open a new PowerPoint: Command + N
Open existing PowerPoint: Command + O
Open print preview: Command + Option + P
View and Zoom: Command + 1 (Normal), Command + 2 (Outline), Command + 3 (Slide Sorter), Command + Plus or Minus (Zoom In/Out)
Presenting: Shift + Command + Enter (Start Slideshow)
What are the disadvantages of using Keynote?
Keynote slides have limited compatibility with Microsoft systems, potentially causing issues when exporting to PPT format. Transitioning from PowerPoint to Keynote can be time-consuming and frustrating, especially for experienced PowerPoint users.
Can I collaborate on presentations with KeyNote or WPS Presentation?
Yes, both KeyNote and WPS Presentation offer collaboration features, making it easy for multiple users to work on a presentation simultaneously.
Mac users can create PowerPoint-style presentations, including Office for Mac, Keynote, or the free WPS Presentation. WPS provides a full-featured alternative with hundreds of free templates and easy compatibility for exporting PowerPoint files. Any Mac user can quickly make professional presentations by following the step-by-step instructions.
- 1. 5 Best Free Fonts That Make Your PowerPoint Presentations Visually Appealing
- 2. How to make a timeline in PowerPoint
- 3. How to Make a PowerPoint on Mac (Easy Tutorial)
- 4. How to Make a Shape Transparent in PowerPoint
- 5. How to Make A Beautiful Slideshow in PowerPoint-- Make Your Presentations Better
- 6. Professional Tips to Make Your PowerPoint Slides Appealing to the Audience

15 years of office industry experience, tech lover and copywriter. Follow me for product reviews, comparisons, and recommendations for new apps and software.

Microsoft Learn Q&A needs your feedback! Learn More
May 20, 2024
Microsoft Learn Q&A needs your feedback!
Want to earn $25 for telling us how you feel about the current Microsoft Learn Q&A thread experience? Help our research team understand how to make Q&A great for you.
Find out more!
Contribute to the Microsoft 365 and Office forum! Click here to learn more 💡
April 9, 2024
Contribute to the Microsoft 365 and Office forum!
Click here to learn more 💡
PowerPoint Forum Top Contributors: Steve Rindsberg - John Korchok - Bob Jones AKA: CyberTaz ✅
May 10, 2024
PowerPoint Forum Top Contributors:
Steve Rindsberg - John Korchok - Bob Jones AKA: CyberTaz ✅
- Search the community and support articles
- Microsoft 365 and Office
- Search Community member
Ask a new question
Enable Copilot in Powerpoint on mac
Hi! I´m on a office 365 family sub and have a copilot pro subscription.
How can I enable copilot to be use it in Powerpoint and word on Mac?
Report abuse
Reported content has been submitted
Replies (6)
- Microsoft Agent |
Dear Arvid,
Thank you for posting to Microsoft Community. We are glad to assist. We are looking into your situation, and we will update the thread shortly.
Appreciate your patience and understanding and thank for your time and cooperation.
Sukie | Microsoft Community Moderator
Was this reply helpful? Yes No
Sorry this didn't help.
Great! Thanks for your feedback.
How satisfied are you with this reply?
Thanks for your feedback, it helps us improve the site.
Thanks for your feedback.
Good day, thanks for querying in this forum. We’re happy to help you.
From your description, it seems that you want to use Copilot in Word for Mac and PowerPoint for Mac.
If my understanding is right, according to official article, Copilot is available in Microsoft 365 apps.
You can refer to steps below to check if you can enable Copilot, as shown below:

For more details, you can refer to this article: Copilot Pro: Microsoft 365 apps and your privacy - Microsoft Support
If the suggestion above doesn’t work, to better understand your situation, could you provide the information below?
Could you provide the version of your PowerPoint? You can go to PowerPoint > About PowerPoint and provide the screenshot of it.
Could you provide the version of Mac OS?
If the scenario above is not consistent with yours, you can also post back and point that.
thank you for the quick reply!
My Privocy settings seem to be the way they need to be.
This information is on "about powerpoint"
Version 16.81 (24011420)
Licence: Microsoft 365 Subscription
and my MacOS is macOS Sonoma Version 14.1.2
One thing I noticed is that in my About Section in Powerpoint it says under "belongs to" that it belongs to an email that is not in use anymore- which however doesnt habe a 365 subscription and is definitely not the one drive and microsoft account its currently connected to- so i can ignore that i guess?
an addition: I can use it in the browser when following the link from the microsoft website "try copolot in ppt" but just not in the Application on my mac
- Volunteer Moderator
CoPilot was originally made available only to enterprise licensed Office and was very expensive. Microsoft has just announced in the last week or so that it'll be more widely available at $20/month for individuals.
As I understand it, it's rolling out gradually, but should be available from your Microsoft 365 account page when it's available to you. I'd check there every so often.
The email address your account is activated under must be the same account that is your Co-Pilot account.
To switch accounts:
In PowerPoint, use the Menu Bar . Choose PowerPoint > Sign Out .
Restart your Mac
When you start PowerPoint (or any office app) it will prompt you to enter your credentials. Use the credentials for the co-pilot license.
Question Info
- Norsk Bokmål
- Ελληνικά
- Русский
- עברית
- العربية
- ไทย
- 한국어
- 中文(简体)
- 中文(繁體)
- 日本語
- PDFelement for Windows
- PDFelement for Mac
- PDFelement on Mac App Store
- PDF Reader for Windows
- PDFelement for iPhone/iPad
- Get from App Store
- PDFelement for Android
- Get from App Google Play
- PDF Scanner for iPhone
Cloud & SDK
- Document Cloud
- PDFelement Pro DC
- PDFelement SDK
Online PDF Tools
- PDF to Word
- Compress PDF
- Word to PDF
Educational Users
- Annotate PDF
- Combine PDF
Personal Users
- Convert PDF
- Organize PDF
Professional Users
- eSign PDFs Legally
- Extract Data from PDF
- Password Protect PDF
PDF Solutions for
- Chat with PDF
- AI PDF Summarizer
- AI PDF Translator
- AI Content Detector
- AI Rewrite PDF
- Proofread PDF
- Add Bookmarks to PDF
- Explain PDF
- Mac Software
- OCR PDF Tips
- Online PDF Tips
- Edit PDF like Word
- PDF Converter Tips
- PDF Compressor Tips
Why PDFelement
- Customer Stories
- PDF Software Comparison
- Contact Support
- PDFelement for iOS
- InstaScan for iPhone
Explore More
- Reviews See what our users say.
- Free PDF Templates Edit, print, and customize free templates.
- PDF Knowledge PDF-related information you need.
- Download Center Download the most powerful and simple PDF tools.
- Download Download Pricing Pricing
How to Make a PowerPoint on Mac OS 10.15 Catalina

Elise Williams
2024-05-22 13:36:15 • Filed to: PowerPoint Tips • Proven solutions
The software that can be used to create a presentation on Mac includes, PowerPoint and keynote among others. In this case, we are going to learn how to make a PowerPoint on mac . There are a number of ways to go by on making a presentation on Mac which includes using Microsoft PowerPoint for Mac, creating a presentation using keynote, or Google docs and export as PowerPoint file (ppt or .pptx).
How to Make a PowerPoint on Mac
In this article, we will use Keynote on Mac to make a presentation and then export it to PowerPoint.
Step 1. Launch Keynote
Click on the “Keynote icon in the Launchpad to open it. A window displaying various theme templates “Theme chooser” will appear. In the case it does not appear, click the option key and on the “File” menu select “new” to open a new presentation template.
Step 2. Choose the Theme of the Presentation
Scroll to navigate in the theme chooser and choose the type of presentation you want to make then double click on it to open.

Step 3. Change the Layout
To change to a different layout, you can click on the “Layout” button, and then select your desired layout.

Step 4. Add Content
There are a number of activities you might need to perfume on the presentation which involves adding your content.
- To add a slide, click on "Add Slide" in the toolbar and then select a layout.
- To add text, there is a placeholder text on the slide which you should double click and type to replace it with your own.
- To add an image, drag and drop or copy and paste an image to the slide from your computer or webpage.
Step 5. Save the File
After you are done with adding your content to the slide and your presentation is ready, you can click on "Save" and enter the file name. Meanwhile, you need to choose the location to save your file, and finally click “Save”.
Step 6. Export to PowerPoint
It is always important to try playing your presentation by yourself before you present it to other people to familiarize with it and make any necessary changes.
- Step 1. To export the file, you can click on “Share” on the menu, and then select “export”.
- Step 2. Click on "PPT" from the menu and then click “Next”.
- Step 3. Navigate to the location you want to save your file and change name if necessary.
- Step 4. Click on “export”. Last but not least, you can open the exported PowerPoint file to confirm the content.

The Best PDF Software for Mac
Wondershare PDFelement - PDF Editor is the best PDF editor which can be described as an All-in-One PDF Editor. It is attributed to powerful features that can edit PDF text and images, convert documents to various formats, and also create fillable forms, protect and share documents. It has become one of the commonly used and preferred document software owing to its advanced features, flexible prices, and perfect performance. PDFelement offers full control of your work on editing and modifying with its custom tools without forgetting its easy-to-use interface. The following are some popular features of PDFelement.
Launch PDFelement on your Mac computer, and click "Open File" and search for the file you want to open. Then you can choose the "Edit" option, and then you can add text, crop, watermark, change font or background, add page numbers among others.

• Convert PDF
Launch PDFelement on your Mac computer and import the PDF document to this program. And you can click the "File" > "Export To" option, then you select the format in which you want to convert the file like excel, word, and image, and finally click "Save".

• Create PDF Forms
Open your PDFlelement program and click on "File" > "Create", and then choose the "Blank Document" option.

Now click on "Form" on the left column, and pick one of the displayed elements and move the cursor to the blank area of the document to execute it.

After that, you can set the properties of the form by double-clicking on it to either align, modify, adjust size or delete. Once you have drawn your forms, you can type in your text content. To open the created fields, you can double click on it, and then you can also open the properties window to set either calculation, options, or appearances. Finally, you can click “Save” when you are done.

Free Download or Buy PDFelement right now!
Buy PDFelement right now!
chief Editor
Speak Your Mind
Related articles.
- How to Add Border in PowerPoint
- How to Add Page Numbers in PowerPoint
- Quicktime Not Available in PowerPoint? Solve It.
- How to Create Video from PowerPoint
- How to Change Background in PowerPoint
How to Do Handout Formats on a PowerPoint for a Mac: Step-by-Step Guide
Creating handouts for your PowerPoint presentation on a Mac may seem daunting, but it’s actually quite simple. All you need is your PowerPoint file, a Mac computer, and a printer if you’re planning to distribute physical copies. In just a few clicks, you’ll have professional-looking handouts ready to go.
Step by Step Tutorial: How to Do Handout Formats on a PowerPoint for a Mac
Before we dive into the steps, let’s clarify what we’re aiming for. By following these instructions, you’re going to learn how to print or save your PowerPoint slides in a handout format. This means multiple slides will be displayed on a single page, saving paper and making it easier for your audience to follow along.
Step 1: Open Your PowerPoint Presentation
Open the PowerPoint presentation you want to create handouts for.
Once you have your PowerPoint open, ensure that all the slides are arranged and edited to your liking. This is your last chance to make any changes before you create the handouts.
Step 2: Click on ‘File’ in the Menu Bar
In the menu bar at the top of your screen, click on ‘File.’
This will open a dropdown menu where you’ll find several options for managing your PowerPoint file. You’re looking for the print settings.
Step 3: Select ‘Print’
From the File menu, choose ‘Print.’ This will open the print menu where you can change various settings.
In the print menu, you’ll be able to select the printer you want to use, set the number of copies, and most importantly for us, choose the layout for your handouts.
Step 4: Choose ‘Handout’
Under the ‘Layout’ option, select ‘Handout.’
This will allow you to choose how many slides you want to appear on each page of your handout. You can choose from 1 slide per page up to 9 slides per page.
Step 5: Adjust Settings as Needed
Here you can adjust the order, frame slides, and print in grayscale if needed.
Play around with these settings to get the look you want for your handout. You can also decide if you want to include things like the slide number, date, or a header/footer.
Step 6: Print or Save Your Handout
Finally, click ‘Print’ to print your handouts or ‘Save as PDF’ to save a digital copy.
If you choose to print, make sure your printer is on and loaded with enough paper. If you save as a PDF, pick a location on your Mac where you can easily find the file later.
After you complete these steps, you’ll have a PDF file of your handout or physical copies, depending on your choice. This handout will be a helpful resource for your audience to reference during and after your presentation.
Tips: How to Do Handout Formats on a PowerPoint for a Mac
- Always preview your handout before printing or saving. This way, you can catch any mistakes or formatting issues.
- Consider the environment – try not to print more copies than necessary.
- Use high-quality images in your PowerPoint to ensure they look good when printed in handout format.
- Think about your audience when deciding how many slides to include per page. More slides per page can be overwhelming.
- Remember that you can also create handouts in other formats, like PDFs, that can be emailed or shared online.
Frequently Asked Questions: How to Do Handout Formats on a PowerPoint for a Mac
What is the best number of slides per page for a handout.
The best number of slides per page depends on your content and audience. Generally, 3-4 slides per page offer a good balance between readability and paper conservation.
Can I add notes to my handouts?
Yes, in the ‘Print’ menu, choose ‘Notes’ instead of ‘Handouts’ to include your speaker notes below each slide.
Can I customize the layout of my handouts?
You can choose the order and orientation of the slides, but customizing beyond the provided layouts may require additional software.
How can I save paper when printing handouts?
Opt for more slides per page, print on both sides of the paper, or consider sharing digital copies instead.
Is it possible to print handouts with slide animations?
No, animations cannot be printed. Handouts will show static versions of your slides.
Summary: How to Do Handout Formats on a PowerPoint for a Mac
- Open PowerPoint presentation
- Click ‘File’ in the menu bar
- Select ‘Print’
- Choose ‘Handout’
- Adjust settings as needed
- Print or save your handout
There you have it, a simple guide on how to do handout formats on a PowerPoint for a Mac. Whether you’re prepping for a big conference or a small meeting, handouts can be a great way to keep your audience engaged and provide them with a valuable resource long after your presentation is over. With these easy steps, you’re now equipped to create handouts that are not only informative but also eco-friendly and visually appealing.
Remember, the key to a great handout is readability and relevance, so take your time choosing the right layout and content. If you need further assistance, don’t hesitate to explore PowerPoint’s help resources or reach out to a tech-savvy friend. Happy presenting!

Matthew Burleigh has been writing tech tutorials since 2008. His writing has appeared on dozens of different websites and been read over 50 million times.
After receiving his Bachelor’s and Master’s degrees in Computer Science he spent several years working in IT management for small businesses. However, he now works full time writing content online and creating websites.
His main writing topics include iPhones, Microsoft Office, Google Apps, Android, and Photoshop, but he has also written about many other tech topics as well.
Read his full bio here.
Share this:
Join our free newsletter.
Featured guides and deals
You may opt out at any time. Read our Privacy Policy
Related posts:
- How to Change a PowerPoint to a Handout Layout: A Step-by-Step Guide
- How to Save Powerpoint as PDF with Notes
- Can I Convert My Powerpoint to Google Slides?
- How to Create Powerpoint Handouts in Microsoft Word: A Step-by-Step Guide
- How Do You Print Handouts in Powerpoint 2010?
- How to Convert a PowerPoint to Word and Edit with Ease
- How to Use a Mac With PowerPoint: A Step-by-Step Guide
- How to Print 6 Slides Per Page in Powerpoint 2010
- How to Drag Slides From One PowerPoint to Another: A Step-by-Step Guide
- How to Set Time for Slides in Powerpoint
- How to Make a Powerpoint Slide Vertical in Powerpoint 2013
- How to Check Word Count on Powerpoint 2010
- Can a PowerPoint Presentation Created on a PC Run on a Mac? Here’s How
- How to Print 4 Slides Per Page in Google Slides
- How to Print an Outline of the Presentation in Powerpoint
- How to Email a PowerPoint Slideshow: A Step-by-Step Guide
- How to Unhide a Slide in Powerpoint 2013
- How Do I Print Just the Notes in Powerpoint 2010?
- How to Insert Slides from Another Presentation in Powerpoint 2010
- How to Change the Font on All Slides in Google Slides
- Skip to main content
- Skip to secondary menu
- Skip to primary sidebar
- Skip to footer
Erin Wright Writing
Writing-Related Software Tutorials
How to Create Handouts in PowerPoint for Mac
By Erin Wright

This tutorial shows how to create printable handouts in PowerPoint for Mac.
If you’re on a PC, please see my other tutorial “ How to Create Handouts in PowerPoint (Printable & Editable) .”
Important Note: PowerPoint for Mac doesn’t offer a way to export handouts to Microsoft Word for further editing, like PowerPoint for the PC does. However, Mac users can save PowerPoint handouts as PDFs, as shown in the Pro Tip at the bottom of this tutorial.
This tutorial is also available as a YouTube video showing all the steps in real time.
Watch more than 100 other writing-related software tutorials on my YouTube channel .
The images below are from PowerPoint for Microsoft 365 for Mac. These steps also apply to older versions back to PowerPoint 2016 for Mac.
How to Create Printable Handouts in PowerPoint for Mac
- Select the File menu.

- Select Print from the drop-down menu.

- (Optional) Enter the number of copies you want to print into the Copies text box in the Print dialog box.

- (Optional) Choose the slides you want to include from the Slides options.
- All is the default option.
- From and to let you enter a page range into the text boxes.
- Selected slides includes the slides currently selected in your presentation.
- Custom Range lets you enter individual pages and ranges into the text box. Separate individual pages with commas and ranges with hyphens (e.g., 2,5,7-10).

- Select an option from the Layout menu.
- Slides (This option prints one slide per page.)
- Handouts (2 slides per page)
- Handouts (3 slides per page) (This option prints lines for writing notes next to the slide images.)
- Handouts (4 slides per page)
- Handouts (6 slides per page)
- Handouts (9 slides per page)
- Notes (This option prints one slide per page with the presenter’s notes below each slide.)
- Outline (This option prints the slide text without images.)

- (Optional in PowerPoint for Microsoft 365 for Mac) Uncheck Print slide numbers on handouts if you don’t want to include slide numbers.

- Select the Print button.

Pro Tip: You can also select the PDF menu for additional options such as Save as PDF, Send in Mail, or Save to iCloud Drive.

Related Resources
How to Convert PDFs to PowerPoint Slides in Adobe Acrobat (PC & Mac)
How to Save Tables and Figures as Images in Microsoft Word (PC & Mac)
- Microsoft Word Tutorials
- Adobe Acrobat Tutorials
- PowerPoint Tutorials
- Writing Tips
- Editing Tips
- Writing-Related Resources
Keynote User Guide for Mac
- What’s new in Keynote 14.0
- Intro to Keynote
- Intro to images, charts, and other objects
- Create a presentation
- Choose how to navigate your presentation
- Open or close a presentation
- Save and name a presentation
- Find a presentation
- Print a presentation
- Undo or redo changes
- Show or hide sidebars
- Quick navigation
- Change the working view
- Expand and zoom your workspace
- Customize the Keynote toolbar
- Change Keynote settings on Mac
- Touch Bar for Keynote
- Create a presentation using VoiceOver
- Add or delete slides
- Reorder slides
- Group or ungroup slides
- Skip or unskip a slide
- Change the slide size
- Change a slide background
- Add a border around a slide
- Show or hide text placeholders
- Show or hide slide numbers
- Apply a slide layout
- Add and edit slide layouts
- Change a theme
- Add an image
- Add an image gallery
- Edit an image
- Add and edit a shape
- Combine or break apart shapes
- Draw a shape
- Save a shape to the shapes library
- Add and align text inside a shape
- Add 3D objects
- Add lines and arrows
- Animate, share, or save drawings
- Add video and audio
- Record audio
- Edit video and audio
- Add live video
- Set movie and image formats
- Position and align objects
- Use alignment guides
- Place objects inside a text box or shape
- Layer, group, and lock objects
- Change object transparency
- Fill shapes and text boxes with color or an image
- Add a border to an object
- Add a caption or title
- Add a reflection or shadow
- Use object styles
- Resize, rotate, and flip objects
- Move and edit objects using the object list
- Add linked objects to make your presentation interactive
- Select text
- Copy and paste text
- Use dictation to enter text
- Use accents and special characters
- Format a presentation for another language
- Use phonetic guides
- Use bidirectional text
- Use vertical text
- Change the font or font size
- Add bold, italic, underline, or strikethrough to text
- Change the color of text
- Change text capitalization
- Add a shadow or outline to text
- Intro to paragraph styles
- Apply a paragraph style
- Create, rename, or delete paragraph styles
- Update or revert a paragraph style
- Use a keyboard shortcut to apply a style
- Adjust character spacing
- Add drop caps
- Raise and lower characters and text
- Format fractions automatically
- Create and use character styles
- Format dashes and quotation marks
- Format Chinese, Japanese, or Korean text
- Set tab stops
- Format text into columns
- Adjust line spacing
- Format lists
- Add a highlight effect to text
- Add mathematical equations
- Add borders and rules (lines) to separate text
- Add or delete a table
- Select tables, cells, rows, and columns
- Add or remove rows and columns
- Move rows and columns
- Resize rows and columns
- Merge or unmerge cells
- Change the look of table text
- Show, hide, or edit a table title
- Change table gridlines and colors
- Use table styles
- Resize, move, or lock a table
- Add and edit cell content
- Format dates, currency, and more
- Create a custom cell format
- Highlight cells conditionally
- Format tables for bidirectional text
- Alphabetize or sort table data
- Calculate values using data in table cells
- Use the Formulas and Functions Help
- Add or delete a chart
- Change a chart from one type to another
- Modify chart data
- Move, resize, and rotate a chart
- Change the look of data series
- Add a legend, gridlines, and other markings
- Change the look of chart text and labels
- Add a chart border and background
- Use chart styles
- Animate objects onto and off a slide
- Animate objects on a slide
- Change build order and timing
- Add transitions
- Present on your Mac
- Present on a separate display
- Present on a Mac over the internet
- Use a remote
- Make a presentation advance automatically
- Play a slideshow with multiple presenters
- Add and view presenter notes
- Rehearse on your Mac
- Record presentations
- Check spelling
- Look up words
- Find and replace text
- Replace text automatically
- Set author name and comment color
- Highlight text
- Add and print comments
- Send a presentation
- Intro to collaboration
- Invite others to collaborate
- Collaborate on a shared presentation
- See the latest activity in a shared presentation
- Change a shared presentation’s settings
- Stop sharing a presentation
- Shared folders and collaboration
- Use Box to collaborate
- Create an animated GIF
- Post your presentation in a blog
- Use iCloud Drive with Keynote
- Export to PowerPoint or another file format
- Reduce the presentation file size
- Save a large presentation as a package file
- Restore an earlier version of a presentation
- Move a presentation
- Delete a presentation
- Password-protect a presentation
- Lock a presentation
- Create and manage custom themes
- Transfer files with AirDrop
- Transfer presentations with Handoff
- Transfer presentations with the Finder
- Keyboard shortcuts
- Keyboard shortcut symbols
Create a presentation in Keynote on Mac
To create a new presentation, you first choose a theme to use as a starting point. Themes use coordinated fonts and colors for a unified look and often include placeholders that you can replace with your own content.
Create a presentation from a theme
To open Keynote, click the Keynote icon in the Dock, Launchpad, or the Applications folder.
If the theme chooser (shown below) doesn’t appear, click New Document in the bottom-left corner of the dialog. You can also choose File > New (from the File menu at the top of your screen).

Note: If you’d like the ability to format table and chart data using the conventions of another language, choose the language in the bottom-left corner before choosing a theme. See Format a presentation for another language .
In the theme chooser, browse the themes by category, then double-click the one that looks closest to what you want to create. To narrow the choices, click a category along the sidebar on the left.
Some themes aren’t downloaded to your computer until you choose them or open a presentation that uses one. If your connection is slow or you’re offline when this happens, placeholder images and slide backgrounds in the presentation may appear at a lower resolution until you’re online again or the theme finishes downloading.
Each slide layout offers a different arrangement of text and images that you use as a starting point for your content.
To add your own content to the presentation, do any of the following:
Add text: Double-click placeholder text and type your own.
Choose File > Save, enter a name, choose a location, then click Save.
Keynote automatically saves your changes as you work, so you don’t need to worry about saving your presentation manually. However, it’s a good idea to rename your presentation so you can easily find it the next time you want to work on it. You can change the name of the presentation or change where it’s saved at any time.
If iCloud Drive is set up on your Mac, Keynote saves the presentation to iCloud Drive by default.
To end the presentation, press the Esc (Escape) key. For more ways to show a presentation, see Play a presentation on your Mac .
To close the presentation, click the red close button in the top-left corner of the window.
Select a default theme for new presentations
You can set Keynote to always open a new presentation in a particular theme instead of from the theme chooser.
Choose Keynote > Settings (from the Keynote menu at the top of your screen).
Click General at the top of the window, then select “Use theme” in the For New Presentations controls.
The name that appears after “Use theme” is the currently selected theme.
Click the Change Theme button, select a theme, then click Choose.
To close the window, click the red close button in the upper-left corner.
After you change this setting, you can still open a new presentation with a different theme. Hold down the Option key, then choose File > New from Theme Chooser (from the File menu at the top of your screen).
How-To Geek
6 ways to create more interactive powerpoint presentations.
Engage your audience with cool, actionable features.
Quick Links
- Add a QR code
- Embed Microsoft Forms (Education or Business Only)
- Embed a Live Web Page
- Add Links and Menus
- Add Clickable Images to Give More Info
- Add a Countdown Timer
We've all been to a presentation where the speaker bores you to death with a mundane PowerPoint presentation. Actually, the speaker could have kept you much more engaged by adding some interactive features to their slideshow. Let's look into some of these options.
1. Add a QR code
Adding a QR code can be particularly useful if you want to direct your audience to an online form, website, or video.
Some websites have in-built ways to create a QR code. For example, on Microsoft Forms , when you click "Collect Responses," you'll see the QR code option via the icon highlighted in the screenshot below. You can either right-click the QR code to copy and paste it into your presentation, or click "Download" to add it to your device gallery to insert the QR code as a picture.
In fact, you can easily add a QR code to take your viewer to any website. On Microsoft Edge, right-click anywhere on a web page where there isn't already a link, and left-click "Create QR Code For This Page."
You can also create QR codes in other browsers, such as Chrome.
You can then copy or download the QR code to use wherever you like in your presentation.
2. Embed Microsoft Forms (Education or Business Only)
If you plan to send your PPT presentation to others—for example, if you're a trainer sending step-by-step instruction presentation, a teacher sending an independent learning task to your students, or a campaigner for your local councilor sending a persuasive PPT to constituents—you might want to embed a quiz, questionnaire, pole, or feedback survey in your presentation.
In PowerPoint, open the "Insert" tab on the ribbon, and in the Forms group, click "Forms". If you cannot see this option, you can add new buttons to the ribbon .
As at April 2024, this feature is only available for those using their work or school account. We're using a Microsoft 365 Personal account in the screenshot below, which is why the Forms icon is grayed out.
Then, a sidebar will appear on the right-hand side of your screen, where you can either choose a form you have already created or opt to craft a new form.
Now, you can share your PPT presentation with others , who can click the fields and submit their responses when they view the presentation.
3. Embed a Live Web Page
You could always screenshot a web page and paste that into your PPT, but that's not a very interactive addition to your presentation. Instead, you can embed a live web page into your PPT so that people with access to your presentation can interact actively with its contents.
To do this, we will need to add an add-in to our PPT account .
Add-ins are not always reliable or secure. Before installing an add-in to your Microsoft account, check that the author is a reputable company, and type the add-in's name into a search engine to read reviews and other users' experiences.
To embed a web page, add the Web Viewer add-in ( this is an add-in created by Microsoft ).
Go to the relevant slide and open the Web Viewer add-in. Then, copy and paste the secure URL into the field box, and remove https:// from the start of the address. In our example, we will add a selector wheel to our slide. Click "Preview" to see a sample of the web page's appearance in your presentation.
This is how ours will look.
When you or someone with access to your presentation views the slideshow, this web page will be live and interactive.
4. Add Links and Menus
As well as moving from one slide to the next through a keyboard action or mouse click, you can create links within your presentation to direct the audience to specific locations.
To create a link, right-click the outline of the clickable object, and click "Link."
In the Insert Hyperlink dialog box, click "Place In This Document," choose the landing destination, and click "OK."
What's more, to make it clear that an object is clickable, you can use action buttons. Open the "Insert" tab on the ribbon, click "Shape," and then choose an appropriate action button. Usefully, PPT will automatically prompt you to add a link to these shapes.
You might also want a menu that displays on every slide. Once you have created the menu, add the links using the method outlined above. Then, select all the items, press Ctrl+C (copy), and then use Ctrl+V to paste them in your other slides.
5. Add Clickable Images to Give More Info
Through PowerPoint's animations, you can give your viewer the power to choose what they see and when they see it. This works nicely whether you're planning to send your presentation to others to run through independently or whether you're presenting in front of a group and want your audience to decide which action they want to take.
Start by creating the objects that will be clickable (trigger) and the items that will appear (pop-up).
Then, select all the pop-ups together. When you click "Animations" on the ribbon and choose an appropriate animation for the effect you want to achieve, this will be applied to all objects you have selected.
The next step is to rename the triggers in your presentation. To do this, open the "Home" tab, and in the Editing group, click "Select", and then "Selection Pane."
With the Selection Pane open, select each trigger on your slide individually, and rename them in the Selection Pane, so that they can be easily linked to in the next step.
Finally, go back to the first pop-up. Open the "Animations" tab, and in the Advanced Animation group, click the "Trigger" drop-down arrow. Then, you can set the item to appear when a trigger is clicked in your presentation.
If you want your item to disappear when the trigger is clicked again, select the pop-up, click "Add Animation" in the Advanced Animation group, choose an Exit animation, and follow the same step to link that animation to the trigger button.
6. Add a Countdown Timer
A great way to get your audience to engage with your PPT presentation is to keep them on edge by adding a countdown timer. Whether you're leading a presentation and want to let your audience stop to discuss a topic, or running an online quiz with time-limit questions, having a countdown timer means your audience will keep their eye on your slide throughout.
To do this, you need to animate text boxes or shapes containing your countdown numbers. Choose and format a shape and type the highest number that your countdown clock will need. In our case, we're creating a 10-second timer.
Now, with your shape selected, open the "Animations" tab on the ribbon and click the animation drop-down arrow. Then, in the Exit menu, click "Disappear."
Open the Animation Pane, and click the drop-down arrow next to the animation you've just added. From there, choose "Timing."
Make sure "On Click" is selected in the Start menu, and change the Delay option to "1 second," before clicking "OK."
Then, with this shape still selected, press Ctrl+C (copy), and then Ctrl+V (paste). In the second box, type 9 . With the Animation Pane still open and this second shape selected, click the drop-down arrow and choose "Timing" again. Change the Start option to "After Previous," and make sure the Delay option is 1 second. Then, click "OK."
We can now use this second shape as our template, as when we copy and paste it again, the animations will also duplicate. With this second shape selected, press Ctrl+C and Ctrl+V, type 8 into the box, and continue to do the same until you get to 0 .
Next, remove the animations from the "0" box, as you don't want this to disappear. To do this, click the shape, and in the Animation Pane drop-down, click "Remove."
You now need to layer them in order. Right-click the box containing number 1, and click "Bring To Front." You will now see that box on the top. Do the same with the other numbers in ascending order.
Finally, you need to align the objects together. Click anywhere on your slide and press Ctrl+A. Then, in the Home tab on the ribbon, click "Arrange." First click "Align Center," and then bring the menu up again, so that you can click "Align Middle."
Press Ctrl+A again to select your timer, and you can then move your timer or copy and paste it elsewhere.
Press F5 to see the presentation in action, and when you get to the slide containing the timer, click anywhere on the slide to see your countdown timer in action!
Now that your PPT presentation is more interactive, make sure you've avoided these eight common presentational mistakes before you present your slides.
- What is ChatGPT?
- How to Use Google Gemini
The 5 best things you can do with Copilot Pro right now

Copilot Pro is Microsoft’s AI subscription service that costs $20 per month for individuals and is integrated into the brand’s Microsoft 365 suite. The paid service offers unique features to Microsoft users, provides faster and more consistent AI performance with priority access to the GPT-4 and GPT-4 Turbo large language models (LLM) during peak times, and also brings the AI technology to the brand’s most popular PC applications — and that’s where things get really interesting.
Create custom GPTs
Dalle-3 access in microsoft designer, make powerpoint presentations from text prompts, create graphs and visuals through text prompts, have copilot write for you directly in word.
Here are some of the best features on Copilot Pro and how they work.
One of the most interesting features of Copilot Pro is that you can build your own custom GPT within the AI service, meaning you can create and edit a unique chatbot to do your bidding. You can create your chatbot as a personal trainer, a chef, a language tutor, a language adviser, or a career coach, among many other personalized ideas. You can do so by accessing the Microsoft Copilot GPT Builder at copilot.microsoft.com and signing in using your Microsoft account (such as outlook.com).
Follow the setup steps included there to get started building your custom GPT. Because it is a GPT environment, you essentially need only to input the text parameters of your chatbot to begin training it. There are also instructions on how to edit the GPT, if needed. For the best results, complete the steps in the Microsoft Edge browser.
Because Copilot Pro is a paid service, it benefits from OpenAI’s latest DALL-E 3 image model, which can generate images from more elaborate text descriptions or generate from other images. It also has upgraded editing abilities. Much of the image generation for the brand’s AI subscription service takes place within the Microsoft Designer tool.
Within Copilot Pro, you can generate up to 100 images per day and have the option to create images in either landscape or square. This is a massive upgrade in comparison to the free version, which allows 15 generations per day and square images only.
A very fascinating part of Microsoft’s Copilot Pro is you can use the brand’s AI service in conjunction with other popular programs, such as the Microsoft 365 suite. The Copilot Pro chatbot and icon are integrated into all of these apps, including Word, Excel, PowerPoint, OneNote, and Outlook. Typically, you must have a separate Microsoft 365 subscription to access Microsoft Copilot Pro features in tandem with the apps of that service on PCs. However, to access the features without having to invest in a Microsoft 365 subscription, you can use Microsoft 365 apps through the web apps at no extra cost.
Creating presentations in Microsoft PowerPoint is a popular productivity option in the Microsoft 365 suite. Adding Copilot Pro makes the function as simple as typing a sentence. Once you’re in PowerPoint, you go to the Home tab to open the drop-down menu. This reveals the Copilot button in the upper-right corner. Click it to open the Copilot menu on the right side of the PowerPoint window.
Click Create a Presentation, type your prompt, and it will begin to generate the slides of your presentation. You can add a slide, ask questions prompts, and edit the text of your prompt to improve your presentation. You also have access to the Microsoft Designer tab in the drop-down menu, which gives you creative options for your slide within PowerPoint, since you can’t use prompts to make creative edits within Copilot. There is also the Copilot Labs section for generating ideas.
Excel is an extremely useful app for professionals who need to crunch numbers and simplify statistics. Copilot Pro can calculate, analyze, and present your figures and graphs in a manner that is easy to decipher. Once in Excel, you can access the Copilot button in the upper-right corner of the drop-down menu. If you are using Excel online, you may see a notice that says it only works with Excel table, but all of the AI functionalities are actually still intact.
If you have a file with some figures, you can highlight some text and Copilot Pro will give you some prompt ideas (such as show formula suggestions, highlight filter, sort data, and bold the first column) that you can select and will make up the entirety of your prompt once you’re done. These details will not only be the information but the look and feel of your results.
Select Ask for Insights and Excel will generate the tables and graphs with all of your data laid out. Select another insight or All insights for a more complete look at your information. Alternatively, you can enter a prompt in Copilot Pro with the parameters you desire.
Word is one of the most used apps in the Microsoft 365 suite and Copilot Pro introduces several automated features into the word processors. Before even launching Copilot Pro within Microsoft Pro, you can highlight blocks of text within Word and a Copilot icon will appear on the left of the text, indicating that it can be edited by the chatbot. Right-click the highlighted text with your mouse and you can select the options, rewrite with Copilot, or visualize as a table. It will do those functions in the text area without having to execute a prompt.
You can also access the Copilot button in the upper-right corner of the drop-down menu and use it whether you have a blank document or you’re working with an existing document.
You can type your prompt directly into Copilot Pro to generate whatever result you need, or you can get assistance via a host of assistant tabs and quick options, including write about, ask a question, and summarize this document. Summarize this document, for example, will roll out text in a bullet point format and pull credits from the source document that you can refer back to later. For further assistance in prompt generation, you can select more prompts and access Copilot Labs.
Editors' Recommendations
- The real reason behind Copilot+ PCs goes far beyond just AI
- The best Copilot+ laptops that were just announced
- The new Surface Laptop and Surface Pro are finally living up to their potential
- Whatever you do, don’t buy a Windows laptop right now
- 5 headsets you should buy instead of the Vision Pro
- Artificial Intelligence

The AI bots are going nuts again. Microsoft Copilot -- a rebranded version of Bing Chat -- is getting stuck in some old ways by providing strange, uncanny, and sometimes downright unsettling responses. And it all has to do with emojis.
A post on the ChatGPT subreddit is currently making the rounds with a specific prompt about emojis. The post itself, as well as the hundreds of comments below, show different variations of Copilot providing unhinged responses to the prompt. I assumed they were fake -- it wouldn't be the first time we've seen similar photos -- so imagine my surprise when the prompt produced similarly unsettling responses for me.
Got your eye on a shiny new MacBook Air? We can’t blame you, they're fantastic laptops. But before you pull the trigger, you should consider holding off for a few more weeks.
At some point in March, Apple is expected to unveil a new generation of the MacBook Air, either at an event or via a press release. This forthcoming laptop will reportedly come loaded with Apple’s new M3 chip, giving the MacBook Air a notable performance boost.
There's no laptop quite like the MacBook Pro right now. No alternatives on the Windows side can match the power, efficiency, and battery life in a laptop of this size -- and that's not even mentioning the Pro's premium features and design.
There are, however, a few laptops that come close, while undercutting it significantly in price. So, if you're looking for a proper Windows alternative to the more powerful configurations of the MacBook Pro, or even just a cheaper laptop that can replicate some of what the MacBook Pro can do, here are a few solid options to consider before shelling out the cash on a MacBook Pro. HP Envy 16

How To Get Free Access To Microsoft PowerPoint
E very time you need to present an overview of a plan or a report to a whole room of people, chances are you turn to Microsoft PowerPoint. And who doesn't? It's popular for its wide array of features that make creating effective presentations a walk in the park. PowerPoint comes with a host of keyboard shortcuts for easy navigation, subtitles and video recordings for your audience's benefit, and a variety of transitions, animations, and designs for better engagement.
But with these nifty features comes a hefty price tag. At the moment, the personal plan — which includes other Office apps — is at $69.99 a year. This might be the most budget-friendly option, especially if you plan to use the other Microsoft Office apps, too. Unfortunately, you can't buy PowerPoint alone, but there are a few workarounds you can use to get access to PowerPoint at no cost to you at all.
Read more: The 20 Best Mac Apps That Will Improve Your Apple Experience
Method #1: Sign Up For A Free Microsoft Account On The Office Website
Microsoft offers a web-based version of PowerPoint completely free of charge to all users. Here's how you can access it:
- Visit the Microsoft 365 page .
- If you already have a free account with Microsoft, click Sign in. Otherwise, press "Sign up for the free version of Microsoft 365" to create a new account at no cost.
- On the Office home page, select PowerPoint from the side panel on the left.
- Click on "Blank presentation" to create your presentation from scratch, or pick your preferred free PowerPoint template from the options at the top (there's also a host of editable templates you can find on the Microsoft 365 Create site ).
- Create your presentation as normal. Your edits will be saved automatically to your Microsoft OneDrive as long as you're connected to the internet.
It's important to keep in mind, though, that while you're free to use this web version of PowerPoint to create your slides and edit templates, there are certain features it doesn't have that you can find on the paid version. For instance, you can access only a handful of font styles and stock elements like images, videos, icons, and stickers. Designer is also available for use on up to three presentations per month only (it's unlimited for premium subscribers). When presenting, you won't find the Present Live and Always Use Subtitles options present in the paid plans. The biggest caveat of the free version is that it won't get any newly released features, unlike its premium counterparts.
Method #2: Install Microsoft 365 (Office) To Your Windows
Don't fancy working on your presentation in a browser? If you have a Windows computer with the Office 365 apps pre-installed or downloaded from a previous Office 365 trial, you can use the Microsoft 365 (Office) app instead. Unlike the individual Microsoft apps that you need to buy from the Microsoft Store, this one is free to download and use. Here's how to get free PowerPoint on the Microsoft 365 (Office) app:
- Search for Microsoft 365 (Office) on the Microsoft Store app.
- Install and open it.
- Sign in with your Microsoft account. Alternatively, press "Create free account" if you don't have one yet.
- Click on Create on the left side panel.
- Select Presentation.
- In the PowerPoint window that opens, log in using your account.
- Press Accept on the "Free 5-day pass" section. This lets you use PowerPoint (and Word and Excel) for five days — free of charge and without having to input any payment information.
- Create your presentation as usual. As you're using the desktop version, you can access the full features of PowerPoint, including the ability to present in Teams, export the presentation as a video file, translate the slides' content to a different language, and even work offline.
The only downside of this method is the time limit. Once the five days are up, you can no longer open the PowerPoint desktop app. However, all your files will still be accessible to you. If you saved them to OneDrive, you can continue editing them on the web app. If you saved them to your computer, you can upload them to OneDrive and edit them from there.
Method #3: Download The Microsoft PowerPoint App On Your Android Or iOS Device
If you're always on the move and need the flexibility of creating and editing presentations on your Android or iOS device, you'll be glad to know that PowerPoint is free and available for offline use on your mobile phones. But — of course, there's a but — you can only access the free version if your device is under 10.1 inches. Anything bigger than that requires a premium subscription. If your phone fits the bill, then follow these steps to get free PowerPoint on your device:
- Install Microsoft PowerPoint from the App Store or Google Play Store .
- Log in using your existing Microsoft email or enter a new email address to create one if you don't already have an account.
- On the "Get Microsoft 365 Personal Plan" screen, press Skip For Now.
- If you're offered a free trial, select Try later (or enjoy the free 30-day trial if you're interested).
- To make a new presentation, tap the plus sign in the upper right corner.
- Change the "Create in" option from OneDrive - Personal to a folder on your device. This allows you to save the presentation to your local storage and make offline edits.
- Press "Set as default" to set your local folder as the default file storage location.
- Choose your template from the selection or use a blank presentation.
- Edit your presentation as needed.
Do note that PowerPoint mobile comes with some restrictions. There's no option to insert stock elements, change the slide size to a custom size, use the Designer feature, or display the presentation in Immersive Reader mode. However, you can use font styles considered premium on the web app.
Method #4: Use Your School Email Address
Office 365 Education is free for students and teachers, provided they have an email address from an eligible school. To check for your eligibility, here's what you need to do:
- Go to the Office 365 Education page .
- Type in your school email address in the empty text field.
- Press "Get Started."
- On the next screen, verify your eligibility. If you're eligible, you'll be asked to select whether you're a student or a teacher. If your school isn't recognized, however, you'll get a message telling you so.
- For those who are eligible, proceed with creating your Office 365 Education account. Make sure your school email can receive external mail, as Microsoft will send you a verification code for your account.
- Once you're done filling out the form, press "Start." This will open your Office 365 account page.
You can then start making your PowerPoint presentation using the web app. If your school's plan supports it, you can also install the Office 365 apps to your computer by clicking the "Install Office" button on your Office 365 account page and running the downloaded installation file. What sets the Office 365 Education account apart from the regular free account is that you have unlimited personal cloud storage and access to other Office apps like Word, Excel, and Outlook.
Read the original article on SlashGear .

- Draft and add content
- Rewrite text
- Chat with Copilot
- Create a summary
- Copilot in Word on mobile devices
- Frequently asked questions
- Create a new presentation
- Add a slide or image
- Summarize your presentation
- Organize your presentation
- Use your organization's branding
- Copilot in PowerPoint for mobile devices
- Draft an Outlook email message
- Summarize an email thread
- Suggested drafts in Outlook
- Email coaching
- Get started with Copilot in Excel
- Identify insights
- Highlight, sort, and filter your data
- Generate formula columns
- Summarize your OneNote notes
- Create a to-do list and tasks
- Create project plans in OneNote
Create a new presentation with Copilot in PowerPoint
Note: This feature is available to customers with a Copilot for Microsoft 365 license or Copilot Pro license.
Create a new presentation in PowerPoint.

Select Send . Copilot will draft a presentation for you!
Edit the presentation to suit your needs, ask Copilot to add a slide , or start over with a new presentation and refine your prompt to include more specifics. For example, "Create a presentation about hybrid meeting best practices that includes examples for team building.”
Create a presentation with a template
Note: This feature is only available to customers with a Copilot for Microsoft 365 (work) license. It is not currently available to customers with a Copilot Pro (home) license.
Copilot can use your existing themes and templates to create a presentation. Learn more about making your presentations look great with Copilot in PowerPoint .

Enter your prompt or select Create presentation from file to create a first draft of your presentation using your theme or template.

Edit the presentation to suit your needs, ask Copilot to add a slide , organize your presentation, or add images.
Create a presentation from a file with Copilot
Note: This feature is only available to customers with a Copilot for Microsoft 365 (work) license. It is not currently available to customers with a Copilot Pro (home) license.

With Copilot in PowerPoint, you can create a presentation from an existing Word document. Point Copilot in PowerPoint to your Word document, and it will generate slides, apply layouts, create speaker notes, and choose a theme for you.

Select the Word document you want from the picker that appears. If you don't see the document you want, start typing any part of the filename to search for it.
Note: If the file picker doesn't appear type a front slash (/) to cause it to pop up.
Best practices when creating a presentation from a Word document
Leverage word styles to help copilot understand the structure of your document.
By using Styles in Word to organize your document, Copilot will better understand your document structure and how to break it up into slides of a presentation. Structure your content under Titles and Headers when appropriate and Copilot will do its best to generate a presentation for you.
Include images that are relevant to your presentation
When creating a presentation, Copilot will try to incorporate the images in your Word document. If you have images that you would like to be brought over to your presentation, be sure to include them in your Word document.
Start with your organization’s template
If your organization uses a standard template, start with this file before creating a presentation with Copilot. Starting with a template will let Copilot know that you would like to retain the presentation’s theme and design. Copilot will use existing layouts to build a presentation for you. Learn more about Making your presentations look great with Copilot in PowerPoint .
Tip: Copilot works best with Word documents that are less than 24 MB.
Welcome to Copilot in PowerPoint
Frequently Asked Questions about Copilot in PowerPoint
Where can I get Microsoft Copilot?
Copilot Lab - Start your Copilot journey

Need more help?
Want more options.
Explore subscription benefits, browse training courses, learn how to secure your device, and more.

Microsoft 365 subscription benefits

Microsoft 365 training

Microsoft security

Accessibility center
Communities help you ask and answer questions, give feedback, and hear from experts with rich knowledge.

Ask the Microsoft Community

Microsoft Tech Community

Windows Insiders
Microsoft 365 Insiders
Find solutions to common problems or get help from a support agent.

Online support
Was this information helpful?
Thank you for your feedback.
IMAGES
VIDEO
COMMENTS
Step 2: Open PowerPoint. Open PowerPoint and choose a template or open a blank presentation. PowerPoint offers a variety of templates to suit different presentation styles. If you choose to start with a blank slate, you'll have complete creative freedom.
Making a PowerPoint on a Mac is easy. First, open up the Pages application on your Mac. Then, select the File menu and choose New from Template. From there, you can select a PowerPoint template and customize it to fit your needs. When you are finished, you can save your presentation and share it with others.
Apply or change slide layouts. Customize a slide master. Change the page orientation of your PowerPoint presentation. Create and use your own presentation template. Create your own theme in PowerPoint. Learn about SmartArt graphics. Compress the picture size. Crop a picture. Add a transparent picture (watermark) to your slides.
How to Make a PowerPoint Presentation on a Mac. Part of the series: Using Apple Computers. Making a PowerPoint presentation on a Mac computer can be done usi...
PowerPoint 2021 for Mac lets you create compelling content with the addition of features including co-authoring, Ink Replay, better support for SVG, and more rich media content from the Office Premium Creative Content collection. If you're upgrading to PowerPoint 2021 for Mac from PowerPoint 2019 for Mac, you'll still have all the features you ...
Whether you need to show off your school project, business plan, or family vacation photos, PowerPoint is your go-to app for presentations. Kickstart your creativity. • Achieve more and enhance your documents with access to a growing catalog of premium templates for Word, Excel, and PowerPoint. • Advanced formatting and layout options ...
How to create a powerpoint on Apple products of iMac or MacBook or MacBookAir
Ensure that you build your pitch decks with less text and more graphics. Keeping the slide content simple and precise will bestow your MAC slideshow with a decluttered look. It will help you to further your brand aesthetics as well. You may consider following the famous 10-20-30 rule of PowerPoint presentations.
Learn how to get PowerPoint on a Mac, whether free or paid and options for presenting without PowerPoint, such as Mac's Keynote or Google Slides. ... To convert PowerPoint to video on a Mac, open the presentation you want to save and select File > Export. In the export window, next to File Format, select a file format option, ...
Apply a template to a new presentation. Open PowerPoint, and you'll see a set of standard templates in the gallery. If you're already working in PowerPoint, click File > New from Template to see the templates. (In version 2011, you then select All under the Templates category.) You can choose one of the standard templates, or, if you want to ...
Step 7. Type in a name for the presentation and decide where to save it. Then click "Export." This will convert your presentation to a PowerPoint compatible file and save it to the location you selected. Even if you do not have Microsoft Office installed on your Mac computer, you can still create presentations that are compatible with the ...
Make sure that Monitor 2 in Powerpoint is routed to the display where you want to show the presentation. From step 1: If Monitor 2 is the display used to show the presentation to the audience, then you can proceed to step 3. If Monitor 2 is the stage-monitor that you want for presenter-view, then you need to swap the routing of two hdmi-outputs ...
Making a PowerPoint presentation on a Mac computer can be done using any slide show or business presentation software available through iWork Office Suite. F...
Step 1: Open the App Store on your Mac. App Store Icon on Mac Launcher. Step 2: In the search bar at the top right, type in "PowerPoint" and press Return. App Store Search Bar. Step 3: The Microsoft PowerPoint app should appear as the first result. Click on the Get button and then Install.
The slides you create using a Mac or iPad will look the same on an iPhone or web browser — and vice versa. You can also work on presentations stored on iCloud or Box using a PC. ... You can save Keynote presentations as PowerPoint files. Or import and edit PowerPoint presentations right in Keynote. Learn more about Microsoft PowerPoint ...
1. Open the PowerPoint presentation on your Mac desktop or laptop. 2. Click the "File" tab in the top left corner. 3. Select "Share" from the dropdown menu. This will grant you the option to ...
Follow these simple steps to make presentations using WPS Presentation on your Mac: Step 1: Open WPS Office, and click on New. create new file in wps office. Step 2: Choose Presentation. open wps presentation. Step 3: Select a blank presentation or template. "wps presentation templates".
To switch accounts: In PowerPoint, use the Menu Bar. Choose PowerPoint > Sign Out. Restart your Mac. When you start PowerPoint (or any office app) it will prompt you to enter your credentials. Use the credentials for the co-pilot license. Be sure to include the version number and OS version when asking your question.
In this article, we will use Keynote on Mac to make a presentation and then export it to PowerPoint. Step 1. Launch Keynote. Click on the "Keynote icon in the Launchpad to open it. A window displaying various theme templates "Theme chooser" will appear. In the case it does not appear, click the option key and on the "File" menu select ...
Step 1: Open Your PowerPoint Presentation. Open the PowerPoint presentation you want to create handouts for. Once you have your PowerPoint open, ensure that all the slides are arranged and edited to your liking. This is your last chance to make any changes before you create the handouts. Step 2: Click on 'File' in the Menu Bar
How to Create Printable Handouts in PowerPoint for Mac. Select the File menu. Figure 1. File menu. Select Print from the drop-down menu. Figure 2. Print option. (Optional) Enter the number of copies you want to print into the Copies text box in the Print dialog box. Figure 3.
To play the presentation, click in the toolbar, then press the arrow keys to advance through the slides. To end the presentation, press the Esc (Escape) key. For more ways to show a presentation, see Play a presentation on your Mac. To close the presentation, click the red close button in the top-left corner of the window.
Then, with this shape still selected, press Ctrl+C (copy), and then Ctrl+V (paste). In the second box, type 9. With the Animation Pane still open and this second shape selected, click the drop-down arrow and choose "Timing" again. Change the Start option to "After Previous," and make sure the Delay option is 1 second.
Microsoft Excel, the ultimate tool for data management and analysis, reaches new heights with Copilot AI integration. Highlighting specific data points becomes a breeze with AI commands, allowing ...
Sign up now (through my referral link) for Skillshare Premium Membership and get 1 FREE MONTH!https://www.skillshare.com/r/profile/Alan-Lomer/552037189?gr_tc...
Contents. Create custom GPTs. Dalle-3 access in Microsoft Designer. Make PowerPoint presentations from text prompts. Create graphs and visuals through text prompts. Have Copilot write for you ...
Here's how to get free PowerPoint on the Microsoft 365 (Office) app: Search for Microsoft 365 (Office) on the Microsoft Store app. Install and open it. Sign in with your Microsoft account ...
Step 3: Add Custom Animations to Your Animated PowerPoint. Your animated PowerPoint templates and all Visme presentation templates have plenty of different styles of animation possibilities. With Visme, add all these types of animations to any element in a slide. Enter Animations. Fade in.
Access Microsoft PowerPoint. Launch Microsoft PowerPoint and start a new presentation or open an existing one to begin utilizing Microsoft Copilot. Step 2. Enable Microsoft Copilot. Navigate to the "View" tab in PowerPoint's ribbon and select "Copilot" from the menu to enable the AI assistant. If not available go to File - Add In - Select Copilot.
Select the Copilot button in the Home tab of the ribbon. Enter your prompt or select Create presentation from file to create a first draft of your presentation using your theme or template. Copilot will replace your current presentation with a new one. If needed, save a copy first and rerun the steps above. If you already have a copy, confirm ...